manuals.online logo
Brands
  1. Home
  2. •
  3. Brands
  4. •
  5. Premio
  6. •
  7. Network Storage Server
  8. •
  9. Premio FlacheSAN1N6C-D4 User manual

Premio FlacheSAN1N6C-D4 User manual

Installation and service of this product should be conducted by trained
personnels to avoid any bodily injury from electric shock or heavy object
Observe ESD (Electrostatic Discharge) practices during integration to avoid
possible damage to the board and / or other components
FlacheSAN1N6C-D4 Quick Guide
Version 1.10 –2017.02.13
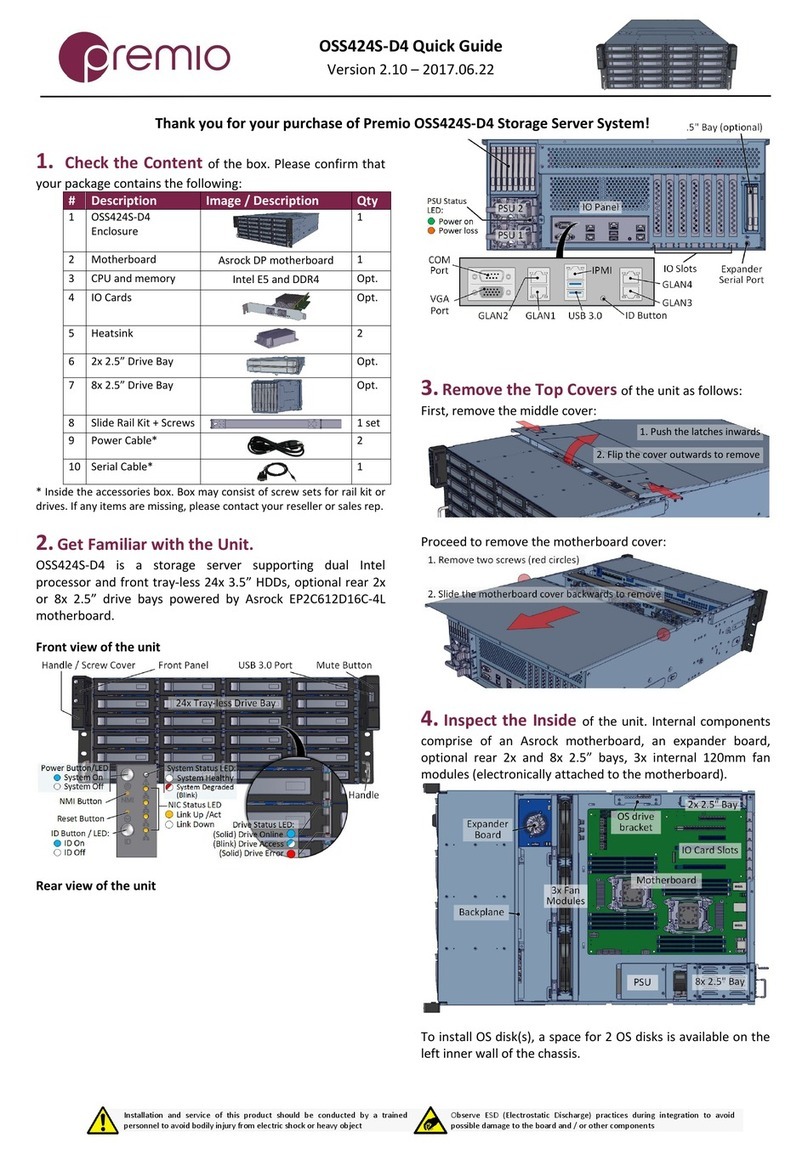
1. Check the content of the box. Please verify that
your package contains the following:
#
Description
Image / Description
Qty
1
Enclosure
1
2
Motherboard
Asrock EP2C612D16FM
1
3
OS drive
optional
1 or 2
4
CPU and memory
(optional)
Pre-installed upon request
2 sets
5
Heat sink
(optional)
2
6
Power Cable*
2
7
Slide Rail Kit (opt)
1
8
This Quick Guide
1
9
Packaging
1 set
* Inside the accessories box. If any items are missing, please contact
your authorized reseller or sales representative
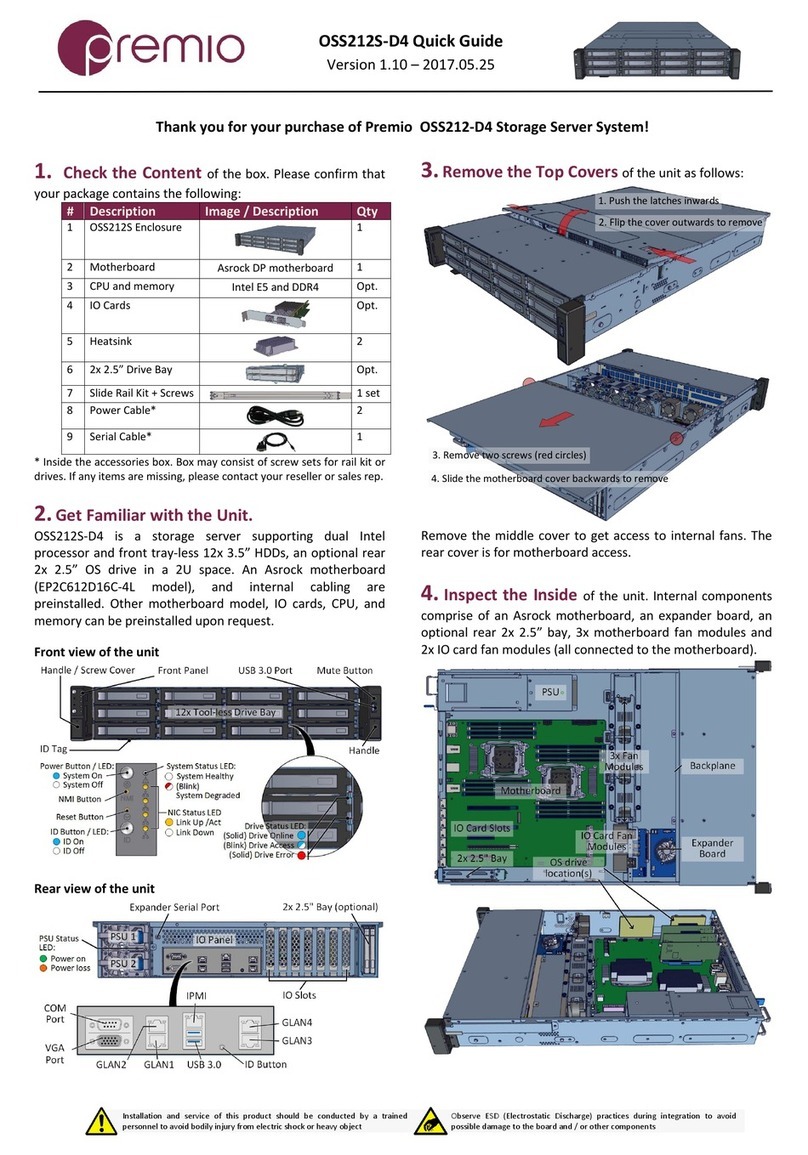
2. Get familiar with the unit.
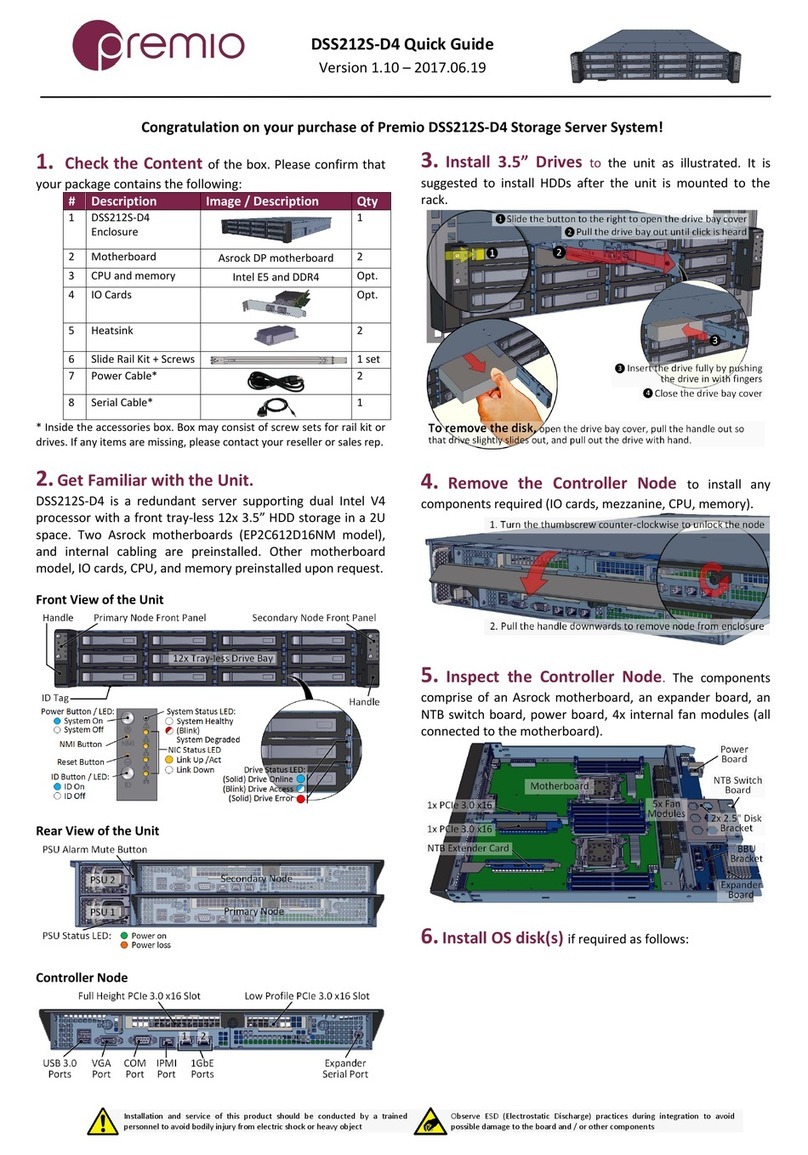
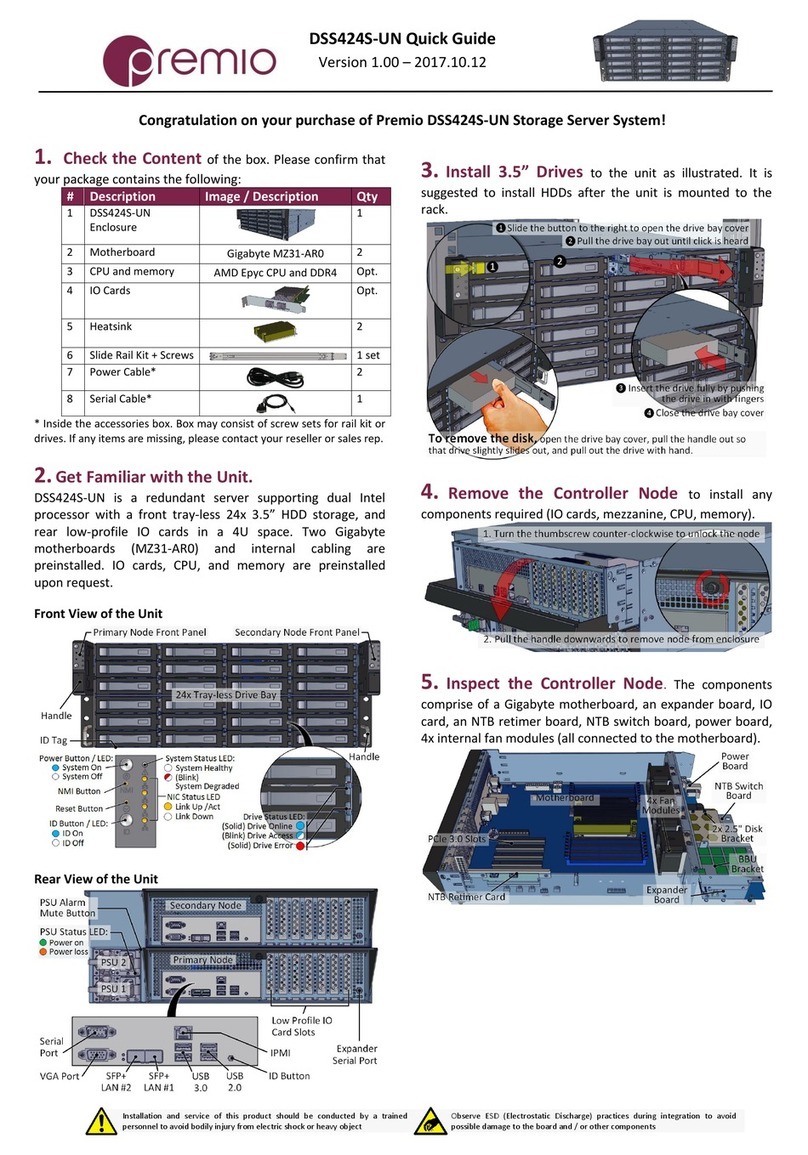
FlacheSAN1N6 is a 6-Bay NVMe storage server supporting
Intel Xeon E5-2600v3/v4 processor, front hot-swap low
profile PCIe3 x4 NVMe cards, up to 2x PCIe3 x16 expansion
slots, and PCIe3 x8 IOM.
Front View
Rear View
NVMe Carrier
FlacheSAN1N NVMe carrier supports multiple low-profile
NVMe PCIe cards such as Kingston EP1000 by Liqid, Samsung
SM1715; and M.2 form factor NVMe e.g. SM951-NVme.
To hot swap the NVMe cards, press the Power Off button,
wait until the button is completely off before replacing it.
3. Install NVMe cards to the carrier as follows. One
carrier supports one low-profile PCIe3 x4 NVMe card.
1. Press the latch
and pull the carrier
handle outwards
2. Remove the carrier
from the enclosure
Latch
3. Remove the
screw securing
the lock bracket
Lock Bracket
Carrier Handle
4. Remove the
lock bracket
5. Insert the NVMe
card to the slot
6. Secure the card by replacing the lock
bracket and secure it with the screw
When using M.2 NVMe cards, M.2 brackets are needed to
secure M.2 cards on. See below on how to install M.2 to the
carrier:
4. Install Expansion Card to the unit. Expansion
module support up to 2x PCIe3 x16 low-profile cards.
1. Push the latch inwards (yellow markings)
2. Remove the expansion card module
3. Remove the screw (yellow circle)
to remove the lock bracket
4. Insert the card
(with low profile
bracket) to the
riser card slot
5. Return the expander
module to the unit.
Make sure the pins go
into the pin guide
Thank you for your purchase of FlacheSAN1N6C-D4 1U 6x NVMe Haswell
Server!
FlacheSAN1N6C-D4 Quick Guide
For more information please visit our website at www.premioinc.com
Copyright © 2017, Premio Inc. All rights reserved.
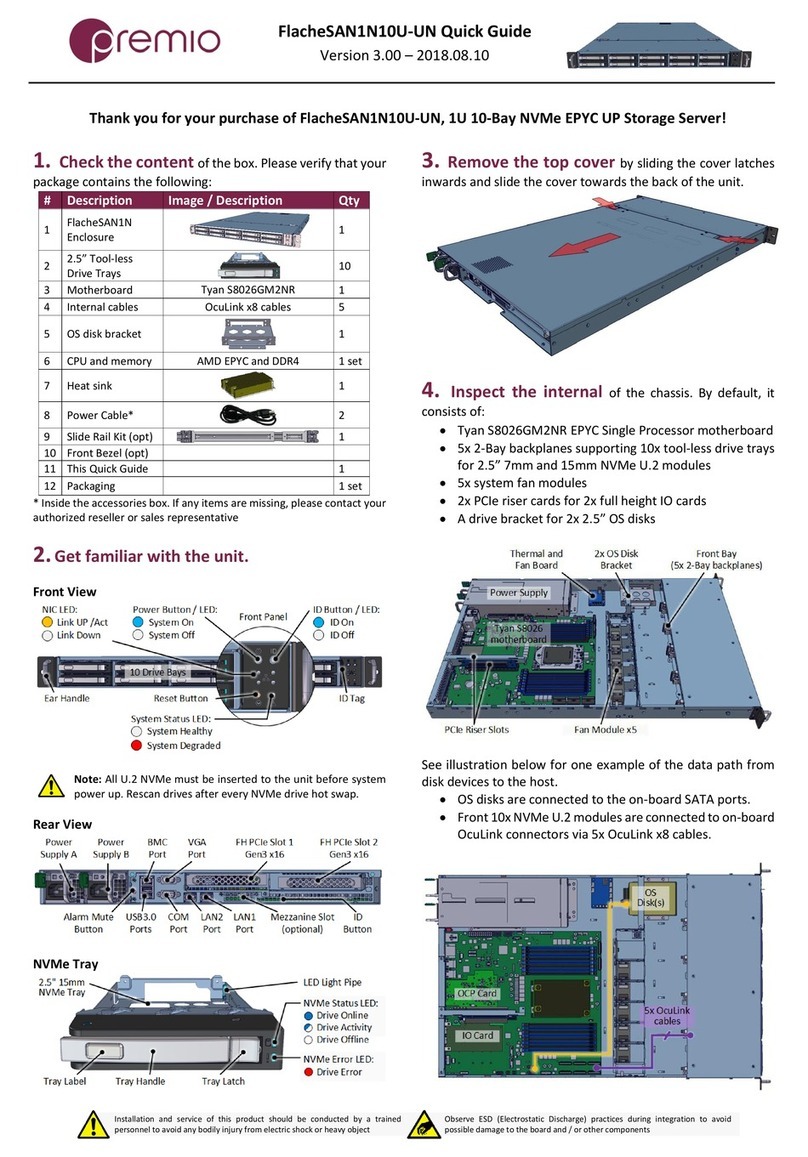
5. Remove the top cover to install or inspect the
internal of the system.
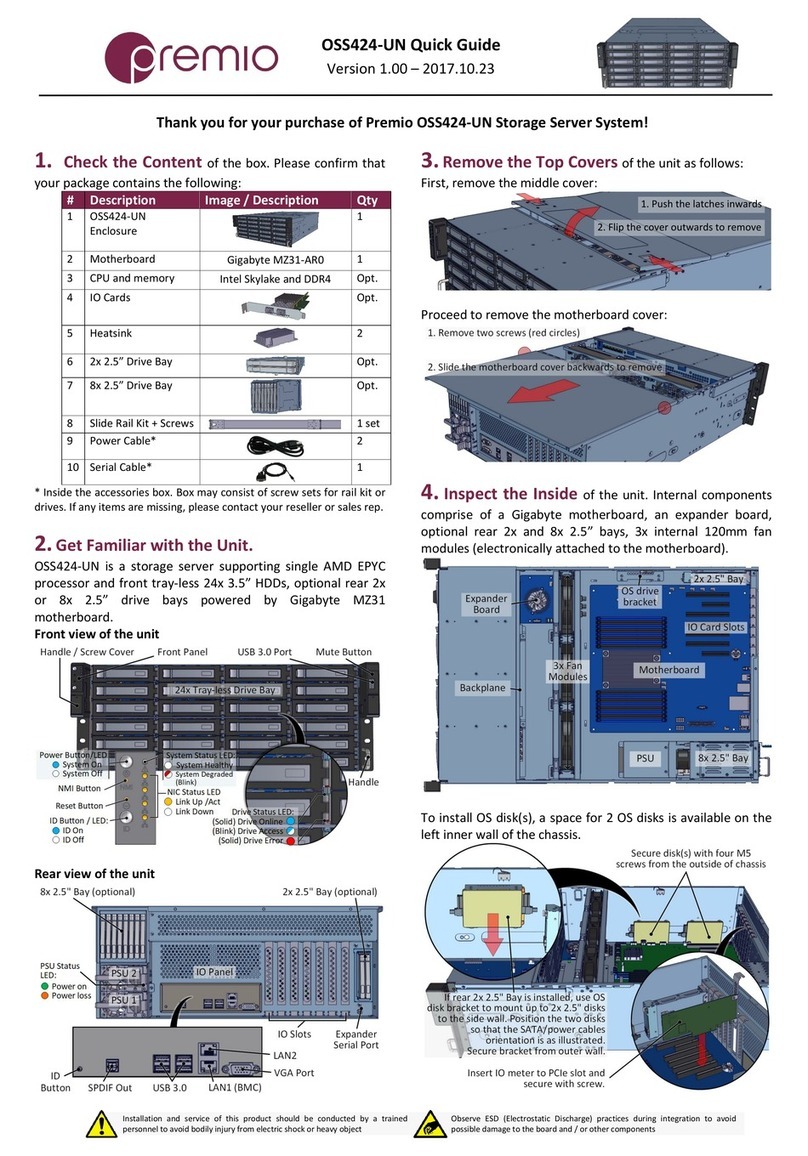
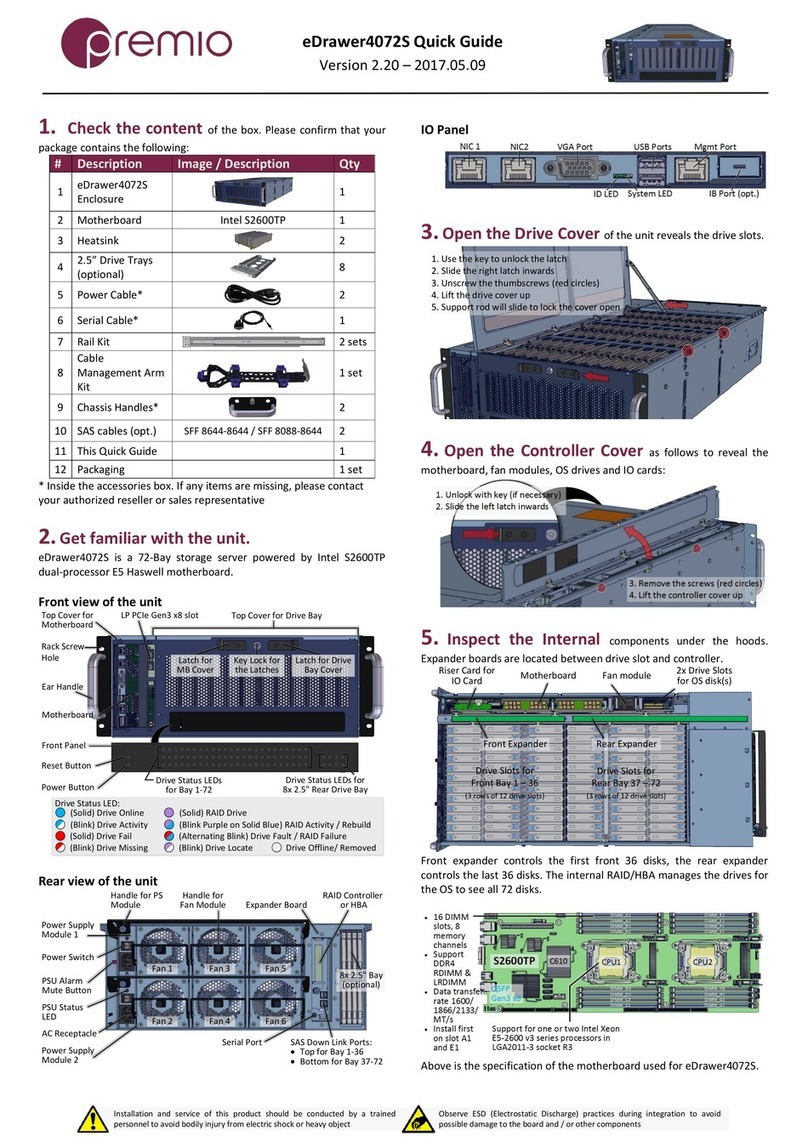
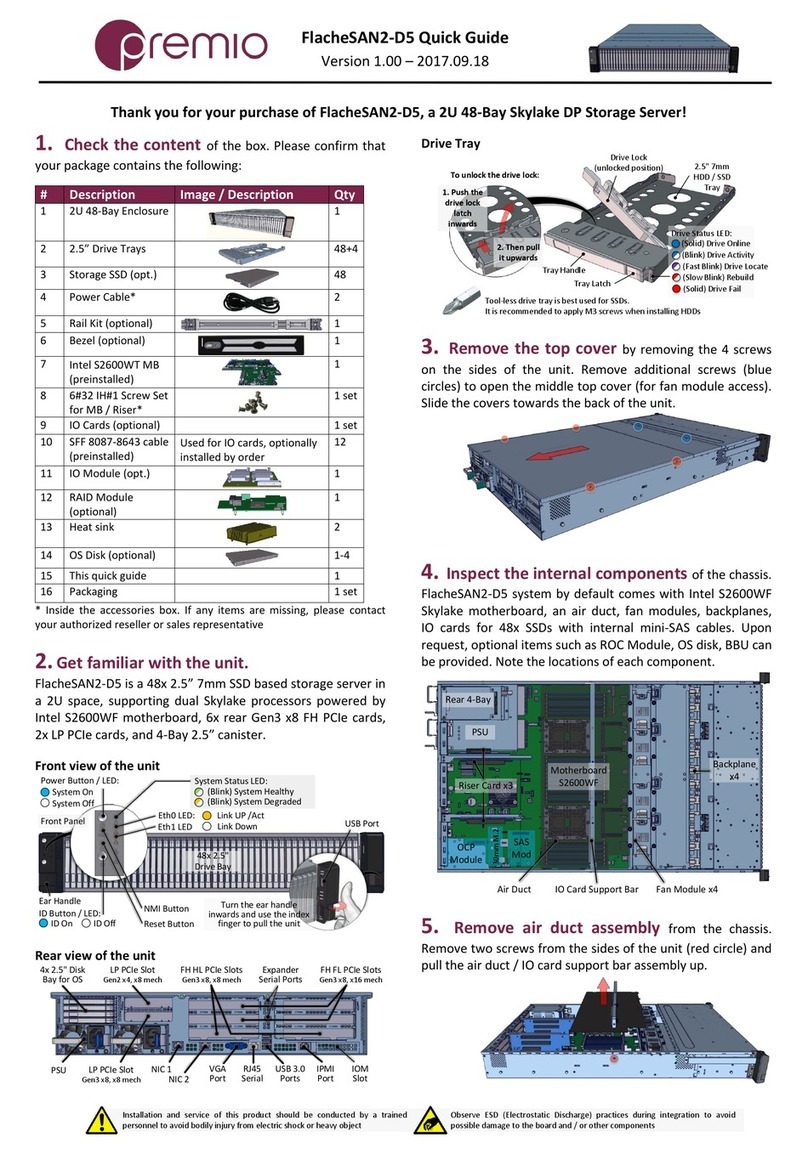
6. Inspect the internal of the system. By default, it
consists of an Asrock EP2C612D16FM Haswell Dual Processor
motherboard, a set of CPU and memory, a switch board, 3x
blower modules. Optionally, OS drive (up to 2x), IOM card
(Gen3x8), NVMe cards (Gen3x4 each) and Expansion cards
(Gen3x16 each) are installed by request.
PSU
Switch
Board
OS Drive
x2
Blower
x3
Motherboard
NVMe #6 (bottom)
NVMe #5 (top)
NVMe #2 (bottom)
NVMe #1 (top)
Exp. card #1 (top)
Exp. card #2 (bottom)
CPU2
CPU1
IOM Card
NVMe #4 (bottom)
NVMe #3 (top)
NVMe #1 to #4 and Expansion card #1 are associated with
CPU1. NVMe #5, NVMe #6, and Expansion card #2 are
associated with CPU2. IOM card is connected to CPU1.
7. Install CPU and memory (may be sold separately)
to their respective slots on the motherboard. Please be aware
of each component’s installation requirements and
prerequisites. Refer to the motherboard’s TPS for details.
Processor:
· Intel Xeon E5-2600/
4600 v3/v4 series CPU
· Dual Socket LGA 2011
R3
· Intel C612 Chipset
Memory:
· 16 DIMM slots
· Quad channel memory
· DDR4 2400*/2133/
1866/1600 RDIMM and
LRDIMM
· 1.2V
· RDIMM: 32, 16, 8, 4GB
· LRDIMM: 64GB, 32GB
* Only for E5-2600 v4
8. Install OS disk(s) into the bracket as follows:
1. Remove the OS disk bracket
2. Install the OS disk and
secure with M3 screws
(red circles)
3. Place the disk bracket assembly
back to the enclosure
4. Install the SATA and power cables to the disks
9. Replace the top cover. Once we are finished with
the internals of the system, close the top of the chassis.
10.Prepare rack mounting by installing inner rail to
the enclosure.
1. Install stand-offs (yellow circles) when necessary
2. Secure inner rail with M4x4L screw (red circle)
Install the outer rail to the rack. Use 6-32 x16L screws to
secure the rail (red circles, for rear posts only).
1U
11. Mount the enclosure to the rack. Secure the
enclosure with 6-32 x16L by the ears.
1. Slide the inner rail of the enclosure
to the outer rail of the rack
2. Pull the latch (red circle) to
push the unit all the way
12. Plug in the power cords to the AC receptacles
on the back of the unit and secure it with the wire lock.
13. Press the power button on the
front of the unit after connecting a monitor
and input devices, and get ready for
software setup.
Other Premio Network Storage Server manuals

Premio OSS212S-D4 User manual

Premio

Premio OSS212S-D4 User manual

Premio DSS424SF-D5 User manual

Premio

Premio DSS424SF-D5 User manual

Premio FlacheSAN2-D5 User manual

Premio

Premio FlacheSAN2-D5 User manual

Premio eDrawer4072S User manual

Premio

Premio eDrawer4072S User manual

Premio FlacheSAN1N10U-UN User manual

Premio

Premio FlacheSAN1N10U-UN User manual

Premio DSS212S-D4 User manual

Premio

Premio DSS212S-D4 User manual

Premio FlacheSAN1L-D4 User manual

Premio

Premio FlacheSAN1L-D4 User manual

Premio FlacheSAN1N4C-D4 User manual

Premio

Premio FlacheSAN1N4C-D4 User manual

Premio OSS424S-D4 User manual

Premio

Premio OSS424S-D4 User manual

Premio DSS424S-UN User manual

Premio

Premio DSS424S-UN User manual

Premio OSS424-UN User manual

Premio

Premio OSS424-UN User manual

Popular Network Storage Server manuals by other brands

QNAP Nextephive user guide

QNAP

QNAP Nextephive user guide

Seagate 8-BAY RACKMOUNT NAS user manual

Seagate

Seagate 8-BAY RACKMOUNT NAS user manual

Rorke Data Galaxy HDX4 16 Bay RAID Installation and hardware reference manual

Rorke Data

Rorke Data Galaxy HDX4 16 Bay RAID Installation and hardware reference manual

Synology DS223j product manual

Synology

Synology DS223j product manual

TRENDnet TS-U100 - NAS Server - USB Quick installation guide

TRENDnet

TRENDnet TS-U100 - NAS Server - USB Quick installation guide

Dell PowerVault 600 Getting started

Dell

Dell PowerVault 600 Getting started

3Com OfficeConnect 3C19500 user guide

3Com

3Com OfficeConnect 3C19500 user guide

Supero SC213A-R900UB user manual

Supero

Supero SC213A-R900UB user manual

HP X1800sb Quickspecs

HP

HP X1800sb Quickspecs

Netstor NA762TB3 user manual

Netstor

Netstor NA762TB3 user manual

Western Digital My Book Pro user manual

Western Digital

Western Digital My Book Pro user manual

Buffalo TeraStation HD-HTGL user manual

Buffalo

Buffalo TeraStation HD-HTGL user manual

AIC FB122-PV user manual

AIC

AIC FB122-PV user manual

Buffalo TeraStation III TS-IXL user manual

Buffalo

Buffalo TeraStation III TS-IXL user manual

SMC Networks TigerStore SMCNAS04 user guide

SMC Networks

SMC Networks TigerStore SMCNAS04 user guide

LogiLink NS0045A Brochure & specs

LogiLink

LogiLink NS0045A Brochure & specs

IBM 9370 Installation manual - physical planning

IBM

IBM 9370 Installation manual - physical planning

Synology DiskStation DS213air Quick installation guide

Synology

Synology DiskStation DS213air Quick installation guide

manuals.online logo
manuals.online logoBrands
  • About & Mission
  • Contact us
  • Privacy Policy
  • Terms and Conditions

Copyright 2025 Manuals.Online. All Rights Reserved.