Pressol 18 051 User manual

88 870 932 A403 GB
OPERATING INSTRUCTIONS
AND SAFETY NOTES
Battery Grease Gun
with Accessories

2
GB Operating Instructions - Battery Grease Gun
Pressol Schmiergeräte GmbH
This documentation is exclusively intended for the operating company and their sta.
Without our written consent, the content of this documentation (textes, gures, drawings, charts,
diagrams etc. ), must not be duplicated or distributed, neither in full or in part, utilized for the purpose
of competition or passed on/made availabe to third parties.
Pressol Schmiergeräte GmbH
Parkstraße 7
93167 Falkenstein | Germany
Tel. +49 9462 17-0
Fax +49 9462 17-208
info@pressol.com
www.pressol.com
Operating instructions translation
Date of issue: 07/2021
We reserve the right to make design and product modications, which serve to improve the product.
Table of Contents
1. Introduction ________________________________________________________________________3
1.1 Preface ___________________________________________________________________________3
1.2 Obligations of the personnel __________________________________________________________3
1.3 Symbols in this manual _______________________________________________________________3
1.3.1. Structure of the safety notes ___________________________________________________________3
1.3.2. Hazard symbols _____________________________________________________________________4
1.3.3. General symbols ____________________________________________________________________4
2. Safety notes ________________________________________________________________________4
3. Intended conditions of use ____________________________________________________________4
3.1 Reasonably foreseeable misuse ________________________________________________________5
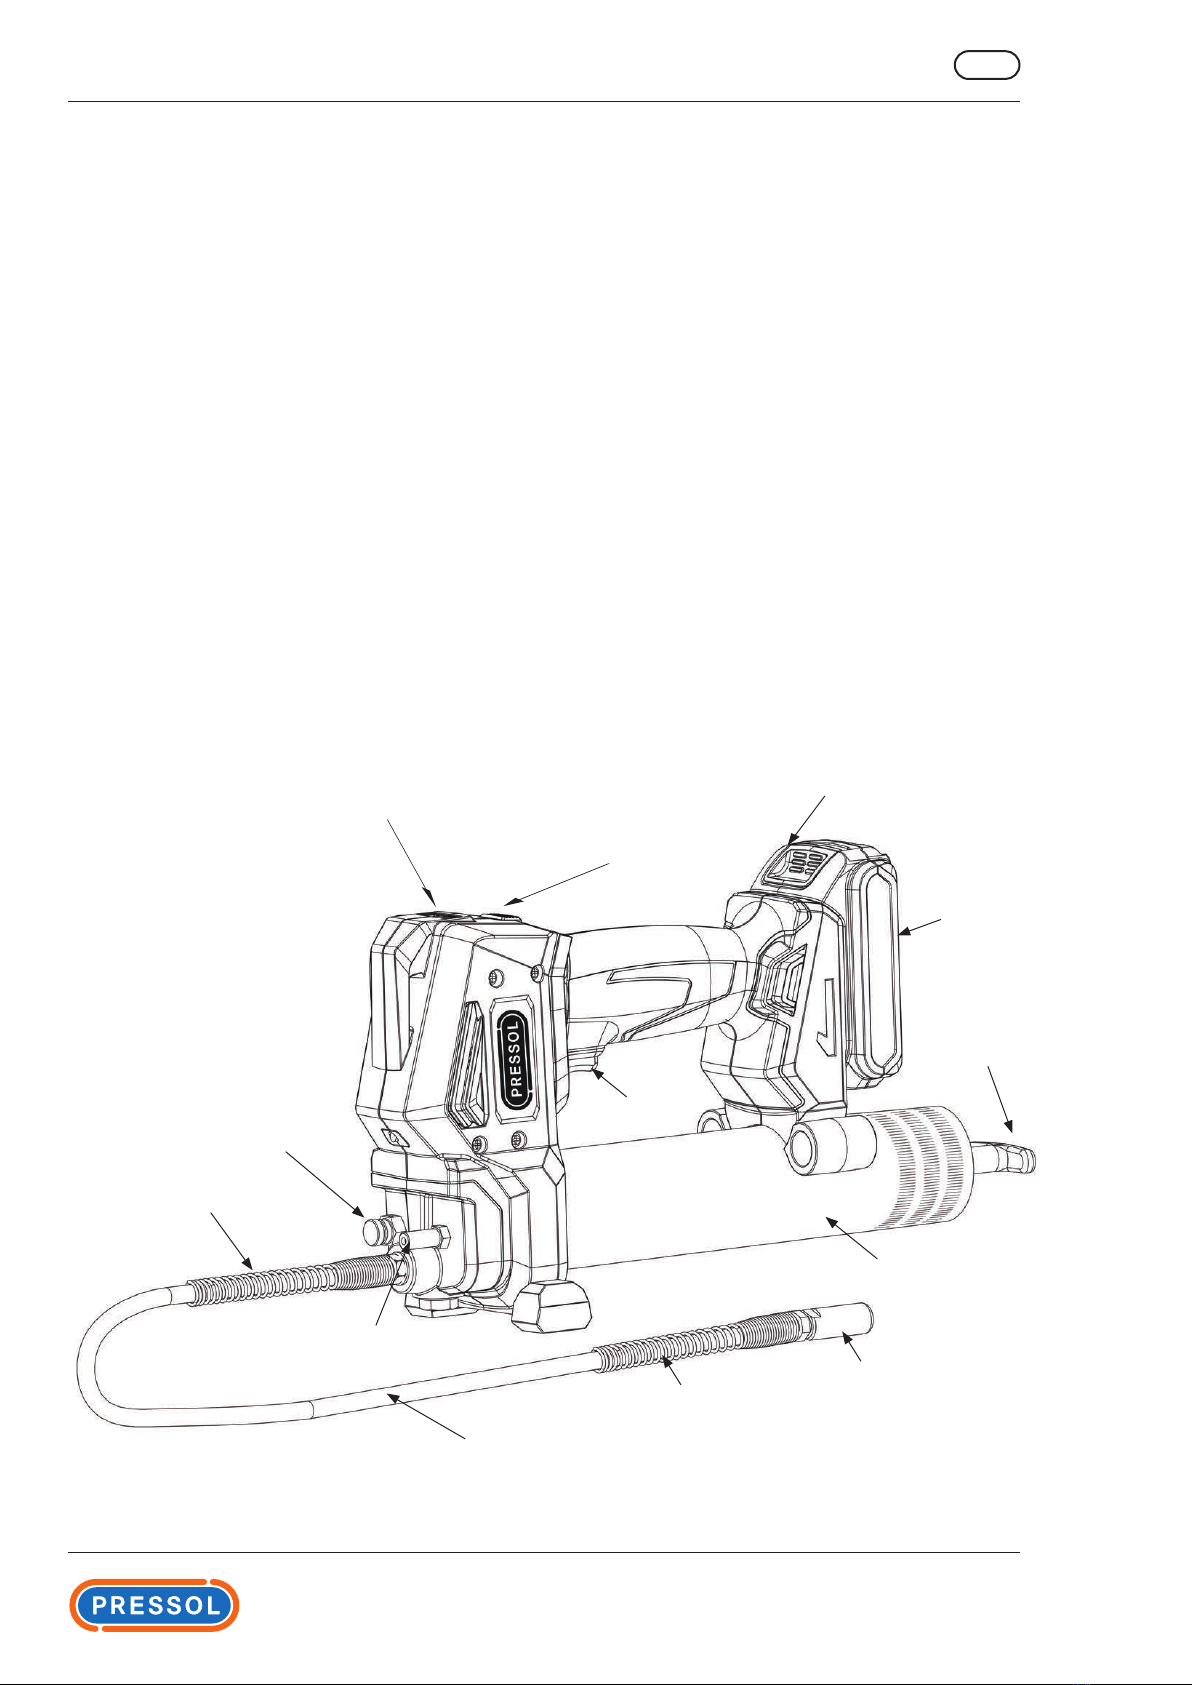
3.2 Design and functional description ______________________________________________________5
4. Technical data ______________________________________________________________________6
5. Area of application __________________________________________________________________7
6. Risks when handling the grease gun ____________________________________________________7
7. Commissioning and putting into operation _______________________________________________7
7.1 Filling the grease gun ________________________________________________________________8
7.1.1. Filling with grease cartridge according to DIN 1284_________________________________________8
7.1.2. Filling with grease gun lling device ____________________________________________________8
7.1.3. Filling the grease gun from a bulk container ______________________________________________8
7.1.4. Removal of trapped air________________________________________________________________8
7.2 Making the grease gun ready for operation _______________________________________________9
8. Battery ___________________________________________________________________________10
8.1 Safety instructions when handling the battery ___________________________________________11
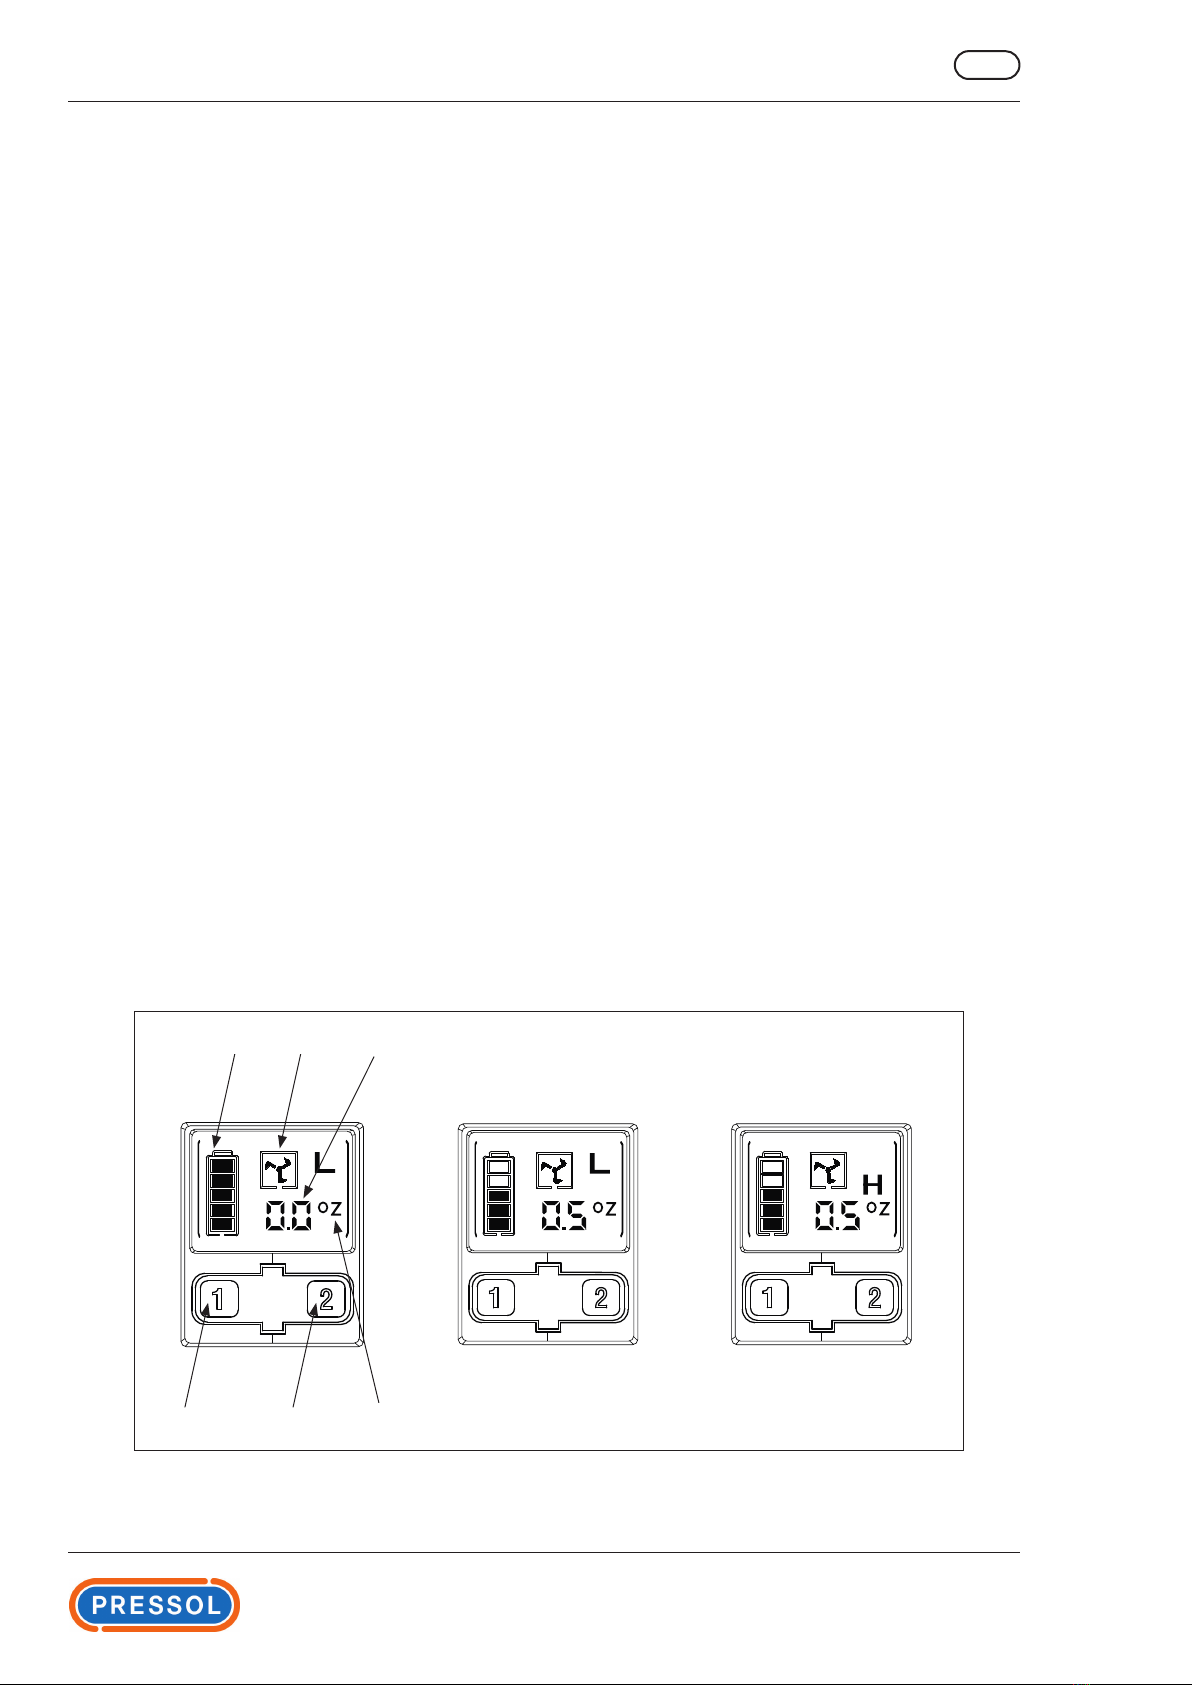
9. Operation _________________________________________________________________________11
10. Inspection, maintenance and cleaning _________________________________________________11
11. Troubleshooting ___________________________________________________________________12
12. Exploded view of the battery grease gun ________________________________________________13
13. Battery charger for Li-Io battery 20 V____________________________________________________14
14. Safety instructions for the battery charger _______________________________________________14
15. Repair / Service_____________________________________________________________________15
16. Disposal __________________________________________________________________________15
17. Transport _________________________________________________________________________15
18. EC Declaration of Conformity _________________________________________________________16

3
Operating Instructions - Battery Grease Gun GB
1. Introduction
1.1 Preface
Please carefully read these operating instructions and observe in particular all safety notes!
Our sta will be pleased to provide support if you have any questions about the product.
Yours sincerely, Pressol Schmiergeräte GmbH
1.2 Obligations of the personnel
Before commencing work, all persons who are entrusted to work with the battery grease gun are obliged:
– to follow all applicable regulations on occupational safety and accident prevention.
– to read and to comply with all safety instructions and warning notes contained in these operating
instructions.
Please observe the following instructions in the interest of all concerned:
Refrain from any unsafe working methods!
Adhere to all hazard and warning notes contained in this manual!
In addition to this documentation, keep to all generally accepted safety rules, legal provisions as
well as all other binding rules regarding occupational safety, accident prevention and environmental
protection!
Wear appropriate protective clothing in accordance with the work to be done!
Perform only work for which you have been suciently trained and instructed!
Only genuine spare parts as well as original tools and auxiliaries of the manufacturer are allowed to be
used in order to ensure the functional safety and maintain the warranty coverage.
1.3 Symbols in this manual
1.3.1 Structure of the safety notes
The safety notes have the following structure:
SIGNAL WORD
Type and source of the hazard
– Consquences of non-compliance with the notes
–Measures to avoid that risk
Depending on the danger level, dierent signal words are used:
Signal word Danger level Consequences of non-compliance
DANGER Imminent threat of
danger
Death or serious bodily injury
WARNING Possible threat of
danger
Death or serious bodily injury
CAUTION Possibly dangerous
situation
Minor bodily injury
ATTENTION Possibly dangerous
situation
Damage to material property

4
GB Operating Instructions - Battery Grease Gun
NOTE
Indicates further information or tips which facilitate work.
1.3.2 Hazard symbols
Symbol Meaning
General hazard symbol. The warning note marked in this way contains sup-
plementary information on the type of hazard.
This symbol warns of dangerous electrical voltages.
This symbol warns of a hazardous explosive atmosphere.
1.3.3 General symbols
Symbol Meaning
A small black square indicates the work you have to perform.
–The arrow identies cross-references.
aThe arrow identies cross-references.
If cross-references to other chapters are required within the text, the
expression is shortened for reasons of clarity.
Example: aChapter 2 Safety instructions
This means: please refer to chapter 2 for the safety instructions.
2. Safety instructions
Various dangers may occur if the battery grease gun is improperly handled during installation,
commissioning and daily operation.
WARNING
Risk of injury and damage to material property because of improper handling!
Hold the manual at the disposal of the operating sta at the usage site of the unit.
Country-specic safety measures and accident prevention regulations must be
observed.
3. Intended conditions of use
The battery grease gun is ideally suited for mobile applications and is solely designed for pumping greases
up to NLGI 2. Operation with 20 Volt battery power.
The maximum permissible technical data must not be exceeded.
Any departure from the usage stipulations (other media, use of force) or unauthorized modications
(changes, use of non-original parts) can be dangerous and are considered to be non-intended usage.
The user is liable for any damage resulting from non-intended use.

5
Operating Instructions - Battery Grease Gun GB
3.1 Reasonably foreseeable misuse
Foreseeable misuse could be:
– Using the battery grease gun with a cartridge that is not conform to the DIN 1284 standard.
– Use greases that do not comply with the NLGI 2 viscosity class.
3.2 Design and functional description
The battery grease gun is powered by a lithium ion battery. It is driven by a small low-voltage electric mo-
tor which is connected to a gear drive.
The technology integrated in the battery grease gun includes the following:
1. A motor protection preventing an overload due to an excessive power consumption. In this case, the
motor stops and the display ashes red.
2. An LCD display indicating the battery charge, the delivery speed and the delivery volume.
3. An LED light to illuminate the lubricator / grease nipple.
4. A grease ow monitoring system and the indication of the delivery volume
The measurement accuracy for the delivery rate is +/- 10 % at ambient temperatures from 0°C to 35°C
and at counter pressures from 0 to 250 bar. Outside these parameters, accurate measurements of the
delivered volume are not possible. The accuracy of the measuring device applies for the use with
NLGI 2 grease, the resolution is 0.1 g.
Fig. 3.2 -1: Structure battery grease gun
85 277
18 042
12 672
Push rod
with T-grip
Accu
12 642
Battery release button
On/O switcher
Display
Operating button
Anti-kink spring
Anti-kink spring
81 871

6
GB Operating Instructions - Battery Grease Gun
Spare parts list
Item no. Designation Item no. Designation
18 042 High pressure-grease hose 81 871 Grease gun tube complete
18 051 100 Li-Io battery-20 V-2000 mAh 85 277 Venting valve
18 051 101 Li-Io battery-20 V-4000 mAh 00 442 Flat gasket for grease gun head
18 051 200 Charger-230 V 12 642 Precision coupler with valve
18 051 400 Adapter kit-400-g-screw-in cartridge 12 672 Filling nipple
18 051 401 Adapter kit-500-g-screw-in cartridge
4. Technical data
Description Battery grease gun Li-Io 20 V
18 051
Grease gun
Grease gun pump actuation continuous grease supply provided by 20 V electric motor
Relling options 400-g-grease cartridge DIN 1284 or bulk grease
Grease supply into the grease gun head spring operated
Diameter of grease pump piston (mm) 7
Delivery rate (g/min) approx. 150
Operating pressure max. (bar) 400
Maximum pressure (bar) 680
Airborne emissions < 70 db(A)
Grease supply hose (mm) 11 x 1000
Operation of plunger rod with T-grip
Sealing cover loose
Wall thickness of grease gun tube (mm) 1
Dimensions LxWxH (mm) 380 x 205 x 110
Weight, battery grease gun empty (kg) 3,07
Charger for Li-Io-battery 20 V Charger
18 051 200
Input voltage 230 V/AC
Frequency (Hz) 50/60
Power(W) 45
Output voltage 16 - 21 V/DC
Nominal current 1,5 A
Dimensions without cable LxWxH (mm) 180 x 120 x 85
Weight (kg) 0,455
Power cable with Euro plug, length (m) 1,6
Battery Li-Io-battery 20 V
18 051 100
Capacity 2000 mAh
Voltage (V) 20
Charging time battery (minutes) approx. 60
Delivery/battery charge 25 pieces 400 g cartridges (without counter pressure)
7 pieces 400 g cartridges (at approx.100 bar counter pressure)
Dimensions LxWxH (mm) 118 x 76 x 45
Weight (kg) 0,378
Battery Li-Io-battery 20 V
18 051 101
Capacity 4000 mAh

7
Operating Instructions - Battery Grease Gun GB
Voltage (V) 20
Charging time (minutes) approx. 120
Delivery/Battery load 50 pieces 400 g cartridges (without counter pressure)
15 pieces 400 g cartridges (at approx. 100 bar counter pressure)
Dimensions LxWxH (mm) 118 x 76 x 65
Weight (kg) 0,632
Tab. 4.-1: Technical data
5. Area of application
The grease gun is suitable for pressing greases up to the viscosity class NLGI 2 at a temperature of 20 °C.
6. Risks when handling the battery grease gun
CAUTION
Excessive pressure at the point of lubrication may destroy the grease
nipple, the bearing or even the machine
Observe the maintenance and service instructions of the machine
manufacturer.
CAUTION
Damaged accessories may lead to personal injury and material damage!
High pressure hoses must not be bent, twisted or stretched.
Attachments and accessories must be checked for wear, splits or other
damage throughout its period of use.
Damaged accessories and attachments must be replaced immediately.
DANGER
Never work with the battery grease gun in the vicinity of open re, gas or
other combustible uids.
The battery grease gun can build up a high pressure (up to 400 bar). Safety
glasses and safety shoes are required. Keep hands away from rubber hoses
under high pressure.
CAUTION
Risk of personal injury due to electric shock!
Avoid contact with other metals during greasing because of the risk of
accidental earthing.
Do not use the device in rain or when wet (electric shock!).
Do not use the battery charger in humid / moist rooms.
Do not use the grease gun if it is damaged, if it was stored under the open sky
or if it was dipped into a liquid.
7. Commissioning and putting into operation
Check the grease gun and the accessories for completeness (see achapter 12.
exploded view of the battery grease gun).
After each relling or grease cartridge change, check the grease gun. Note that an air bubble may
cause fat loss or ineciency.
Use the venting valve to vent the grease pump (see achapter 7.1.4.).

8
GB Operating Instructions - Battery Grease Gun
7.1 Filling the grease gun
There are various possibilities to ll the grease gun:
– Filling with grease cartridge according to DIN 1284.
– Filling with grease gun lling device by lling nipple.
– Filling with bulk grease from a large container.
7.1.1. Filling with grease cartridge according to DIN 1284
Removing an empty cartridge:
CAUTION
Injuries due to overpressure
Do not open the grease gun under pressure!
Before disconnecting the grease gun head and tube, the push rod must be
pulled back and locked automatically by the locking pawl.
Unscrew the grease gun tube from the device.
Slowly loosen the handle, pull the grease cartridge up and out of the device.
Installing a new grease cartridge:
Remove the plastic cap from the full grease cartridge and insert it into the grease gun tube.
Only then tear o the„pull-o“ closure of the cartridge and screw up the grease gun head.
While pulling on the push rod, activate the locking pawl and slide the push rod back into the tube.
Use the venting valve to bleed o any air that may be trapped in the cartridge
(see achapter 7.1.4.).
NOTE
Ensure cleanliness during installation and that the accessories are correctly
connected with the grease gun head.
Use appropriate sealants and adhesives (e. g. Teon tape).
7.1.2. Filling with grease gun lling device
Put the grease gun with the lling nipple on the lling valve of the grease gun lling device and hold it
with light counter pressure.
Actuate the grease gun lling device to ll the grease gun. The push rod may be pressed out of the
grease gun tube by the lling operation.
While pulling on the push rod, activate the locking pawl and slide the push rod back into the tube.
7.1.3. Filling the grease gun from a bulk container
Unscrew the grease gun tube from the grease gun.
Plunge the open end of the grease gun tube into the grease container.
Hold the grease gun tube and slowly pull the piston back by means of the grip.
Ensure that the open end of the grease gun tube is always completely immersed in the grease in order
to avoid the intake of air.
Stop lling when the piston is completely pulled out.
Screw the grease gun tube down again to the head of the grease gun.
While pulling on the push rod, activate the locking pawl and slide the push rod back into the tube.
7.1.4. Removal of trapped air
Use the venting valve to vent the grease pump.
Vent the grease gun, open the venting valve until grease escapes from the venting valve.
Close the venting valve.
Press the trigger until grease escapes from the precision machined coupler.

9
Operating Instructions - Battery Grease Gun GB
Pos. 1 Pos. 2 Pos. 4
Pos. 5 Pos. 3Pos. 6
7.2 Making the grease gun ready for operation
Check to ensure that the grease gun tube is tightly screwed in the device. To remove trapped air, open the
venting valve while the push rod is moved forward. The grease gun is now ready for operation.
Switching on the display and the LED light:
Switching on the display:
Press button 1 or operate the trigger/switch.
Switching on/o the LED light:
Press button 1.
After the greasing operation, the display and the LED light are turned o automatically
after 30 seconds.
Selection of the pump speed
Press button 2 to switch between high and low pump speed. The letters„L“ (low speed) or„H“ (high speed)
appear on the screen.
140 g/min are delivered at high speed (H) and at a counter pressure of 100 bar.
95 g/min are delivered at low speed (L) and at a counter pressure of 100 bar.
The motor speed automatically switches from L to H, if the counter pressure exceeds 200 bar.
Resetting the counted delivery volume (Pos. 3, g.)
Keep button 1 pressed for 3 seconds in order to reset the indicated delivery volume to 0.
Switching the unit of measurement (Pos. 4, g.)
Keep button 1 pressed for 15 seconds in order to switch the unit of measurement between grams
and ounces (US).
Display of the grease delivery (Pos. 5, g.)
The display of the grease delivery is only active when grease is actually delivered. No quasi-lubrication, no
air in the system
Battery charging level indicator on the display (Pos. 6, g.)

10
GB Operating Instructions - Battery Grease Gun
8. Battery
The battery is only partially charged at delivery. When used for the rst time, it must be fully charged
to ensure satisfactory performance. When the tool performance begins to drop sharply, it indicates the
battery needs to be recharged.
NOTE
Only use the supplied charger. Other chargers may catch re and are not
suitable for this device.
Avoid that the battery is completely discharged when the current level is low,
because otherwise the battery‘s lifetime will be considerably reduced.
Charging process
Connect the charger to an appropriate socket before inserting the battery.
Put the battery on the charger. Check to ensure that the battery and the charger are completely connected.
When the battery is fully secured, a faint„click“ can be heard.
Press the selection button in order to display the charging status on the screen. If the battery is fully
charged, the display remains switched on.
When the battery is completely charged (approx. 60 minutes), disconnect the charger from the mains and
take out the battery.
Battery charging indicators
Battery indicator Solution
Slowdown
hot/cold battery
Slow or
quick ashing
Cool the battery
(0 °C - 45 °C)
Battery fault Quick ashing Replace the battery
Battery charging Slow ashing
Battery fully charged Steady ashing
Battery charging level indicator on the battery
When the button is pressed, the battery‘s charging level is indicated by means of three bars.
Display indicator Meaning
Full power 100 %
Enough power 75 %
Low power 25 %

11
Operating Instructions - Battery Grease Gun GB
8.1 Safety instructions when handling the battery
WARNING
Risk of injuries by burns!
Never throw the battery in a re. Risk of explosion!
Never charge defective (leaky) batteries.
Never allow the battery to come into contact with water.
Do not store the battery in places where the temperature may exceed 50 °C.
Store the battery only at ambient temperatures between 5 °C and 40 °C.
Do not try to open the battery.
In case of improper use, uid may spurt out of the battery. This uid may
cause irritations or burns. Avoid any contact with this uid. In the event of
accidental contact, rinse the aected area with plenty of water. In case of eye
contact, ush with water and contact a physician immediately.
Only use the specied charger to charge the battery. There is a danger of re
if an unsuitable charger is used.
If the battery is not used, it must be kept away from other metal objects, such
as staples, coins, keys, nails and other small metal objects which could make
a connection from one pole to the other. A short circuit between the poles
may cause burns and res.
Store the device in a clean and dry place out of the reach of children.
9. Operation
CAUTION
Excessive pressure may lead to a bursting of the grease gun head and of the
accessories!
When using the grease gun, use appropriate equipment such as protective
gloves and goggles.
Put the grease gun with the precision machined coupler on the lling nipple.
Carry out the greasing procedure by activating the ON/OFF switcher.
10. Inspection, maintenance and cleaning
In general, the battery grease gun only requires very little care or maintenance.
Inspection, maintenance and cleaning work must be carried out by qualied personnel only.
CAUTION
Risk of injury
Disconnect the charger from the mains before carrying out inspection,
maintenance or cleaning work.
Remove the battery from the device.
Due to the operator responsibilities the following components must be regularly checked to avoid the
risk of environmental or equipment damage or personal injury:

12
GB Operating Instructions - Battery Grease Gun
Before each
use:
Check the general condition of the grease gun.
Check all moving parts for possible irregularities.
Look out for burst or broken components, a leaking battery, damaged hoses
as well as for each irregularity which would prevent the grease gun from
being safely started.
In case of abnormal noises or vibrations, check the grease gun before
continuing to use the unit.
If required, use a soft and dry cloth to remove dirt and grease residues from
the exterior of the grease gun.
Always store the grease gun with the batteries removed!
Store the device in a clean and dry place out of the reach of children.
11. Troubleshooting
Malfunction Cause Solution
Motor does not run No power supply,
the battery is empty
Charge the battery
Grease comes out of the
vent valve
Blocked lubrication point
Clogged hose
Check discharge hose
Clean or replace the
hose
Grease gun does not
deliver fat
Air pockets in the grease
Push rod blocked
Check to ensure that the
grease gun tube assy. contains grease.
Repeat the preparation
process (achapter 7)
Removal of trapped air
(achapter 7.1.4.)
Replace the grease gun tube assy.
The battery cannot be
charged
The charger is not properly
powered
The battery is damaged
Check the
power cable connection
Replace the battery

13
Operating Instructions - Battery Grease Gun GB
12. Exploded view of the battery grease gun
Pos. Quantity Description
1 1 Selection button
2 1 Spring
3 1 On/O switcher
4 1 Stand (left)
5 1 Housing (left)
6 1 Control panel assembly
7 1 LED light cover
8 1 Grease gun tube assembly
9 2 Cross headed screw
10 1 O ring
11 1 Gear box assembly
12 1 Copper washer
13 1 High-pressure grease delivery hose
14 1 Cross-headed screw
15 1 Hose holder
16 8 Screw, with washer
17 1 Stand (right)
18 1 Housing (right)
19 1 Coupler cap
20 1 Precision machined coupler with valve
Tab. 12.-1: Overview of components for Fig. 12.-1
Fig. 12.-1 Exploded view of the accu grease gun

14
GB Operating Instructions - Battery Grease Gun
13. Battery charger for Li-Io battery 20 V
WARNING
Risk of personal injury due to electric shock!
Use only the specied rechargeable battery (18 051 100) included with this
device for the charger. Charger also for (18 051 101). Other types of batteries
can burst, cause personal injury and property damage.
Use only the specied charger to charge the battery. The charger and the
battery were designed specically for common use.
14. Safety instructions for the battery charger
WARNING
Risk of injury and property damage due to improper handling
Read all instructions and warnings on the charger and battery before using
the charger.
Read and observe the warning notes in this manual.

15
Operating Instructions - Battery Grease Gun GB
WARNING
Risk of injuries by burns and electric shocks
Do not let any liquid enter in the charger, otherwise this may lead to electric
shocks.
Before cleaning the charger, disconnect the charger‘s power plug from the
mains.
Take care that the charger is not exposed to rain or snow.
To disconnect the charger from the power source, always pull the plug and
never the cable. This will reduce the risk to damage the plug and the cable.
Lay the power cable so that no one can step on or trip over it.
An extension cable should only be used if it is absolutely necessary. An
unsuitable extension cable may lead to a re or can cause dangerous injuries
by an electric shock.
Do not put any objects on the charger and do not place the charger on a
smooth surface, because otherwise the air slots could be blocked and the
device could overheat. Keep the device away from heat sources. The charger
features air slots at the top and at the bottom of the housing.
Do not operate the charger if it has suered hard impacts, has fallen down or
is damaged in any way.
The charger is not allowed to be disassembled. Bring the charger to an
authorized service center for maintenance or repair.
A damaged power cable must be replaced by the manufacturer, a service
center or a qualied person.
The charger is designed for operation at a standard mains voltage of 230 V.
The charger is not to be operated at any other voltage.
15. Repair / Service
The battery grease gun has been developed and produced according to the highest quality standards.
Should a problem develop, despite of all quality controls, please contact our customer service:
PRESSOL Schmiergeräte GmbH
Tel +49 9462 17-246
Fax +49 9462 1063
16. Disposal
The operating company is responsible for the proper disposal of the battery grease gun.
Hereby, the industry-specific and local regulations must be observed when disposing of the
different materials.
Only a qualied personnel is authorized to disassemble and dispose of the battery grease gun.
17. Transport
Transport the device only in the carrying case intended and supplied for that purpose.

16
GB Operating Instructions - Battery Grease Gun
18. EC Declaration of Conformity
Manufacturer:
Pressol Schmiergeräte GmbH
Parkstraße 7
93167 Falkenstein
Declares under his sole responsibility that the machine:
Model type Battery Grease Gun
18 051
Electromotor voltage 20 V
Weight without fat 3,6 kg
Function The grease gun is suitable for pressing greases up to the
viscosity class NLGI 2 at a temperature of 20 °C.
Complies with all relevant provisions of the following Directive:
EC Directives 2006/42/EG Machinery Directive
2014/35/EU Low Voltage Directive
Applicable standards DIN 1283
Authorized representative for the compilation of the technical documentation:
Name: Manuel Bredenbruch
Address: Pressol Schmiergeräte GmbH
Parkstraße 7
93167 Falkenstein / Germany
Phone: +49 9462 17-218
Pressol Schmiergeräte GmbH
Falkenstein, 18.05.2018
Dipl.-Ing. Rudolf Schlenker
(Managing Director))

17
Operating Instructions - Battery Grease Gun GB

Pressol Schmiergeräte GmbH
Parkstraße 7
93167 Falkenstein | Germany
Tel. +49 9462 17-0
Fax +49 9462 17-208
info@pressol.com
www.pressol.com
Table of contents
Other Pressol Lubrication System manuals