Primada PCR-1200 User manual
PC -1200R
Please read the Instruction manual and warranty information carefully before using and
keep it for future reference.
INSTRUCTION MANUAL
ROTATABLE
CONVECTION
ROASTER
旋 轉 烤 焗 寶
使 用 說 明 書
昇鋒國際有限公司
感謝您選用寶康達旋轉烤焗寶,為了使您能正確使用本產品,敬請使用前詳細
閱讀本說明書。
P. 01
產品功能及特點
1. 採用防燙雙層爐盤設計,爐盤外表面不燙手;
2. 開蓋立即斷電停止加熱,合蓋繼續加熱工作,超溫斷電停止加熱功能,爐盤沒放到位或
用其它鍋體不通電工作;
3. 多重安全保護裝置,確保使用安全;
4. 採用頂部熱循環烘烤,無油煙、環保潔靜;
5. 電腦記憶程序方便烘烤過程中給食物加燒烤汁;
6. 智能控制斷續旋轉烘烤扁狀食物,如:魚、牛排等;
7. 採用爐盤與爐座可分離設計,可將爐盤與食物一體放置餐桌上,使用更方便;
8. 可拆爐蓋人性化設計,更易清洗。
安全及注意事項
當使用本產品時,必須遵守以下安全保護措施及注意事項:
1. 請核對並確認銘牌上所標註的電源,確保產品是在符合標籤的
狀態下使用;
2. 此產品適合於家庭使用,不適合工業或商業使用;
3. 使用本產品時,必須將產品放置在平整及耐熱的平面上;
4. 請勿讓電源線接觸熱的物體表面;
5. 請勿使用延長電源線來操作本產品;
6. 請勿用拉扯電源線的方法拔出插頭;
7. 請勿將產品放在靠近煤氣爐或煮食爐等高溫環境中使用;
8. 請勿將產品靠近易燃物品使用,如窗簾或窗紗等;
9. 請勿將本產品放在易爆物品附近使用,如汽油等;
10. 請勿使用非本產品製造商提供的零部件及配件;
11. 請勿在無人看管的情況下使用本產品;
12. 8歲及以上年齡的兒童以及物理、感官或精神能力低下或缺乏
經驗和知識的人需要在被給予有關安全使用本產品並且理解相
關危險的監護或指導下使用。兒童不得玩耍該產品。兒童不得
在沒有監護的情況下進行清洗和維護。
此產品及電源線要放置8歲以下兒童不能接觸到的地方。
13. 本產品只適用於家庭或以下環境中:
-商店、辦公室或其他工作環境的員工廚房;
-農場房屋;
-在酒店、旅館或其他住宅租住的客人;
-家庭旅館;
14. 請勿將產品主機及帶電源線的插頭等浸入水中清洗;
15 若電源或插頭出現破損或產品故障時,切勿自行維修。請將產
品送到指定的維修中心修理;
16. 請勿自行拆開機體,改裝零件或自行修理;
Cleaning methods
Recipes for Reference
TIME (min) TEMPERATURE (°C)
FOOD
Skewer
Chicken
Fish
Pork
Cake
Lobster
Shrimp
Sausage
Peanut
Baked bread
Potatoes
Rice
Crab
Fries
Chicken wing
30
10-15
15-20
10-12
12-15
10-12
10-13
10-15
8-10
15-20
15-20
10-13
20
35
15-18
185-195
135-150
185-195
150-165
135-165
150-185
120-150
135-165
120-150
185-195
150-180
135-165
185-195
185-195
185-195
P. 22
1. Always turn off and unplug the unit before cleaning, make sure the appliance complete
cool before cleaning.
2. The outer surface of the power head and oven cover can be cleaned by wiping it with a
damp cloth. Do not reach water directly when washing.
3. When cleaning oven cover, take off oven cover according “oven cover assembly” when
necessary.
4. Inner pot, accessories, oven cover can be cleaned in mild detergent water. Do not
washing in high temperature water.
P. 21
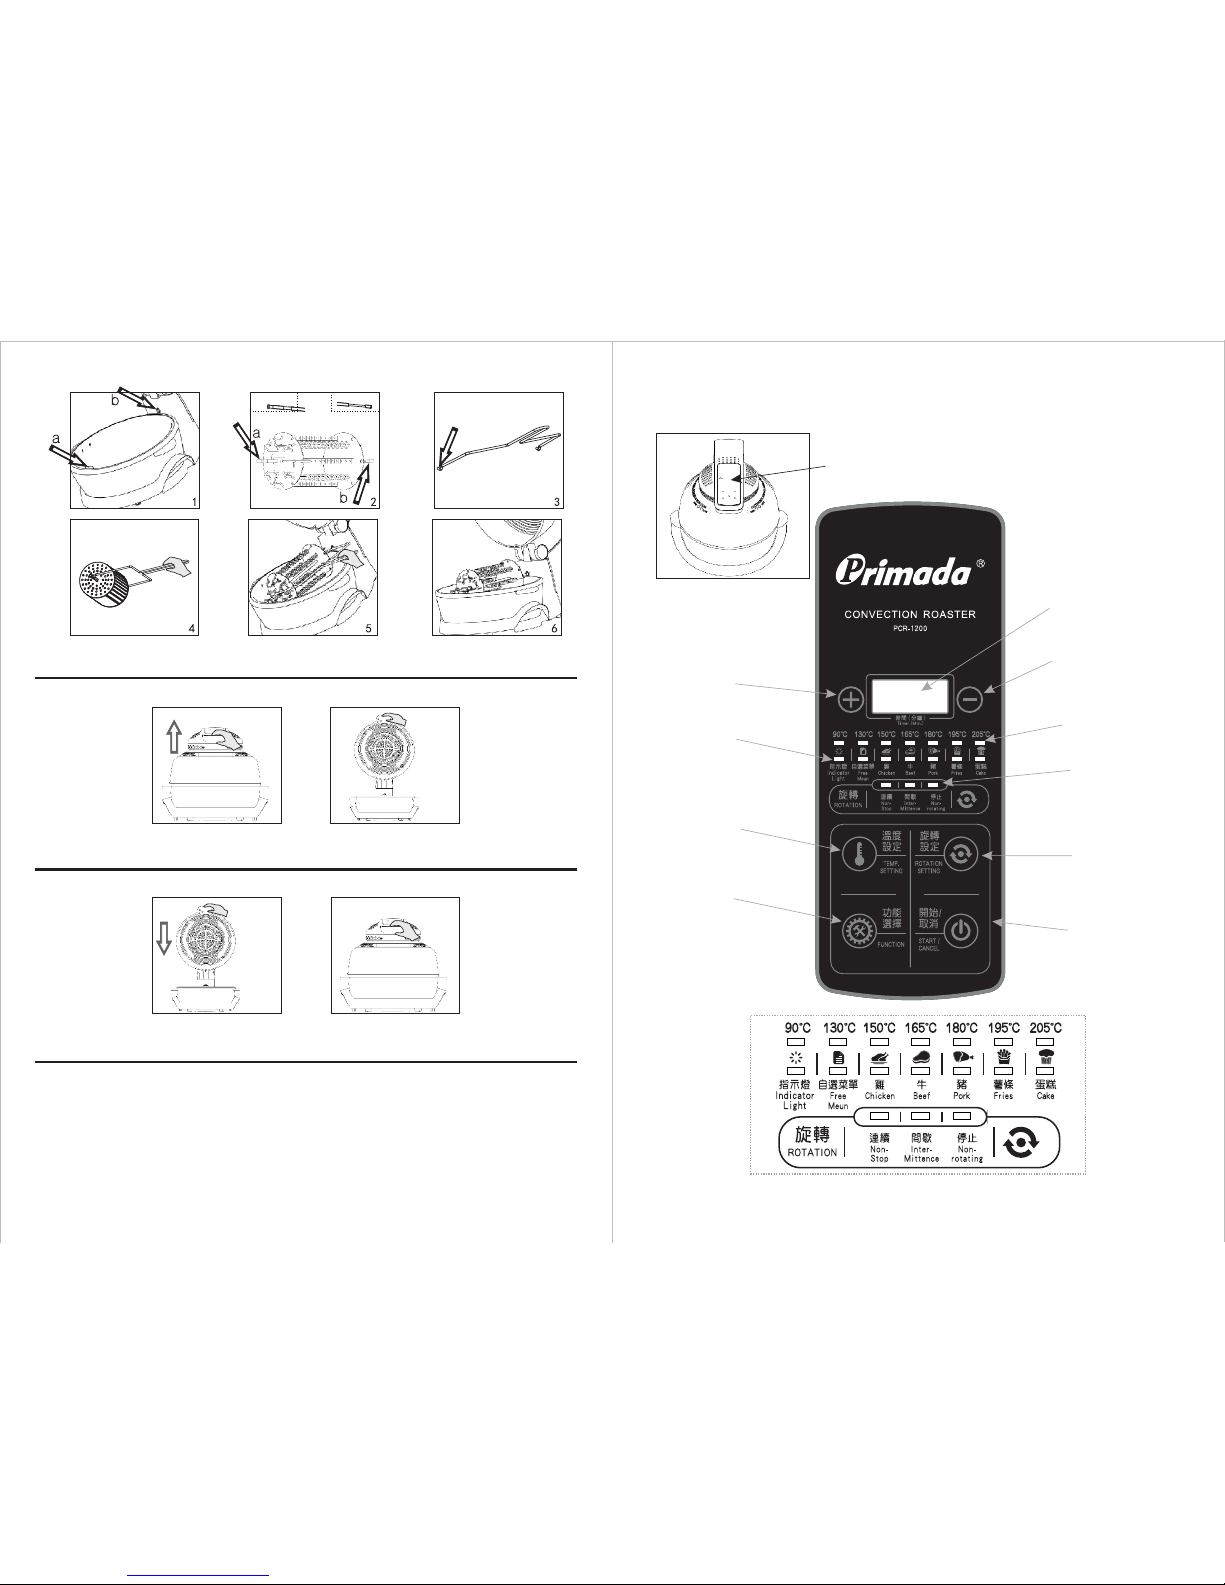
10. Temperature setting:
Press this button can adjust temperature in standby mode, allowing you to choose the
following temperatures from left to right in circulation: 90°C, 130°C, 150°C, 165°C,180
195°C, 205 .
11. Rotation button:
Press this button can choose the rotation modes, like Non-Stop, Inter-Mittence, Non-
Rotating. Turn open the cover oven when you need to add ingredients for the sauce.
After close cover that will continue to work.
°C,
°C
Note: Inter-Mittence, you can choose this function while you need to grill both side
of food, such as fish. When it turn to front (opposite) side, stop rotating, after grill
15seconds it will rotating automatic, then turn to opposite (front) side, stop and grill
15seconds, after that will start rotating again. Repeat this 2 ways of rotating, until time you
setting is end.
220V
50Hz
1200W
90°C-205°C
0-119(MIN)
444(W) X 401(D) X 353.5(H)
325(W) X 325(D) X 90(H)
14L
4.5KG
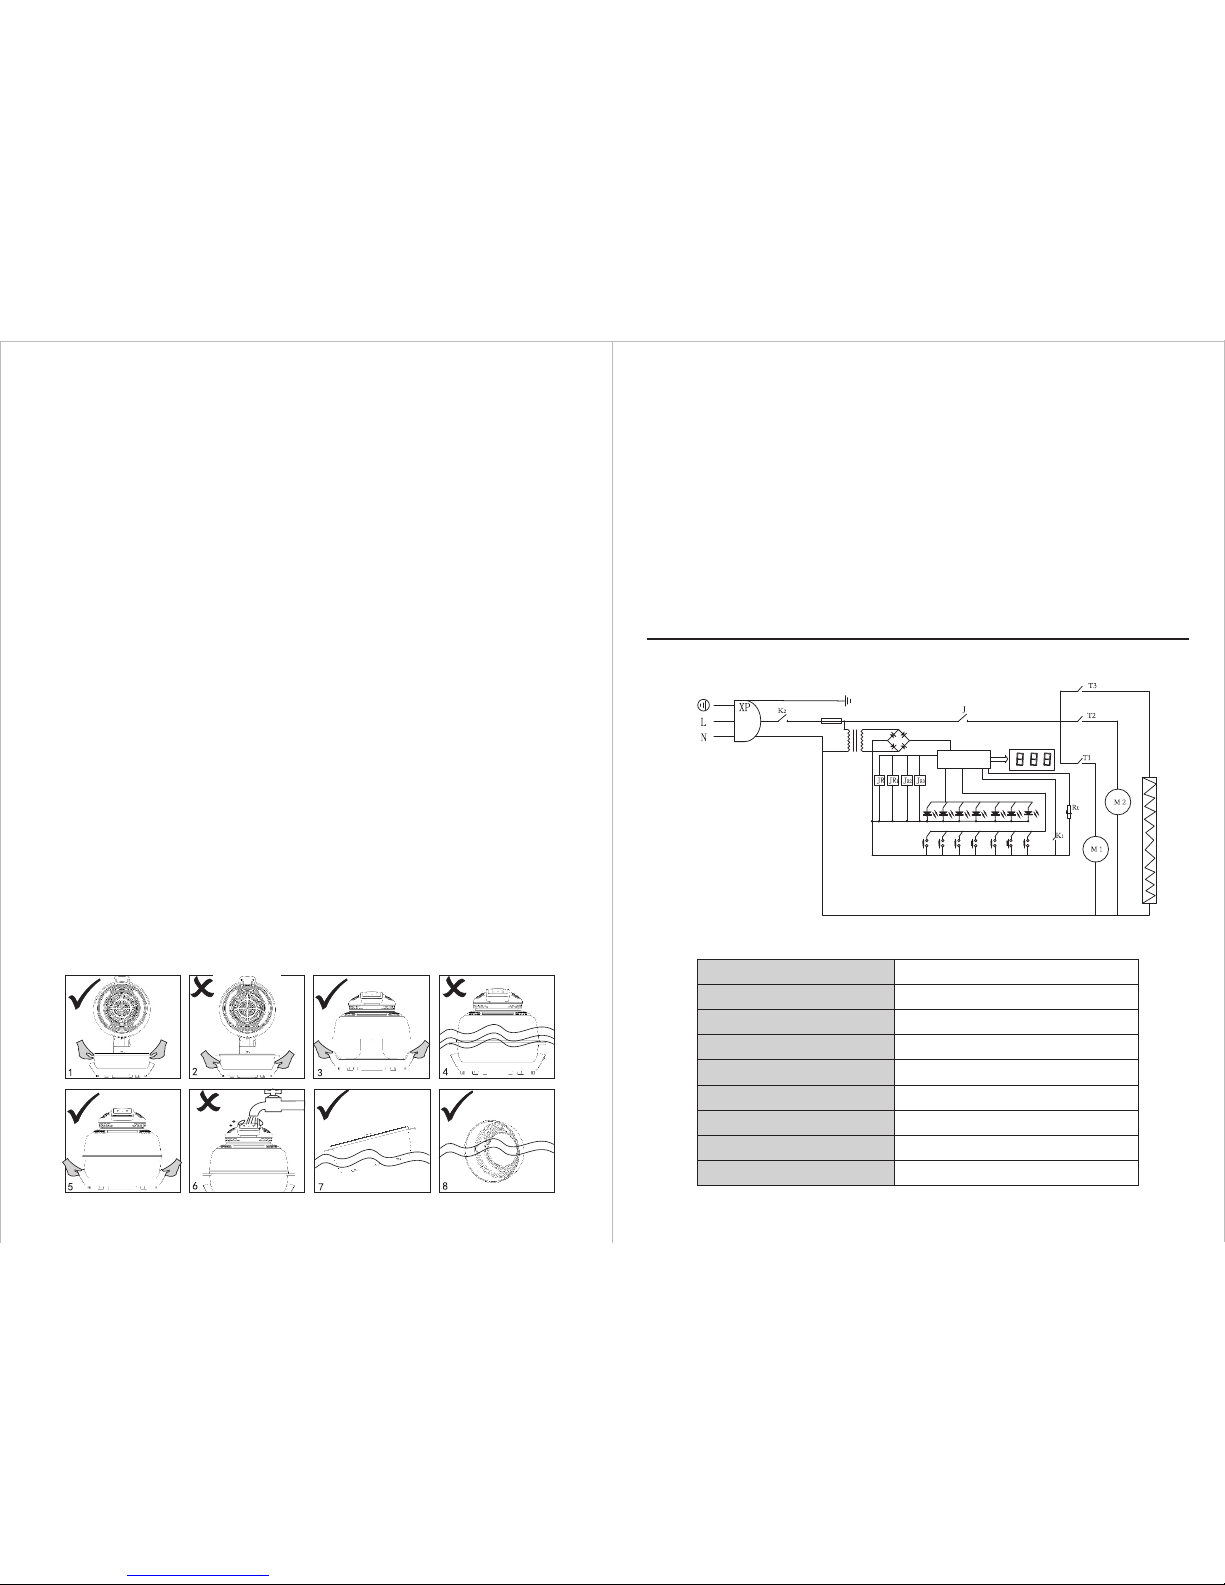
Circuit Digram
Technical parameters
AC220V~
Plug
Fuse
Controller
Heating element
Voltage
Frequency
Power
Temperature adjustment range
Time setting range
Products size(mm)
Inner pot size(mm)
Container capacity
Net weight
P. 02
使用前須知
1、請用乾淨的濕海綿或濕布清潔透明爐罩及爐盤之內鍋,並清洗乾淨所需的燒烤配件;
2、必須將透明爐罩放置在透明爐罩固定座規定的位置上;
3、必須將爐盤放置在爐座規定的位置上,若未放正確,產品不能通電工作;
4、將電源線插頭連接在本產品規定的使用電源插座上;
5、由於烘烤溫度由微電腦芯片控制,當溫度達到設定值時,光波加熱管停止加熱,加熱管
不亮,當溫度降至設定值時,光波加熱管通電加熱,加熱管發亮。在烹飪過程中加熱管
時亮時滅屬正常現象。
17. 請勿直接或間接加熱易燃易爆物品,以免燃燒著或爆炸,引
起危險;
18. 使用時請勿觸摸透明爐罩及爐蓋散熱孔,以免燙傷;
19 翻爐蓋時,請提翻蓋提手,烹飪結束翻爐蓋時,必須遠離面
部,以防蒸汽燙傷;
20 移動爐盤時,請提爐盤提手;
21. 請勿裝食物頂至爐蓋防護罩,適宜留2cm以上距離,以免影
響熱風循環及烹飪效果;
22. 烹飪結束後,取轉籠或高、低物架食物時,請用旋轉裝拆夾
或取物夾取出;也可待食物降溫後再提取,以免燙傷。
23. 使用過程中發現產品不能啟動或透明爐罩變形及其他異常現
象,請立即停止使用,待送公司售後維修服務中心維修合格
後,才可繼續使用。
24. 本產品不能通過外聯計時器或者獨立的遙控系統來工作。
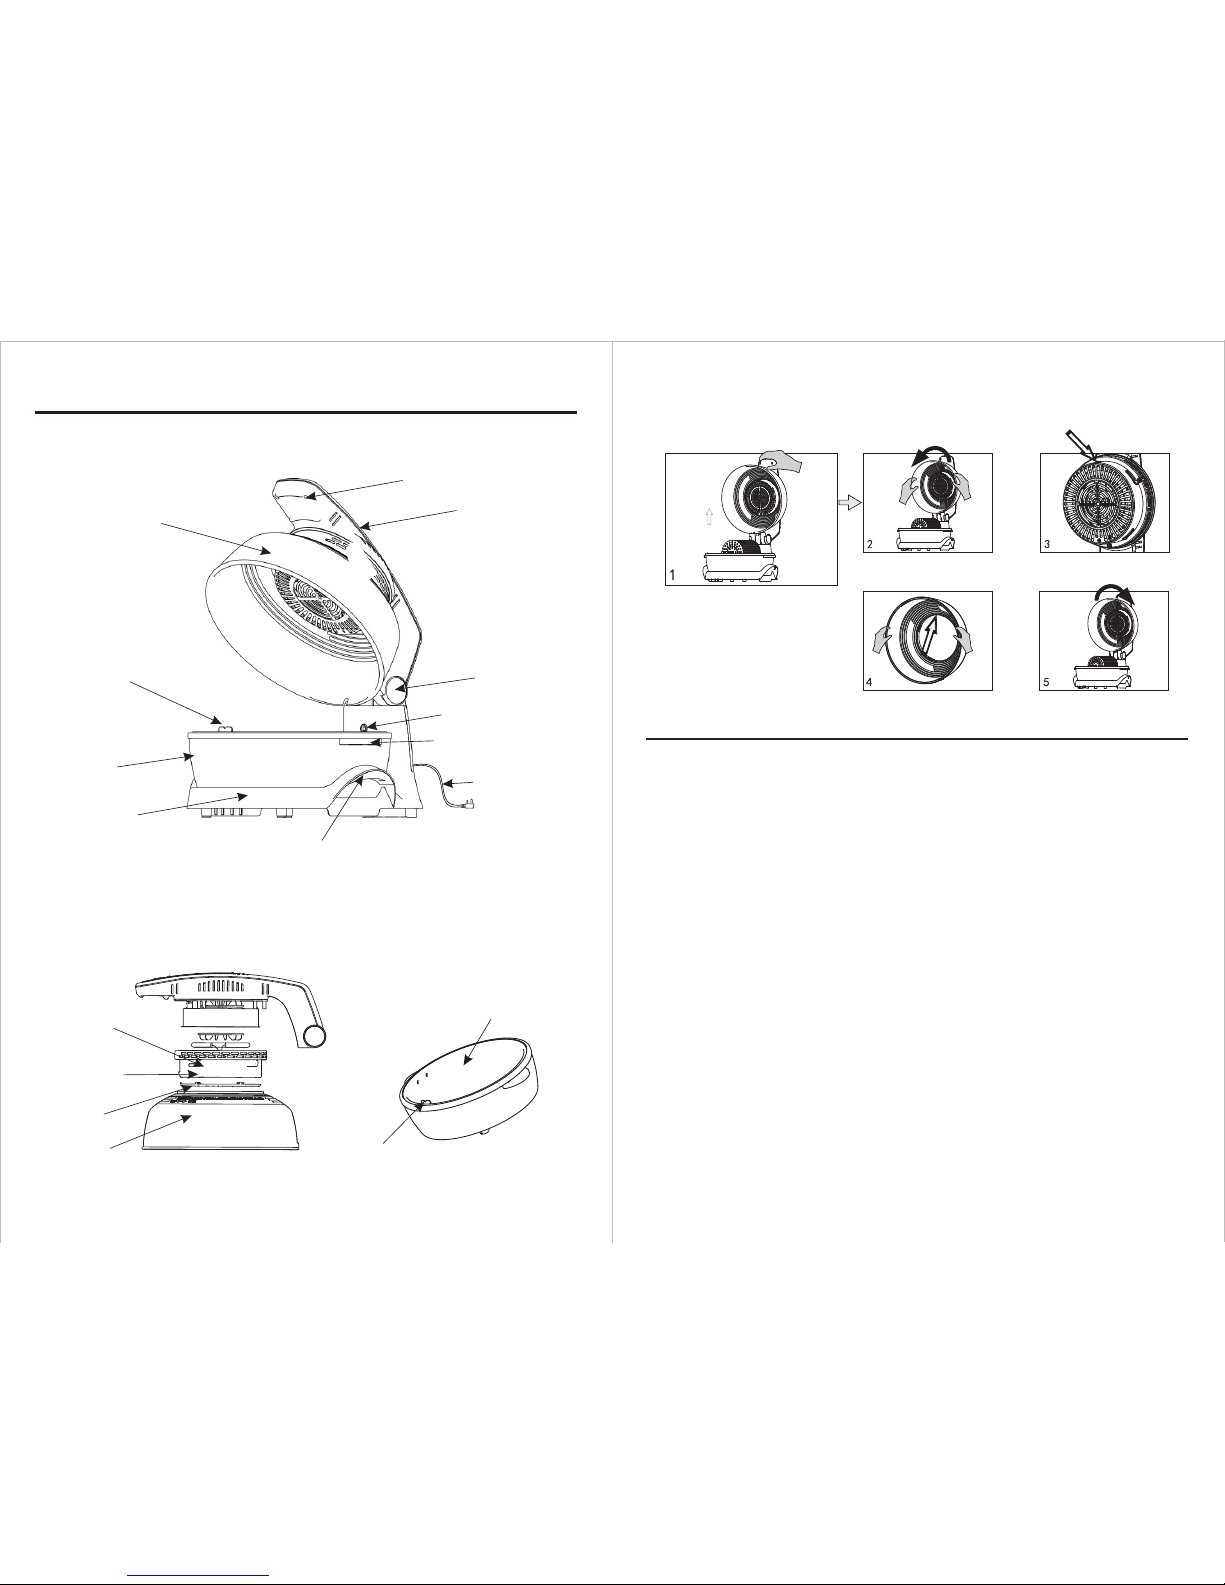
P. 03
熱旋風葉
產品結構及裝拆方法
產品結構
翻蓋提手
爐蓋
透明爐罩
翻蓋轉軸
旋轉軸支承孔
爐盤提手
電源線
爐座提手
爐座
爐盤
旋轉軸支架
熱旋系統拆解
環型光波管
散熱孔
防護罩
爐盤(內不粘鍋)
旋轉軸支架
P. 20
Operation Instruction
1. Place the inner pot on the exact position of the base as indicated on the previous page.
2. Open the oven cover, choose required accessory into the pot before food is filled. Make
sure to leave some space between food and the cover.
3. Close the oven cover.
4. Power on.
5. Standby Mode
The buzzer buzzes once and entire standby mode, the display screen shows “0:00”, all
indicator lights are off; buttons of all functions can be selected now.
6. Start/Cancel button
In state of standby mode, press this button, the product starts to work after the time,
temperature or a certain function has been set; If not in standby mode, pressing this key
can directly cancel the current position and return to the standby mode.
7. In state of standby model, pressing Function button can allow you to choose the following
functions from left to right in circulation: Free Menu, Chicken, Beef, Pork, Fries, Cake.
When the oven start working, press this button without any function.
8. Press “Function” button to choose your desire cooking, the indicator light start flashing,
press time “+” , “-” to set your desire cooking time (from 1min~119mins), then press
“temperature” button to set your desire cooking temperature (allowing you to choose the
following temperatures from left to right in circulation: 90°C, 130°C, 150°C,165°C,180°C,
195°C ), set the rotating function if necessary, press “rotatable button “knob to
set your desire function. Then you can press “Start / Cancel” button to begin cooking,
green indicator and menu indicator and temperature indicator light will always on, LED
screen will show the time you setting and will begin to count down.
9. Timer “+” / “-”:
In state of standby mode or cooking process, press “Time(+)” or “Time(-)” button, the
time will increase or decrease by minutes; long press on “Time(+)” or “Time(-)” button
allows the time to increase or decrease at pace of 10 minutes.
,205°C
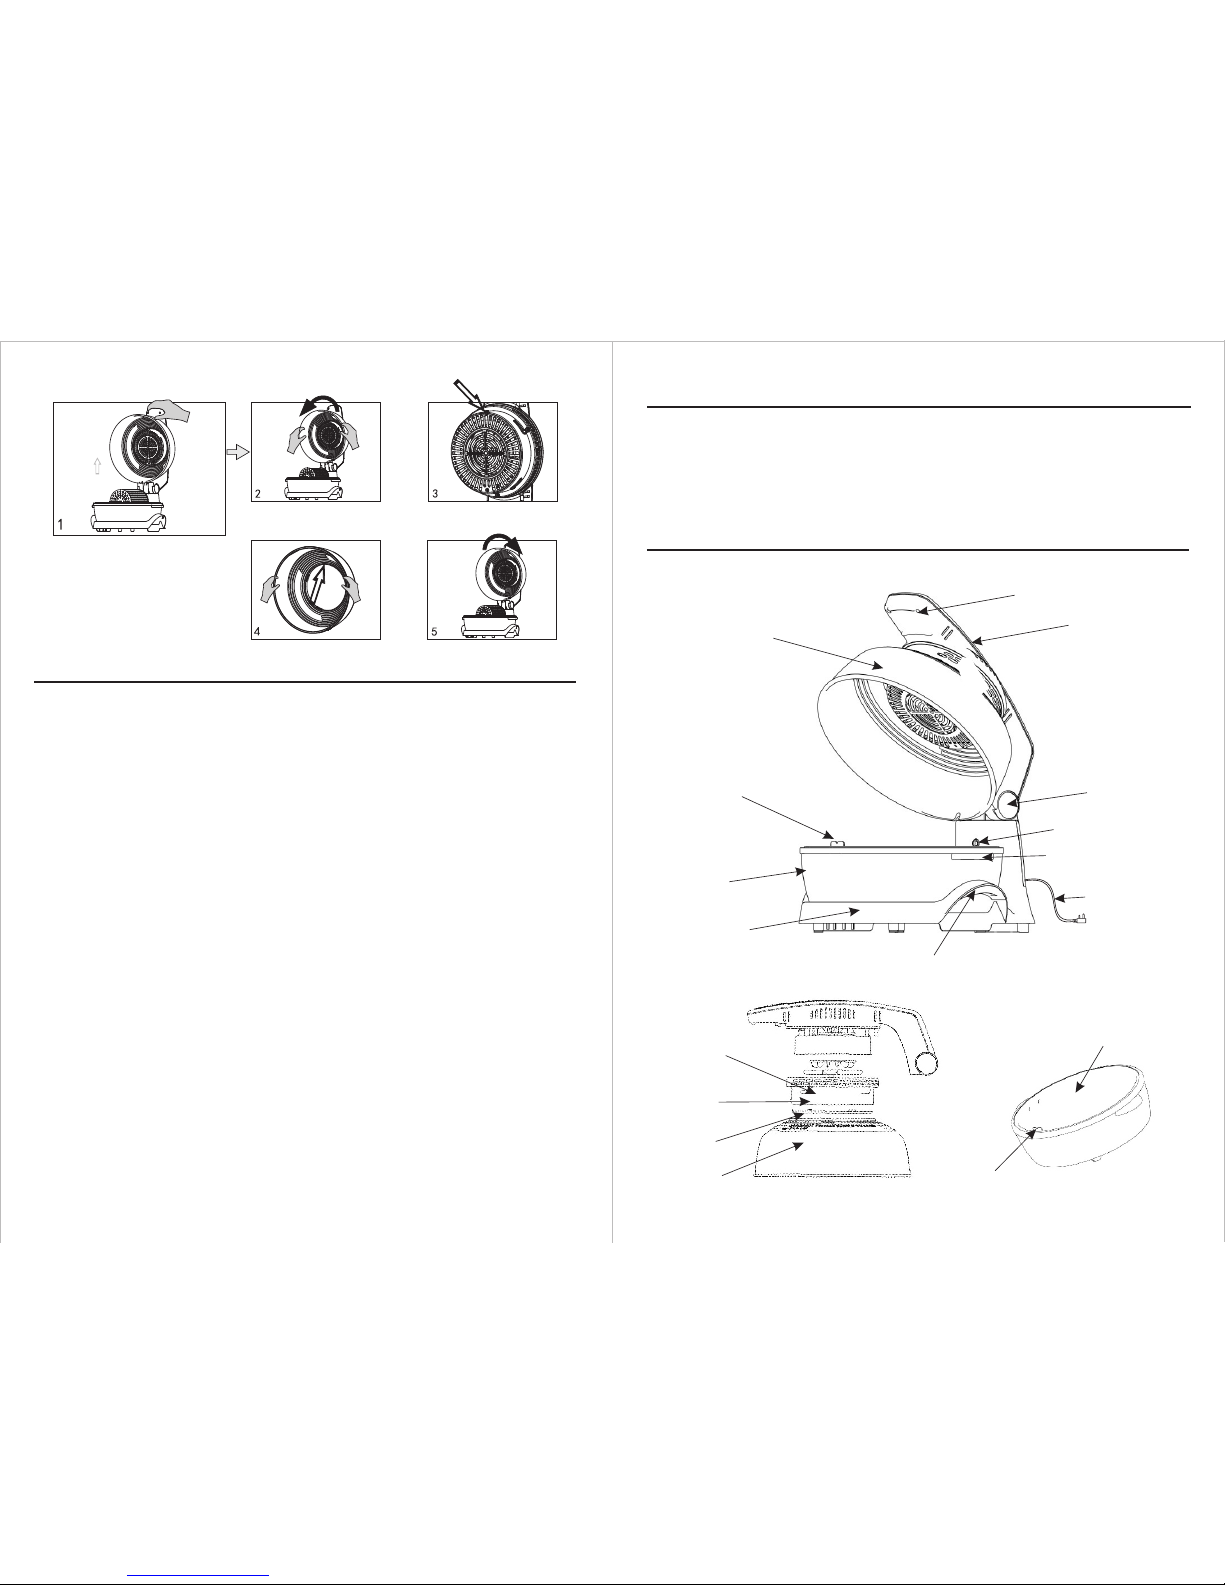
Install: hold the oven cover base edge by both hand, When cover groove (Figure 4) and
oven bump (Figure3) in the same level line, push the cover until reach cover oven base
(Figure5). Turn cover clockwise so far it fits on the oven.
P.19
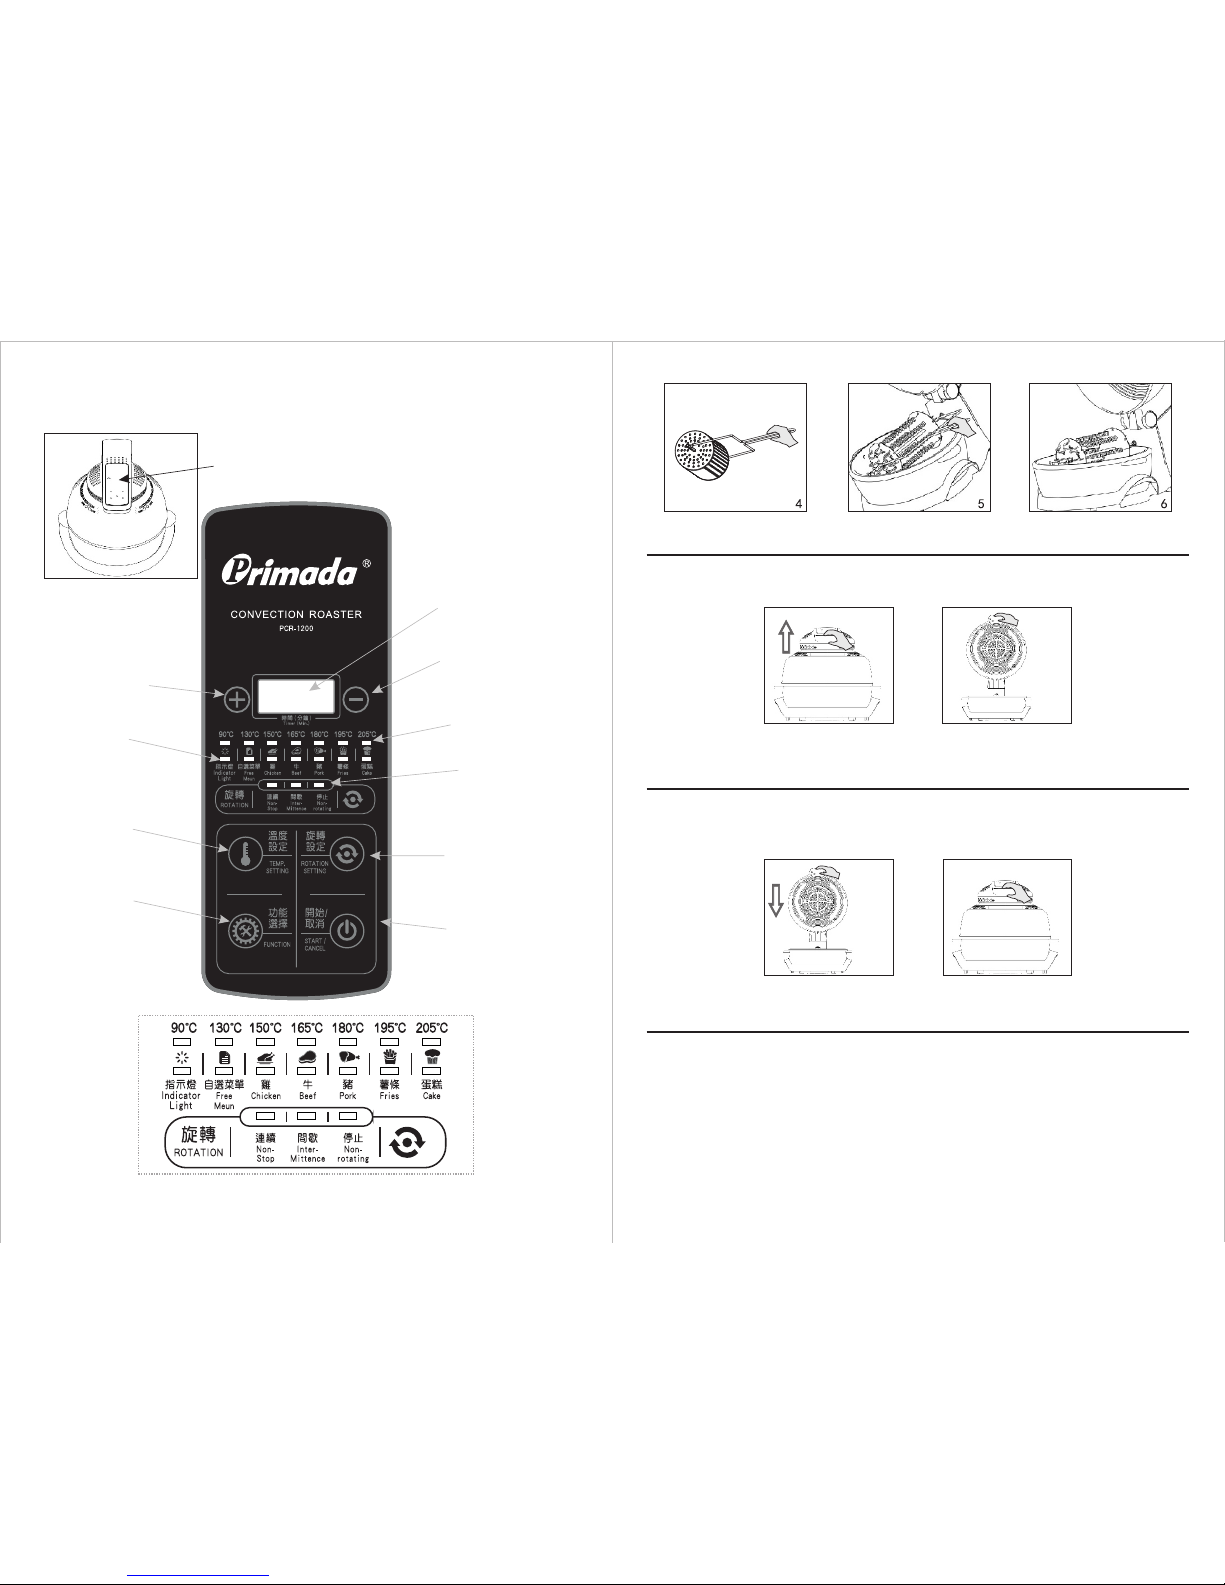
How to open the Lid
Open the Lid: Hold the handle, lift up upwardly as picture show.
How to close the Lid
Close the Lid: Hold the handle down until oven cover reach body.
Assembly Cover
When cleaning the Products, please according to assembly Oven cover step by step as
below.
Dismantle: Make sure the appliance have been complete cool when cleaning, turn over
the oven cover (Figure1), hold the oven cover base edge by both hand and anticlockwise
rotating it to 25 degree (Figure2) When cover groove (Figure 4) and oven bump (Figure3)
in the same level line, then pull the cover outwardly.
P. 04
產品結構
操作面板
時間設置加量
鍵(分鐘)
溫度選擇鍵(℃)
功能選擇鍵
時間顯示屏
時間設置減量鍵(分鐘)
溫度指示燈
功能指示燈
旋轉指示燈
旋轉控制鍵
啟動/取消鍵
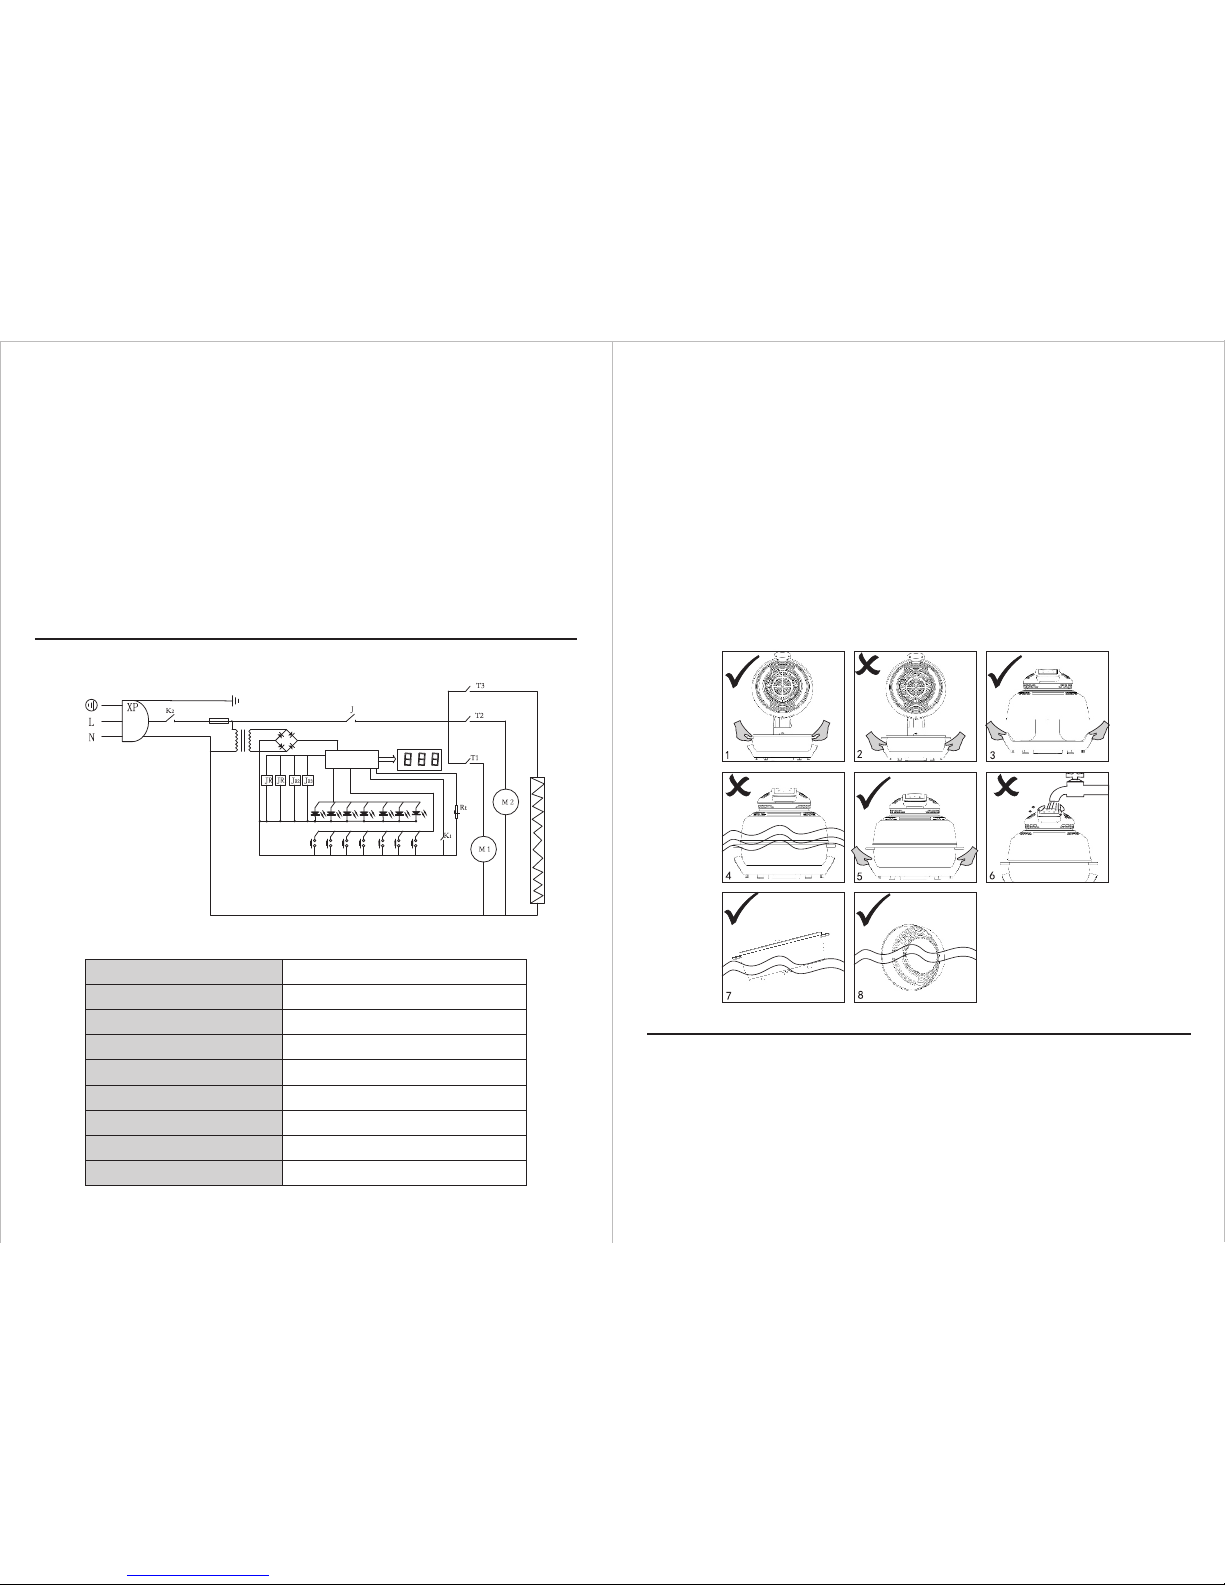
鍋體放置方法
當產品處於(見圖1)狀態時,用手握住翻蓋提手處朝上翻蓋,當產品處於(見圖2)狀態時,用
雙手握住鍋體扶手(見圖3),按(圖4)[注:箭頭處朝人體前方]所示水平放置在產品上(見圖5),
當聽到“咔”的一聲,代表已放置好(見圖6)
P. 05
配件
隨機配件
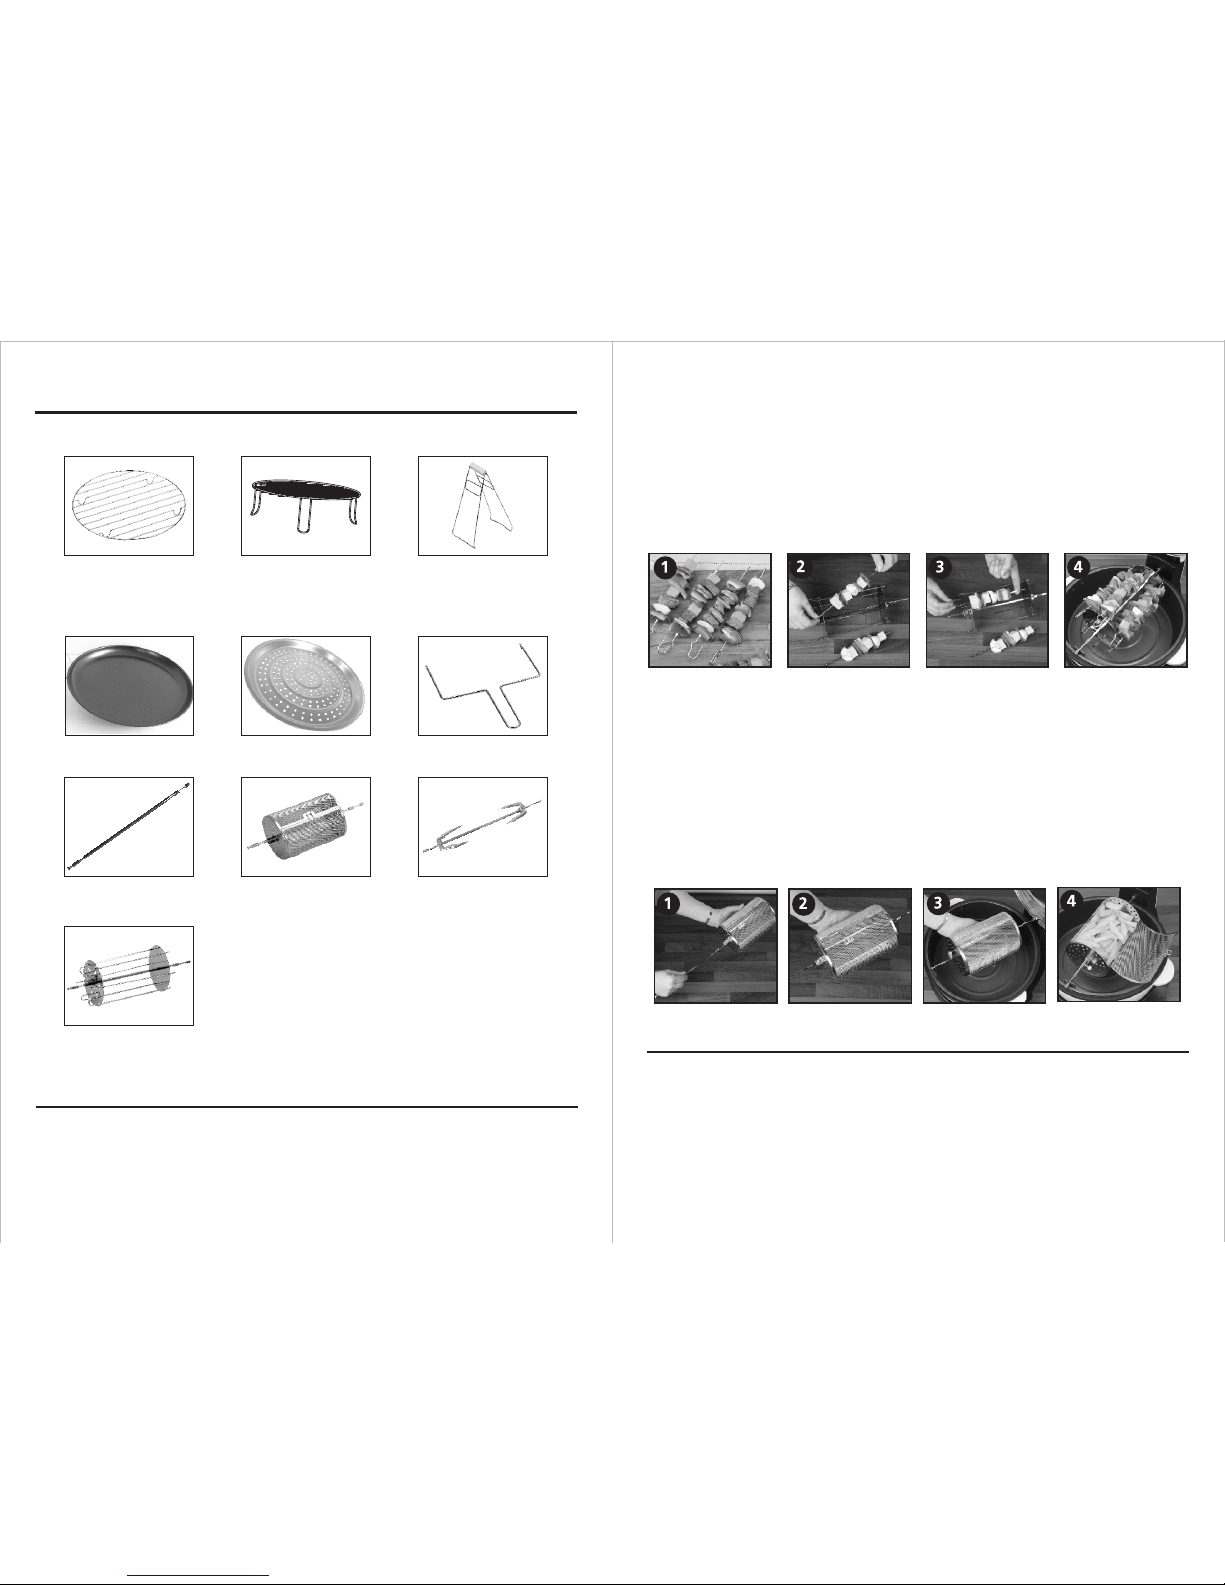
低物架 高物架 取物夾
煎盤 鋁蒸盤 旋轉裝拆夾
可選配件(需另外購買)
1 2 3
4 5 6
烤籠 烤雞叉
8 9
串燒架
10
旋轉軸(與配件圖
8,9,10並用)
7
Assembling the Skewer
P. 18
Assembling the Rotating Roast Cage
How to place accessories
(Figure1) a for rotating bracket, b for rotating sleeve; (Figure2) c for rotational axle side, d
for rotating sleeve side. (Figure3) rotating assembly clamp.
How to install: Hold the rotating clamp, make it perfect on rotational axle side (Figure 4),
according the direction as Figure 1 and Figure 2 to place the accessories on the products
(Figure5).
How to dismantle: Hold the rotating clamp, upwards rotational axle end (figure 4), remove
the rotating axle outwards slightly (Figure5), hold rotating assembly clamp and lift upwards.
1. Place the Rotating Roast Cage (8) on the Rotation Axle (7) and fix in position with the
two fixing screws.
2. Put the food into the cage and close it.
3. Do not overfill the Rotating Roast Cage allow for space for a sufficient degree of
movement of the chips when the drum is rotating to give even cooking.
4. Place the assembled Rotating Roast Cage in position on the main body of the cooker
making sure that the longer squared section at the end of the rod engages with the
drive hole on the main body of the Cooker. Place the shorter squared section on the
Rotating Axle Bracket.
1. Place one end of the Skewer (10) onto the Rotation Axle (7) and fix in place with fixing
screw.
2. Make up the Kebabs onto the six individual skewers.
3. Thread through the six made-up skewers onto the Skewer Rack.
4. Place the assembled Skewer in p osition on the main body of the cooker making sure
that the longer squared section at the end of the rod engages with the drive hole on
the main body of the Cooker. Place the shorter squared section on the Rotating Axle
Bracket.
P. 17
Assembling the Accessories
Assembling the Chicken Forks
配件安裝方法
烤雞叉使用方法
P. 06
串燒架使用方法
1. 串燒叉(配件10)固定架固定在旋轉軸(配件7)的兩端相應凹位上,並用螺絲鎖緊;
2. 將食物穿進串燒叉內;
3. 先將串燒叉尖端的一方穿進固定架圓孔內,然後將U形的一端套進另一端並推到尾部位
放好;
4. 將旋轉軸較長圓柱的一端放入旋轉軸支承孔,另一端放在爐盤上的旋轉軸支架上即可。
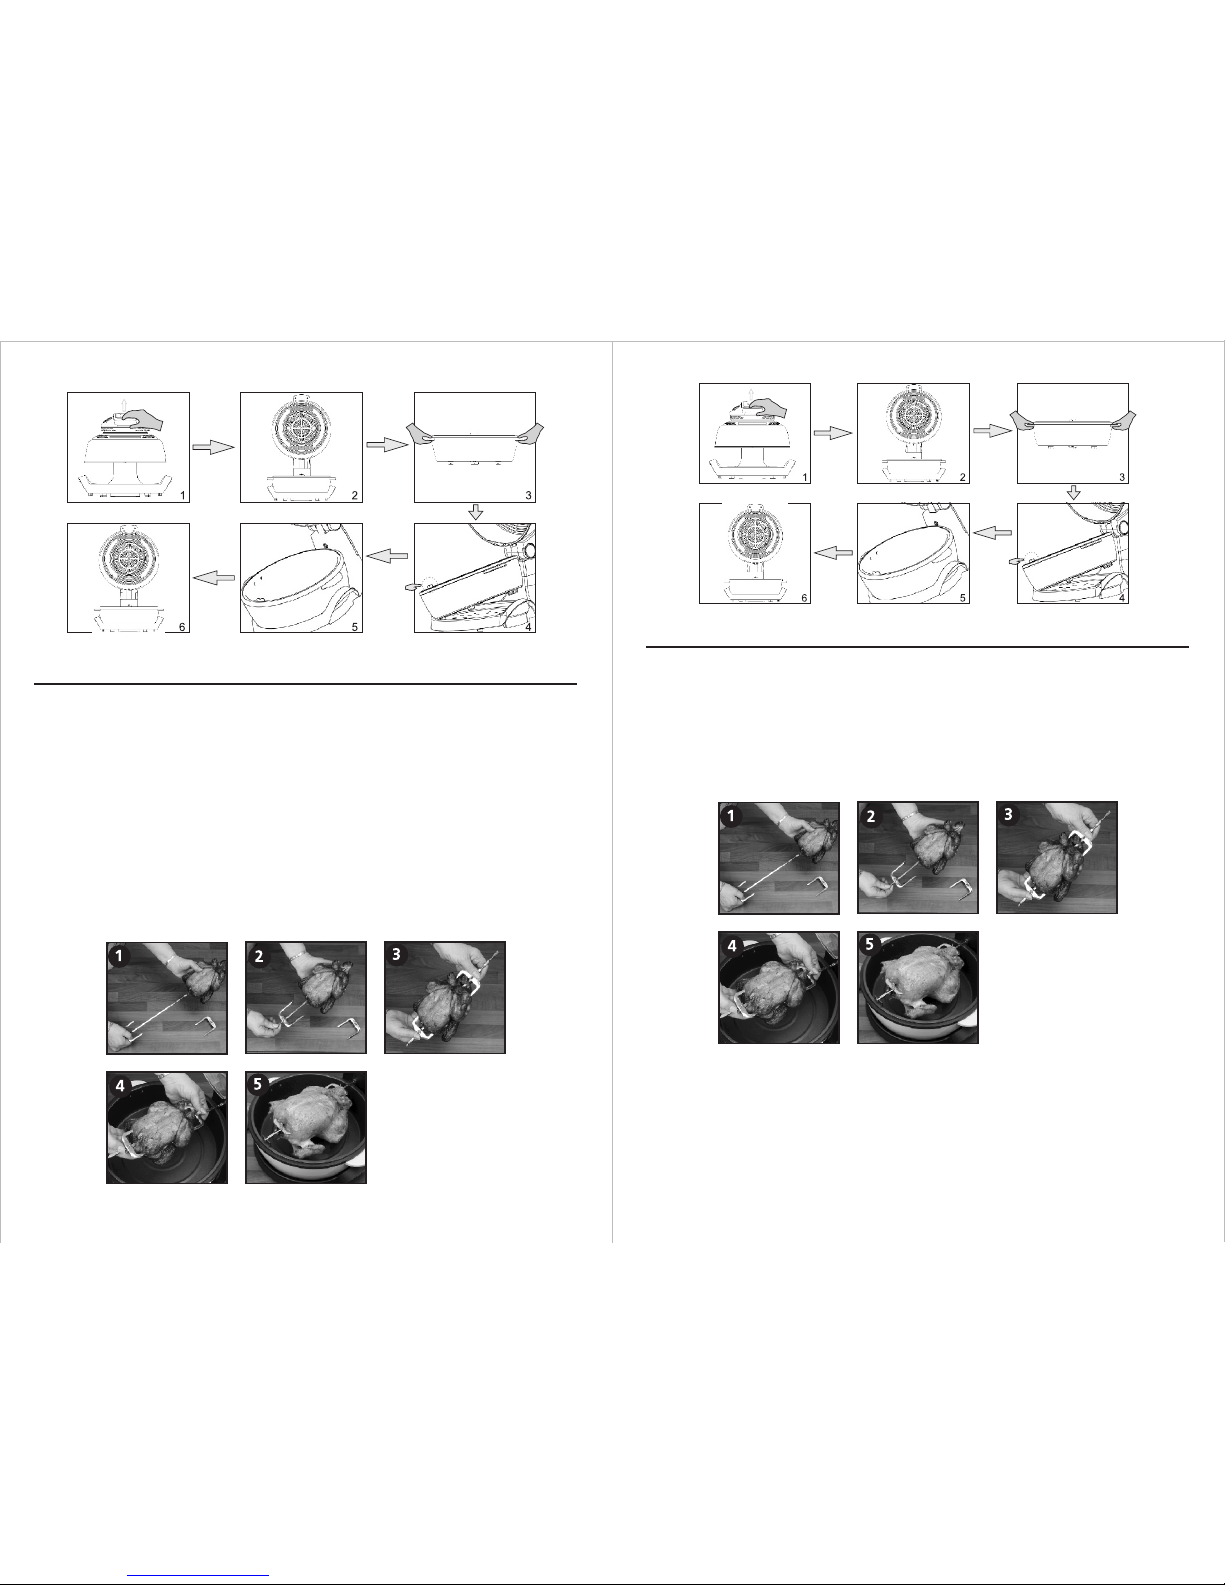
1. 將一個烤雞叉(配件9)套進旋轉軸(配件7)的一端並用螺絲固定在相應的凹位上;
2. 將旋轉軸穿過雞隻或食物,直至雞/食物被固定;
3. 將另一個烤雞叉(配件9)套進旋轉軸(配件7)直至能將雞/食物固定,並用螺絲固定好烤雞
叉;
4. 將旋轉軸較長圓柱的一端放入旋轉軸支承孔,另一端放在爐盤上的旋轉軸支架上即可;
注意: 請留意需預留足夠的空間讓食物旋轉。
1. Locate one of the Chicken Forks (9) onto the Rotation Axle (7) and screw down the fork
holding screw.
2. Push the spindle through the chicken or meat you wish to cook until the fork engages
with the food.
3. Place the Chicken Fork (9) onto the other end of the Rotation Axle (7) and push it along
the rod until it engages with the food and screw down the fixing screw on the fork to fix
in position.
4. Place the assembled Chicken Fork in position on the main body of the cooker making
sure that the longer squared section at the end of the rod engages with the drive hole on
the main body of the Cooker. Place the shorter squared section on the Rotating Axle
Bracket.
Caution: Always check that there is sufficient space top and bottom for the food to rotate
freely without causing an obstruction.

P. 07
烤籠使用方法
1. 將旋轉軸插入烤籠(配件8)並在相應的兩端凹位上用螺絲固定好;
2. 將食物放進烤籠(配件8)內並合上滾動門;
3. 注意食物不要放太多,以便預留足夠空間讓食物翻滾;
4. 將旋轉軸較長圓柱的一端放入旋轉軸支承孔,另一端放在爐盤上的旋轉軸支架上即可。
配件放置方法
(圖1)a為旋轉軸支架,b為旋轉套筒;(圖2)a為旋轉軸支架端,b為旋轉軸套筒端;(圖3)為旋
轉裝拆夾。
裝置方法:用手握住(圖3)旋轉裝拆夾手柄,旋轉裝拆夾箭頭處朝上如(圖3),按(圖1、圖2)所
示方向對應放置在產品上如(圖5),裝好後效果如(圖6)。
拆取方法:用手握住(圖3)旋轉裝拆夾手柄,旋轉裝拆夾箭頭處朝上如(圖4),按(圖5)所示,
先把旋轉軸往外輕移出一點,握住旋轉裝拆夾朝左上方拿起即可。
P. 16
Accessories:
low steam rack High steam rack clip
Optional Accessories
Rotating Assembly clamp
Aluminium steam plateFried pan
Standard accessories
1 2 3
4 5 6
Rotating Roast Cage Chicken Fork
8 9
Skewer
10
Rotation Axle (Use
with item 8, 9, 10)
7
How to place the pot
Place the base on the firm table surface (Figure1), hold the Hand to open Lid (Figure2),
tilted pot body (Figure1), hold handle by both hand (Figure3), set it as Figure 4 to put
body on products (Figure 5 & Figure 6), also you will heard a clear sound.
P. 15
Products Structure
Control Panel
Time setting(min)
Function selecting
button
Time Display screen
Time setting (min)
Function
indicator
Temperature
indicator
Start/Cancel button
Temperature
setting button (°C)
Synchronous
motor indicator
Synchronous Motor
Control button
P. 08
開爐蓋方法
開蓋:用手握住爐蓋提手,朝箭頭方向提起至爐座後端托位即可。
合蓋:用手握住爐蓋提手,朝箭頭方向拉下至透明爐罩與爐盤吻合即可。
合爐蓋方法
爐罩拆裝方法
當爐蓋在使用過程中,有油污需要清洗時,按以下方法裝拆爐蓋。
拆取方法:待設備完全冷卻後,翻開爐蓋如(圖1),用雙手握住爐蓋底部邊緣,逆時針方向
旋轉爐蓋至25度左右如(圖2),當爐蓋凹槽(圖4箭頭所指處)與爐頭凸點(圖3)在同一水平線
上時,往外拉取爐蓋即可。
裝置方法:拿起爐蓋,雙手握住爐蓋底部邊緣(圖4),當爐蓋凹槽(圖4)與爐頭凸點(圖3)在同
一水平線上時,稍用力往裏推爐蓋至爐頭底部(圖5)。順時針方向旋轉爐蓋至爐頭不能再旋轉
狀態即可。
P. 09
烘烤食物操作方法
→ →
→ →
1. 把鍋體按前頁示意圖所示方向放置在底座上,或檢查鍋體有無按示意圖放置。
2. 翻開爐頭,根據需要選用配件放置食物至鍋體內。注意:食物與蓋子之間要保留一定的空
間。
3. 蓋上爐頭。
4. 連接電源。
5. 待機:
通電蜂鳴器響一聲後,進入待機狀態,顯示屏顯示“0:00”,轉軸停止指示燈長亮其它所
有指示燈熄滅,此時可操作各類按鍵。
6. 啟動/清除鍵:
在待機狀態下,按鍵設置好工作時間、溫度或選擇了某一功能按此鍵直接進入工作;任何
非待機狀態按此鍵,直接取消當前設置回到待機狀態。
7. 功能鍵:
在待機狀態中按此鍵首選菜單指示燈閃亮,再按則從左到右為自選菜單
如此循環顯示;長按此鍵不能前進選擇;啟動工作後按此鍵無效。
8. 當選擇自選菜單功能時,自選菜單指示燈閃亮,此時按時間“+”,“-”鍵可從1分鐘-1
小時59分鐘範圍內調整工作時間,按“溫度”鍵可在“90℃、130℃、150℃、
180℃、195℃、205℃ ”循環選擇烹飪溫度,調節了時間和溫度後按“開始”鍵
可以按照所選菜單工作時間及溫度啟動工作,工作指示燈綠燈長亮,自選菜單指示長亮,
所選溫度指示燈長亮,數碼顯示當前設置的工作時間並開始倒計時,轉軸“ ”指示
燈長亮,若要同時設置轉抽功能則設置好以上狀態(時間和溫度)後按“旋轉”鍵可在“連
續 間歇 停止”三種轉動狀態下循環選擇,菜單時間、溫度、轉抽工作方式都設置
好後按“開始”鍵,則系統開始按照所設置的狀態啟動工作,工作指示燈、自選菜單及
溫度和設置的轉軸狀態指示燈長亮,數碼顯示當前設置的工作時間並開始倒計時。
9. 時間+/-:
待機狀態或烹製工作中按此鍵則以分鐘為單位遞加減。長按此鍵則以10分鐘為單位遞加
減。
雞 牛 豬
薯條 蛋糕
165℃、
、90℃
連續
→
→ →
P. 14
Product Illustrate
Products Structure
Heating system
Transparent Cover
Handle
Plastic Head Cover
Open Lid Axle
Rotating sleeve
Body Handle
Base handle
Power cord
Base
Body
Rotating Axle Bracket
Body(With non-stick inner pot)
Rotating Axle bracket
Hot air fan
Halogen
Louver
Protection Cover
Before Use
1. Clean the inner pot with clean wet sponge, and clean the cooking accessories.
2. Assembly the transparent cover on product.
3. Place inner pot body on base, electric cannot connected when it not in designed position.
4. Plug the power cord.
5. When the product reaches the preset temperature the infra-red light will go out and will
come on again when the product drops below the preset temperature. The infra-red light
will cycle On and Off throughout the product process maintaining the preset temperature
you have selected.
P. 13 P. 10
10. 溫度:
在任意狀態均可按此鍵進行調整溫度,按此鍵可從左到右循環選擇以下溫度功能:90℃、
,長按此鍵不能前進選擇;啟
動工作後按此鍵無效。
11. 旋轉鍵:
在任意狀態均可按此鍵可進行轉軸工作方式在連續、間歇、停止之間循環調節,長按
此鍵無效。需在烤食品時添加配料時,可翻開爐頭,進行加料工作,旋轉鍵不受翻開
爐頭斷電保護。覆蓋繼續按原有設定工作。
130℃、150℃、165℃、180℃、195℃、205℃、90℃
注:間歇(當燒烤食物只需烤食物正反面時,可選擇此功能,當旋轉至正(反)面時,停止旋
轉,烤15秒後,開始旋轉,旋轉至反(正)面時再停止旋轉烤15秒。重複以上二個旋轉動作,
直至設定食物燒烤時間結束。
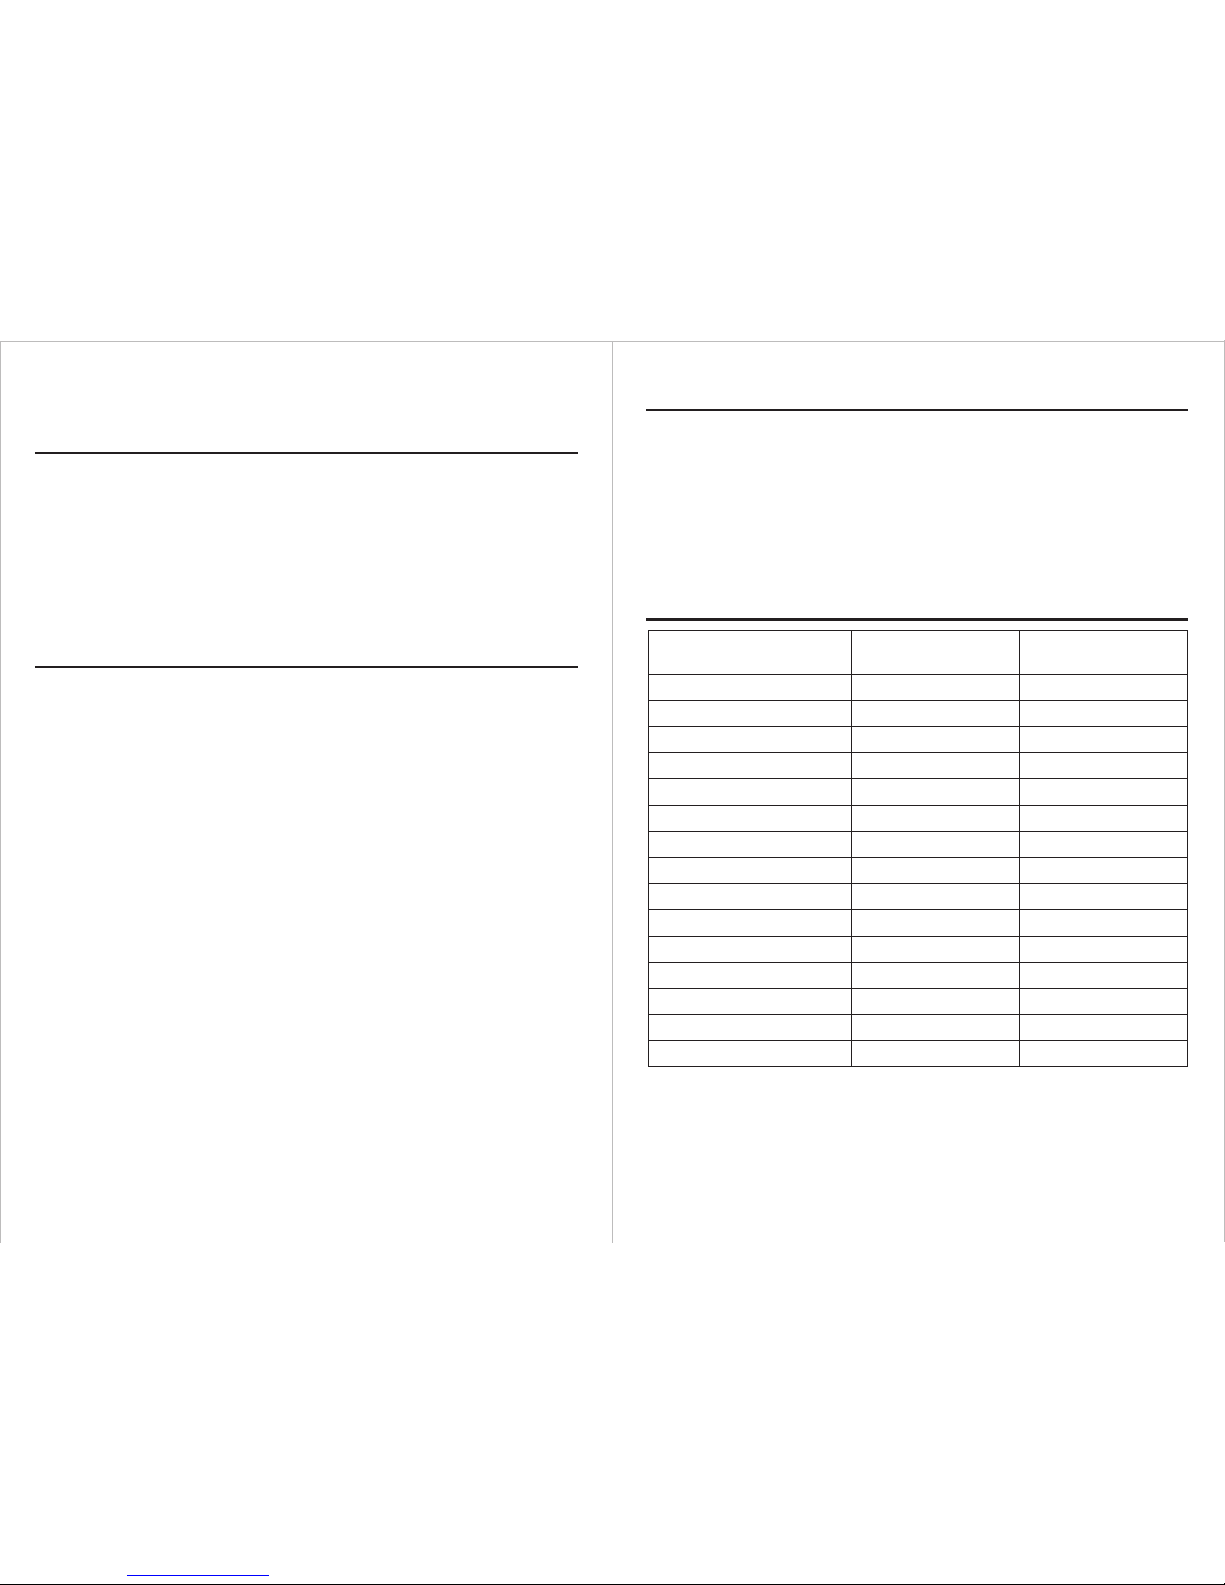
產品技術參數及電氣原理圖
電氣原理圖
AC220V~
插頭
熱熔斷器
控制器
鹵素管
Fuse
技術參數
220V
50Hz
1200W
90°C-205°C
0-119(MIN)
444(W) X 401(D) X 353.5(H)
325(W) X 325(D) X 90(H)
14L
4.5KG
電壓
頻率
功率
溫度設置範圍
時間設置範圍
產品尺寸(mm)
爐盤尺寸(mm)
容量
淨重
13. This appliance is intended to be used in household and similar applications such as:
- staff kitchen areas in shops, offices and other working environments;
- farm houses;
- by clients in hotels, motels and other residential type environments;
- bed and breakfast type environments.
14. To protect against electric shock, DO NOT immerse the cable, plug or the product main
body heater/control assembly in water or any other liquid.
15. Do not operate the product if the power cord, plug or product is damaged or if the product
has been dropped or has malfunctioned. If the main cord is damaged it must only be
replaced by the manufacturer or their service representative, as special tools are required.
16. To avoid risk of electric shock do not dismantle the product control/assembly. Any repairs
must be carried out by the manufacturer of their service representative.
17. Do not heat explosive materials directly or indirectly by product, to avoid burning or
explosion.
18. Do not touch transparent cover and lid louver, to prevent being scalded.
19. Always remove oven cover away from you so the escaping steam is channeled away
from your face after you cooking.
20. Please use the handle when moving the inner body.
21. Do not place food up to the lid, leave at least 2cm of space, that may result heating cycle
system and cooking problem, 2cm distance is suitable.
22. After finish cooking, please use clamp to serve food when using rotating cage or inner
rack or high rack. Or serve food wait for until food in a lower temperature to prevent being
scalded.
23. please stop using when product cannot start or transparent cover deforms or the appliance
does not perform normally, also please contact after service center.
24. The appliances are not intended to be operated by means of an external timer or separate
remote-control system.

P. 11
參考食譜
設置時間(min) 設置溫度 (℃)
食物
串燒
雞
魚
豬肉
蛋糕
龍蝦
小蝦
香腸
花生
烤面包
馬鈴薯
大米
螃蟹
薯條
雞亦
30
10-15
15-20
10-12
12-15
10-12
10-13
10-15
8-10
15-20
15-20
10-13
20
35
15-18
185-195
135-150
185-195
150-165
135-165
150-185
120-150
135-165
120-150
185-195
150-180
135-165
185-195
185-195
185-195
清潔方法
1. 清潔產品前先拔下電源,待機件完全冷卻後方可進行;
2. 清潔爐頭表面及爐罩時,請使用溫軟布或濕海綿抹拭,不可用水直接沖洗;
3. 清潔爐蓋時,如有需要拆下清潔,可按“爐蓋裝拆方法”進行裝拆。
4. 清潔內鍋、配件、爐蓋時,可用含溫和洗潔精的水進行清潔,但不可在高溫進行;
Product feature and characteristic
1. Cool to touch.
2. Lid protection, Fuse protection, Micro-switch protection.
3. Multiple safety protection devices to ensure safety use.
4. No lampblack during cooking, environmental and clean.
5. Convenient to add barbecue sauce during cooking.
6. Unique Intelligent system to grill fish, steak and other flat shape food.
7. Lid and base can be separated ,more convenient.
8. Removable Cover with humanity designed ,cleaning easier.
P. 12
Important safeguards
Read and follow the warning and instructions in this manual carefully before and
during the use of product:
1. Before switching on the Rotatable Convection Roaster, ensure that the voltage indicated
on the rating label is the same as that in your home.
2. This product is intended for household use only, it is not intended for commercial or
industrial use.
3. Ensure the product is placed on a flat stable, dry heat-resistant surface when in operation.
4. Do not allow the power cord to come into contact with warm parts of the appliance or
any other hot surface.
5. We do not recommend the use of extension power cord with this appliance.
6. To disconnect from the electricity supply, grip the plug and pull the plug from the wall
outlet socket. Never pull on the cord.
7. Do not place the product on or near a heated cooker or a hot gas or electric burner.
8. Do not operate the product under a wall cupboard, shelves or other overhanging objects
or near flammable materials such as blinds, curtains or wall hangings.
9. Do not operate the product in the presence of explosive and/or flammable fumes such
as petrol or kerosine.
10. Do no use any other accessories or attachments not recommended by the manufacturer
with the product.
11. Do not leave the product operating without supervision.
12. This appliance can be used by children aged from 8 years and above and persons with
reduced physical, sensory or mental capabilities or lack of experience and knowledge if
they have been given supervision or instruction concerning use of the appliance in a safe
way and understand the hazards involved. Children shall not play with the appliance.
Cleaning and user maintenance shall not be made by children unless they are older than
8 and supervised.
Keep the appliance and its cord out of reach of children less than 8 years.
Thanks for choosing Primada Rotatable Convection Roaster. Please read this user
manual carefully before using.
Other manuals for PCR-1200
1
Table of contents
Other Primada Kitchen Appliance manuals


