Primes Cube M User manual
Revision 12 EN - 03/2023
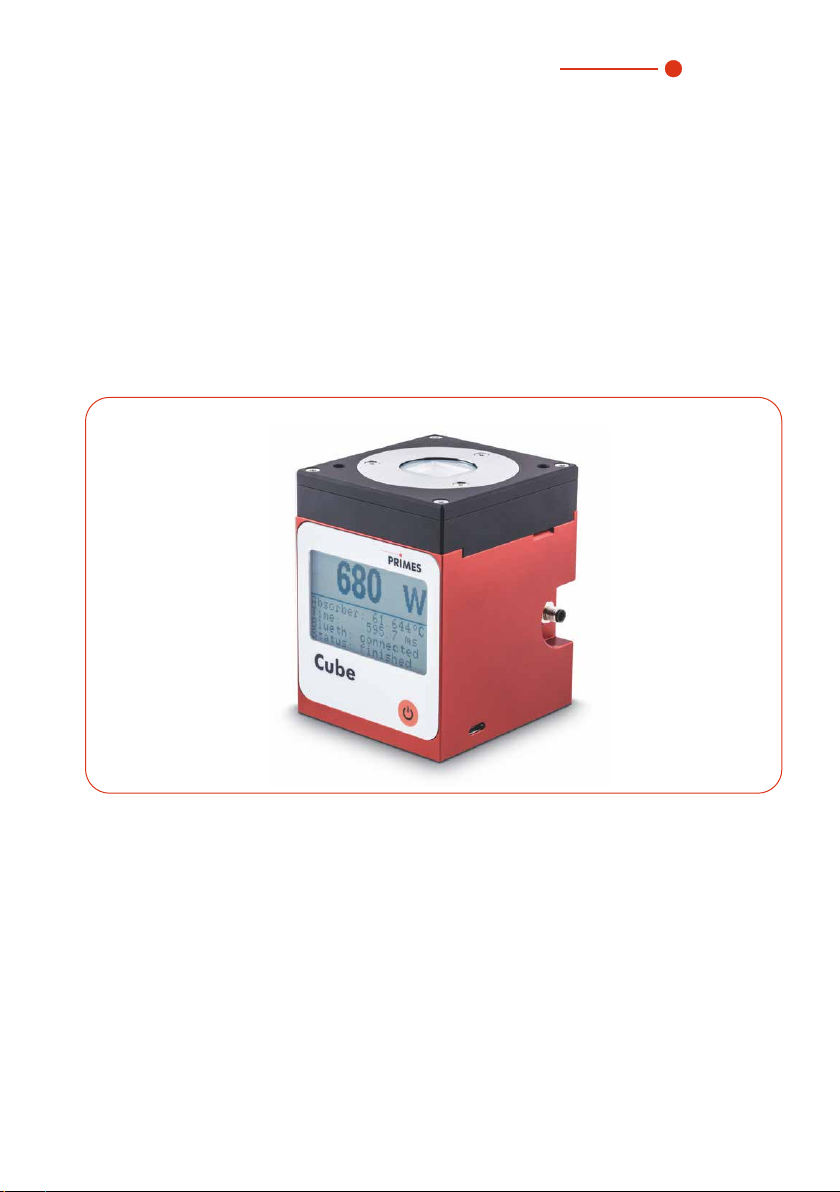
Cube M
CubeMA with advanced absorber
LaserDiagnosticsSoftware LDS
Cube App
Original Instructions
35,0(6


35,0(6
3
Cube M
Revision 12 EN - 03/2023
IMPORTANT!
READ CAREFULLY BEFORE USE.
KEEP FOR FUTURE USE.

35,0(6
4
Cube M
Revision 12 EN - 03/2023
Table of contents
1 Basic safety notes 8
2 Icons and conventions 10
3 About this operating manual 12
4 Device description 13
4.1 Functional description .......................................................................... 13
4.2 Measuring principle.............................................................................. 13
4.3 Functions of the On/Off button............................................................. 14
4.4 Optical display ..................................................................................... 14
4.4.1 Status messages.................................................................... 14
4.4.2 Warning message................................................................... 15
4.5 Scope of delivery and optional accessories.......................................... 15
4.6 Important notes on the lithium-ion battery ............................................ 15
4.6.1 Charging the lithium-ion battery.............................................. 16
4.6.2 Storing the device with a permanently installed lithium-ion
battery.................................................................................... 16
4.6.3 Dangers to health and the environment in the event of damage
to the lithium-ion battery......................................................... 16
4.6.4 Charge status of the lithium-ion battery .................................. 16
5 Transport and storage 17
5.1 Warning messages .............................................................................. 17
5.2 Shipping the device with permanently installed battery......................... 17
6 Install LaserDiagnosticsSoftware LDS 18
7 Mounting 19
7.1 Conditions at the installation site .......................................................... 19
7.2 Installation in the laser system.............................................................. 19
7.2.1 Prepare mounting................................................................... 19

35,0(6
5
Cube M
Revision 12 EN - 03/2023
7.2.2 Possible mounting positions................................................... 19
7.2.3 Align the device...................................................................... 19
7.2.4 Align the device centrally using the alignment tool .................. 22
7.2.5 Mount the device.................................................................... 23
7.3 Removal from the laser system ............................................................ 24
8 Connections 25
8.1 Overview of connections...................................................................... 25
8.2 Micro-USB port.................................................................................... 25
8.2.1 PRIMES USB driver................................................................ 25
8.2.2 Install the USB driver manually ............................................... 26
8.3 Bluetooth®.......................................................................................... 27
8.3.1 Recommended Bluetooth®dongle and Bluetooth®
specifications ......................................................................... 27
8.3.2 Activate Bluetooth®on the PC (Windows® 10) ........................ 27
8.3.3 Connect device to PC via Bluetooth® (Windows® 10) .............. 27
8.4 Safety interlock .................................................................................... 28
9 Laser parameter setting 30
9.1 Setting the laser rise time..................................................................... 30
9.2 Maximum permissible power density.................................................... 31
9.3 Minimum and maximum energy input per measurement ...................... 32
9.4 Waiting times until the next measurement in serial measurements........ 33
9.5 Measurement with pulsed lasers .......................................................... 34
10 Measure 35
10.1 Warning messages .............................................................................. 35
10.2 Measuring with the CubeM ................................................................. 37
10.2.1 Start measurement................................................................. 37
10.2.2 Display of measurement results .............................................. 39
10.3 Measuring with the optional LaserDiagnosticsSoftware LDS ................ 40

35,0(6
6
Cube M
Revision 12 EN - 03/2023
10.3.1 Connect/disconnect the device with the LDS ......................... 40
10.3.2 Open toolbench Cube Measurement...................................... 42
10.3.3 Settings in the device control.................................................. 43
10.3.4 Start measurement................................................................. 46
10.3.5 Measuring results display ....................................................... 47
10.3.6 Delete measurements from the memory of the CubeM.......... 52
10.4 Measuring with the optional Cube App................................................. 52
11 Troubleshooting 53
11.1 Messages in the LaserDiagnosticsSoftware LDS during measurement. 53
11.2 Connection failure with the LDS ........................................................... 55
11.3 Other errors ......................................................................................... 55
12 Maintenance and service 58
12.1 Maintenance intervals .......................................................................... 58
12.2 Cleaning .............................................................................................. 58
12.2.1 Cleaning the device surface.................................................... 58
12.2.2 Cleaning the protective window.............................................. 58
12.3 Exchanging the protective window on the device................................. 59
12.3.1 Warning messages................................................................. 60
12.3.2 Exchanging the protective window ......................................... 61
13 Measures for the product disposal 62
14 Declaration of conformity 63
15 Technical data 65
16 Dimensions 67
17 Appendix 69
A GNU GPL license notice ...................................................................... 69

35,0(6
7
Cube M
Revision 12 EN - 03/2023
PRIMES - the company
PRIMES is a manufacturer of measuring devices which are used to analyze laser
beams. These devices are employed for the diagnostics of high-power lasers rang-
ing from CO2-, fiber- and solid-state lasers to diode lasers. A wavelength range from
infrared through to near UV is covered, offering a wide variety of measuring devices to
determine the following beam parameters:
• Laser power
• Beam dimensions and position of an unfocused beam
• Beam dimensions and position of a focused beam
• Beam quality factor M²
Development, production and calibration of the measuring devices is performed at
PRIMES. This guarantees optimum quality, excellent service, and a short reaction time,
providing the basis for us to meet all of our customers’ requirements quickly and reliably.
PRIMES GmbH
Max-Planck-Str. 2
64319 Pfungstadt
Germany
Tel +49 6157 9878-0
www.primes.de

35,0(6
8
Cube M
Revision 12 EN - 03/2023
1 Basic safety notes
Intended use
The device has been designed exclusively for measurements in the beam of high-power
lasers.
Use for any other purpose is considered as not intended and is strictly prohibited.
Furthermore, intended use requires that you observe all information, instructions, safety
notes and warning messages in this operating manual. The specifications given in chap-
ter15 „Technical data“ on page65 apply. Any given limit values must be complied
with.
If not used as intended, the device or the system in which the device is installed can be
damaged or destroyed. In addition, there is an increased risk to health and life. Only use
the device in such a way that there is no risk of injury.
This operating manual is an integral part of the device and must be kept in the immedi-
ate vicinity of the place of use, accessible to personnel at all times.
Every person who is responsible for the installation, start-up or operation of the device
must have read and understood the operating manual and, in particular, the safety
instructions.
If you still have questions after reading this operating manual, please contact PRIMES or
your supplier for your own safety.
Observing applicable safety regulations
Observe the safety-relevant laws, guidelines, standards and regulations in the current
editions published by the state, standardization organizations, professional associations,
etc. In particular, observe the regulations on laser safety and comply with their require-
ments.
Necessary safety measures
The device measures direct laser radiation, but does not emit any radiation itself. How-
ever, during the measurement the laser beam is directed at the device. This produces
scattered or directed reflection of the laser beam (laser class 4). The reflected beam is
usually not visible.

35,0(6
9
Cube M
Revision 12 EN - 03/2023
Protect yourself from direct and reflected laser radiation while working with the device
by taking the following measures:
• Never leave the device unattended when taking measurements.
• Wear safety goggles adapted to the power, power density, laser wavelength and
operating mode of the laser beam source in use.
• Wear suitable protective clothing or protective gloves if necessary.
• If possible, also protect yourself from direct laser radiation and scattered radiation
by using separating protective devices that block or attenuate the radiation.
• If the device is moved from its aligned position, increased scattered or directed
reflection of the laser beam occurs during measuring operation. Mount the device
in such a way that it cannot be moved unintentionally, i.e. by bumping or pulling
the cables
• Connect the laser control’s safety interlock to the device. Check that the safety
interlock will switch off the laser properly in case of error.
• Install safety switches or emergency safety mechanisms that allow the laser to be
switched off immediately.
• Use suitable beam guidance and beam absorber elements which do not emit any
hazardous substances when irradiated.
Employing qualified personnel
The device may only be operated by qualified personnel. The qualified personnel must
have been instructed in the installation and operation of the device and must have a
basic understanding of working with high-power lasers, beam guiding systems and
focusing units.
Conversions and modifications
The device may not be modified in terms of design or safety without the explicit consent
of the manufacturer. The same applies to unauthorized opening, dismantling and repair.
The removal of covers is only permitted within the scope of the intended use.
Liability disclaimer
Manufacturer and distributor exclude any liability for damages and injuries which are
direct or indirect consequences of using the device not as intended or modifying the
device or the associated software without authorization.

35,0(6
10
Cube M
Revision 12 EN - 03/2023
2 Icons and conventions
Warning messages
The following icons and signal words indicate possible residual risks in the form of warn-
ings:
DANGER
Means that death or serious physical injuries will occur if necessary safety
precautions are not taken.
WARNING
Means that death or serious physical injuries can occur if necessary safety
precautions are not taken.
CAUTION
Means that a slight physical injury can occur if necessary safety precautions
are not taken.
NOTICE
Means that property damages can occur if necessary safety precautions are
not taken.
Product safety labels
The following icons are used on the device itself to indicate imperatives and possible
dangers:
Read and understand the operating manual before using the device!
Labeling according to WEEE directive:
The device must not be disposed of with household waste, but in a separate
WEEE collection in an environmentally friendly way.

35,0(6
11
Cube M
Revision 12 EN - 03/2023
Further icons and conventions in this operating manual
Here you will find useful information and helpful tips.
Indicates a single instruction.
If several of these instructions appear one below the other, the order in which
they are executed is irrelevant or they represent alternative courses of action.
1.
2.
...
A numbered list identifies a sequence of instructions that must be executed in
the specified order.
Indicates the result of an action to explain processes that take place in the
background.
Indicates an observation prompt to draw attention to visible feedback from the
device or the software.
Observation prompts make it easier to check whether an instruction was ex-
ecuted successfully. Often they also guide to the next instruction.
Points to a control element that is to be pressed/clicked.
Points to an element described in the text (for example an input field).

35,0(6
12
Cube M
Revision 12 EN - 03/2023
3 About this operating manual
This operating manual describes the Cube M with advanced absorber.
Devices with an advanced absorbers are marked with CubeMA on the identi-
fication plate.
Devices with a standard absorbers are marked with CubeM on the identifica-
tion plate. For an earlier version of the operating manual with standard absorb-
This manual describes the installation and operation of the CubeMA and performing
measurements with the CubeMA, the optional Cube App or the optional LaserDiag-
nosticsSoftware LDS version 1.4 or higher. In this operating manual, the abbreviations
CubeM and LDS are used.
With the Cube App for mobile devices with Android™ you can operate and evaluate the
device via a smartphone/tablet. The Cube App is available for free in Google Play-Store/
Apps.
For measurement operation with a PC, the optional LaserDiagnosticsSoftware LDS
must be installed on the PC. PRIMES will be happy to provide you with a current down-
load link. For this purpose, contact your sales partner or send an e-mail to:
The software description includes a brief introduction on using the device for measure-
ments. For a detailed description of the software installation, file management and
evaluation of the measurement data, please refer to the separate instructions for the
LaserDiagnosticsSoftware LDS.
This operating manual describes the software version valid at the time of print-
ing. Since the LDS is subject to continuous development, the supplied data
medium may have a newer version number.
35,0(6
13
Cube M
Revision 12 EN - 03/2023
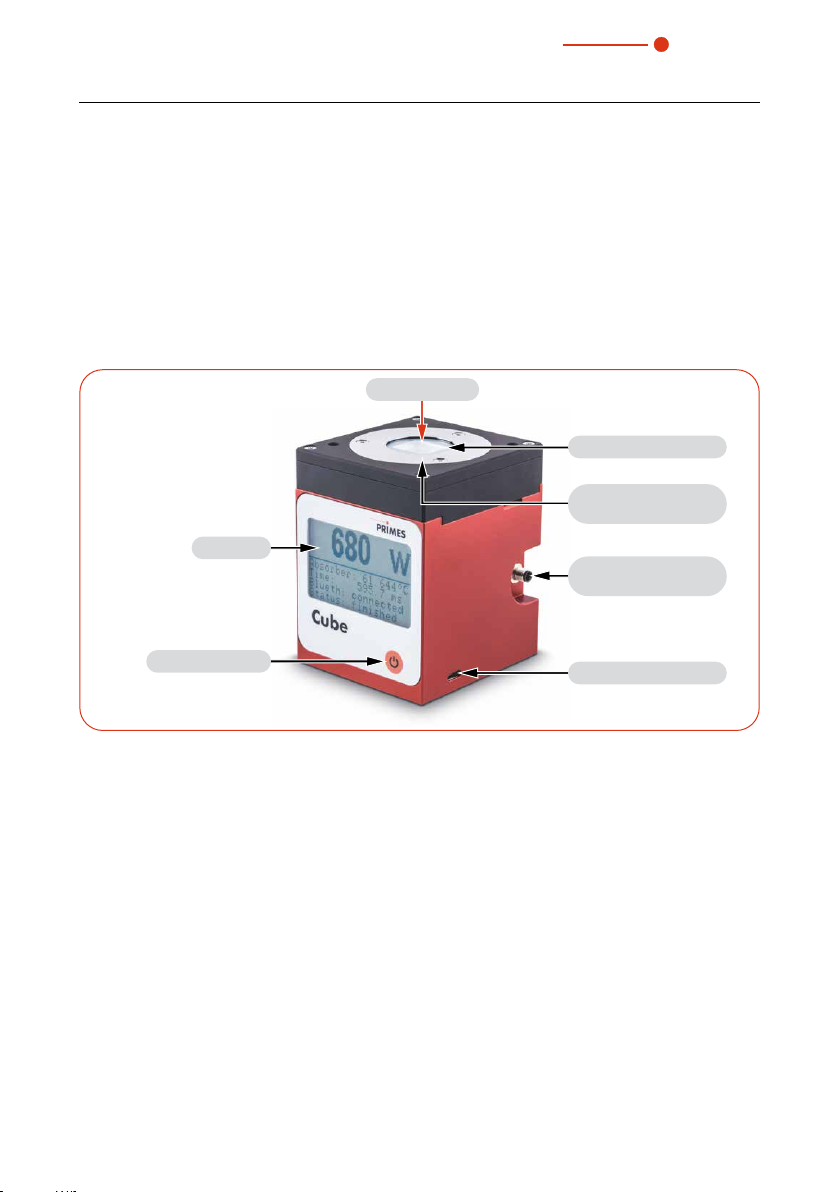
4 Device description
4.1 Functional description
The device is used to measure laser power. The laser beam passes through the protec-
tive window and hits the absorber and a photodiode. The absorber and the photodiode
are protected from contamination by the protective window. The display shows the
measured laser power and further information on the status of the device.
Safety interlock
connection
Protective window
Laser beam
Micro-USB port
Display
On/Off button
Protective window
mount
Fig. 4.1: Functional description
4.2 Measuring principle
The device offers a fast, passively cooled power measurement according to the calori-
metric measuring principle.
The absorber of the measuring device is briefly irradiated with the laser beam. The ir-
radiated energy is determined by the temperature rise of the absorber.
The photodiode simultaneously determines the laser ontime. The high-frequency sam-
pling rate of the photodiode enables single pulse detection for pulses not shorter than
50μs.
Thus, in addition to the average power, the peak power can be calculated. In the sec-
ond step, the actual laser power is calculated from the irradiated energy divided by the
laser ontime.

35,0(6
14
Cube M
Revision 12 EN - 03/2023
4.3 Functions of the On/Off button
The On/Off button has several functions:
Keystroke Function
Short press Switch on
5seconds Switch off
2seconds Show measuring values
Press again for 2 seconds Switch to next window
Tab. 4.1: Functions of the On/Off button
4.4 Optical display
Laser power in watt
Bluetooth connection
active/inactive
Charge status
Status/warning message
Absorber temperature
Fig. 4.2: Optical display
4.4.1 Status messages
Status message Meaning
Waiting for laser beam The device is ready for operation, the laser can be switched on.
Check temp. The temperature gradient (change in the absorber temperature/time)
is checked. Please wait until the message disappears.
Thermalize The thermalization time allows a uniform temperature distribution in
the absorber. Afterwards, the temperature is measured.
Finished The measurement is completed.
Tab. 4.2: Status messages

35,0(6
15
Cube M
Revision 12 EN - 03/2023
4.4.2 Warning message
Warning message Reason
Safety interlock open The absorber temperature has exceeded 100°C. In order to protect
the device, the safety interlock was triggered.
Tab. 4.3: Warning message
This warning message does not imply an error. The message is automatically
reset as soon as the absorber temperature is below 100°C again. The safety
interlock is then also automatically switched back to the permissible operating
status.
Detailed information on triggering the safety interlock is described in chapter
8.4 on page28.
4.5 Scope of delivery and optional accessories
The following parts are within the scope of delivery:
• CubeM
• Alignment tool
• Cable USB 2.0, 1.8 m
• Safety interlock cable with one-sided connector M5, 2m
(Co. Binder, order number: 77 3450 0000 40003-0200)
• Operating manual or quick start guide CubeM
• Transport and storage bag
The following accessories are available:
• LaserDiagnosticsSoftware LDS
• Cube App
4.6 Important notes on the lithium-ion battery
The device is equipped with a permanently installed rechargeable battery. Be aware that
this battery may ignite at high temperatures. For operation, storage and shipping, refer
to the information according to chapter15 „Technical data“ on page65.

35,0(6
16
Cube M
Revision 12 EN - 03/2023
4.6.1 Charging the lithium-ion battery
Charge the battery completely before using the device for the first time. The first com-
plete charge on the PC requires approx. 3hours. Only use the supplied USB cable to
charge the battery. Recharge the battery when the charge level reaches 20%. Do not
charge the rechargeable battery unattended, e.g. overnight. Do not expose the device
to direct sunlight.
4.6.2 Storing the device with a permanently installed lithium-ion battery
Store the device in a cool, dry place. Keep a minimum distance of 3 m from combus-
tible materials. Do not expose the device to direct sunlight. Please charge the battery at
least every three months.
4.6.3 Dangers to health and the environment in the event of damage to the
lithium-ion battery
In general, contact with leaking battery components may pose a hazard to health and
the environment:
• When the battery is damaged, fluids (electrolytes) may leak out. These are flam-
mable, contact with the eyes or skin may cause irritation.
• Vapors may irritate the eyes, respiratory organs, and skin.
• Fire or intense heat may cause violent bursting. Heating or fire may release toxic
gases. Burning produces irritating smoke.
4.6.4 Charge status of the lithium-ion battery
The charge status of the battery is displayed in %. The accuracy of the display depends
on various factors (e.g. temperature, age of the battery, etc.).
The battery has a capacity of 1000mAh. The battery can be charged with a max.
charging current of 1.3 A via the supplied USB cable. At a charging current of 1.0A,
the charging time is approx. 1hour. At a charging current of 0.5A, the charging time is
approx. 2.5hours.
At 100% charge status, the possible operating time is approx. 6hours (equivalent to
approx. 100measurements). When using all power saving functions (see section „Pow-
er saving functions“ in chapter10.3.3 „Settings in the device control“ on page43)
approx. 15hours.

35,0(6
17
Cube M
Revision 12 EN - 03/2023
5 Transport and storage
5.1 Warning messages
NOTICE
Damaging/Destruction of the device
Hard impacts can damage the absorber within the device.
Handle the device carefully when transporting or installing it.
To avoid contamination, cover the inlet aperture with the alignment tool pro-
vided.
5.2 Shipping the device with permanently installed battery
The device is equipped with a permanently installed lithium-ion battery (hereinafter
referred to as battery). A removal of the battery by the end user is not intended for this
product.
In case of shipment the device is a dangerous good. Due to the permanently built-in
battery it is classified as “lithium ion batteries contained in equipment”.
Please observe the requirements for shipping according to the valid regulations.
Particularly in case of a damaged battery, special regulations must be observed:
A damaged battery can cause fire! These batteries must be sorted out, checked and, if
necessary, repacked by qualified personal!
If you need more information on how to safely remove the battery, please contact
Battery details for shipping:
Cell/battery typ: Lithium Ion
Cell or battery: Battery
LC or Wh rating: 3.7 Wh
Cell/battery weight: 20 g
UN-Classification: UN 3481: Lithium ion batteries contained in equipment
35,0(6
18
Cube M
Revision 12 EN - 03/2023
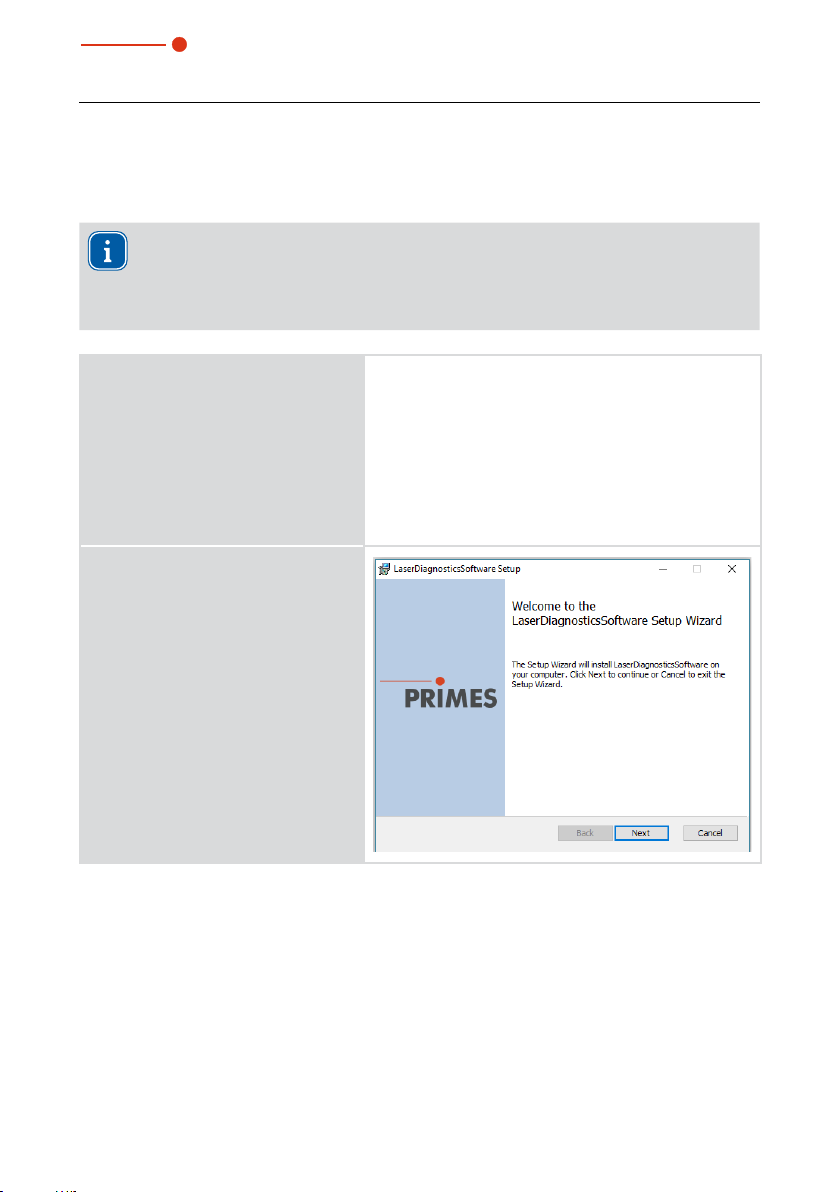
6 Install LaserDiagnosticsSoftware LDS
For measurement operation with a PC, the optional LaserDiagnosticsSoftware
LDS must be installed on the PC. PRIMES will be happy to provide you with
a link to download the current version. Please contact your sales partner or
1. Please ensure:
• System requirements are met.
• You have administrator rights.
2. Close all programs on your PC.
3. Download the LDS via the
download link.
System requirements:
• Intel Pentium Corei3 or better
• Windows 10 (64-bit version)
• At least 4GB RAM; 8GB RAM recommended
• Display resolution: Full HD (1920x 1080) at
100% scaling
• A USB port or Bluetooth for connecting the
measuring device
4. Double-click the LDS_Setup exe
file to start the installation.
5. Follow the instructions on the
screen.
If no other Iocation is specified,
then the main program LDS.exe
will be copied to the directory
C:\Programs\Primes\Laser-
DiagnosticsSoftware.

35,0(6
19
Cube M
Revision 12 EN - 03/2023
7 Mounting
7.1 Conditions at the installation site
• The device must not be operated in a condensing atmosphere.
• The ambient air must be free of gases and aerosols that interfere with the laser
radiation (e.g. organic solvents, cigarette smoke, sulfur hexafluoride).
• Protect the device from splashes of water and dust.
• Operate the device in closed rooms only.
7.2 Installation in the laser system
7.2.1 Prepare mounting
1. Switch off the laser beam.
2. Ensure that moving parts, e.g. robot arms, etc. are at a standstill and that they
cannot be set in motion unintentionally.
7.2.2 Possible mounting positions
The device can be mounted vertically or horizontally.
7.2.3 Align the device
The device must be aligned to the laser beam. The laser beam must hit the centre of
the inlet aperture. Please mind and adhere to the specifications and limit values given in
chapter15 „Technical data“ on page65.
An alignment tool is supplied for centering the device under the laser (see chapter7.2.4
on page22).
35,0(6
20
Cube M
Revision 12 EN - 03/2023
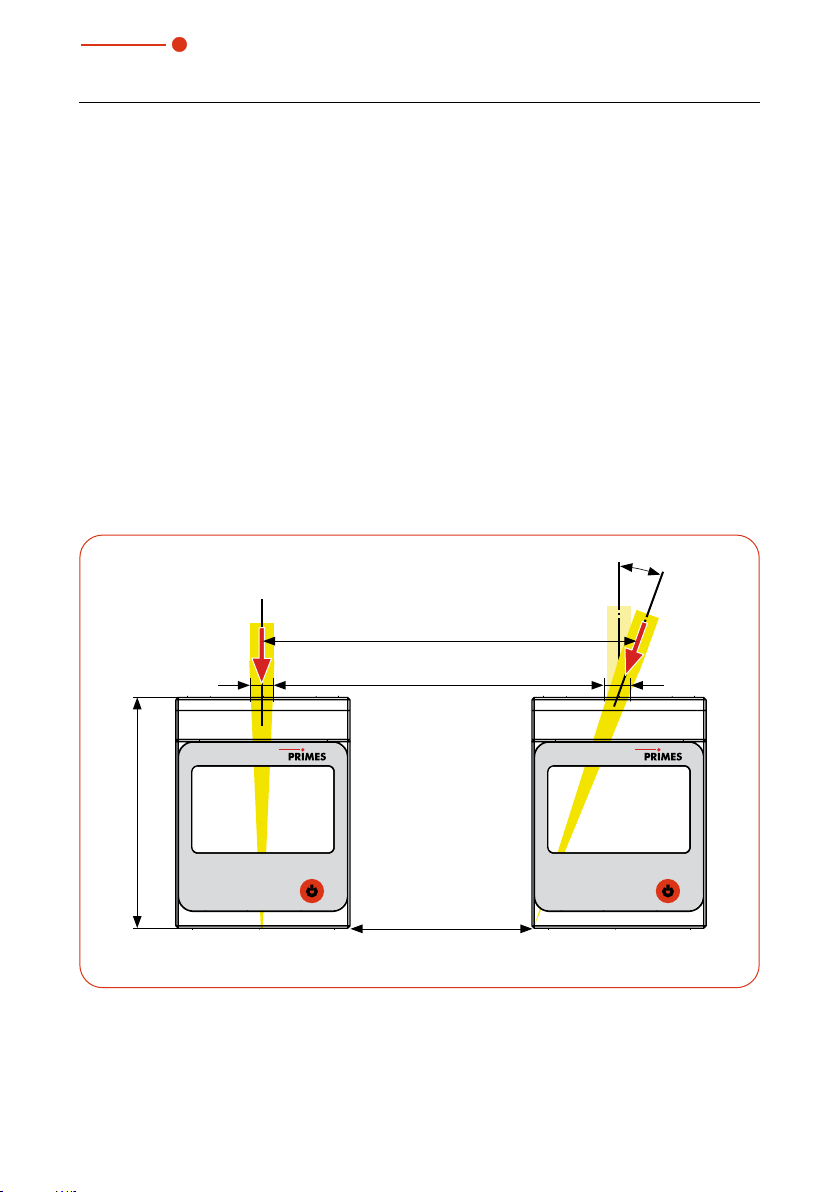
Use of the device with the focal plane on the bottom edge of the device
The focal plane of the laser beam should be on the bottom edge of the device. The
laser beam should be convergent (see Fig. 7.1 on page20).
Use of the device with the focal plane above the bottom edge of the device
Alternatively, the device can be used with the focal plane above the bottom edge of the
device. The beam entrance of the device can be located in the convergent or divergent
range of the laser beam (see Fig. 7.2 on page21).
Please observe:
• the beam diameter of 1–4mm at the beam entrance
• the max. permissible power density of 250kW/cm² at the beam entrance
• the max. tolerance to the centered beam incidence of ± 2.0 mm
• the max. permissible beam divergence of 300 mrad (full angle) with perpen-
dicular beam incidence
79.5mm
Illustration with perpendicular
beam incidence
Illustration with max. angle of
incidence of 20°
20°
Focal plane
Laser beam
Beam diameter 1–4mm
Fig. 7.1: Alignment to the laser beam with the focal plane on the bottom edge of the device
Other manuals for Cube M
2
This manual suits for next models
1
Table of contents
Other Primes Diagnostic Equipment manuals


