Primula Eco FL User manual

IRONING PRESSING MACHINERIES –FUSING PRESSES
Instruction Manual
Eco FL (S+B)

Instruction Manual ECO FL
2
Table of Contents
1. ATTENTION!!! ............................................................................................................................. 3
2. Technical Details …………………………………………………………………………………………………………………...4
2.1 Identification Data ................................................................................................................... 4
2.2 Use of the instruction Manual .................................................................................................. 4
2.3 Technical Characteristics………………………………………………………………………………………………………5
2.4 Technical Description……………………………………………………………………………………………………………5
3. General rules and Warnings ....................................................................................................... 5
3.1 General rules of using the Ironing Table .................................................................................. 5
3.2 Warning marks placed on the Ironing Table………………………………………………………………………...5
4. Operating Instructions……………………………………………………………………………………………………………6
5. Electrical Connection………………………………………………………………………………………………………………7
6. Activation Instructions……………………………………………………………………………………………………………7
7. Maintenance………………………………………………………………………………………………………………………….8
8. Troubleshooting……………………………………………………………………………………………………………………..8
8.1 The vacuum does not function properly…………………………………………………………………………………8
8.2 The heating of the working surface is not activated …………………………………………………………….8
8.3 The heating of ironing buck is not activated………………………………………………………………………….8
8.4 The machine operates loudly ……………………………………………………………………………………………….8
Images of the spare parts ………………………………………………………………………………………………………….9
List of Spare parts ………………………………………….…………………………………………………………………….….10
Wiring Diagram of Eco FL ……………………..…………………………………………………………………………….….11
TECHNICAL ASSISTANT……………………………………………………………………………………………………………..12

Instruction Manual ECO FL
3
1. ATTENTION!!!
Please read this instruction manual very carefully before you start using your new Ironing Table.
The customer by purchasing this product declares that he is fully aware, and accepts everything
mentioned in this operating manual.
Primula SA assumes neither responsibility for any errors herein, nor for incidental nor for resulting
damage in connection with the performance or use of this operating manual.
You may not copy, reproduce, or translate this operating manual, or parts of it, to another
language without prior written consent of Primula SA
Any information in this manual may be subject to change without any prior notice.
CAUTION! PLEASE READ CAREFULLY THE INSTRUCTION MANUAL BEFORE INSTALLING THE
IRONING TABLE!!!
2nd edition–April 2017
© Primula S.A. 2017
Company name: Primula S.A
Address: 14th km Thessaloniki –Kilkis,
57200 Liti, Thessaloniki, Greece
Industry: Manufacturing of Ironing, Pressing and Finishing Equipment
Telephone: +30 23940 71215
Fax: +30 23940 71438
Web: www.primula.gr

Instruction Manual ECO FL
4
2. Technical Details
2.1Identification Data
The Ironing Table, that you have purchased, is a machine of high advanced technology with many
advantages, unique in its kind. It is manufactured according to International and European safety
standards by a company with experience, since 1969, in this sector. Congratulations for your
choice!
Regarding its characteristics, the Ironing Table includes a serial number plate (see below) where
all its specifications are displayed. Every warning and symbol that is placed on the Ironing Table
is in accordance with the specifications of the European standards.
The serial number plate has been placed in a visible place on the Ironing Table and is made from
fadeless material.
Amongst others, the Serial Number plate displays the following:
Company Logo
Manufacturer Information
Model
Serial Number
Rated Voltage of Use
Rated Frequency of Use
Year of manufacturing
Accumulated Installed Wattage
Picture 1: Serial Number Plate
2.2Use of the Instruction Manual
The correct assembly and adjustment of the machine is vital to the safety of the user and the
machine‘s life span. For this reason, the installation, alteration, replacement or extension of the
machine should only be performed by qualified personnel.
Under no circumstances is the intervention allowed in the machine, unless it’s for the planned
maintenance by an unauthorized engineer.
If you remain uncertain regarding the correct assembly of the machine after reading the
instructions, contact the manufacturer or an authorized representative before starting the
operation of the machine.

Instruction Manual ECO FL
5
2.3Technical Characteristics
Ironing table with heating and suction.
The flat ironing surface is suitable for underpressing seams, linings and ironing small parts such
as collars, cuffs, pockets and T-shirts, shirts, blouses as well. Suitable for garment industries,
workshops and ateliers. It can accommodate one or two ironing bucks.
2.4Technical Description
Model
Eco FL
Working Surface
130X65 cm (standard)
Standard height
85 cm
Heating Power
1 KW
Suction Power
0.50 HP
Power supply
400V-3ph- 50Hz/60Hz or
230V-1ph- 50Hz/60Hz
3. General Rules and Warnings
3.1General rules of using the Ironing Table
For the safe usage of your Ironing Table, please read the following operating instructions
carefully, as listed below:
Install, use and maintain the Ironing Table according to the instructions in this manual.
Otherwise, the manufacturer has no responsibility for the possible failed operation or
safety.
Before connecting the power supply, check that the voltage corresponds to the voltage
indicated on the technical specifications.
Connect the machine only to a power supply that meets the minimum required frequency
and is properly grounded. Do not leave the Ironing Table while it is operating and is on
power without supervision.
Use the Ironing Table ONLY for the intended purpose in accordance with the current
instruction manual and only with the accessories that are provided or that are intended
for this specific Ironing Table. The manufacturer is not liable for any damages resulting
from misuse or wrong use of the Ironing Table.
DO NOT touch the power supply with wet hands.
Do not clean the Ironing Table with corrosive or other damaging materials/chemicals.
Never use the Ironing Table to support any other machine or structure.
It is strictly prohibited to do any kind of welding or alterations on the Ironing Table or
its parts.
It is strictly prohibited to remove any protective device/guards.
It is strictly prohibited to intervene in the control units/circuit boards of the Ironing
Table.
It is strictly forbidden to do any modification to the technical specifications of the
machine (electrical or mechanical) by third persons.
Please contact your dealer or the manufacturer for any malfunction or further information
requests
3.2 Warning marks placed on the Ironing Table
The following attention marks are placed on each ironing table:

Instruction Manual ECO FL
6
The operator of the system has the obligation to inform himself regarding the dangers which may
occur during usage, so that he/she can avoid them or minimize their occurrence as best as he/she
is able to.
4. Operating Instructions
For the instructions mentioned in the current section please see the below images (picture 2).
Picture 2: Assembly
Turn, the base of the machine (A) upside down, as seen bellow.
B
A
C
A

Instruction Manual ECO FL
7
Assembly the base of button pedal (B) on top of it, by tightening all the screws.
Turn the ironing table, the right side up.
Afterwards put the ironing surface(C) of top of the stand and tighten all the screws once
again.
5. Electrical Connection
For the electrical connection and above all for the power supply, please follow carefully the
instructions of the wiring diagram (enclosed) as well the warning signs symbols attached on the
machine. In case you have purchased a single phase machine 230V, connect the machine to the
power into the socket 230V/16A. The connection should be done with 3-phase 3Χ1,5 mm (1 phase,
1 neutral, 1 grounded). The power should be provided with a fuse 10Α.
CAUTION! For your own safety, pay attention to all the warning labels (yellow colored) that are
placed on the machine. The manufacturer bears no liability for any damages or accidents due to
faulty supplying network or to not specified personnel.
6. Activation Instructions
Picture 3: Images of Switches placed on Eco FL
Switch on the main switch (No 1)
Switch on the thermostat knob (No 3) at a temperature of 110°C during the winter and at 90°C
during the summer.
Whenever you want to use suction/vacuum, just press the food pedal with your foot.
Adjust the steam quantity of your steam generator in proportion to the suction capacity used
on the ironing table, in order to avoid steam liquidation on the working surface.
Especially during the wintertime when the environment’s temperature is low and the
environment’s humidity is elevated.
The delicate fabrics require a small quantity of steam, while the rougher fabrics require large
quantity of steam.
The ironing buck’s heating is activated when you press the switch (No 2) to position I.

Instruction Manual ECO FL
8
Additional Instructions
In case the table disposes a Vario iron system (optional):
Hook the steam iron from the balancer and adjust the distance of the steam iron from the working
surface (approximately 5cm). After you have finished ironing, unhook the steam iron from the balancer
and put it on the iron rest mat.
7. Maintenance
Make sure that the covers of the table and the ironing buck remain clean, in order to have
high performance of suction and blowing air. Wash periodically the blue polyester fabric and
the foam blue in the washing machine (30-40 οC).In case you use felt molletone instead of blue
foam, do not wash it in the washing machine, but wash it by hand. Replace them regularly, in
order to keep high suction performance.
Clean the dust of the fan wheel /impeller at least 2-3 times per year.
Clean periodically and grease the arm’s as well as the buck’s bearings.
Clean periodically the internal parts of the table as well as the electronic circuit by using
compressed air.
Keep the machine clean.
CAUTION!
Before doing maintenance work, please disconnect the machine from the electrical power supply.
8. Troubleshooting
For the instructions mentioned in the current section please see the drawing of the spare parts
of the machine on page 11.
8.1 The vacuum does not function properly
Check if there is power supply.
Check if the power feeding cable No 05 is for some reason cut off.
Check the fuse inside the fuse case No 07.
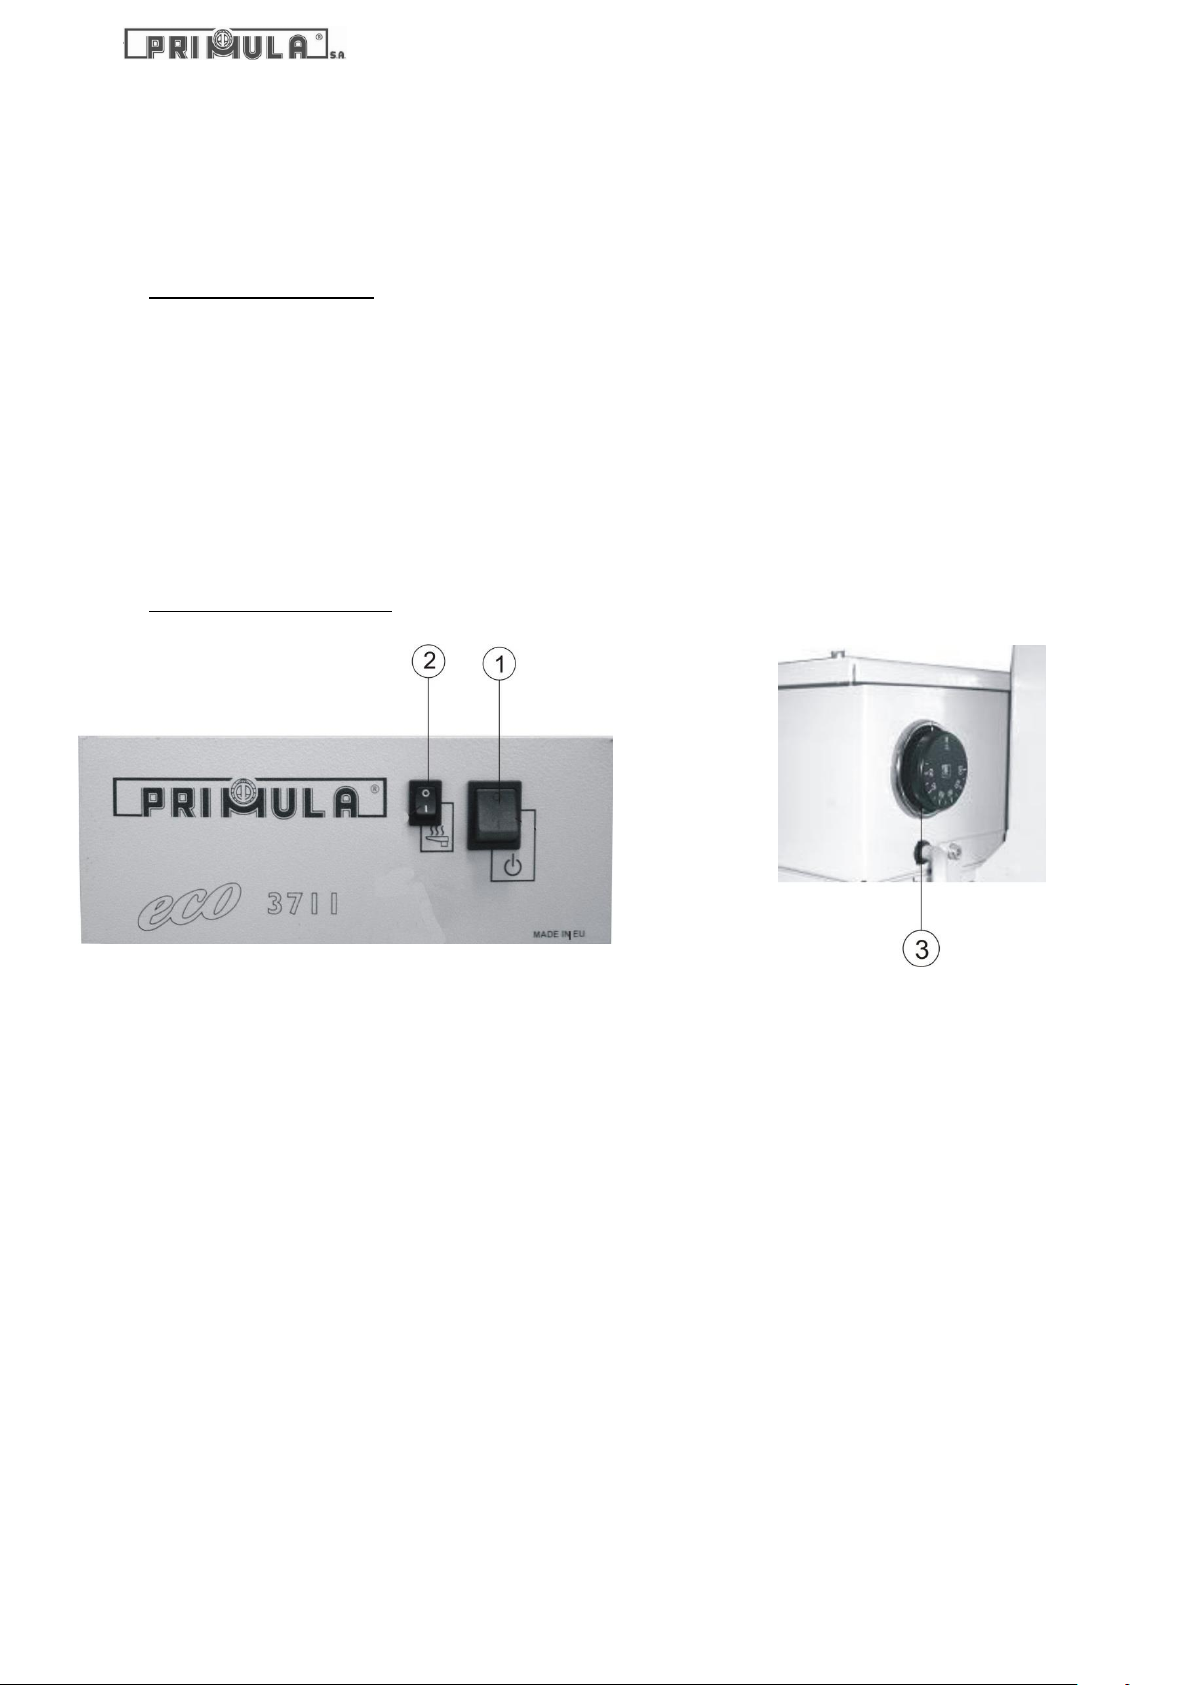
Check if the suction’s button pedal No 21 is faulty.
Check if the motor No 01 is for some reason damaged.
Check the electronic circuit Νο 26.
8.2 The heating of the working surface is not activated
Check if the fuse inside the fuse case No 07 is burnt out. Replace it.
Check if the thermostat No 10 is faulty. Replace it.
Check if the heating element No 09 is burnt out. Replace it.
Check if the thermostat No 11 is faulty. Replace it.
8.2The heating of the ironing buck is not activated.
Check the buck’s cable and plug.
Check the switch (No 8) which indicates the buck’s heating on the panel.
Check the heating element of the ironing buck.
8.4 The machine operates loudly
Check if the ball bearings of the motor are faulty. Replace them.
Check the impeller to be sure, that there is no dust which could cause the vibration.

Instruction Manual ECO FL
9
Images of spare parts
43

Instruction Manual ECO FL
10
List of Spare parts
Pos.
Articel nr.
Description
1
302-26-001
Motor 0,50HP 230V
2
302-26-002
Aluminum impeller
160
3
192-26-003
Metallic shell
4
302-27-004
3pol’s plug
5
302-26-005
Power feeding cable with plug 3X1,5
6
308-00-006
Switch ON-OFF 16A
7
300-00-084
Fuse case
8
302-22-054
Buck’s switch ON-OFF
9
302-01-014
Heating element 1KW 230V
10
302-00-012
Thermostat 110°C
11
302-01-010
Safety thermostat 145°C
12
302-26-012
Terminal block
13
192-27-013
Supporting corner
14
192-27-014
Perforated plate
15
302-27-015
Wire mesh plastic
16
302-27-016-1
302-22-038
302-22-038-2
Foam blue IFP-7mm
Felt molletone (optional)
Vacufix silicone SPF-6mm (optional)
17
302-27-017
Fabric cover
18
302-27-018
Terminal block
19
192-27-019
Metallic base of heating element
20
192-27-020
Ironing table base
21
302-26-026
Pedal switch
22
192-27-022
Vacuum’s foot pedal
23
302-26-023
Foot pedal’s screw
24
302-26-024
Foot pedal’s spring
25
302-02-014
Regulator
26
302-26-025
PC Board
27
192-26-027
Balancer’s – trolley movement bar
28
302-00-049
Trolley of balancer
29
302-00-051
Balancer
30
102-27-013
Lighting system EFL/LT
31
102-26-031
Swivel arm
32
304-01-032
Form’s feeding cable
33
192-26-033
Swivel arm’s bearing
34
304-01-034
Safety thermostat 65ºC
35
304-01-035
Heating element 100W 230V
36
304-01-036
Perforated plate
37
304-01-037
Wire mesh plastic
38
304-01-038-1
304-00-038
304-00-001-2
Foam blue IFP-7mm
Felt molletone (optional)
Vacufix silicone SPF-6mm (optional)
39
304-01-039
Spring
40
304-01-001
Fabric cover
41
302-26-041
Stop for balancer
42
302-27-042
Cable for lighting Eco FL
43
302-26-004
Thermostat knob

Instruction Manual ECO FL
11
Wiring Diagram Eco FL

Instruction Manual ECO FL
12
For any advice about the operation of the machine or the spare parts, please contact the dealer
you have purchased the machine from or us directly at:
14th km Thessaloniki –Kilkis, 57200 Liti, Thessaloniki, Greece
Tel.: +30 23940 71 215 Fax: +30 23940 71 438
All specifications have been made to the best of our knowledge.
Primula S.A preserves the right to make changes to the system and its parts without prior
notice.
TECHNICAL ASSISTANCE
Table of contents
Other Primula Power Tools manuals
Popular Power Tools manuals by other brands

Craftsman
Craftsman 21914 - 12 in. Drill Press Operator's manual

Tesla Power Tools
Tesla Power Tools TC-2 quick start guide

Craftsman
Craftsman 103.20720 operating instructions

Jet
Jet JSSG-10 Specifications

Hitachi
Hitachi CJ 65VA2 Instruction manual and safety instructions

FOREDOM
FOREDOM K.1050 Operation & maintenance manual