Prince Castle DHB-BK1PC User manual

DHB-BK1 541-520 Rev. D Printed in USA 0506 © 2003
PRODUCT HOLDING BIN
PRODUCT HOLDING BIN
DHB-BK Series
DHB-BK Series
w/Prince Castle Button Bar
Operation
Operation
Manual
Manual
355 East Kehoe Blvd. • Carol Stream, IL 60188
Phone: 630-462-8800 • Toll Free: 1-800-PCASTLE
Fax: 630-462-1460 • www.princecastle.com
LIMITED WARRANTY
This product is warranted to be free from defects in material and/or work-
manship for a period of two (2) years from date of original installation, not
to exceed 30 months from date of shipment from our factory. P.C. Boards
and Heater Assemblies are warranted for three (3) years from date of
installation, not to exceed 42 months from date of shipment.
Any component which proves to be faulty in material and/or workmanship
will be replaced or repaired (at the option of Prince Castle, Inc.) without
cost to the customer for parts or labor. This warranty covers on location
service (i.e. trip charges and/or mileage). Travel mileage is limited to 100
miles (200 kilometers) round trip (one trip warranty) from an authorized
service agency or its sub-service agency.
This warranty is subject to the following exceptions/conditions:
• Use of any non-genuine Prince Castle parts voids this warranty.
• All labor shall be performed during regular work hours. Overtime premi-
um will be charged to the buyer.
• Damage caused by carelessness, neglect, and/or abuse (e.g., dropping,
tampering or altering parts, equipment damaged in shipment, by fire,
flood or an act of God) is not covered under this warranty.
TABLE OF CONTENTS
Safety Information . . . . . . . . . . . . . . . . . . . . . . . . . . . . .2
Electrical Specifications . . . . . . . . . . . . . . . . . . . . . . . . .2
Product Identification . . . . . . . . . . . . . . . . . . . . . . . . . . .2
Installation . . . . . . . . . . . . . . . . . . . . . . . . . . . . . . . . . . .3
Operation . . . . . . . . . . . . . . . . . . . . . . . . . . . . . . . . . . . .3
Cleaning . . . . . . . . . . . . . . . . . . . . . . . . . . . . . . . . . . . .4
Programming . . . . . . . . . . . . . . . . . . . . . . . . . . . . . . .4–8
CastleNet® Communications Network . . . . . . . . . . . . . .9
Factory Presets . . . . . . . . . . . . . . . . . . . . . . . . . . . . . .10
Troubleshooting . . . . . . . . . . . . . . . . . . . . . . . . . . . . . .11
Wiring Diagram . . . . . . . . . . . . . . . . . . . . . . . . . . . . . . .11
Parts List and Exploded View . . . . . . . . . . . . . . . . . . . .12

DHB-BK1 541-520 Rev. DPrinted in USA 0506 © 20032
Product Holding Bin
DHB-BK Series
Product Identification
Electrical Specifications
Temperature
Control Panel Pan Racks
Power On/Off
Switch
Pan Covers
Only used with broiled products
(Fried products do not require covers)
LED Timers (tri-color)
(qty. 8)
Pan Buttons
(qty. 8)
Burger King Logo Button Transfer Button
Upper Pan Displays
(qty. 4)
Lower Pan Displays
(qty. 4)
DAYPART/ENTER
Button
BKFT (Breakfast)
LED
UP and DOWN
Arrow Buttons
REG (Regular Menu)
LED
Button Bar
Components
Model No. Volts Watts Amps Hz
DHB-BK1PC 208-240 2500 8.7-10.5 50/60
DHB-BK3PC 208-240 2500 8.7-10.5 50/60
DHB-BK5PC 220-240 2300 10.0 50/60
DHB-BK7PC 220-240 2300 10.0 50/60
Safety Information
Important
Prince Castle reserves the right to change specifications and product design without notice. Such
revisions do not entitle the buyer to corresponding changes, improvements, additions or replacements
for previously purchased equipment.
WARNING
Indicates information important to the proper opera-
tion of the unit. Failure to observe may result in dam-
age to the equipment and/or severe bodily injury or
death.
CAUTION
Indicates information important to the operation of
the unit. Failure to observe may result in damage to
the equipment.

DHB-BK1 541-520 Rev. D Printed in USA 0506 © 20033
Product Holding Bin
DHB-BK Series
Installation
Operation
Remove the unit from the carton and inspect for signs of damage. If
there is damage to the unit:
• notify the carrier within 24 hours of delivery
• save carton and packaging materials for inspection purposes
• contact your local dealer, or if purchased directly, the Prince Castle
Sales Department at 800-722-7853 or 1-630-462-8800 to arrange for a
replacement unit.
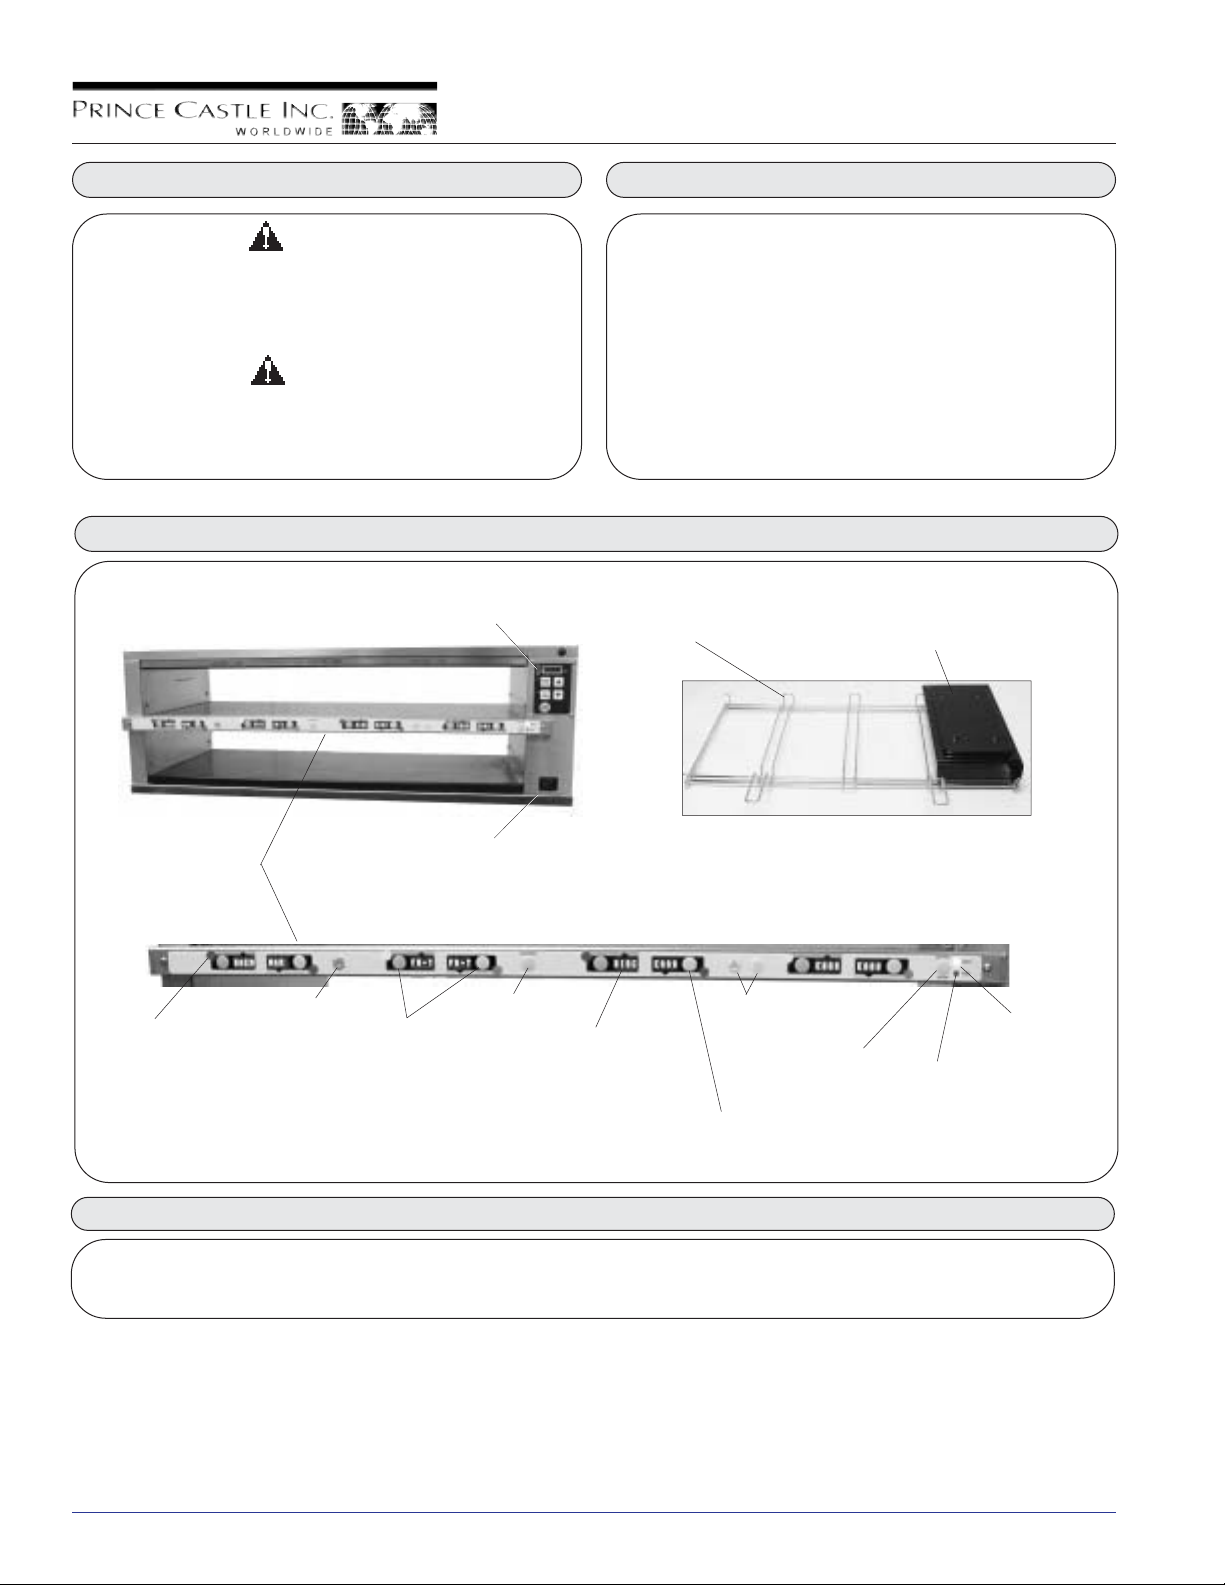
Verify that the following parts have been received.
• 1 pan cover kit
NOTE: When installing this unit, the ambient temperature at the mount-
ing site should not exceed 100°F.
Plug the power cord into the proper electrical receptacle. All electrical
connections must be in accordance with local electrical codes and any
other applicable codes.
If the unit is to be networked with other Prince Castle units, refer to the
CastleNet®Communications Network section in this manual for installa-
tion instructions.
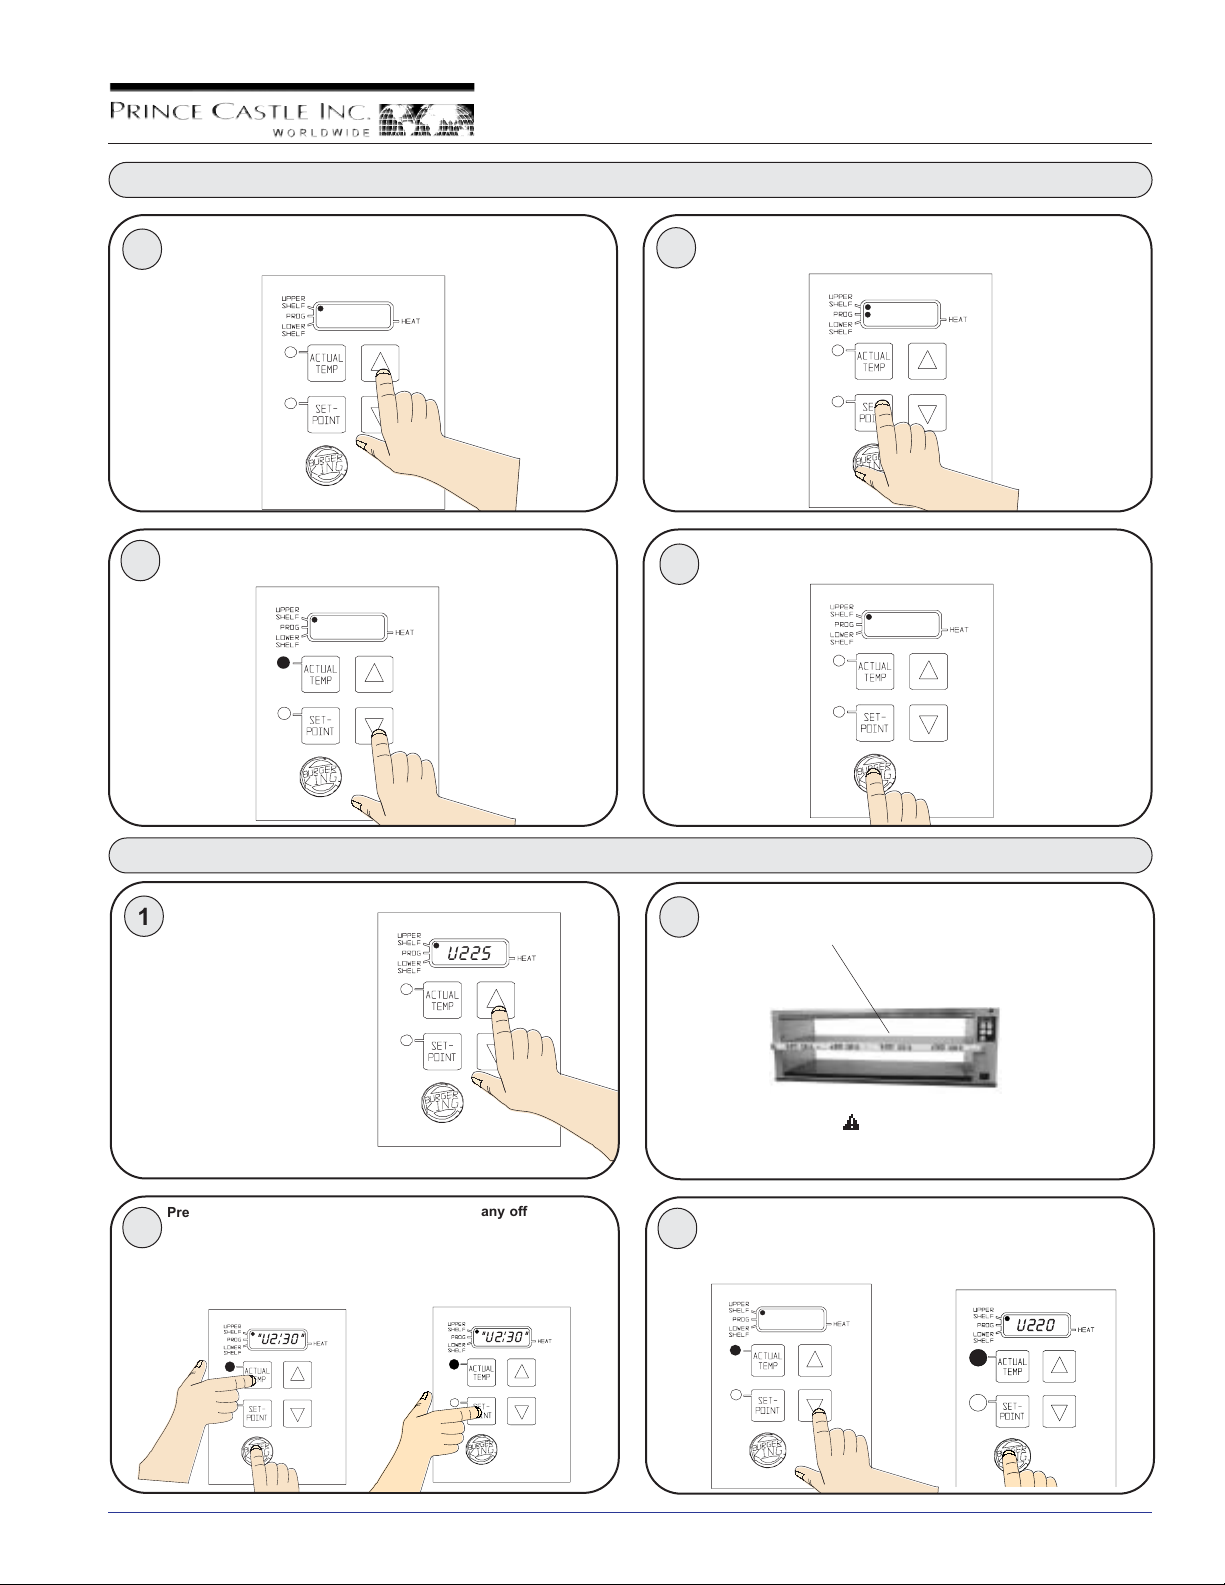
1Turn power On/Off switch to ON position.
Allow 20 minutes for
heaters to reach operating
temperature. The
Temperature Display will
read “----” until unit is
warmed up, then display
will show pre-programmed
operating temperature.
Load pan covers (if used) onto pan racks and
insert racks into the unit.
Press all PAN Buttons
The PAN DISPLAYS will show the
assigned product name.
If no product is assigned, the display
will be dim and show “----”. Pressing
the PAN button will not activate the
timer if “----” is displayed. Pressing
PAN button when product name is
displayed will start timing cycle.
BKFT (Breakfast) or
REG (Regular Menu)
will be lit depending on
pre-programmed menu.
2
LED Timing Status When LED is steady
RED, load product
and press the PAN
Button.
(steady) = Ready for product
(flashing) = Discard product
(steady) = Oldest product, use first
(flashing) = Cook more product
(steady) = Newer product, use green first
(flashing) = Cook more product
34
If only one pan is active for a
product, the LED will turn from
RED to GREEN.
If more than one pan is active for
a product, the LED for the first
pan loaded will turn from RED to
GREEN.
The LED for the 2nd pan loaded
will turn from
RED to YELLOW.
An LED timer can be stopped
(cancelled) at any time by press-
ing and releasing the
corresponding PAN Button.
LED Timers
RED
RED
RED
RED
GREEN
GREEN
GREEN
GREEN
YELLOW
YELLOW
Discard product
Cook more product
Cook more product
When any of the timer LED’s flash, cook more product or
remove and discard product as indicated.
56Product, along with any remaining time, can be
transferred from one cavity to another as follows:
A. Press and release the
TRANSFER Button. All displays
will flash between bright and dim.
B. Press and release the PAN
button of the product to be
moved. All displays except
this one will stop flashing.
C. Press and release the
TRANSFER button again.
D. Move the product. Press and release
the PAN Button for the new location.
The new location will finish timing
the product. When the transferred
pan timing expires, location will
revert to original menu setting.
WARNING
Hot surfaces. NOTE: If product transfer is not completed within a pre-programmed
transfer time, the transfer will be cancelled. See your Manager.
GREEN
GREEN
Flashing
YELLOW
YELLOW
Flashing
RED
RED
Flashing

DHB-BK1 541-520 Rev. D Printed in USA 0506 © 20034
Product Holding Bin
DHB-BK Series
U225
Operation (continued)
Cleaning
7To change a menu selection for a specific pan cavity, use the following steps:
A. Press and hold the Burger King Logo Button for 6 seconds. All Pan
Displays will show “PROG”. All LED Timers will be red.
D. Press the UP or DOWN Button to
scroll to the desired menu item.
B. Press and hold the DAYPART/ENTER Button. The display next to the
DAYPART/ENTER Button will display the menu choices. While holding
the DAYPART/ENTER button, press the UP or DOWN Buttons to scroll
through the menu choices.
C. Press a PAN Button to change the menu. The LED Timer will change to
yellow and the Display will change from “PROG” to the assigned menu
item.
F. Repeat steps A - E as required for other Pan Displays. Press
the Burger King Logo Button to exit the program mode.
NOTE: Up to six menu items may be programmed for each Pan
Button. In addition, a pan may be set as “not used” by assigning
“----” as its product.
8
1
To shut down the unit, turn the power On/Off switch to OFF.
Setting Temperature
E. Press the DAYPART/ENTER
button to select the menu item.
1. Turn the unit off and unplug the power cord from the electrical
receptacle.
2. Remove the pan covers and pan racks. Wipe all parts and unit
with a damp cloth. DO NOT use a green scotch bright pad cleaner,
ice or water.
WARNING
Before performing any maintenance, turn the power switch to the OFF
position and unplug the power cord from the electrical receptacle.
CAUTION
This unit is not watertight. Do not clean with a water jet/jet spray.
Do not immerse the unit in water.
The unit has two shelves, each with an upper and lower heater (four heaters total).
The factory pre-set for the two upper heaters is 225°F.
The factory pre-set for the two lower heaters is 195°F.
Each heater has a programmable range of 150° - 250°F.
Use the control below and the following steps to set the setpoint temperatures for each heater.
UPPER SHELF LED
This LED will be lit to indicate
upper shelf is selected
UP/DOWN ARROW BUTTONS
Used with other buttons to scroll
through heater and temperature
selections
BURGER KING LOGO BUTTON
Press to enter
temperature selections
TEMPERATURE DISPLAY
U=Upper Heater
L=Lower Heater
NOTE: The unit is preset to display temperature in
Fahrenheit. To display in Celsius, press and hold
the DOWN Arrow button immediately after turning
on the power switch. To switch back to Fahrenheit,
press and hold the UP Arrow button after turning
on the power switch.
PROG LED
This LED will be lit to indicate
unit is in Program Mode
LOWER SHELF & LED
This LED will be lit to indicate
lower shelf is selected
ACTUAL TEMP BUTTON & LED
Press to display actual temperature for the
selected heater. LED will be lit when actual tem-
perature is displayed.
SETPOINT BUTTON & LED
Press to display setpoint temperature of a
selected heater. LED will be lit when setpoint
temperature is displayed.
NOTE: To reset all times and temperatures to the factory settings, turn the unit off, then press and hold the UP and DOWN arrow buttons
simultaneously while turning the unit back on. A “P” will appear in the display and all times and temperatures will be reset to original factory settings.

DHB-BK1 541-520 Rev.D Printed in USA 0506 © 20035
Product Holding Bin
DHB-BK Series
U2'20
'
U225
U225
Setting Temperature (continued)
Press the UP or DOWN Arrow Buttons until the desired shelf
LED and upper (U) or lower (L) heater is selected.
2Press and hold the SETPOINT Button and the Burger King
Logo Button for 5 seconds. The Program LED will light.
3
Calibrating Heaters
Use the following steps to calibrate
the individual heaters.
NOTE: Allow sufficient amount of
time for temperatures to stabilize
before starting calibration.
Press the UP or DOWN Arrow
Buttons until the desired shelf LED
and upper (U) or lower (L) heater is
selected.
Take a temperature reading within the shelf near the center of
the heater surface.
Use a standalone temperature meter (not supplied).
Press the UP or DOWN Arrow Buttons until the desired
setpoint temperature is displayed
4
7 !
U225
1
Press and hold the BURGER KING
LOGO and ACTUAL Buttons for 5
seconds. The semi-colon (:) LED
indicator will light. The temp dis-
played is the actual heater tempera-
ture sensed by the controller.
3
U2'20
'
2
Press the UP or DOWN Arrow
Buttons until the temperature
displayed matches the reading
obtained in Step 2.
Press the BURGER KING LOGO
Button to save the temperature
value and exit the Calibration
Mode.
4
Press the Burger King Logo Button to save the new setpoint
value. Repeat steps 2—5 to change the setpoint for any other
heater..
5
WARNING
Hot surfaces. Use caution when taking
temperature readings within the shelf
U220
7 !
To clear any offset
readings, press the
SETPOINT Button.
7

DHB-BK1 541-520 Rev. D Printed in USA 0506 © 20036
Product Holding Bin
DHB-BK Series
Selecting Breakfast and Regular Menus
Programming the Menus
There are six menus available:
BKFT LED ON = Breakfast1 or Breakfast2
REG LED ON = Regular1, Regular2, Regular3, or Regular4
Press and hold the DAYPART/ENTER Button, then use the UP
or DOWN Arrow Buttons to scroll through the 6 menus.
Press and hold the DAYPART/ENTER Button, then use the UP
or DOWN Arrow Buttons to scroll through the 6 menus.
Release the DAYPART/ENTER Button when the desired menu
is displayed.
When the DAYPART/ENTER Button is released, all displays
will again show PO.
Press and hold the BURGER KING LOGO Button (on the but-
ton bar) until all the displays show PO and the pan buttons
LED’s all glow red.
Press the PAN Button next to the display to be changed. The
LED will change from red to yellow and the display will
change from PO to the current product.
When scrolling, menus appears in this display
When the desired menu is displayed, release the
DAYPART/ENTER Button. The food products for the menu will
be displayed in the upper and lower PAN DISPLAYS.
When you change to a new menu, any timers started before the
change will flash the product name from the previous menu.
Press the PAN Button next to the flashing display to cancel the
timer and stop the display from flashing.
1
1
3Repeat Steps 2 – 3 as required.
Press the BURGER KING LOGO Button to exit the
Programming Mode.
NOTE: A pan may be set as “not used” by assigning “----” as
its product.
4
2
2
Press the UP or DOWN Arrow Buttons to scroll to the desired
product.
Press the DAYPART/ENTER Button to save the selection. All
other displays will display PO.

DHB-BK1 541-520 Rev. D Printed in USA 0506 © 20037
Product Holding Bin
DHB-BK Series
Changing the Hold & Cook-More Times
The SET PRODUCT TIME menu is used to change the Hold & Cook-More times.
Press and hold the BURGER KING LOGO Button, then immediately press and hold the DAYPART/ENTER Button until the display shows one
of four programming menus.
Use the UP or DOWN Arrow Button to scroll to the PO M ⇑ ⇓ (Set Product Time) Menu.
Press and release the DAYPART/ENTER Button to enter the Set
Product Time menu. The display will show M⇑ ⇓ .
Use the UP or DOWN Arrow Button to scroll through the list of
products. When the desired product is displayed, press the
DAYPART/ENTER Button to select it.
NOTE: Holding the UP or DOWN Arrow Buttons for longer than
2 seconds will cause the product list to automatically scroll up
or down.
The display will show HOL :00 ⇑ ⇓ .
The display will show PO M ⇑ ⇓ .
Repeat Steps 2–4 for any other product.
Press and release the BURGER KING LOGO Button at any time to
exit the programming mode and return to the run mode.
NOTE: If the DAYPART/ENTER Button has not been pressed to save
any changes, the program will revert to the original values.
The display will show COOK :07 ⇑ ⇓ .
1
3
45
2
Burger King Logo Button DayPart/Enter Button
Use the UP or DOWN Arrow Button to scroll to the desired hold
time. When the desired hold time is displayed, press the
DAYPART/ENTER Button to save the desired hold time.
NOTE: Hold time cannot be reduced to less than the Cook-More
time plus one minute.
NOTE: Cook time cannot be increased to more than the
Hold time plus one minute.
Use the UP or DOWN Arrow Button to scroll to the desired cook
time. When the desired cook time is displayed, press the
DAYPART/ENTER Button to save the desired cook time.

DHB-BK1 541-520 Rev. D Printed in USA 0506 © 20038
Product Holding Bin
DHB-BK Series
Changing the Product Name
The EDIT PRODUCT NAME menu is used to change a default product name to one of your own choosing.
Press and hold the BURGER KING LOGO Button, then immediately press and hold the DAYPART/ENTER Button until the display shows one
of four programming menus.
Use the UP or DOWN Arrow Button to scroll to the L P O XXXX ⇑ ⇓ (Edit Product Name) Menu.
NOTE: The default names available for editing are: BACN, POP, MOZ, SPCY & EXP1 thru EXP9.
Press and release the DAYPART/ENTER Button to enter the
Edit Product Name menu.
Use the UP or DOWN Arrow Button to scroll through the list
of products. When the desired product is displayed, press
the DAYPART/ENTER Button to select it.
The first letter (in this case, the ) will start blinking.
The display will show PO M ⇑ ⇓ .
Repeat Steps 2–4 for any other product.
Press and release the BURGER KING LOGO Button at any time to
exit the programming mode and return to the run mode.
NOTE: If the DAYPART/ENTER Button has not been pressed to save
any changes, the program will revert to the original names.
1
3
5
2
Burger King Logo Button DayPart/Enter Button
To change the blinking E, use the UP or DOWN Arrow Button to
scroll to the desired letter/number/symbol. When the desired
selection is displayed, press the PAN Button to move to the
next digit. Repeat for all digits.
NOTE: Holding the UP or DOWN Arrow Buttons for longer than 2
seconds will cause the display to automatically scroll up or down.
When all four digits have been changed, press the
DAYPART/ENTER button to select the new name.
4

DHB-BK1 541-520 Rev. D Printed in USA 0 5 06 © 2003
9
Product Holding Bin
DHB-BK Series
CastleNet®Communications Network
The Prince Castle DHB-BK1PC, DHB-BK3PC Bins, Retro Bun Timer and
New Bun Cabinet Timers can be inter-connected to form the CastleNet®
Communication Network. The network can be used for data transfer
between bins and timers for menu updates or to transfer product hold
time from bin-to-bin.
Each bin is supplied with a standard 25' cable and allows units to be
“daisy-chained” together to form the network. Extender cables are
available (refer to the Parts List on page 12).
General Telephone jack plugs are located on the back of the unit.
Connect the units using the cables provided as shown here.
bin2
2
To check the bin address,
press and hold the ACTUAL
and SETPOINT buttons. The
display will show the bin
address. Default for a new
address is .
EXAMPLE: If a location has
three bins, the bins and
timers must be set to address
1 through 3. See the
following steps.
White Plug
Jack
(in from
another unit)
Power Cord Inlet
Blue Plug Jack
(Plug timer data cable
into here)
Black Plug
Jack
(out to
another unit)
The factory default address for all bins and timers is address .
The factory default address for the Retro Bun Timer is uF.
bin2
3
3
Continue to hold the buttons
until PROG LED turns on.
To change a bin address, disconnect power to the unit and wait
30 seconds. Reconnect power to the unit and immediately press
and hold the ACTUAL and SETPOINT buttons.
bin3
4
Available addresses are:
1thru 9, , , C, ,
and F.
IMPORTANT: A timer address must
match the corresponding bin
address. For example, if the bin
address is , the timer address
must also be . Continue to step 5
to check the timer address. Two
timers mounted on different bins
cannot have the same address.
Use the UP or DOWN Arrow buttons to scroll to the desired
address. Press the Burger King Logo Button to store the new
address.
EGGS
EGGS
EGGS
MENU
ENTER
TRANSFER
BIN 2
EGGS
5
To check the timer address, press and hold the BURGER KING
LOGO button and the DOWN Arrow button. The current timer
address will be displayed in the far right timer display.
To change the timer address, proceed to step 6.
ENTR
ADDR
SET
MEN
ENT
TRANSFER
⇑
⇑
BIN 2
6
To change the timer address, disconnect power to the unit and
wait 30 seconds. Reconnect power to the unit and immediately
press and hold the BURGER KING LOGO button and the DOWN
Arrow button until the display shows ⇑ ⇓ .
The address number will blink on/off.
ENTR
MENU
ENTER
BK
RE
BIN 3
7
Use the UP or DOWN Arrow button to scroll to the desired
address. Press the ENTER button to store the new address and
return to normal operating mode.
Available addresses are:
1thru 9, , , C, , and F.

DHB-BK1 541-520 Rev. D Printed in USA 0506 © 2003
10
Product Holding Bin
DHB-BK Series
Factory Presets
Product Menu Details
Menus
Eggs EGGS 120 7
Biscuits BISC 60 17
Sausage SAUS 60 1
French Toast FR-T 30 2
Ham HAM 120 2
Fish FISH 45 5
Chicken Crisp CRSP 45 3
Chicken Patty CHKN 45 3
Chicken Tenders TEND 30 3
Burgers BURG 60 3
Whoppers WHPR 45 3
BK Broiler -BK- 60 6
Bacon BACN2120 2
Poppers POP230 2
Mozzarella Stick MOZ230 2
Spicy Chicken Wings SPCY260 3
Experimental #1 EXP1260 2
Experimental #2 EXP2260 2
Experimental #3 EXP3260 2
Experimental #4 EXP4260 2
Experimental #5 EXP5260 2
Experimental #6 EXP6260 2
Experimental #7 EXP7260 2
Experimental #8 EXP8260 2
Experimental #9 EXP9260 2
1. Hold and Cook-More times may be re-programmed. See page 7.
2. Product abbreviations BACN thru EXP9 may be reprogrammed. See page 8.
Product Display Hold Cook-More
Name Minutes1Minutes1
Timer 8 Timer 7 Timer 6 Timer 5 Timer 4 Timer 3 Timer 2 Timer 1 Menu indicator
BACN HAM FR-T SAUS BISC EGGS EGGS EGGS MNU1 Bkft
WHPR WHPR WHPR WHPR BURG BURG BURG BURG MNU2 Reg
TEND TEND CHKN CHKN CRSP CRSP FISH FISH MNU3 Reg
WHPR WHPR WHPR WHPR BURG BURG BURG BURG MNU4 Reg
SPCY SPCY MOZ MOZ POP POP -BK- -BK- MNU5 Reg
BACN HAM FR-T SAUS BISC EGGS EGGS EGGS MNU6 Bkft

DHB-BK1 541-520 Rev. C Printed in USA 1201 © 2002
11
Product Holding Bin
DHB-BK Series
Troubleshooting
Wiring Diagram
Display flashes Op & rL.
Display flashes Hr & rL.
Display flashes Op & rL.
Display shows HHH for an extend-
ed period of time and heater sur-
face temperature is hot.
Display shows HHH for an extend-
ed period of time and heater sur-
face temperature is cool.
Open relay. Circuit inoperable.
Shorted relay. Circuit inoperable.
Open heater.
Unplugged ribbon cable between
power and main circuit boards.
Temperature is below 75°F.
Heater inoperable.
Probe inoperable.
Relay inoperable.
Temperature is above 300°F
(abnormal operation).
Probe is inoperable.
Replace power circuit board.
Test heater resistance (150.2 Ohms).
Replace heater if necessary.
Verify ribbon cable connection.
Normal display during warmup.
Test heater resistance (150.2 Ohms).
Check for open thermocouple wires from probe.
Replace heater/probe assembly.
Replace power circuit board.
Diagnostic circuit inoperable. Replace power cir-
cuit board.
Check for pinched thermocouple wires from
probe. Replace heater/probe assembly.
Problem Possible Cause Corrective Action

72-235S Power Cord Kit, UKC series
12
Product Holding Bin
DHB-BK Series
Parts List & Exploded View
1
21
18
25 24
20
23
26
19
28 11
87
6
21
9
10
12
18
17
1314 4
15
16
15
19
3
1 541-316 Side Panel Cover, Side
2541-735S Main P. C. Board Kit
3 541-799 P.C. Board Bracket
4541-317 Insulation
5541-326 Wire Chase
6 541-333S Display P.C. Board Kit
7 89-955 Spacer
8536-802S Overlay Kit
986-118 Hole Plug
10 541-320 Hold Down Bracket
11 78-219S Power Switch
12 88-609 Power Inlet
13 72-200-25S Power Cord Kit
* 541-TSMUKC Button Bars (Main for UKC series)
* 541-TSAUKC Button Bars (Aux for UKC series)
Ref. Part No. Description Ref. Part No. Description
27
19 541-369 Insulation Bottom
20 541-329 Top Cover
21 541-324 Header
22 541-650 Trim
23 541-383 Shelf Bracket
24 541-488 Chassis, Left
25 541-317 Insulation
26 541-606 Base
27 197-232 Foot
28 541-322 Bottom Cover
*541-723E4S Black Pan Covers, Pk. of 4
* 541-420 Cable, Prince Castle (Not Shown)
* 940-0504 Cable, Radio Shack (Not Shown)
*95-1212-25 Tel Cable RJ12/RJ
* 541-636 Rack, Guide w/ Hand
* 541-TSMC Button Bars (Main)
* 541-TSAC Button Bars (Aux)
14 76-724 Screw, Socket, 8-32 x 3/4
15 541-375S Lower Heater Assy (230 Volt)
16 541-376S Upper Heater Assy (230 Volt)
17 541-656 Chassis, Right
18 541-129 Side Cover Bracket
DHB-BK1 541-520 Rev.D Printed in USA 0506 © 2003

DHB-BK1 541-520 Rev. D Printed in USA 0506 © 2003
13
Product Holding Bin
DHB-BK Series
NOTES

DHB-BK1 541-520 Rev. D Imprimé aux Etats-Unis 0506 © 2003
14
Panier pour Produit
Série DHB-BK
Numéro d'Identification Produit
Descriptif d'électricité
Panneau de Contrôle
du Thermostat Supports Paniers
Interrupteur
Marche/Arrêt
Couvercles
À n'utiliser que pour produits grillés
(les fritures n'ont pas besoin d'être couvertes)
Minuteries à voyant
(tricolores) (nb. : 8)
Commandes paniers
(nb. : 8)
Bouton "King Burger Logo" Bouton de Transfert
Affichages Cuves supérieures
(nb.: 4)
Affichages Cuves inférieures
(nb. : 4)
Bouton
DAYPART/ENTER
Voyant lumineux BKFT
(petit déjeûner)
Flèches de défilement
HAUT et BAS
Voyant lumineux REG
(menu ordinaire)
Barre de Boutons
Composants
Modèle No. Voltage Puissance A Hz
DHB-BK1PC 208-240 2500 8.7-10.5 50/60
DHB-BK3PC 208-240 2500 8.7-10.5 50/60
DHB-BK5PC 220-240 2300 10.0 50/60
DHB-BK7PC 220-240 2300 10.0 50/60
Instructions de Sécurité
Important
Prince Castle se réserve le droit de changer les spécifications et le design du produit sans préavis. En cas de
modifications, l'acquérant ne pourra réclamer des changements, améliorations, additions correspondantes sur les pro-
duits achetés précédemment ou demander le remplacement de tels produits.
AVERTISSEMENT
Indique toute information importante pour le bon
fonctionnement de l'unité. Toute négligence pourrait
endommager l'équipement ou/et avoir des con-
séquences dangereuses ou fatales pour les person-
nes physiques.
ATTENTION
Indique toute information importante pour le bon
fonctionnement de l'unité. Toute négligence pourrait
endommager l'équipement.

DHB-BK1 541-520 Rev. D Imprimé aux Etats-Unis 0506 © 2003
15
Panier pour Produit
Série DHB-BK
Installation
Fonctionnement
Déballer l'unité et vérifier qu'elle n'est pas endommagée. En cas de
dommages:
• avertir le transporteur dans un délai de 24 heures après la livraison.
• garder le carton et le matériel d'emballage pour inspection.
• contacter votre détaillant ou, si acheté directement auprès de Prince
Castle, appeler le service des ventes au 1-800-722-7853 ou au 1-630-
462-6800 afin de procéder aux arrangements nécessaires pour le rem
placement du produit.
Vérifier qu'aucune pièce ne manque.
• 1 kit couvercle-panier
• 2 grilles de menu
• 9 sets de labels de menu
NOTE: Au moment de l'installation, la température sur le site de mon-
tage ne doit pas dépasser les 100°F.
Brancher le cordon d'alimentation dans la prise électrique adaptée.
Tous les branchements électriques doivent être faits conformément aux
normes locales et à toutes autres normes applicables.
Si l’unité doit être connectée en réseau avec d’autres unités Prince
Castle, veuillez consulter la section Réseau de Communications
CastleNet®dans le présent manuel pour les instructions d’installation.
1Presser l'interrupteur pour le mettre en position de marche (On).
Attendre 20 minutes jusqu'à
ce que les éléments chauf-
fants aient atteint la tem-
pérature de fonction-
nement. L'affichage tem-
pérature indiquera "___"
jusqu'à réchauffement de
l'unité. Il affichera ensuite
les températures de fonc-
tionnement programmées.
Placer (le cas échéant) les couvercles sur les
Supports Paniers et ceux-ci dans l'unité.
Presser tous les boutons "PAN" (Panier).
L'affichage PAN indiquera alors le nom de produit
assigné à chacun des paniers.
Si aucun produit n'a été assigné à un panier, l'af-
fichage lumineux correspondant perdra d'intensité
et indiquera "___". Lorsque l'affichage indique
"___", la minuterie ne se met pas en marche même
en appuyant sur le bouton de commande PAN.
Presser le bouton de commande PAN n'activera la
minuterie que si le nom de produit est affiché.
BKFT (Petit déjeuner)
ou REG (Menu ordi-
naire) seront affichés
en fonction du menu
pré-configuré.
2
Table de correspondances de la minuterie à voyant Lorsque le voyant
lumineux est ROUGE
solide, placer le produit
dans le panier et presser
la commande PAN.
34
Si un seul élément chauffant est en
fonction pour un produit, le voyant
passera du ROUGE au VERT
Si plus d'un élément chauffant
est en fonction pour un produit
donné, le voyant lumineux du
panier qui aura été chargé en
premier passera du ROUGE au
VERT.
Le voyant du panier chargé
immédiatement après le premier
passera du ROUGE au JAUNE.
Les minuteries à voyant peuvent
être désactivées à tout moment
(annulation) en pressant et
relâchant la commande PAN cor-
respondante.
Minuterie à voyant
ROUGE (solide) = Prêt pour produit
ROUGE (clignotant) = Jeter produit
VERT (solide) =
Produit moins récent, utiliser en premier
VERT (clignotant) = Préparer davantage de produit
JAUNE (solide) =
Produit plus récent, utiliser le vert avant
JAUNE (clignotant) = Préparer davantage de produit
Lorsqu'un voyant lumineux clignote, préparez plus du produit
correspondant ou retirer ou jeter le produit correspondant,
conformément aux instructions.
56Tous les produits et leur temps de cuisson restant peuvent être
transférés d'une cuve à l'autre comme suit:
Presser et relâcher le bouton TRANSFER. Tous
les affichages clignoteront, le voyant alternant
entre intensité forte et intensité faible.
Presser et relâcher le bouton de com-
mande PAN correspondant au produit
devant être transféré. Tous les autres
affichages cesseront de clignoter.
C. Presser et relâcher encore une fois le
bouton TRANSFER.
D. Déplacer le produit. Presser et relâcher le bou-
ton de commande PAN correspondant à la
nouvelle cuve dont la minuterie complètera le
cycle commencé. Lorsque la minuterie ainsi
transférée atteindra la fin du cycle, la configu-
ration originale de menu sera rétablie.
AVERTISSEMENT
Surfaces chaudes. NOTE : Si le transfert du produit n'est pas complété dans un délai de transfert
préalablement programmé, le transfert sera annulé. Parlez-en avec votre directeur.
VERT clignotant
Préparer davantage
JAUNE clignotant
Préparer davantage
ROUGE clignotant
Jeter produit

DHB-BK1 541-520 Rev. D Imprimé aux Etats-Unis 0506 © 2003
16
Panier pour Produit
Série DHB-BK
U225
Fonctionnement (suite)
Entretien
7Pour changer la sélection menu pour une cuve en particulier, suivez la procédure ci-dessous
A. Presser sur le Bouton "Burger King Logo" pendant 6 secondes. Tous
les affichages PAN indiqueront "PROG". Toutes les minuteries
passeront au rouge.
D.Presser sur les flèches de défile-
ment HAUT ou BAS pour faire
défiler la liste jusqu'à l'article
désiré.
B. Presser le bouton DAYPART/ENTER sans lâcher. L'affichage à côté du
bouton affichera les choix de menu. Sans lâcher le bouton
DAYPART/ENTER, appuyer sur les flèches de défilement HAUT et BAS
pour faire défiler les choix de menu.
C. Appuyer sur le bouton PAN pour changer le menu. La minuterie à voy-
ant passera au jaune et l'affichage passera de "PROG" au menu pointé.
F. Répéter les étapes de A à E si nécessaire pour les autres
affichages PAN. Appuyer sur le bouton "Burger King Logo"
pour quitter le mode utilisateur.
NOTE: Chaque bouton PAN peut être programmé jusqu'à concur-
rence de six menus. De plus, il est possible de placer un panier en
position "non en service" en choisissant "___" comme produit.
8
1
Pour éteindre l'unité, mettre l'interrupteur de Marche/Arrêt en
position OFF.
Programmer la Température
E. Presser le bouton DAYPART/ENTER
pour sélectionner l'article.
1. Désactiver l'unité et débrancher le fil d'alimentation.
2. Enlever les couvercles et supports paniers. Essuyer tous les élé-
ments avec un torchon humide. NE PAS utiliser un Scotch Bright,
de la glace ou de l'eau.
AVERTISSEMENT
Mettre l'interrupteur de Marche/Arrêt sur OFF et couper l'alimentation
avant d'entreprendre toute opération d'entretien.
ATTENTION
Cette unité n'est pas imperméable. Ne pas utiliser de jet d'eau/spray.
Ne pas immerger dans l'eau.
L'unité dispose de deux étages et chacun de ces étages a un élément chauffant supérieur et un élément chauffant inférieur (quatre en tout).
Le pré-réglage est fixé à 225°F en usine pour les deux éléments chauffants supérieurs.
Le pré-réglage est fixé à 195°F en usine pour les deux éléments chauffants inférieurs.
Chaque élément chauffant peut être programmé à des températures allant de 150° à 250°F.
Utiliser chacune des commandes ci-dessous et les procédures décrites pour fixer le point de consigne de la température pour chaque élément chauffant.
VOYANT ÉTAGE SUPÉRIEUR
Si ce témoin lumineux est éclairé,
l'étage supérieur est sélectionné.
FLÈCHES DE DÉFILEMENT HAUT/BAS
Utilisées en association aux autres bou-
tons pour faire défiler les listes des élé-
ments chauffants et des températures.
BOUTON BURGER KING LOGO
Presser pour sélectionner la température.
AFFICHAGE TEMPÉRATURE
U = Élément chauffant supérieur
L = Élément chauffant inférieur
NOTE : L'unité est pré-configurée pour afficher la température en degrés
Fahrenheit. Pour un affichage en degrés Celsius, presser la flèche de
défilement BAS immédiatement après avoir actionné le bouton de mise en
marche de l'unité et garder appuyé. Pour retourner à un affichage en
degrés Fahrenheit, presser sur la flèche de défilement HAUT après avoir
actionné le bouton de mise en marche de l'unité et garder appuyé.
VOYANT MODE UTILISATEUR
Ce témoin lumineux sera activé pour indi-
quer que l'unité est en Mode utilisateur.
VOYANT ÉTAGE INFÉRIEUR
Si ce témoin lumineux est éclairé,
l'étage inférieur est sélectionné.
BOUTON ET VOYANT TEMPÉRATURE RÉELLE
Presser pour afficher la température réelle de
l'élément chauffant sélectionné. Le voyant sera
activé lorsque la température réelle s'affichera.
BOUTON ET VOYANT POINT DE CONSIGNE
Presser pour afficher le point de consigne de la
température de l'élément chauffant sélectionné.
Le voyant sera activé lorsque la température
réelle s'affichera.
NOTE : Pour ramener toutes les minuteries et les températures aux définitions d'usine, éteindre l'unité, puis presser simultanément sur les deux flèches de
défilement HAUT et BAS en remettant en marche et garder pressé. Un "P" apparaîtra sur l'affichage et les définitions originales établies en usine seront rétablies.

DHB-BK1 541-520 Rev. D Imprimé aux Etats-Unis 0506 © 2003
17
Panier pour Produit
Série DHB-BK
U2'20
'
U225
U225
Programmer la Température
Appuyer sur les flèches de défilement HAUT ou BAS jusqu'à
sélection de l'élément chauffant désiré de l'étage supérieur (U)
ou inférieur (L).
2Appuyer sur les boutons SETPOINT et "Burger King Logo"
pendant 5 secondes. Le voyant Utilisateur (PROG) s'activera.
3
Calibrage des Éléments Chauffants
Suivre la procédure suivante pour
calibrer chacun des éléments chauf-
fants individuellement.
NOTE : Attendre jusqu'à stabilisa-
tion de la température avant de
procéder au calibrage.
Presser les flèches de défilement
HAUT et BAS jusqu'à sélection des
voyants de l'étage et de l'élément
chauffant supérieur (U) ou inférieur
(L) désirés.
Prendre la température sur l'étage désiré, proche du centre
de la superficie de l'élément chauffant.
Utiliser un thermomètre standard (non inclus).
Faire une moyenne des deux températures afin d'obtenir la
température réelle de la superficie.
Presser les flèches de défilement HAUT ou BAS jusqu'à
sélection du point désiré de consigne de la température.
4
7 !
U225
1
Presser sans relâcher sur les boutons
BURGER KING LOGO et ACTUAL pen-
dant 5 secondes. Le voyant lumineux
(:) s’illuminera. La température affichée
indique la température effective de
l’élément chauffant calculée par le
régulateur.
3
U2'20
'
2
Presser les flèches de défilement HAUT
ou BAS jusqu'à affichage de la tem-
pérature correspondant à la moyenne
des températures prises au cours de
l'étape n. 2 de la présente procédure.
Presser le bouton "Burger King
Logo" pour enregistrer la tem-
pérature ainsi sélectionnée et
quitter le mode Calibrage.
4
Appuyer sur le bouton "Burger King Logo" pour enregistrer la
nouvelle valeur de consigne. Répéter les étapes 2-5 pour modi-
fier les valeurs de consigne des autres éléments chauffants.
5
AVERTISSEMENT
Surface chaude. Faire attention au moment
de prendre la température à l'étage désiré.
U220
7 !
To clear any offset
readings, press the
SETPOINT Button.
U220

DHB-BK1 541-520 Rev. D Imprimé aux Etats-Unis 0506 © 2003
18
Panier pour Produit
Série DHB-BK
Sélection Menus Petit Déjeuner et Menus Ordinaires
Programmation des Menus
Six menus sont disponibles :
BKFT = Petit Déjeuner 1 ou Petit Déjeuner 2
Voyant lumineux REG = Menu ordinaire 1, Menu ordinaire 2,
Menu ordinaire 3, Menu ordinaire 4
Appuyer et garder le doigt sur le bouton DAYPART/ENTER
puis, en utilisant les flèches de défilement HAUT et BAS, faire
défiler la liste des 6 menus.
Presser le bouton DAYPART/ENTER et, gardant pressé, utilis-
er les flèches de défilement HAUT et BAS pour faire défiler la
liste des 6 menus. Lâcher le bouton DAYPART/ENTER lorsque
le menu désiré est affiché.
Tous les affichages indiqueront de nouveau PO après que
vous aurez lâché le bouton DAYPART/ENTER.
Presser le bouton "Burger King Logo" (sur la barre des bou-
tons) jusqu'à ce que tous les affichages indiquent PO et les
voyants des boutons PAN tournent au rouge.
Appuyer sur le bouton PAN à côté de l'affichage à modifier. Le
voyant tournera du rouge au jaune et l'affichage passera de
PO au produit en sélection.
Les menus apparaissent tour à tour sur cet affichage.
Lorsque le menu désiré est affiché, lâcher le bouton DAY-
PART/ENTER. Les produits alimentaires constituant le menu
apparaîtront sur les affichages PAN supérieurs et inférieurs.
Lorsque vous changez de menu, toutes les minuteries activées
avant le changement afficheront le nom du produit du menu
précédant en le faisant clignoter. Appuyer sur le bouton PAN à
côté de l'affichage clignotant afin de désactiver la minuterie :
l'affichage cessera alors de clignoter.
1
1
3Répéter les étapes 2-3 au besoin.
Appuyer sur le bouton "Burger King Logo" pour quitter le
mode utilisateur.
Note : Un panier peut-être mis en mode "non en service" en
sélectionnant "__" comme produit.
4
2
2
Presser les flèches de défilement HAUT et BAS pour choisir le
produit désiré.
Presser le bouton DAYPART/ENTER pour enregistrer la sélec-
tion. PO apparaîtra sur tous les autres affichages.

DHB-BK1 541-520 Rev. D Imprimé aux Etats-Unis 0506 © 2003
19
Panier pour Produit
Série DHB-BK
Changer les valeurs des temps assignées aux fonctions d’attente et de fin de cuisson.
Le menu SET PRODUCT TIME sert à modifier les temps des fonctions d'Attente et d'Alarme de Fin de Cuisson.
Presser le bouton "Burger King Logo" sans relâcher et appuyer immédiatement sur le bouton DAYPART/ENTER et garder pressé jusqu'à ce
qu'apparaisse l'un des quatre menus utilisateur.
Utiliser les flèches de défilement HAUT et BAS pour faire défiler le menu POUC M⇑ ⇓ (Fixer Temps Produit).
Presser puis relâcher le bouton DAYPART/ENTER pour accéder
au menu Set Product Time. Le message M⇑ ⇓ .
apparaîtra sur l'affichage.
Utiliser les flèches de défilement HAUT et BAS pour faire défiler
la liste des produits. À affichage du produit désiré, presser le
bouton DAYPART/ENTER pour le sélectionner.
NOTE : Si vous appuyez sur les boutons HAUT et BAS pendant
plus de 2 secondes, la liste des produits commencera à défiler
automatiquement vers le haut ou vers le bas.
L'affichage indiquera alors HOL 00 ⇑ ⇓ .
L'affichage indiquera PO M⇑ ⇓ .
Répéter les étapes 2-4 pour tout autre produit.
Presser et relâcher le bouton BURGER KING LOGO à tout
moment pour sortir du mode utilisateur et retourner sur le
mode fonctionnement.
NOTE : Si le bouton DAYPART/ENTER n'a pas été pressé afin
de sauvegarder les changements, le programme retournera
automatiquement aux valeurs originales.
Le message COOK :01 ⇑ ⇓ apparaîtra sur l'affichage.
1
3
45
2
Bouton "Burger King Logo" Bouton "DayPart/Enter"
Utiliser les flèches de défilement HAUT et BAS pour sélectionner le
temps d'attente désiré. Lorsque le temps d'attente désiré s'af-
fichera, presser le bouton DAYPART/ENTER pour enregistrement.
NOTE :Le temps d'attente ne peut pas être inférieur au temps
assigné à la fonction Alarme Fin de Cuisson (Cook More) plus une
minute.
NOTE : Le temps de cuisson ne peut être supérieur au temps
d'attente plus une minute.
Utiliser les flèches de défilement HAUT et BAS pour sélectionner
le temps de cuisson désiré. Lorsque le temps de cuisson est
affiché, presser DAYPART/ENTER pour l'enregistrer.

DHB-BK1 541-520 Rev. D Imprimé aux Etats-Unis 0506 © 2003
20
Panier pour Produit
Série DHB-BK
Changement du Nom de Produit
Le menu EDIT PRODUCT NAME sert à substituer un nom de votre choix au nom de produit par défaut.
Appuyer sur BURGER KING LOGO sans relâcher, puis presser immédiatement DAYPART/ENTER jusqu'à ce que l'un des quatre menus utilisa-
teur s'affiche.
Utiliser les flèches de défilement HAUT et BAS pour faire défiler le menu jusqu'à L P O XXXX ⇑ ⇓ (Modifier Nom Produit).
NOTE : Par défaut, les noms à modifier sont : BACN, POP, MOZ, SPCY et de EXP1 à EXP9.
Presser et relâcher le bouton DAYPART/ENTER pour accéder
au menu Product Name.
Utiliser les flèches de défilement HAUT et BAS pour faire
défiler la liste de produits. Lorsque le produit recherché appa-
raît, appuyer sur DAYPART/ENTER pour le sélectionner.
La première lettre du nom de produit (dans ce cas, le ) clig-
notera.
L'affichage marquera alors PO M ⇑ ⇓ .
Répéter les étapes 2-4 pour chacun des produits
Presser et relâcher le bouton BURGER KING LOGO à tout
moment pour quitter le mode utilisateur et retourner en mode
fonctionnement.
NOTE : Si le bouton DAYPART/ENTER n'a pas été pressé pour
sauvegarder les modifications, le programme rétablira les
noms originaux.
1
3
5
2Pour modifier le E, presser les flèches de défilement HAUT et
BAS pour sélectionner la lettre/le numéro/le symbole désiré.
Lorsque le caractère désiré est sélectionné, presser le bouton
PAN pour changer le caractère suivant. Répéter la même opéra-
tion pour tous les autres caractères.
NOTE : Si vous pressez les flèches de défilement HAUT et BAS
pendant plus de deux secondes, l'affichage défilera automatique-
ment vers le haut ou vers le bas.
Lorsque les quatre caractères auront été modifiés, presser
sur le bouton DAYPART/ENTER pour enregistrer le nouveau
nom choisi.
4
Bouton "Burger King Logo" Bouton "DayPart/Enter"
This manual suits for next models
4
Table of contents
Languages:
Other Prince Castle Food Warmer manuals