Pro Breeze PB-P07 User manual

Instruction Manual
PB-P07
Air Purier with UV, Ionizer and 3-Layer Filtration System
IMPORTANT INSTRUCTIONS
- RETAIN FOR FUTURE USE

1 | English
AIR PURIFIER
MODEL PB-P07
Thank you for choosing to purchase a product from Pro Breeze. Please read the entire manual
carefully prior to rst use and keep in a safe place for future reference.
SAFETY INSTRUCTIONS
―
―
WARNING: TO AVOID THE RISK OF
ELECTRICAL SHOCK, FIRE OR INJURY
TO PEOPLE, ALWAYS MAKE SURE THE
APPLIANCE IS UNPLUGGED FROM
THE ELECTRICAL OUTLET BEFORE
RELOCATING, SERVICING, OR CLEANING IT.
• Use this appliance only as described
in this manual. Any other use not
recommended by the manufacturer may
cause re, electric shock, or injury to
person.
• The appliance is not to be used by
persons (including children) with
reduced physical, sensory or mental
capabilities, or lack of experience and
knowledge, unless they have been given
supervision or instruction.
• The appliance must have a minimum
50cm clearance around all sides.
• Children must be supervised not to play
with the appliance.
• Children of less than 3 years should
be kept away unless continuously
supervised.
• Do not leave children alone or
unattended in the area where the
appliance is in use.
• Cleaning and user maintenance shall not
be made by children unless continuously
supervised.
• Place the appliance on a at, stable
and dry surface and always keep
the appliance in an upright position.
Operating the appliance in any other
position could cause a hazard.
• There may be trace of odour during the
rst few minutes of initial use. This is
normal and will quickly disappear.
• Do not cover, obstruct or push objects
into the vents and opening of the
appliance as this may cause an electric
shock, re or damage the appliance.
• Never place anything on top of the
appliance.
• Do not operate the appliance with wet
hands.
• Do not operate the appliance without
the lter.
• Do not use this appliance near water
or in the immediate surroundings of a
bath, shower or a swimming pool. Never
locate the appliance where it may fall
into a bathtub or other water container.
• Do not allow water or other liquids to
run into the interior of the appliance, as
this could create a re and/or electrical
hazard.
• This appliance is intended for indoor
household use and similar applications.
Do not use outdoors.
• Avoid placing the power cord in areas
where it can become a tripping hazard.
Do not place the power cord under
carpeting or cover it with rugs, runners
or similar.
• To avoid a circuit overload when using
this appliance, do not operate another
high-wattage appliance on the same
electrical circuit.
• Always plug the appliance directly into a
wall socket. Avoid using extension leads
where possible as they may overheat
and cause a risk of re.
• Do not use this appliance with an
external programmer, timer switch or
any other device which would switch
the appliance on automatically unless
this has already been pre-built into the
appliance by the manufacturer.
• Do not kink or wrap the power cord
English | 2
and plug around the appliance, as this
may cause the insulation to weaken
or split, particularly where it enters the
appliance.
• Do not pull on the mains cable. Never
move, carry or hang the appliance by
the mains cable.
• Ensure the mains cable is fully extended
before use and arrange it so that it is not
in contact with any part of the appliance.
• Do not operate the appliance with any
safety guards removed.
• Do not operate the appliance if there
are signs of damage to the appliance,
power cord, or any of the accessories
supplied. If the supply cord is damaged,
it must be replaced by the manufacturer,
its service agent or a similarly qualied
person in order to avoid a hazard.
• Do not attempt to repair or adjust any
electrical or mechanical elements in the
appliance. Doing so may be unsafe and
will void your warranty.
• Ensure that the mains supply (including
voltage, frequency and power) complies
with the rating label of the appliance.
• Do not use the appliance near petrol,
paints, ammable gases, ovens, or other
heating sources.
SPECIFICATIONS
―
―
• Voltage: 220-240V~
• Frequency: 50-60Hz
• Power: 50W
• Size: 26 x 26.3 x 52.7cm
• Net Weight: 5.15Kg
• Gross Weight: 7.0Kg
• Clean Air Delivery Rate (CADR): 518m3/h
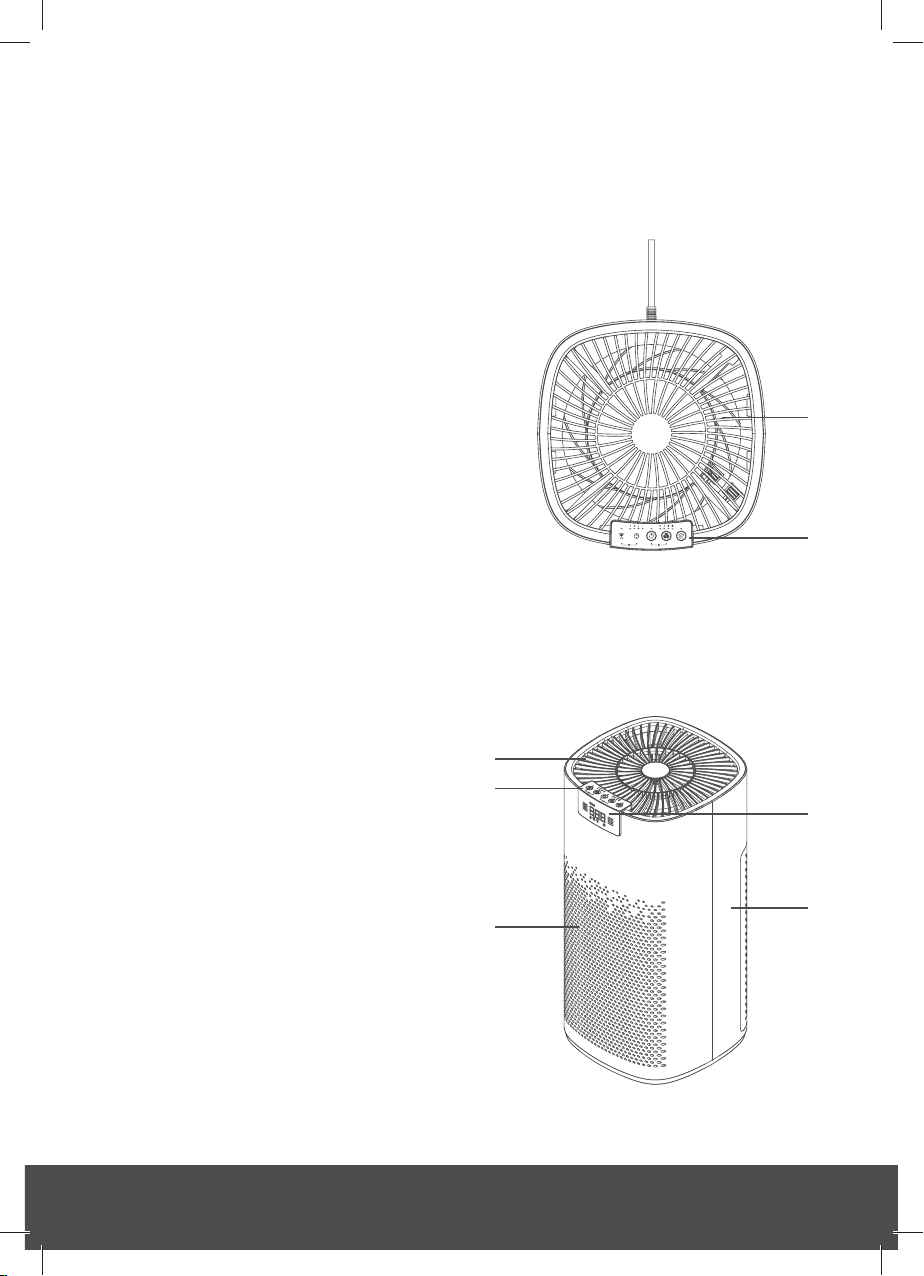
PARTS
―
―
Top
1. Air outlet
2. Control panel
1
2
Front
3. Air intake
4. Display
5. Main body
1
2
3
4
5
3 | English
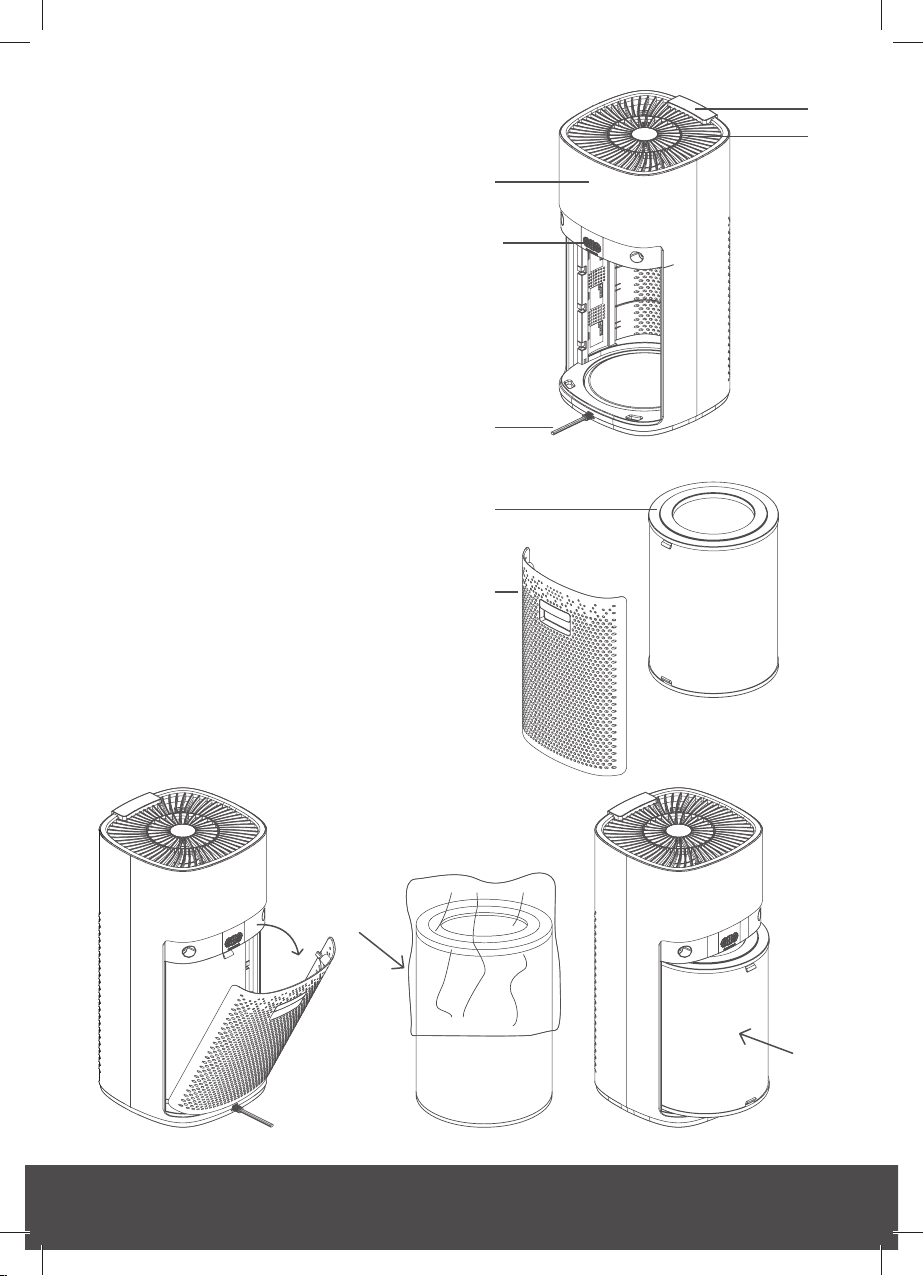
Back
6. Filter
7. Power Cord
8. Filter Cover
9. Ionizer
10. UV-C
9,10 are inside and well-hidden in the device.
BEFORE YOU USE
―
―
Prior to rst use, please ensure you follow
the steps below:
A. Open the lter cover
B. Remove the lter from air purier and
remove its PE bag
C. Insert the lter back into the air purier
D. Re-attach the lter cover
7
10
9
8
6
2
1
AB
C
English | 4
D
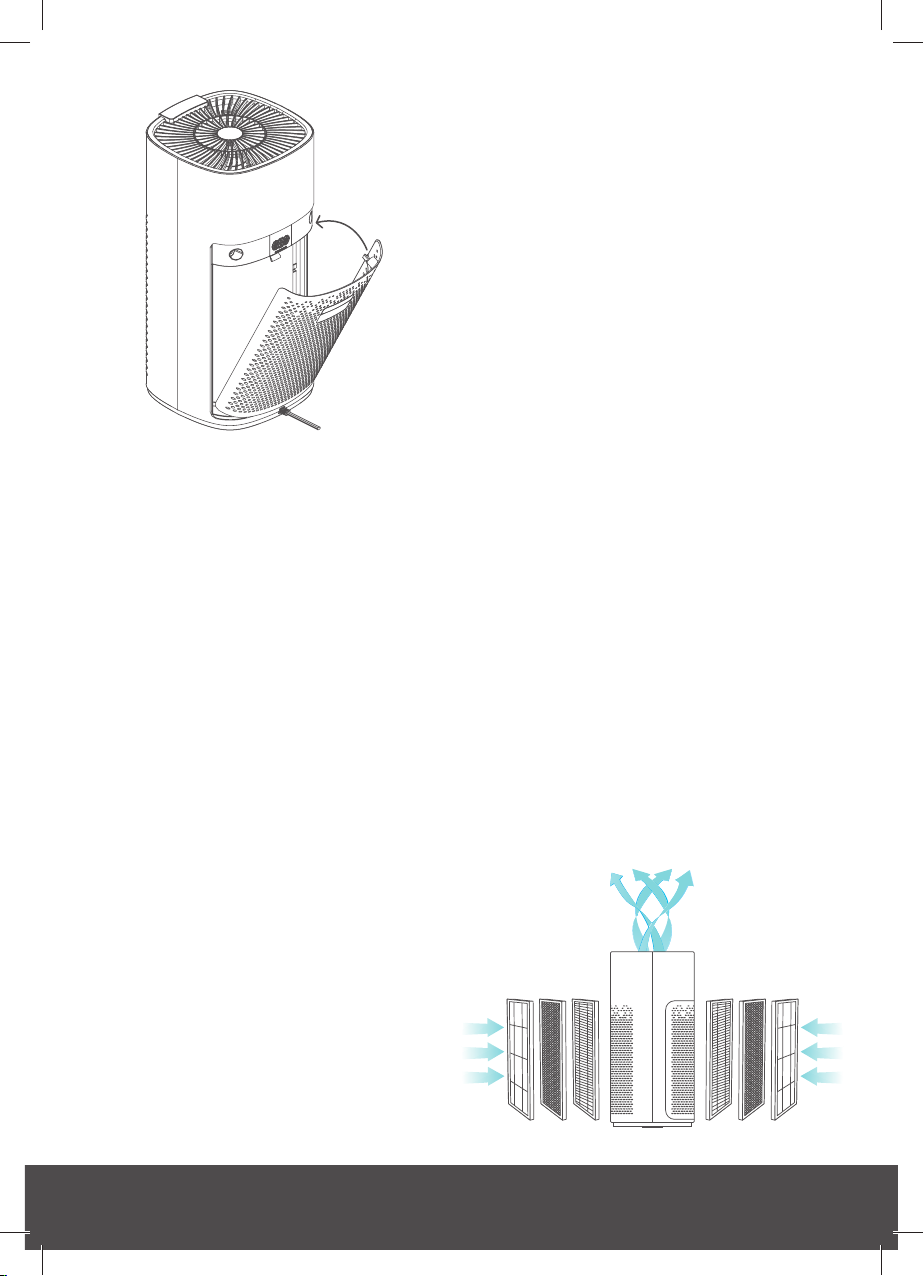
HOW IT WORKS
―
―
Your Pro Breeze Air Purier removes up to
99.95% of dust, bacteria, and allergens from
the air. A 5-way purication system includes
3-layers of ltration, built-in Ultraviolet (UV)
LED sterilisation technology, and a negative
ion generator to help you to create an
invigoratingly clean living or working space.
• 3-Layer Filtration:
1. Fine Preliminary Layer: for large
airborne particles, and to help protect
the lifespan of the HEPA lter.
2. True HEPA 12 Filter Layer: HEPA
captures airborne particles as small as
0.3 microns such as dust, pollen, mould
spores and airborne mites.
3. Micro Granular Activated Carbon
Layer: Removes pet odours, smoke
odours and harmful gases such as
formaldehyde and benzene. With 98%
Total Volatile Organic Compounds
(TVOCs) and 99% Formaldehyde
removable rate, the micro granular
activated carbon is evenly distributed
and will purify air 5-10 times more
thoroughly than traditional large granular
activated carbon lters.
• Deep Ultraviolet (UV) LED Sterilisation
Technology: Our UV LED sterilisation
technology adopts wavelengths of
between 260 and 280nm of UV-C light.
This technology can be used for killing
99.9% of odour causing bacteria,
certain moulds and other allergens by
destroying DNA & RNA. This is non-
toxic, non-residual, and odourless, and
can eectively kill most bacteria in 1-40
seconds. Our UV light is installed inside
the air purier to reduce exposure and
does not need replacing unlike more
traditional UV lights.
Deep UV LED vs. Traditional UV mercury
lamp: UV LED is more than 1,000 times
more eective than a traditional UV-C
mercury lamp. Unlike the traditional
mercury lamp, UV LED does not contain
any toxic substances and is more
environmentally friendly.
• Negative Ion Generator: Releases
negative ions into the air to eliminate
airborne bacteria and contaminants.
The negative ions bind to and neutralise
airborne pollutants for a cleaner
environment. The ultra-powerful Pro
Breeze negative ion generator generates
more than 2 million negative ion outputs.

5 | English
DISPLAY & INDICATORS
―
―
1. Child Lock
2. Ionizer
3. UV LED
4. Change Filter Indicator
5. Air Quality Light Indicator
6. PM 2.5 Standard
PM2.5
―
―
1. PM 2.5 Standard - PM 2.5 is a scale
for measuring the number of particles
smaller than 2.5 microns in the air (a
human hair measure 50-70 microns in
diameter). This is converted into an air
quality index whereby the lower the
number, the better the air quality.
2. Air Quality Light Indicator - The Air
Quality Index will be displayed on the
screen. The appliance will also light up
based on the following scale:
• Green (Excellent Air Quality)
- PM2.5 < 75 µg/m3
• Yellow (Medium Air Quality)
- 76 < PM2.5 < 150 µg/m3
• Red (Bad Air Quality)
- PM2.5 < 151 µg/m3
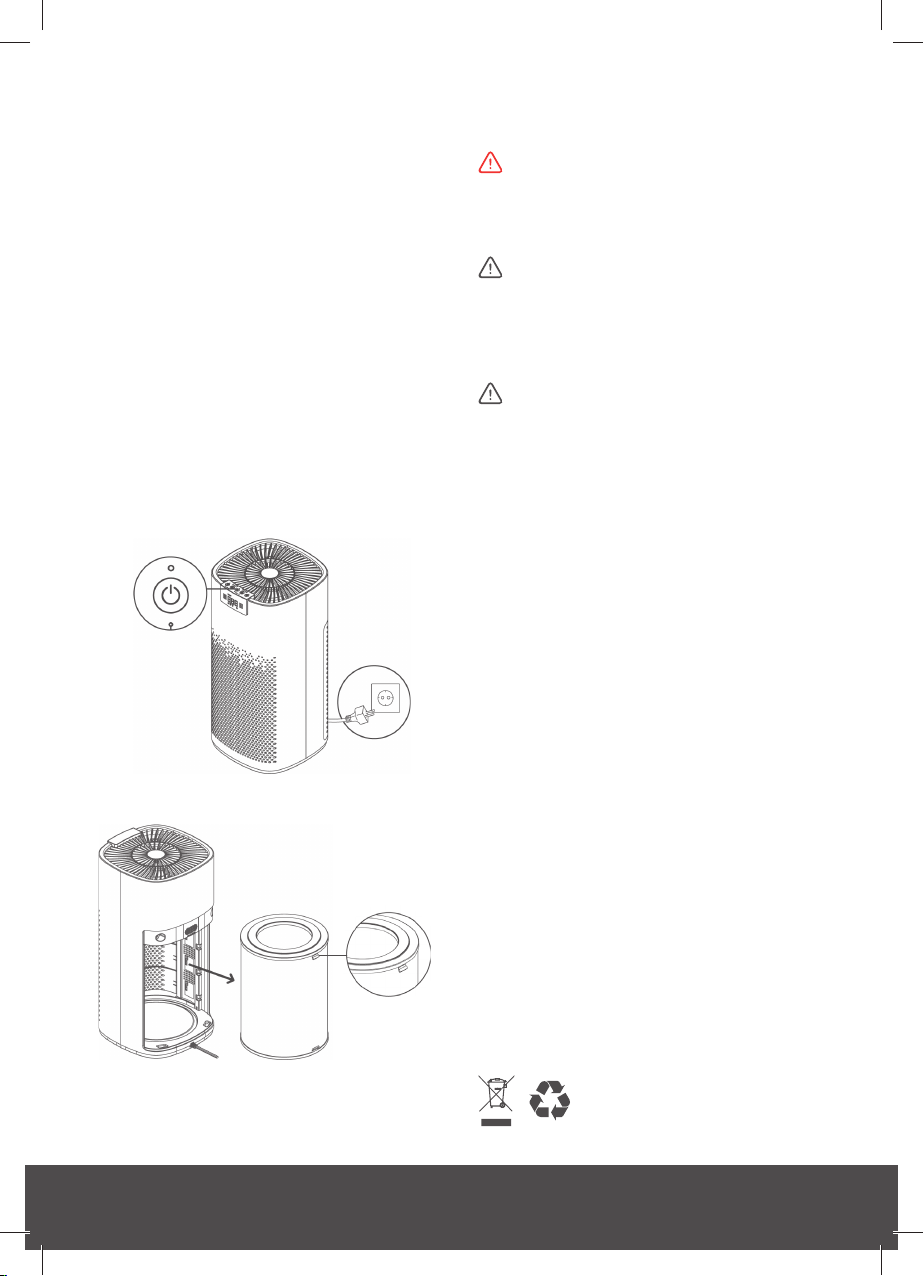
CONTROLS
―
―
• ON/OFF Button: Press ON/OFF button
once to turn the device on or o.
• UV Button: UV mode will activate the
invisible UVC light. For more information
on how it works, please see the HOW
IT WORKS section above or visit
Probreeze.com
1. The device will automatically start with
UV mode o.
2. Press the UV button to turn the mode
on/o. The indicator light will illuminate
on/o.
• Timer Button: Timer mode can be used
to turn the device o automatically (after
1, 2, 4, or 8 hours).
1. When the device is on, press the timer
button until the desired time appears on
the screen.
2. The device will automatically turn o
when the time is reached.
• Speed Button: There are four speed
options: Sleep, Low, Mid and High.
When Sleep Mode is selected, the
device will continue to run, but all lights
will turn o.

English | 6
1. The device will start in low speed
mode -
2. Press the SPEED button to manually
change the speed. The indicator light
will illuminate on your selected speed.
3. To select Sleep Mode - , press the
SPEED button until Sleep Mode is
illuminated. The device will continue to
work in sleep mode. All lights will turn o
apart from the sleep mode indicator light.
4. To turn o sleep mode, press the SPEED
button again.
• AUTO Button: When under auto mode,
the device will adjust the fan speed
automatically, according to the air
quality.
1. Press the AUTO button once to turn on
auto mode.
2. To turn o the auto mode, press the
speed button.
+ =
• ON/OFF + Speed Button = Child Lock
Button
1. Press and hold the ON/OFF and SPEED
buttons simultaneously for 5 seconds
to activate or deactivate the child lock
mode.
2. When in child lock mode, all other
buttons will be disabled.
+ =
• UV + Timer Button = Filter Reset
Button
1. After 2,000 hours of use, the lter
indicator light ashes and the device will
beep as a reminder to replace the lter.
2. If the lter needs replacing, press
and hold the UV and TIMER buttons
simultaneously for 5 seconds after you
have replaced the lter to reset the
device.
Note: For your safety, the device will
automatically stop working and show “E1” on
the display, if the lter cover is opened.
+ =
• Timer + ON/OFF Button = Negative
Ion Generator Button
1. The device will start in with the negative
ion generator on.
2. Press and hold the TIMER and ON/OFF
buttons simultaneously for 5 seconds to
turn the Negative Ion Generator on/o.
The indicator light will illuminate on/o.
REPLACING THE FILTER
INSTRUCTIONS
―
―
WARNING: ALWAYS TURN THE
APPLIANCE OFF AND UNPLUG THE
POWER CORD FROM THE ELECTRICAL
OUTLET BEFORE HANDLING AND
REPLACING THE FILTER.
We recommended cleaning the lter with a
vacuum cleaner once a month and replacing
the lter every 6 to 12 months, or after 2,000
hours of use. After 2,000 hours of use, the
lter indicator light will ash and beep as a
reminder to replace the lter. You may need
to replace the lter earlier depending on the
environment of the room.
Note: this lter is for Pro Breeze PB-P07 Air
Purier use only. For replacement lters visit
www.probreeze.com
7 | English
To replace the lter:
1. Shut down the appliance and turn the
power o. (Figure 1)
2. Open the lter cover by lightly pulling
the handle.
3. Remove the lter by pulling out the tab
at the top of the lter. We recommend
that you have a bag ready to prevent the
pollutants on the lter falling back into
the room (Figure 2).
4. Insert the new lter and re-attach the
door cover.
5. Press and hold the "UV" and "timer"
buttons simultaneously for 5 seconds
after you have replaced the lter.
Replacement Filter Model Number:
PB-P07F
CLEANING & STORAGE
―
―
WARNING: ALWAYS TURN THE
APPLIANCE OFF, UNPLUG THE POWER
CORD FROM THE ELECTRICAL OUTLET
BEFORE HANDLING OR CLEANING IT.
CAUTION: DO NOT ALLOW WATER
OR OTHER LIQUIDS TO RUN INTO THE
INTERIOR OF THE APPLIANCE, AS
THIS COULD CREATE A FIRE AND/OR
ELECTRICAL HAZARD.
CAUTION: DO NOT USE ANY
ABRASIVE CLEANERS OR SOLVENTS, AS
THIS CAN DAMAGE THE APPLIANCE.
• Clean the exterior surface of the
appliance by wiping it with a soft, damp
cloth. Dry the appliance with a soft,
clean cloth.
• Clean the vents and openings of the
appliance regularly with a vacuum
cleaner, using the brush attachment to
avoid any dust build-up.
• To extend the lifespan of the lter,
a vacuum cleaner, using the brush
attachment can be used to remove dust
from the surface of the lter.
• Store the appliance in a safe, clean and
dry place, out of reach of children when
not in use.
RECYCLING & DISPOSAL
―
―
The packaging of your new product has a
recycle mark on it. Please dispose of it as
recycled paper. Waste electrical products
should not be disposed of with general
household waste. This is to prevent the
possible harm to the environment and human
well-being. Contact your local council or
government for information regarding the
collection schemes in your area.
Figure 1
Figure 2

8

9

10
One Retail Group, Ryland House
24a Ryland Road, London, NW5 3EH, United Kingdom
EU Authorised Representative: Brandrep Limited, The Black Church
St Mary's Pl N, Dublin, D07 P4AX, Ireland
© Copyright 2021
Other manuals for PB-P07
2
Table of contents
Other Pro Breeze Air Cleaner manuals

Pro Breeze
Pro Breeze PB-P01F User manual

Pro Breeze
Pro Breeze PB-P03 User manual

Pro Breeze
Pro Breeze PB-P01 User manual

Pro Breeze
Pro Breeze PB-P07 User manual

Pro Breeze
Pro Breeze PB-P02 User manual

Pro Breeze
Pro Breeze PB-P06-US User manual

Pro Breeze
Pro Breeze PB-P03 User manual

Pro Breeze
Pro Breeze PB-P07 User manual


