PROEL EXaverb User manual

Sound Processor
www.proelgroup.com
Designed and Engineered by Proel
UK
USER MANUAL

Proel Sound Processors User Manual
2
SAFETY INSTRUCTIONS
In order to avoid damage to unit hardware and electronic parts during unit use and/or maintenance following safety instructions must be
heed. Before using the unit please read these instructions. Follow all instructions and keep this instruction manual.
- Be careful that unit operation may not cause damage to people.
- Place the unit in a location protected from weather and far from water and moisture.
- Don’t place this unit close to heat sources (radiators spots amplifiers etc.).
- Avoid any liquid entering inside the unit.
- Connect this unit to a power supply line able to support unit power consumption checking power supply line good operating conditions.
- Be careful that power supply line has an efficient ground line.
- Disconnect the unit from a. c. power socket during lighting storms or when unused for long periods of time.
Refer all servicing to qualified service personnel. Servicing is required when the apparatus has been damaged in any way such as:
- Detective connections and/or on connections cables.
- Liquid has spilled inside the unit.
- The unit has fallen or has been damager or doesn’t operate normally.
No user-serviceable parts inside. Refer servicing to an authorized maintenance centre.
Proel Sound Processor units comply with EMC Directive 89/336/CEE (Directive on approximation of member nation's ordinance
concerning the electromagnetic compatibility) and following modifications 92/31/CEE and 93/68/CEE as stated in EN 50082-1:1997 EN
55013:1990 EN 55020:1994 standards. These units comply to Low Voltage Directive 73/23/EEC (Directive on approximation of member
nation's ordinance concerning electric equipment designed to be used within the specified voltage range) and following modifications
93/68/CEE as stated in EN 60065:1998 standard.
To avoid electric shock don’t open this unit. To prevent risks of fire and/or electric shock don’t expose this unit to rain or moisture.
PACKAGING
This unit package has been submitted to ISTA 1A integrity tests. We suggest you control the unit conditions immediately after unpacking
it. If any damage is found immediately advise the dealer. Keep all unit packaging parts to allow inspection. Proel is not responsible for any
damage that occurs during shipment.
SHIPMENT AND COMPLAINT
Products are sold “delivered ex warehouse” and shipment is at charge and risk of the buyer.
Possible damages to unit should be immediately notified to forwarder. Each complaint for manumitted package should be done within
eight days from product receipt.
WARRANTY AND PRODUCTS RETURN
Proel Sound Processor products have operating warranty and comply their specifications as stated by manufacturer. Proel warrants all
materials workmanship and proper operation of this product for a period of two years from the original date of purchase. If any defects are
found in the materials or workmanship or if the product fails to function properly during the applicable warranty period the owner should
inform about these defects the dealer or the distributor providing receipt or invoice of date of purchase and defect detailed description.
This warranty does not extend to damage resulting from improper installation misuse neglect or abuse. Proel S.p.A. will verify damage on
returned units and when the unit has been properly used and warranty is still valid then the unit will be replaced or repaired. Proel S.p.A.
is not responsible for any "direct damage" or "indirect damage" caused by product defectiveness.
INSTALLATION
Product installation is in professional 19” standard rack.
DISCLAIMER
Proel Sound Processor products have been expressly designed for audio application with signals in audio range (20Hz to 20kHz). Proel
has no liability for damages caused in case of lack of maintenance modifications improper use or improper installation non-applying
safety instructions.
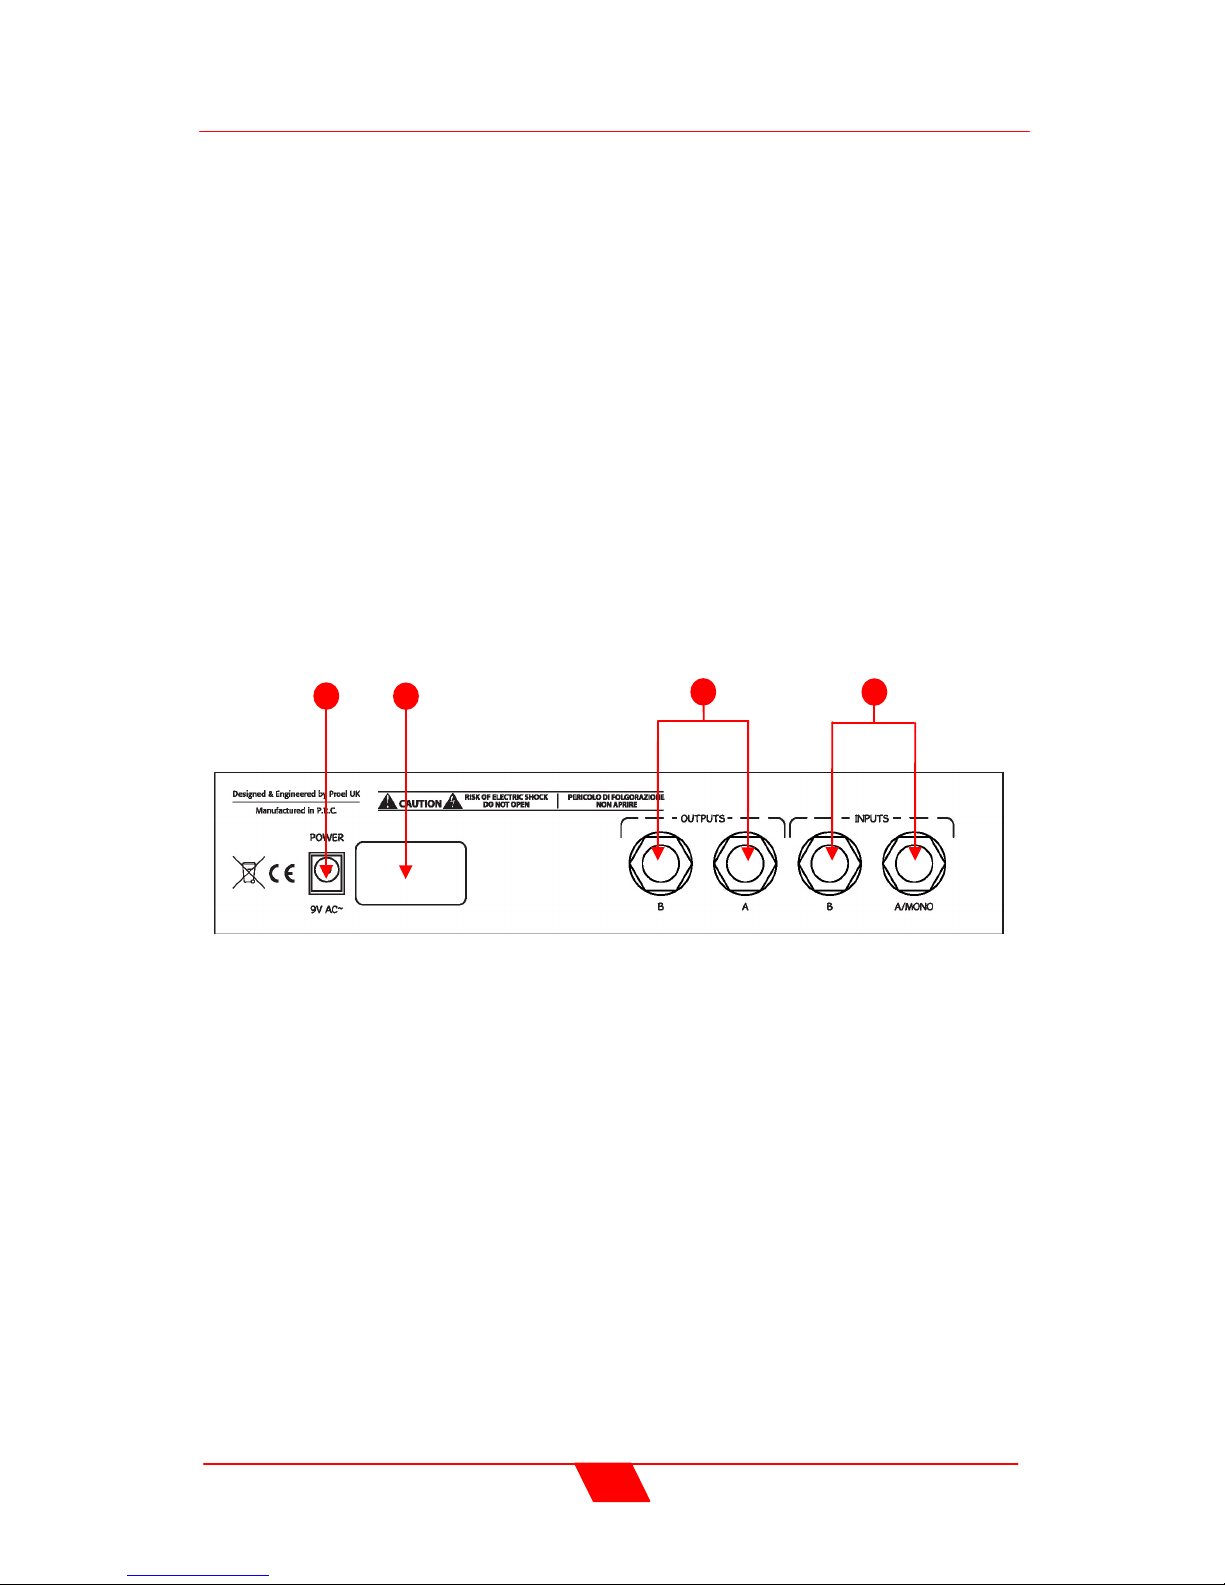
POWER SUPPLY
Proel Sound Processor products are provided with 9V a. c. power these units may be damaged when used with a different power supply
or a power supply supplying d. c. power. It’s possible to use the Proel PPS62A rack mounting power supply. The use of different power
supply or adapters will expire terms of Proel S.p.A. liability as well as the terms of warranty.
Proel S.p.A. reserves the right to change these specifications at any time without notice.

Proel Sound Processors User Manual
3
Contents
SAFETY INSTRUCTIONS ..............................................................................................................2
CONTENTS ....................................................................................................................................3
PROEL EXAVERB QUICK START GUIDE .................................................................................4
FRONT PANEL...............................................................................................................................5
REAR PANEL.................................................................................................................................7
PROEL RAPTOR QUICK START GUIDE....................................................................................8
FRONT PANEL...............................................................................................................................9
REAR PANEL...............................................................................................................................10
TABLE 1 EXAVERB EFFECTS VARIABLE PARAMETERS ....................................................11
TABLE 2 EXAVERB EFFECTS DESCRIPTION.........................................................................12
EXAVERB & RAPTOR TECHINCAL SPECIFICATIONS .............................................................13
HOOK-UP WIRING EXAMPLES (EXAVERB) ..............................................................................14
FRONT PANEL SETTING (EXAVERB):.......................................................................................14
HOOK-UP AND SETTING EXAMPLE (RAPTOR)........................................................................15
FRONT PANEL SETTING (RAPTOR) ..........................................................................................16
INSERT (“Y” SHAPED) CABLE CONNECTION ..........................................................................16

Proel Sound Processors User Manual
4
Proel exaverb Quick Start Guide
To connect this unit you need unbalanced (TS) ¼” cables carrying line level signals from your
mixer or other line level source to be connected to ¼” jacks of this unit rear panel.
If your sound source is monophonic please connect the cable to “LEFT/MONO” input jack only.
For stereo sound sources use both “LEFT/MONO” and “RIGHT” jacks by connecting two discrete
cables to each of the two inputs.
Set the output level of your sound source (mixer or other line level source) and the input gain
(“INPUT LEVEL”) so that “CLIP” LED will never turn on.
Connect unit outputs (“OUTUPT LEFT” and “OUTPUT RIGHT”) to your mixer effects return or
stereo line level input.
Please make sure “FX/BYPASS” LED is turned off.
Rotate the “OUTPUT LEVEL” knob until reaching the desired output signal level.
Now you can choose the effect you want to use by rotating the selection knob (7).
Using “MIX” knob set the quantity of direct signal (DRY) versus effect signal (WET) to be sent to
outputs.
In order to obtain the best possible results please refer to page 14 connections examples.

Proel Sound Processors User Manual
5
Front Panel
1) INPUT LEVEL Knob
This knob allows you to set input signal gain.
2) Mix Knob
This knob is useful to balance original sound versus effect sound to zetaverb output. Rotating the
knob counter clockwise (towards “DRY”) you’ll listen more of the original signal. Rotating the knob
clockwise (towards “WET”) you’ll listen more effect.
3) OUTPUT LEVEL Knob
This knob sets the output level of overall signal from the processor.
4) CLIP LED
This LED turns on when the processor input signal level is too high. In this case you should reduce
the input level by “INPUT LEVEL” knob.
) VARIATION Knob
This knob allows you to modify the value of the parameter associated to each effect.
Each effect parameters editable using the “VARIATION” knob are listed in TABLE 1 (page 11).
At each effect change the last selected parameter value is stored. When an effect is recalled the
stored parameter value is recalled regardless of current position of VARIATION knob. Thus in this
condition by rotating the knob there could be no value exchange unless the VARIATION knob
passes thru stored VARIATION value point. Once the VARIATION knob passes thru the stored
point it’s possible to modify the effect value. In order to verify that VARAITION knob has passed
the stored value point you can see the FX/BYPASS LED (8) in this case the LED will briefly flash.
1
2
3
4
5
6
7
9
8
10 11
This manual suits for next models
1
Table of contents
Languages:
Other PROEL Recording Equipment manuals