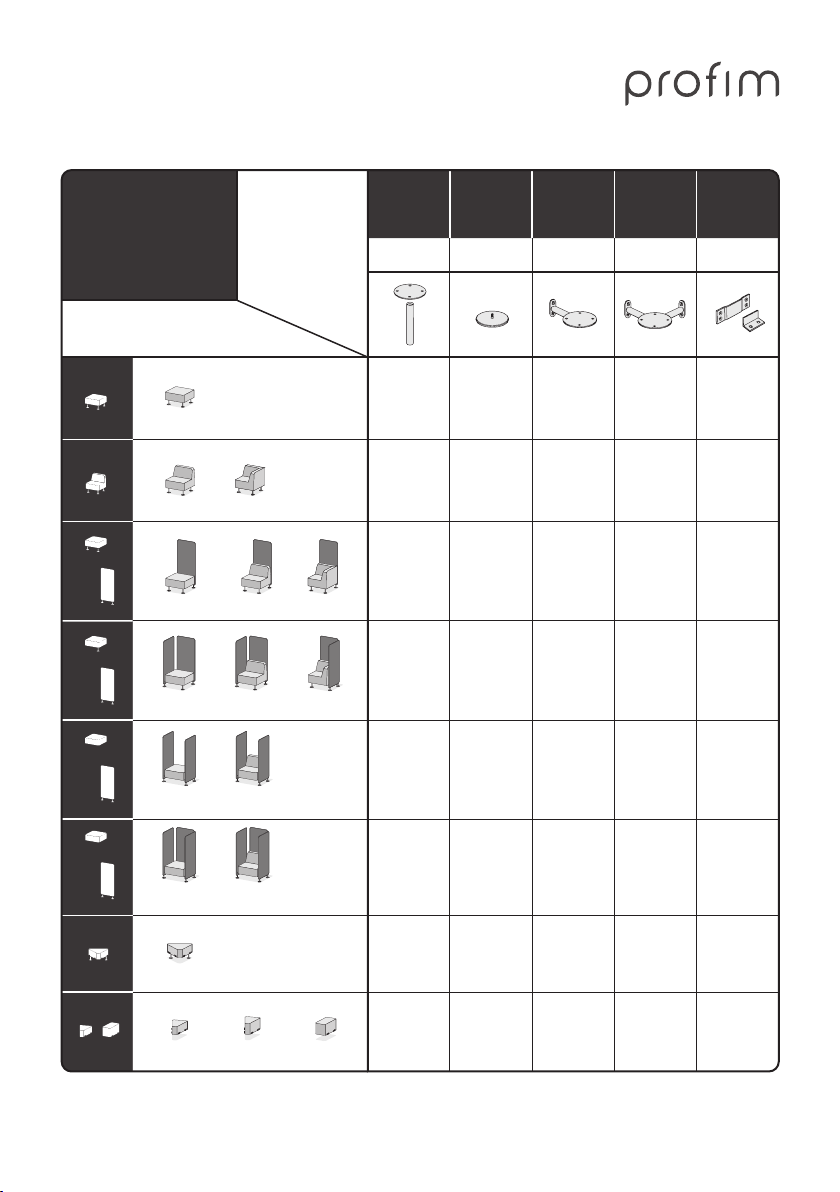
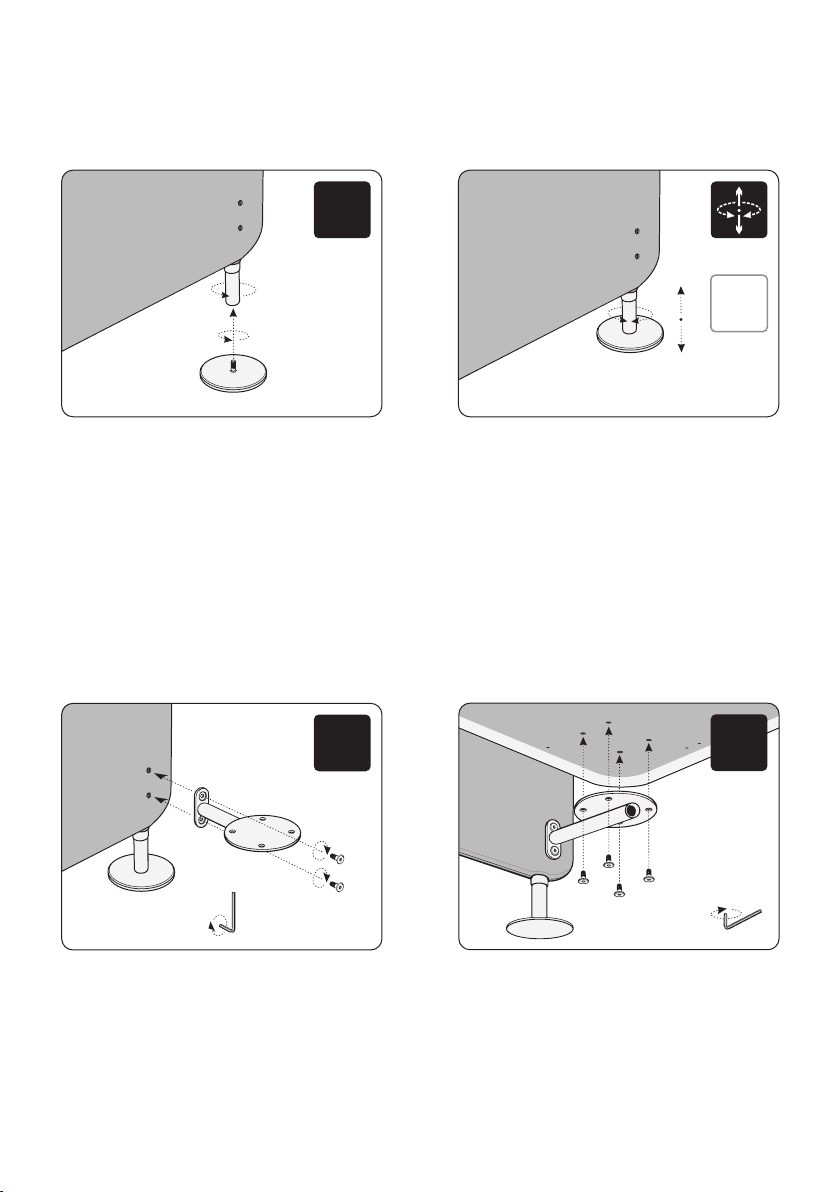
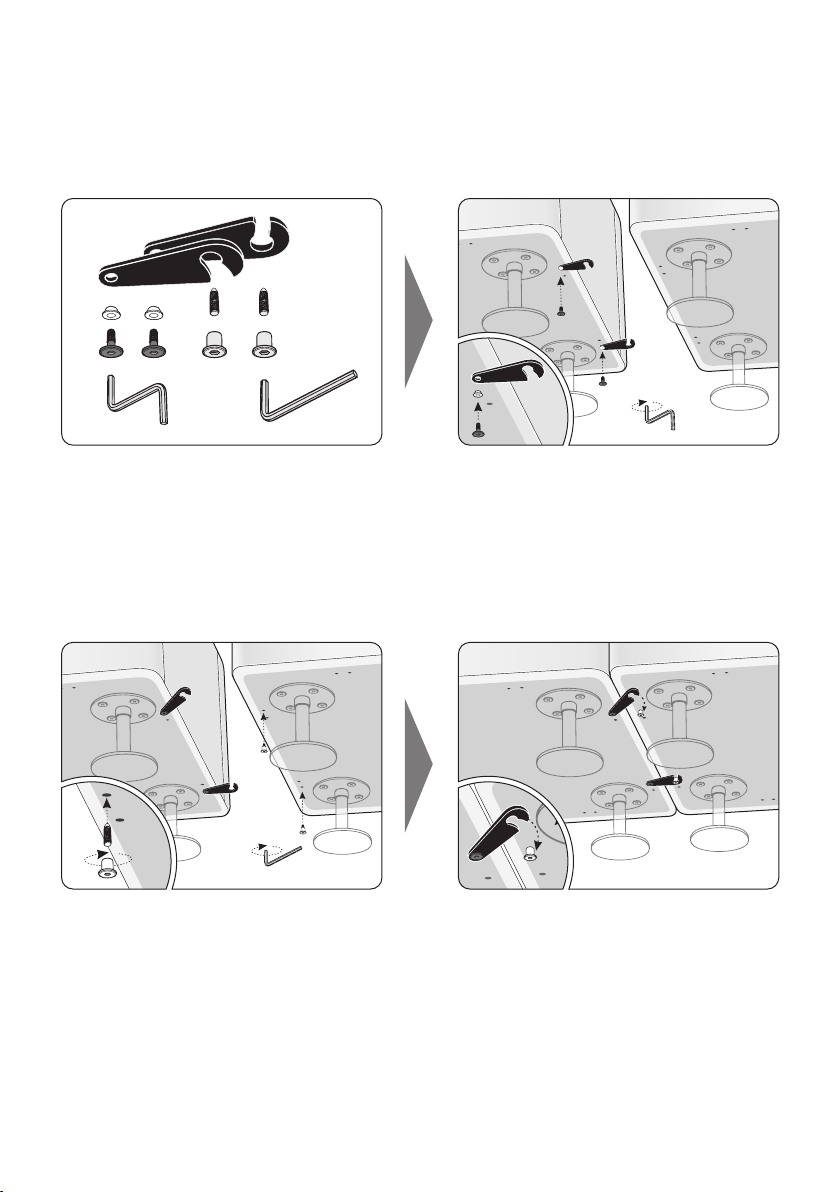
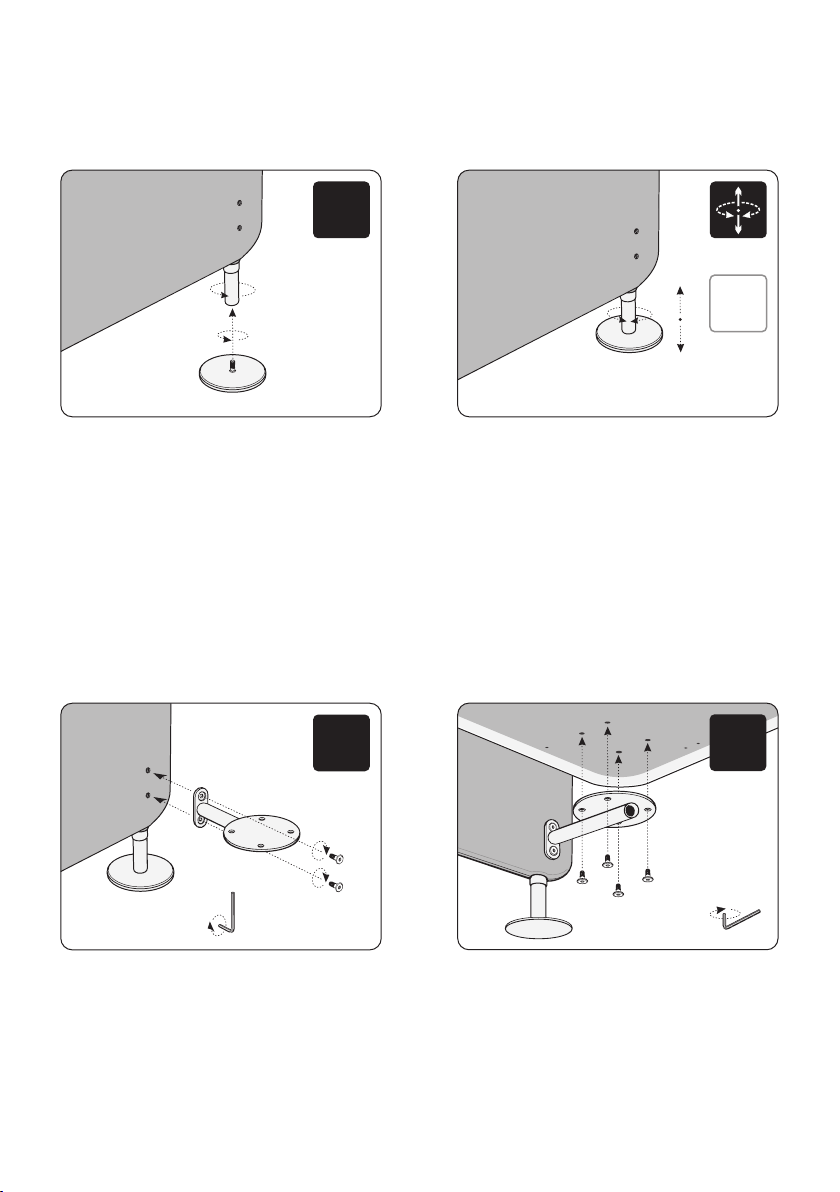
Profim WALL IN User manual

M037 WALL IN
Instrukcja montażu
Assembly instructions
Montageanleitung
Instructions de montage
Инструкция по сборке
Návod k montáži

Polski Strona 3
English Page 9
Deutsch Seite 15
Français Page 21
Русский Страница 27
Český Strana 33
u
u
u
u
u
u

3
INSTRUKCJA MONTAŻU
systemu recepcyjnego
Sugerowana ilość osób do montażu – 2 osoby.
WALL IN
4
*
-
-
-
-
-
-
2 2 - -
-1 2 1
-
- -
4
2
- -
2
noga pufy /
fotela / stolika łącznik
pojedynczy łącznik
narożny
KONFIGURACJA
10 / B
x
11 / BW1 + 1 W11
x
12 / BW2 + 2 W11
x
12 + 2 W11
x
13 + 3 W11
20
x
21 + 1 W11
x
22 + 2 W11
x
22 + 2 W11
23 + 3xW11
30
x
31 + 1 W11
x
32 + 2 W11
x
2
+
x
2
+
x
1
+
+
x
3
C2 / B2
C1/ B1 P1 P3
zaczep
pufy
2 4
4
- -
---
* nie dotyczy, modele pakowane na gotowo.
ELEMENTY
MONTAŻOWE
Tabela obrazująca ilość
i rodzaj elementów
montażowych: A, B, C, D, E
w poszczególnych
konfiguracjach
systemu WALL IN.
A B DC E
stopka
nogi
4
4
5
4
6
-
2
*

4
2.2. REGULACJA WYSOKOŚCI
2.1. MONTAŻ STOPKI NOGI
Przykręcić stopkę do nogi ścianki.
+
A
element
B
element
+
B
element
A
element
1.1. MONTAŻ NOGI 1.2. MONTAŻ NOGI
Za pomocą 4 śrub lekko przykręć górną część nogi. Następnie dokręć
kluczem imbusowym wszystkie śruby na stałe.
A
element
Wkręcić rurę nogi do zamocowanej wcześniej górnej części nogi,
końcem z nawierconym z boku otworem.
A
element
2. Schemat montażu stopek (B) w nogach puf, foteli i stolików
oraz regulacja wysokości.
1. Schemat montażu nóg (A) w pufach, fotelach i stolikach.
Istnieje możliwość regulacji wysokości mebla za pomocą rury nogi.

5
C
element
* Za pomocą 2 śrub lekko przykręć łącznik do ścianki. Po ustawieniu
łącznika pionowo przykręć całość kluczem imbusowym na stałe.
Powtórz operację w przypadku drugiego łącznika.
* w wersji ścianki W12 przykręć 4 łączniki.
4.1. MONTAŻ ŁĄCZNIKÓW DO ŚCIANKI
C
element
Za pomocą 4 śrub lekko przykręć łącznik do kubełka. Po odpowiednim
ustawieniu łącznika przykręć całość kluczem imbusowym na stałe.
4.2. MONTAŻ ŁĄCZNIKÓW DO KUBEŁKA
4. Schemat montażu łączników pojedynczych (C) do ścianek
oraz do kubełków puf, foteli i stolików.
3.1. MONTAŻ STOPEK W NOGACH ŚCIANEK
Przykręć stopkę do nogi ścianki.
3.2. REGULACJA WYSOKOŚCI NOGI
B
element
B
element
+
3. Schemat montażu stopek (B) w ściankach.
Istnieje możliwość regulacji wysokości ścianki za pomocą rury nogi*.
*rura nogi jest montowana przez producenta.

6
Ustaw 2 ścianki względem siebie pod kątem prostym. Za pomocą
śrub lekko przykręć łącznik do wcześniej ustawionych ścianek.
Po ustawieniu ścianek pionowo przykręć całość kluczem
imbusowym na stałe.
5.1. MONTAŻ ŁĄCZNIKA DO ŚCIANEK
Za pomocą 4 śrub lekko przykręć łącznik do kubełka*. Po odpowiednim
ustawieniu łącznika przykręć całość kluczem imbusowym na stałe.
* w wersji kubełka 13 przykręć 2 łączniki.
5.2. MONTAŻ ŁĄCZNIKA DO KUBEŁKA
D
element
5. Schemat montażu łączników narożnych (D) do ścianek oraz
do kubełków puf, foteli i stolików.
Każdy komplet zaczepów (E) składa się z 4 elementów stałych, oznaczonych na rys. symbolem (I), montowanych na gotowo w pufkach- (C1, C2),
stolikach (B1, B2) i podłokietnikach (P1, P3) oraz dołączonych luzem 4 elementów ruchomych, wraz z komponentami do ich montażu, oznaczonych na rys.
symbolem (II), dokręcanych (regulacja montażu uchwytów - w zależności od grubości pokrowca) do puf /foteli /stolików (10, 20, 20, B, BW1, BW2, 11, 21, 31,
12, 22, 32). Pufki-łączniki (C1, C2), stoliki (B1, B2), i podłokietniki (P1, P3) występują tylko w połączeniu z sąsiadującymi z obu stron pufami/fotelami
(10, 20, 30, 11, 21, 31, 12, 22, 32) lub stolikami (B, BW1, BW2).
łącznikach
E
element
4 x
(I)
E
element
(II)
6.1. MONTAŻ ELEMENTÓW REGULOWANYCH 6.2. ŁĄCZENIE ZA POMOCĄ ZACZEPÓW
Za pomocą 2 śrub lekko przykręć każdy z 2 zaczepów do kubełka.
Po takim samym ustawieniu zaczepów względem kubełka przykręć
całość kluczem imbusowym na stałe.
Element C1/C2/B1/B2/P1/P2/P3 (z zamontowanymi przez
producenta uchwytami) nałóż od góry na zaczepy kubełka
zgodnie z rysunkiem.
(II)
2 x
6. Schemat łączenia pufek- łączników/stolików i podłokietników
z pufami, fotelami i stolikami za pomocą zaczepów.
D
element

7
7. Schemat montażu haczyków stabilizujących oraz sposób
łączenia pufek, foteli i stolików.
7.1. ZESTAWIENIE ELEMENTÓW 7.2. MONTAŻ HACZYKÓW
Komplet haczyków zawiera:
2 haczyki, 2 tulejki plastikowe z kołnierzem, 2 śruby mocujące haczyk,
2 śruby chwytające haczyk oraz 2 pręty gwintowane.
1 komplet haczyków stabilizujących służy do połączenia
dwóch sąsiadujących elementów.
7.4. SPOSÓB ŁĄCZENIA PUF, FOTELI, STOLIKÓW7.3. MONTAŻ ŚRUB CHWYTAJĄCYCH
+
W otwory haczyków włóż tulejki plastikowe z kołnierzem.
Za pomocą 2 śrub przykręć kluczem imbusowym 2 haczyki
stabilizujące do skrajnych otworów boku pierwszego kubełka.
W śruby chwytające wkręć pręty gwintowane, a następnie
za pomocą klucza imbusowego wkręć 2 śruby chwytające
do skrajnych otworów na boku drugiego kubełka.
Połącz 2 kubełki zgodnie z rysunkiem.
Regulacja całego zestawu: w pierwszej kolejności wyregulować ustawienia ścianek, a następnie przednie nogi kubełków,
tak aby nie było luzu pomiędzy stopkami a podłożem.

8
A A
AA A A
WALL IN 10 / 20 / 30 / B WALL IN C2 / B2
D C
AC
WALL IN 12 / 22 / 32 / BW2
D D
CC
WALL IN 13 / 23
Uwaga!
- umożliwiające uniwersalną konfigurację siedziska ze ściankami. Elementy te posiadają dodatkowo otwory
do zamocowania zaczepów, służących do przyłączania pufek-łączników / stolików / podłokietników.
Każde siedzisko ma od spodu przygotowane wszystkie otwory do montażu zarówno nóg jak i łączników -
C C
AA
WALL IN 11 / 21 / 31 / BW1 WALL IN 12 / 22
C
CC
C
8. Rzut od spodu zmontowanych nóg / łączników.

9
ASSEMBLY INSTRUCTION
Reception system WALL IN
Suggested number of persons required for assembly – 2.
4
*
-
-
-
-
-
-
2 2 - -
-1 2 1
-
- -
4
2
- -
2
Leg for pouf /
armchair / table Single
linking part Corner
linking part
CONFIGURATION
10 / B
x
11 / BW1 + 1 W11
x
12 / BW2 + 2 W11
x
12 + 2 W11
x
13 + 3 W11
20
x
21 + 1 W11
x
22 + 2 W11
x
22 + 2 W11
23 + 3xW11
30
x
31 + 1 W11
x
32 + 2 W11
x
2
+
x
2
+
x
1
+
+
x
3
C2 / B2
C1/ B1 P1 P3
Latch
2 4
4
- -
---
* does not apply, models assembled and ready to use.
ASSEMBLY
ELEMENTS
Table showing the number
and type of assembly
elements A, B, C, D, E
in various configurations
of the WALL IN system.
A B DC E
Foot
for wall's leg
4
4
5
4
6
-
2
*

10
2.2. HEIGHT ADJUSTMENT
2.1. FOOT INSTALLATION
Screw the foot into the wall leg.
+
A
element
B
element
+
B
element
A
element
1.1. LEG INSTALLATION 1.2. LEG INSTALLATION
Using the 4 screws lightly attach the upper part of the leg.
Then, tighten all screws using an Allen wrench..
A
element
Attach the leg pipe to the previously attached upper part of the leg
using the end with the opening drilled in its side.
A
element
2. Diagram showing the installation of feet (B) in pouffes,
armchairs and table legs and height adjustment.
1. Diagram showing the installation of legs (A) in pouffes,
armchairs and tables.
It is possible to adjust the height of the piece of furniture
using the leg pipe.

11
C
element
* Using the 2 screws lightly attach the connector to the wall.
After setting the connector in the vertical position secure it
to the body using an Allen wrench. Repeat the same operation
for the second connector. .
* In the W12 wall variant attach 4 connectors.
4.1. ATTACHMENT OF CONNECTOR TO WALLS
C
element
Using the 4 screws lightly attach the connector to the piece
of furniture's body. After positioning the connector in the correct
position, secure it to the body using an Allen wrench.
4.2. ATTACHMENT OF CONNECTORS
TO THE PIECE OF FURNITURE'S BODY
4. Diagram showing the installation of single connector (C)
in walls and pouffes, armchairs and table bodies.
3.1. INSTALLATION OF FEET IN LEG WALLS
Screw the foot into the wall leg.
3.2. LEG HEIGHT ADJUSTMENT
B
element
B
element
+
3. Diagram showing the installation of feet (B) in walls.
It is possible to adjust the height of the wall using the leg pipe*.
* the leg pipe is installed by the manufacturer.

12
Position the 2 walls at right angle. Using the screws lightly attach
the connector to the walls positioned in the previous step.
After positioning the walls vertically secure the entire assembly
using an Allen wrench.
5.1. ATTACHMENT OF CONNECTOR TO THE WALLS
Using the 4 screws lightly attach the connector to the piece of furniture's
body.* After positioning the connector in the correct position, secure
it to the body using an Allen wrench..
* In piece of furniture body variant 13 attach 2 connectors.
5.2. ATTACHMENT OF THE CONNECTOR
TO THE PIECE OF FURNITURE'S BODY
D
element
5. Diagram showing the installation of corner connectors (D)
in walls and pouffes, armchairs and table bodies.
Each set of catches (E) consists of 4 fixed elements designated in the figure using the (I) symbol, which are installed by the manufacturer in the pouffe connectors
(C1, C2), tables (B1, B2) and armrests (P1, P3) and the 4 unassembled moveable hooks supplied together with installation elements designated in the figure
using the (II) symbol, which are installed (and adjusted depending on the thickness of the covering) on the pouffes/armchairs/tables (10, 20, 20, B, BW1,
BW2, 11, 21, 31, 12, 22, 32).The pouffe connectors (C1, C2), tables (B1, B2) and armrests (P1, P3) are only used in conjunction with neighbouring
pouffes/armchairs (10, 20, 30, 11, 21, 31, 12, 22, 32) attached on both sides or with the table (B, BW1, BW2).
E
element
4 x
(I)
E
element
(II)
6.1. INSTALLATION OF ADJUSTABLE COMPONENTS
6.2. CONNECTING COMPONENTS USING
THE CATCHES
Using the 2 screws lightly attach each of the 2 hooks to the piece of furniture's
body. After setting the hooks in identical position in relation to the piece
of furniture's body secure the assembly using an Allen wrench.
Position the element C1/C2/B1/B2/P1/P2/P3 (with catches installed
by the manufacturer) from above on the piece of furniture's body
hooks as shown on the diagram.
(II)
2 x
6. Diagram for joining the pouffe connectors/tables and armrests
with pouffes, armchairs and tables using catches.
D
element

13
7. Diagram showing the installation of stabilising hooks and
the method for joining pouffes, armchairs and tables together.
7.1. LIST OF COMPONENTS 7.2. INSTALLATION OF HOOKS
A hook set consists of:
2 hooks, 2 plastic flanged sleeves,
2 screws for the attachment of hooks,
2 screws locking the hook and 2 threaded rods.
1 set of stabilising hooks is used to secure the two
neighbouring components together.
7.4. METHOD FOR JOINING POUFFES,
ARMCHAIRS, TABLES7.3. INSTALLATION OF HOOKING BOLTS
+
Place the plastic flanged sleeves into the hook openings.
Using the 2 screws and the Allen wrench attach the 2 hooks
in the outer openings in the wall of the first piece of furniture's body.
Install the threaded rods into the hooking bolts and then,
using the Allen wrench, install the 2 hooking bolts in the outer
openings in the wall of the second piece of furniture's body.
Join the 2 pieces of furniture together as shown on the diagram.
Adjustment of the unit: first adjust the position of the walls, then the front legs of the pieces of furniture,
so that there is no play between the feet and the ground.

14
A A
AA A A
WALL IN 10 / 20 / 30 / B WALL IN C2 / B2
D C
AC
WALL IN 12 / 22 / 32 / BW2
D D
CC
WALL IN 13 / 23
Note!
of seats and walls. Seats and walls has got additional holes for latches to add pouffe-connectors and armrests.
Each seat has got pre-drilled holes underneath to assemble legs and linking parts enabling versatile configurations
C C
AA
WALL IN 11 / 21 / 31 / BW1 WALL IN 12 / 22
C
CC
C
8. The bottom view of legs / linking parts.

15
MONTAGEANLEITUNG
Wartesystem WALL IN
Die Montage sollte mit 2 Personen durchgeführt werden.
4
*
-
-
-
-
-
-
2 2 - -
-1 2 1
-
- -
4
2
- -
2
Bein für
Sessel / Tisch Einzelverbindung Eckverbindung
KONFIGURATION
10 / B
x
11 / BW1 + 1 W11
x
12 / BW2 + 2 W11
x
12 + 2 W11
x
13 + 3 W11
20
x
21 + 1 W11
x
22 + 2 W11
x
22 + 2 W11
23 + 3xW11
30
x
31 + 1 W11
x
32 + 2 W11
x
2
+
x
2
+
x
1
+
+
x
3
C2 / B2
C1/ B1 P1 P3
Riegel
2 4
4
- -
---
* . Modelle sind fertig montiert, keine weiteren Teile nötig
MONTAGEANLEITUNG
Die Tabelle zeigt die benötige
Anzahl und Ausführung
der Verbindungselemente,
Beine und Füße für typische
Konfigurationen
beim WALL IN System.
A B DC E
Fuß für
Wandelement
4
4
5
4
6
-
2
*

16
2.2. HÖHENEINSTELLUNG
2.1. MONTAGE VON TELLERFUß
Den Tellerfuß auf das Bein anschrauben.
+
A
Element
B
Element
+
B
Element
A
Element
1.1. MONTAGE VON BEINEN 1.2. MONTAGE VON BEINEN
Das Oberteil des Beines mit 4 Inbusschrauben leicht befestigen.
Alle Schrauben fest anziehen.
A
Element
Das Bein auf das Gewinde mit der Markierung (kleines Loch) nach
oben anschrauben.
A
Element
2. Anleitung zur Montage von Tellerfuß (B) für Sitzbänke,
Sessel und Tische.
1. Anleitung zur Montage von Beinen (A) für Sitzbänke,
Sessel und Tische.
Das Bein kann in der Höhe eingestellt werden.

17
C
Element
* Das Element mit 2 Inbusschrauben an der Wand leicht befestigen.
Alle Schrauben fest anziehen. Mit zweiter Einzelverbindung
in gleicher Weise verfahren.
* Die Trennwand W12 mit 4 Einzelverbindern montieren.
4.1. MONTAGE AN DER WAND
C
Element
Das Element mit 4 Inbusschrauben leicht befestigen.
Alle Schrauben fest anziehen.
4.2. MONTAGE AM SITZ
4. Anleitung zur Montage von Einzelverbindung (C)
für Trennwände, Sitzbänke, Sessel und Tische.
3.1. MONTAGE VON TELLERFUß FÜR TRENNWÄNDE
Den Tellerfuß auf das Bein von der Trennwand anschrauben
Beinhöheneinstellung.
3.2. BEINHÖHENEINSTELLUNG
B
Element
B
Element
+
3. Anleitung zur Montage von Tellerfuß für Trennwände.
Das Bein von der Trennwand kann in der Höhe eingestellt werden*.
* Beinrohr wurde vom Hersteller montiert

18
5. Anleitung zur Montage von Eckverbinder (D) für Sitzbänke,
Sessel, Trennwände, Tische.
Jedes Verbindungsset (E) enthält 4 Teile (I) welche bereits an den Verbindungselementen (C1, C2) Tischen (B1,B2) und Armlehnen (P1,P3) befestigt sind
sowie 4 Teile (II) zur Montage an Sitzbänken, Armlehnen und Tischen (10,20, B, BW1, BW2, 11,21,31,12,22,32). Verbindungselemente (C1,C2), Tische
(B1,B2) und Armlehnen (P1,P3) können nur in Verbindung mit Sitzbänken, Sesseln (10,20,30,11,21,31,12,22,32) oder Tisch (B, BW1, BW2) an beiden
Seiten eingesetzt werden.
E
Element
4 x
(I)
E
Element
(II)
6.1. MONTAGE VON VERBINDUNGSRIEGELN 6.2. MONTAGE VON VERBINDUNGSELEMENTE
Das Element mit 2 Inbusschrauben leicht befestigen.
Alle Schrauben fest anziehen Montage von Verbindungselementen.
Verbindungselemente C1/C2/B1/B2/P1/P2/P3 wie im Bild
dargestellt verbinden.
(II)
2 x
6. Anleitung zur Montage von Verbindungsriegeln
an Verbindungelementen, Tischen, Armlehnen.
2 Trennwände im 90° Winkel aufstellen.
Das Element mit 4 Inbusschrauben leicht an der Wand befestigen.
Einstellbare Trennwände fest anschrauben.
5.1. MONTAGE AN DER WAND
Das Element mit 4 Inbusschrauben am Sitz befestigen.
Version 13 mit 2 Eckverbindern montieren.
5.2. MONTAGE AM SITZ
D
Element
D
Element

19
7. Anleitung zur Montage von Verbindungshaken
an Verbindungselementen, Tischen, Armlehnen
7.1. VERBINDUNGSSET 7.2. MONTAGE DER HAKEN
Jedes Verbindungsset beinhaltet
2 Haken, 2 Hülsen, 2 Befestigungsschrauben sowie 2 Schrauben
zur Aufnahme des Hakens, 2 Gewindestäbe
Ein Set verbindet zwei nebeneinander stehende Elemente.
7.4. VERBINDUNGSART FÜR SITZBÄNKE,
SESSEL UND TISCHE
7.3. MONTAGE VON AUFNAHMESCHRAUBEN
+
In Hakenlöcher die Hülsen einlegen.
Zwei Haken mit Inbusschrauben am ersten Sitz an der äußersten
Vorbohrung montieren.
Gewindestäbe in Schrauben zur Aufnahme des Hakens anschrauben.
Die Aufnahmeschrauben mit Inbusschrauben am zweiten Sitz an
der äußersten Vorbohrung montieren..
Die Sitze wie im Bild dargestellt verbinden.
Einstellung der Konfiguration: Zuerst die Trennwände ausrichten, dann die vorderen Beine der Sessel oder Tische einstellen.

20
A A
AA A A
WALL IN 10 / 20 / 30 / B WALL IN C2 / B2
D C
AC
WALL IN 12 / 22 / 32 / BW2
D D
CC
WALL IN 13 / 23
Achtung!
Bohrungen ermöglichen verschiedenste Konfigurationsmöglichkeiten von Sitzen und Wänden. Darüber hinaus
haben die Sitze und Wände Bohrungen zur Aufnahme der Verbindungsriegel - und haken um Armlehnen anzubringen.
Jedes Sitzelement verfügt bereits über Bohrungen zur Montage der Beine und Verbindungselemente. Diese
C C
AA
WALL IN 11 / 21 / 31 / BW1 WALL IN 12 / 22
C
CC
C
8. Ansichten der Unterseite / Anordnung Beine
und Verbindungen.
This manual suits for next models
22
Table of contents
Languages:
Other Profim Indoor Furnishing manuals

Profim
Profim mPosition User manual

Profim
Profim MyTurn 10FZ User manual

Profim
Profim RAYA User manual

Profim
Profim Violle User manual

Profim
Profim ACTIVE User manual

Profim
Profim Bit 580H User manual

Profim
Profim LightUp User manual

Profim
Profim Com Series User manual

Profim
Profim SYNCHRO SELF Ellie Pro HW User manual

Profim
Profim Accis Pro User manual