Profoto B10X Plus Duo Kit User manual

For other languages visit:
Pour les autres langues,veuillez consulter:
www.profoto.com
User guide
Profoto Connect Pro

Connect Pro
2
www.profoto.com

Connect Pro
3
www.profoto.com
Congratulations on your new
Profoto product!
Regardless if you chose a new flash or a new light shaping tool,know
that more than half a century’s worth of experience was put into its
making.
If the years have taught us one thing, it is never to neglect a single
detail.We only put our name on a product in which we have the fullest
confidence. Before shipping, every one of our products passes an
extensive and strict testing program. Unless it complies with the
specified performance,quality and safety,it is a no-go.
As a result, we are confident that your new Profoto product will stay
with you foryearsand help you grow as a photographer.But getting the
product is only the beginning of that journey.Using it for light shaping
is the real adventure for today and into the future.That is why we take
pride in providing you such a wide assortment of light shaping tools
and continuing to bring you the latest technology to our products,
allowing you to shape the light in any way you can imagine across any
devices.
The almost infinite possibilities might seem bewildering at first, but
we’re certain you will soon get the hang ofit.
Make sure you download our Profoto app and sign up to MyProfoto
account to manage your Profoto devices and stay updated with
product news and updates.You’ll also receive insights,tips and tricks
from leading photographers on how to shape light; because we hope
that sharing our experiences from over 50 years of light shaping will
inspireyou to grow even further.
Enjoyyour Profoto product.
Conny Dufgran,founder

Connect Pro
4
www.profoto.com
General safety instructions
IMPORTANT SAFETY INFORMATION AND WARNINGS!
Do not operate the equipment before studying the Quick Start and Safety Guide and the User Guide. Make sure
that the Quick Start and Safety Guide is always accessible to the user! Profoto products are intended for indoor
condition use! Do not place or use the equipment where it can be exposed to moisture,extreme electromagnetic
fields or in areaswithflammable gases ordust! Do not expose the equipment to dripping or splashing.Do not place
any objects filled with liquids, such as vases, on or near the equipment. Do not expose the equipment to hasty
temperature changes in humid conditions as this could lead to condensation water in the unit. Do not modify,
disassemble, open, drop, crush, puncture, heat above 60°C (140°F), incinerate, or shred battery. Do not use flash
heads without supplied protective glass covers or protective grids. Glass covers shall be replaced,before using the
equipment,if it has becomevisibly damaged to such an extent that their effectiveness is impaired,for example by
cracks ordeep scratches.Lampsshall be replaced if theyare damaged or thermally deformed.When placing a lamp
into the holder ensure not to touch the bulb with bare hands,always use protective gloves and allow equipment to
cool down before placing lamp.Always use protective gloves and safety glasses while performing maintenance on
theflashequipment.Ifthe productenclosureshouldcrack,immediately stop using the product,remove the battery
andcontactProfotoService!Itisunavoidablethatthetypeofcapacitorusedinflashproductscansometimebreak.
If this should happen a sharp smell may emitfrom theflash product along with smoke.Avoid getting the emission
in the face.If the emissions should get in the eyes or mouth,rinse withwater.The emission is nontoxic. Rinse with
waterand soap ifyou get leaking electrolyte on skin.Do not ingest the electrolyte.When using a stand,always make
surethattheequipment is securelyattached.Profotoproductsareonlyintendedfor the purpose of image capture,
such as photographyand videography.They are not intendedforuse in anyother application.
WARNING – Electrical Shock – High Voltage!
Equipment must only be serviced, modified or repaired by authorized and competent service personnel!
Equipment operates with high voltage.The flashes, generators or lamp heads can contain hazardous live, for a
considerable time,even when powered off and / or the batteryhas been removed.
Caution – Burn Hazard – Hot Parts!
Do not touch hotpartswith bare fingers! Modeling lamps and flashtubes may make certain metal parts,front lenses
or glas covers emit strong heat when used! All lamps may on rare occasions explode and throw out hot particles!
Caution!
Possibly hazardousopticalradiation emitted from lightsandflashes.Do not stare at operating lamp.May be harmful
to the eye.Do not use flashes or lights too close to persons.Do not trigger a flash towards an unexpected subject,
any person operating heavy equipment,or on anyone performing any otheractivities where an unexpected flash
could cause injury or harm.Please note that flashes can be triggered remotelyfrom a long distance.
Final Disposal
When the product reaches end of service, do not dispose of it with your other household waste. Equipment
contains battery, electrical and electronic components that could be harmful to the environment.Equipment may
be returned to Profoto distributors free of charge for recycling. Follow local legislation for disposal of batteries,
electrical and electronic components,respectively.

Connect Pro
5
www.profoto.com
Table of Contents
Congratulations on your new
Profoto product! .................................................................................................................3
General safety instructions............................................................................................. 4
Nomenclature .....................................................................................................................6
About Connect Pro ........................................................................................................... 7
About AirX............................................................................................................................. 7
Getting started.................................................................................................................... 8
Mandatory safety instructions..................................................................... 8
Product registration and firmware update...............................................8
Setting up Connect Pro and flashes .........................................................8
Basic operation...................................................................................................................9
Power On/O....................................................................................................9
Main display view............................................................................................................. 10
Top bar.................................................................................................................11
AUTO/MANUAL flash control......................................................................11
High Speed Sync (Hi-S)................................................................................12
Selecting groups.............................................................................................12
Air 1 and Air 2 control mode........................................................................ 13
MANUAL flash control...................................................................................14
AUTO flash control ........................................................................................ 15
Continuous light ON/OFF........................................................................... 16
Head ON/OFF................................................................................................. 16
Settings menu................................................................................................................... 18
Air channel........................................................................................................ 18
Control mode................................................................................................... 19
X-Sync ............................................................................................................... 19
Bluetooth .......................................................................................................... 19
Advanced settings ...................................................................................... 20
Profoto apps......................................................................................................................22
Wireless trouble shooting ............................................................................................ 23
Technical specifications............................................................................................... 25
Credit .................................................................................................................................. 26
Connect Pro
6
www.profoto.com
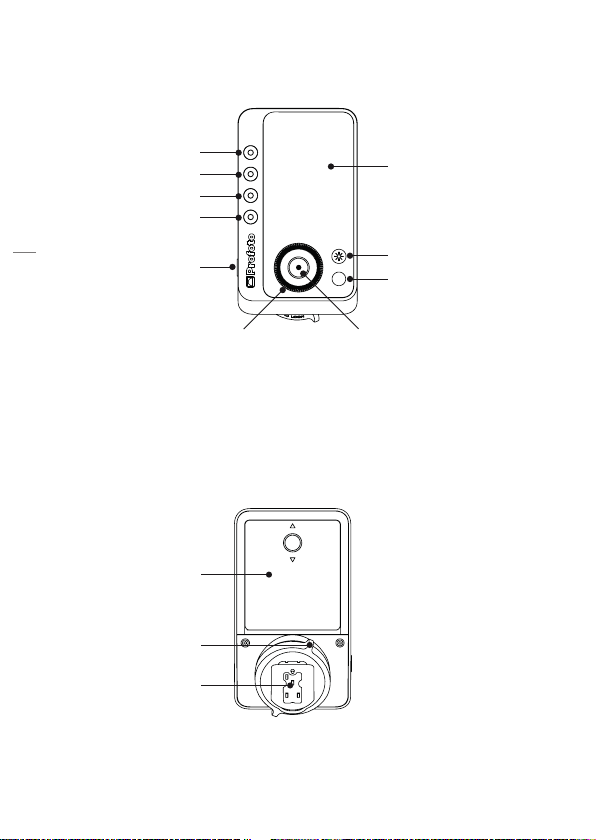
Nomenclature
AUTO
1
2
3
4
59
8
10
67
1. Group button 1
2. Group button 2
3. Group button 3
4. Group button 4
5. Test button
6. Main dial
7. Center button
8. Auto button (Non-TTL
version: Head on/off)
9. Continuous light button
11
12
13
10. Display
11. Battery compartment
12. Locking mechanism
13. Hot shoe connector

Connect Pro
7
www.profoto.com
About Connect Pro
The small, lightweight Connect Pro is designed to make off camera
flash easy. Mounted on the camera hot shoe, it acts as a wireless
extension of your camera to your Profoto flashes with the option to
manually adjust and sync your Profoto lights.
• The Connect Pro can be used to trigger and remote control all
Profoto flasheswith built-in ProfotoAir connectivity.
• TheConnect Procan also beused to trigger theAir Remote andAir
Sync Profoto Air transceivers.
• The Connect Pro is not compatible with non-Profotoflashes.
• The Connect Pro is not compatible with any 3rd party radio
triggering systems.
About AirX
Connect Pro comes with built-in Profoto AirX connectivity.AirX is the
3rd generation ofwireless Profoto connectivity,afterAir andAirTTL.
AirX supports:
• Wireless Air and AirTTL functionality in Profoto Air and AirTTL
enabled flashes.
• Dedicated AirX functionality in AirX enabled Profoto flashes and
apps.

Connect Pro
8
www.profoto.com
Getting started
Mandatorysafetyinstructions
In addition to this user guide,you are required to read the Quick Start
and Safety Guide before you start using yourConnect Pro.It contains
vital information for the safe operation of the product as well as
important regulatory information.TheQuick Start and SafetyGuide are
supplied in print with the Connect Pro translated into many languages,
it can also be foundfordownload where you download this user guide.
Productregistrationand firmwareupdate
Before use, product registration and firmware update are required.
When you start the Connect Pro for the first time, a welcome screen
with a QR code will appear on the display.Scan the QR code with your
smartphone and you will be directed to a web page with instructions
on how to set up your Connect Pro.
SettingupConnect Proand flashes
1. Put AAAbatteries in the battery compartment [11] of the Connect
Pro.
2. Slide the hot shoe connector [13] on the Connect Pro into the hot
shoe of the camera. Turn the Locking mechanism [12] clockwise
to lock it securely to the hotshoe.
3. Switch on the Connect Pro.
4. Select Air channel on Connect Pro and make sure to select the
same Air channel on all Profoto flashes that you will use in your
setup.
NOTE
Connect Pro will triggerand control all flashes set to the same channelwithin wireless
range so ifyou are setting up yourlights close to another setup,then make sure that you
are using different channels.
5. Ifyou are using severalflashes and want to be able to control them
individually from Connect Pro, you can do that by selecting a
different Airgroup (A-F) on each flash.

Connect Pro
9
www.profoto.com
Basic operation
PowerOn/Off
ON: Press and hold theTest button [5] for>1 s.
Off: Press and hold theTest button [5] for>1.2 s while the system is on.
When the Connect Pro is switched off, the current settings are stored
and will applywhen the unit is switched on again.
NOTE
To save battery,the Connect Pro automatically enters standby mode and/or switches
off completely after a period of inactivity.The periods of inactivityfor the standby and
auto power-off functions are selectable via the settings menu.

Connect Pro
10
www.profoto.com
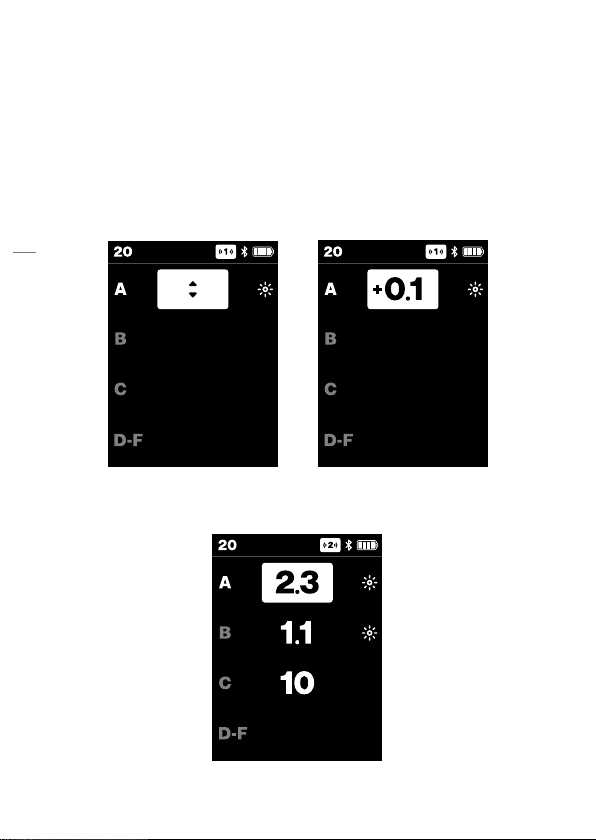
Main display view
When starting the Connect Proyou are met with the main displayview.
From this screen,you can adjust flash power,set continuous light on/
off and turnflashes(heads) on/off for individual groups offlashes.
15
16
18
17
14
14. Top bar
15. Flash power adjustments
16. Group symbols
17. Continuous light ON symbol
18. Head OFF symbol

Connect Pro
11
www.profoto.com
Top bar
The top bar displays information about the selected channel, Hi-S,
AUTO/MANUAL, Control mode, Bluetooth and battery status. When
all symbols are active,theywill be positioned as below.
AUTO/MANUALflash control
AUTO/MANUALis toggled with the AUTO button [8] on camera brand
specific versions of Connect Pro.If AUTO is active,it is indicated with
an AUTO icon in the top bar.If MANUALis active there is no indication
in the top bar.
When AUTO flash control is active, Connect Pro will adjust the flash
powerof all connectedflashes automatically for each photo with help
from theThrough The Lens (TTL) metering function in the camera.
When MANUALflash control is active,all flash power adjustments are
done manually from the Connect Pro.The flash powerwill not change
until you change it.
When toggling from AUTO to MANUAL the flashes will keep the flash
powerfrom the last image shot before switching to MANUAL.So even
if you want to control your lights manually you can benefit from using
the AUTO flash control as away to reach a baseline from whichyou can
make manual adjustments.
AUTO/MANUALselection is remembered when Connect Pro is turned
off and on again.
NOTE
• When AUTO flash control is selected it only impacts groups A-C. Group D-F are
always manual.
• AUTO is not an available setting on the non-TTL version of Connect Pro. On this
version ofConnect Pro,theAUTO button [8] is replaced with a Head On/Offbutton.

Connect Pro
12
www.profoto.com
HighSpeedSync(Hi-S)
In most cases Hi Speed Sync is automatically enabled on camera
specific versions of Connect Pro whenever a picture is taken with
the shutter speed set to anything shorter than the cameras specified
X-sync shutter speed.
On Nikon and Fujifilm cameras Auto-FP (HSS) must be pre-enabled
in the camera menu for Hi-Speed Sync to be enabled on Connect Pro.
Whenever Hi Speed Sync is activated on Connect Pro, a Hi-S symbol
will appear in the top bar.
NOTE
• High Speed Sync is not supported on the non-TTL version of Connect Pro.
Selectinggroups
• When starting the remote,group Ais always preselected.
• Press a group button [1],[2],[3] to select a specific group.
SwitchingviewtocontrolgroupD-F
• Pressgroupbutton[4]to switchviewbetweengroupsA-Cand D-F.
Selectingall groups
• All groups can be selected ifMANUALflash control is selected.
• If a group is alreadyselected and the group button [1],[2],[3] forthe
selected group is pressed again,all groups (A-F)will be selected.
• If the useris switching views between group A-C and group D-Fall
group selectionwill stay active.
• If all groups are selected and anygroup button [1],[2],[3] is pressed
again,selection will revert to highlighting onlythat group.

Connect Pro
13
www.profoto.com
Air1 andAir2 control mode
You can select two alternative ways of controlling your lights from the
Connect Pro.
The Air 1 mode is the “legacy” control mode setting that can be used
to control all generations of Profoto Air lights,including lights that are
discontinued from the market. It is also the recommended control
mode ifyou have an explorative workstyle.Itwon´t let you see the exact
power setting of each light but on the other hand it will let you freely
change flash power anywhere (onyourlights or from the Connect Pro)
withoutanything everbecoming outofsync. WhenAir1 modeis active,
the Air1 icon is displayed in the top bar.
The Air2 mode makes Connect Pro the masterand is recommended
if you want to be in full control from the camera. In Air 2 mode you will
be able to control and see the flash power settings of each group
directly on the Connect Pro display. But it will also restrict you to only
controlflash powerfromtheConnect Pro.Ifyouchange theflash power
directly on one of the lights, the flash power setting on the light will
temporarilybe out of syncwith the Connect Pro before it is overridden
byyour next interaction with the Connect Pro.
The Air 2 mode is not compatible with all generations of Profoto Air
lights. The compatibility is generally restricted to Profoto lights with
AirX connectivity. When Air2 mode is active,theAir 2 icon is displayed
in the top bar.
To change between the two settings,see section Control mode.
Connect Pro
14
www.profoto.com
MANUALflash control
• Turning the main dial will adjustflash powerin 0.1 f-stop increments
forthe group that is selected.
• Turning clockwise will increase flash power.
In Air 1 control mode,no flash poweris displayed for anyof the groups.
When a group is selected,arrows indicate that the flash power can be
adjusted for the selected group. When turning the Main dial [6], the
flash powerchange is displayedwith a + or - to the left.
In Air 2 control mode the user can set the energy flash power for each
group to anyvalue between 0.1-10 by using the Main dial [6].

Connect Pro
15
www.profoto.com
AUTO flashcontrol
When AUTO flash control is selected you can onlypreselect exposure
offsets for group A-C.
The selected offset for group A-C is always displayed. By factory
default group A is selected and all group offsets are set to ±0.0 when
the remote is first started.
• Turning the main dial will adjust the offsetfor the selected group.
• Turning clockwise will increase the offset
• Offsets can be adjusted between -2.0 and +2.0 (f-stops).
When AUTO flash control is active, it only impacts group A-C. Group
D-F is still manual. This is indicatedwith an M (Manual) indicator to the
right.If group D-F is selected, their flash power can be adjusted in the
same way as if MANUAL is selected.

Connect Pro
16
www.profoto.com
Continuouslight ON/OFF
• Pressing the Continuous light button [9] will toggle the light on/
off for that group.
• When on,a sun icon appears for that group.
• The selected continuous light on/off state is kept when toggling
betweenAUTO/MANUAL.
HeadON/OFF
• Head on/off is toggled with a long press (>1s) on a group button
[1],[2],[3].
• When head is turned off all other controls are disabled for that
group.

Connect Pro
17
www.profoto.com
• When Head is set off, the continuous light icon (if on) is hidden as
well as the offset numbers. Only the highlight and head off icon
are visible.
• The selected head on/off state is kept when toggling between
AUTO/MANUAL.
• When turning the head back on, the flash and continuous light
settings will revert to the previously selected settings.
When all groups are selected all of them can be set to Head off by long
pressing on anygroup button.

Connect Pro
18
www.profoto.com
Settings menu
Open the settings menu bypressing the Centerbutton [7].
Use the dial [6] and centerbutton [7] to navigate the settings menu.
• Turn the dial to select (highlight) a setting.
• Push the center button to toggle between options and to open
submenus.
− Turn the dial to change the submenu option.
− Push the centerbutton [7] to set the highlighted option.
• Push the test button [5] or select < and push the center button [7]
to exit the settings menu.
Airchannel
The air channel setting is used to select the channel (1-100) forwireless
triggering of Profoto Air flashes.
NOTE
You need to set the same channel on all flashes thatyou want to use with Connect Pro.

Connect Pro
19
www.profoto.com
All 100 channels are only selectable in Profoto flashes with AirX connectivity. Older
flashes may onlyhave channel 1-8 or channel 1-20 selectable.
Controlmode
The control mode setting is used to select betweenAir1 orAir2 control
mode.See section“Air 1 andAir 2 control mode”for more information.
X-Sync
The X-sync setting is onlyvisible in Canon and Nikon cameraversions
of Connect Pro. The factory setting is OFF. If X-sync is enabled, all
data communication with the camera is disabled.This will completely
disable Hi-Speed sync and Auto flash sync (TTL) functionality,but it will
also enable faster continuous shooting with somecamera models.The
generallyrecommended X-sync setting is OFF.
Selecting 1st and 2nd (Rear) curtain sync cannot be done though this
menu. This is selected on the camera. On Nikon and Fujifilm and
cameras you also need to select Auto FP (HSS) if you want this to be
enabled in the camera.
Bluetooth
The BLUETOOTH setting is used to enable and disable connectivity
with Profoto apps.
• BLUETOOTH: Select ON to make the Connect Pro discoverable
and OFF to deactivate Bluetooth.When Bluetooth is activated, a
Bluetooth icon is shown at the top bar.
• When the remote is connected over Bluetooth this is indicated by
the connected Bluetooth icon.
• DISCONNECT: This is only selectable ifthe Bluetooth is activated
and connected to the Profoto app. It can be selected to force
disconnection from the Profoto app without turning offBluetooth.
Connect Pro
20
www.profoto.com
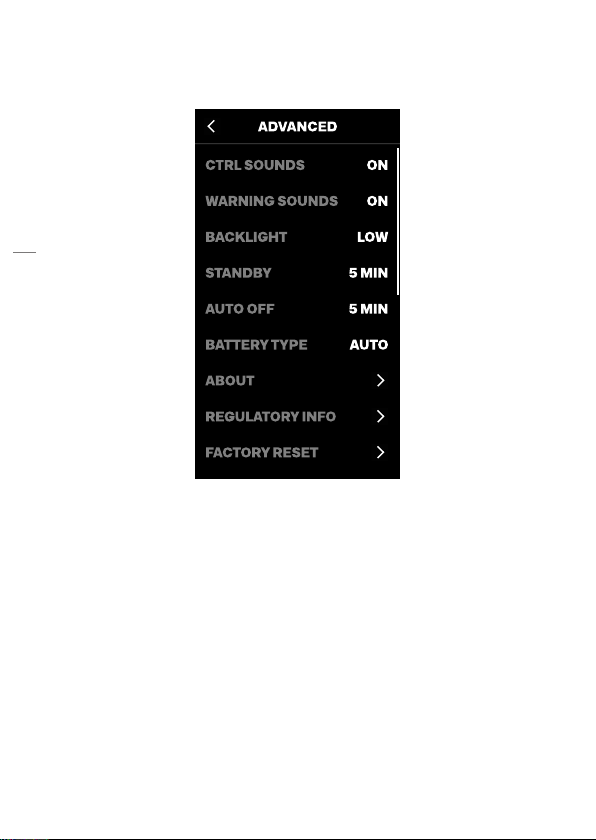
Advanced settings
The Advanced option opens the Advanced settings menu.
Controlsounds
The controlsounds setting is used to enable/disable the tactile sounds
forthe dials and buttons.Factory setting is ON.
Warning sounds
The warning sounds setting is used to enable/disable the sound for the
wrong exposure alarm.Factorysetting is ON.
NOTE
The EXP indicator will always appear temporarily on the menu display[10] in case of a
wrong exposure alarm,regardless ofthe warning sound setting.
Backlight
The backlight setting is used to change the display backlight.
Selectable settings are: LOW, MED,MAX.Factorysetting is MED.
This manual suits for next models
1
Table of contents
Other Profoto Camera Flash manuals


