Proline DH12 SILENT User manual

DEHUMIDIFIER
ONTVOCHTIGER
HANDLEIDING
MANUEL D'UTILISATION
OPERATING INSTRUCTIONS
DESHUMIDIFICATEUR
DH12SILENT
Downloaded from www.vandenborre.be

Catalogue
Language of introduction Page
GB1_GB11
FR1_FR11
NL1_NL11
English --------------------------------------
French ---------------------------------------
Dutch ----------------------------------------
Downloaded from www.vandenborre.be

WARNINGS
This appliance is intended for domesc household use only and should not be
used for any other purpose or in any other applicaon, such as for non-domesc
use or in a commercial environment.
This appliance can be used by children aged from 8 years and above and persons
with reduced physical, sensory or mental capabilies or lack of experience and
knowledge if they have been given supervision or instrucon concerning use of
the appliance in a safe way and understand the hazards involved. Children shall
not play with the appliance. Cleaning and user maintenance shall not be made
by children without supervision.
If the supply cord is damaged, it must be replaced by the manufacturer, its
service agent or similarly qualified persons in order to avoid a hazard.
For the details concerning the method and frequency of cleaning, please see
secon “Cleaning and maintenance” on page 9.
GB
1
Downloaded from www.vandenborre.be

GB
2
For disposal of the appliance:
To prevent possible harm to the environment or human health from
uncontrolled waste disposal, recycle it responsibly to promote the sustainable
reuse of material resources. And the disposal should only be done through
public collection points.
For installation, servicing:
The appliance should be placed on a horizontal floor and keep the ventilation
freely. Don’t try to replace or repair any components by yourself, ask the service
agency for help if necessary.
For handling:
Always handle the appliance to avoid any damage.
The R-410A refrigerant used in this product contains a fluorinated greenhouse
gas under the Kyoto Protocol, which can be harmful to the environment and
may be responsible for global warming if it escapes into the atmosphere. Its
global warming potential is 2087.5.
The appliance shall be installed in accordance with national wiring regulations.
Allow at least 20cm of air space
on all sides of the appliance and
40cm above the appliance for
proper air circulation.
Downloaded from www.vandenborre.be

GB
3
IMPORTANT SAFETY INSTRUCTIONS
To reduce electric shock, risk of fire or injury, please read all instructions
carefully before operating the appliance and keep them for future reference.
Never immerse the appliance in water or other liquids.
Do not repair the appliance yourself. Repairs should be carried out by a
qualified personal.
Do not operate the appliance outdoors or expose to rain or moisture.
Install your dehumidifier on a stable, level surface. Make sure the surface is
strong enough to support the weight of the dehumidifier with a full water tank.
Do not sit or stand on the dehumidifier.
Turn off and disconnect the appliance from the mains socket when not in use
and before cleaning.
Do not place any object on the appliance.
Do not drink or use the water collected in the water tank.
Do not operate the appliance near flammable gas or combustibles, such as
gasoline, benzene, thinner, etc.
Do not remove the water tank during operation.
Do not place aerosols or other hazardous materials in the vicinity. Also do not
place inflammable materials such as petrol or thinner nearby. These may
explode and cause fire.
Do not place the appliance near a heat source. This may cause the plastic parts
inside to melt and catch fire.
Operate the appliance only on level, stable surfaces.
Do not place any water container such as a vase on the appliance. Water
spillage may cause insulation failure and electrical shock or fire.
Do not stand or lean against the appliance. This may cause it to fall over,
resulting in personal injury.
Do not obstruct air inlets and outlets with clothing or anything else.
Obstruction of the airflow will cause overheating, malfunction or fire.
Do not operate the appliance without the filter in place.
Downloaded from www.vandenborre.be
GB
4
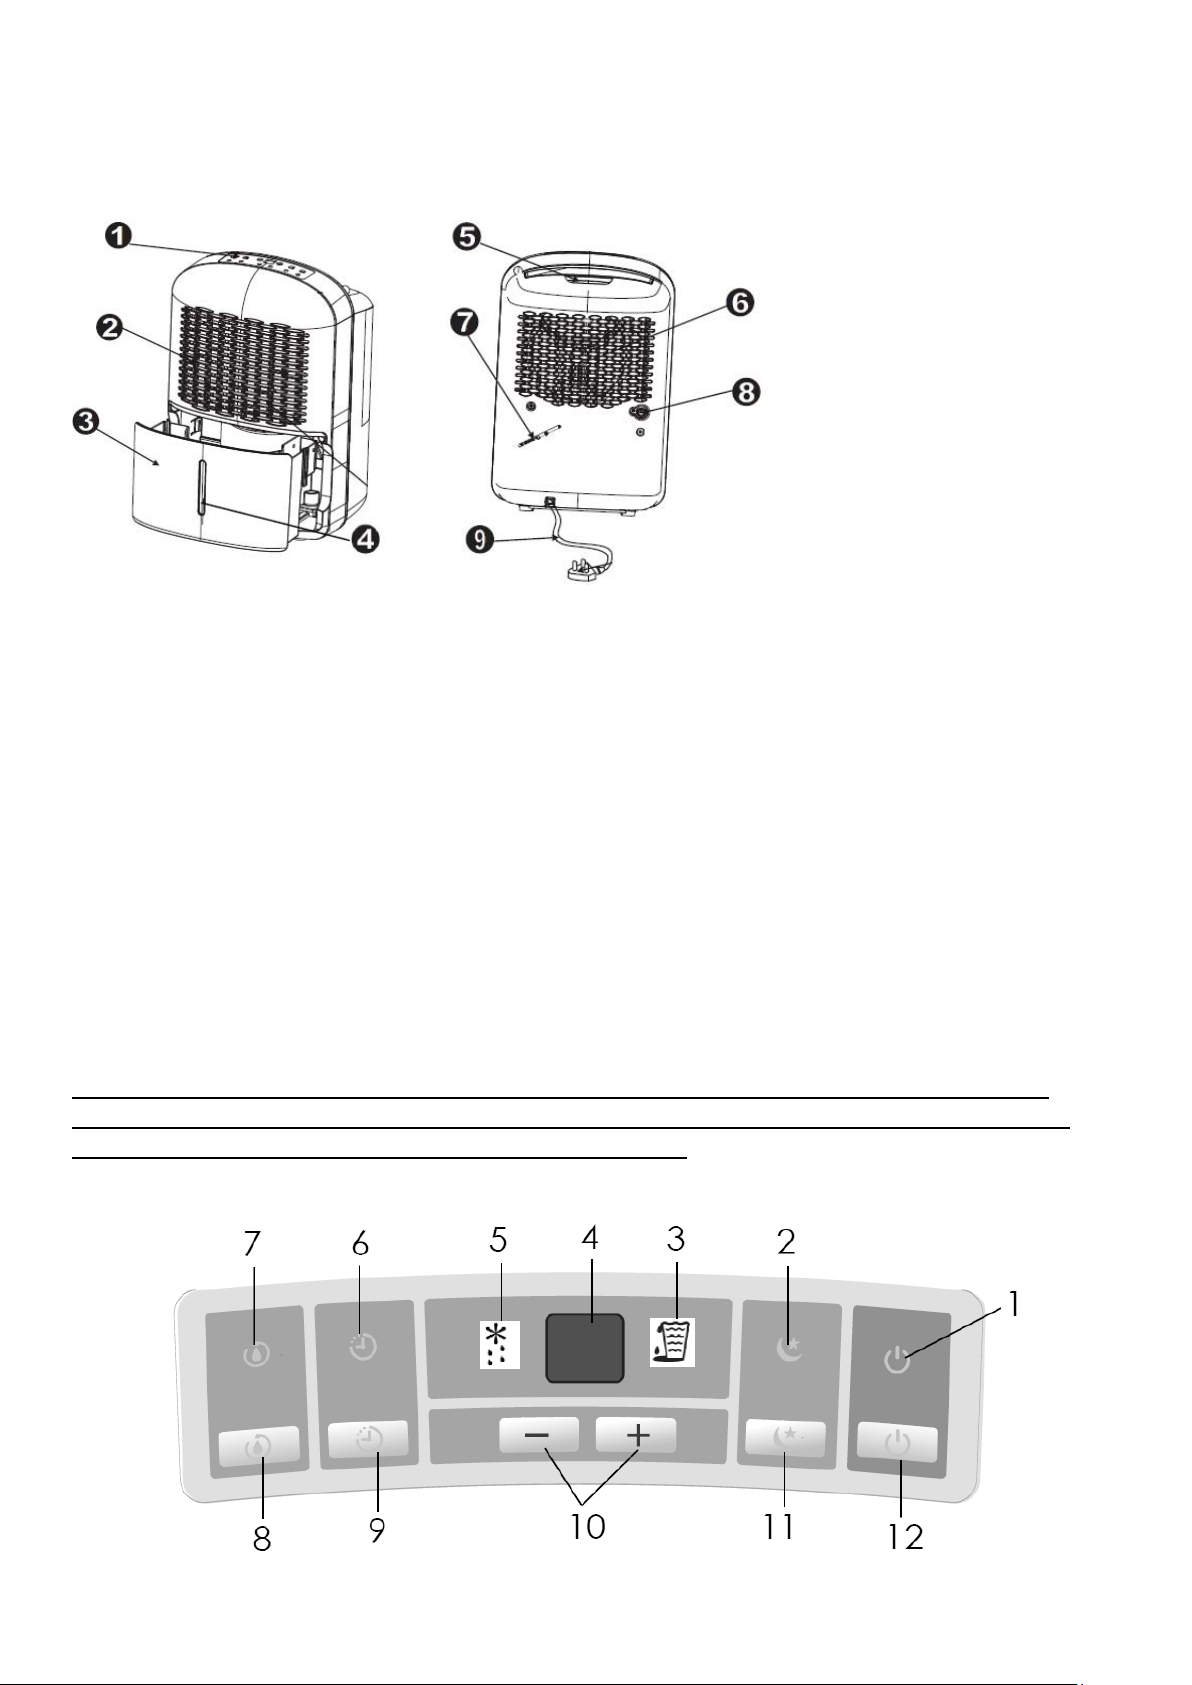
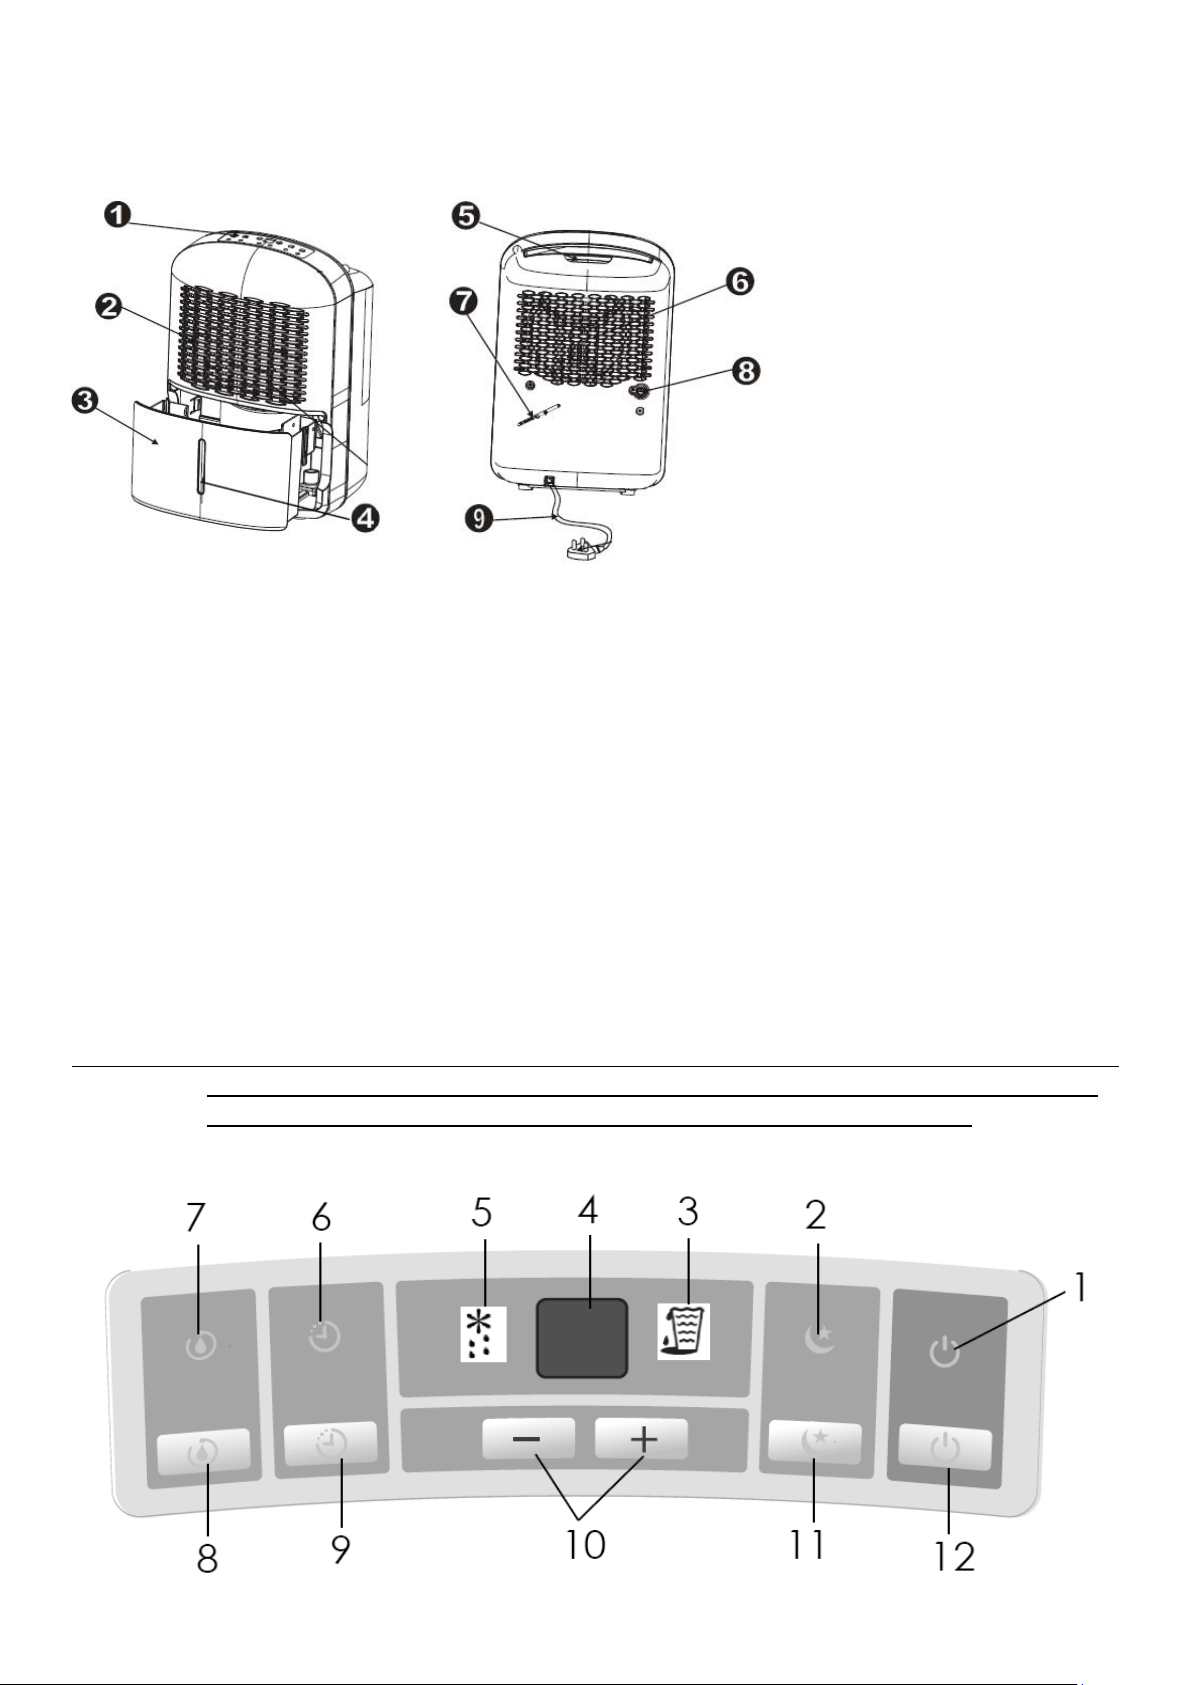
OVERVIEW
Front View
Rear View
1. Control panel
2. Air inlet grille
3. Water tank
4. Water level window
5. Handle
6. Air outlet grille
7. Power cord band
8. Continuous drainage port
9. Power cord
OPERATION
When first using the appliance, operate it for 24 hours continuously. This will help the refrigerant settle in
properly.
This appliance is designed to operate in an ambient temperature between 5°C and 35°C.
Select a suitable location, making sure you have easy access to the mains socket.
Do not connect the appliance to a multiple socket outlet.
Place the appliance away from the clothes dryer, heater or radiator.
You can use the appliance to prevent books or valuables from moisture damage.
You can use the appliance in a basement to help prevent moisture damage.
The appliance must be operated in an enclosed area to be most effective.
Close all doors, windows and other outside openings to the room.
Casters can let you move the appliance easily.
Make sure the water tank is correctly fitted.
NOTE: Always be careful when moving the appliance, especially as water gets higher in the tank; the
higher the water gets in the tank, the easier it is for the appliance to fall over when being moved. It is
recommended to empty the tank before moving the appliance.
Control Panel
Downloaded from www.vandenborre.be
GB
5
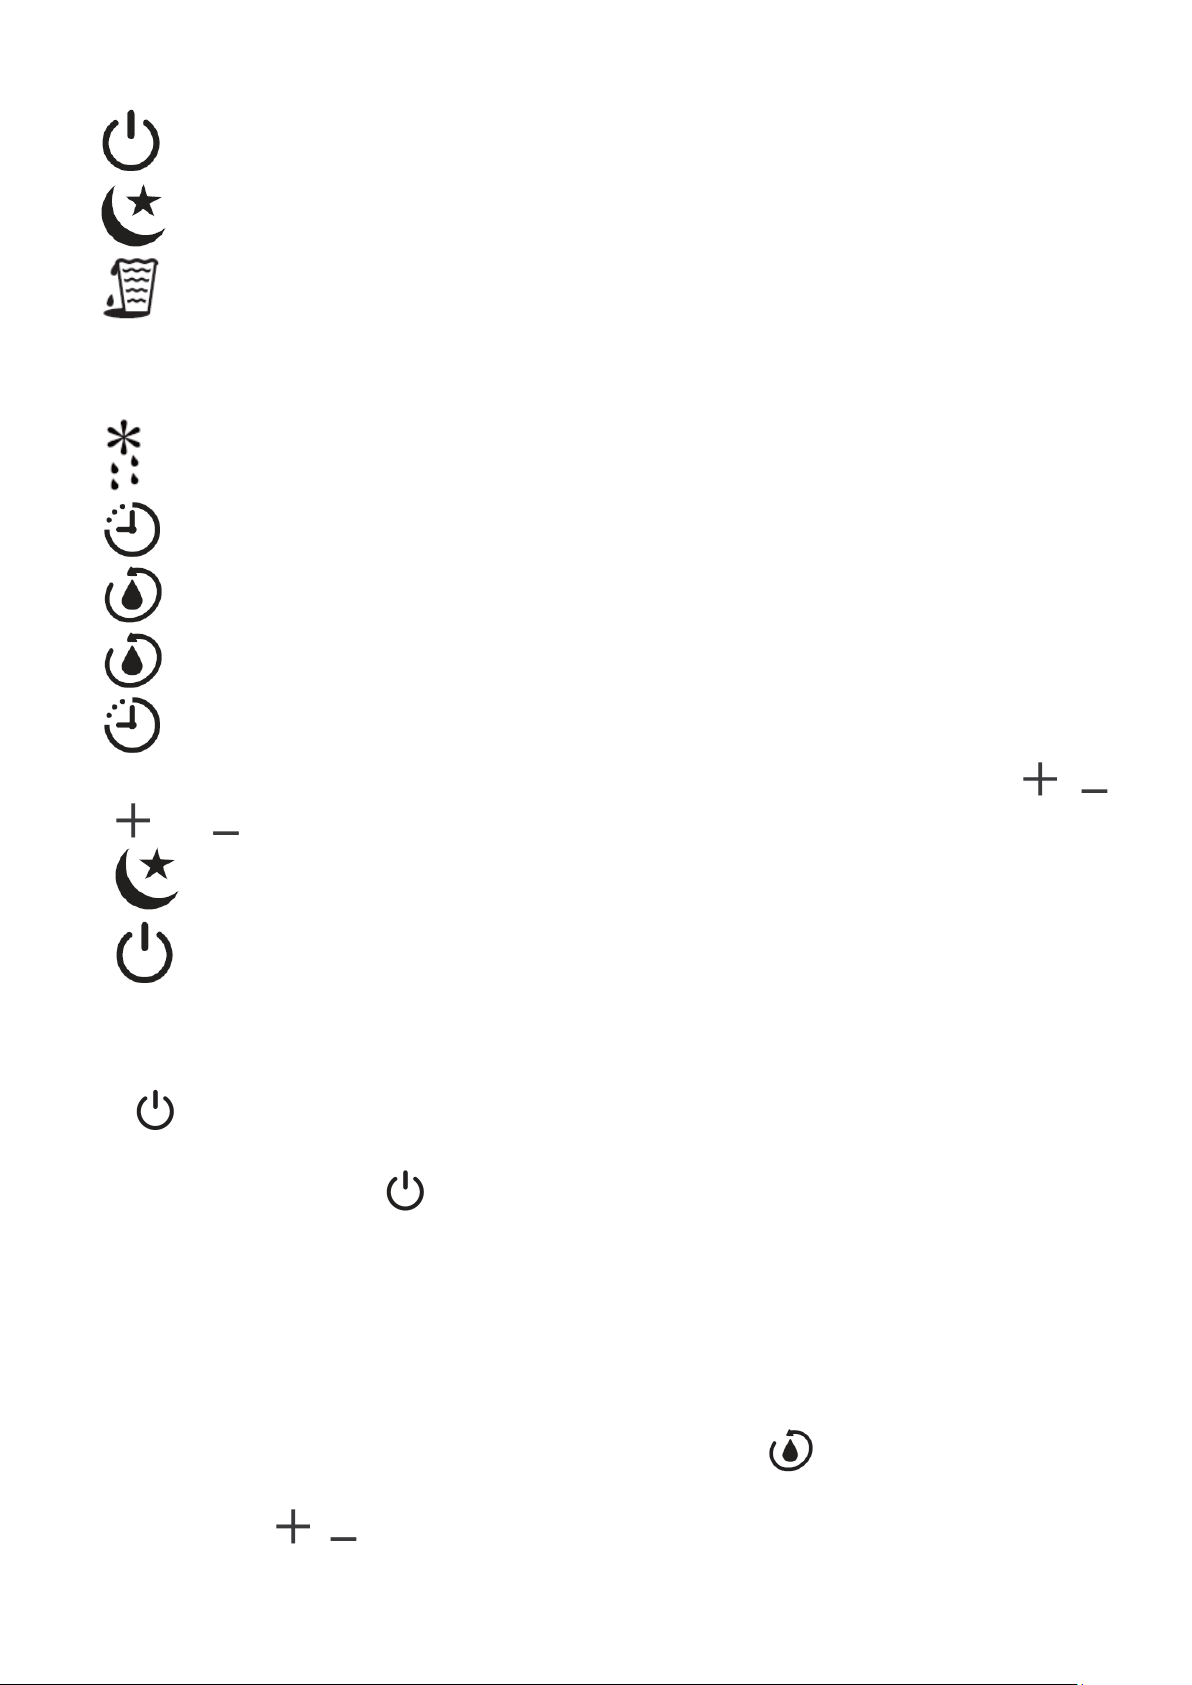
1. Power indicator light (green)
2. Silent function indicator light (green)
3. Tank full indicator light (red)
4. Display
To show the relative humidity percentage level, error codes, the delayed start or delayed stop time.
5. Auto defrosting operation (green)
6. Timer indicator light (green)
7. Continuous dehumidifying mode indicator light (green)
8. Continuous dehumidifying mode button
9. Timer button
Press this button to select the delayed start or delayed stop function, in conjunction with / .
10. and buttons
11. Silent mode button
12. Power button
Power On and Off
Press to turn on the appliance.
The display will show the ambient humidity level.
To turn off the appliance, press again.
Wait for 3 minutes before resuming operation
If power is restored after a power failure, allow approximately 3 minutes for the appliance to continue to
operate at the selected settings.
Dehumidifying Mode
To operate the appliance in the dehumidifying mode, repeatedly press until the corresponding
indicator light goes out.
1. Repeatedly press / to set the desired humidity level in 5% increments.
Downloaded from www.vandenborre.be

GB
6
The humidity level can be set within a range of 35%RH (Relative Humidity) to 85%RH (Relative
Humidity).
For drier air, set the humidity level for a lower percentage value.
For damper air, set the humidity level for a higher percent value.
2. After you have set the desired humidity level, the display will briefly show the set humidity level and
then return to actual ambient humidity level.
Continuous Dehumidifying Mode
You can use this mode to remove the excess moisture from the air all the time.
For continous operation, press to activate this function and the corresponding indicator light will
illuminate.
NOTE: You cannot set a desired humidity level when the appliance is in this mode.
Silent Mode
This mode allows the dehumidifier to operate quietly at a lower fan speed.
To activate this mode, press . The corresponding indicator light will illuminate.
To deactivate this mode, press again. The corresponding indicator light will go out. The fan will return to
the normal speed.
Timer
To programme the auto start function:
1. When the appliance is in the power off state, press .
The corresponding indicator light will illuminate and the display will show the hour.
2. While the hour is displaying, repeatedly press or press&hold / to set the desired hours.
The time will be changed by 0.5 hour increments up to 10 hours, and then by 1 hour increments up to
24 hours.
3. After about 5 seconds the set time will be confirmed and then disappear from the display.
4. When the set time has elapsed, the appliance will start working.
To programme the auto stop function:
1. When the appliance is in the power on state, press .
The corresponding indicator light will illuminate and the display will show the hour.
2. While the hour is displaying, repeatedly press or press&hold / to set the desired hours.
The time will be changed by 0.5-hour increments up to 10 hours, and then by 1-hour increments up to
24 hours.
3. After about 5 seconds the set time will be confirmed and then the display will return to the ambient
humidity level.
4. When the set time has elapsed, the appliance will stop working.
Downloaded from www.vandenborre.be
GB
7
To modify or cancel the timer:
If you wish to modify the set auto start or stop time, press once and then while the hour is
displaying, repeatedly press or press&hold / until the desired time is selected.
If you wish to cancel the timer, press once and then while the hour is displaying repeatedly press
or press&hold / until “0.0” is selected. The timer will also be cancelled when the display shows
the error code “P2”.
Other Functions
Tank full
The indicator light will illuminate when the water tank is full or not in place. Please empty the tank
or replace it in the correct position and then this indicator light will go out.
Auto Shut Off
The dehumidifier will shut off when the water tank is full, or when the water tank is removed or not placed
in the proper position. It will also be shut off when the set dehumidty level is reached.
Auto Defrost
When frost builds up on the evaporator coils, the compressor will cycle off and the fan will continue to run
until the frost disappears.
When auto defrosting is operating, the indicator light will illuminate.
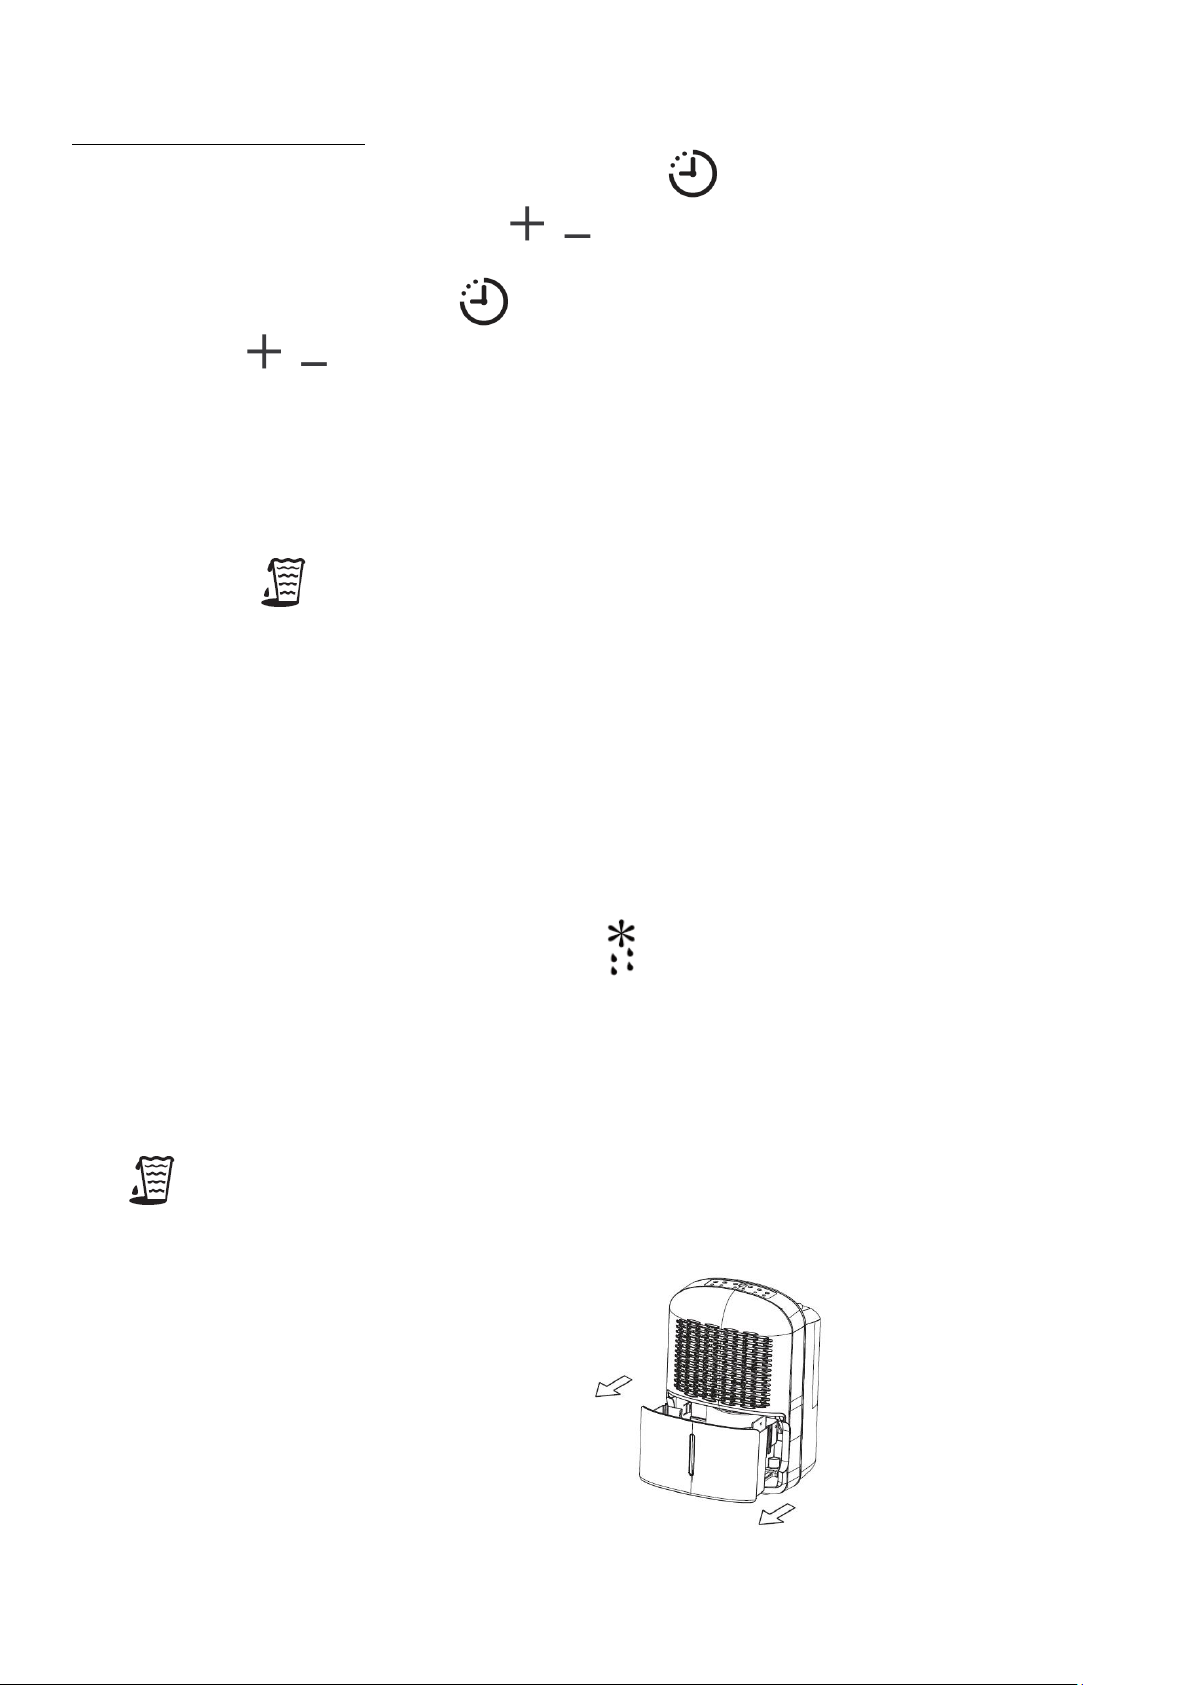
EMPTYING THE WATER TANK
The dehumidifier will stop working when the water tank is full. The display will show “P2” and the indicator
light will illumiante.
Please follow the steps below to empty the water tank and then continue using the appliance.
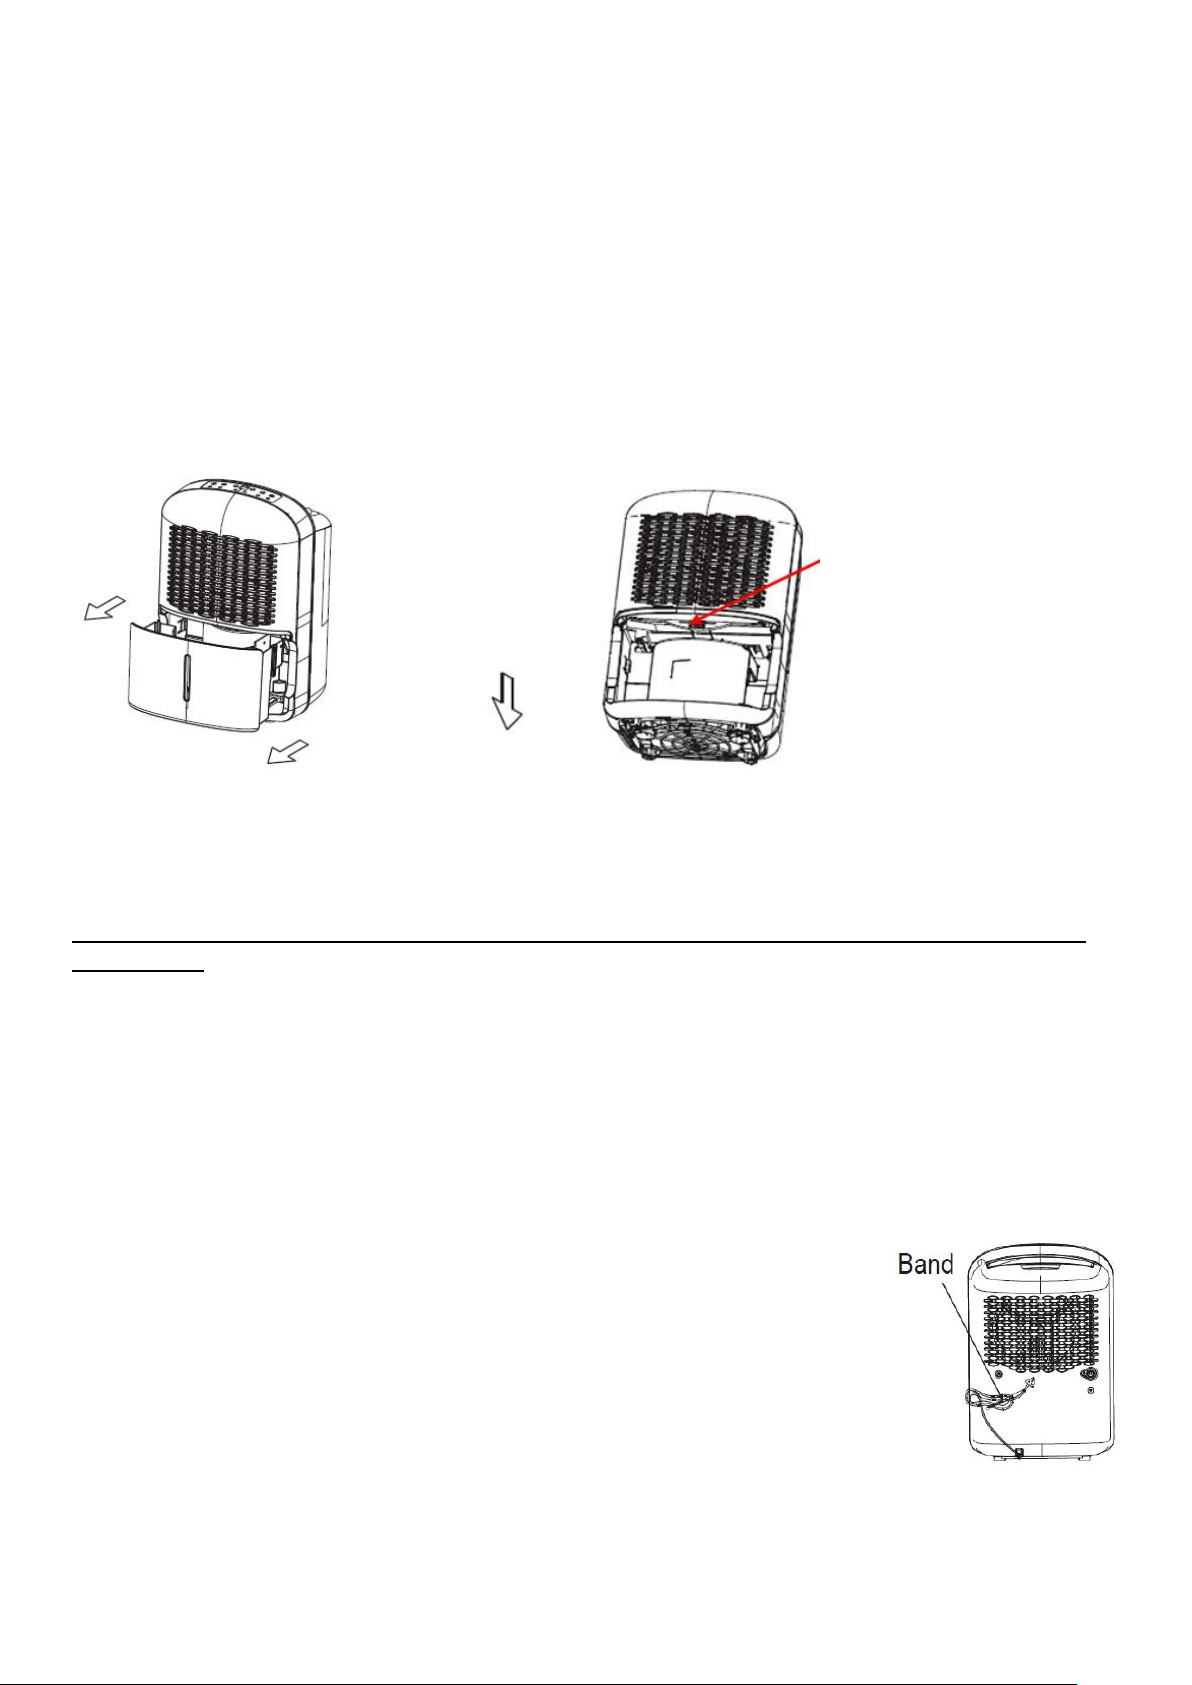
1. Slowly pull out the water tank.
Hold the appliance firmly and pull out the
tank, being careful not to spill any water.
Downloaded from www.vandenborre.be
GB
8
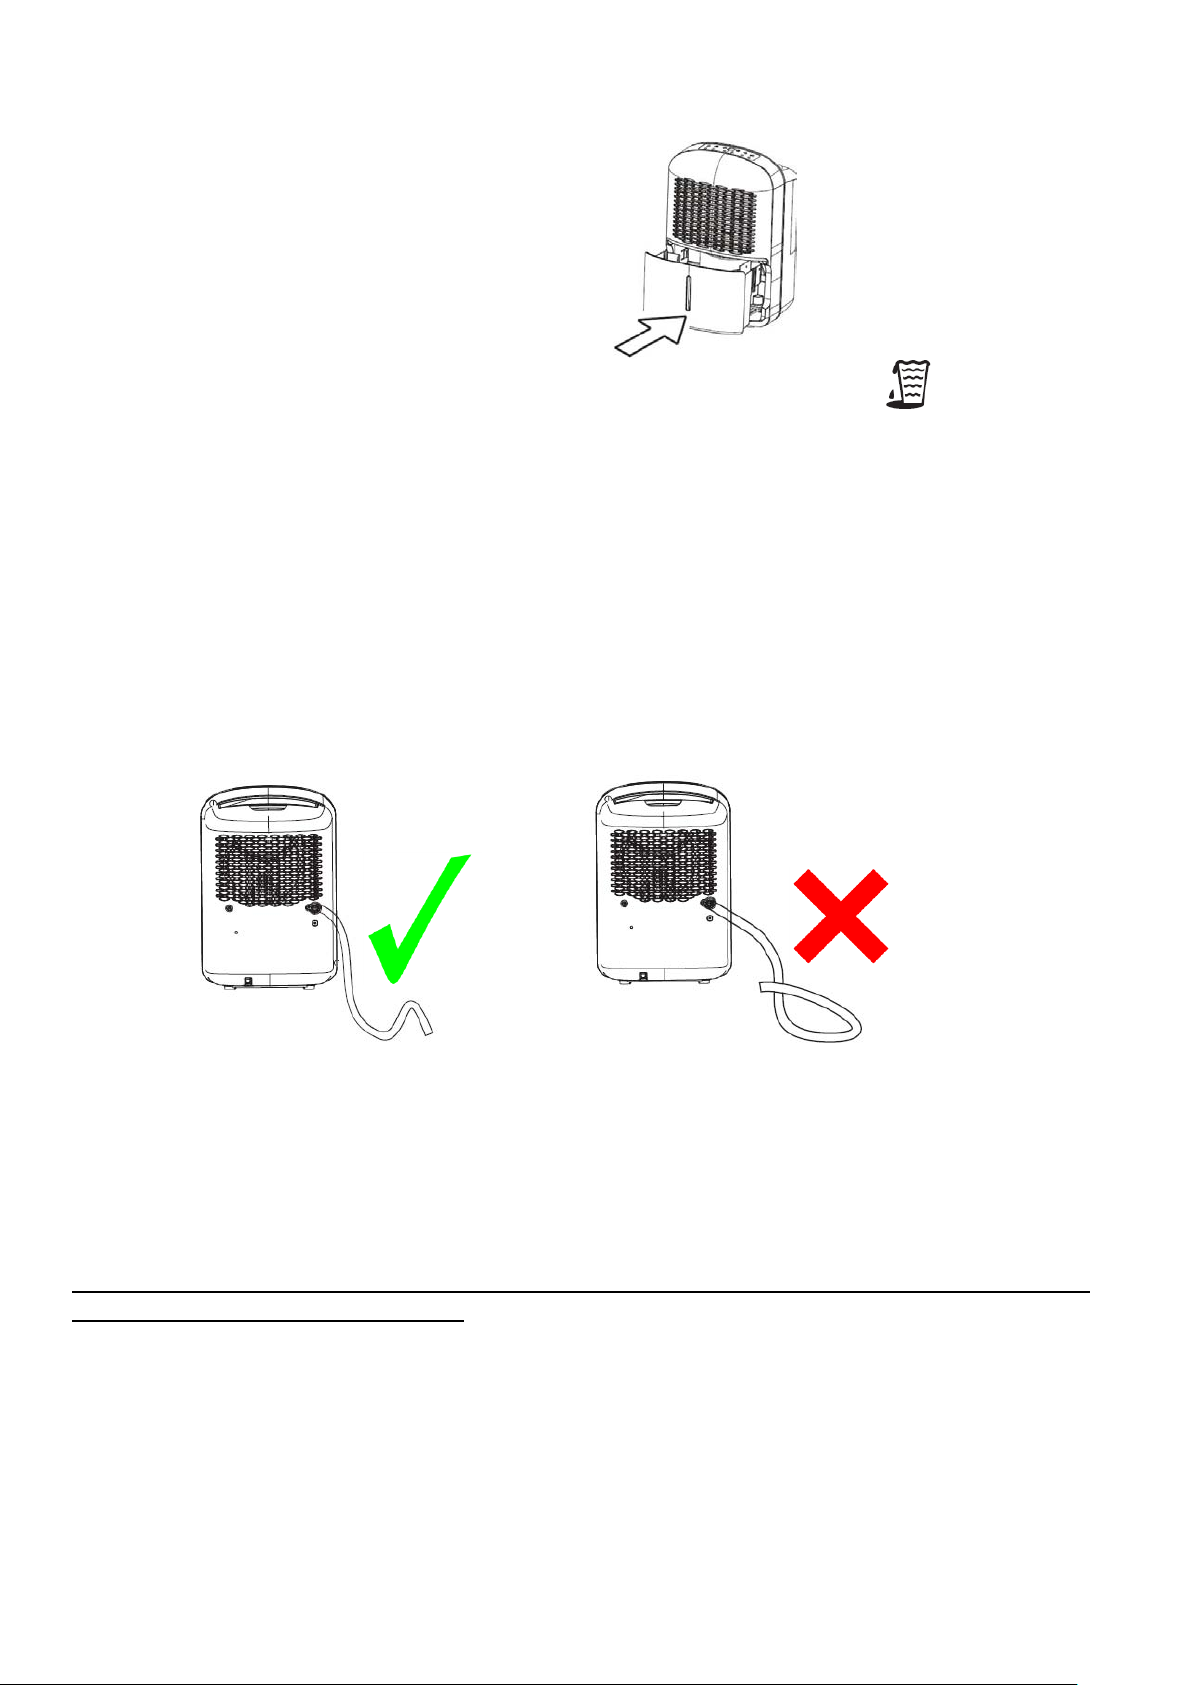
2. Pour out the water.
3. Push the water tank gently all the way in.
Failing to push the tank securely may cause
the appliance to stop operating.
4. When the tank is put back, the appliance will start operating. The indicator light will go out
and “P2” will disappear from the display.
NOTE:
Never drink the water or use it to water plant.
After you remove the water tank, do not touch internal parts of the dehumidifier. It could damage the
appliance.
Continuous External Draining
If the appliance is to be operated for long periods but you are unable to empty the tank, it is recommended
to use the continuous drain facility.
1. Remove the rubber plug from the drain outlet.
2. Fasten a hose (not supplied) to the drain outlet.
Make sure that the hose is not higher than the outlet; otherwise water will remain in the tank. Also
check that the hose is not kinked.
3. Lead the water hose to the floor drain or a suitable drainage facility.
The drainage facility should be lower than the drain outlet.
NOTE: When the continuous drain facility is not being used, remove the hose from the outlet and attach
the rubber plug back to the drain outlet.
Downloaded from www.vandenborre.be
GB
9
CLEANING AND MAINTENANCE
Turn the appliance off and remove the plug from the mains socket before performing any cleaning or
maintenance operations.
Never immerse the appliance in water.
Cleaning the body
Clean the outside of the appliance with a slightly damp cloth. Dry thoroughly.
Do not use abrasive or chemical cleaning agents.
Cleaning the filter
Remove and clean the filter once a month.
To remove the filter, first remove the water tank and then pull the filter outwards.
Clean it in warm soapy water. Rinse and dry it thoroughly before replacing it.
Attach the filter back to the rear of the dehumidifier.
CAUTION: DO NOT operate the dehumidifier without a filter because dirt and lint will clog it and reduce
performance.
Routine cleaning of the water tank (once a month)
Depending on where the dehumidifier is used, the inside of the water tank may become dirty as a result of
dirt and dust contained in the air. If this is the case, clean the tank in soapy water.
NOTE: Do not clean the tank in a dishwasher. After cleaning, the tank must be placed in place for the
dehumidifier to operate.
If the appliance is not used for long periods
After turning off and unplugging the appliance from the mains socket, empty the
tank.
Clean the outside of the appliance. Clean and reposition the tank and filter.
Cover the appliance to protect it from dust.
Store the appliance upright in a dry, well-ventilated place.
Wap the power cord and bundle it with the band at the rear of the dehumidifier.
Grip the tab on the filter
and then pull the filter
outwards.
Downloaded from www.vandenborre.be

GB
10
TROUBLESHOOTING
Before calling for service, check the following items yourself.
Problem
What to check
The appliance does not operate.
Check that the appliance is plugged into the mains socket.
Check the fuse/circuit breaker box.
Check if the water tank is full.
Check that the water tank is correctly fitted.
Check if the appliance is not turned on.
Dehumidifying capacity (moisture
removal) is low.
Check that all doors or windows are closed or not opened too
often.
Check that the room temperature is higher than 5°C.
Check that there is no kerosene heater or other device giving off
water vapour in the room.
The appliance is noisy.
Check that the filter is not clogged.
Check that the appliance is not tilted.
Check that the floor surface where the appliance is placed is
stable and level.
Error and protection codes
Code
Description
Possible Solution
AS
Humidity sensor error
Unplug the appliance and plug it back in. If this error
repeats, call for service.
ES
Temperature sensor error
EC
Refrigerant leakage detection
Call for service.
P2
Water tank is full or it is not
in right position.
Empty the water tank or replace it in place.
SPECIFICATIONS
Capacity
(Under the following test conditions:
The ambient temperature DB=30°C,
the relativity humidity RH=80%)
12L / DAY
Excessive operating pressure
Discharge : 1.7 MPa
Suction: 0.7MPa
Weight
11 kg
Power source
220-240V~ 50Hz, 1Ph
Refrigerant
R410a / 80g
Rated current
2.0A
Rated input
290W
Downloaded from www.vandenborre.be

DISPOSAL
As a responsible retailer we care about the environment.
As such we urge you to follow the correct disposal procedure for the appliance and
packaging materials. This will help conserve natural resources and ensure that it is recycled
in a manner that protects health and the environment.
You must dispose of this appliance and its packaging according to local laws and regulations.
Because this appliance contains electronic components, the appliance and its accessories
must be disposed of separately from household waste when the appliance reaches its end of
life.
Contact your local authority to learn about disposal and recycling.
The appliance should be taken to your local collection point for recycling. Some collection
points accept appliance free of charge.
We apologise for any inconvenience caused by minor inconsistencies in these instructions,
which may occur as a result of product improvement and development.
Darty Holdings SAS © 14 route d’Aulnay 93140 Bondy, France 02 / 11 / 2015
11
Downloaded from www.vandenborre.be

AVERTISSEMENTS
Cet appareil est desné à un usage domesque uniquement. Toute ulisaon
autre que celle prévue pour cet appareil, ou pour une autre applicaon que
celle prévue, par exemple une applicaon commerciale, est interdite.
Cet appareil peut être ulisé par des enfants âgés d'au moins 8 ans et par des
personnes ayant des capacités physiques, sensorielles ou mentales réduites ou
dénuées d’expérience ou de connaissance, s'ils (si elles) sont correctement
surveillé(e)s ou si des instrucons relaves à l'ulisaon de l'appareil en toute
sécurité leur ont été données et si les risques encourus ont été appréhendés.
Les enfants ne doivent pas jouer avec l’appareil. Le neoyage et l'entreen par
l'usager ne doivent pas être effectués par des enfants sans surveillance.
Si le câble d'alimentaon est endommagé, il doit être remplacé par le fabricant,
son service après vente ou des personnes de qualificaon similaire afin d'éviter
un danger.
En ce qui concerne la méthode et la fréquence du neoyage, référez-vous à la
secton “NETTOYAGE ET ENTRETIEN” en page
Mise au rebut de l’appareil:
Pour éviter toute nuisance envers l’environnement ou la santé humaine causée
par la mise au rebut non contrôlée de déchets électriques, recyclez l’appareil de
façon responsable pour promouvoir la réulisaon des ressources matérielles.
La mise au rebut doit être faite de façon sûre dans des points de collecte publique
prévus à cet effet.
Installaon et mise en service:
L’appareil doit être installé sur le sol, sur une surface plane et horizontale en s’assurant que
les ouvertures d’aéraon sont correctement dégagées.
Ne jamais essayer de remplacer ou de réparer vous même une pare ou un composant de
l’appareil, demandez de l’aide à un personnel professionnel et qualifié, si besoin.
FR
1
9.
Downloaded from www.vandenborre.be

FR
2
Manipulation:
Toujours manipuler l’appareil avec soin afin d’éviter d’endommager celui-ci.
Le R-410A utilisé dans cet appareil est un gaz à effet de serre fluoré relevant du
protocole de Kyoto, qui peut être nocif pour l’environnement et peut être
responsable du réchauffement global s’il s’échappe dans l’atmosphère. Son
potentiel de réchauffement global est 2087.5.
L’appareil doit être installé conformément aux réglementations nationales
concernant les câblages électriques.
Laissez au moins 20 cm d'espace
de tous les côtés de l'appareil et
40 cm au-dessus de l'appareil afin
de garantir une circulation d'air
suffisante.
INSTRUCTIONS DE SÉCURITÉIMPORTANTES
Pour réduire les risques de choc électrique, d'incendie ou de blessure, veuillez
lire attentivement toutes les instructions avant d’utiliser l’appareil et
conservez-les pour toute consultation ultérieure.
L'appareil ne doit pas être immergé dans l'eau ni dans aucun autre liquide.
Ne réparez pas l’appareil vous-même. Toutes les réparations doivent être
effectuées par un électricien qualifié.
Downloaded from www.vandenborre.be

FR
3
Ne faites pas fonctionner l'appareil à l'extérieur et ne l’exposez pas à la pluie ni
à l’humidité.
Installez votre déshumidificateur sur une surface plane et stable. Assurez-vous
que la surface est suffisamment solide pour supporter le poids du
déshumidificateur avec une cuve à eau pleine. Ne vous asseyez pas et ne montez
jamais sur le déshumidificateur.
Eteignez l'appareil et débranchez le câble d’alimentation de la prise murale
lorsque l’appareil n’est pas utilisé et avant de le nettoyer.
Ne posez aucun objet sur l’appareil.
Ne buvez pas et n'utilisez pas l'eau recueillie dans la cuve de l'appareil.
Ne faites pas fonctionner l'appareil à proximité de gaz ou de combustibles
inflammables, comme de l'essence, du benzène, un diluant, etc.
Ne retirez pas la cuve à eau lorsque l'appareil est en marche.
Ne placez pas d'aérosols ou d'autres matières dangereuses à proximité de
l'appareil, ni de matériaux inflammables tels que de l'essence ou du diluant. Ces
matériaux risqueraient d’exploser et de provoquer un incendie.
Ne placez pas l'appareil près d’une source de chaleur. Cela pourrait faire
fondre les pièces en plastique internes et provoquer un incendie.
Placez l’appareil exclusivement sur une surface plane et stable.
Ne placez aucun récipient rempli de liquide, comme un vase, sur l'appareil. Un
écoulement d’eau pourrait en effect entraîner un dysfonctionnement de
l'isolation et un choc électrique ou un incendie.
Ne vous tenez pas contre l'appareil et ne vous appuyez pas sur l'appareil. Il
risquerait de basculer et d’entraîner des blessures.
Veuillez à ne pas obstruer l'arrivée ou la sortie d'air avec des vêtements ou
tout autre objet. L'obstruction de la circulation de l'air provoquerait une
surchauffe, un dysfonctionnement ou un incendie.
Ne faites pas fonctionner l'appareil sans le filtre en place.
Downloaded from www.vandenborre.be
FR
4
DESCRIPTION
Vue avant
Vue arrière
1. Panneau de contrôle
2. Grille d’entrée d’air
3. Réservoir d’eau
4. Indicateur du niveau d’eau
5. Poignée
6. Grille de sortie d'air
7. Attache du câble
d’alimentation
8. Orifice de vidange d'eau en
continu
9. Câble d’alimentation
FONCTIONNEMENT
Lors de la première utilisation de l'appareil, faites-le fonctionner pendant 24 heures sans interruption.
Cela permettra au réfrigérant de se régler correctement.
Cet appareil est conçu pour fonctionner sous une température ambiante entre 5°C et 35°C.
Choisissez un emplacement adapté, en vous assurant que la prise de courant est facilement accessible.
Ne branchez pas l'appareil à une prise électrique alimentant d'autres appareils.
Placez l'appareil dans un endroit éloigné du sèche-linge, du chauffe-eau ou des radiateurs.
Vous pouvez utiliser l'appareil pour empêcher que les livres ou les objets de valeur ne soient
endommagés par l'humidité.
Vous pouvez utiliser l'appareil dans un sous-sol pour aider à prévenir les dommages liés à l'humidité.
L'appareil doit être utilisé dans un espace clos pour être plus efficace.
Fermez toutes les portes, fenêtres et autres ouvertures de la pièce vers l'extérieur.
Les roulettes vous permettent de déplacer facilement l'appareil.
Assurez-vous que la cuve à eau est correctement installée.
REMARQUE : Déplacez toujours l'appareil avec prudence, surtout lorsqu'il y a beaucoup d'eau dans la cuve;
plus il y a d'eau dans la cuve, plus le risque est élevé de faire basculer l'appareil lorsqu'il est
déplacé. Il est recommandé de vider la cuve à eau avant de déplacer l'appareil.
Panneau de Contrôle
Downloaded from www.vandenborre.be

FR
5
1. Indicateur lumineux d’alimentation (vert)
2. Indicateur lumineux de fonctionnement silencieux (vert)
3. Indicateur lumineux de cuve pleine (rouge)
4. Écran d'affichage
Affiche le taux d'humidité relative, les codes d'erreur, le délai avant le départ différé ou l'arrêt différé.
5. Fonction de dégivrage automatique (vert)
6. Indicateur lumineux du minuteur (vert)
7. Indicateur lumineux du mode de déshumidification en continu (vert)
8. Bouton du mode de déshumidification en continu
9. Bouton du minuteur
Appuyez sur ce bouton pour sélectionner la fonction de départ différé ou d’arrêt différé puis
effectuez le réglage souhaité à l’aide des boutons / .
10. Boutons et
11. Bouton du mode silencieux
12. Bouton d’alimentation
Mise en marche et arrêt
Appuyez sur pour mettre l'appareil en marche.
L'affichage indiquera le niveau d'humidité ambiant.
Pour éteindre l'appareil, appuyez de nouveau sur .
En cas de panne de courant
Si l'alimentation est rétablie après une panne de courant, attendez environ 3 minutes avant de remettre
l’appareil en marche pour qu’il continue à fonctionner avec les paramètres sélectionnés.
Downloaded from www.vandenborre.be

FR
6
Mode de déshumidification
Pour faire fonctionner l'appareil en mode de déshumidification, appuyez plusieurs fois sur jusqu'à ce
que l'indicateur lumineux correspondant s'éteigne.
1. Appuyez plusieurs fois sur / pour régler le niveau d'humidité désiré par intervalles de 5%.
Le niveau d'humidité peut être réglé sur une échelle comprise entre 35%HR (Humidité Relative) et
85%HR.
Pour un air plus sec, réglez le niveau d'humidité sur un pourcentage plus faible.
Pour un air plus humide, réglez le niveau d'humidité sur un pourcentage plus élevé.
2. Après avoir réglé le niveau d'humidité désiré, l'affichage indiquera brièvement le niveau d'humidité
sélectionné, puis affichera de nouveau le niveau d'humidité ambiant de la pièce.
Mode de déshumidification continue
Vous pouvez utiliser ce mode afin que l'excès d'humidité de l'air soit absorbé en continu.
Pour un fonctionnement en continu, appuyez sur pour activer cette fonction et l'indicateur lumineux
correspondant s'allumera.
REMARQUE : Vous ne pouvez pas sélectionner le niveau d'humidité désiré lorsque l'appareil est réglé sur ce
mode.
Mode silencieux
Ce mode permet au déshumidificateur de fonctionner silencieusement à une vitesse de ventilation plus
faible.
Pour activer ce mode, appuyez sur . L'indicateur lumineux correspondant s'allumera.
Pour désactiver ce mode, appuyez à nouveau sur ce bouton. L'indicateur lumineux correspondant
s'éteindra. Le ventilateur fonctionnera de nouveau à la vitesse normale.
Minuteur
Pour programmer un départ différé :
1. Lorsque l'appareil est éteint, appuyez sur .
L'indicateur lumineux correspondant s'allumera et les chiffres des heures s’afficheront.
2. Lorsque les chiffres des heures sont affichés, appuyez plusieurs fois ou appuyez et maintenez les boutons
/ enfoncés pour régler la durée souhaitée avant le départ différé.
La durée avant le démarrage différé peut être modifiée par intervalles de 0,5 heures jusqu'à 10 heures,
puis par intervalles de 1 heure jusqu'à 24 heures.
3. Après environ 5 secondes, la durée réglée sera confirmée puis disparaîtra de l'affichage.
4. Lorsque la durée réglée sera écoulée, l'appareil commencera à fonctionner.
Downloaded from www.vandenborre.be

FR
7
Pour programmer un arrêt différé :
1. Lorsque l'appareil est en marche, appuyez sur .
L'indicateur lumineux correspondant s'allumera et les chiffres des heures s’afficheront.
2. Lorsque les chiffres des heures sont affichés, appuyez plusieurs fois ou appuyez et maintenez les boutons
/ enfoncés pour régler la durée souhaitée avant l’arrêt différé.
La durée avant l'arrêt différé peut être modifiée par intervalles de 0,5 heures jusqu'à 10 heures, puis
par intervalles de 1 heure jusqu'à 24 heures.
3. Après environ 5 secondes, la durée réglée sera confirmée puis l'affichage indiquera de nouveau le niveau
d'humidité ambiant.
4. Lorsque la durée réglée sera écoulée, l'appareil s'arrêtera de fonctionner.
Pour modifier ou annuler le minuteur :
Si vous désirez modifier la durée avant le démarrage différé ou l'arrêt différé, appuyez une fois sur
et lorsque les heures s'affichent, appuyez plusieurs fois ou appuyez et maintenez les boutons /
enfoncés jusqu'à ce que la durée désirée soit sélectionnée.
Si vous désirez annuler le minuteur, appuyez une fois sur et lorsque les heures s'affichent,
appuyez plusieurs fois ou appuyez et maintenez les boutons / enfoncés jusqu'à ce que "0.0"
s'affiche. Le minuteur sera également annulé lorsque l'écran affichera le code d'erreur "P2".
Autres fonctions
Cuve à eau pleine
L'indicateur lumineux s'allume lorsque la cuve à eau est pleine ou qu'elle n'est pas correctement
mise en place. Veuillez vider la cuve ou la remettre correctement en position puis l'indicateur lumineux
s'éteindra.
Arrêt automatique
Le déshumidificateur s'éteint lorsque la cuve à eau est pleine, lorsque la cuve à eau est retirée ou n'est pas
placée correctement en position. Il s'arrêtera également de fonctionner lorsque le niveau du taux
d'humidité réglé est atteint.
Dégivrage automatique
Lorsque du givre s'accumule sur les bobines de l'évaporateur, le compresseur s'arrête et le ventilateur
continue de fonctionner jusqu'à ce que le givre disparaisse.
Lorsque le dégivrage automatique est en fonctionnement, l'indicateur lumineux s'allume.
Downloaded from www.vandenborre.be
Table of contents
Languages:
Other Proline Dehumidifier manuals


Popular Dehumidifier manuals by other brands


YAUFEY
YAUFEY AD1901 user manual

izzy
izzy Avra IZ-9050 instruction manual

Santa Fe
Santa Fe Clasic 4029700 Installer's & owner's manual

Sygonix
Sygonix D011C-10L operating instructions

International Refrigeration Products
International Refrigeration Products DH470 user manual

Royal Sovereign
Royal Sovereign BDH-550 owner's manual