Prompter People Flex Series Manual

Tool-less top mounted
camera position adjustment
Adjustable LCD Position
(LCD slides o for transport)
Tripod Mount slides into
bottom or top rail Lightweight extruded
aluminum frame
(Provides perfect balance for any camera)
Detachable dual height
camera riser
(use any camera size)
Flex Series Teleprompters

STEP 1 - ATTACH TRIPOD MOUNTING PLATE
The ProLine 15/17’s patent pending mounting system allows the use of any size/weight camera. This mounting
system allows the tripod mounting plate to be attached to either the upper rail or lower rail of the teleprompter.
For heavier cameras mounting the tripod plate to the upper rail has the added benefit of lowering the center of
gravity for improved tripod head operation. In addition, the tripod mounting plate can slide anywhere along the
rails for precise balancing.
For lighter cameras the
tripod mounting plate is
attached to the lower rail.
For heavier cameras the
tripod mounting plate is
attached to the upper rail.
Tripod plate slides into channel on
either upper or lower rail.
Loosen thumbscrews
and lift up retaining
plate on back of upper
rail to slide on tripod
mounting plate.
Slide tripod mounting plate front
to back to balance teleprompter
Tighten screws to secure
tripod plate. Screws can be
tightened with a coin or
screwdriver.
The tripod mounting plate offers both
1/4”and 3/8”industry standard
mounting holes. Attach this plate to
your tripod’s quick release plate.
1Revised 042009
Flex 15/17/19 Set-Up Sheet

Slide the LCD monitor onto the lower rail
and tighten the thumbscrew.
The LCD can be adjusted fore/aft by
loosening the thumbscrew.To remove the LCD
unscrew the thrumbscrew all the way and slide
the LCD off the rail.
Note:The thumbscrew has a stop to keep it
from coming out all the way.
STEP 2 - LCD INSTALL
1
2
2Revised 042009
Slide mirror assembly on to it’s
mounting bracket on sled
Mirror assembly mounts on top
side of sled bracket
MOUNTING THE MIRROR ASSEMBLY
3seated tighten the two metal knobs
on the top side to secure the mirror
assembly in place
The spring loaded pin locks into camera
hole to keep camera from rotating.
Rotate camera until this locks in place.
Turn the camera knob to secure camera.
Loosen slightly to adjust camera position.
When camera is in position turn knob to lock
into place.Do not over tighten.
ce
.
USING DUAL HEIGHT RISER
The dual height camera riser is used with
smaller cameras.To attach simply pla
riser on camera mounting block and
tighten the camera block knob. Loosen
slightly to adjust camera position
The camera thumbscrew
can be removed from
one end and attached to
the other side.
NOTE: Full sized cameras
do not require dual
height riser.
3Revised 042009
STEP 3 - ATTACH CAMERA TO TELEPROMPTER
The Flex 15/17/19 oers multiple methods for attaching your video camera. Larger cameras attach directly to the
camera mounting block. Smaller cameras mount on the included dual height camera riser that attaches to the
camera mounting block. The dual height camera riser also allows cameras with short or ush mounted lenses to get
closer to the teleprompter mirror for optimum performance.
PLACE CAMERA ON SLED
The camera should be mounted with it’s lens vertically centered
in the beamsplitter. Choose the side of the riser that puts the
camera in this position. Secure camera to riser with attached
camera screw. When camera is mounted slide it gently forward
until lens is one inch behind glass beamsplitter. Rotate red knob
in “lock” direction to secure camera in place.
After camera is positioned properly, pull lens hood
over lens and secure with drawstring. Make sure hood
is not in front of lens. Note dual height is turned in this
picture is turned to accomodate dierent sized camera.

STEP 4 - CAMERA/LCD POSITION ADJUSTMENT
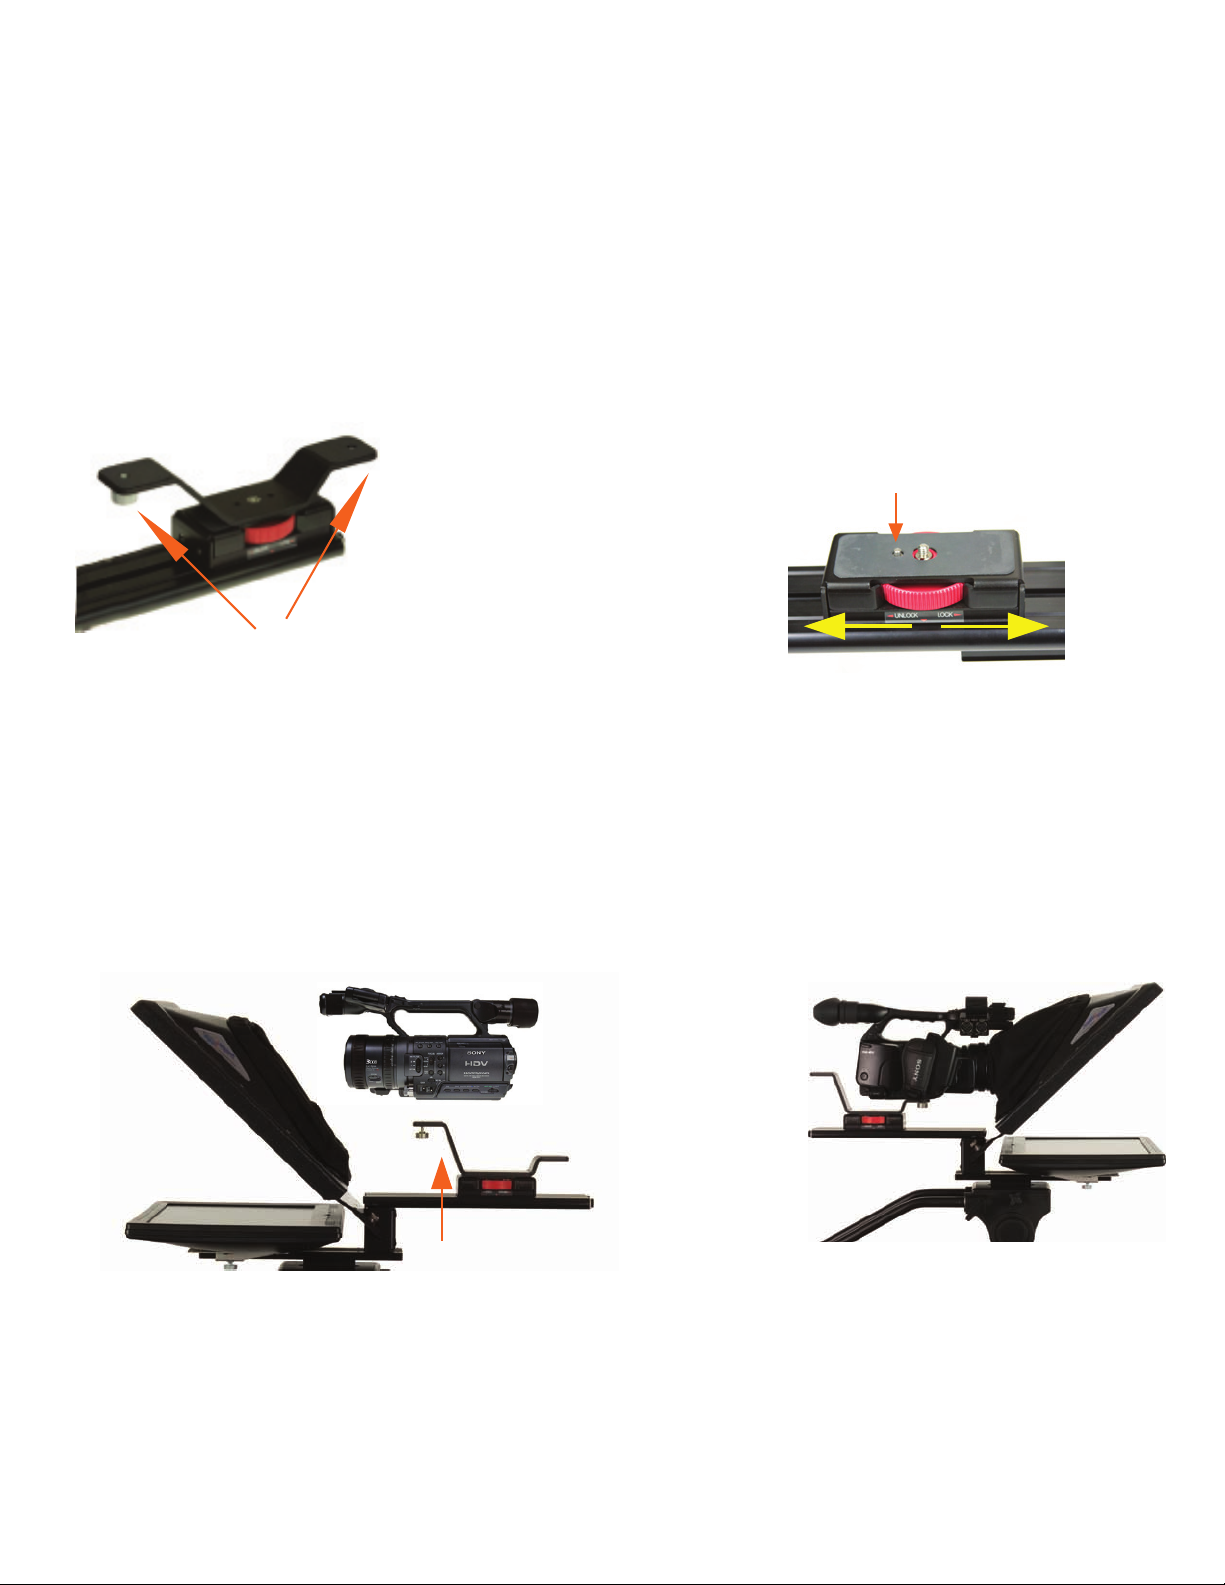
Turn knob to left to unlock and to the right to lock.
Remove the cameras lens shade.
Position camera lens within 1/2”from glass. Once camera is positioned place lens shade around lens.
Tighten lens shade with draw string.
4Revised 042009
The Flex 15/17/19’s top mounted camera block makes fore/aft camera positioning a fast, tool-free procedure.
Remove the lens shade on your camera so that the lens can get as close to the glass as possible. Then simply
turn the large red, knurled knob to tighten or release the camera for easy adjustment. The cloth lens shade
wraps around the lens to keep light from entering from the rear. The LCD can be postioned fore/aft by
loosening it’s thumbscrew. The LCD can be quickly removed for safe, compact transport. The mirror
assembly can also be quickly nad easily removed for
safe and compact transport.
Tool-less top mounted
camera position adjustment
Adjustable LCD Position
(LCD slides o for transport)
Tripod Mount slides into
bottom or top rail Lightweight extruded
aluminum frame
(Provides perfect balance for any camera)
Detachable dual height
camera riser
(use any camera size)
This manual suits for next models
3


