PROPOINT 8369464 User manual

Please read this manual before use.
User Manual
2 TON
JACKSTANDS
V 3.0 8369464


Visit www.princessauto.com for more information 3
8369464 V 3.0
2 TON
JACKSTANDS
SPECIFICATIONS
Weight Capacity 4,000 lb per matched pair
Lift Range 10-13/16 to 16-1/2 in.
Jack Stand Base
Single Unit Frame Steel Construction
Integral Bracing and Welded Corner
Support for Greater Base Stability
Solid Steel Handle with End Cap
Ratchet Bar
Large Notched Saddle
12 Ratchet Teeth for Fine Adjusting
Ductile Steel
Jack Stand Weight (pair) 11.68 lb
IMPORTANT SAFETY PRECAUTIONS
WARNING! Read and understand all instructions before using this
tool. The operator must follow basic precautions to reduce the
risk of personal injury and/or damage to the equipment. Before
allowing someone else to use this tool, make sure they are aware
of all safety information.

4 For technical questions call 1-800-665-8685
V 3.0 2 Ton Jack Stands 8369464
Note: Keep this manual for the safety warnings, precautions and
operating, inspection and maintenance instructions. Note that
when this manual refers to a part number, it refers to the parts list.
WORK AREA
1. Operate in a safe work environment. Keep your work area
clean and well lit.
2. Keep anyone not wearing the appropriate safety equipment
away from the work area.
3. Minimize distractions in the work environment. Distractions
can cause you to lose control of the tool.
4. Store tool properly in a safe and dry location to prevent rust
or damage.
5. Always lock up tools and keep them out of the reach of
children.
PERSONAL SAFETY
CAUTION! Wear protective equipment approved by the Canadian
Standards Association (CSA) or American National Standards
Institute (ANSI) when using the tool.
1. Head Protection
a. Always wear impact safety goggles that provide front and
side protection for the eyes.
b. Wear the appropriate rated dust mask or respirator when
working around metal, wood and chemical dusts or mists.
c. Wear earplugs if the power tool or work environment is
noisy.
d. Wear a full-face shield if your work creates metal filings or
wood chips.
e. Wear a hard hat to protect your head from falling objects.
2. Gloves
a. The gloves should provide protection based on the work
materials.
b. Wear suitable gloves to reduce the eects of vibration.

Visit www.princessauto.com for more information 5
8369464 2 Ton Jack Stands V 3.0
3. Protective Clothing
a. Wear protective clothing designed for the work
environment and tool. Examples are electrical non-
conductive clothes or clothes treated to resist corrosive
liquids or materials.
4. Foot Protection
a. Steel toe footwear or steel toecaps to prevent injury from
falling objects.
b. Non-skid footwear is recommended to maintain footing
and balance.
5. Control the tool, personal movement and the work
environment to avoid personal injury or damage to tool. Stay
alert, watch what you are doing and use your common sense.
a. Keep articles of clothing, jewelry, hair, etc., away from
moving parts to avoid entanglement with a tool.
b. Do not operate any machine/tool when tired or under the
influence of drugs, alcohol or medications.
c. Do not overreach when operating a tool. Proper
footing and balance enables better control of a tool in
unexpected situations.
d. Use clamps or other practical ways to support or secure
the work piece to a stable platform. Holding the work
piece by hand or against your body is not stable and may
lead to loss of control and injury.
SPECIFIC SAFETY PRECAUTIONS
1. Do not overload the jack stands beyond their rated lift
capacity (see Specifications).
a. The weight capacity is for both jack stands combined.
b. The jack stands’ weight capacity MUST exceed vehicle’s
curb weight.
• Consult the vehicle’s owner manual to determine the
curb weight.

6 For technical questions call 1-800-665-8685
V 3.0 2 Ton Jack Stands 8369464
2. Consult the vehicle owner’s manual for proper placement of
the floor jack before lifting.
a. Do not use the vehicle’s emergency jack in place of a floor jack.
3. Never allow people in a vehicle that is being lifted or moved.
4. Only elevate one end of the vehicle at a time with jack stands
to retain stability.
a. Never elevate both ends of a vehicle with jack stands at
the same time.
b. Never use jack stands to support the side of a vehicle.
5. Test that the vehicle is safely supported by the jack stands by
pushing the vehicle away from you.
a. Keep the vehicle at arm’s length when performing this test.
b. Ensure the workspace is clear of people and obstacles.
c. Provide enough room to escape the area should the
vehicle slip o the jack stands.
TOOL USE AND CARE
1. Use the correct jack stand for the job. Do not use a lower
rated jack stand to do the work of a sturdier jack stand.
Maximize jack stand performance and safety by using the
jack stands for its intended task.
2. This jack stand was designed for a specific function.
Do Not:
a. Modify or alter this jack stand.
b. Use this jack stand for an unintended purpose.
3. Maintain jack stands with care (see Maintenance).
UNPACKING
1. Carefully remove the parts and accessories from the box.
NOTE: Retain packaging material until you have carefully
inspected and satisfactorily installed or operated the tool.
2. Make sure that all items in the Parts Identification list are
included.
3. Inspect the parts carefully to make sure the jack stands were
not damaged while shipping.

Visit www.princessauto.com for more information 7
8369464 2 Ton Jack Stands V 3.0
OPERATION
PARTS IDENTIFICATION
There are two jack stands. Each jack stand has the following
components:
Saddle
Ratchet Bar
Pawl Mechanism
Metal Tab
Steel Handle
Jack Stand Base
• Ratchet bar
• Jack stand base
• End cap for handle (preinstalled)
ASSEMBLY
CAUTION! Do not lift or carry the assembled jack
stand by the ratchet bar. The base may slide down
the ratchet bar, causing a personal injury or damage
to the jack stand or other items in the work area.
1. Set the jack stand base on a level surface.
2. Raise handle to maximum height. This will
move the pawl into out of the way.
NOTE: The pawl position can be seen by looking
into the opening at the top of the base and
moving the handle.
PAWL

8 For technical questions call 1-800-665-8685
V 3.0 2 Ton Jack Stands 8369464
3. Position ratchet bar so the teeth face
the pawl.
4. Slide the ratchet bar down until the
bottom of the saddle rests on the top of
the jack stand base.
5. Lower handle until it is at rest.
6. Pull ratchet bar up until the pawl clicks
into place.
7. Bend metal tab inward. This will prevent the ratchet bar from
sliding out of the base.
OPERATION
BEFORE RAISING THE VEHICLE
1. The jack stand is designed for use on a hard,
level surface capable of sustaining the load. Use
on other surfaces can result in jack instability
and possible loss of load or damage to the
surface material.
2. Set the vehicle in parking gear and engage the
parking brake.
a. For vehicles with a manual transmission,
engage the parking brake and leave the car
in reverse or 1st gear. Consult your vehicle
owner’s manual for the correct gear.
3. Place wheel chocks that fit the wheel curve on either side of
the vehicle’s remaining wheels.
4. Place the Floor jack only on support points or areas specified
by the vehicle manufacturer (consult owner’s manual).
5. Lift the vehicle to a height that leaves enough room to place
the jack stands.
POSITIONING THE JACK STANDS
WARNING! Do not place body under vehicle to
position jack stands as vehicle may slip off the floor
jack and cause serious damage or death.
Bend Metal
Tab In

Visit www.princessauto.com for more information 9
8369464 2 Ton Jack Stands V 3.0
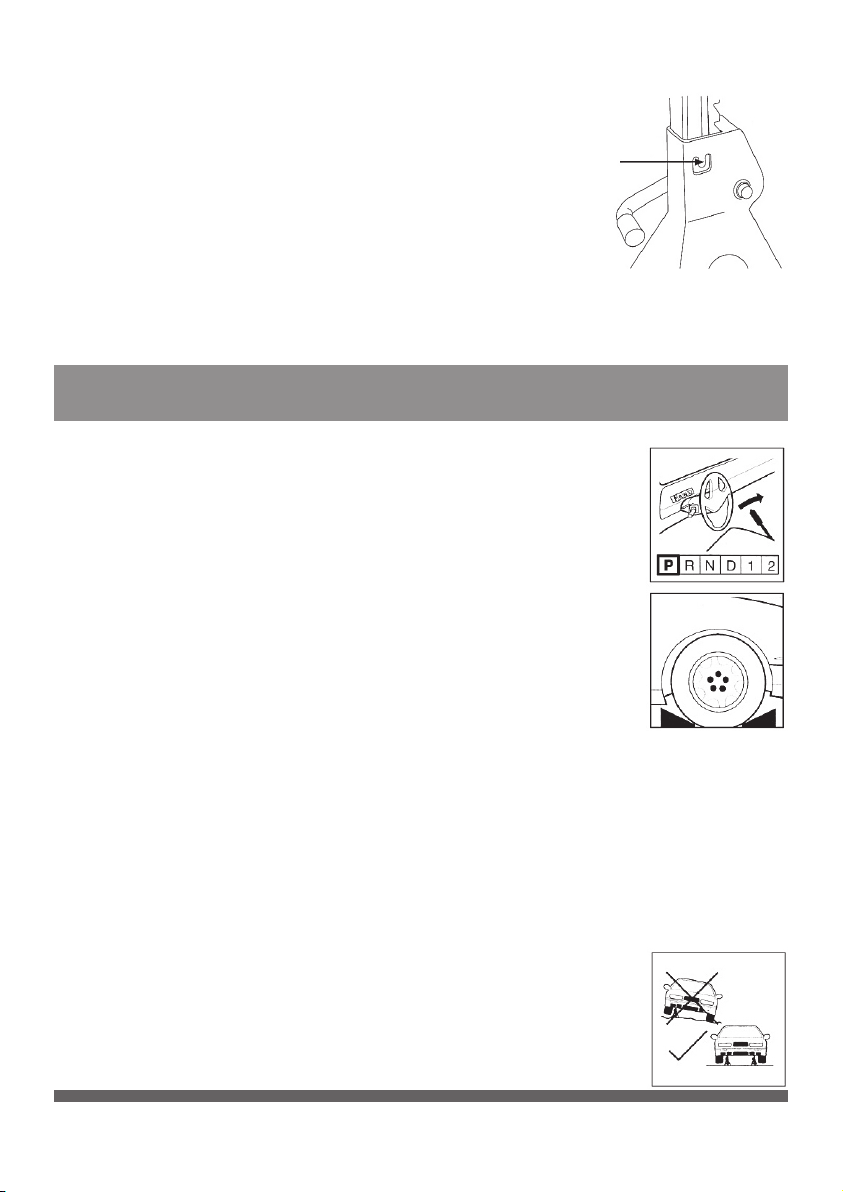
1. Use jack stands in pairs to support the vehicle.
a. Both jack stands must support the same point on either
side of the vehicle.
b. Both jack stand saddles must be at the same height when
the vehicle is lowered onto the jack stands.
CAUTION! The jack stand’s legs may damage the floor surface when
holding a vehicle. Place a 1/4 in. sheet of plywood or a rigid metal
sheet underneath the jack stand’s legs to distribute the weight.
2. Place the jack stands under areas of solid metal:
a. Vehicle frame
b. Frame rails
• A frame rail prevents the vehicle’s undercarriage from
colliding with road obstacles. A rail runs the length of the
vehicle on each side and may resemble a metal seam.
c. Wheel axle
d. Steel cross member
3. Once in position, raise the saddle until it just beneath the
vehicle’s support point on the vehicle.
WARNING! Ensure the jack stand’s saddle matches the shape of the
support points to permit a solid contact. A mismatch may cause the
vehicle to slip off the jack stand and cause serious injury or death.
a. Pull ratchet bar upward. The ratchet teeth will slide past
the pawl.
NOTE: The handle will rise and fall, as the ratchet bar is moving
upward.
b. When positioned below the support point, ensure the
handle is in the down position. If not, move the ratchet
bar up and down slightly until the handle settles. A click
can be heard when the pawl is in place.
c. Release the ratchet bar and push handle down to confirm
it is in place.
d. Repeat with the second jack stand and confirm it is at the
same height as the first (count visible ratchet bar teeth).
4. Lower floor jack slowly and allow the vehicle to settle on the
jack stands.

10 For technical questions call 1-800-665-8685
V 3.0 2 Ton Jack Stands 8369464
NOTE: The floor jack can be used as an additional safety
mechanism. Once the vehicle load is transferred to the jack
stands, lower the floor jack until it is just out of contact with the
vehicle and leave in place. Never use an emergency jack for this
purpose, as it is not designed to withstand a moving impact.
5. Push the vehicle to check that it has settled correctly on the
jack stands before allowing anyone beneath it.
MAINTENANCE
WARNING! Never use a jack stand that has structural damage such
as cracks or warping. Dispose or recycle the jack stand immediately.
1. Maintain the jack stand with care. A maintained tool is
ecient and easier to control.
2. Inspect the jack stand components for damage or wear. Have
those components repaired or replaced by an authorized
technician unless the damage compromises the jack stand’s
physical integrity.
3. Keep the jack stand handle clean, dry and free from oil/
grease at all times.
4. Clean dust and debris from the jack stand’s foot supports,
ratchet bar teeth and saddle, plus the base stand’s opening
on the top.
5. Maintain the label and nameplate on the jack stand. These
carry important information. If unreadable or missing,
contact Princess Auto for replacements.
LUBRICATION
CAUTION! Only use the lubricants supplied with the tool or specified
by the manufacturer. Other lubricants may not be suitable and may
damage the tool or cause a malfunction during use.
1. Spray the handle pivot points with a light lubricant if needed.
2. Clean the pawl and ratchet bar teeth of any lubricant that is
deposited.

Visit www.princessauto.com for more information 11
8369464 2 Ton Jack Stands V 3.0
DISPOSING OF TOOL
If your jack stand has become damaged beyond repair, do not
throw it out. Bring it to the appropriate recycling facility.
PARTS BREAKDOWN
Item No. Description Qty
1 Ratchet 1
2 Handle 1
3 Stand Base 1

V 3.0 8369464
Veuillez lire ce manuel avant d'utiliser cet outil.
CHANDELLES,
2TONNES
Manuel d'utilisateur


Visitez www.princessauto.com pour plus d'informations 3
8369464 V 3.0
CHANDELLES,
2TONNES
SPÉCIFICATIONS
Capacité pondérale 4 000 lb par paire combinée
Plage de levage 10 13/16 à 16 1/2 po
Base de chandelle
Support unitaire fabriqué en acier
Support avec renfort intégré et coins
soudés pour une base plus stable
Poignée en acier solide avec capuchon
d’extrémité
Barre à cliquet
Stabilisateur à large cran
12 dents pour un ajustement précis
Acier ductile
Poids des chandelles (paire) 11,68 lb
CONSIGNES DE SÉCURITÉ IMPORTANTES
AVERTISSEMENT! Veuillez lire et comprendre toutes les
instructions avant d’utiliser cet outil. L’utilisateur doit respecter
les précautions de base lorsqu’il utilise cet outil afin de réduire
le risque de blessure et/ou de dommage à l’équipement. Avant
de permettre à un autre individu d’utiliser cet outil, assurez-vous
qu’il connaît toutes les consignes de sécurité.

4 En cas de questions techniques, appelez le 1-800-665-8685
V 3.0 Chandelles, 2 tonnes 8369464
REMARQUE: Conservez ce manuel qui contient les avertissements
de sécurité, les précautions et les instructions de fonctionnement,
d’inspection et d’entretien. Veuillez noter que lorsque ce manuel
fait référence à un numéro de pièce, il fait référence à la liste des
pièces.
AIRE DE TRAVAIL
1. Travaillez dans un environnement de travail sécuritaire.
Gardez votre aire de travail propre et bien éclairée.
2. Assurez-vous que les personnes qui ne portent pas
l’équipement de sécurité approprié ne se trouvent pas à
proximité de l’aire de travail.
3. Minimisez les distractions au-sein de l’environnement de travail.
Les distractions peuvent causer une perte de contrôle de l’outil.
4. Rangez l’outil correctement dans un lieu sécurisé et sec pour
empêcher la rouille ou les dommages.
5. Gardez toujours les outils dans un endroit verrouillé et hors
de portée des enfants.
SÉCURITÉ PERSONNELLE
ATTENTION! Portez de l’équipement de protection approuvé par
l’Association canadienne de normalisation (CSA) ou l’American
National Standards Institute (ANSI) quand vous utilisez l’outil.
1. Protection de la tête
a. Portez toujours des lunettes de sécurité étanches qui
orent une protection frontale et latérale des yeux.
b. Portez un masque antipoussières ou un appareil
respiratoire nominal approprié lorsque vous travaillez où il
y a des poussières et des vapeurs provenant du métal, du
bois ou de produits chimiques.
c. Portez des bouchons d’oreille si l’outil électrique ou
l’environnement de travail est bruyant.
d. Portez un écran facial panoramique si votre travail produit
des limailles ou des copeaux de bois.
e. Pour vous protéger de la chute d’objets, portez un casque
de protection.

Visitez www.princessauto.com pour plus d'informations 5
8369464 Chandelles, 2 tonnes V 3.0
2. Gants
a. Les gants doivent assurer la protection nécessaire en
fonction des matériaux à travailler.
b. Portez des gants appropriés pour réduire les eets des
vibrations.
3. Vêtements de protection
a. Portez des vêtements de protection conçus pour
l’environnement de travail et pour l’outil. Par exemple, des
vêtements en tissu non conducteur ou en tissu traité pour
résister aux liquides ou aux produits corrosifs.
4. Protection des pieds
a. Chaussures à embout d’acier ou coquilles d’acier pour
éviter les blessures dues à la chute d’objets.
b. On recommande des chaussures antidérapantes pour
maintenir la stabilité et l’équilibre.
5. Gardez le contrôle de l’outil, des mouvements des personnes
et de l’environnement de travail pour éviter les blessures ou
l’endommagement de l’outil. Restez alerte, portez attention à
vos gestes et faites preuve de bon sens.
a. Tenez les vêtements, les bijoux, les cheveux, etc. à l’écart
des pièces mobiles pour éviter de les faire coincer par
l’outil.
b. N’utilisez pas d’appareil ou d’outil si vous êtes fatigué ou
sous l’eet de drogues, d’alcool ou de médicaments.
c. Ne vous étirez pas trop loin lorsque vous utilisez un
outil. Une stabilité et un équilibre appropriés permettent
d’avoir un meilleur contrôle de l’outil en cas de situations
inattendues.
d. Utilisez des serres ou un autre moyen pratique pour
fixer la pièce à travailler sur une plate-forme stable. Une
pièce à travailler tenue dans les mains ou appuyée contre
le corps n’est pas stable et risque d’entraîner perte de
contrôle et blessure.

6 En cas de questions techniques, appelez le 1-800-665-8685
V 3.0 Chandelles, 2 tonnes 8369464
MESURES DE SÉCURITÉ SPÉCIFIQUES
1. Ne surchargez pas les chandelles au-delà de leur capacité de
levage nominale (voir les spécifications).
a. La capacité pondérale s’applique aux deux chandelles
combinées.
b. La capacité pondérale des chandelles DOIT excéder le
poids à vide du véhicule.
• Consultez le manuel du propriétaire du véhicule pour
déterminer le poids à vide.
2. Consultez le manuel du propriétaire du véhicule pour
connaître l’emplacement conseillé des chandelles avant le
levage.
a. N’utilisez pas le cric d’urgence du véhicule à la place d’un
cric rouleur.
3. N’autorisez personne à rester dans le véhicule pendant son
levage ou son déplacement.
4. Levez seulement une extrémité du véhicule à la fois avec les
chandelles afin d’assurer sa stabilité.
a. Ne levez jamais les deux extrémités du véhicule
simultanément avec les chandelles.
b. N’utilisez jamais les chandelles pour soutenir le côté d’un
véhicule.
5. Vérifiez si le véhicule est soutenu de manière sécuritaire au
moyen des chandelles en poussant le véhicule loin de vous.
a. Gardez le véhicule à distance pendant que vous faites cette
vérification.
b. Assurez-vous qu’il n’y a aucune personne, ni aucun
obstacle dans l’aire de travail.
c. Gardez susamment d’espace pour sortir de l’aire de
travail au cas où le véhicule glisserait hors des chandelles.

Visitez www.princessauto.com pour plus d'informations 7
8369464 Chandelles, 2 tonnes V 3.0
UTILISATION ET ENTRETIEN DE L’OUTIL
1. Utilisez la chandelle appropriée pour la tâche à eectuer.
N’utilisez pas une chandelle d’une capacité nominale
inférieure pour remplacer une chandelle plus solide.
Maximisez la performance et la sécurité de la chandelle en
utilisant des chandelles conçues pour leur utilisation prévue.
2. Cette chandelle a été conçue pour une utilisation spécifique.
Il ne faut pas:
a. Modifier ou altérer cette chandelle
b. Utiliser cette chandelle à des fins non prévues
3. Entretenez les chandelles avec soin (voir Entretien).
DÉBALLAGE
1. Retirez soigneusement les pièces et les accessoires de la
boîte.
REMARQUE: Conservez les matériaux d’emballage jusqu’à ce
que vous ayez inspecté avec soin et installé ou utilisé l’outil de
manière satisfaisante.
2. Assurez-vous que tous les éléments figurant sur la liste des
pièces soient compris.
3. Inspectez les pièces attentivement pour vous assurer que les
chandelles n’ont pas été endommagées pendant le transport.

8 En cas de questions techniques, appelez le 1-800-665-8685
V 3.0 Chandelles, 2 tonnes 8369464
UTILISATION
IDENTIFICATION DES PIÈCES
Il y a deux chandelles. Chaque chandelle comprend les composants
suivants :
Stabilisateur
Barre à cliquet
Mécanisme de cliquet
Onglet
Poigneé
Base de
chandelle
• Barre à cliquet
• Base de chandelle
• Capuchon d’extrémité pour la poignée (préinstallée)
ASSEMBLAGE
ATTENTION! Ne levez ou ne transportez pas la
chandelle assemblée au moyen de la barre à cliquet.
La base pourrait glisser et descendre de la barre à
cliquet et causer des blessures ou des dommages à
la chandelle ou aux autres éléments se trouvant dans
l’aire de travail.
1. Déposez la base de chandelle sur une
surface de niveau.
2. Levez la poignée à une hauteur maximale.
Ceci déplacera le cliquet d’arrêt à l’écart.
Cliquet

Visitez www.princessauto.com pour plus d'informations 9
8369464 Chandelles, 2 tonnes V 3.0
REMARQUE: La position du cliquet d’arrêt est
visible en regardant par l’ouverture située en
haut de la base et en déplaçant la poignée.
3. Placez la barre à cliquet pour que les
dents soient en face du cliquet d’arrêt.
4. Glissez la barre à cliquet vers le bas
jusqu’à ce que la base du stabilisateur
soit en contact avec la partie supérieure
de la base de chandelle.
5. Abaissez la poignée jusqu’à ce qu’elle soit au repos.
6. Levez la barre à cliquet jusqu’à ce que le cliquet d’arrêt soit
enclenché.
7. Pliez la languette de métal vers l’intérieur. Ceci empêchera la
barre à cliquet de glisser hors de la base.
UTILISATION
AVANT DE LEVER LE VÉHICULE
1. La chandelle est conçue pour être utilisée sur
une surface dure et de niveau pouvant soutenir la
charge. L’usage sur d’autres surfaces peut causer
une instabilité de la chandelle, une perte de
charge ou des dommages au matériel de surface.
2. Mettez la transmission en position de
stationnement et serrez le frein de
stationnement.
a. Pour les véhicules avec une transmission
manuelle, serrez le frein de stationnement
et laissez le sélecteur en position de marche
arrière ou en 1re vitesse. Consultez le manuel du propriétaire
du véhicule pour connaître l’embrayage approprié.
3. Placez des cales de roue qui conviennent à la courbe de la
roue de chaque côté des autres roues du véhicule.
4. Placez un cric rouleur seulement sur les points d’appui ou les
endroits spécifiés par le fabricant automobile (consultez le
manuel du propriétaire).
Pliez la languette
de métal vers
l’intérieur
Table of contents
Languages:
Other PROPOINT Jack manuals
Popular Jack manuals by other brands

Champion Power Equipment
Champion Power Equipment 80005 Owner's Manual and Operating Instructions

Daytona
Daytona DS300SB Owner's manual & safety instructions

Matco Tools
Matco Tools SUPTJ-1B operating instructions

Expert
Expert E200141 instruction sheet

Total Source
Total Source KRIH0001 operating manual

K Tool International
K Tool International KTI-HD63230 owner's manual