manuals.online logo
Brands
  1. Home
  2. •
  3. Brands
  4. •
  5. Prorack
  6. •
  7. Automobile Accessories
  8. •
  9. Prorack PR3213 User manual

Prorack PR3213 User manual

Page 1 of 4
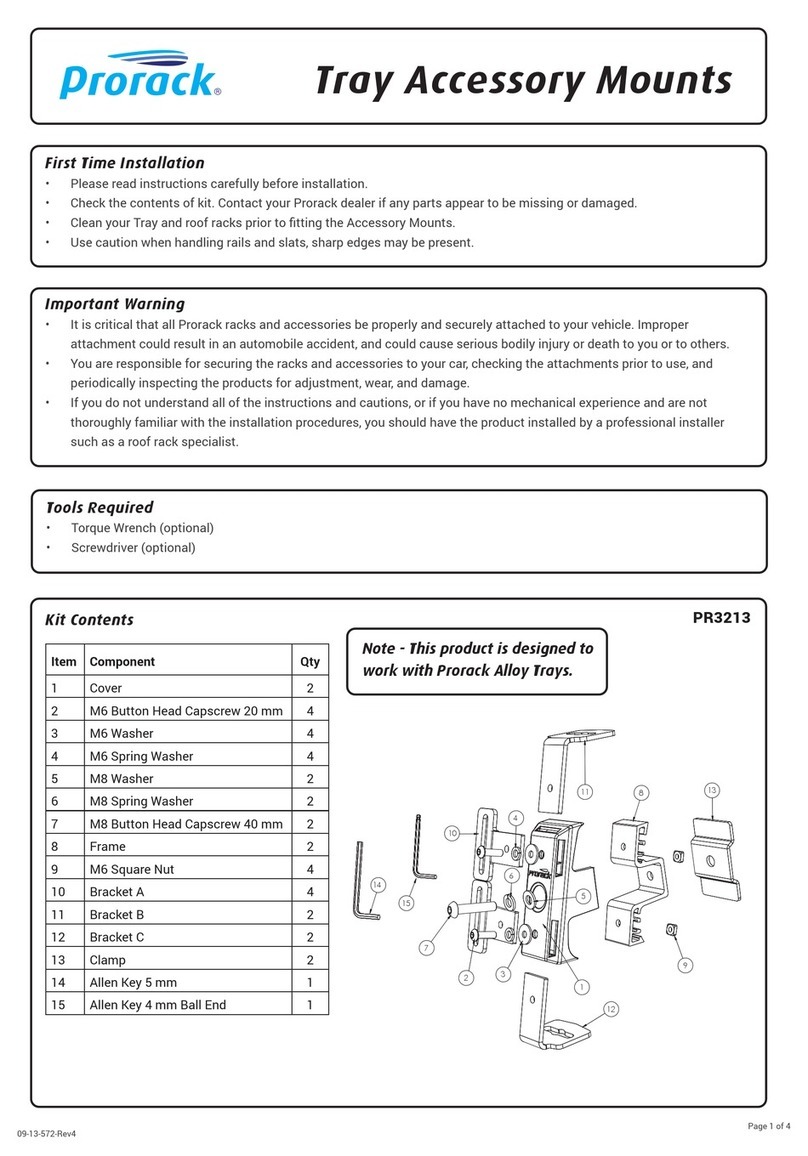
PR3213 VOYAGER PRO TRAY ACCESSORY MOUNTS
FIRST TIME INSTALLATION
• Please read instructions carefully before installation.
• Check the contents of kit. Contact your Prorack dealer if any parts appear to be missing or damaged.
• Clean your Tray prior to tting the Accessory Mounts.
• Use caution when handling rails and slats, sharp edges may be present.
IMPORTANT WARNING!
IT IS CRITICAL THAT ALL PRORACK RACKS AND ACCESSORIES BE PROPERLY AND SECURELY ATTACHED TO YOUR VEHICLE. IMPROPER ATTACHMENT COULD RESULT IN
AN AUTOMOBILE ACCIDENT, AND COULD CAUSE SERIOUS BODILY INJURY OR DEATH TO YOU OR TO OTHERS.YOU ARE RESPONSIBLE FOR SECURING THE RACKS AND
ACCESSORIES TO YOUR CAR, CHECKING THE ATTACHMENTS PRIOR TO USE, AND PERIODICALLY INSPECTING THE PRODUCTS FOR ADJUSTMENT, WEAR, AND DAMAGE.
THEREFORE, YOU MUST READ AND UNDERSTAND ALL OF THE INSTRUCTIONS AND CAUTIONS SUPPLIED WITH YOUR PRORACK PRODUCT PRIOR TO INSTALLATION OR USE.
IF YOU DO NOT UNDERSTAND ALL OF THE INSTRUCTIONS AND CAUTIONS, OR IF YOU HAVE NO MECHANICAL EXPERIENCE AND ARE NOT THOROUGHLY FAMILIAR WITH THE
INSTALLATION PROCEDURES, YOU SHOULD HAVE THE PRODUCT INSTALLED BY A PROFESSIONAL INSTALLER SUCH AS A ROOF RACK SPECIALIST.
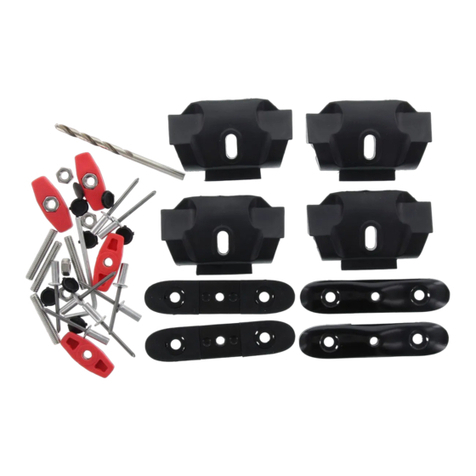
KIT CONTENTS
Item # Component Qty
1Cover 2
2 M6 Button Head Capscrew 20mm 4
3M6 Washer 4
4M6 Spring Washer 4
5M8 Washer 2
6M8 Spring Washer 2
7 M8 Button Head Capscrew 40mm 2
8 Frame 2
9 M6 Square Nut 4
10 Bracket A 4
11 Bracket B 2
12 Bracket C 2
13 Clamp 2
14 Allen Key 5mm 1
15 Allen Key 4mm Ball End 1
09-13-572 Rev 3
TOOLS REQUIRED
• Torque Wrench (optional)
• Screwdriver (optional)
1
2
7
3
4
5
6
9
10
11
12
13
8
15
14
NOTE - THIS PRODUCT IS
DESIGNED TO WORK WITH
PRORACK VOYAGER PRO
ALLOY TRAYS
Page 2 of 4
Fig. 2
1Referring to Figure 1, slide 2 x M6 Square Nuts into the top and bottom channels on
each Frame, lining up with the holes in the Frame.
M6 Capscrew
M6 Spring Washer
M6 Washer
4Choose the position on your Alloy Tray rails where you would like to t the Accessory
Mounts. The central protrusion on the Accessory Mount ts between the gap in the
upper and lower rails of the Alloy Tray.
M8 Capscrew
M8 Spring Washer
M8 Washer
Cover
Frame
x2
2Referring to Figure 2, loosely assemble each Frame and Cover together using 1 x M8
Washer, 1 x M8 Spring Washer and 1 x M8 Capscrew.
Fig. 1
x2
Frame
M6 Square Nut M6 Square Nut
3Referring to the example congurations over page, attach Brackets to the assembly
according to your accessory needs using any bracket into any of the 6 slots. Secure
Brackets using 1 x M6 Washer, 1 x M6 Spring Washer and 1 x M6 Capscrew per
Bracket. Tighten screws to 5Nm with 4mm Ball End Allen Key provided or a suitable
Torque Wrench.
Note - Keep the
frame horizontal to
prevent the Square
Nuts from sliding
out of the channel.
Sections of foam
or other material
approx. 12mm in
length may be
placed into the
channel either side
of the nut to keep
the nut in the correct
central position.
Note - optional bracket
conguration shown,
refer over page for
more examples.
Note - orientation of
Bracket A sits in front
of the cover.
Page 3 of 4
Accessories such as the Prorack Shovel Holder (PR3204) and Prorack Shade Awning
(PR3215) can be mounted as shown.
Note - The
Accessory Mounts
can carry up to
16kg of equipment
per pair. Ensure all
items are securely
attached.
5Secure the Accessory Mounts to tray with the Clamps and tighten the centre M8
Capscrews loosely installed in Step 1 to 5Nm with 5mm Allen Key provided or a
suitable Torque Wrench.
Clamp
Suggested Conguration for the Prorack Shovel
Holder (PR3204) and Prorack Shade Awning
(PR3215).
Accessories such as the Prorack Recovery Tracks Carrier (PR3207) can be mounted
as shown.
Accessories such as Light Bars, Spotlights, Aerials and Flags can be mounted using
the shown congurations.
Note - The
Accessory
Mounts can
carry up
to 16kg of
equipment
per pair.
Ensure all
items are
securely
attached.
Suggested Conguration for the Prorack Recovery Tracks Carrier (PR3207).
Note - The Accessory
Mounts can carry up to
16kg of equipment per
pair. Ensure all items are
securely attached.
EXAMPLE CONFIGURATION - SHOVEL HOLDER OR AWNING
EXAMPLE CONFIGURATION - RECOVERY TRACKS CARRIER EXAMPLE CONFIGURATION - LIGHTS, FLAGS, AERIALS
Page 4 of 4
MAINTENANCE
• Check accessory is securely attached whenever you ret it to the vehicle. If the unit feels
loose, refer to the tting instructions and readjust.
• Regularly check all fasteners. This includes all attached accessories and roof racks.
• Clean with hot soapy water and sponge as required.
CAUTION
• The Accessory Mounts can carry up to 16kg of equipment per pair. Ensure all items are
securely attached.
• Ensure that all loads are distributed evenly across the roof racks and on the Tray, and are
fastened securely.
• A loaded roof rack system can alter the performance of your vehicle. Be especially aware
of the effects of side winds, changing of direction, and braking performance. Avoid rapid
acceleration and deceleration. Drive Carefully.
• Make sure all loads are securely fastened with non-elastic straps. Check regularly during
longer journeys.
• Never drive into a car wash with the roof rack system or accessories tted.
• Do not exceed the vehicle manufacturer’s roof load rating. Total load equals weight of roof
racks + accessories + cargo/equipment.
WARRANTY & DISCLAIMER
Yakima Australia Pty Ltd ABN 58 154 440 221
17 Hinkler Court, Brendale QLD 4500
Tel: 0800 4776 722 (NZ) or 1800 143 548 (AU)
Email: warranty@yakima.co.nz or warranty@yakima.com.au
1. Where the product is supplied to the customer for other than business purposes within the meaning of section 43 of the
New Zealand Consumer Guarantees Act 1993, the provisions of that Act shall apply. It is important that anyone who
fits or uses this product does so in accordance with the manufacturer’s instructions.
2. Where the product is supplied to the customer for business purposes within the meaning of section 43 of the New Zealand
Consumer Guarantees Act 1993, the provisions of that Act and all other representations or terms (including any conditions
or warranty expressed or implied by law, statute or otherwise) not expressly included in this leaflet are hereby expressly
excluded shall have no effect and the clauses (a) and (b) shall apply.
3. Subject to the Additional Information (Australia), where the product is supplied and purchased in Australia, the following
shall apply:
(a). THE SUPPLIER WARRANTS the product to be free from defects in materials and/or workmanship for a period of three (3)
years from the date of original purchase (the warranty period). Proof of purchase is required. Subject to the limitations
and exclusions set out below, the Supplier hereby agrees to remedy any defects in materials or workmanship becoming
apparent during the warranty period, by replacing or repairing any defective product or component (at its option) free of
charge to the purchaser in respect of replacement parts or labour. Any defective product or component must be notified
and where practicable, returned at the purchaser’s expense to the Supplier immediately upon discovery of the alleged
defect and no attempt made on the part of the purchaser to repair it.
(b). EXCEPTIONS, EXCLUSIONS AND LIMITATIONS TO WARRANTY. The product and/or its components must be
fitted/assembled and loaded in accordance with the Supplier’s written instructions and any requirements set out
in the car’s owner manual. This warranty does not cover defects, loss or damage resulting from circumstances
beyond the Supplier’s control including, but not limited to misuse, overloading, or failure to assemble and/or fit
the product or component in accordance with the Supplier’s written instructions. Nor does the warranty cover
defects, loss or damage resulting from accidents, unlawful use of the vehicle or defects/inconsistencies in the
vehicle on which the product or component is fitted. Liability for direct, indirect, special, punitive, incidental,
exemplary, contractual or consequential damage or loss arising from defects, faulty materials or design
omissions or negligence or workmanship in the product or its components is hereby expressly excluded subject
to the following. Certain Commonwealth legislation, including the Competition and Consumer Act 2010 (Cth),
and other State and Territorial legislation confers upon purchasers rights which cannot be excluded from or be
restricted or modified by contract. Any conditions, guarantees and/or warranties implied by law and incapable
of exclusion are deemed to be expressly incorporated herein. Nothing herein contained is intended nor shall be
permitted to be inconsistent with any such conditions, guarantees and/or warranties. To the extent permitted by
legislation all conditions, guarantees and/or warranties such as implied warranties which are capable of exclusion
are hereby expressly excluded and negatived.
ADDITIONAL INFORMATION ( AUSTRALIA )
This information should be read in conjunction with clauses (a) and (b).
IMPORTANT LEGAL NOTICE
Our goods come with guarantees that cannot be excluded under the Australian Consumer Law. You are entitled to a
replacement or refund for a major failure and for compensation for any other reasonably foreseeable loss or damage.
You are also entitled to have the goods repaired or replaced if the goods fail to be of acceptable quality and the failure
does not amount to a major failure.
This warranty does not change or take away your rights under the Australian Consumer Law. Your right to claim under
this policy for the benefits covered is in addition to other rights and remedies you have under the law in relation to the
product.
Where you become aware of defects in materials or of workmanship, and wish to make a claim under this warranty you
must do the following for the warranty to be honoured by your Prorack dealer or Yakima Australia Pty Ltd ABN 58 154
440 221 (Yakima):
1. Make a claim as soon as practicable by contacting the Prorack dealer from whom you purchased the product, who
will give you instructions on how to proceed.
2. If you are unable to contact the Prorack dealer, or the dealer is not able to remedy the defect, you should contact
Yakima as soon as practicable at:
Call: 0800 4776 722 (NZ) or 1800 143 548 (AU)
Email: warranty@yakima.co.nz or warranty@yakima.com.au
Alternately, you can write to Yakima at 17 Hinkler Court, Brendale QLD Australia 4500 in order to make a claim
under your warranty.
3. Upon contacting Yakima directly, you should explain as fully as possible the defect. A Yakima representative will
provide you with appropriate instructions for returning the product together with a copy of the original purchase
invoice or receipt to Yakima.
4. The costs and expenses associated with making a claim under your warranty including the costs of complying with
those instructions and of returning the product to Yakima or the Prorack dealer will be borne by you.
Following receipt of the product and purchase invoice or receipt, Yakima or the Prorack dealer must inspect the product
to determine whether the claim falls within the warranty. If:
4.1 the claim falls within the warranty, Yakima will remedy any defects in materials or workmanship becoming
apparent during the warranty period, by replacing or repairing any defective product or component (at its
option) free of charge to the purchaser in respect of replacement parts or labour.
4.2 the claim does not fall within the warranty, Yakima will return the product to you at your expense.
Yakima Australia Pty Ltd
17 Hinkler Court, Brendale
QLD 4500, Australia
Freephone
AU: 1800 143 548 www.prorack.com.au
NZ: 0800 4776 722 www.prorack.co.nz
Other Prorack Automobile Accessories manuals

Prorack K727 User manual

Prorack

Prorack K727 User manual

Prorack K1051 User manual

Prorack

Prorack K1051 User manual

Prorack K985 User manual

Prorack

Prorack K985 User manual

Prorack K334 User manual

Prorack

Prorack K334 User manual

Prorack WHISPBAR S45 Operation and installation manual

Prorack

Prorack WHISPBAR S45 Operation and installation manual

Prorack K308 User manual

Prorack

Prorack K308 User manual

Prorack K467 User manual

Prorack

Prorack K467 User manual

Prorack K470 User manual

Prorack

Prorack K470 User manual

Prorack K160 Operation and installation manual

Prorack

Prorack K160 Operation and installation manual

Prorack Q19 User manual

Prorack

Prorack Q19 User manual

Prorack K458 User manual

Prorack

Prorack K458 User manual

Prorack K186 User manual

Prorack

Prorack K186 User manual

Prorack K604 User manual

Prorack

Prorack K604 User manual

Prorack K105 Operation and installation manual

Prorack

Prorack K105 Operation and installation manual

Prorack K891 Operation and installation manual

Prorack

Prorack K891 Operation and installation manual

Prorack PR3097 User manual

Prorack

Prorack PR3097 User manual

Prorack K327 User manual

Prorack

Prorack K327 User manual

Prorack K546 Operation and installation manual

Prorack

Prorack K546 Operation and installation manual

Prorack K085 User manual

Prorack

Prorack K085 User manual

Prorack K182 Operation and installation manual

Prorack

Prorack K182 Operation and installation manual

Prorack K382 User manual

Prorack

Prorack K382 User manual

Prorack K894 User manual

Prorack

Prorack K894 User manual

Prorack K491 User manual

Prorack

Prorack K491 User manual

Prorack K1206 User manual

Prorack

Prorack K1206 User manual

Popular Automobile Accessories manuals by other brands

SVC GROUP VTZ 001-414 FITTING INSTRUCTION

SVC GROUP

SVC GROUP VTZ 001-414 FITTING INSTRUCTION

Mid America Motorworks 648-740 instruction sheet

Mid America Motorworks

Mid America Motorworks 648-740 instruction sheet

Dakota Digital VHX-1021 Instrument Installation

Dakota Digital

Dakota Digital VHX-1021 Instrument Installation

ONEKEY KETO user manual

ONEKEY

ONEKEY KETO user manual

Cruz Cargo SPro Assembly instructions

Cruz

Cruz Cargo SPro Assembly instructions

Whispbar K745W Fitting instructions

Whispbar

Whispbar K745W Fitting instructions

Hama 00188329 operating instructions

Hama

Hama 00188329 operating instructions

Permobil ADAPTOR PAD Operation manual

Permobil

Permobil ADAPTOR PAD Operation manual

Roadmaster 76515 installation instructions

Roadmaster

Roadmaster 76515 installation instructions

Thetford SANICON TURBO 300 manual

Thetford

Thetford SANICON TURBO 300 manual

Dakota Digital HDX-96J-TJ Installation

Dakota Digital

Dakota Digital HDX-96J-TJ Installation

FOVNO RS-03B3 instructions

FOVNO

FOVNO RS-03B3 instructions

Feniex FUSION-S FS-0320 instruction manual

Feniex

Feniex FUSION-S FS-0320 instruction manual

GU Electronic PEUGEOT2017 RCC TD instruction manual

GU Electronic

GU Electronic PEUGEOT2017 RCC TD instruction manual

Whelen Engineering Company 700 Series installation guide

Whelen Engineering Company

Whelen Engineering Company 700 Series installation guide

IMMI CADDIE instruction manual

IMMI

IMMI CADDIE instruction manual

STO N SHO SNS 316 Installation procedures

STO N SHO

STO N SHO SNS 316 Installation procedures

Rydeen SV747HD owner's manual

Rydeen

Rydeen SV747HD owner's manual

manuals.online logo
manuals.online logoBrands
  • About & Mission
  • Contact us
  • Privacy Policy
  • Terms and Conditions

Copyright 2025 Manuals.Online. All Rights Reserved.