Proscenic 790T User manual

Please keep this user manual in your sight, read it thoroughly and carefully
before using this product.
User Manual
COCO Smart 790T
Français
Deutsch
Italiano
español
English русский

Contents
Safety Instructions --------------------------------------------------
Main Body and Accessories -------------------------------------------3
2
Main Body Diagram ---------------------------------------------------4
Docking Station and Remote Control ----------------------------------5
Display Panel ----------------------------------------------------------6
Battery Charging ------------------------------------------------------7
8
Power on/Standby/Sleep Mode -------------------------------------
Scheduling -------------------------------------------------------- 9-10
10-11
Cleaning Modes----------------------------------------------------
--------------------11
------------13
Cleaning Side Brushes--------------------------------------------------12
Cleaning Dust Bin and Filters-------------------------------------------13
Product Specifications-----------------------------------------------14
Battery Replacement-------------------------------------------------14
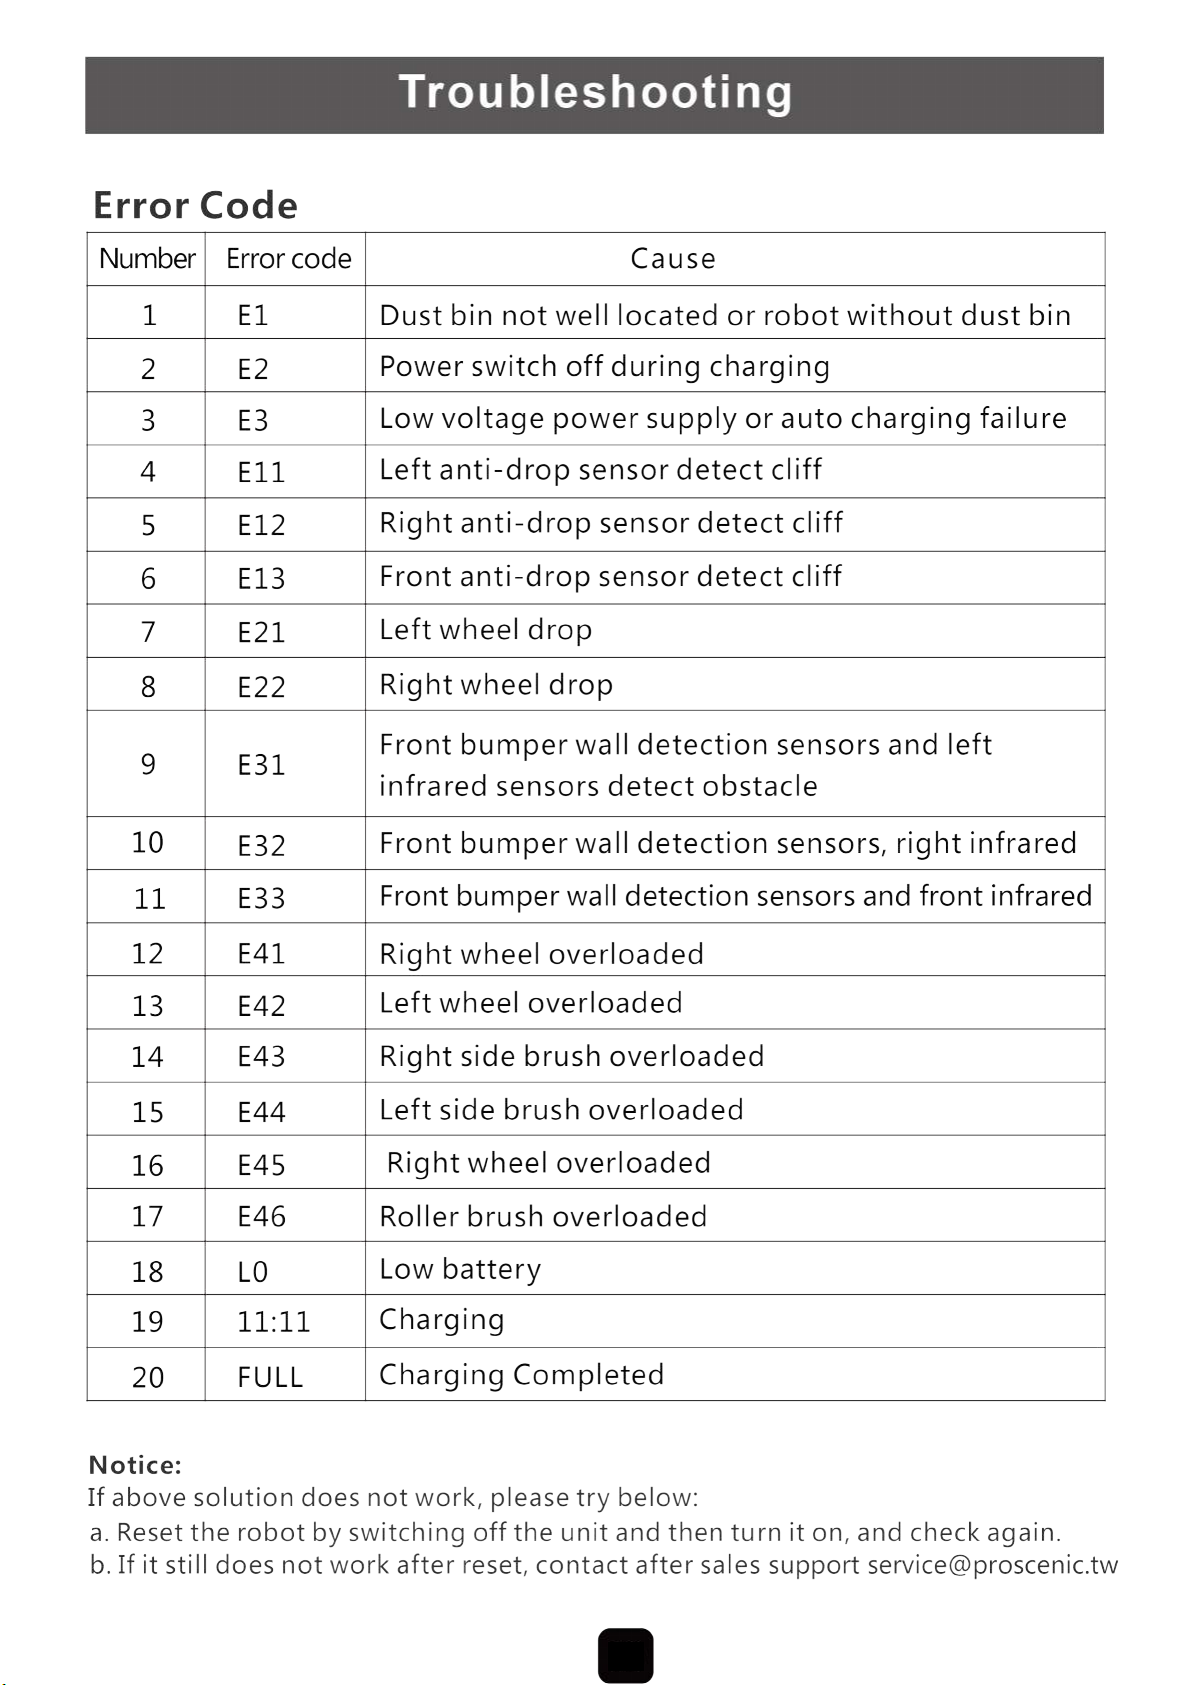
Trouble Shooting-----------------------------------------------------15
Vacuuming and Sweeping Switching
Proscenic Mobile APP is available on iOS and Android.
1

Turn off the power
NO.
1
2
3
4
5
6
7
8
Description Quantity
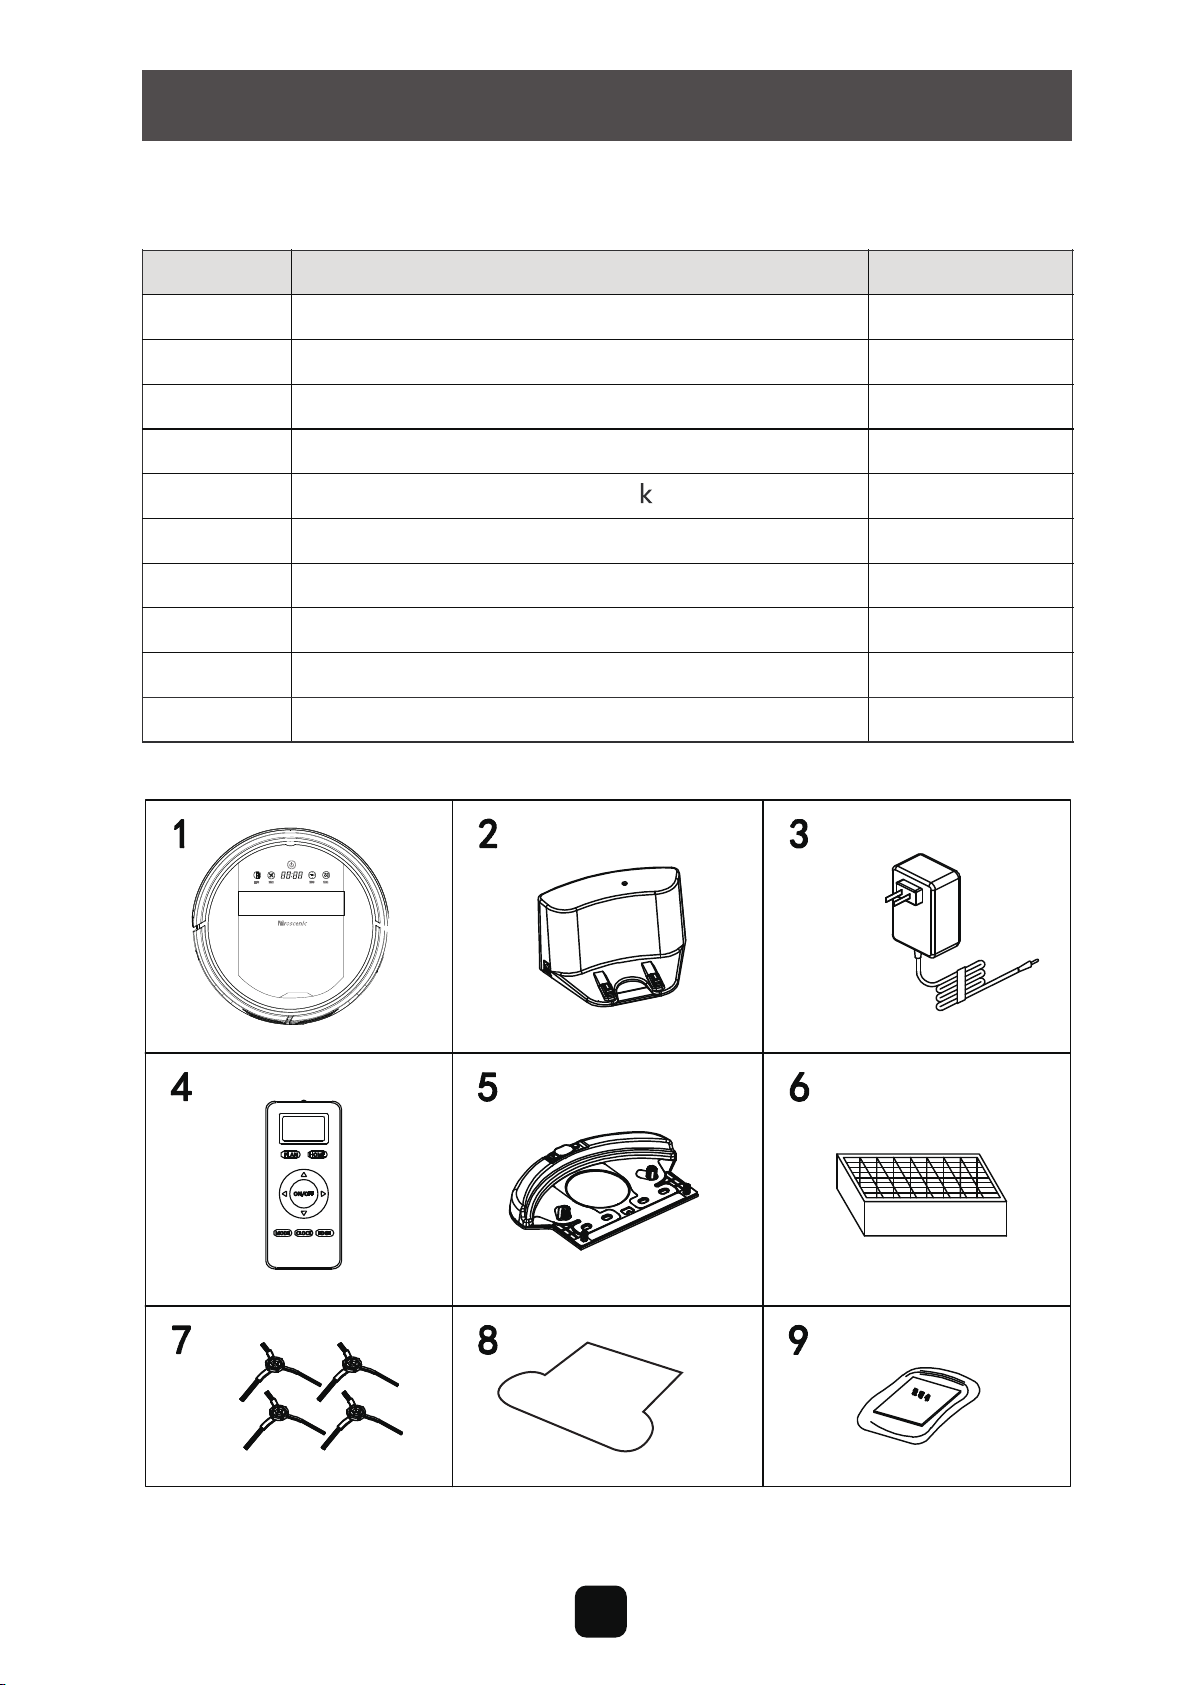
Main Body
Adapter
HEPA Filter
Side Brush
Water Tan
Docking Station
1
1
1
1
1
1
4
Remote Control (battery not included)
9
10
User Manual
2
1
Main Body and Accessories
Product Components
PLAN HOME
ON/OFF
MODE CLOCK EDGE
Mopping cloth
3

Main Body Diagram
Bumper
Bumper Strip
Power Switch
Suction Component
Roller Brush
Component
Touch Key
LED Display
Cover
Left wheel
Left Side
Brush
Front Wheel
Auto Charging
Pole
Battery Cover
Right Side Brush
Charging
Socket
Right Wheel
Bottom Cover
Dust Bin
Product Components
4
Product Components
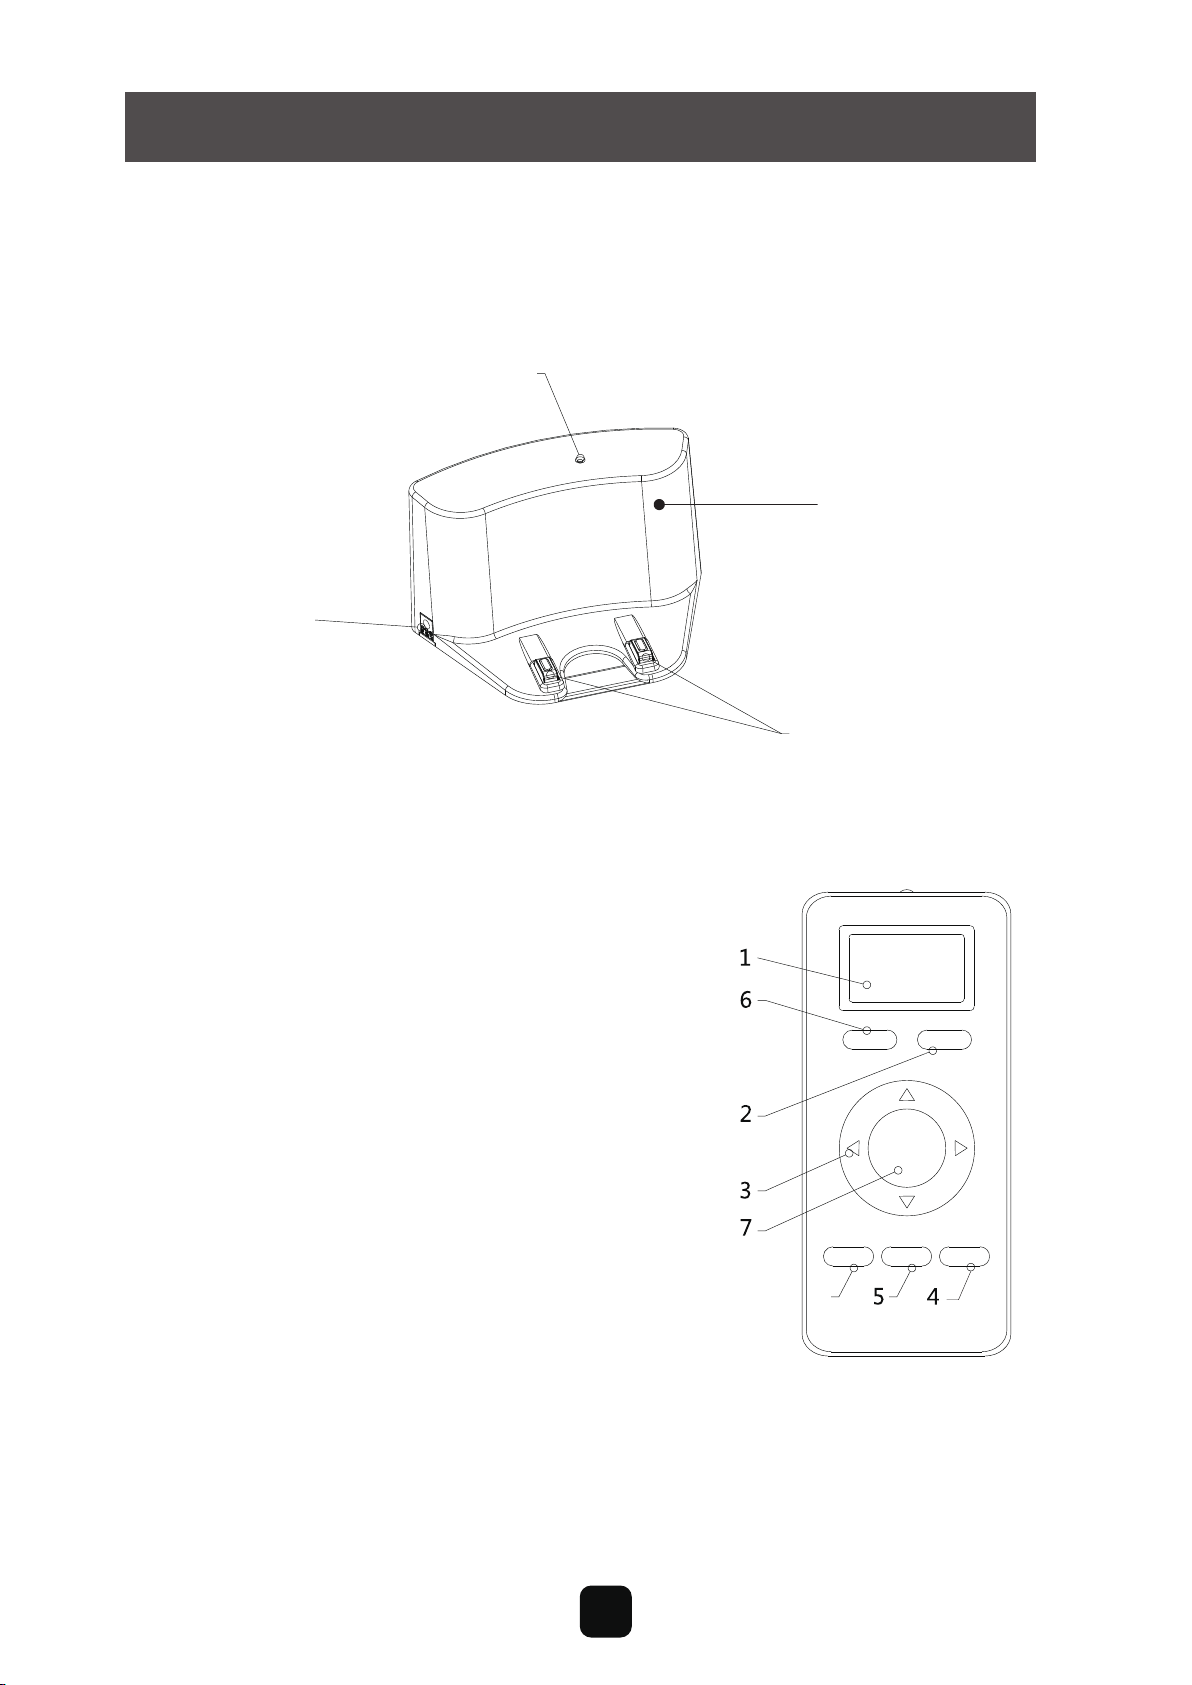
Docking Station
Charging Socket
1. Display Screen
2. Auto Charging
3. Direction Button
(Only Effective in Standby Mode)
4. Edge Cleaning
(Only Effective in Standby Mode)
5. Clock Setting
6. Schedule Setting
7. ON/OF
8. Area Cleaning
(Only Effective in Standby Mode)
Power Indicator
Top Cover
Charging Poles
Install two AAA type batteries into the remote control before use, Remove
the batteries if the remote control will be left unused for a long period.
Note:
8
Remote
PLAN HOME
ON/OFF
MODE CLOCK EDGE
5

Product Components
Display Panel
EDGE CLEAN
B. Confirm schedule setting in scheduling mode.
C. Start cleaning in standby mode.
A. Press this button to increase number in scheduling
scheduling
mode.
B. In other mode, press this button to start auto-homing and charg
-ing mode.
A: Press this button to decrease number in scheduling mode.
B: In other mode, press this button to start auto cleaning.
In standby/charging
charging
mode, press this button to enter/quit robot
time setting.
Hold this button to enter/quit scheduling mode.
Press this button to start edge cleaning in standby mode.
panel
it shows the time setting, charging status, and error codes by
using numbers
Button
A. Press this button to activate from sleep mode to standby mode.
In standby mode, press this button and hold it for more than 3
seconds to go into sleep mode.
Clean
6

Product Operation
Battery Charging
1. Docking station placement
Place docking station against the wall
and remove obstacles from within 1
meter at two sides and about 2 meters
in front of the station, as shown in the
right figure.
If the robot has been shut down, power on the robot by pressing the
power switch. side of the robot for more than 3 seconds.
2. Charge the robot in either way as shown below:
a. When robot is being charged, LED panel will gradually show 1111 from
left to right.
b. Once charging is complete, LED panel will show FULL.
c. In the standby status, the robot will broadcast voice prompt 'Please cha
-rge' when battery power is low.
d. In the working status, the robot will return to charging station automati
-cally when battery power is low.
Note:
b. Press on robot or HOME on remote control to operate the robot
to go back to the charging station for recharging as shown in Figure.b.
a. Insert the adapter into the robot and the plug at the other end to the
power socket as shown in Figure.a.
For extending battery life:
a. Before first use, charge the robot for 12 hours.
b. Charge the robot as soon as possible when battery power is low.
c. The robot will return to charging station automatically when it accompli
-shes cleaning or battery power is low.
d. If the robot is not to be used for a long time, fully charge the battery be
-fore use and turn the power switch off.
e. If the robot is not to be used for more than 3 months, charge the robot
for 12 hours.
7

Product Operation
Starting Up / Standby / Sleeping / Power Off
a. During robot cleaning, press on main body to enter standby mode.
b. During robot cleaning, press ON/OFF button on remote control to po
-wer off the robot.
Note:
If robot is in sleep mode, press on main body to wake up the robot from sleep
mode, then press again, the robot will start cleaning automatically.
a. Press on main body and hold it for 3 seconds.
b. Robot will automatically enter sleep mode if no command is received
for more than 2 minutes
How to schedule the robot
1. Schedule on Display Panel on Main Body
1. Starting up
a. Make sure the power switch is on(The power switch is at the right side
of main body)
b. In standby mode, press on main body or ON/OFF on remote control
to start cleaning.
2. Standby
Standby means robot has its power switch on, waiting for the user's
operation. It can be changed to standby mode by one of the following
methods:
3. Sleep
In sleep mode, the robot can only be waken up from button on main
body or ON/OFF on remote control. In order to save power, you can turn
the robot into sleep mode from standby mode via either of the following
methods:
A. Setting robot clock (Make sure the robot is in standby or
power on status)
a. Press“Schedule”button to start clock-setting. the LED panel will
show the current system time.
b. Then the left two numbers on LED panel will flash .Press“
“
”
”
to
increase hour or clean to decrease it.
8
Charging

Product Operation
C. Cancel the scheduling
Set the scheduling time to 00:00.
c. When finish setting, with the remote pointing to the robot, press
“ON/OFF”button on remote. Display panel will show corresponding
time when it's been scheduled successfully.
d. Press button to save the setting, then press “schedule” to exit
(Before the setting is saved, if press “Schedule” to exit, the current
setting will be invalid).
c. Press to enter minute-setting mode, the right two numbers on LED
panel will flash. Press to increase it or“Clean” to decrease it.
B. Setting the scheduling time (Make sure the robot is in
standby or power on status)
a. Press “schedule” and hold it for 3 seconds to start scheduling, then
the left two numbers on LED panel will flash.
c. Press to enter minute-setting mode, the right two numbers on LED
panel will flash, press
“”
button to increase it or “Clean”
button to decrease it.
d. Press again to save the setting, then press “Schedule” button to
exit (Before the setting is saved, if press “Schedule” to exit, the
current setting will be invalid).
b.Press button to increase hour or“Clean”button to decrea
-se it.
a. Before scheduling, please set the robot time to be the same with real time.
b. The robot will start cleaning at the schedule time of Robot Clock every day.
Schedule has to be reset again after the power switch has been turned off.
Note:
2. Schedule on Remote Control
A. Scheduling Setting
a. Make sure the robot is in standby or charging status. Press“Schedule”
button on remote and hold it for 3 seconds to enter scheduling mode.
b. Then numbers on LED screen on the remote will flash. Change flash
-ing numbers by pressing “Up” or “Down” button. Press “Left/
Right”button to set next digit when finishing the setting of previous
digit.
9
Charging
“”
Charging
“”
Charging

Product Operation
Note:
a. During time scheduling, press “ON/OFF” on remote to set hour and minute;
press “Schedule” to enter/quit schedule setting.
Cleaning Modes
Four cleaning modes to meet your different needs.
1. Auto cleaning
For example: If current time is 8:00am, and remote setting number is 01:00. If it has
been successfully saved, the robot will start working in1 hour. It means 9:00am has
been scheduled as working time and the robot will start cleaning at 9:00am everyday.
Note:
The numbers show on remote is delay time during scheduling.
B. Cancel the scheduling
Press“Schedule”on remote to enter scheduling mode , then press
“ON/OFF” button one more time.(Display screen on main body will
show 00:00 when the scheduling has been cancelled. If not, press
“ON/OFF” one more time.
b. The “ON/OFF” on remote has the same function as “ ”on main body.
Press “Clean” on robot or “Clean” on
remote control to start auto cleaning. Robot
enters auto cleaning mode.
2. Area cleaning
Press ”AREA ” on remote to enter area
cleaning.
a. Choose area cleaning “AREA 1”, the
screen on remote will show “AREA 1”
and the robot will clean about 1*1m
square area line by line.
10

Product Operation
The robot will all return to its start point when
above cleaning modes completed.
b. Choose area cleaning “AREA 2”, the screen on
remote will show “AREA 2” and the robot will
clean about 2*2m square area line by line.
c. Choose area cleaning “AREA 3”, the screen on
remote will show “AREA 3” and the robot will
clean about 3*3m square area line by line.
d. Choose area cleaning “AREA 4”, the screen on
remote will show “AREA 4” and the robot will
clean about 4*4m square area line by line.
In cleaning mode, press to enter edge
cleaning mode. The robot will clean along
the walls.
3. Edge cleaning
Schedule the robot's cleaning according
to yourneed. And our robot will start clean
-ing as scheduled.
4. Schedule cleaning
Vacuuming and Sweeping Switching
(Applicable to certain models, consult your customer service)
The suction kit and the roller brush kit are replaceable. You can install
accordingly as below as your need
Suction Component
Roller Brush
Component
Left wheel
Left Side
Brush
Front Wheel
Auto Charging
Pole
Ultrasonic
Dectetion End
Battery Cover
Right Side Brush
Charging
Socket
Right Wheel
Bottom Cover
11
Cleaning Side Brushes
1 .Make sure side brushes are not damaged and no foreign matter among
them.
2. Use cleaning kit or cloth to clean side brushes.
3. Remove side brushed and put them in warm water for five seconds can
solve side brushes tangling and deformation.
4.Replace side brushes when they are worn.
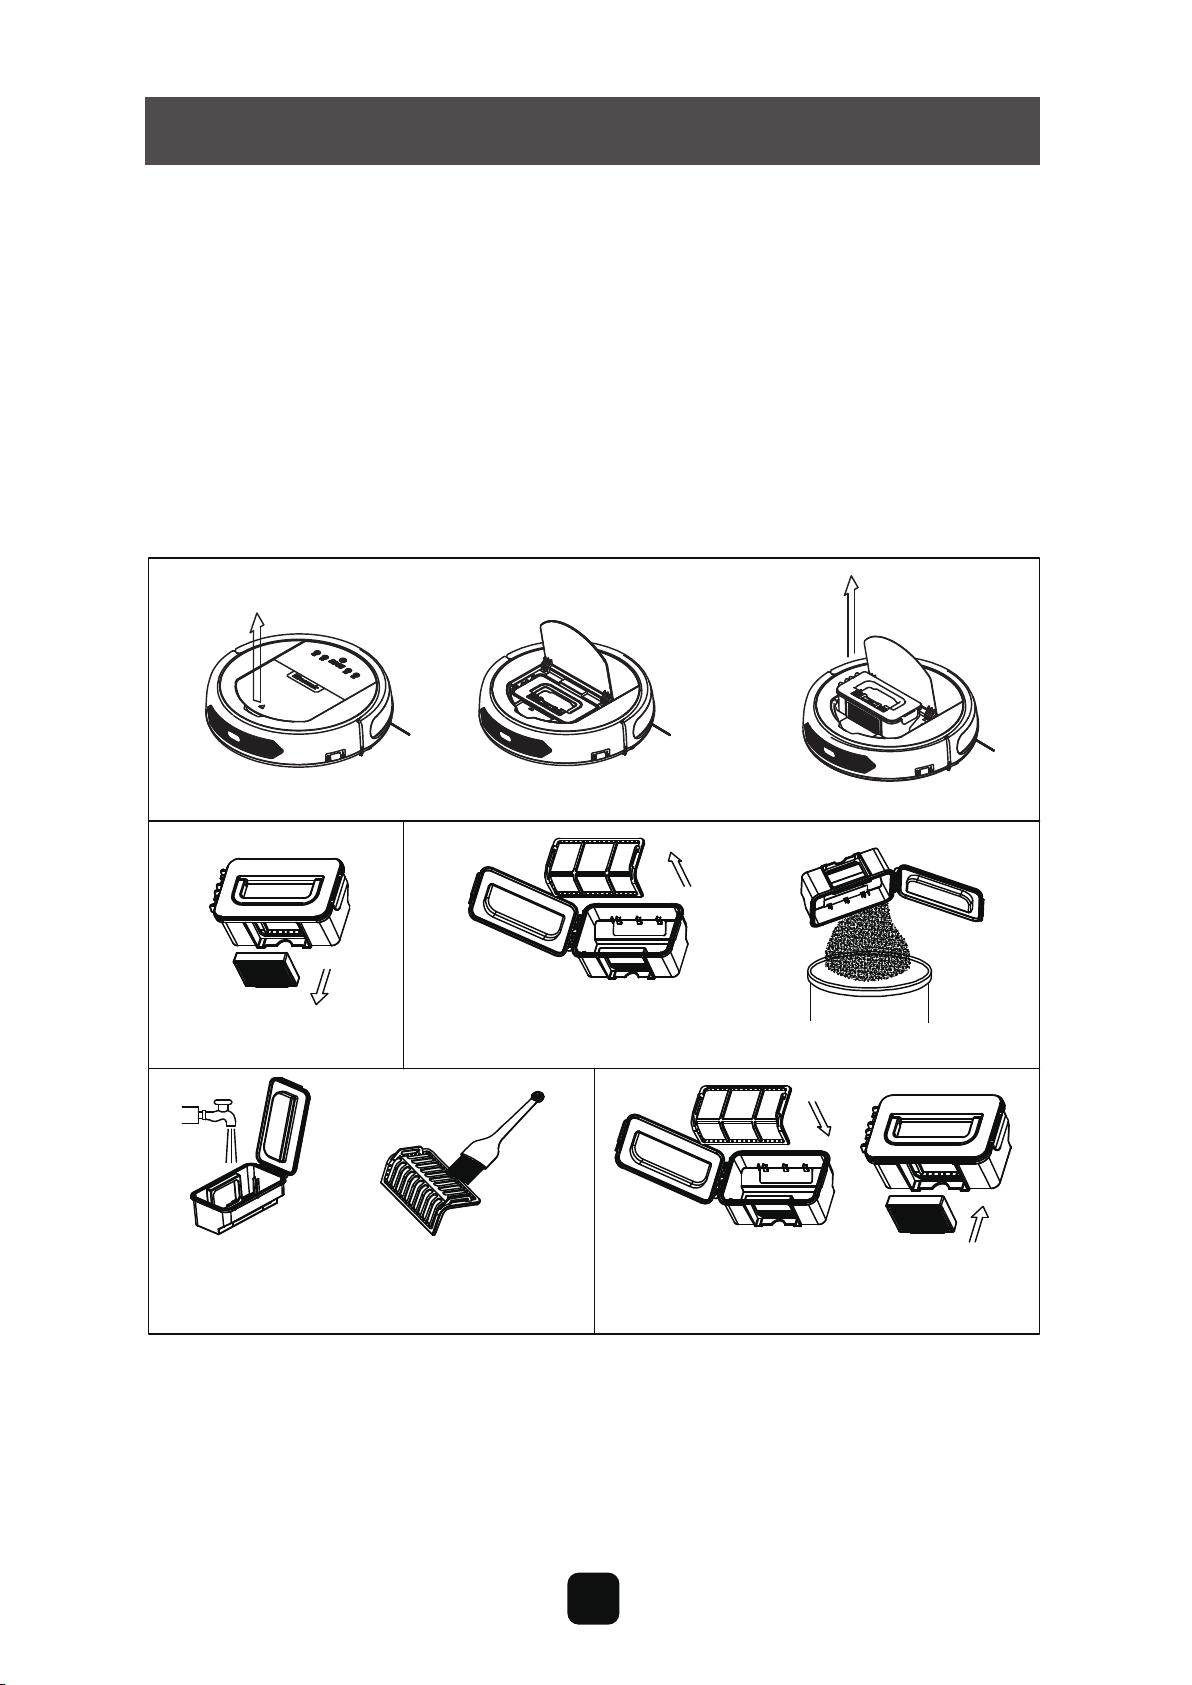
Cleaning Dust Bin and Filters
a. Wash the HEPA and primary filter after used for 15~30 days. Max life span for HEPA
and primary filter is 24 months.
b. Reinstall the HEPA and primary filter after they are fully dry.
c. HEPA and primary filter could be replaced if needed.
d. Do not dry the filters under baking sunshine.
Product Maintenance
Take out the dust bin.
Take out the HEPA.
Open dust bin cover,
take cut primary filter. Empty the dust bin.
Wash dust bin and filter,
clean the HEPA with brush.
Install the primary filter and
HEPA back into the dust bin.
Note:
12

Product Maintenance Kit
Cleaning Roller Brush
Take out and disassemble the roller brush kit as shown in figure below, and
clean it with soft cleaning cloth or tool. (The roller brush axle is washable)
Note: Please re-install the roller brush axle after it is fully dry.
Proscenic Mobile APP is available on iOS and Android.
1.Go to Apple App Store (iOS) or Google Play (Android),
search “Proscenic Robotic”,download and install.
2.Run the app and signup an account for the first time.
3.Please make sure your phone is connected to current WIFI.
4.Hold “ ” button on the robot until you hear a Chime.
5.Robot should have “CONN” displayed, and Click the “+”add
6.Enjoy your app.
charging
13
device.

Product Specifications
Touch pad (LED display)
Classification Item Detail
Mechanical
Specifications
Diameter 350mm
Height 99mm
Weight 3.7Kg
Electrical
Specifications
Power Rating
14.4V
Charging Type Auto Charging/ Manual
Charging
Cleaning Mode
Charging Time
Cleaning Time
4~6 hours
100 mins
Main Body Button Type
Product Specifications
Cleaning
Specifications Auto, Area, Edge, Schedule
Battery Removal
1.Unscrew the screws on battery cover with a screw driver
2.Remove the battery capsule cover
3.Take out the battery
4.Push the electrode tips connected the battery and main body.
5.Put the new battery into the battery case with the battery label facing up
6.Plug the wire connector that connects the battery and robot.
7.Reorganize the wire connector and wires.
8.Reinstall the battery door
9.Lock the battery capsule cover
Notice: Do not use non original battery. It may cause damage to the robot.
14
15
Inhaltsverzeichnis
Guide d'installation du réservoir d'ea------------------------------------- 1
-------------------------------------------- 2-3
Hôte et accessoires
Station de charge et contrôle à distance----------------------------------
5
4
Écran d'affichage-------------------------------------------------------
6
Fonctionnement du produit----------------------------------------------
7-8
9
9
10
10
11
12
12
13
Réservation de nettoyage----------------------------------------------
Nettoyage de zone-----------------------------------------------------
Nettoyage des brosses latérales----------------------------------------
Nettoyage de la boîte à poussière et du filtre----------------------------
----------------------------
Nettoyage de l’ensemble de brosse à rouleaux -------------------------
Spécifications----------------------------------------------------------
Remplacement de la batterie -------------------------------------------
Défaillance du capteur-------------------------------------------------
FR
1
A
B
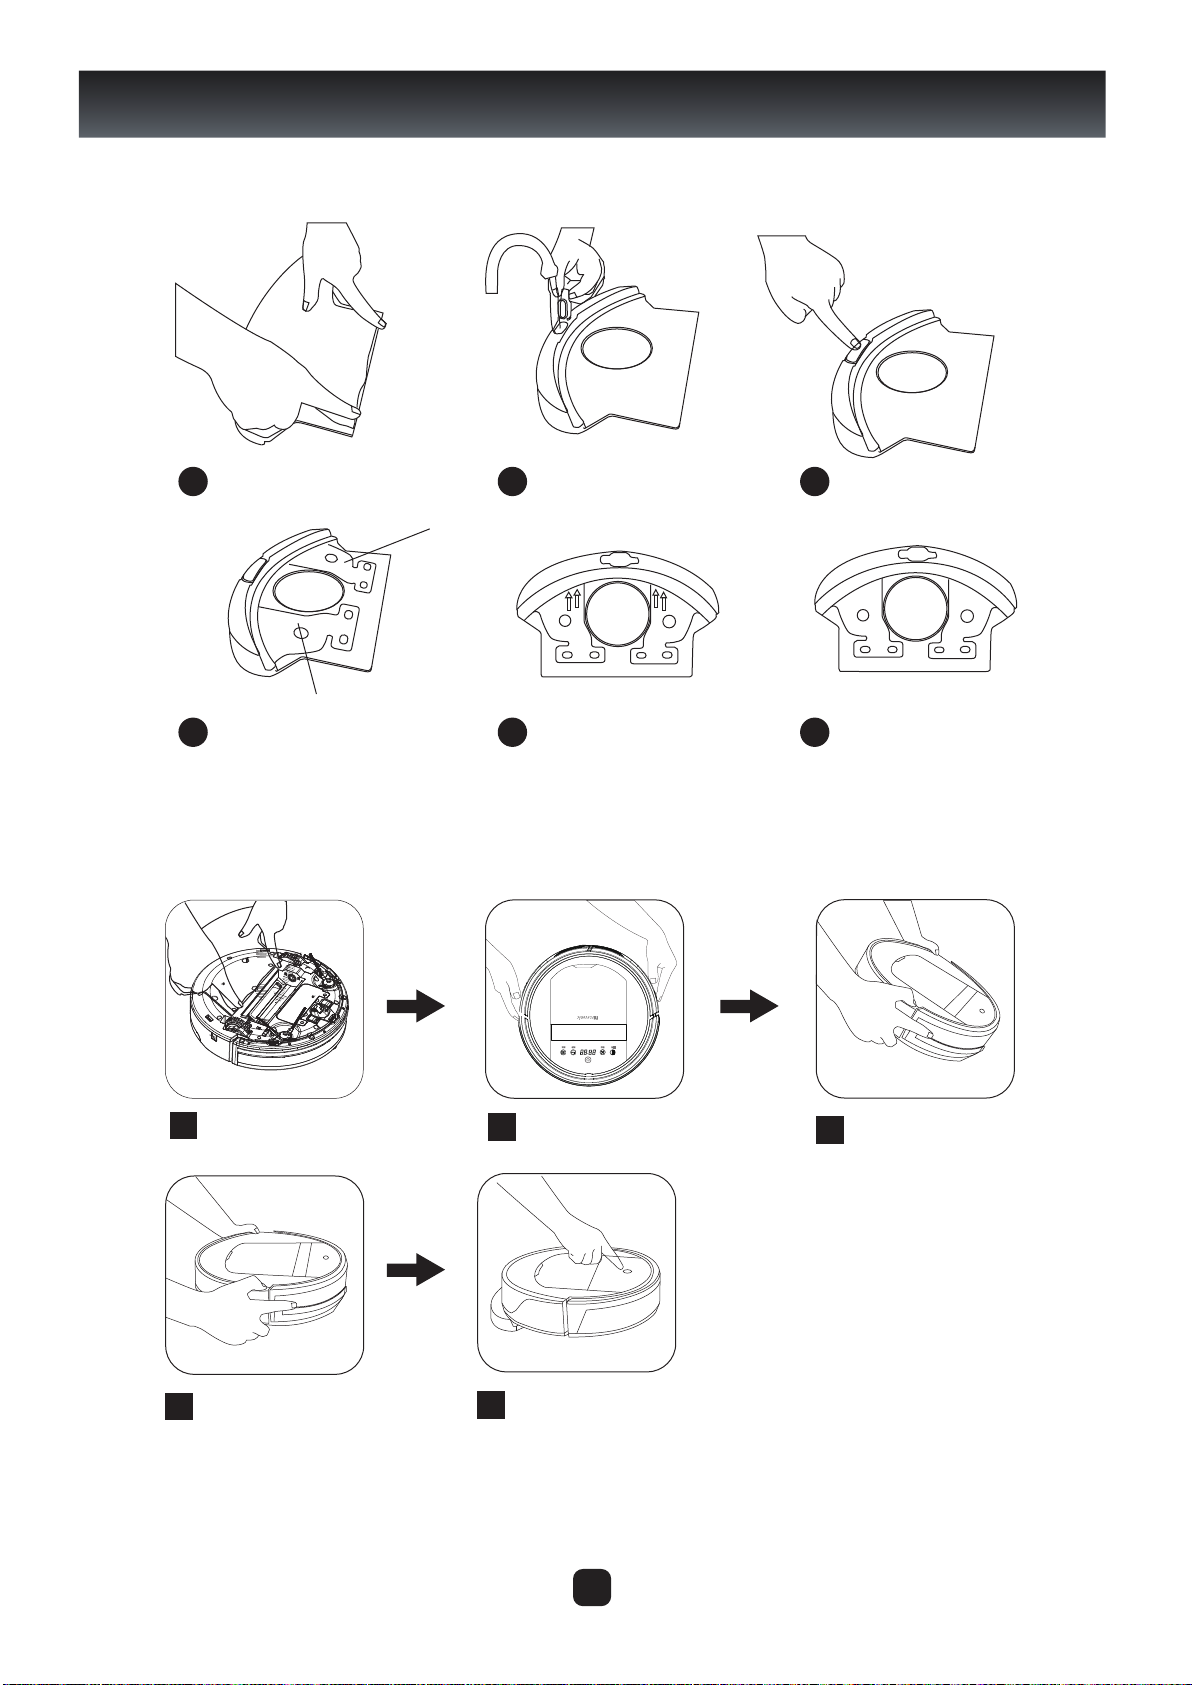
Presser le tissu d'essuyage à plat
contre la plaque de nettoyage.
Ouvrir le bouchon du réservoir
d'eau, ajouter de l'eau dans le
réservoir
Après avoir rempli d'eau, placer le réservoir
d'eau à plat et serrer le bouchon.
A la partie inférieure du réservoir au
point A ou B, les bulles peuvent se
produire (normal)
Gardez le réservoir d'eau
verticalement à l'envers pour
s'assurer que les bulles d'air sont
déchargées au sommet du réservoir
Lorsque l'air du bas est épuisé, assurez-vous
que l'eau dans le réservoir pénètre dans le
chiffon de nettoyage
1 2 3
4 5 6
Placez l'ensemble du réservoir et du
chiffon de nettoyage aux trous de
fixation sur la partie inférieure de la
machine, et pressez pour fixer
Installer l'ensemble du réservoir et du
chiffon de nettoyage sur le fond de la
machine, tournez la machine à l'envers
pour faire sortir l’air au fond du réservoir.
78
11
10
9
Guide d’installation du réservoir d'eauEtapes de l'ajout d'eau dans le
réservoir et le principe de l'échappement d’air
Pratiques appropriées de montage du réservoir d'eau
Installer l'ensemble du réservoir et du chiffon de
nettoyage sur le fond de la machine, tournez la
machine à l'envers pour faire sortir l’air au fond
du réservoir.
Démarrez la machine pour commencer
le nettoyage.
Mettez la machine lentement, ne tournez
pas la machine au cours du processus.
Remarque spéciale :
Durant la marche du robot, quand il rencontre une montée ou une fosse, son corps s’inclinera, il y aura peut-être des bulles au point
A ou B du réservoir d'eau, qui conduira à l'infiltration mauvaise d'eau, c’est un phénomène normal, dans ce cas-là, il suffit de tenir la
machine inversée pendant 5 secondes, répéter comme indiqué dans la figure 8.

2
预约
区域 时间 延边
回充
开/关
Composition du produit
Hôte et accessoires
No. Description
Hôte
Station de charge
Adaptateur d’alimentation
Télécommande (batterie non incluse)
Chiffons et réservoir d'eau
HEPA efficace
Brosse latérale
Manuel du produit
Menge

3
Composition du produit
Diagramme de l'hôte
Boutons tactiles
Écran d'affichage
Couvercle central
Pare-chocs
Bande de pare-chocs
Interrupteur d’alimentation
Ensemble d'orifice d'aspiration
(Pour certains modèles, veuillez contacter l
e service à la clientèle)
Ensemble des brosses
à rouleaux
(Pour certains modèles, veuillez
contacter le service à la clientèle)
Roue gauche
Brosse latérale
gauche
Volant
Pièces polaires de
charge automatique
Port de détection
ultrasonique
Couvercle sous hôte
Roue droit
prise de charge
Brosse latérale droite Couvercle de la batterie
Boîte à poussière
Table of contents
Languages:
Other Proscenic Vacuum Cleaner manuals

Proscenic
Proscenic BL828 User manual

Proscenic
Proscenic RobbyPro User manual

Proscenic
Proscenic M8 PRO User manual

Proscenic
Proscenic P9 User manual

Proscenic
Proscenic Wash Vac F20 User manual

Proscenic
Proscenic LDS D500 User manual

Proscenic
Proscenic 850T User manual

Proscenic
Proscenic M8 User manual

Proscenic
Proscenic P8 User manual

Proscenic
Proscenic BL828 User manual


