Proscenic LDS D500 User manual

User Manual
LDS D500/D550
Please keep this user manual in your sight,read it
throughly and carefully before using this product.
Taiwan Proscenic Polytron Technologies Inc
Service support
E-mail:[email protected]
www.proscenic.com
English
Deutsch
Français
Italiano
Español
Pусский
01
WARNING: TO REDUCE THE RISK OF INJURY OR DAMAGE, READ THE
FOLLOWING SAFETY PRECAUTIONS WHEN SETTING UP. USING, AND MAIN-
TAINING YOUR ROBOT.
THIS APPLIANCE MAY ONLY BE USED BY CHILDREN AGED 8 YEARS AND
ABOVE AND PERSONS WITH REDUCED PHYSICAL, SENSORY, OR MENTAL
CAPABILITIES OR LACK OF EXPERIENCE AND KNOWLEDGE IF THEY HAVE
BEEN GIVEN SUPERVISION OR INSTRUCTION CONCERNING USE OF THE
APPLIANCE IN A SAFE WAY AND UNDERSTAND THE HAZARDS INVOLVED.
CHILDREN MUST NOT PLAY WITH THE APPLIANCE. CLEANING AND USER
MAINTENANCE MUST NOT BE CARRIED OUT BY CHILDREN WITHOUT
SUPERVISION.
WARNING: TO AVOID ELECTRIC SHOCK DO NOT EXPOSE THE ELECT-
RONICS OF YOUR ROBOT, OR THE INTEGRATED DOCK-CHARGER KNOWN
AS CHARGING BASE. THERE ARE NO USER SERVICEABLE PARTS INS IDE.
REFER SERVICING TO QUALIFIED SERVICE PERSONNEL DO NOT HANDLE
YOUR ROBOT AND CHARGING BASE WITH WET HANDS.
· Heed all warnings on your robot and its parts.
· WARNING: Risk of electric shock, use indoors in dry locations only.
· Your robot is not a toy. Do not sit or stand on this device. Small children
and pets should be supervised when your robot is operating.
· Store and operate your robot in room temperature environments only.
· Do not use this device to pick up sharp objects, glass, or anything that is
burning or smoking.
· Do not use this device to pick up spills of water, bleach, paint, other chemi-
cals,or anything wet.
· Do not spray or pour liquids on your robot.
· Before using this device, pick up objects like clothing, loose papers, pull
cords for blinds or curtains, power cords, and any fragile objects. If the
device passes over a power cord and drags it, there is a chance an object
could be pulled off a table or shelf.
Important Safety Instructions
Important Safety Instruction
02
· If the room to be cleaned has a balcony, a physical barrier should be
used to prevent access to the balcony and ensure safe operation.
· Do not place anything on top of your robot.
· Be aware that the robot moves on its own. Take care when walking in
the area that the robot is operating in to avoid stepping on it.
· Do not operate the robot in areas with exposed electrical sockets in the
floor.
· WARNING Shock Hazard: Your robot comes with a region appr-
oved power supply cord. Do not use any other power supply cord. For
replacement cords, please contact Customer Care to ensure the proper
selection of a country specific power supply cord.
· This robot is intended for dry floor use only.
· WARNING Shock and Fire Hazard: This product is designed to be
plugged into a standard electrical socket only. The product may not be
used with any type of power converter.
Use of power converters will immediately void the warranty.
· Do not use non-rechargeable batteries. Use only the rechargeable battery
supplied with the product. For replacement, purchase an identical Prosc-
enic battery or contact Proscenic Customer Care for alternative battery
options.
· ACAUTION :Use only rechargeable battery packs with the correct
specification approved by Proscenic.
· WARNING Shock Hazard: Do not use a charging base with a dam-
aged cord or plug. If the cord or plug is damaged, it must be replaced.
· Always charge and remove the battery from your robot and accessories
before long-term storage or transportation.
· If you live in an area prone to electrical storms, it is recommended that
you use additional surge protection. Your robot‘s charging base must be
protected with a surge protector in the event of severe electrical storms.
· WARNING Shock Hazard: Always disconnect your robot from the
charging base before cleaning or maintaining it.
· Before every use, check the battery pack for any signs of damage or leak-
age. Do not charge damaged or leaking battery packs.
· WARNING Chemical Exposure: If the battery pack is leaking, do not
allow the liquid to come in contact with skin or eyes.If contact has been
made, wash the affected area with copious amounts of water and seek
medical advice. Place the battery in a sealed plastic bag and dispose of
safely according to local environmental regulations.
· The battery pack must be removed from the robot beefore disposal.
03
· WARNING Fire or Explosion Hazard: Do not crush or dismantle
battery packs.Do not heat or place the battery pack near any heat source
or in direct sunlight. Do not incinerate or shortcircuit the battery pack. Do
not subject batteries to mechanical shock.
· Do not immerse the battery pack in any liquid.
· Contact your local waste management authority for more information on
battery recycling and disposal regulations in your area.
This symbol on the product or its packaging indicates:
Do not dispose of electrical appliances or batteries as unsorted
municipal waste, use separate collection facilities. Contact your
local authority for information regarding the collection systems
available. If electrical appliances are disposed of in landfills or
dumps, hazardous substances can leak into the groundwater and
get into the food chain damaging your health and well-being.
Please contact your local or regional authority for more information
on collection, reuse, and recycling programmes.

04
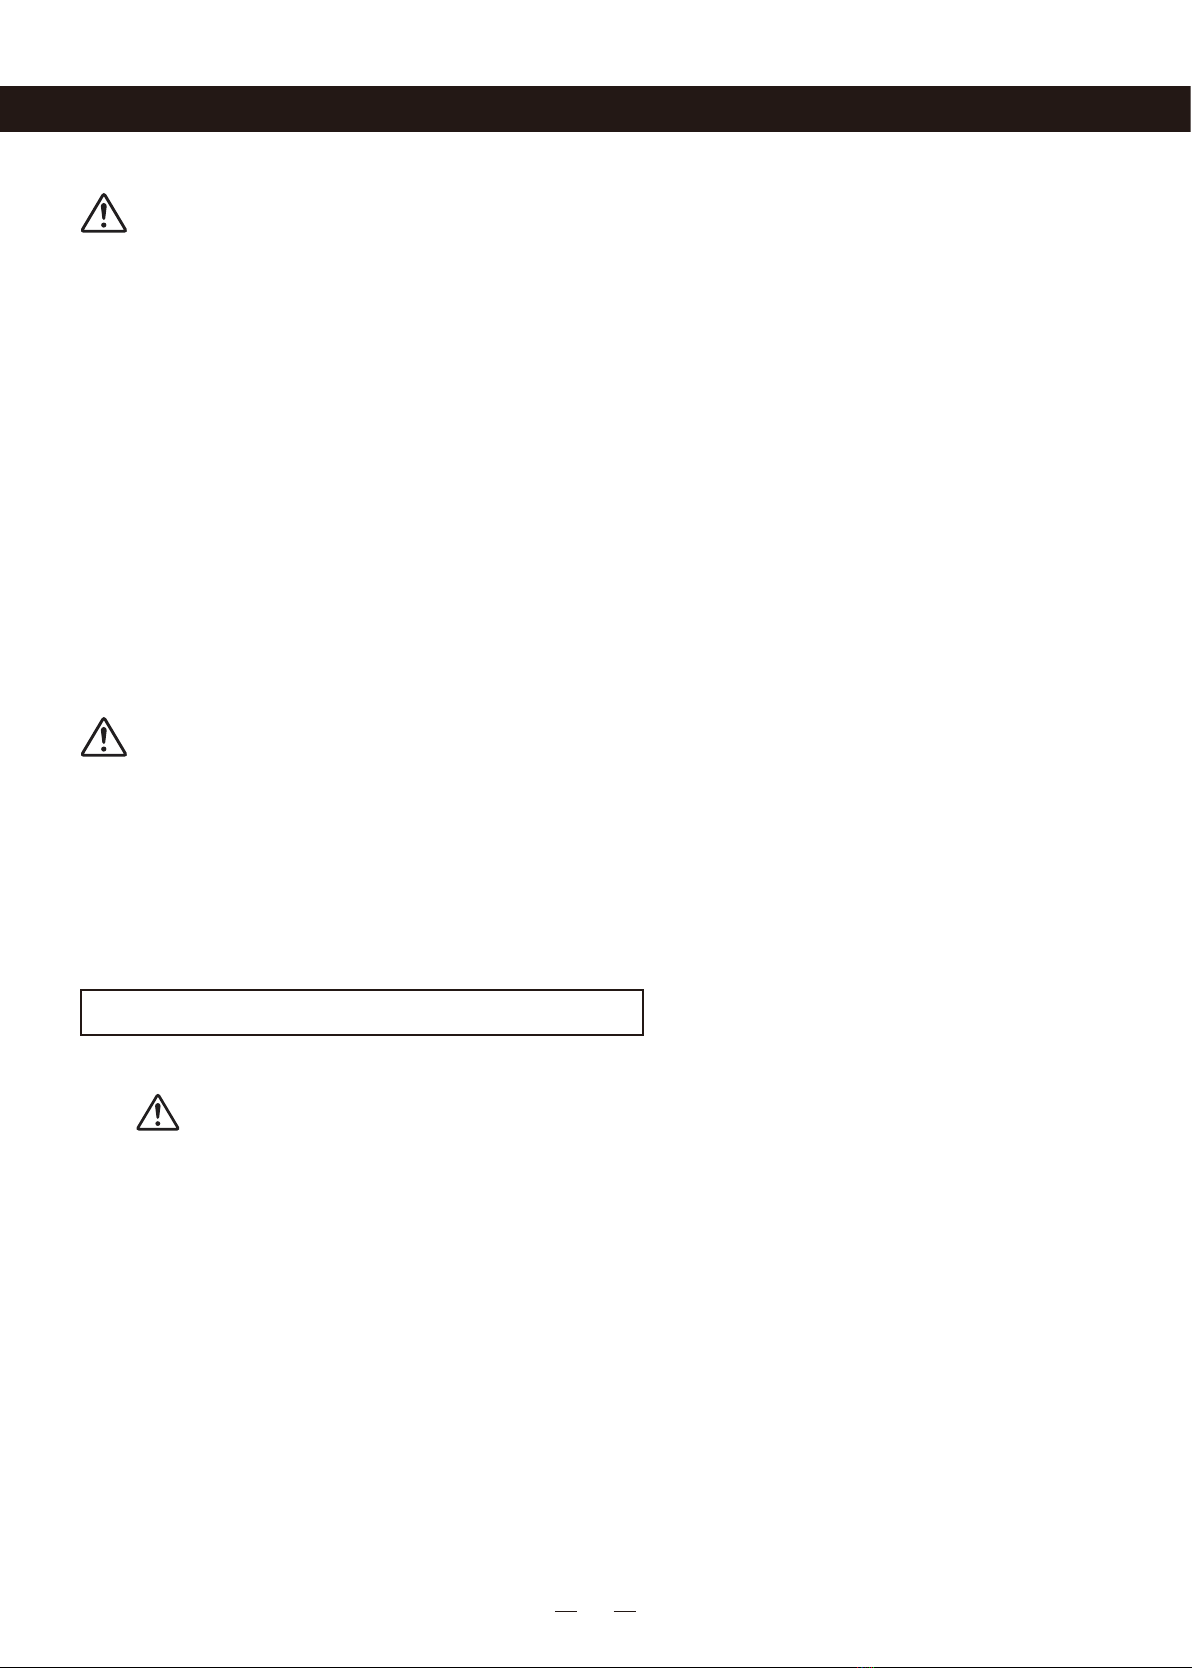
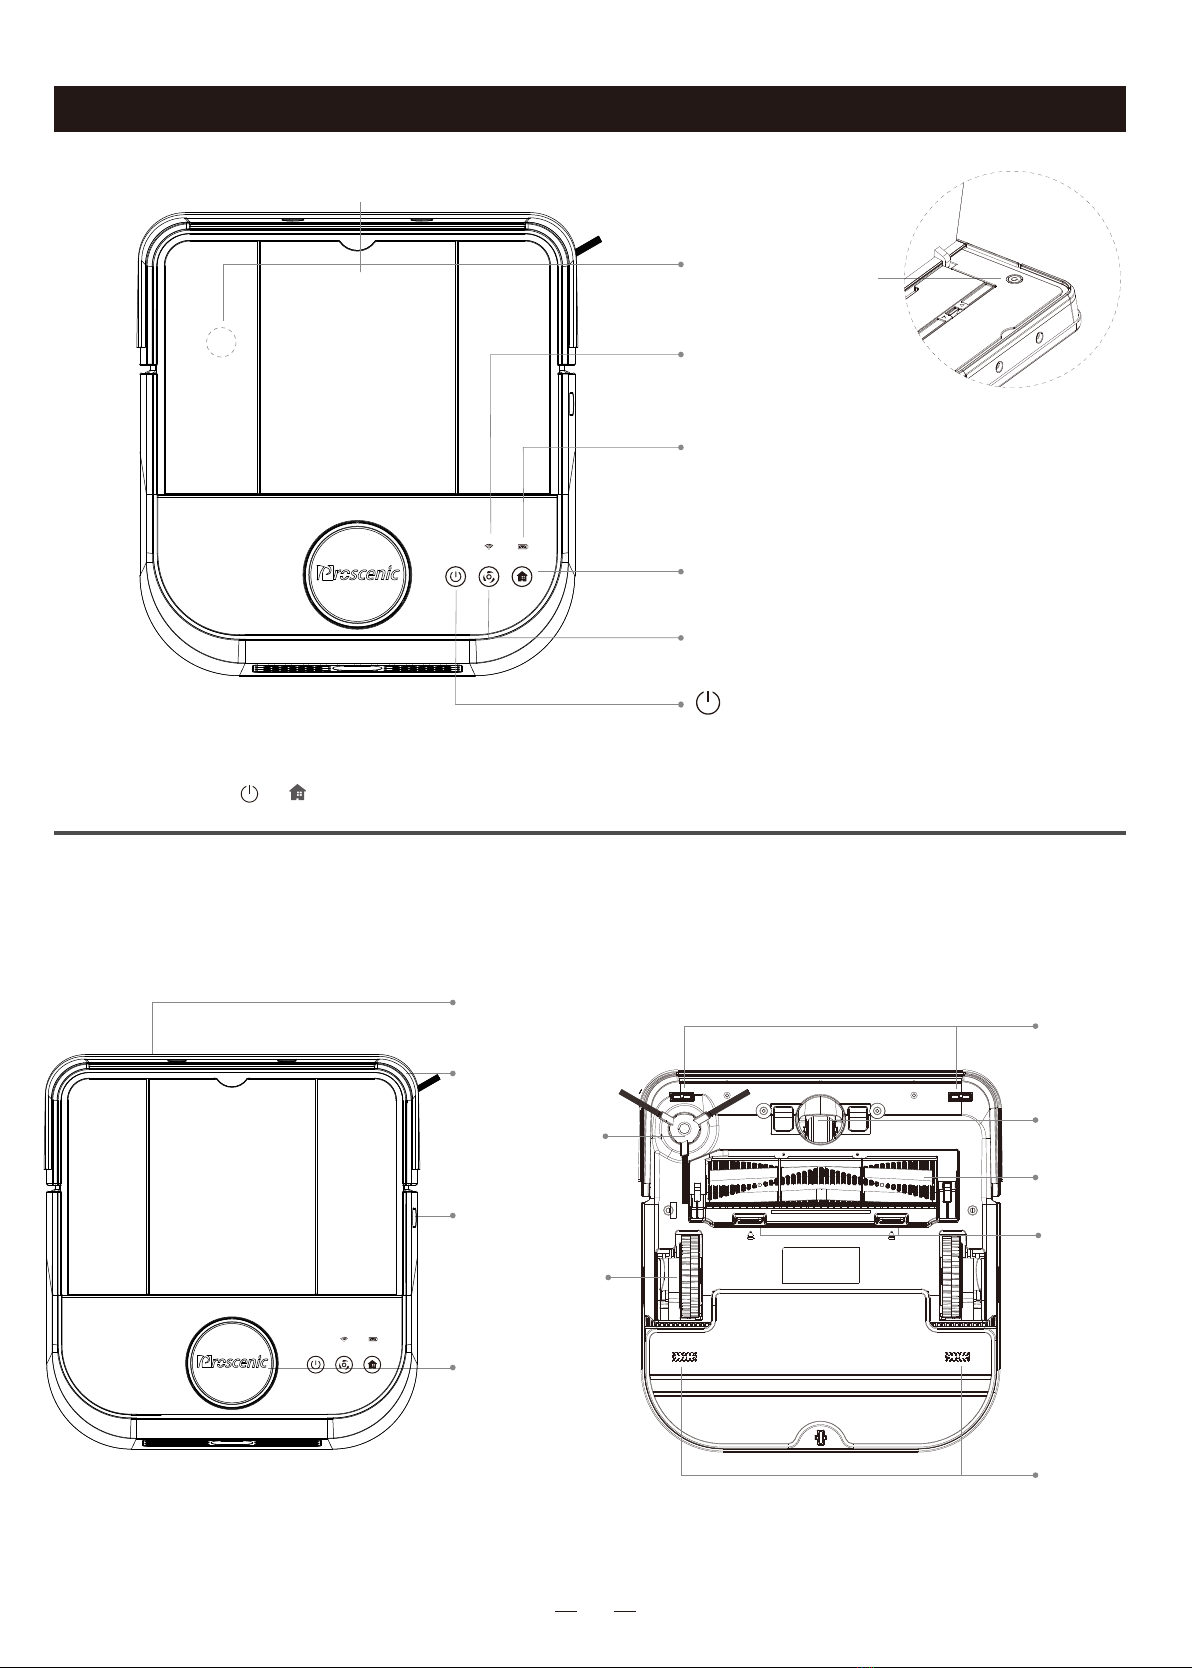
Robot cover
Network Configuration
Press and hold“ ”+“ ”for 3 seconds to start network
configuration.
Recharge Button
Clean Button
·Press it to start charging mode
·Press to start clean
Power Indicator
·Power >=20%: stable green light
·Power <20%: red light blinks
WIFI indicator
·flash fast/slowly: wifi connecting
·solid light: wifi connected
·No operation for 10 minutes / press and hold it for 3
seconds to enter sleep mode
·Press to stop cleaning
ON/OFF
Power Button
·Short press it to
power on/off the robot
Infrared Sensor
Collision Bumper
Side Brush
Fall-Arrest
Sensors
Universal
Wheel
Drive Wheels
Main Brush
Buckles of
Main Brush
Cover
Edge Sensor
LDS Laser
Distance Sensor
Fall-Arrest
Sensors
Key Buttons
Main Body
Product Introduction

05
Filter Element
Water Tank
Stickup Area
Duster Cloth
Water-Tank
Buckles
Water Filling
Nozzle
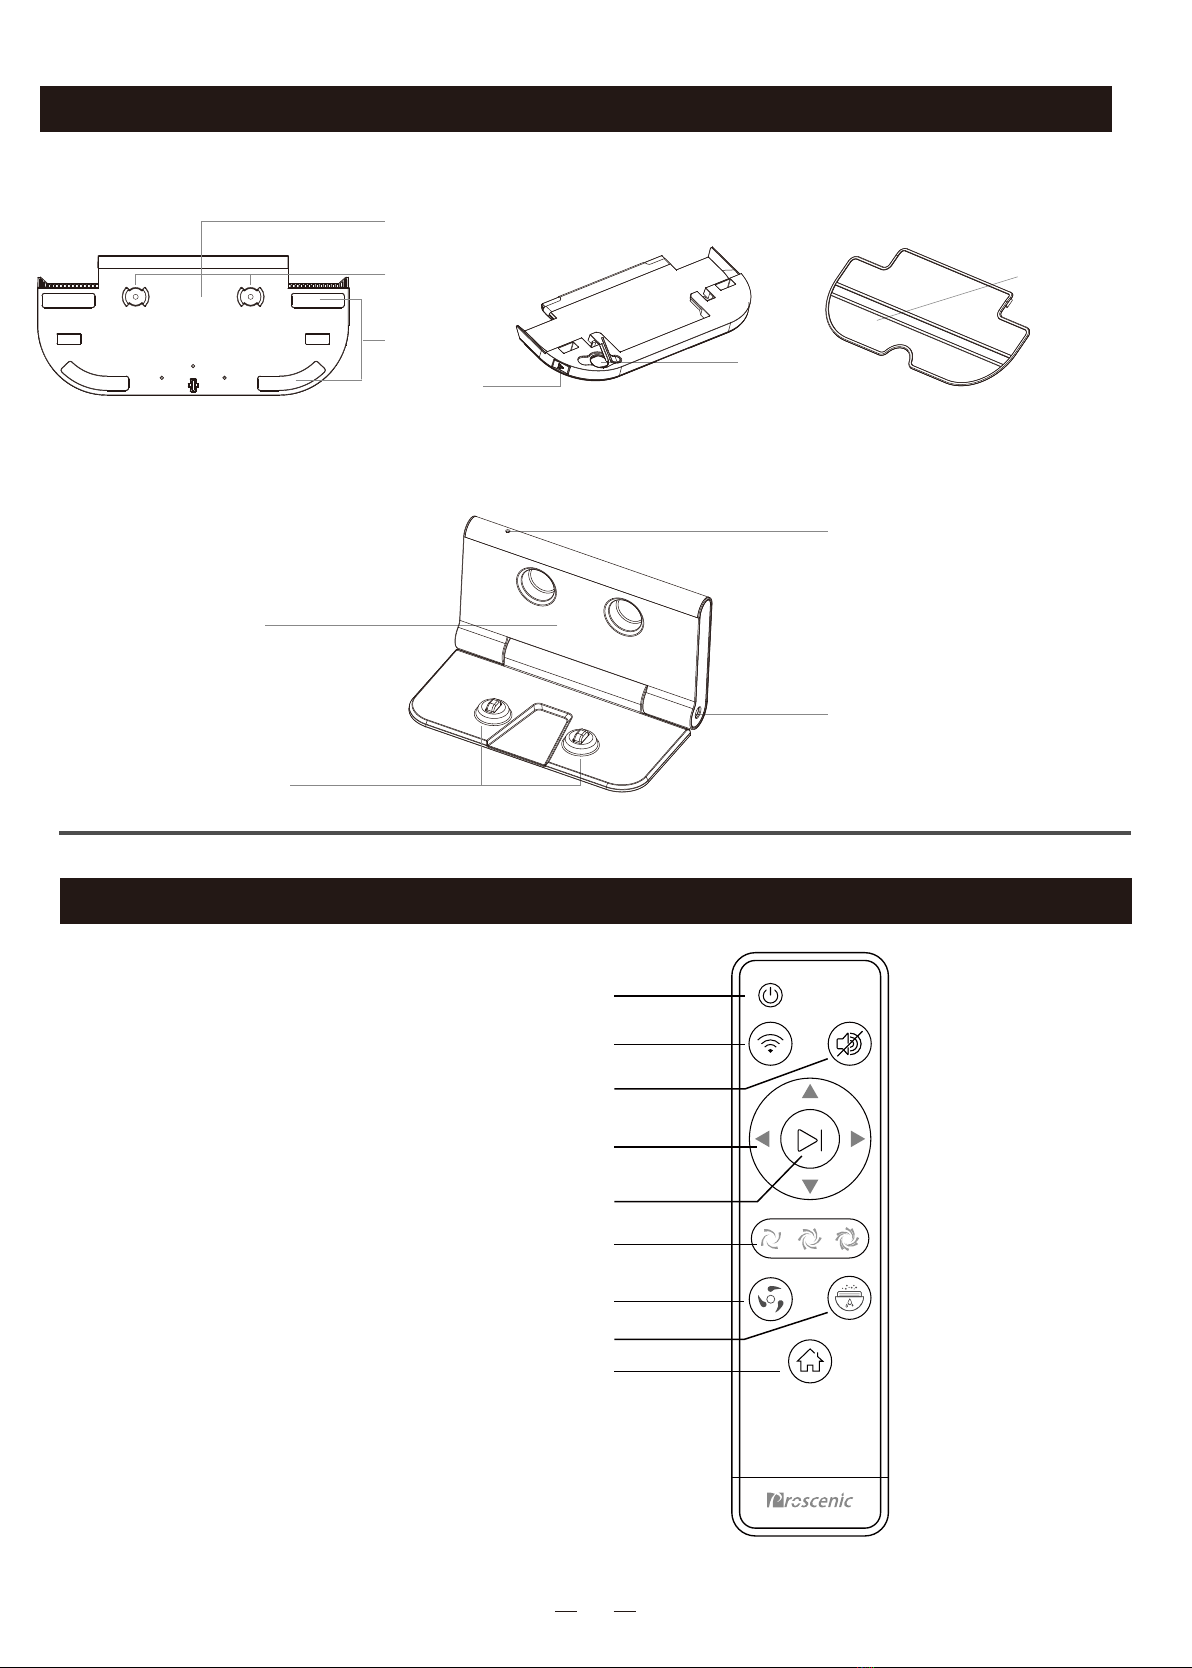
Charging Indicator
DC Plug
Infrared signal
emitting area
Charging Contact Points
1、Power Button
2、WiFi
3、Mute
4、Direction Button
5、Pause/Start
6、Suction Strength
7、Clean
8、Mopping(Draught Fan does not work)
9、Recharge
1
2
3
4
6
7
8
9
5
Mopping Module
Charging Base
Product Introduction
Remote Control

06
1.Docking station placement
Place docking station against the wall and remove
obstacles from within 0.5 meter at two sides and
about 1.5 meters in front of the station, as shown
in the figure a.
If the robot has been shut down,power on the
robot by pressing the power switch under the
robot cover.
2.Press on robot or on remote control to
operate the robot to go back to the charging
station for recharging as shown in Figure.b.
Note: Power Indicator
Flash red : <20%
Flash green:in charging
Solid green light:fully charged
a.When the cleaning task is completed, the host will
automatically return to the charging stand.
b.If the battery runs low, the robot can not be turned
on.Please charge it.
c.The robot cannot be shut down while charging.
d.The charging base is foldable for easy carrying.
e.While charging, please remove the water tank.
f.Place the charging base out of direct sunlight .
meter meter
meter
a
b
Main Body*1 Side Brush*2 HEPA Filter*1 Duster Cloth*2
Charging Base*1 Remote Control*1Water Tank*1
(dust bin included)
Filter Elements*4
Manual*1
adapter*1
Main Body and Accessories
Product Operation
07
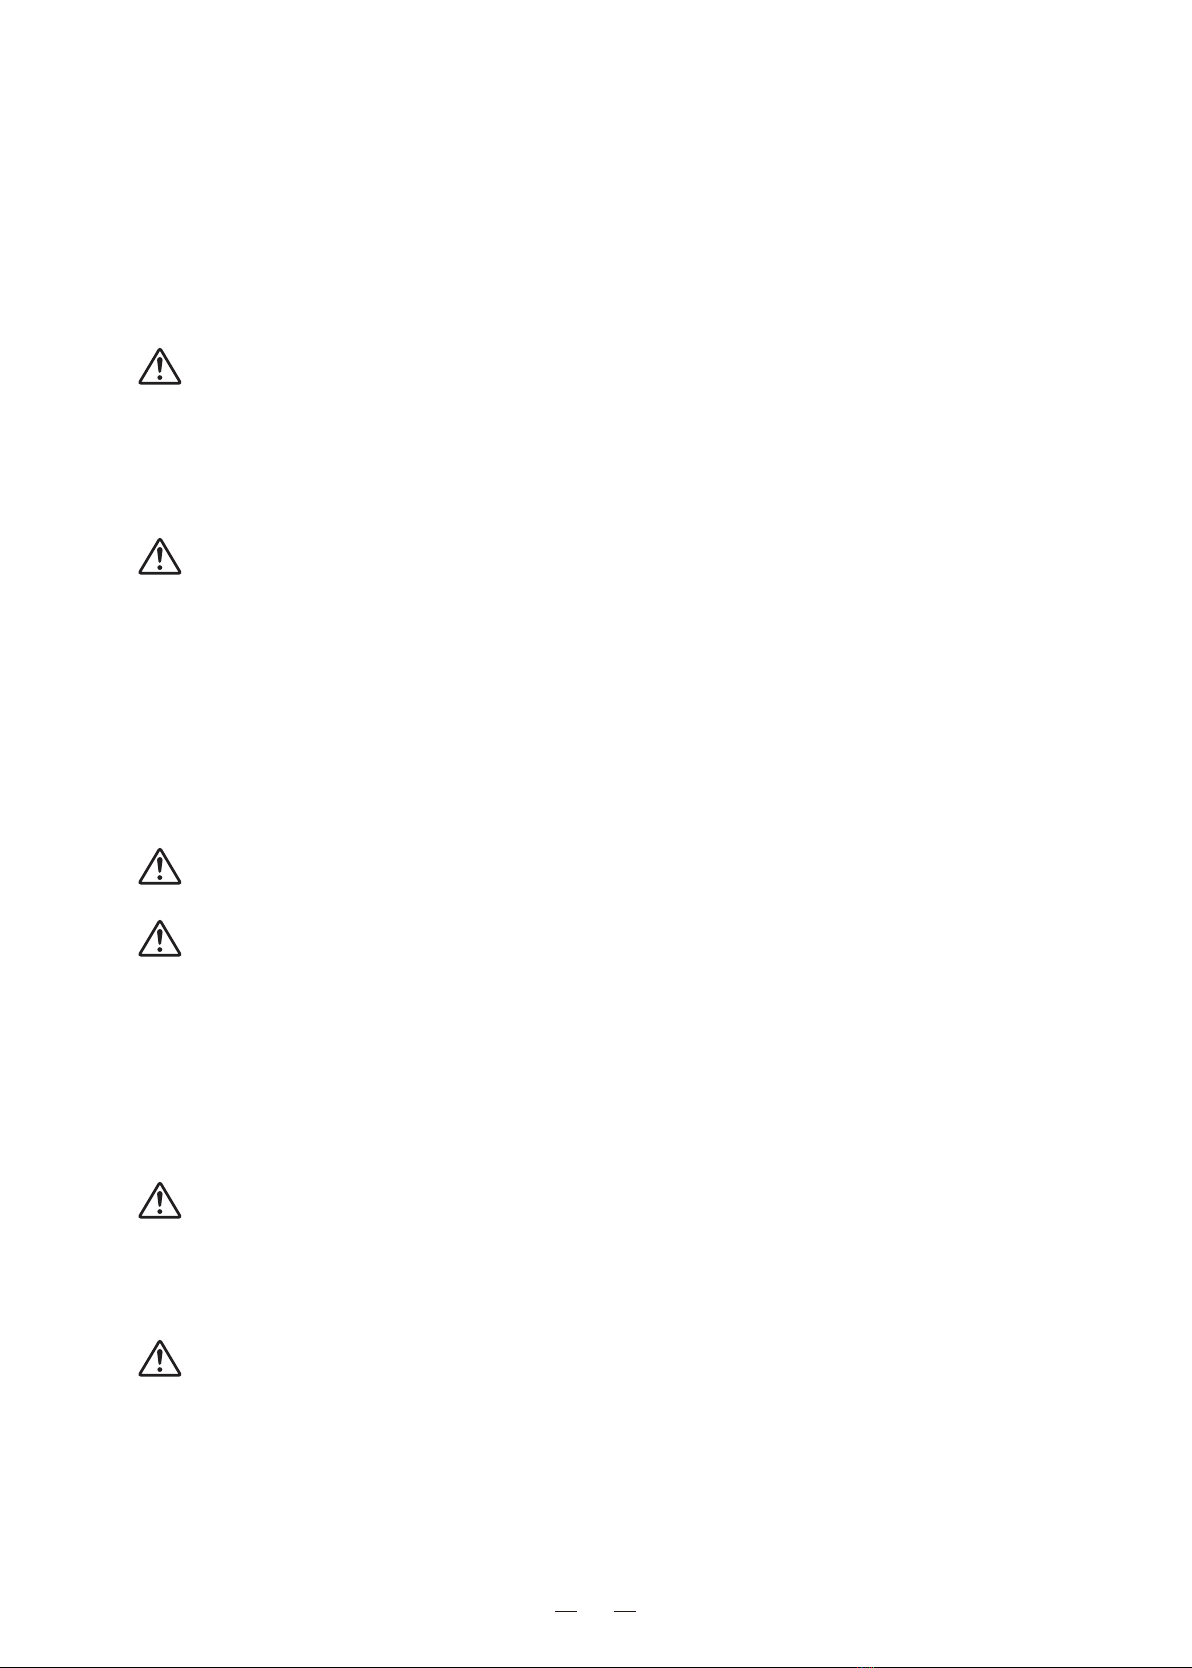
Please download APP“ProscenicHome” by sca-
ning the QR code or in Google Play or App Store.
·After the app installation, please follow the APP prompts to enter
network configuration. With APP, you can get more robot function
after connecting the robot wifi.
·The robot is not compatible with 5Ghz network.
press and hold “ ”+“ ”for 3 seconds to
start network configuration
Network Configuration
Network Configuration
1
Enter wifi password
4
Add a Devide
2
Make sure WIFI indicator flashes
3
LDS D500/D550
LDS-xxxx
M7
H500
H600
Please select the purchased device
Click or pull up to load more
Please select the purchased device
LDS D500/D550
......
......
Search Device Hotspots
WIFI indicator flashes
Hold Down “ ”+” ”for 3 seconds until
you hear "Network Configuration Begins”.
Network Configuration
Hold Down “ ”+” ”for 3 seconds until
you hear "Network Configuration Begins”.
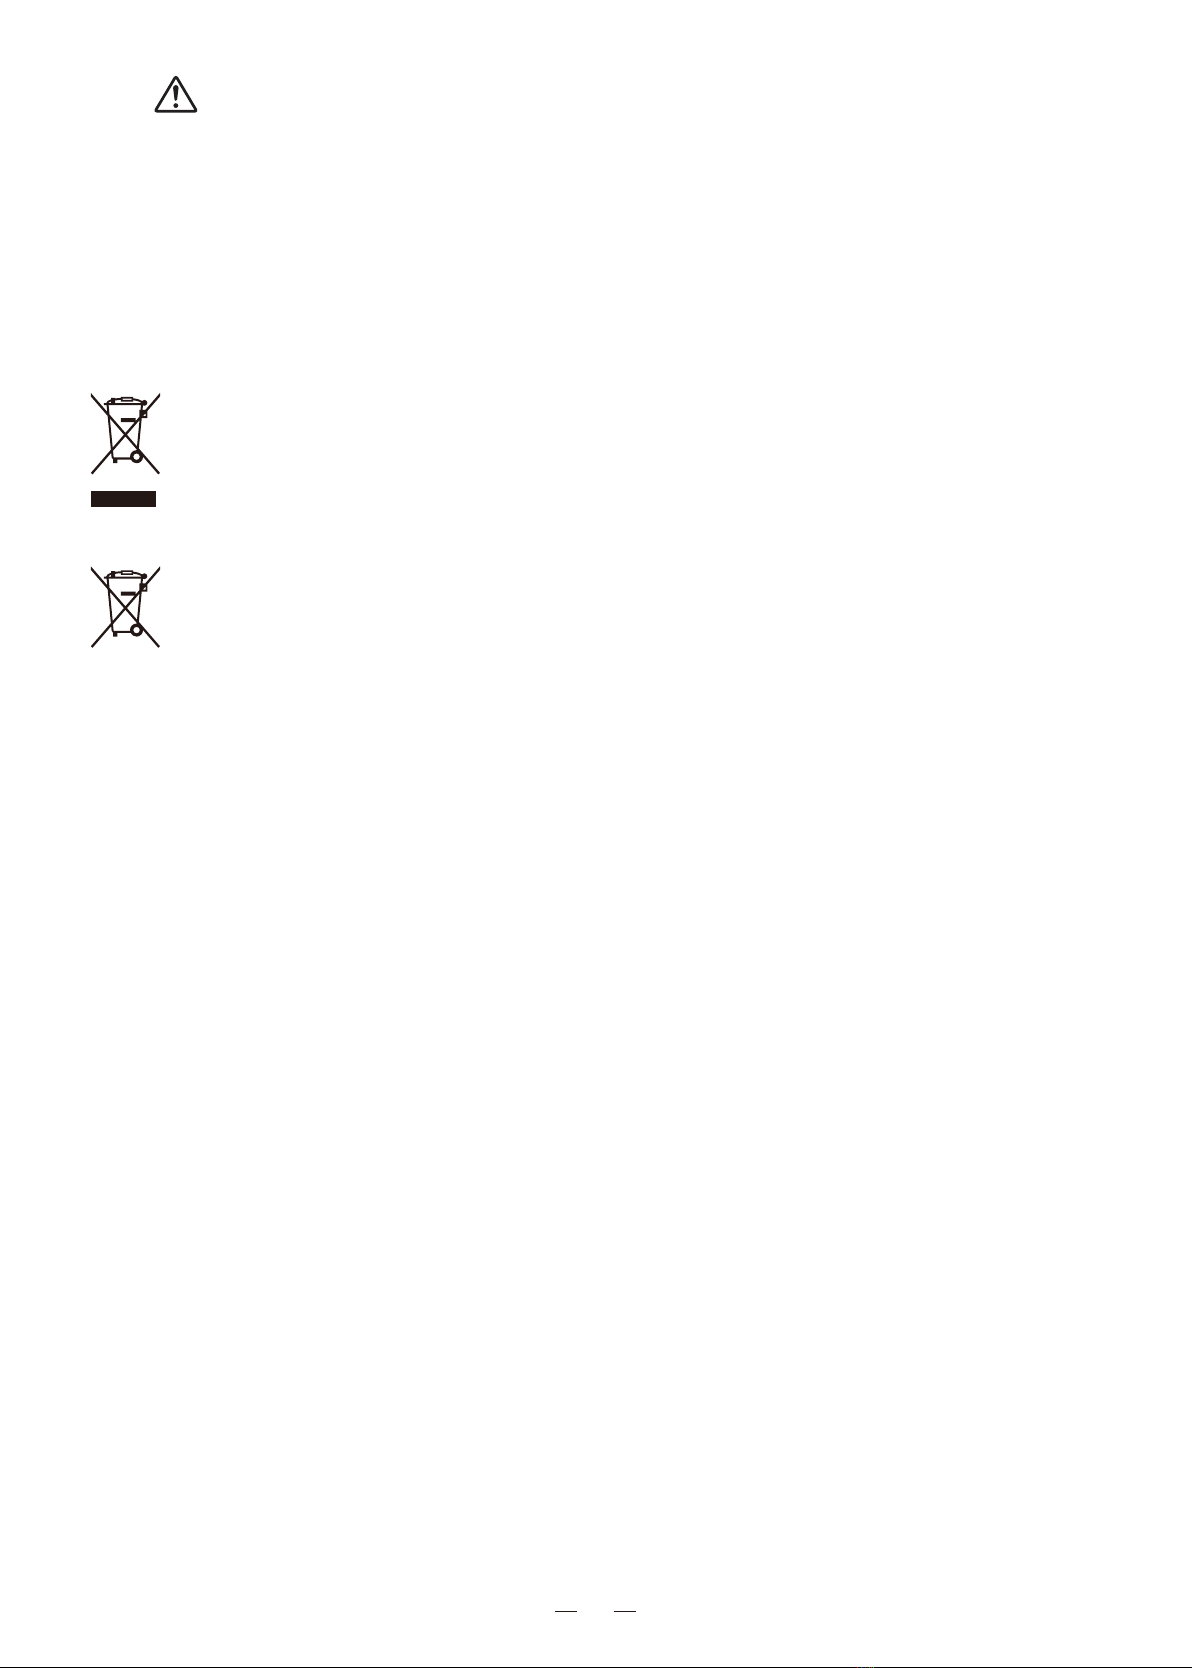
WIFI Resetting
When the wifi connection between the mobile phone
and the robot fails, please reset the robot wifi by pre-
ssing and holding " " and " " for 3 seconds
until you hear a voice prompt "WI-FI has been reset,
meanwhile, the WIFI indicator blinks. The possible
causes of connection failure includes router configur-
ation change, wifi password change, and etc..
The wifi connection between APP and robot
begins.
Please wait until the connection completes.
Start network configuration
6
Connect to Robot WIFI
5
Enter the page of Setting > WIFI in your phone,
choose wifi “Proscenic-XXXX”.Reopen APP after
successfully connecting to wifi “Proscenic-XXXX”
Select and connect to the device network
according to the APP prompts
Proscenic-XXXX
Proscenic-XXXX
Device Choice
Cancel Refresh
Proscenic-XXXX
Proscenic-XXXX
Device Choice
Cancel Refresh
Setting
AVAILABLE NETWORKS......
WLAN
WLAN
Proscenic-XXXX
XXXXXXXX
XXXXXXXX
Setting
AVAILABLE NETWORKS
...
WLAN
WLAN
Proscenic-XXXX
XXXXXXXX
XXXXXXXX
Network Configuration
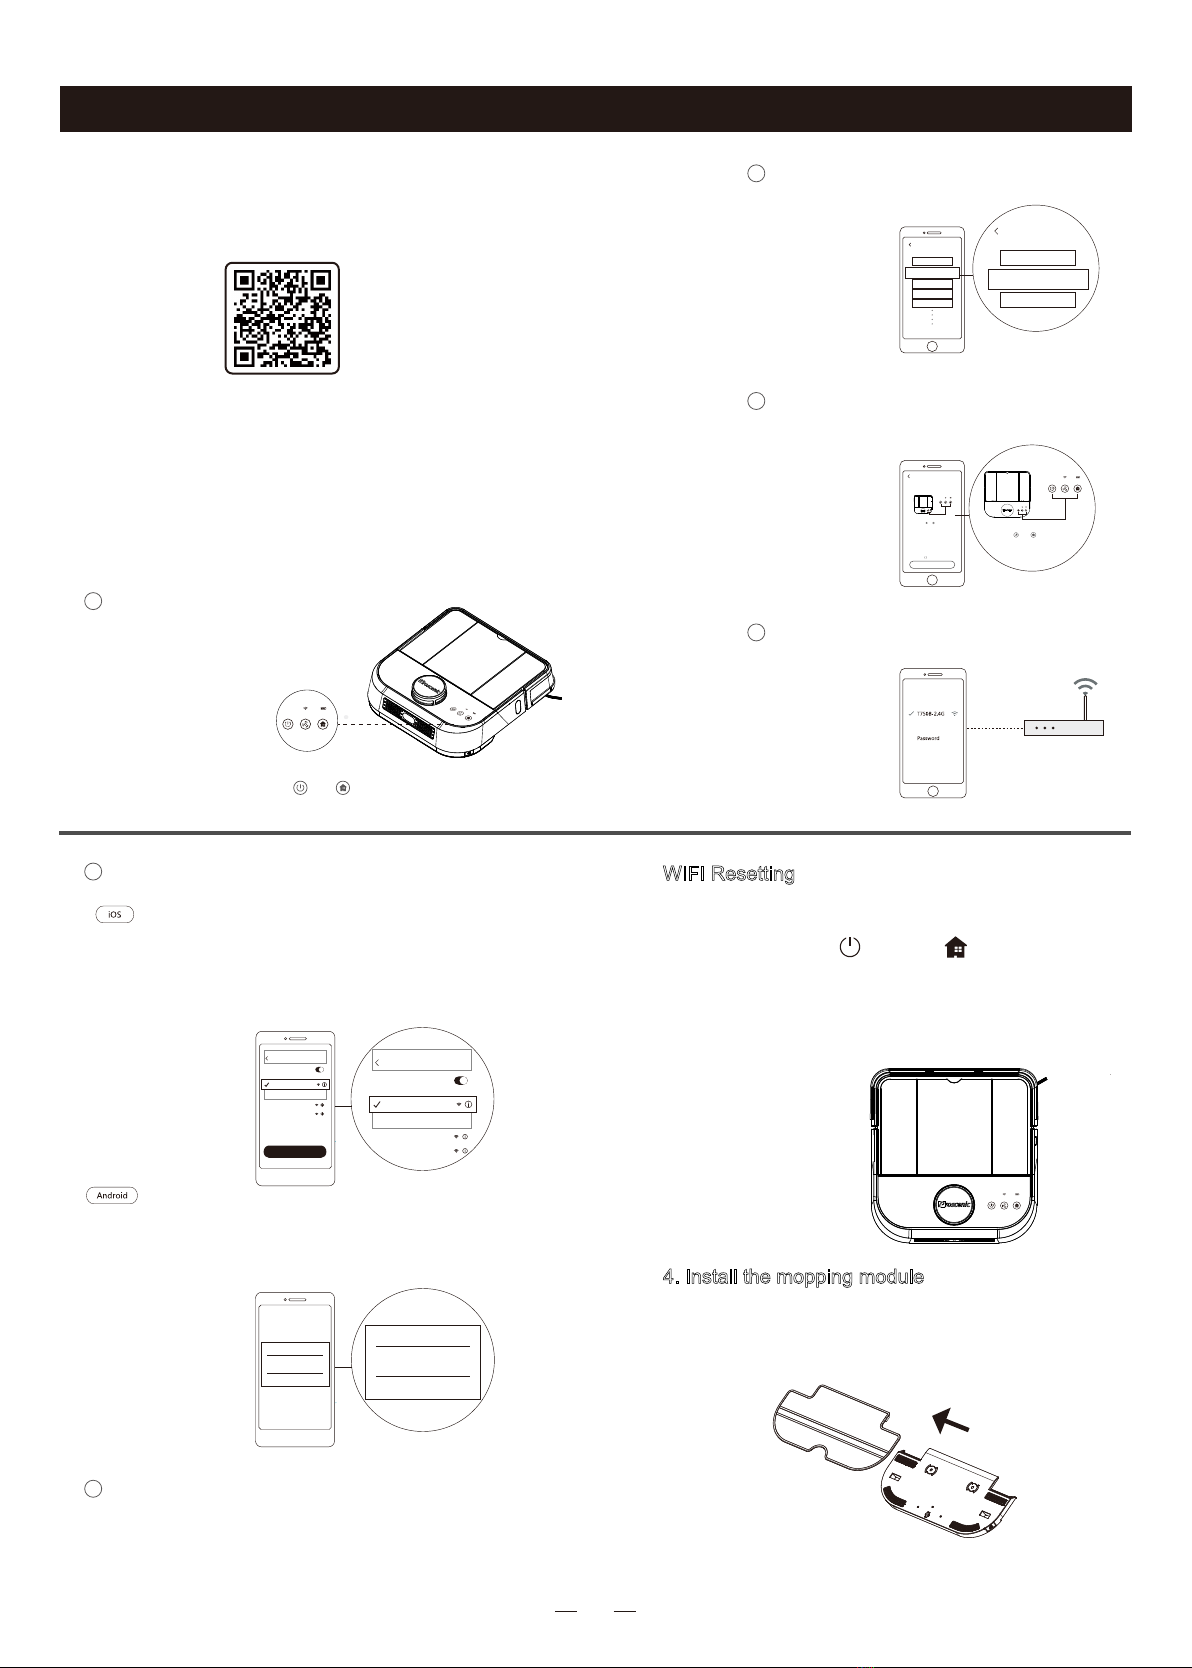
4. Install the mopping module
①Stick Mopping Cloth on the bottom of water
tank, and press to make it straight.
·Do not mop home when no one is at home
·Do not use the mopping module on carpets.
Not recommended for first cleaning
3.APP installation
Product Operation
08
②Uncap the water tank, fill it with water, and fasten the
rubber cover.
③As shown in the figure, push the mopping module
horizontally into the bottom of the robot.Please make
sure the buckles on both sides are installed properly.
Press the buckles on both sides of the mop module
to remove the mopping modules.
·Some disinfectant or detergent may clog the tank filter
·Please remove the mopping module while charging or not in service
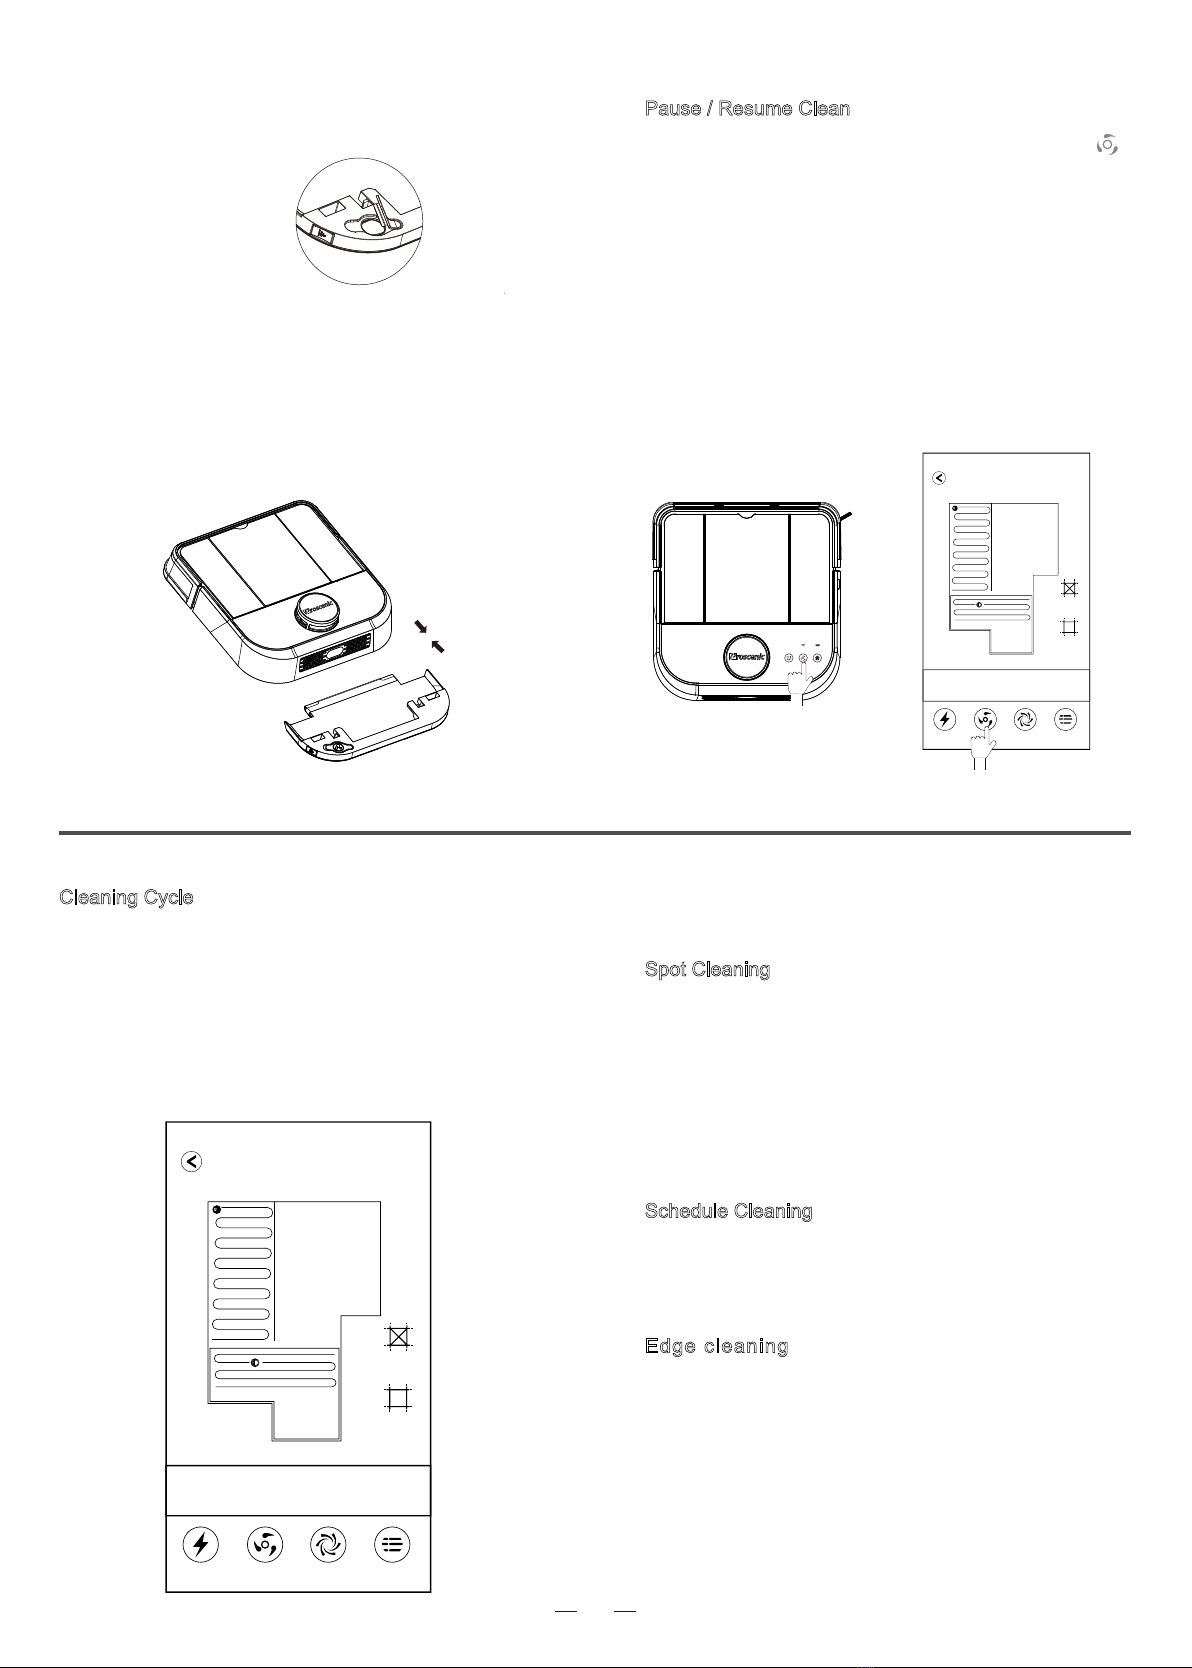
Pause / Resume Clean
1. As the figure a shows, in standby mode, press" "
on the robot to start clean (Press any button to pause
cleaning ).
2. As the figure b shows, click the clean button in APP to
start clean (Click the pause button to pause the current
task)
Note:
·The robot vacuum is not recommend for cleaning liquids.
·If the power is less than 20%, the cleaning task will not be performed.
Please charge before starting the cleaning.
·Robot automatically shuts down when the battery is below 5%.
·Please put aside wires on the floor before cleaning to avoid power failure
or damage to furniture.
a b
42㎡
Cleaning Area
57%
Battery Level
38min
Clean Time
Charging 清扫
Charging
Vacuum Robot
Silent Mode More
Cleaning Cycle
Edge cleaning
The robot cleans along the walls, and it returns
to its charging base after the current task is fi-
nished.
Robot stars by scaning the house, generating a map for
the area and intelligently dividing the house into different
sections. In each section, the robot firstly cleans along
the wall, and then cleans in a zigzag pattern.The robot
completes the cleaning of each section in an efficient
and orderly way. When finished, the robot returns to
its base to get charged.
Note: If you move robot mid-cycle it will clear its map and create a new
one when you restart it.It will also be unable to return to its base.
The robot cleans in a square area of 1.5X1.5m.The
robot enters spot clean mode via either of the
following methods:
a.When the user specifies a point on the map, the
robot will come near that point, and then centering
on that point, the robot starts cleaning.
b.Start spot clean mode by remote control.
Spot Cleaning
Please use the APP to schedule cleaning.The robot will
start cleaning as scheduled,and return to base after
finishing cleaning.
Schedule Cleaning
42㎡
Cleaning Area
57%
Battery Level
38min
Clean Time
Charging Clean
Charging
Vacuum Robot
Quite Mode More

09
Area Cleaning
Press and hold the recharge button on the robot for 3
seconds. Centering on the start point, the robot cleans
in a square area of 2m*2m.
Recharge
Automatic Mode: After cleaning, the robot will au-
tomatically return to the charging base.
Manual Mode: In the pause state, press the rechar-
ge Button on the robot or the APP.
Note:
·If the robot fails to return to its charging base when it completes its
cleaning, please pick it up and place it on its base.
·If mid-cleaning the battery power of your robot falls under 20% , it will
return to base to charge. As the battery level approaches 80%, it will auto-
matically return to finish cleaning where it left off.If mid-cleaning the bat-
tery power of your robot falls under 20% , it will return to base to charge.
As the battery level approaches 80%, it will automatically return to finish
cleaning where it left off.
Custome Zone
2)Zone Cleaning
Zone cleaning confines the robot to a specific area
on-demand. Customized options include: the pos-
ition, the size , and the quantity of spicific areas, and
number of clean times. The default number of clean
times is once or twice.
1) Off-Limits Areas
Set a specific area as an Off-Limits Area to keep the
robot out of the place you don't want to be cleaned .
You can draw permanent off-limits areas in the map.
Note:
·The robot may enter the off-limits area due to positioning errors,
sensor anomalies, etc.
·The setting of permanent off-limits area may be invalid due to great
changes of the location of charging base and furniture. Therefore,
please do not interfere or move your robot mid-cycle.
·Rebuilding the map will result in the loss of the setting of permanent
off-limits areas.
Robot Vacuum
Add a Off-LimitsArea Save
Robot Vacuum
Add a Off-LimitsArea Save
Vacuum Suction Strength
Choose quiet, standard, or strong mode by app or remote
control. The default is standard mode.
Sleep
In order to save power, you can turn the robot into sleep mode
from standby mode.
a.Press on the remote control to make robot enter or exit sleep mode.
b.You can also press and hold on the robot surface to make robot enter sleep
mode, and press on the robot surface to make robot exit sleep
mode.
c.Robot will automatically enter sleep mode if no command is received for
more than 5 minutes.
d.The robot will not automatically enter sleep mode while being charged by
charging base.
42㎡
Cleaning Area
57%
Battery Level
38min
Clean Time
Charging Clean
Charging
Vacuum Robot
Silent Mode More
10
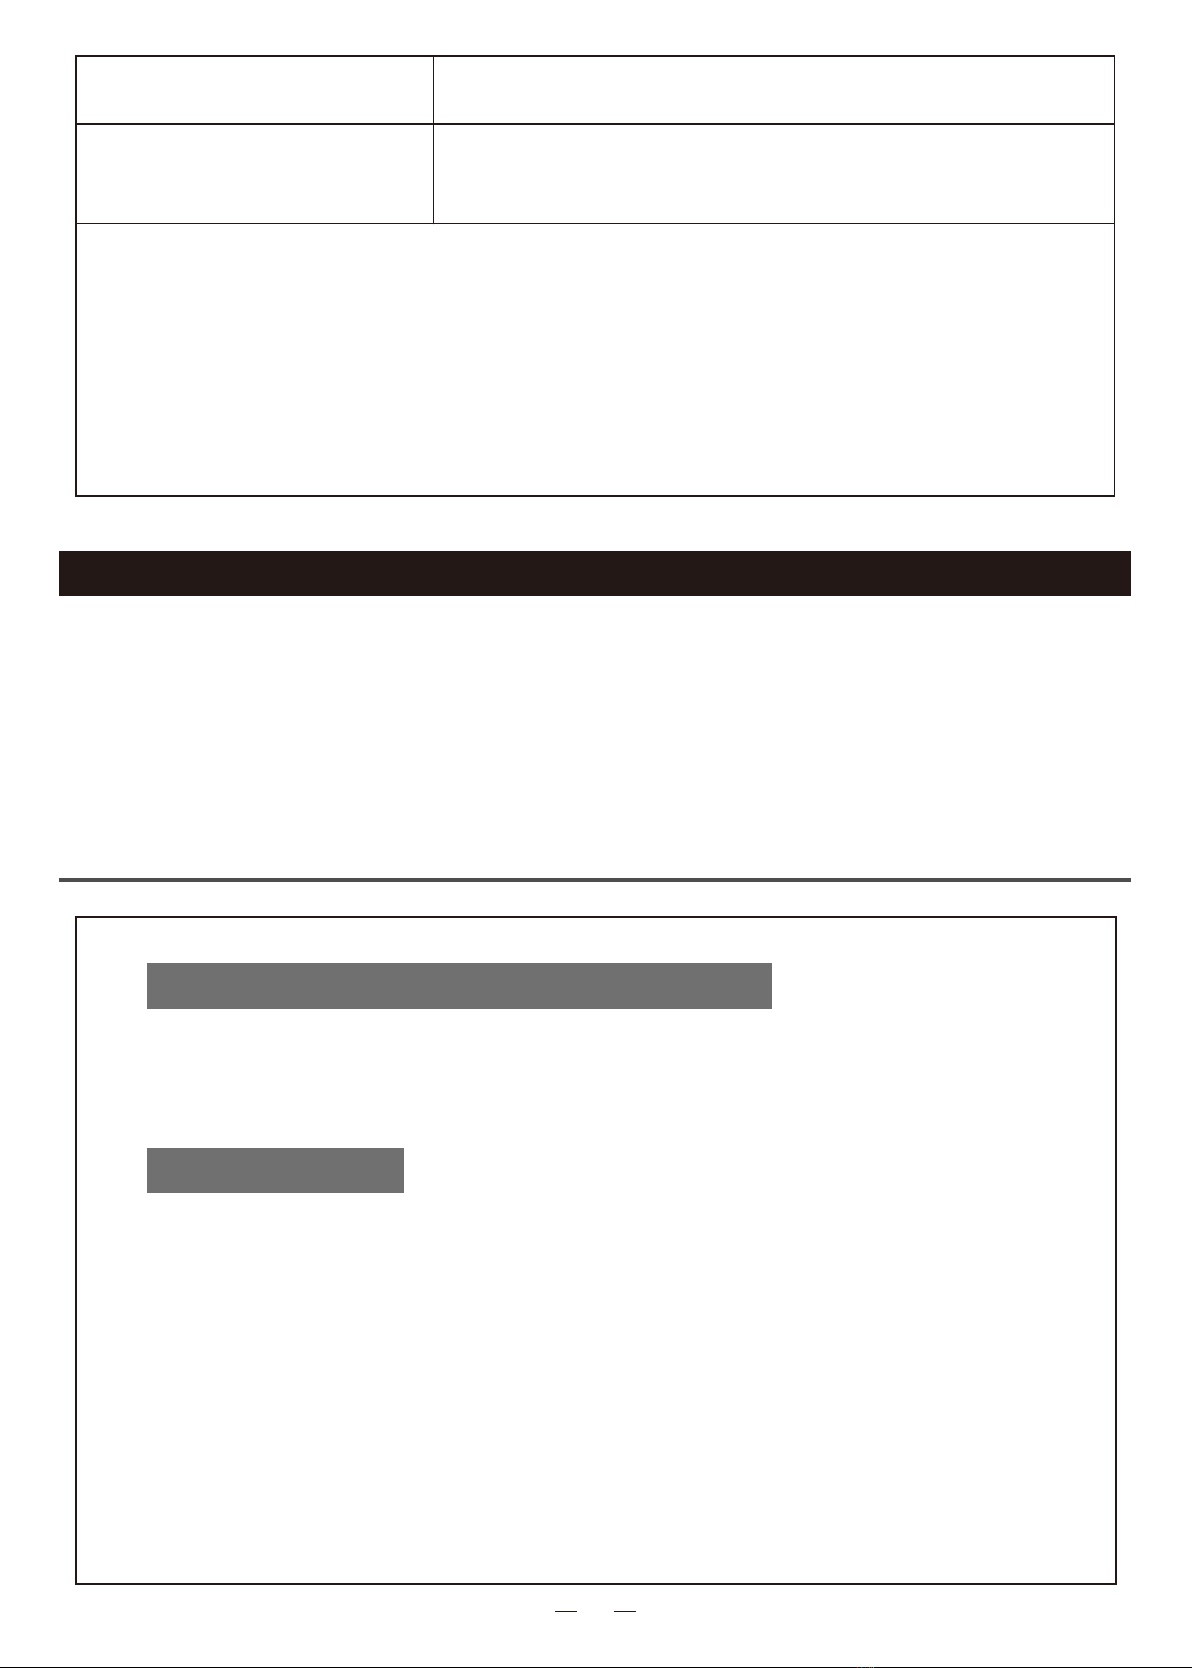
Take out and disassemble the roller brush kit as
shown in figure below, and clean it with soft clea-
ning cloth or tool. (The roller brush axle is washa-
ble.)
Note:Recommended to change the main brush per 6-12 months to
ensure the cleaning effect.
1. Open the robot cover
and take out the dust bin.
Brush Cover
Main Brush
Buckles
2. Uncap the dust bin to dump trash
3. Clean the filter
4. Reassemble the dust bin
Clean the filter
The filter can not be washed with water. It is recommended
to replace the filter every 3 months.
To avoid clogging the filter, it is recommended to clean the
filter regularly with a cleaning brush;
Recommended to change the side brush every 3 months to ensure the
cleaning effect
Regularly clean the sensors with a soft rag.
Disassemble and clean the side brush regularly.
Fall-Arrest Sensors
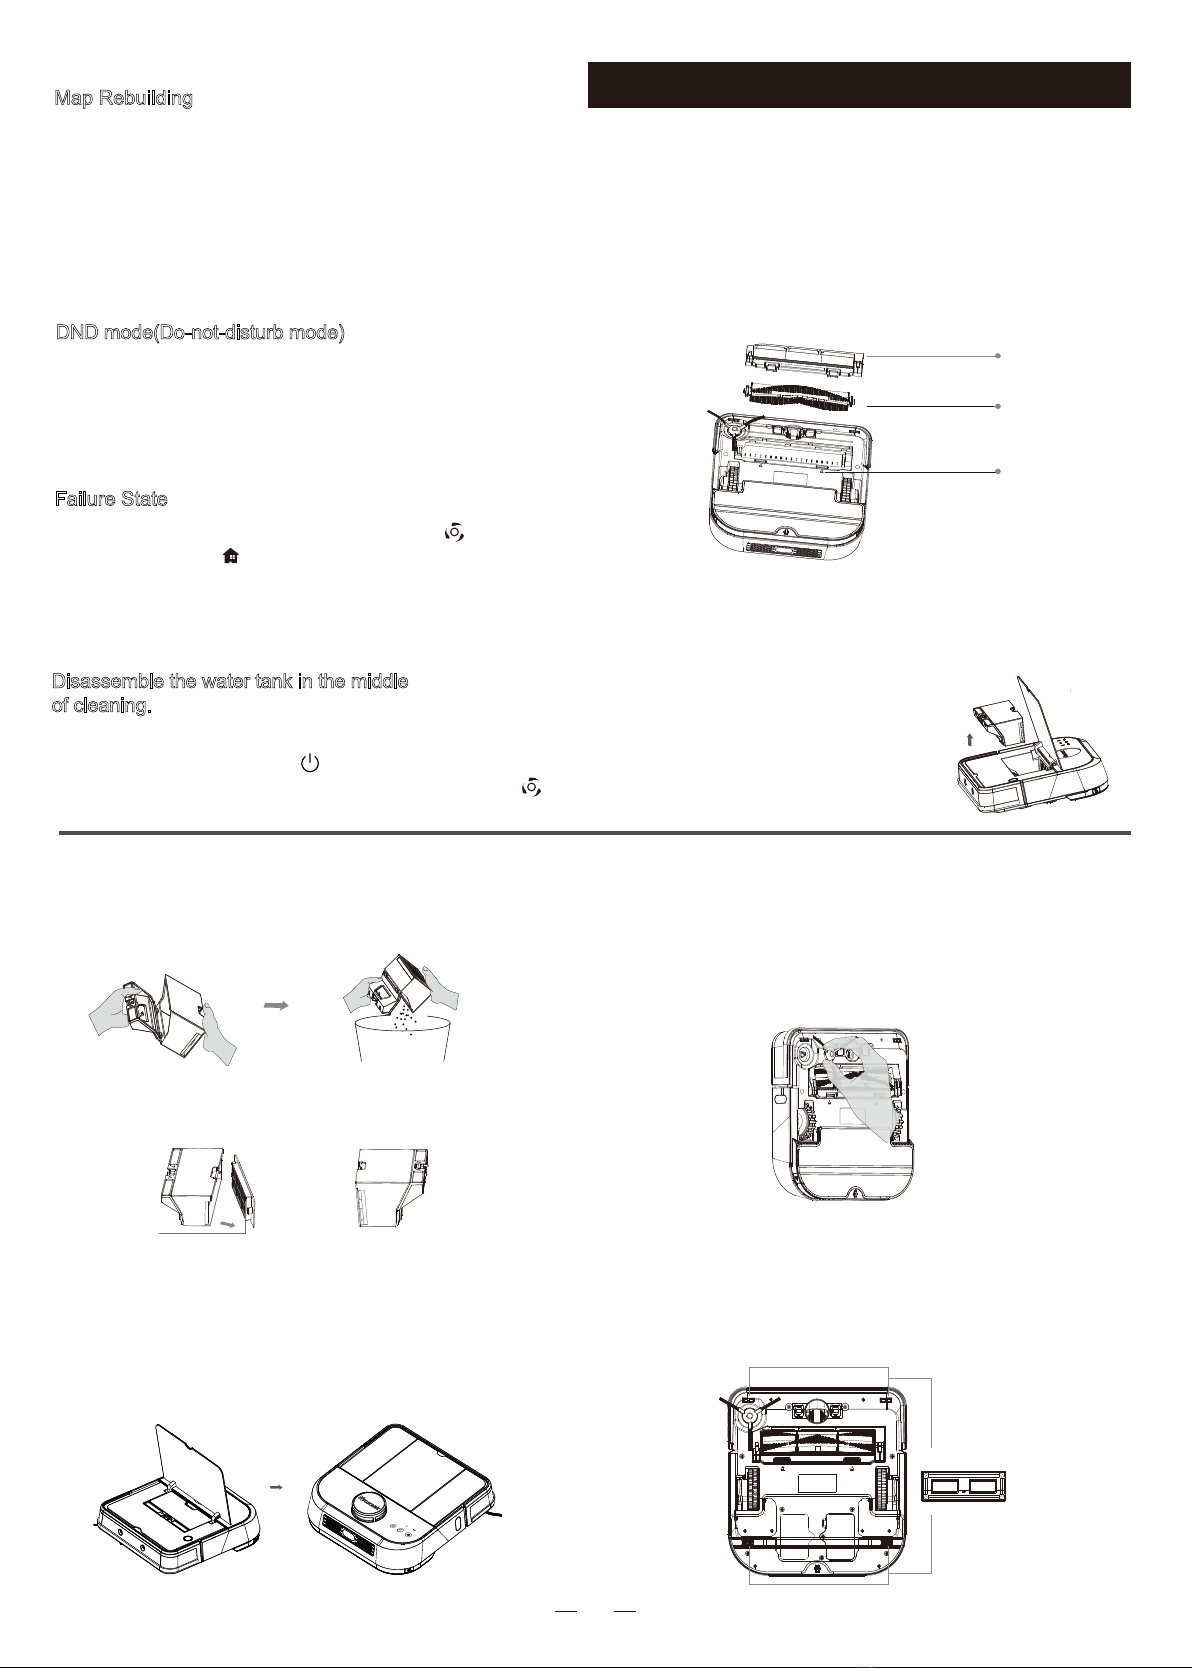
Map Rebuilding
1.Robot builds a new map when it starts in a strange
area.
2.A great change of the indoor home environment will
cause the positioning fail, and hence the robot rebuilds
the navigation map.
Rebuilding the map will result in the loss of settings
made on the original map (including the Off-Limits
Area).
DND mode(Do-not-disturb mode)
During the DND period, the robot does not automa-
tically resume work and actively play the voice. DND
mode is enabled by default in the factory, and its op-
ening time is 22:00-07:00.Please disable DND mode
by app.
·See troubleshooting for solutions,in Page 11.
No operation after 5 minutes in failure state,the robot will automatically enter
sleep mode
Failure State
When the robot has an error, Clean Button or
Recharge Button blinks, and the voice prompts.
Disassemble the water tank in the middle
of cleaning.
If you want to add water in the middle of cleaning, please
stop the robot by pressing of the robot.After adding
water and reassemble the water tank,please press
to continue cleaning.
Main Brush
Clean Dust Bin and Filter
Product Maintenance
Fall-Arrest Sensors
Side Brush

11
Classification Parameter
Dimension 320mm*300mm*97mm
Weight 3.5kg
Power Rating 14.4V
Rated Power 46.08W
Working Current 3.2A
Dimension 152mm×100mm×47mm
Output Rating 14.4W
Rated Input 100-240V~
Rated Output 24 V—600mA
Input Frequency 50/60Hz
voice prompt Indicators Solution
1, Please put back the
dust box and filter
Please try to replace the filter and confirm
that the filter and dust box are in place. If
the problem remains, please try to replace
the filter again.
2, Please move the rob-
ot to the horizontal gro-
und to start
Clean button and Recharge button
blink:they will slowly blink once
then quickly blink once.
Clean button and Recharge button
blink: they will slowly blink twice
then quickly blink twice.
Clean button and Recharge button
blink:they will slowly blink three
times then quickly blink once.
The robot is tilted at startup, please put the
robot on the horizontal ground to restart;
3. Please check the fall-
arrest sensors and move
the robot to a new posi-
tion to start
The robot suspends. Please move it to anot-
her position and restart it ; Dirty fall-arrest
sensors may cause the fault, so please wipe
them with soft rag
Clean button blinks: it will slowly
blink once then quickly blink twice.
Clean button blinks: it will slowly
blink twice then quickly blink once.
4, Please clean the right
wheel
The right wheel is entangled with garbage.
Please remove garbage.
5, Please clean the left
wheel
The left wheel is entangled with garbage.
Please remove garbage.
When an abnormality occurs during the running of the robot, the Clean button or the Recharge button flashes,and voice
prompts. Please refer to the table below for troubleshooting.
HOST
Charging Base
Product Specifications
Trouble Shooting

12
6, Please clean the side
brush
The side brush is entangled with garbage.
Please disassemble the side brush and clean it;
7, Please clean the main
brush
Clean button blinks: it will slowly
blink once then quickly flash once
Clean button fblinks: it will slowly
blink three times then quickly flash
once
The main brush may be entangled with gargage.
Please remove it and its bearing to clean.
8, Please place the robot
on the ground to start
The wheels are suspended. Please place the robot
on the ground to start.
Note: Restart the robot can solve some abnormalities
9, Please clear the obst-
acle around the charging
base
Please clear the obstruction or other objects arou-
nd the charging stand; if these cannot be cleared,
please move the charging stand to a new position.
10, Please wipe the front
infrared sensor and move
the robot to a new posi-
tion
Please wipe the infrared sensor with a dry cloth,
and clear the obstruction or foreign objects around
the robot. If they cannot be cleared, please move
the robot to a new position to start.
11,Please check if the edge
sensor needs cleaning.
The edge sensor is covered by dust, please wipe
the sensor;
12, The collision bumper
is abnormal, please check
if you need to clean it.
The collision bumper is stuck. Please tap it for
several times to remove foreign objects.
If there is no foreign objects, please move the
robot to another position to start.
13, Please clear the obsta-
cles around the robot and
try again.
The robot may be stuck or trapped. Please clear
obstacles around it.
14.Please check if the lidar
cover get stuck
Please clear foreign objects around the lidar or
move the robot to a new position to restart
Questions Solution
Unable to start up
Unable to charge
The battery is low. Please charge it before use.
The ambient temperature is too low (below 0 °C) or too high (over 50 °C ).
The robot only operates from 0℃to 40℃.
Unable to return to
charging base
The battery is low. Please charge it before use.
Abnormal behavior
There are too many obstacles around the charging stand. Please put the
charging stand in the open area.
The robot is too far away from the charging stand. Please place the robot
near the charging stand and try again;
There is abnormal noise
during cleaning
Reboot after shutdown
The main brush, side brush or drive wheel are possibly entangled with
garbage. Please turn off the robot and clean them;
Cleaning ability declining
or ash dropping
The dust box is full. Please clean it.
The HEPA filter is too dirty.Please clean it.
The main brush is entangled with garbage. Please clean it.
Unable to connect to
Wi-Fi
The Wi-Fi signal is not stable. Please make sure the robot is in a good Wi-Fi
signal coverage area.
The Wi-Fi connection is abnormal. Please reset Wi-Fi, or download
the latest version of appplication and try to connect again.
FAQ
13
The laser distance sensor of this product meets the standards for Class I Laser Products in IEC 60825 and will
not generate hazardous laser radiation.
Cannot return to the charging base
after partial cleaning or being moved
to another position
Please manually place the robot in the charging stand.
Questions Solution
If you can not connect robot to your phone, please refer to the following list for troubleshooting:
1.Please make sure that the WIFI password is entered correctly.
2.Please confirm whether the WIFI is 2.4G; If the home router is a dual-band router, please set the
SSID name of 2.4G and 5G separately.
3.Please close the 4G traffic when binding. And after binding successfully, open the 4G traffic again.
4.Please check if the router has MAC address filtering set, or if the number of assigned IP addresses is full.
5.Try to avoid network rush hours (18:00 to 23:00) for the first time binding.
6.Please contact customer service if it is still not bound successfully.
Laser Safety
This equipment complies with FCC radiation exposure limits set forth for an uncontrolled
environment. This equipment should be installed and operated with minimum distance
20cm between the radiator & your body.
FCC Radiation Exposure Statement
This device complies with Part 15 of the FCC Rules. Operation is subject to the following
two conditions:
(1) This device may not cause harmful interference,
(2) this device must accept any interference received, including interference that may cause
undesired operation.
NOTE: Any changes or modifications to this unit not expressly approved by the party
responsible for compliance could void the user's authority to operate the equipment.
FCC Warning

14
Customer Service
Email:[email protected]
Customer service hotline:
5th floor,Jinshun Building, No 287 Ruy Road, Ailian Community,Longgang
District Shenzhen city,China
(DE)+49 202 75886417
(JP)+04 63-68-7447
English & German
月曜~金曜 9:00-17:00
Mon~Fri 13:00-16:00
周一~周五 9:00-17:00
Japanese
Chinese
(CN)+86 400-0097-087
Shenzhen Proscenic Technology Co.,Ltd
China : Shenzhen Pusensi Technology Co., Ltd
502,Block A,Jinshun Building,Ruyi Road,
longgang District,Shenzhen
www.proscenic.com
Taiwan : Taiwan Proscenic Technology Co., Ltd
yingyi street 121 lane 3rd lingya area,
gaoxiong,taiwan
www.proscenic.com
01
AVVISO: PER RIDURRE IL RISCHIO DI LESIONI O DANNI, LEGGERE LE
SEGUENTI PRECAUZIONI DURANTE LA CONFIGURAZIONE, L'UTILIZZO E
LA MANUTENZIONE DEL ROBOT.
QUESTO APPARECCHIO PUÒ ESSERE UTILIZZATO DAI BAMBINI E DA PE-
RSONE CON RIDOTTE CAPACITÀ FISICHE, SENSORIALI O MENTALI O CON
MANCANZA DI ESPERIENZA E CONOSCENZA SOLO SE SOTTO SUPERVIS-
IONE O DIETRO ISTRUZIONI RELATIVE ALL'USO DELL'APPARECCHIO IN
MODO SICURO E DOPO AVERNE COMPRESO I POTENZIALI PERICOLI. NON
LASCIARE I BAMBINI GIOCARE CON L'APPARECCHIO. PULIZIA E MANUTE-
NZIONE DELL'UTENTE NON DEVONO ESSERE EFFETTUATE DA BAMBINI
SENZA SUPERVISIONE.
AVVISO: PER EVITARE SCARICHE ELETTRICHE NON ESPORRE I COM-
PONENTI ELETTRONICI DEL ROBOT O IL CARICABATTERIE/STAZIONE DI
DOCKING INTEGRATO NOTO COME HOME BASE. L'APPARECCHIO NON
CONTIENE PARTI RIPARABILI DALL'UTENTE. L'ASSISTENZA DEVE ESSERE
EFFETTUATA DA PERSONALE QUALIFICATO. NON TOCCARE IL ROBOT E
LA HOME BASE™ CON LE MANI BAGNATE
· Osservare tutte le avvertenze riportate sul robot e sulle sue parti.
· AVVISO Rischio di scariche elettriche: utilizzare esclusivamente in
ambienti interni e asciutti.
· Il robot non è un giocattolo. Non sedersi o salire in piedi sul dispositivo.
Sorvegliare i bambini piccoli e gli animali domestici quando il robot è in
funzione.
· Conservare e utilizzare il robot solamente in ambienti a temperatura
ambiente.
· Non utilizzare il dispositivo per raccogliere vetro, oggetti appuntiti,in fia-
mme o roventi.
· Non utilizzare il dispositivo per raccogliere residui di candeggina liquida,
vernice o altre sostanze chimiche né oggetti bagnati.
· Non versare o spruzzare sostanze liquide sul robot.
Importanti istruzioni di sicurezza
Importanti istruzioni di sicurezza
02
· Prima di utilizzare il dispositivo, raccogliere oggetti come vestiti, fogli di
carta, cordelle per tapparelle o tende, cavi di alimentazione e qualsiasi
oggetto fragile. Se il dispositivo passa su un cavo di alimentazione e lo
trascina, potrebbero cadere oggetti da un tavolo o uno scaffale.
· Se la stanza che si intende pulire comprende un balcone, utilizzare una
barriera fisica per impedire l'accesso al balcone e garantire la sicurezza.
· Non collocare oggetti sopra il robot.
· Ricordare che il robot si muove autonomamente. Prestare attenzione
quando si cammina nelle vicinanze del robot quando è in funzione, poiché
vi è il rischio di calpestarlo.
· Non utilizzare il robot in aree in cui vi sono prese elettriche esposte sul
pavimento.
· AVVISO Rischio di folgorazione: il robot è fornito in dotazione con un
cavo di alimentazione approvato secondo le normative locali.Non utilizzare
altri tipi di cavi di alimentazione. Qualora fosse necessario un cavo di rica-
mbio, contattare l'assistenza clienti per ottenere il cavo di alimentazione
specifico per il proprio paese.
· Il robot è destinato esclusivamente all'uso su pavimenti asciutti.
· AVVISO Pericolo di scosse elettriche e di incendio: questo prodotto è
progettato per essere collegato esclusivamente a una presa standard. Il prodotto
non può essere utilizzato con un convertitore di potenza. L'uso di convertitori di
potenza renderà immediatamente nulla la garanzia.
· Non utilizzare batterie non ricaricabili. Utilizzare esclusivamente
la batteria ricaricabile fornita con il prodotto. Per la batteria di ricambio, acquistare
una batteria identica oppure contattare l'assistenza clienti per soluzioni alternative.
· ATTENZIONE: caricare solo una delle seguenti batterie Proscenic:
Utilizzare solo batterie ricaricabili con le specifiche corrette approvate da
Proscenic
·AVVISO Rischio di folgorazione: non utilizzare una Base di ricarica il
cui cavo o spina siano danneggiati. Se il cavo o la spina sono danneggiati,
devono essere sostituiti.
· Ricaricare e rimuovere sempre la batteria dal robot e dagli accessori prima
di riporre l'apparecchio per lunghi periodi o durante il trasporto.
· Se si vive in un'area soggetta a temporali, si consiglia di utilizzare una pro-
tezione da sovracorrente aggiuntiva. La Base di ricarica del robot può essere
protetta con una protezione da sovracorrente in caso di temporali.
·AVVISO Rischio di folgorazione: scollegare sempre il robot dalla
Base di ricarica prima di effettuare pulizia o manutenzione.
· Prima di ogni utilizzo, verificare se la batteria presenta eventuali segni di
danno o di perdite. Non ricaricare batterie danneggiate o che mostrano
segni di perdite.

03
·AVVISO Esposizione a sostanze chimiche: se la batteria mostra
segni di perdite, evitare che il liquido venga a contatto con la pelle o gli
occhi. In caso di contatto, lavare l'area interessata con abbondante acqua
e consultare un medico. Collocare la batteria all'interno di un sacchetto
di plastica sigillato e smaltirla in modo sicuro secondo le normative ambi-
entali locali.
· La batteria deve essere rimossa dal robot prima dello smaltimento.
·AVVISO Pericolo di incendio o di esplosione: non distruggere o sm-
ontare la batteria. Non riscaldare o posizionare la batteria vicino a fonti di
calore. Non incenerire o mandare in cortocircuito la batteria.
Non sottoporre le batterie a urti meccanici.
· Non immergere la batteria in una sostanza liquida.
· Per le normative relative al riciclaggio e allo smaltimento della batteria,
contattare l'ente responsabile per lo smaltimento dei rifiuti nella propria
zona.
Questo simbolo sul prodotto o sulla confezione indica quanto segue:
Non smaltire apparecchi elettrici o batterie come rifiuti urbani indiffere-
nziati; rivolgersi a strutture per la raccolta differenziata. Per informazioni
sui sistemi di raccolta disponibili, contattare gli enti della propria zona.
Se gli apparecchi elettrici vengono smaltiti in discariche o centri di racc-
olta, le sostanze pericolose possono infiltrarsi nelle falde acquifere e pe-
netrare nella catena alimentare, con effetti dannosi sulla salute e il ben-
essere. Contattare le autorità di gestione dei rifiuti locali e regionali per
ottenere maggiori informazioni sui programmi di raccolta, riutilizzo e
riciclaggio.
04
Configurazione di Rete
Premi e tieni premuto “ + ” Per 3 secondi per avviare
la configurazione di rete
Pulsanti chiave
Corpo Principale
Corpo Principale e Accessori
Cover robot
Pulsante Ricarica
Pulsante Pulisci
·Premere per avviare la modalità ricarica
·Premi per iniziare la pulizia
Indicatore Potenza
·Potenza > =20%: luce fissa verde
·Potenza <20%: luce lampeggiante rossa
Indicatore Wi-Fi
·Lampeggio veloce/lento: connessione Wi-Fi
·Luminoso: Wi-Fi connesso
·Nessuna operazione per 10 minuti/premi e tieni premuto per
3 secondi per entrare in modalità sleep
·Premere per interrompere la pulizia
ON/OFF
Pulsante di accensione
·Premere per accendere
spegnere il robot
Sensore a Infrarosso
Collision Bumper
Spazzola
Laterale
Ruote di
Guida
Sensore Bordo
Sensore di
Distanza Laser LDS
Sensori
anticaduta
Ruota
Universale
Spazzola
Principale
Fibbie del
coperchio
della spazzola
principale
Sensori
anticaduta
05
1、Accensione
2、WiFi
3、Muto
4、Pulsante Direzione
5、Pausa/Avvio
6、Potenza Aspirazione
7、Pulisci
8、Mopping(la ventola non funziona)
9、Ricarica
1
2
3
4
6
7
8
9
5
Telecomando
Elemento Filtro
Serbatoio Acqua
Area Stickup
Panno Polvere
Fibbie del
serbatoio dell'acqua
Ingresso
dell'acqua
Indicatore di Ricarica
Presa DC
Area di Emissione
Segnale Infrarosso
Contatto di ricarica
Modulo Mopping
Base di Ricarica
Corpo Principale e Accessori
This manual suits for next models
1
Table of contents
Languages:
Other Proscenic Vacuum Cleaner manuals

Proscenic
Proscenic 850T User manual

Proscenic
Proscenic M8 PRO User manual

Proscenic
Proscenic BL828 User manual

Proscenic
Proscenic CocoSmart 880L User manual

Proscenic
Proscenic P8 User manual

Proscenic
Proscenic P9 User manual

Proscenic
Proscenic RobbyPro User manual

Proscenic
Proscenic M8 PRO User manual

Proscenic
Proscenic M8 User manual

Proscenic
Proscenic 790T User manual


