ProteinSimple Maurice CE-SDS User guide

Maurice® CE-SDS Application Guide

2
Maurice CE-SDS Application Guide
INCLUDES QTY/KIT
Maurice CE-SDS Cartridges 2
Maurice CE-SDS Cartridge Cleaning Vials 2
Maurice clear screw caps for sample and reagent vials 100
Maurice glass reagent vials, 2 mL 100
Maurice CE-SDS orange pressure caps 12
Maurice 96-well plates 10
Maurice CE-SDS Separation Matrix 15 mL
Maurice CE-SDS Running Buer – Top 10 vials
Maurice CE-SDS Running Buer – Bottom 15 mL
Maurice CE-SDS 1X Sample Buer 25 mL
Maurice CE-SDS Wash Solution 2 x 20 mL
Maurice CE-SDS Conditioning Solution 1 20 mL
Maurice CE-SDS Conditioning Solution 2 20 mL
Maurice CE-SDS 25X Internal Standard 2 vials
Introduction
CE-SDS Size Application Kit
contents (P/N PS-MAK02-S)
Storage conditions
• Store the 25X Internal Standard (P/N 046-144) at 2-8 °C.
Everything else should be stored at room temperature.
• Separation and Running buer bottles should be tightly
closed to prevent evaporation.
• Running Buer –Top vials must be stored tightly closed
in the original container with two humidifying pouches.
Ordering info
This kit can be reordered by:
• Phone: 1-888-607-9692, option 1
• Fax: 1-408-520-4831
• Email: orders@proteinsimple.com
Other things you’ll need
• Maurice CE-SDS IgG Standard, PN046-039
• Maurice CE-SDS Molecular Weight Markers, PN046-432
(optional)
• Maurice sample vials with integrated inserts, 0.2mL,
PN046-083 (optional)
• β-mercaptoethanol (>98% = 14.2 M) for reducing
conditions
• Iodoacetamide (250 mM) for alkylation at non-reducing
conditions
• Deionized (DI) water
• Pipettes and tips
• Microcentrifuge and tubes
• Ice and ice bucket
• Vortexer
• Water bath or thermocycler
• Centrifuge with plate adapter or vial adapter (12mm,
2mL vials)
The CE-SDS Application Kit is a one-stop shop for all
your size application development needs! It includes
the CE-SDS cartridges, all sample preparation reagents
and consumables that’ll let you tackle any monoclonal
antibody. This Application Guide will help you every step
of the way.
If you add the IgG Standard, which is produced with a
known quantity of non-glycosylated heavy chain, you can
test resolution and quantitation suitability to make sure
your Maurice is ready to go.

3
Maurice CE-SDS Application Guide
Guidelines for great results
• Make sure you read the entire Application Guide before
getting started.
• Use fresh Conditioning Solutions, Separation Matrix, and
Wash Solution for each batch.
• When the Top Running Buer vial is still in the cartridge
insert, the cartridge MUST be kept in an upright position
at all times.
• The 25X Internal Standard, IgG Standard, and CE-SDS
Molecular Weight Markers are lyophilized. Always
reseal the foil bag containing the unopened tubes with
desiccant to prevent moisture absorption.
• Aliquot the reconstituted 25X Internal Standard solution
into appropriately sized vials and store at -80 °C for
long-term storage. For short-term storage (<1 week), the
solution can be stored at 2–8 °C.
• If you observe any precipitation in the 25X Internal
Standard solution, then leave the solution at room
temperature and stir gently until the precipitates have
dissolved completely.
• Don’t reuse reagents, vials or the clear screw caps.
Always keep the orange pressure caps paired with their
respective reagents.
• Orange pressure caps should be used for the CE-SDS
application only.
• If you want to reuse the orange pressure caps, wash
them thoroughly with DI water, soak them overnight in
DI water, rinse caps thoroughly with DI water again and
air dry them before reusing.
• Whenever you handle the cartridge or remove it from
its packaging, make sure the cartridge inlet doesn’t
come in contact with any surfaces. A damaged inlet may
compromise the cartridge and cause a failed injection.
• Always perform the cartridge cleanup before storing,
and always store the cartridge in its original packaging at
room temperature.
• If you see any Separation Matrix sticking to the cartridge
inlet, soak the inlet for 5 min in DI water. Then wipe
the inlet using a lint-free laboratory wipe that’s been
moistened with DI water.
• Each cartridge is guaranteed for up to 100 injections and
maxium of 25 batches. The injection limit of the cartridge
is 200. Its RFID will keep track of how many injections
have been performed and how many are left for you.
Application overview
A successfully dened and optimized CE-SDS method
gives you:
• A highly reproducible peak prole
• Reproducible relative migration times for each peak
• NGHC/HC baseline peak resolution (≥1.5) for the reduced
IgG sample
4
Maurice CE-SDS Application Guide
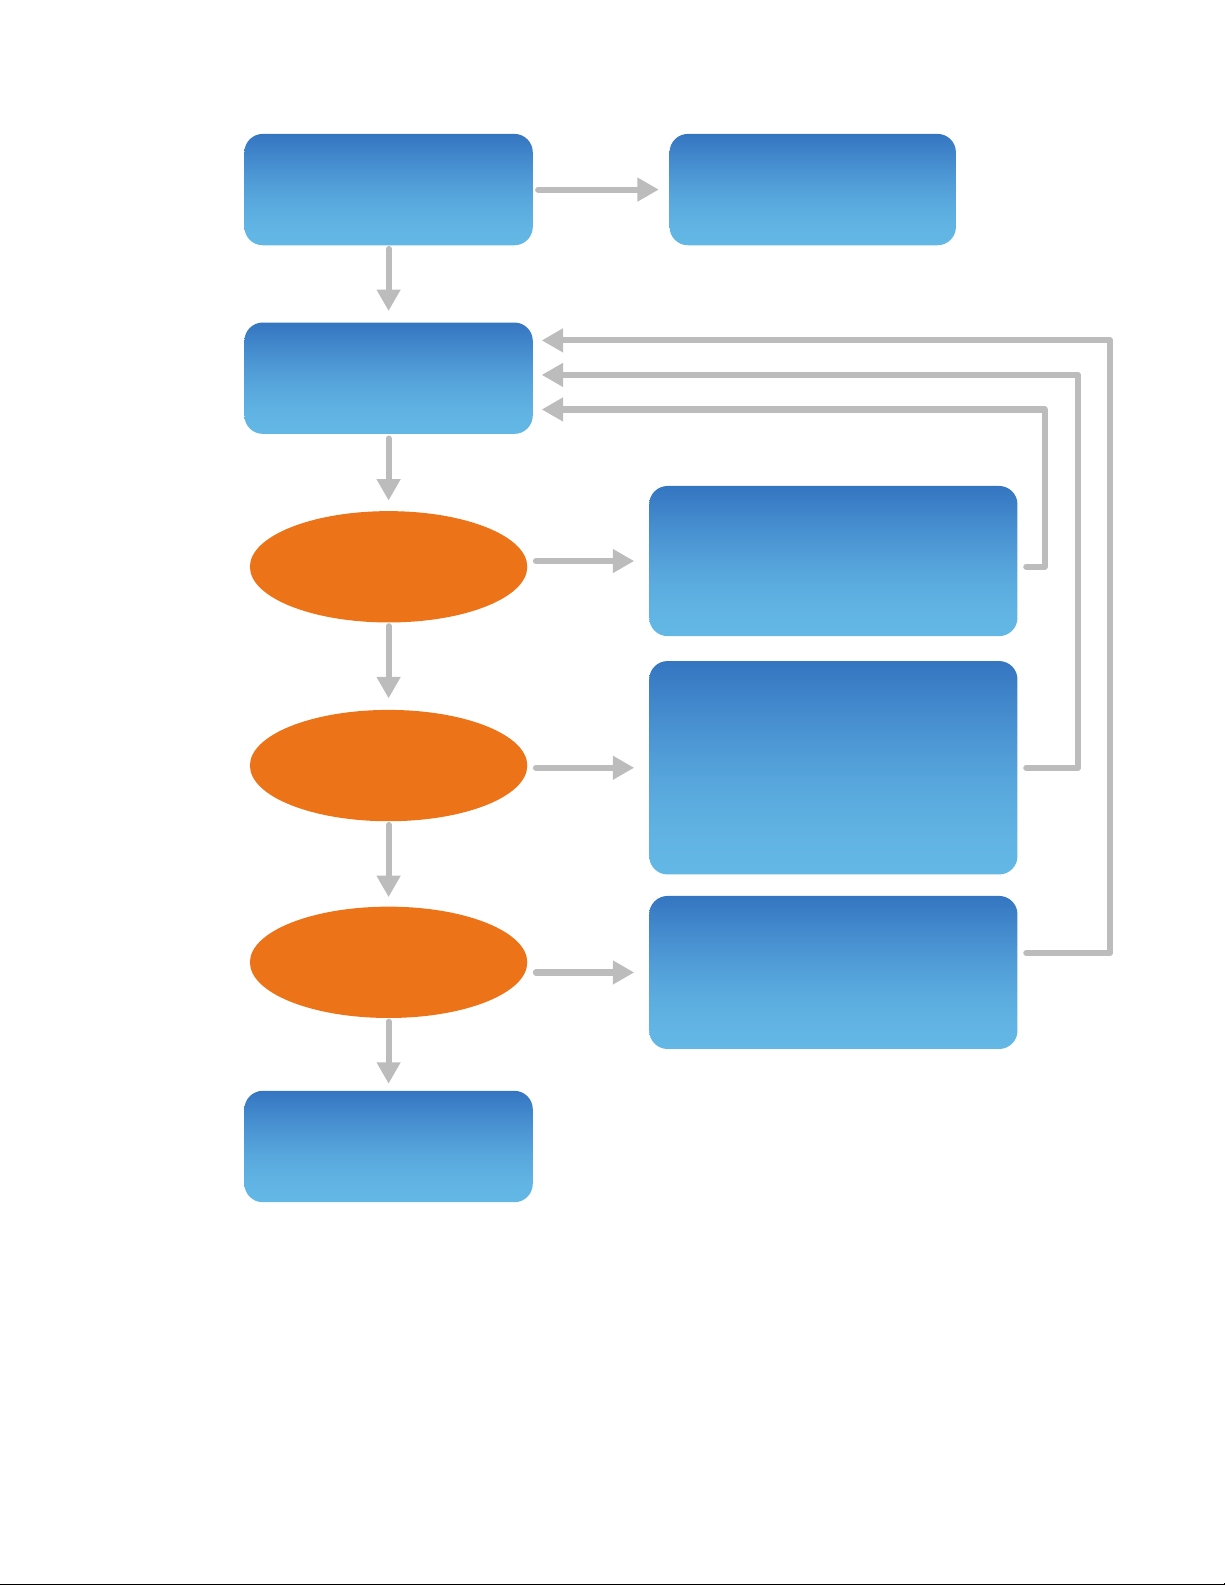
FIGURE 1. Method development strategy.
Step 1: Fail
Pass
Yes
Yes
Yes
Yes
No
No
No
Step 2:
Step3:
Run ProteinSimple
reduced IgG Standard
Call ProteinSimple
Tech Support
• Make sure separation reagents
are in correct vial positions
• Always use fresh reagents
• Optimize salt and protein
concentration in the sample
• Verify denaturing conditions
• Optimize injection and
separation parameters (time
and voltage)
• Check conditioning reagents
• Perform a cartridge cleanup
• Optimize injection parameters
(time and voltage)
Run sample
Current ~25 µA?
All peaks detected?
Resolution sucient?
Method development
is complete

5
Maurice CE-SDS Application Guide
REDUCING CONDITIONS NONREDUCING CONDITIONS CESDS MW MARKERS
STEP VOLTAGE TIME VOLTAGE TIME VOLTAGE TIME
Injection 4600 V 20 sec 4600 V 20 sec 4600 V 20 sec
Separation 5750 V 25 min 5750 V 35 min 5750 V 35 min
TABLE 1. Default run conditions for the IgG Standard and CE-SDS Molecular Weight Markers.
7. Insert the Top Running Buer vial into the cartridge
insert using the procedure in Appendix D, then install
the cartridge in Maurice.
8. Launch Compass for iCE.
9. Click the Batch screen.
10. In the File menu, click New Batch. If your Maurice runs
both size and charge, select Maurice CE-SDS.
11. Add samples by highlighting the sample location(s) in
the Layout pane and clicking Add.
12. Assign the appropriate default method (Reduced IgG
or Non-reduced IgG) to the IgG Standard sample(s)
by clicking the Methods drop down menu in the
Injections pane (see Table 1 for default run conditions).
13. Reinjections are on by default. Click the Reinject icon
to toggle it o if you don’t want Compass for iCE to
pause the separation if the current drops too low and
reinject the same sample automatically.
14. If you want to add sequential replicate injections,
highlight the injection in the Injections pane and click
Replicate.
15. Save your batch.
16. Click Start.
Step 1: Basic Maurice CE-SDS system
performance check
MAURICE SETUP AND START
The IgG Standard allows you to check system performance
before you begin running your samples.
Notes:
See Appendices A, B and D for procedures on prepping the 25X
Internal Standard and IgG Standard, batch reagents and CE-SDS
cartridge prep, respectively.
If you won’t use the 25X Internal or IgG Standards after
reconstitution, keep them on ice.
To run a system performance check:
1. Prepare your batch reagents and place them in
Maurice.
2. Prepare your 25X Internal Standard.
3. Prepare your IgG Standard (reduced and/or non-
reduced).
4. Pipette your prepped IgG Standard samples into the
96-well plate.
5. Spin the plate down for 10 min at 1000xg.
6. Place the 96-well plate metal insert in Maurice and then
place your sample plate in the insert.
6
Maurice CE-SDS Application Guide
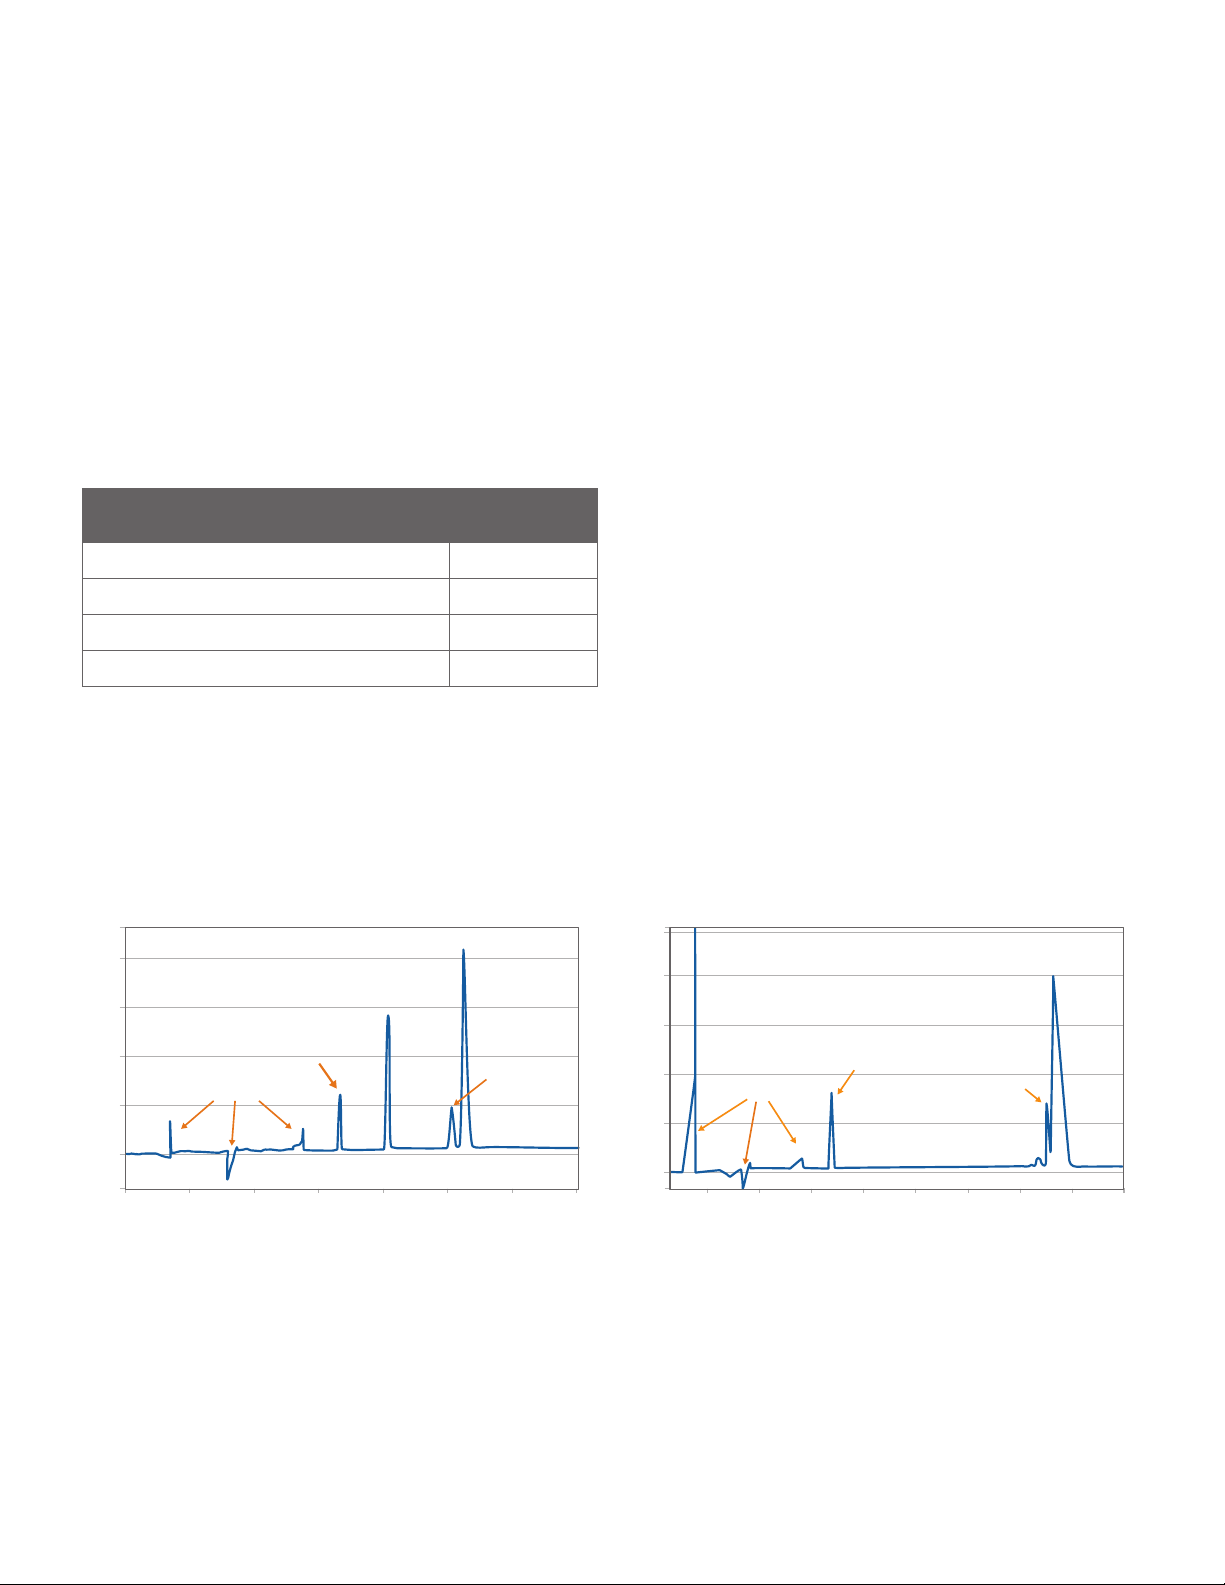
EXPECTED RESULTS
PEAK TYPE MIGRATION
TIME SECONDS
Internal Standard (reduced and non-reduced IgG) 650 – 800
Light chain (reduced IgG) 800 – 950
Glycosylated heavy chain (reduced IgG) 1000 – 1275
Intact IgG (non-reduced IgG) 1400 – 1800
TABLE 2. Expected migration times for peaks in reduced and non-
reduced IgG Standards.
Reduced Samples
A successful result with the reduced IgG Standard
should give you four peaks corresponding to the Internal
Standard, light chain, non-glycosylated heavy chain and
glycosylated heavy chain as shown in Figure 2 (left). When
viewing data with the Standards view selected, the
migration time for the Internal Standard, light chain, and
heavy chain should be within the ranges listed in Table 2.
When viewing data with the Samples view selected, the
non-glycosylated and glycosylated heavy chains should be
baseline resolved with resolution ≥1.5.
Non-reduced Samples
In the non-reduced IgG Standard, only three major peaks
should be present corresponding to the Internal Standard,
non-glycosylated IgG and glycosylated IgG. When viewing
data with the Standards view selected, the migration time
for the Internal Standard and intact IgG (non-glycosylated
+ glycosylated) should be within the ranges listed in Table
2. Up to eight small peaks corresponding to various IgG
fragments may also be present depending on the degree
of antibody fragmentation. The percentage intact IgG
should be >85%.
If you don’t see any peaks, or only see a single amorphous
peak, please contact ProteinSimple Technical Support at
support@proteinsimple.com.
2000 400 600 800 1000 1200 1400
Time (seconds)
0
5
10
15
20
Absorbance
System peaks
Internal standard
Non-glycosylated
heavy chain
Glycosylated heavy chain
Light chain
200
0 400 600 800 1000 1200 1400 1600 1800
Time (seconds)
0
5
10
15
20
25
Absorbance
System peaks
Internal standard
Non-glycosylated IgG
Glycosylated IgG
FIGURE 2. Expected results for the IgG Standard under reduced (left) and non-reduced (right) conditions.

7
Maurice CE-SDS Application Guide
Step 2: Set up and run your sample batch
GENERAL CONSIDERATIONS
• For complete details on sample prep see Appendix A.
• Optimal protein concentration depends on sample
buer composition. In general the acceptable
concentration is between 0.2 and 2mg/mL with an
optimal salt concentration <50 mM. For example, you
can dilute a 5mg/mL sample with 100mM NaCl 1:5 into
the CE-SDS 1X Sample Buer, so you’ll have 1mg/ mL
protein and 20mM NaCl in the nal mix.
• If your sample has low protein concentration, the
presence of high salt will decrease sensitivity. In this
case, we recommend desalting the sample to obtain the
desired sensitivity. See Appendix C for the procedure.
• Sample composition may result in lower electrokinetic
injection eciency and signal decrease. See “Resolution
and Signal Intensity Optimization” on page 9 for
guidance.
• If molecular weight determination is needed, run the
CE-SDS Molecular Weight Markers in your batch.
• You can run as many as 48 injections in one batch. Each
sample can be injected once or multiple times, creating
replicates. We recommend no more than 12 injections
from one sample.
COMMON STEPS
Note: If you won’t use the 25X Internal Standard, IgG Standard,
CE-SDS Molecular Weight Markers or samples immediately, keep
them on ice.
1. Prepare your 25X Internal Standard using the procedure
in Appendix A.
2. Dilute samples to 0.25-1mg/mL in 1X Sample Buer.
We recommend samples be diluted at least 1:1 with
1X Sample Buer. See Appendix A for full sample prep
details.
3. Add 2µL of 25X Internal Standard per 50µL of sample.
FOR REDUCING CONDITIONS
Denature and reduce your samples with
β-mercaptoethanol, following the instructions for sample
prep in Appendix A. Alternatively, β-mercaptoethanol
can be substituted with 10 mM TCEP (tris(2-carboxyethyl)
phosphine), using the same denaturing/reducing
conditions.
FOR NONREDUCING CONDITIONS
Alkylate your samples with 250 mM iodoacetamide (IAM)
and denature, following the instructions for sample prep in
Appendix A.
PREPARATION OF THE CESDS MOLECULAR
WEIGHT MW MARKERS OPTIONAL
Prepare the CE-SDS MW Markers as described in Appendix A.
MAURICE SETUP AND START
1. Prepare your batch reagents and place them in
Maurice. See Appendix B for prep details.
2. Prepare your 25X Internal Standard and samples as
described in Appendix A.
3. Optional: Prepare your IgG Standard and/or CE-SDS MW
Markers as described in Appendix A.
4. Prepare your sample plate or vials:
If you’re using a 96-well plate:
a. Transfer 50 μL of each of your samples and IgG
Standard to their designated wells in a 96-well plate.
b. Cover the plate with a lid and spin for 10 min at
1000xg using a centrifuge plate adapter.
c. Pop any remaining bubbles in the samples with a
clean pipette tip.
If you’re using vials:
a. Transfer 50μL of each of your samples and IgG
Standard to their designated sample vials with
integrated inserts.
8
Maurice CE-SDS Application Guide
b. Close the vials with a clear screw cap.
c. Spin for 10 min at 1000xg using a centrifuge vial
adapter (12mm, 2mL vials).
d. Pop any remaining bubbles in the samples with a
clean pipette tip.
5. Insert the Top Running Buer vial into the cartridge
insert using the procedure in Appendix D, then install
the cartridge in Maurice.
Note: When the Top Running Buer vial is still in the cartridge
insert, the cartridge MUST be kept in an upright position at all
times.
6. Launch Compass for iCE.
7. Click the Batch screen.
8. In the File menu, click New Batch. If your Maurice runs
both size and charge, select Maurice CE-SDS.
9. Add samples by highlighting the sample location(s) in
the Layout pane and clicking Add.
10. The default methods should be suitable for most IgGs
and many other proteins in the 10-270 kDa range,
but you can adjust methods to your specic needs. If
needed, you can also create your own method(s) to use
in the batch. Method parameters such as injection time
and voltage, and separation time and voltage can be
changed in the Methods pane. Follow these guidelines:
a. Default injection and separation conditions in the
Reduced IgG method are suitable for detection of
reduced IgG peaks. To detect peaks in non-reduced
IgG samples, the Non-reduced IgG method can be
used. Increase the separation time for detection of
high molecular weight species.
b. To detect all CE-SDS Molecular Weight Markers
peaks, use the MW Markers method.
c. For other method parameter changes, see the
Method Optimization section.
11. Reinjections are on by default. Click the Reinject icon
to toggle it o if you don’t want Compass for iCE to
pause the separation if the current drops too low and
reinject the same sample automatically.
12. If you want to add sequential replicate injections,
highlight the injection in the Injections pane and click
Replicate.
13. To analyze the same sample with dierent methods,
you can add multiple injections of the same sample
using the Add button and then assign dierent
methods to each injection.
14. Save your batch.
15. Click Start.
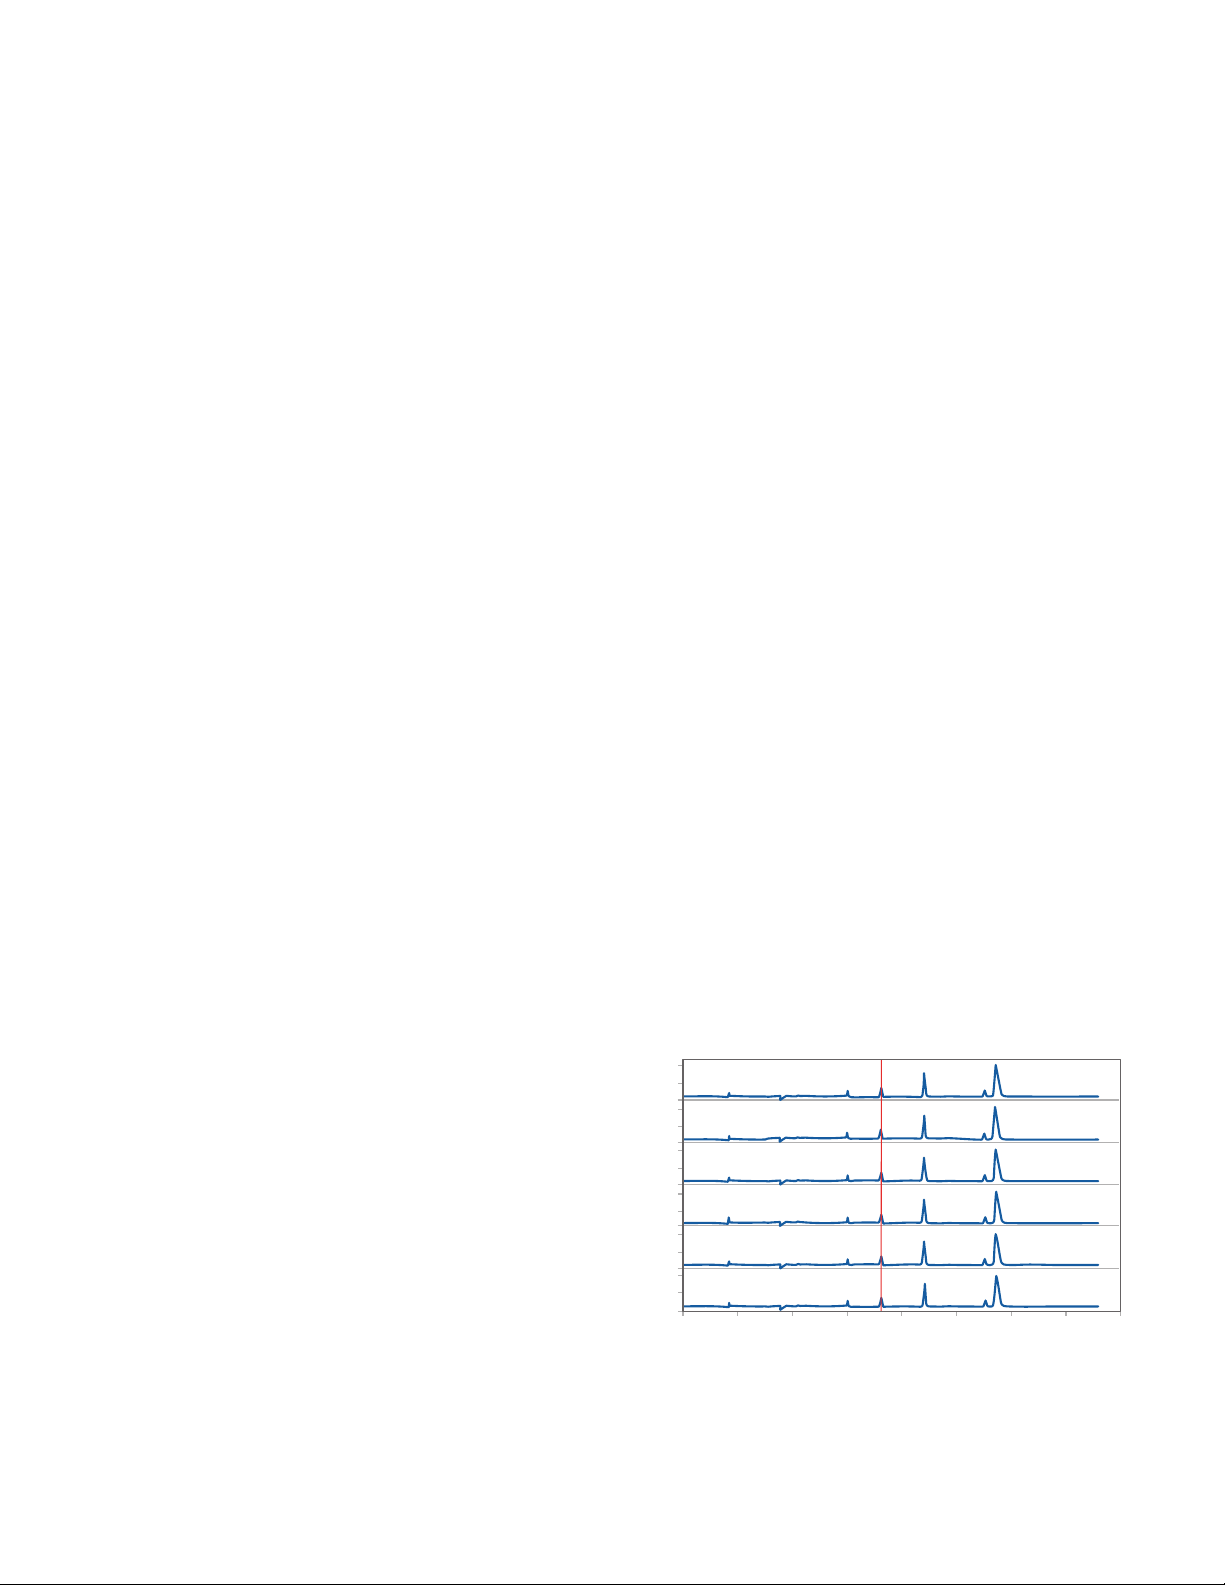
Step 3: Evaluate your results
Evaluate your injection proles:
1. For replicate injections of the same sample, compare
the peak prole across injections. Your peak proles
should be reproducible as shown in Figure 3.
2. The Internal Standard migration time in all samples
should be <800 s.
3. For reduced IgG, you should typically see baseline
resolution between glycosylated and non-glycosylated
heavy chain peaks.
4. For non-reduced IgG, you should be able to detect a
non-glycosylated IgG peak as low as 1% along with the
main intact IgG peak.
5. When looking for impurities, peaks representing 0.1%
impurities of the main protein should be detectable.
2000 400 600 800 1000 1200 1400 1600
Time (seconds)
0
500
1000
0
500
1000
0
500
1000
0
500
1000
0
500
1000
0
500
1000
Absorbance (mAU)
Internal Standard Sample 1
Sample 2
Sample 1
Sample 2
Sample 1
Sample 2
Internal Standard
Internal Standard
Internal Standard
Internal Standard
Internal Standard
FIGURE 3. Reproducible peak prole in repeated injections from two
duplicate reduced IgG samples.
9
Maurice CE-SDS Application Guide
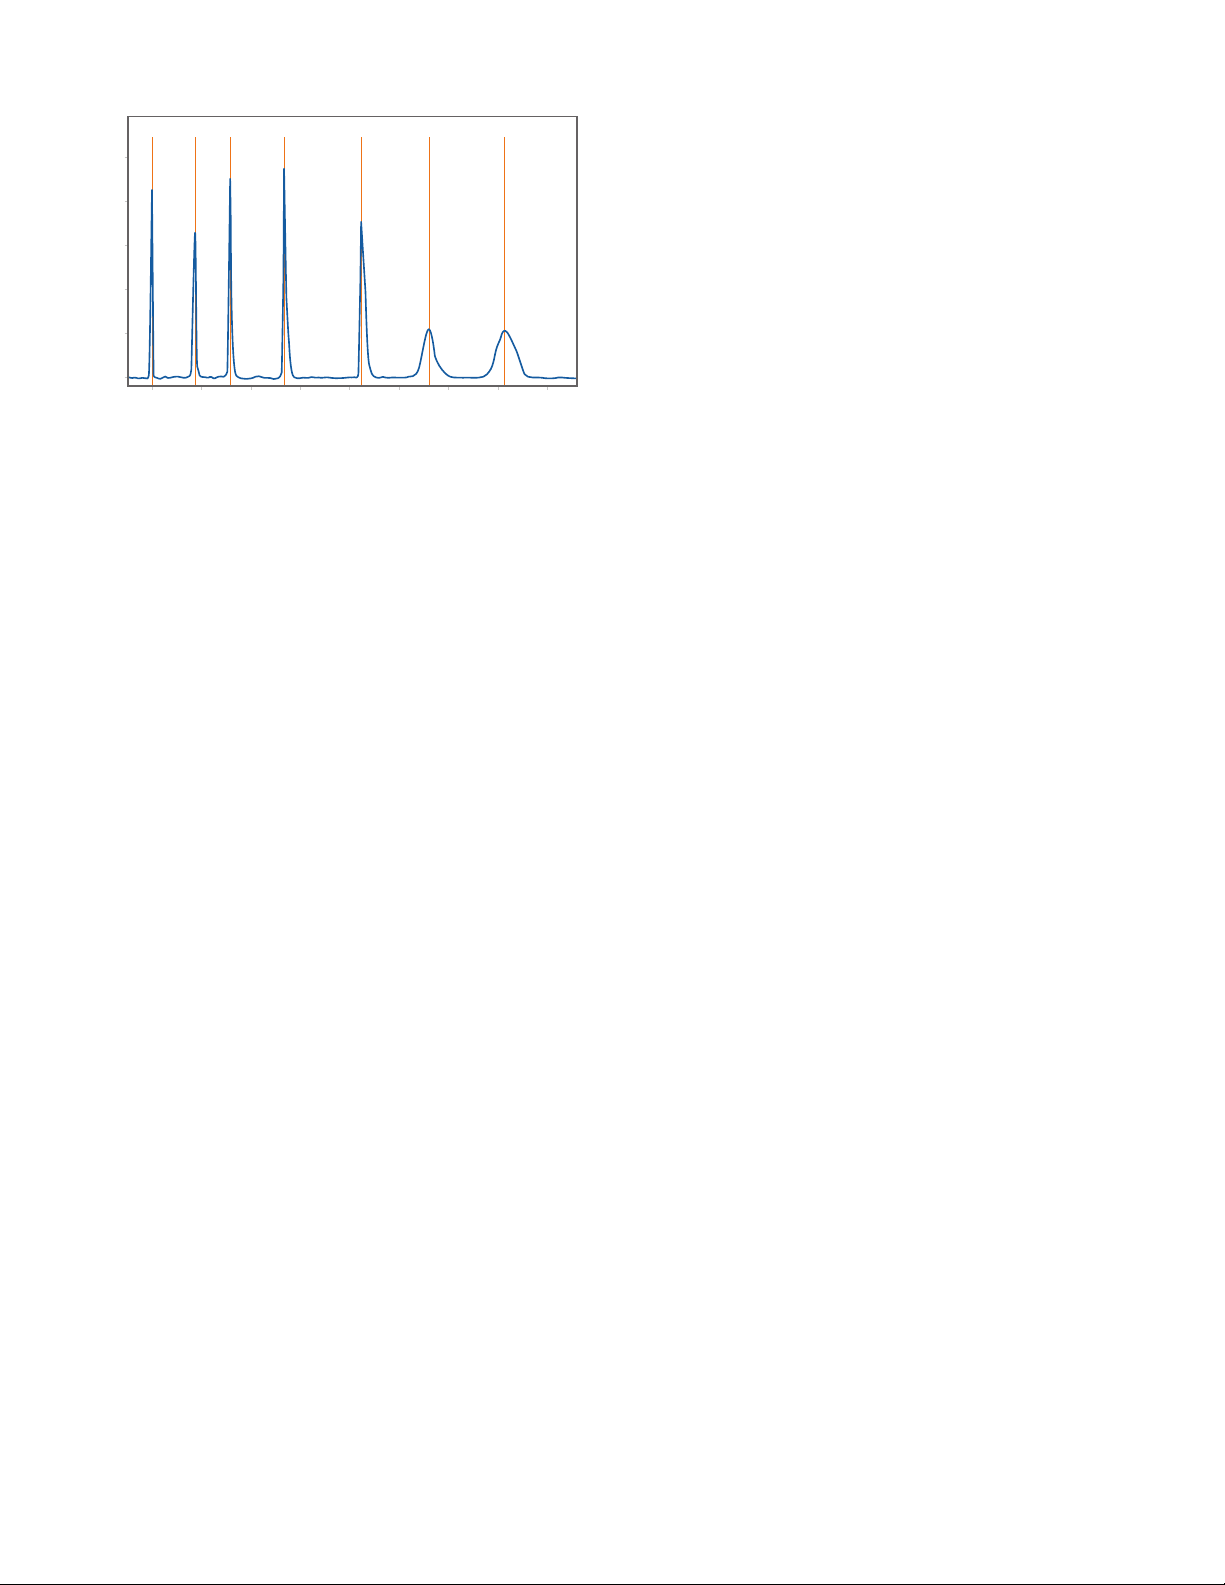
6. If you ran the CE-SDS Molecular Weight Markers, seven
well-dened peaks should be detected as shown in
Figure 4.
Method optimization and
troubleshooting
NONREPRODUCIBLE PEAK PROFILES
• Non-reproducible peak proles can be a sign of
insucient capillary conditioning. It’s critical to use fresh
reagents for each batch.
• They can also result from running the cartridge beyond
the maximum number of 100 guaranteed injections.
NOISY BASELINE
A noisy or non-at baseline can be caused by various
reasons:
• Insucient cleaning of the capillary after the batch
can produce a noisy or spiky baseline. After a batch
is completed, it’s necessary to perform the Cartridge
Cleanup procedure before you store your cartridge. If the
batch was unexpectedly stopped by a user or because
of an instrument error, an additional capillary cleaning is
required. Perform the CE-SDS Cartridge Purge procedure
before you store the cartridge (see the Control chapter in
the Maurice User Guide).
• Sample precipitation can also cause baseline spikes.
Spinning the sample for at least 10 min at 1000xg
minimizes this eect.
1 1.2 1.4 1.6 1.8 2 2.2 2.4 2.6
Relative Migration Time
Absorbance (mAU)
2
4
6
8
10
0
IS 20kDa 33kDa 55kDa 103kDa 178kDa 270kDa RESOLUTION AND SIGNAL INTENSITY
OPTIMIZATION
Adjusting peak resolution or modifying signal intensity can
be achieved by changing injection conditions.
• Decreasing the injection time but keeping the same
injection voltage and separation conditions will result in
higher resolution, but lower signal.
• Increasing the injection time while keeping the default
injection voltage will boost signal intensity, but will
negatively aect resolution. However, these conditions
may be favorable when you need to detect small
amounts of impurities in a sample (0.1% of the main
protein and lower).
• Injection times should be optimized by testing increased
time in 5-second increments, up to 40 s.
• We don’t recommend increasing the injection or
separation voltage above the default conditions as this
can cause Joule heating and bubble formation.
RESOLUTION TROUBLESHOOTING
A successfully dened and optimized CE-SDS method
should give you baseline resolution of the peaks for non-
glycosylated and glycosylated heavy chain of the reduced
IgG. In a non-reduced IgG sample, you should be able to
detect as little as 1% of non-glycosylated IgG.
• Low resolution between peaks in reduced and non-
reduced IgG samples may require troubleshooting.
Insucient resolution is often seen in conjunction
with long migration time. The most probable cause is
insucient conditioning. It’s critical to use new vials and
fresh reagents for each batch.
• Low resolution can also be caused by partial clogging of
the capillary due to insucient cleaning. Always perform
the Cartridge Cleanup step in Compass for iCE before
you store your cartridge. If you see any Separation Matrix
on the end of the capillary, gently remove it with lint-free
laboratory wipes and soak the cartridge inlet in DI water
for 5 min. Then wipe the inlet using a lint-free wipe that’s
been moistened with DI water. Keep the cartridge in its
plastic storage container between uses.
• If a batch was unexpectedly stopped by a user or
because of an instrument error, an additional capillary
cleaning is required. Perform the CE-SDS Cartridge Purge
FIGURE 4. CE-SDS Molecular Weight Markers.

10
Maurice CE-SDS Application Guide
procedure before you store the cartridge (see the Control
chapter in the Maurice User Guide).
SEPARATION TIME AND THROUGHPUT
OPTIMIZATION CONSISTENCY
You can optimize sample separation to reduce batch run
time and achieve the highest possible throughput. You
can do this in one of two ways:
1. Set up a batch to test your sample at dierent
separation times. Start with 23 min and increase
separation time by 2 to 3 minute increments. Choose
the shortest separation time that provides acceptable
resolution and peak detection.
2. Observe the sample while it’s separating. Generally,
peaks in the 10-270kDa molecular weight range
pass the detector between 10 and 35 min during
separation. You can use the CE-SDS Molecular Weight
Markers to estimate the approximate migration time
of your protein of interest. If your protein is heavily
glycosylated, the migration time may be slower than
expected.
Once migration time for the peaks of interest is identied,
we suggest adding 2 min to account for slight variabilities
in migration time between injections and cartridges.
Due to this variability, Relative Migration Time (RMT),
and not the absolute migration time should be used to
characterize assay variability.
Note: If you need any assistance optimizing your injection
reproducibility, peak resolution or signal intensity, please contact
your ProteinSimple Field Application Specialist or our Technical

11
Maurice CE-SDS Application Guide
6. For a reduced IgG Standard: Add 2.5μL of 14.2M
β-mercaptoethanol and mix thoroughly by vortex.
For a non-reduced IgG Standard:Add 2.5μL of
250mM iodoacetamide and mix thoroughly by vortex.
7. Heat the mixture in a water bath or thermocycler at
70°C for 10 min.
8. Place the tube on ice for 5 min.
9. Vortex briey and spin down.
PREPARING THE CESDS MW MARKERS OPTIONAL
1. Using scissors, carefully cut the top of the foil package
leaving the sealing strip intact.
2. Take out the strip of tubes and carefully cut one green
tube of lyophilized CE-SDS MW Markers from the strip.
3. Put the unopened tubes back in the package, seal
tightly and store at 2-8 °C.
4. Pierce the foil on the tube with a clean pipette tip.
5. Reconstitute the CE-SDS MW Markers with 50μL of
1X Sample Buer. Gently resuspend by pipetting
the solution up and down. Transfer the solution to a
microcentrifuge tube.
6. Add 2μL of reconstituted 25X Internal Standard.
7. Add 2.5μL of 14.2M β-mercaptoethanol and mix
thoroughly by vortex.
8. Heat the mixture in a water bath or thermocycler at
70°C for 10 min.
9. Place the tube on ice for 5 min.
10. Vortex briey and spin down.
PREPARE YOUR SAMPLES
1. In a microcentrifuge tube, dilute your IgG sample with
1X Sample Buer to a concentration of 0.25-1 mg/mL
in a nal volume of 50μL.
Note: Dilute with Sample Buer to the desired nal
concentration. Sample Buer must constitute at least 50% of the
nal concentration.
2. Add 2μL of reconstituted 25X Internal Standard.
Appendix A: Sample and standard
preparation
PREPARING THE INTERNAL STANDARD
1. Open the vial of lyophilized 25X Internal Standard by
lifting the center tab and gently pulling it back to break
the metal seal. Then remove the rubber stopper.
2. Reconstitute by adding 240μL of 1X Sample Buer.
Pipette up and down a few times to mix thoroughly.
This results in a 25X Internal Standard solution.
Notes:
Don’t vortex the lyophilized Internal Standard during
preparation.
If you won’t be using the Internal Standard immediately, keep
it on ice. If you observe any precipitation, leave the solution at
room temperature and stir gently until the precipitates have
dissolved completely.
PREPARING THE ALKYLATION REAGENT NON
REDUCED IgG STANDARD AND SAMPLES ONLY
1. Prepare the alkylation reagent by weighing out
46 mg of iodoacetamide (IAM) directly into a 1.5 mL
microcentrifuge tube.
2. Add 1mL of DI water to the tube and mix thoroughly.
Note: Prepare a fresh 250 mM solution of iodoacetamide in DI
water before use.
PREPARING THE IgG STANDARD
1. Using scissors, carefully cut the top of the foil package,
leaving the sealing strip intact.
2. Take out the strip of tubes and carefully cut one pink
tube of lyophilized IgG Standard from the strip. Put the
unopened tubes back in the package, seal tightly and
store at 2-8 °C.
3. Pierce the foil on the tube with a clean pipette tip.
4. Reconstitute the IgG Standard with 50μL of 1X Sample
Buer. Gently resuspend by pipetting the solution up
and down. Transfer the solution to a microcentrifuge
tube.
5. Add 2μL of reconstituted 25X Internal Standard.
12
Maurice CE-SDS Application Guide
3. For reduced IgG samples: Add 2.5μL of 14.2M
β-mercaptoethanol and mix thoroughly by vortex.
For non-reduced IgG samples: Add 2.5μL of 250mM
iodoacetamide and mix thoroughly by vortex.
4. Centrifuge the tube and heat the mixture in a water
bath or a thermocycler at 70 °C for 10 min.
5. Put the tube on ice for 5 min.
6. Vortex briey and spin down.
7. Transfer 50 μL of the sample to a 96-well plate.
8. Spin plate for 10 min at 1000 x g using a centrifuge
plate adapter.
9. Pop bubbles in your sample with a clean pipette tip.
Note: If you won’t be using your samples immediately, keep
them on ice.
Appendix B: Reagent preparation
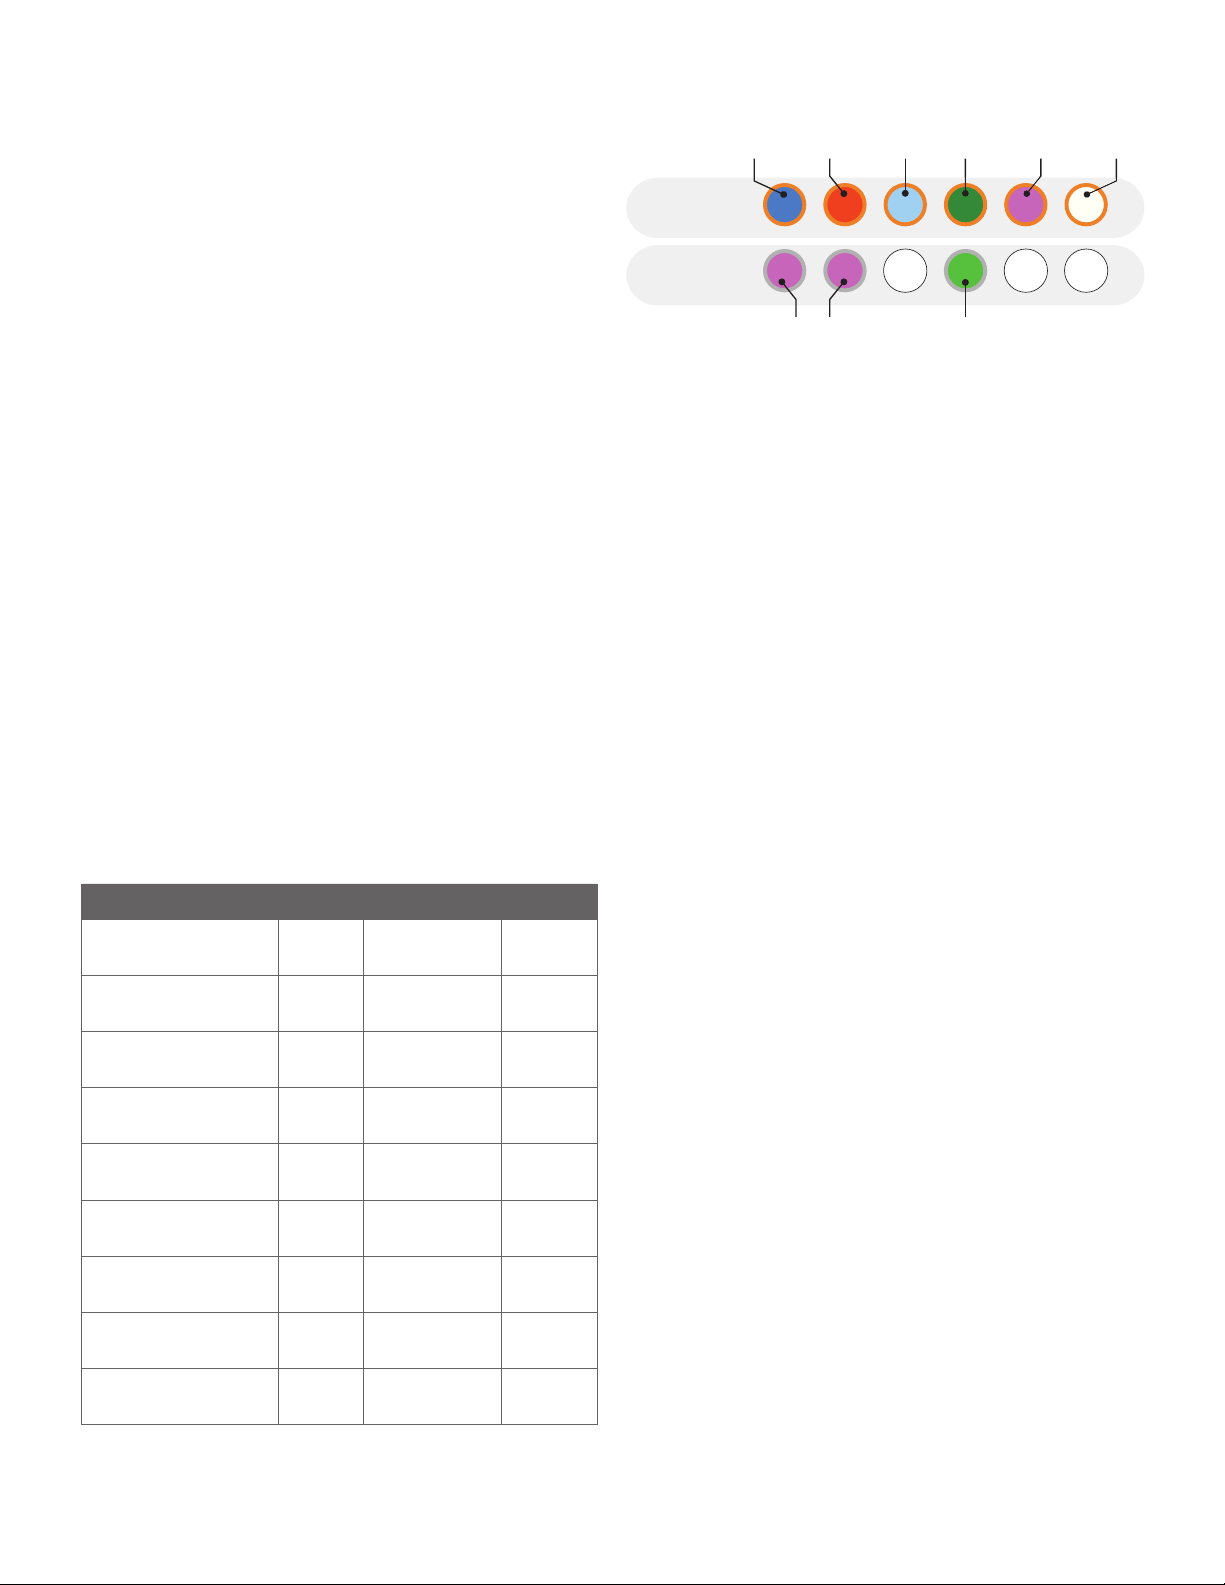
Prepare your batch reagents as shown in Table 3 and
place the reagent vials in Maurice as shown in Figure 5.
Depending on how you prepped your samples, place
the 96-well plate insert or the sample vials insert into
Maurice.
REAGENT VOLUME CAP POSITION
Conditioning Solution 1 1.5 mL Orange
pressure cap
P1
Conditioning Solution 2 1.5 mL Orange
pressure cap
P2
Wash Solution 1.0 mL Orange
pressure cap
P5
Wash Solution 1.5 mL Clear screw cap N1
Wash Solution 1.5 mL Clear screw cap N2
Separation Matrix 1.0 mL Orange
pressure cap
P4
Running Buer – Bottom 1.0 mL Clear screw cap N4
DI water 1.5 mL Orange
pressure cap
P3
Empty vial (air) N/A Orange
pressure cap
P6
TABLE 3. Batch reagent preparation.
Appendix C: Desalting and concentrating
samples
1. Add 500µL of your sample into an Amicon Ultracel 50K
Membrane Centrifugal Filter (Millipore, PN 4311).
2. Centrifuge for 5 minutes at 12,000xg.
3. Replace the ltered volume with 20mM Tris buer pH
7.0 (Life Technologies, PN AM9851).
4. Discard the ltrate from the centrifuge vial.
5. Do two additional cycles of centrifugation and buer
replacement.
6. For simple desalting, replace the ltered volume to
500µL. If you need to concentrate the sample, store
the remaining 100 µL of buer-exchanged sample at
-20°C or below if you won’t use it immediately.
FIGURE 5. Reagent vial placement.
N6N1
Cond.
Solution 1
Cond.
Solution 2 Water
Separation
Matrix
Running Buer – Bottom
Wash
Solution
Wash Solution
Reagents Row P
Reagents Row N
Air
N2 N3 N4 N5
P6P1 P2 P3 P4 P5

13
Maurice CE-SDS Application Guide
Toll-free: (888) 607-9692
Tel: (408) 510-5500
info@proteinsimple.com
proteinsimple.com
© 2018 ProteinSimple. ProteinSimple, the
ProteinSimple logo, Maurice, and iCE are
trademarks and/or registered trademarks
of ProteinSimple.
046-297, Rev E
Appendix D: CE-SDS Cartridge
preparation
1. Take the cartridge out of its packaging. Save the
packaging, you’ll need it later.
2. Pull the cartridge insert out of the cartridge.
3. Insert the Top Running Buer vial into the cartridge
insert so that the metal pin on the side of the vial is
facing out. Press the vial up until it is completely inside
the cartridge insert (see Figure 6).
Notes:
The Top Running Buer vial has metal pins on either side, so no
specic orientation is necessary.
Make sure to keep the cartridge insert in an upright position after
the Top Running Buer vial is inside it.
4. Slide the cartridge insert back into the cartridge.
FIGURE 6. Assembling the Top Running Buer vial in the cartridge insert. Keep the cartridge insert in an upright
position after the vial is inside it.
Metal pin
Table of contents
Other ProteinSimple Laboratory Equipment manuals


