Protek RC Prodigy 620 DUO User manual


· 02
TABLE OF CONTENTS
Introduction......................................................................................................03
Special Features .............................................................................................05
Warning and Safety Notes...............................................................................07
Program Flow Chart ........................................................................................10
Connecting the Charger..................................................................................11
Connecting the Battery....................................................................................12
Initial Parameter Setup (Users Setup).............................................................13
Lithium Battery (LiIon/LiPo/LiFe) Program ......................................................15
Charging Lithium Batteries..............................................................................16
Balance Charging Lithium Batteries................................................................17
Fast Charging Lithium Batteries......................................................................18
Charging Lithium Batteries for Storage ...........................................................19
Discharging Lithium Batteries..........................................................................19
Charging NiCd/NiMH Batteries........................................................................20
Discharging NiCd/NiMH Batteries ...................................................................21
Cycling NiCd/NiMH Batteries ..........................................................................21
Charging Lead-Acid (Pb) Batteries..................................................................22
Discharging Lead-Acid (Pb) Batteries .............................................................22
Saving Charge Profiles....................................................................................23
Loading Charge Profiles..................................................................................24
Additional Charge Information.........................................................................24
Warning and Error Messages..........................................................................25
Recommended Accessories............................................................................26
Conformity Declaration....................................................................................27
Maximum Circuit Power Chart.........................................................................28
Specifications ..................................................................................................29
Commonly Used Terms...................................................................................30
Warranty and Service......................................................................................30

· 03
INTRODUCTION
Please read these instructions, warnings, and safety notes completely before using
your new charger. When properly used, the ProTek R/C Prodigy 620 DUO will
provide years of performance and service.
It can be dangerous to mishandle batteries and battery chargers, as there is a risk of
fire or explosion.
Thank you for purchasing the Prodigy 620 DUO charger from ProTek R/C. You are now
the owner of a professional-level battery management system.
The Prodigy 620 DUO is very simple to use, but unlocking the full power of such a
capable charger requires some knowledge on the part of the user; these instructions are
to help familiarize the user with the features of the charger, as well as how to use them
to their fullest capabilities.

· 04
INTRODUCTION
Navigation
Buttons
Display 1
Large 2x16 LCD for
Easy Reading
Display 2
Large 2x16 LCD for
Easy Reading
Left View
Batt Type/
Stop Button Batt Type/
Stop Button
INC/DEC
Button Enter/Start
Button INC/DEC
Button Enter/Start
Button
Balancing Port 1
Balancing Port 2
Temperature
Sensor 1
Temperature
Sensor 2
Output 1
Output 2
Smart Fan
Power Input (12-18V DC)
Smart Fan
Right View
Output 1 Output 2

· 05
SPECIAL FEATURES
SET CONTENTS
1. Prodigy 620 DUO Charger
2. JST-XH BalancingAdaptor (2 Sets)
3. Alligator Clip Charging Cable (1)
4. 18AWG Wire Charging Cable (2)
5. Plug-in Battery Clamps
SPECIAL FEATURES
Operating software optimized for ease of use and maximum safety
The user can adjust each of Prodigy 620 DUO’s settings and parameters. However, the
Prodigy 620 DUO also features an AUTO charge function that sets output current during
the process of charging or discharging; this can prevent fire or explosion caused by
overcharging due to incorrect charger settings, particularly for lithium batteries. If an error
is detected at any point in the charger’s operating, the unit will stop the charge or
discharge process and an alarm will sound.
Integrated lithium battery cell balancer
The Prodigy 620 DUO features an individual cell balancer built into the case. There’s no
need for an external balancer.
Individual cell balance discharging
While discharging lithium batteries that have been plugged into the integrated balancing
port, the Prodigy 620 DUO can monitor and balance the voltage of each cell individually.
The process will end automatically and an error message will indicate if the voltage of
any single cell is abnormal.
1
2
3
4
5

· 06
SPECIAL FEATURES
Compatible with all types of lithium batteries
The Prodigy 620 DUO is capable of charging various types of lithium batteries, such as
LiPo, LiFe, and Li-Ion.
Fast charge and storage charge modes for lithium batteries
Fast charge alters the rate of change in charge current to reduce the duration of the
charging process, while the storage charge mode brings the voltage of the pack to a
suitable level for long-term storage.
Maximum safety
The Prodigy 620 DUO uses Delta-peak sensitivity to automatically terminate the
charging process once the battery’s voltage exceeds the specified threshold; this
prevents the battery from overcharging.
Automatic charging current limit
For safety and extra protection against battery damage, a user-determined maximum
current limit can be set when charging small-capacity NiCD or NiMH cells with low
internal resistance.
Capacity limit
The charged capacity listed on-screen is calculated by multiplying charging current and
charge time. If the charging capacity exceeds this user-specified limit, the process will
be terminated automatically.
Temperature threshold*
The battery's internal chemical reaction during charging or discharging may cause the
temperature of the battery to rise. If the user-specified temperature limit is exceeded, the
charging process will be terminated automatically.
*This function is available by connecting optional temperature probe, not included.
Processing time limit
The user can set the maximum charge/discharge time. If the time limit is reached, the
process will be terminated automatically.
Programmable memory
The Prodigy 620 DUO can store up to ten (10) different charge/discharge profiles for
your convenience. These stored profiles can be recalled quickly, with no additional
program required.
Continuous charge/discharge cycles
The Prodigy 620 DUO can automatically cycle batteries up to 5 times; this is useful for
refreshing and balancing old batteries after long-term storage.

· 07
WARNING AND SAFETY NOTES
These warnings and safety notes are particularly important. Please follow the
instructions for maximum safety; failure to adhere to these instructions may
damage the charger and/or battery and may cause a fire.
Never leave the charger unattended when connected to its power supply. If any
malfunction occurs, TERMINATE THE PROCESSAT ONCE and refer to the
instruction manual.
Keep the charger well away from dust, moisture, rain, heat, direct sunshine and
vibration. Do not drop the Prodigy 620 DUO.
The correct input voltage is 12-18V DC
Both the charger and battery should be put on a heat-resistant, nonflammable, and
nonconductive surface when in use. Never place these items on a car seat, carpet
or similar surface. Keep all the inflammable and volatile materials away from the
operating area.
Make sure you know the specifications of the battery to be charged or discharged
to ensure that it is compatible with this charger. If the charging program is set up
incorrectly the battery and/or charger may be damaged; this can cause fire or
explosion due to overcharging. ProTek R/C is not responsible for any damage or
subsequent damage arising as a result of misuse or failure to observe the
procedures outlined in this manual.
Standard Battery Parameters
3.7V/cell
Nominal
Voltage
Min. Discharge
Voltage
Max Charge
Voltage
Storage
Voltage
Allowable
Fast Charge
3.7V/cell
4.2V/cell
3.8V/cell
≦1C
≧3.0V/cell
LiPo Li-Ion
3.6V/cell
4.1V/cell
≧2.5V/cell
≦1C
3.3V/cell
3.6V/cell
3.3V/cell
≦4C
≧2.0V/cell
LiFe
1.2V/cell
1.5V/cell
n/a
1C-2C
≧0.85V/cell
NiCd
1.2V/cell
1.5V/cell
n/a
1C-2C
≧1.0V/cell
MiMH
2.0V/cell
2.46V/cell
n/a
≦0.4C
≧1.75V/cell
Pb
Be very careful to choose the correct voltage indicated voltage for each type of battery.
Failure to do so may cause damage to the battery, including fire or explosion.

· 08
WARNING AND SAFETY NOTES
Never attempt to charge a battery that is:
- made of different types of cells.
- made of cells from multiple manufacturers.
- non-rechargeable.
- not among the types listed as compatible with Prodigy 620 DUO (NiCD,
NiMH, LiPo, LiFe, Li-Ion, or lead-acid).
- faulty or damaged.
- fitted with a charge circuit or protection circuit.
- installed in a device, or electrically linked to other components.
- incompatible with the available charge current.
Before beginning any charge or discharge process, you should complete
this checklist:
- Does the selected charger program match the battery type?
- Is the charge/discharge current correct for the battery size and type?
- Does the battery’s cell count match the indicated voltage? (Example:A 2S
LiPo pack has a nominal voltage of 7.4v)
- Are all wire connections secure? Any breaks in the circuit?
Charging Notes
During the charge process, a specific amount of electrical energy is fed into the
battery; this amount is equal to the product of the charge current and the elapsed
charging time. Never charge a battery at an amp rate higher than that specified by
the manufacturer. Only batteries that are expressly stated to be capable of
quick-charging should be charged at a rate higher than its standard charge
current.
Use caution when connecting the battery to the charger’s output terminals; red is
positive, and black is negative. Be sure to use wire of adequate size, as well as
high-quality, gold-plated connectors to reduce internal resistance, as this is
essential for Prodigy 620 DUO to work properly.
WARNING: Connecting a lithium battery to the charger incorrectly may damage
the battery, and can even cause a fire!
Always refer to the information provided by the battery manufacturer when
determining charge current and charging time. Lithium batteries should only be
charged according to the manufacturer’s instructions.

· 09
WARNING AND SAFETY NOTES
Special attention should be paid to the connection of Lithium batteries.
Do not attempt to disassemble the battery pack.
Lithium battery packs can be wired in parallel and in series. In parallel connection,
the battery’s capacity is calculated by multiplying single battery capacity by the
number of cells. Attempting to charge cells with different voltage levels that are
wired in parallel may cause fire or explosion. ProTek R/C recommends charging
lithium batteries in series only.
Discharging
The main purpose of discharging is to deplete any remaining battery power, and
requires the same care and attention as the charging process.
A lithium battery should never be discharged further than its minimum voltage; this
may cause a rapid loss of capacity or even a total failure. Always set the final
discharge voltage to avoid deep-discharging lithium batteries. Frequent full
discharging should be avoided if possible; consider using a larger battery, or
charging the battery more often.
NOTE: Lithium batteries do not reach full capacity until after its first several
cycles, which serve as a “break-in” period that normalizes the battery’s capacity.
Rechargeable NiMH and NiCD batteries, however, develop a “memory”; If they
are only partially depleted before recharging, the battery may remember the point
at which the discharge process stopped and use only this portion of its capacity.
· 10
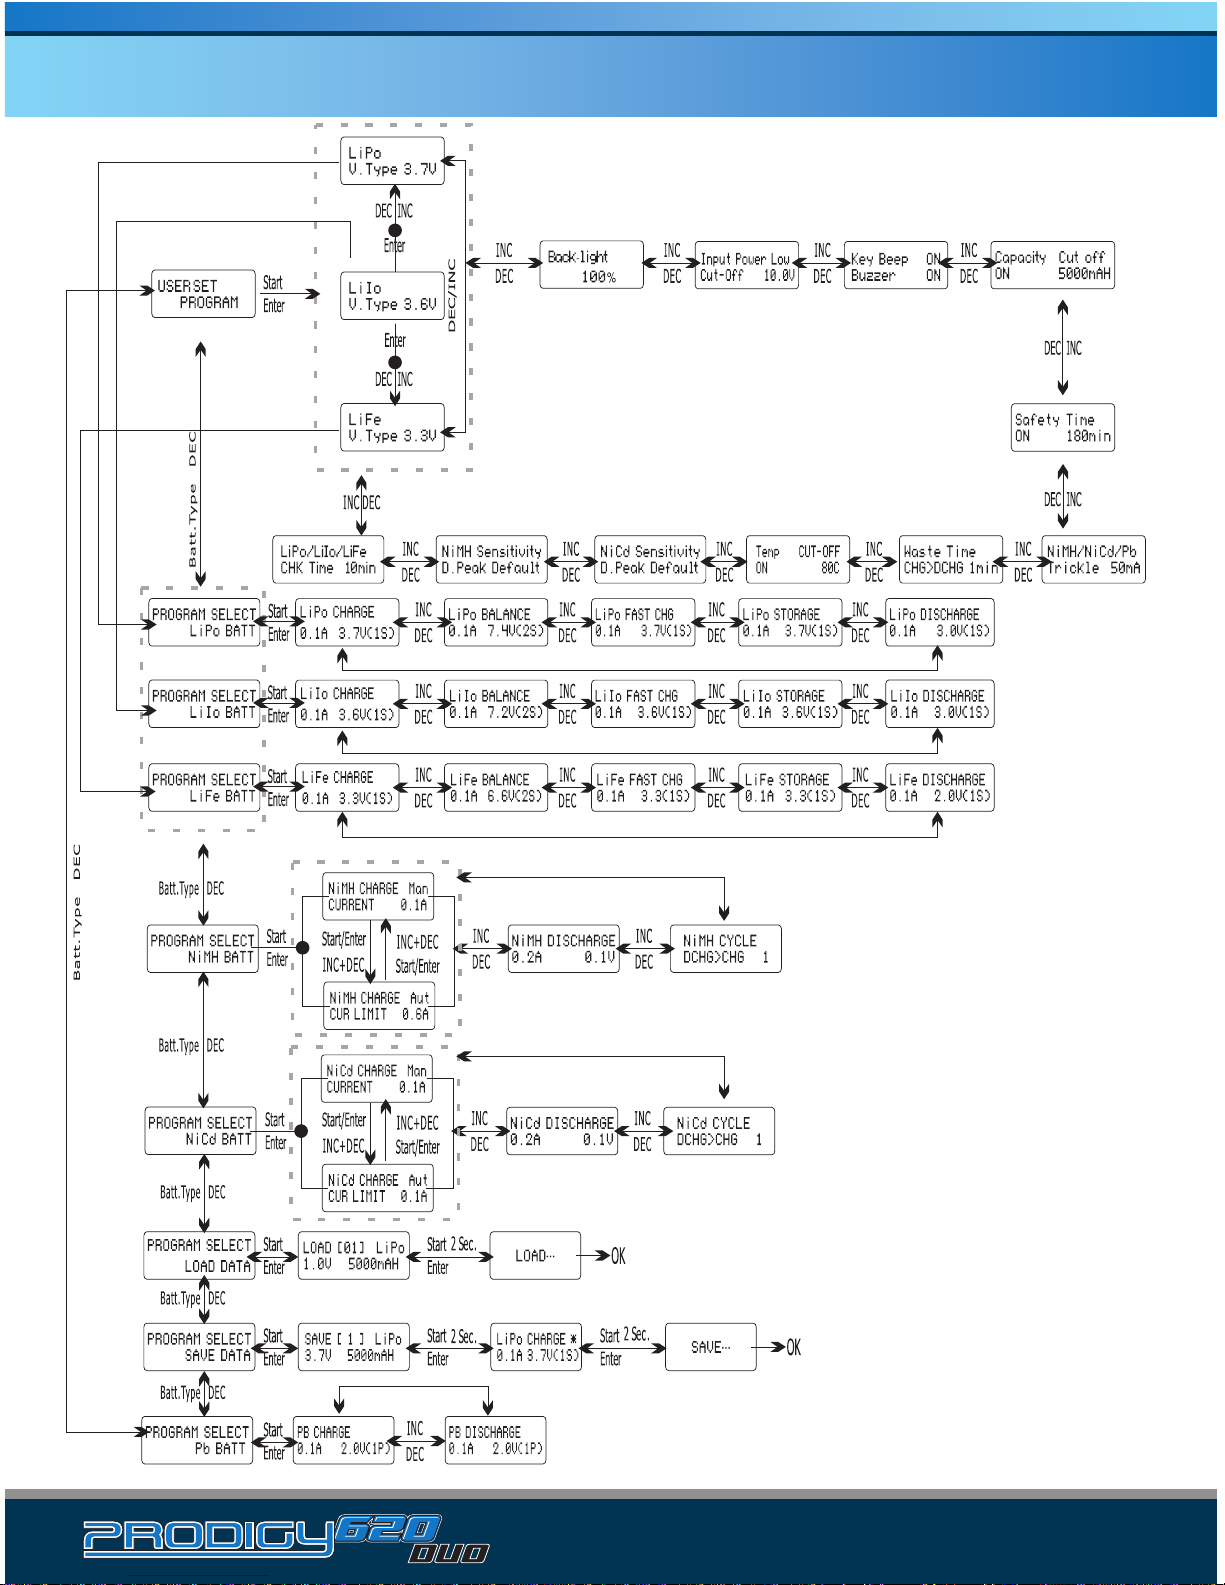
PROGRAM FLOW CHART

· 11
CONNECTING THE CHARGER
Connecting the Charger
The Prodigy 620 DUO comes with male 4mm Bullet connectors attached to the power
INPUT cables. These cables are appropriate for attaching directly to most high-quality
AC-DC power supply units, such as the ProTek R/C "Super Pro 1000" (30V/40A/1000W).
Also included are large Terminal Clips with matching 4mm female bullet connectors for
attaching directly to 12V car batteries. It is critically important that you use either a fully
charged 13.8V car battery or a high quality AC-DC power supply in the range of 15V to
18V DC output, with minimum current rating of 60A to insure reliable performance.
4mm Bullet
Connectors
plugging to
Super Pro 1000
power supply
directly
Using terminal
clip attaching to
car battery
To take advantage of the Prodigy 620 Duo's full power
capability, the power source should be 15V-18V DC,
and output power should be capable of 1000W or
higher. A low quality DC power source may damage
your Prodigy 620 DUO charger. We recommend our
PTK-PRO-1000W-SP - ProTek R/C "Super Pro 1000"
DC power supply. (Part # PTK-PRO-1000W-SP)

Connecting the Battery
Before connecting the Prodigy 620 DUO to a battery, it’s essential to verify that the
charger’s parameters match the battery to be charged or discharged; incorrect settings
may damage the battery and can cause a fire. To avoid short-circuiting the battery pack,
always connect the large leads to the charger before connecting to the battery. When
disconnecting, unplug the battery first and then the charger.
Balance socket:
Before charging a LiPo battery in Balance Charge mode you must first connect the
battery’s balance plug to the charger’s balance plug port. Check the plug’s polarity
before connecting to prevent damage to the battery. (See photo below).
This photo shows the correct way to connect your battery to the Prodigy 620 DUO while
charging in the balance charge program mode only.
· 12
CONNECTING THE BATTERY
WARNING:
Failure to connect as shown in this photo will damage this charger.
To avoid a short circuit between the charge lead always connect the charge cable to the
charger first, then connect the battery. Reverse the sequence when disconnecting.
· 13
INITIAL PROGRAMMING SETUP (USERS SETUP)
Initial Programming Setup
When powering up your new Prodigy 620 DUO for the first time, its charge parameters
will be set to their default values. You may change the values of each parameter and
then store these new settings to recall later.
To change the value of a specific parameter, press the “Start/Enter” button to make it
blink; when blinking, press the INC or DEC buttons to change the parameter to the
desired value. Press the Start/Enter button once to store the new setting.
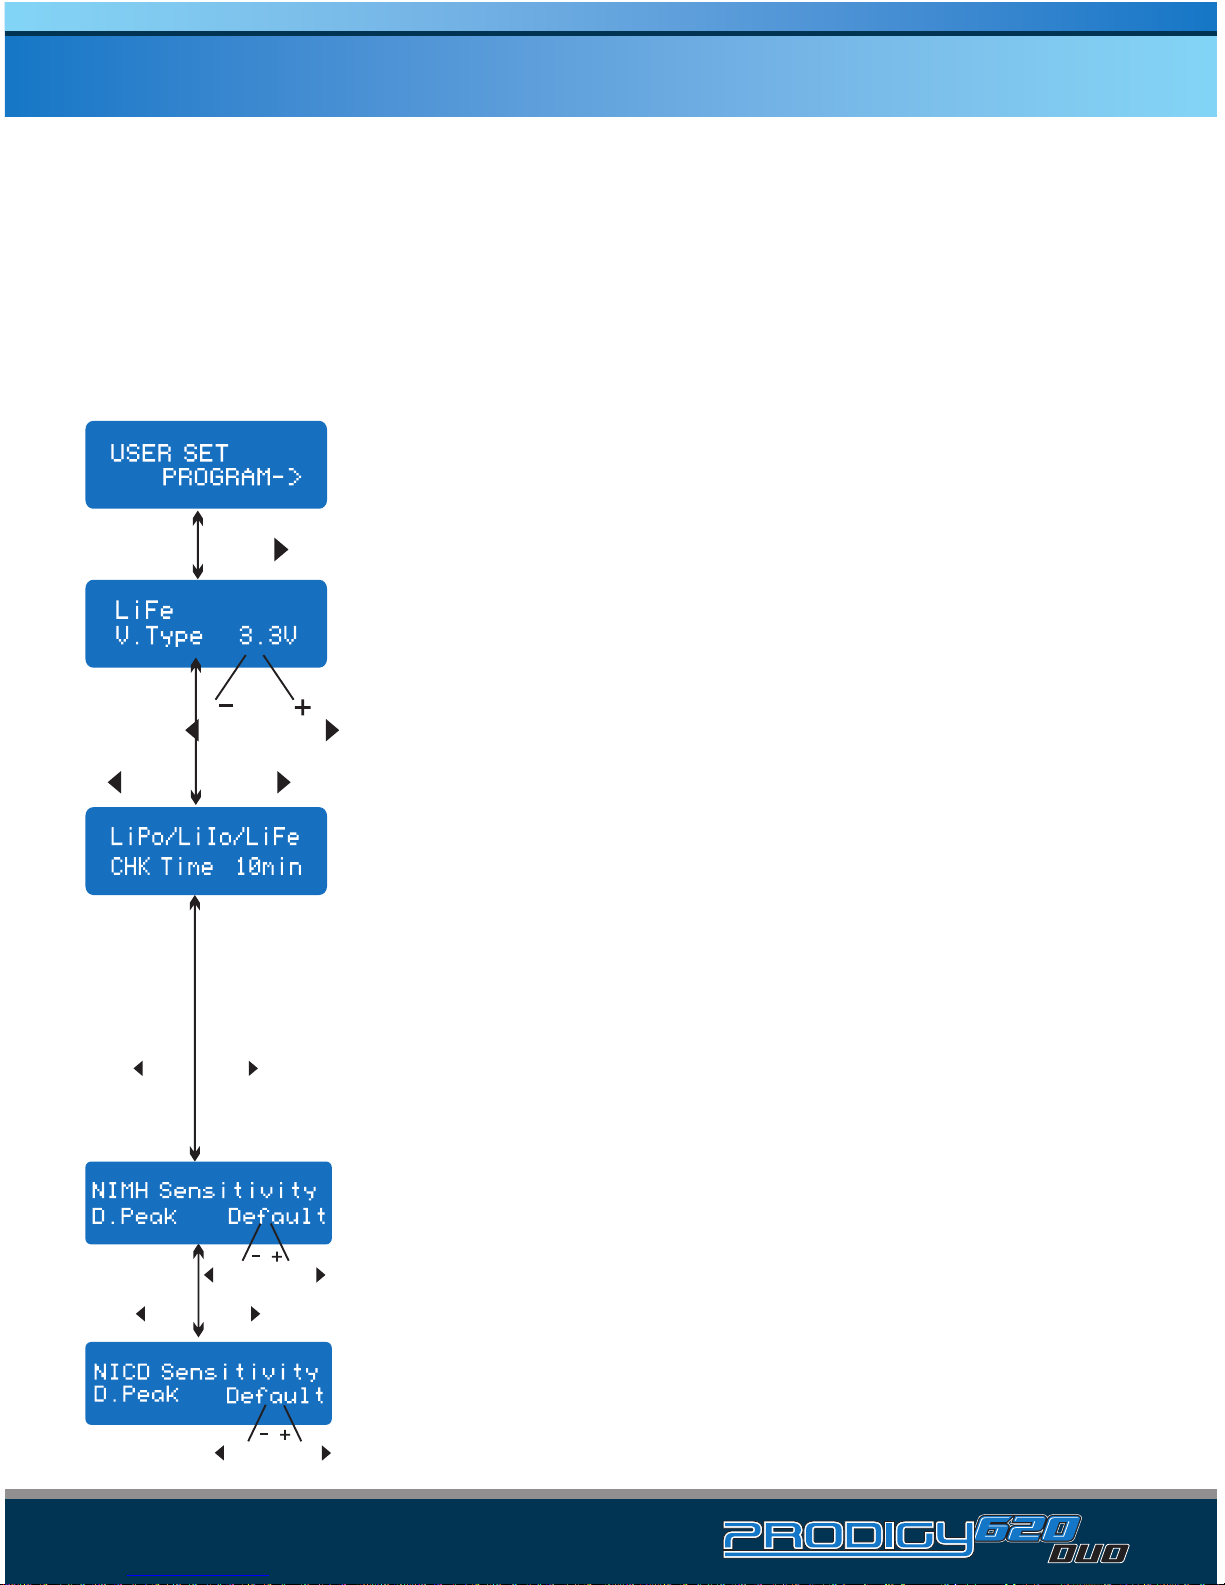
User set up starting screen.
This screen displays the nominal voltage of the Lithium battery
type currently selected: LiPo (3.7V), LiFe (3.6V) or Li-Ion (3.6V). It
is very important that this setting matches the battery that will be
charged, as an incorrect value may damage the battery and can
cause a fire.
The Prodigy 620 DUO will automatically detect the cell count of a
Lithium battery at the beginning of a charge or discharge process;
however, Lithium batteries that have been discharged too deeply
may be difficult for the Prodigy 620 DUO to detect.A timer may
be set to terminate the process early if the cell count cannot be
detected; normally, the default setting of 10 minutes is sufficient,
though you may extend the time limit for larger batteries. Please
note that setting the time limit too high may cause the charge or
discharge process to finish with an improper cell count setting,
which may damage the battery or cause a fire.
The Prodigy 620 DUO uses Delta-peak detection to terminate the
charge process of NiCD and NiMH batteries. The Delta-peak
sensitivity can be adjusted from 5-20mV per cell; too high of a
value may damage the battery due to overcharging, while too low
of a value may cause the charger to terminate the process
prematurely. Please refer to the battery manufacturer’s instruc-
tions. (NiCD default: 12mV NiMH default: 7mV)
INC
DEC INC
INCDEC
INCDEC
INCDEC
DEC INC
DEC INC
· 14
INITIAL PARAMETER SETUP (USERS SETUP)
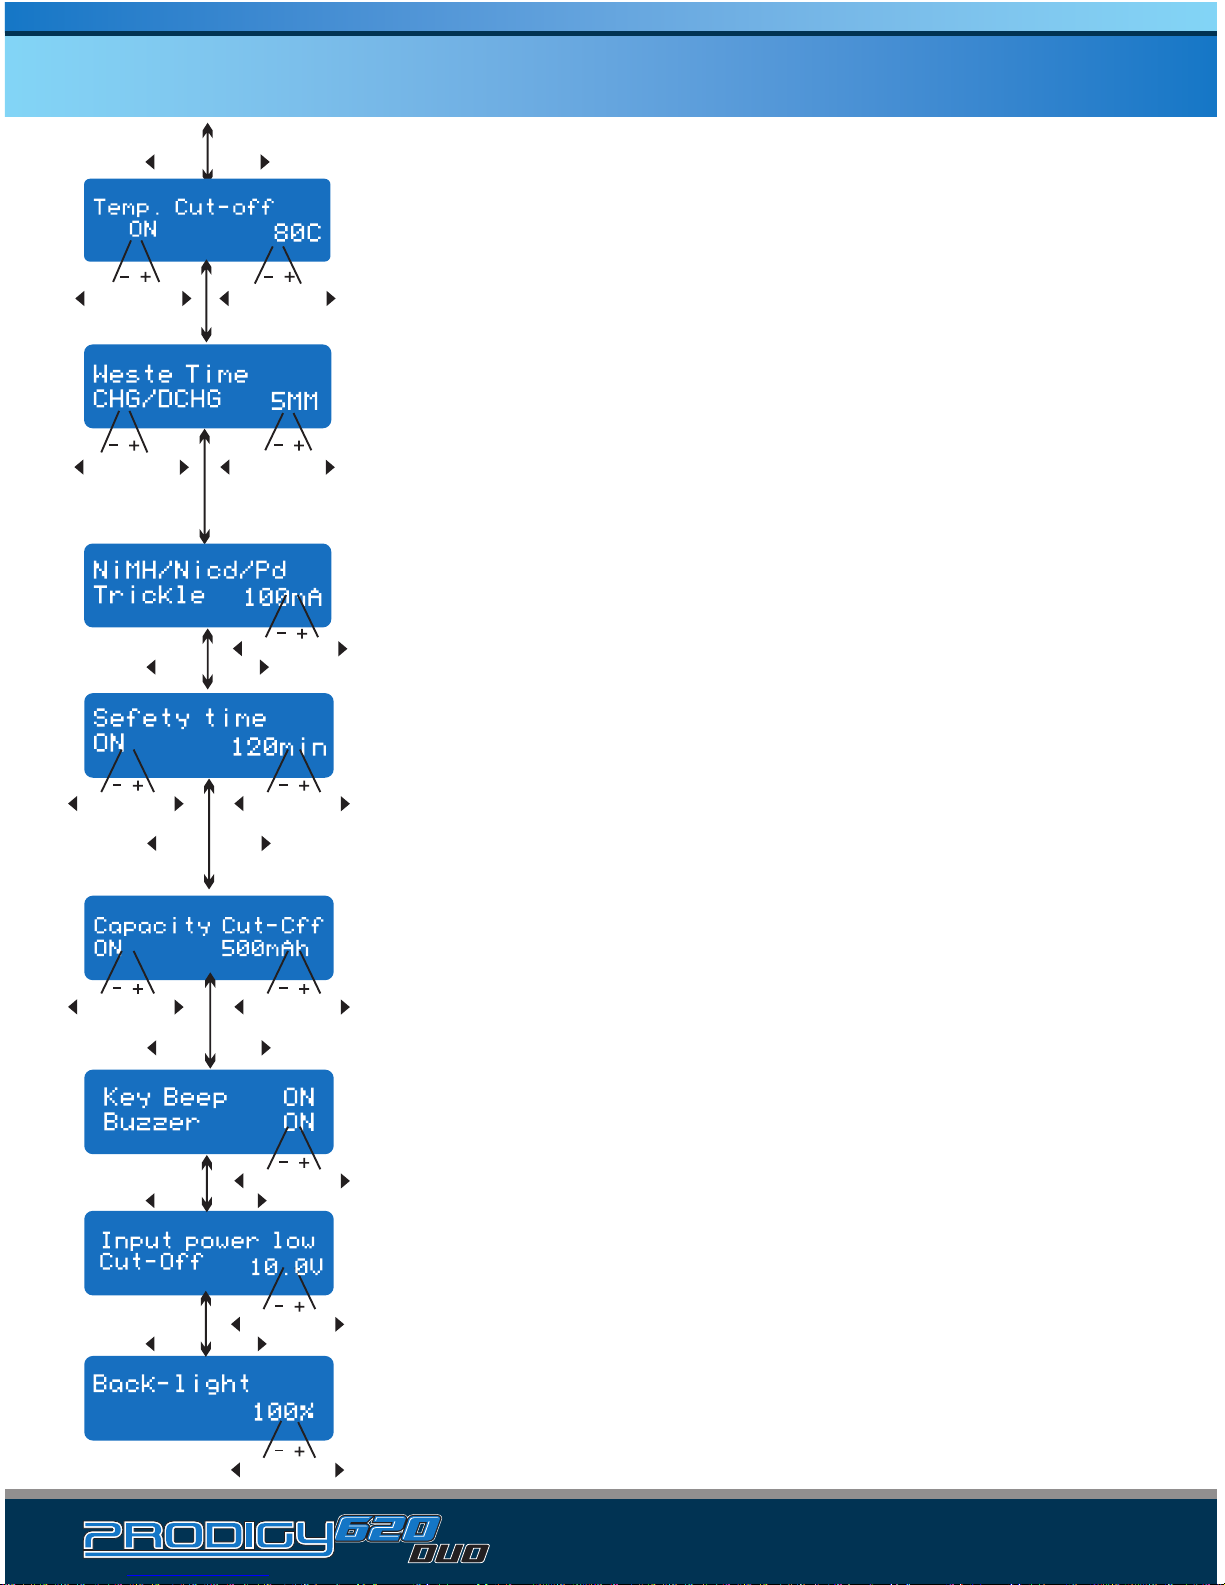
When using the optional temperature probe to monitor the
battery, the temperature cut-off can be turned on or off. When
turned on, the maximum temperature of the battery can be set. If
the battery reaches this temperature the charge process will be
terminated automatically.
A battery pack may become hot when cycled through multiple
charge and discharge cycles. When cycling a battery pack, this
value will insert a delay (1-60 minutes) between charge and
discharge processes to allow time for the pack to cool.
Trickle charge mode for NiCD and NiMH batteries can be turned
on or off. When turned on, the charger will supply the desired
charge current to achieve a full charge without overheating the
battery after it has been fast charged.
The Prodigy 620 DUO has an additional safety timer that begins
when a charge process is started; the safety timer can be set to
prevent overcharging in case of a faulty battery or incorrect
charger settings. The value of the safety timer should be set high
enough to allow sufficient time for the charge process to finish.
The capacity cut-off function regulates the maximum capacity that
will be supplied during the charge process. Should the Delta-peak
sensitivity not terminate the charge process, nor the safety timer,
the capacity cut-off will stop the charge at the selected capacity
value.
Both the beep that sounds when a button has been pressed and
the beeping during operating that indicate different mode
changes can be turned on or off.
When an automobile battery for power input, you may set a low
input voltage cut-off to protect the battery from damage. If the
input voltage drops below the specified value the charge process
will be terminated.
The brightness of the LCD screen can be adjusted.
DEC INC
DEC INC
INCDEC
DEC INC
DEC INC
DEC INC
INCDEC
DEC INC
INCDEC
INCDEC
DEC INC
DEC INC
DEC INC
DEC INC
DEC INC
INCDEC
DEC INC
INCDEC
· 15
LITHIUM BATTERY (LI-ION/LIPO/LIFE) PROGRAM
Lithium Battery Charge Overview
These programs are only compatible with Lithium batteries with nominal voltages of
3.3V, 3.6V, or 3.7V per cell. These batteries require a charge technique called the
CC-CV (constant current-constant voltage) method. The charge current varies according
the battery capacity and performance.
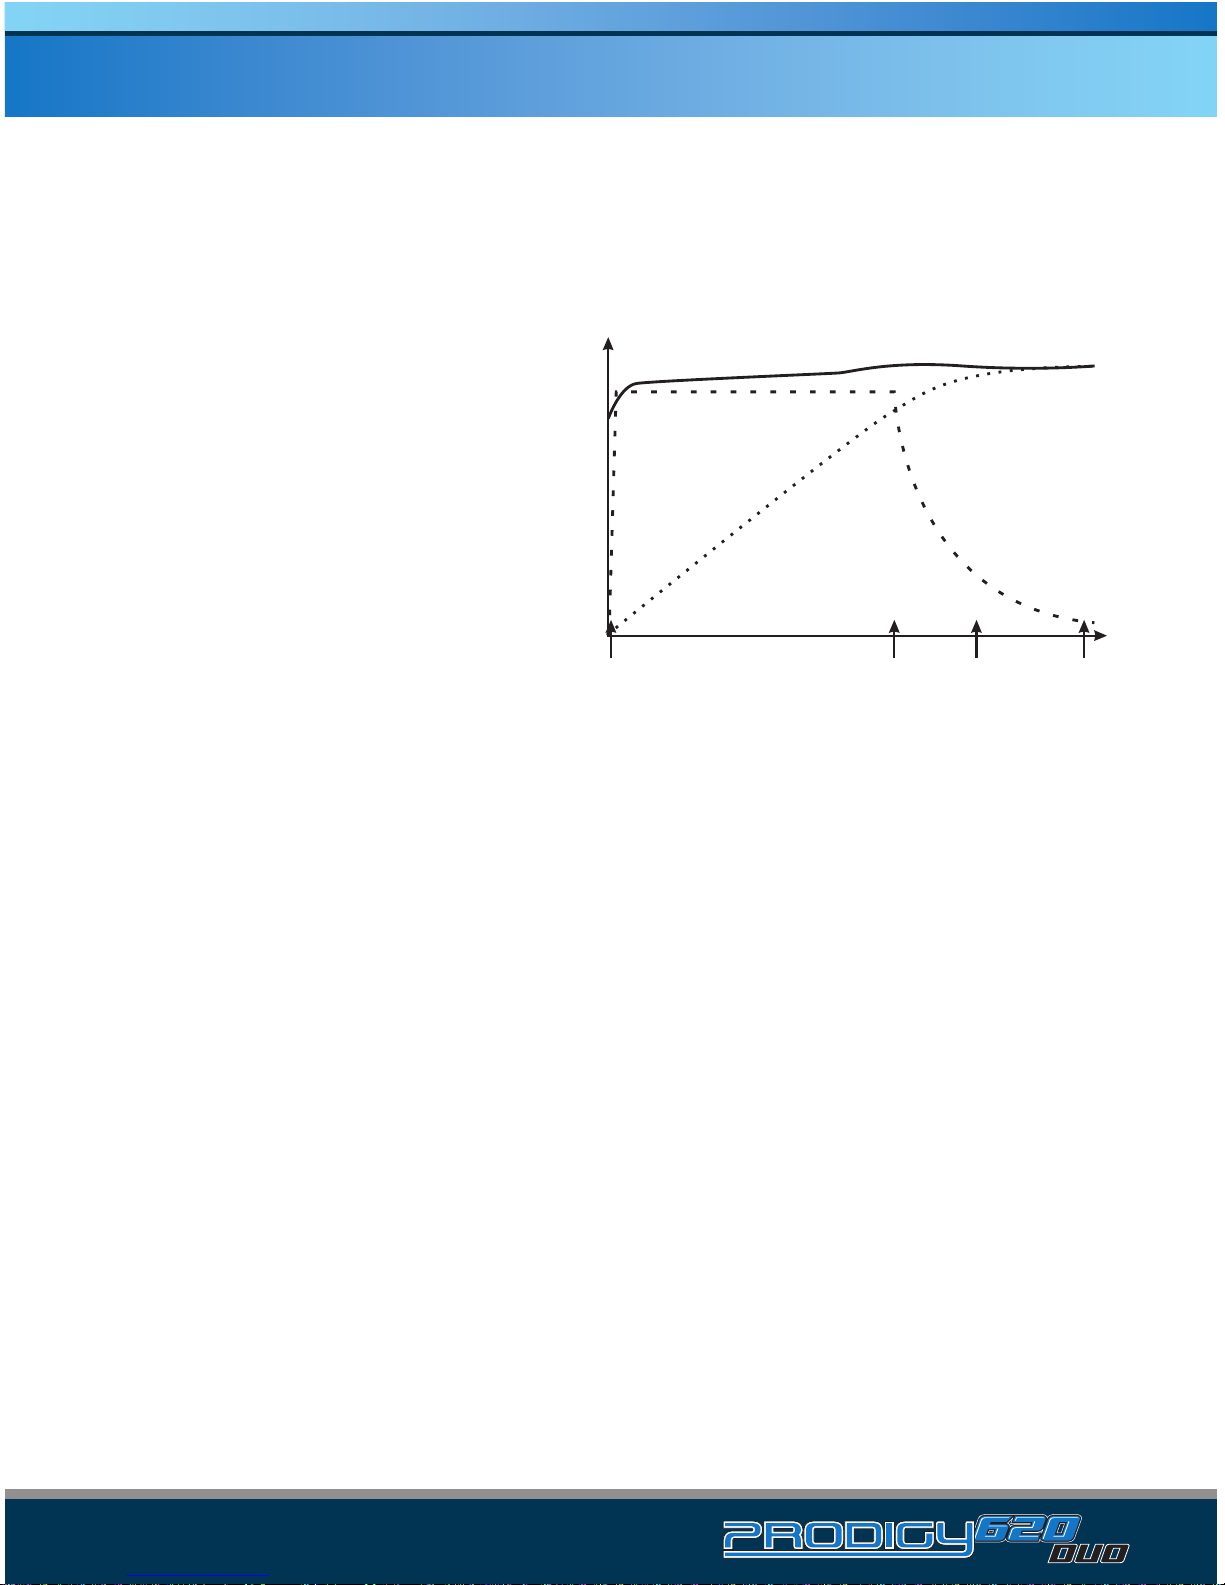
A Lithium battery is charged at a constant
current (A) until it reaches the final charge
voltage of 4.2V per cell (B). After this point,
the voltage is kept at a constant level and
the residual charge takes the form of a
declining current curve (C) until the cut-off
point (D), when the charge current equals
1/10 of the battery’s capacity. At this point,
the battery can be disconnected from the
charger and is ready for us.
The final voltage of the charge process is also very important, and should match the
battery’s chemistry (LiPo: 4.2V Li-Ion: 4.1V LiFe: 3.6V). The charge current, nominal
voltage, and cell count must be correct for the charge program to charge the battery.
To change the value of a specific parameter, press the “Start/Enter” button to make it
blink; when blinking, press the INC or DEC buttons to change the parameter to the
desired value. Press the Start/Enter button once to store the new setting.
4.2V
V
A
Ah
ABCD
t
V/A/Ah

· 16
CHARGING LITHIUM BATTERIES
The left side of the first line shows the type of battery to be
charged. The value on the left of the second line is the charge
current, which can be adjusted (0.1-10.0A). The right side of
the second line shows the number of cells in the battery, along
with the nominal voltage (3.7-22.2V, 1-6S).
This displays the number of cells automatically detected (R),
along with the number of cells indicated on the previous screen
(S). If both numbers are identical, you can start the charging
process by pressing the Start/Enter button. If the numbers do
not match, press the Batt Type/Stop button to go back to the
previous screen.
This screen shows the real-time status of the charge process.
Press the Batt Type/Stop button once to stop the charge
process.
Charging lithium batteries in the charge mode
Lithium batteries with no balance lead should be charged using the standard charge
mode (indicated on the right of the first line of the screen).
Note: ProTek R/C recommends charging lithium batteries with a balance lead in the
Balance Mode only.
INC
INC DEC
DEC -
-+
+
Start
Enter
Batt Type
Stop
Start
Enter
Charged
capacity
Number
of cells Charging
Time Charging
Current
Battery
Voltage
'> 3 seconds’
· 17
BALANCE CHARGING LITHIUM BATTERIES
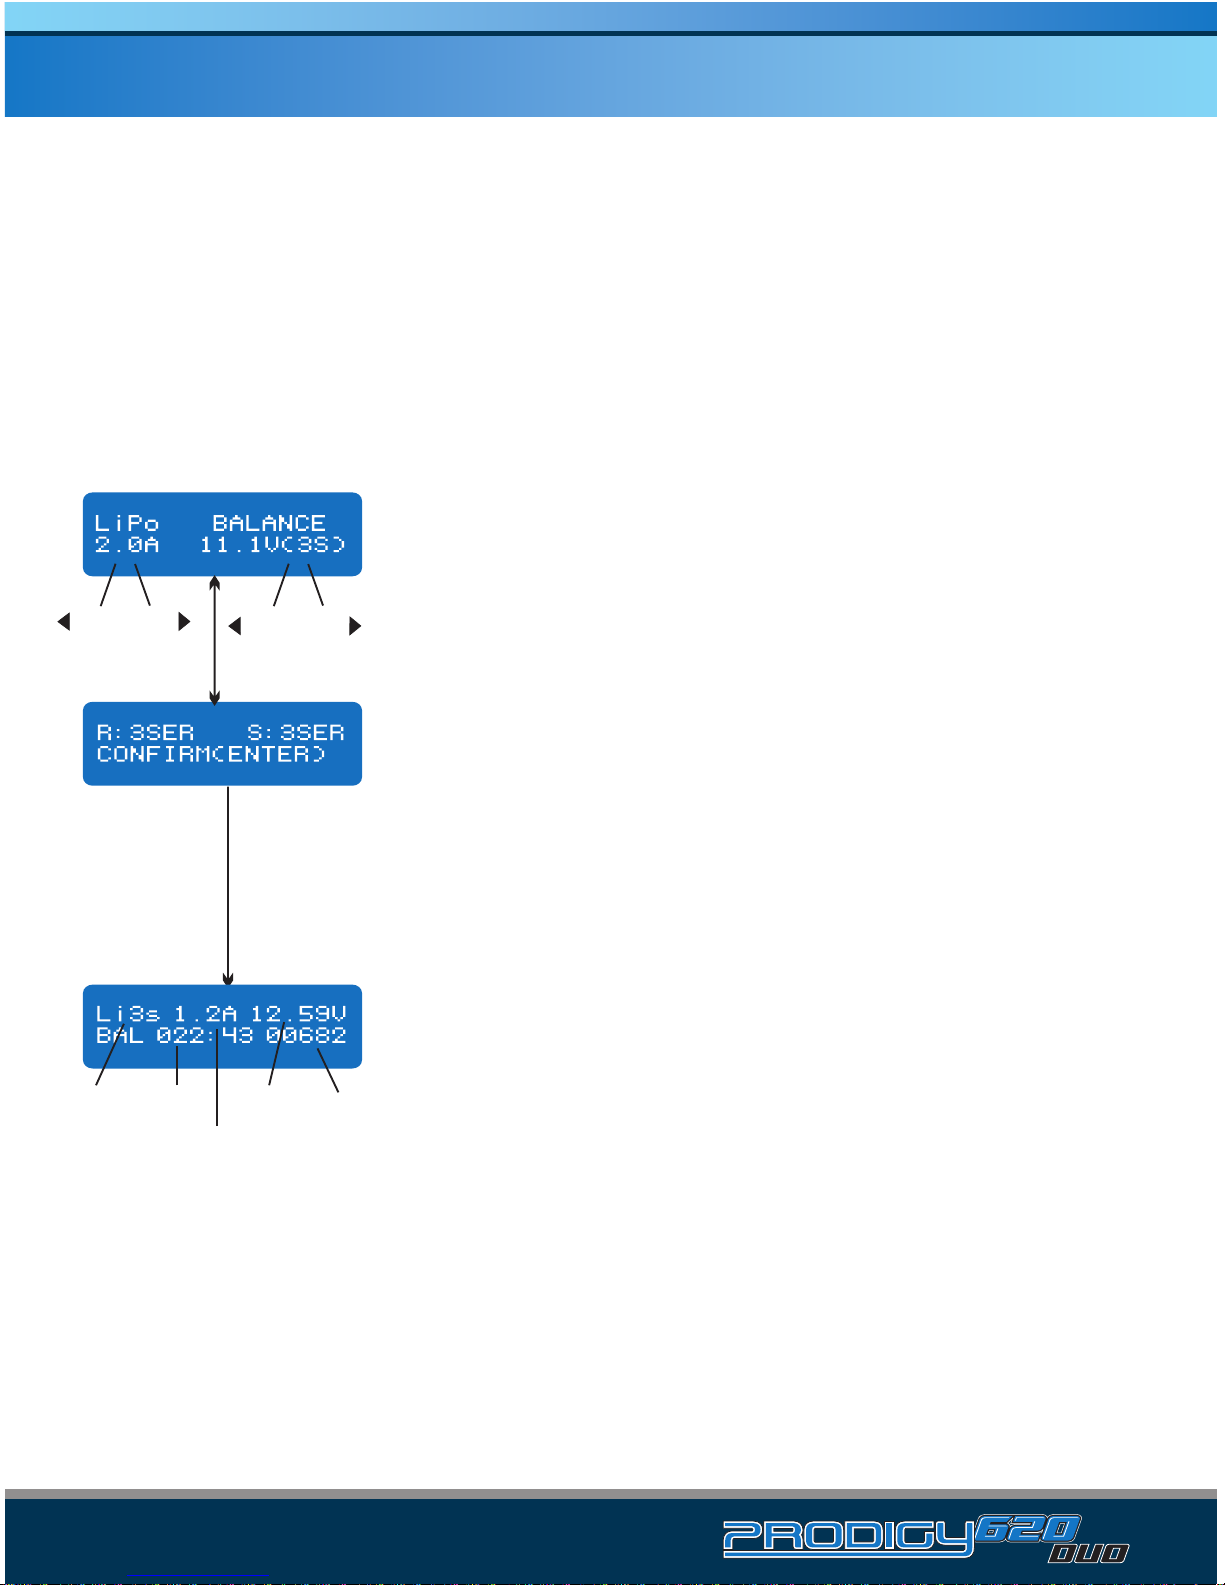
The left side of the first line shows the type of battery to be
charged. The value on the left of the second line is the charge
current, which can be adjusted (0.1-10.0A). The right side of
the second line shows the number of cells in the battery, along
with the nominal voltage (3.7-22.2V, 1-6S).
This displays the number of cells automatically detected (R),
along with the number of cells indicated on the previous screen
(S). If both numbers are identical, you can start the charging
process by pressing the Start/Enter button. If the numbers do
not match, press the Batt Type/Stop button to go back to the
previous screen.
This screen shows the real-time status of the charge process.
Press the Batt Type/Stop button once to stop the charge
process.
Charging lithium batteries in the balance mode
The balance charging mode (indicated on the right of the first line of the screen)
balances the voltage of the cells in a lithium battery during the charge process. In order
to balance charge a lithium battery you must connect its balance lead to the charger in
addition to connecting the power leads to the battery. In this mode, the charger monitors
the voltage of each individual cell and controls the input current of each accordingly.
Note: ProTek R/C recommends charging lithium batteries with a balance lead in the
Balance Mode only.
-
-+
+
INC
DEC INC
DEC
Start
Enter
Batt Type
Stop
Start
Enter
Charged
capacity
Number
of cells Charging
Time Charging
Current
Battery
Voltage
'> 3 seconds’
· 18
FAST CHARGING LITHIUM BATTERIES
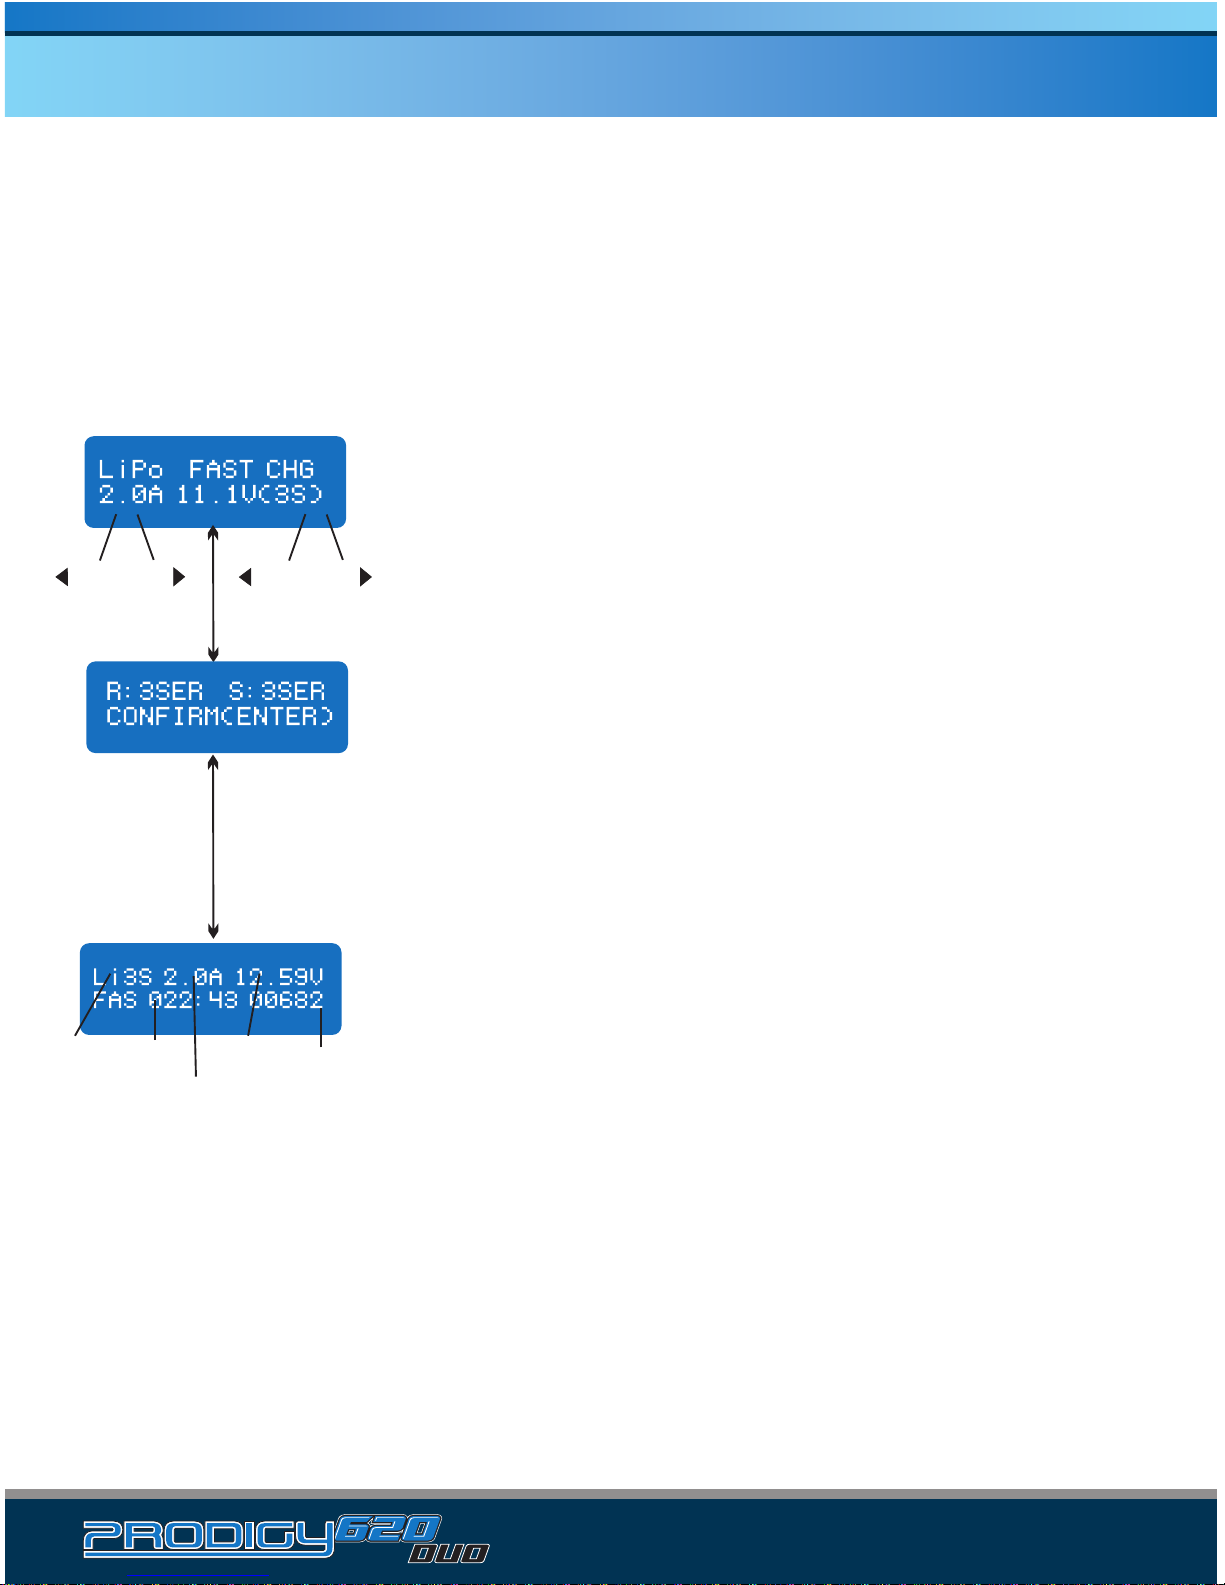
The left side of the first line shows the type of battery to be
charged. The value on the left of the second line is the charge
current, which can be adjusted (0.1-10.0A). The right side of
the second line shows the number of cells in the battery, along
with the nominal voltage (3.7-22.2V, 1-6S).
This displays the number of cells automatically detected (R),
along with the number of cells indicated on the previous screen
(S). If both numbers are identical, you can start the charging
process by pressing the Start/Enter button. If the numbers do
not match, press the Batt Type/Stop button to go back to the
previous screen.
This screen shows the real-time status of the charge process.
Press the Batt Type/Stop button once to stop the charge
process.
Charging lithium batteries in the fast charge mode
When charging in CC-CV mode, the charge current is reduced throughout the process
until it reaches 1/10 of the battery’s capacity. In order to charge the battery more quickly,
the fast charge mode slows down more gradually until reaching 1/5 of the battery’s
capacity. Fast charging may not charge the battery to the same capacity as the normal
charging mode, but the charging time will be reduced.
INC
DEC
INC
DEC
Start
Enter
Batt Type
Stop
Start
Enter
'> 3 seconds’
-- ++
Charged
capacity
Number
of cells Charging
Time Charging
Current
Battery
Voltage
· 19
CHARGING LITHIUM BATTERIES FOR STORAGE
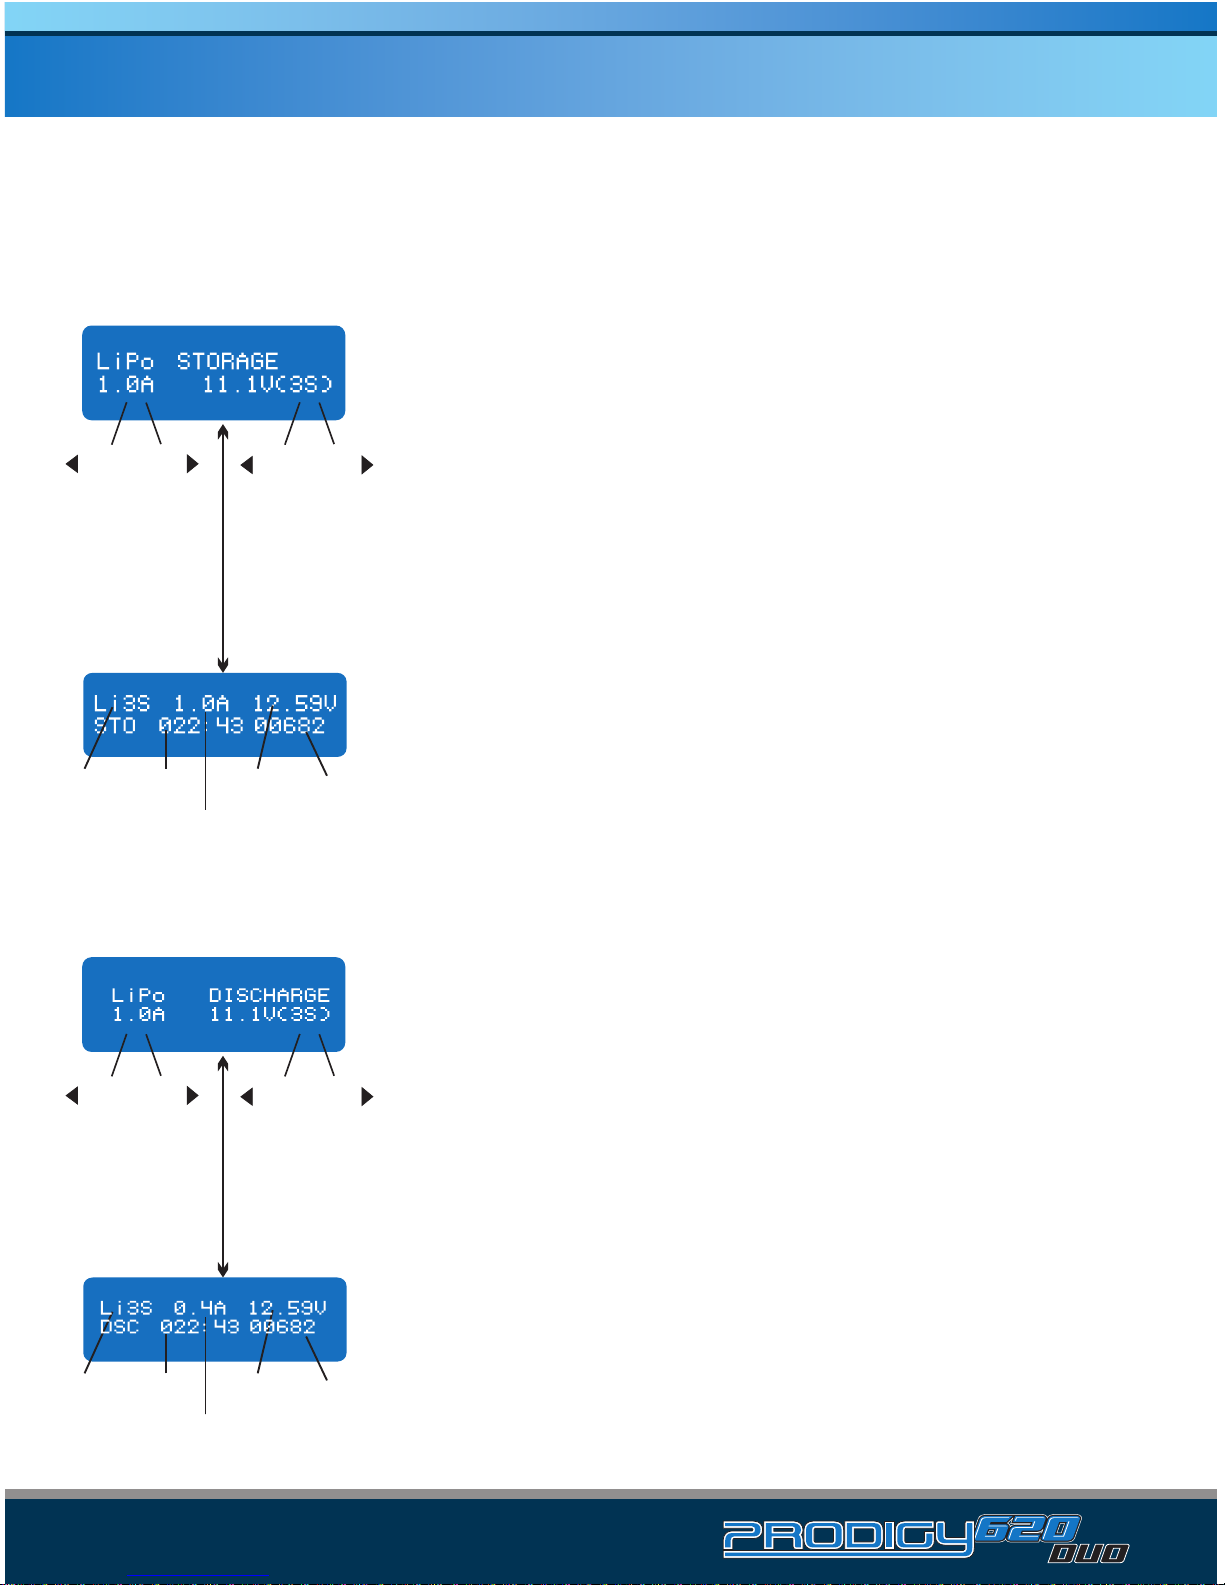
The left side of the first line shows the type of battery to be
stored. The value on the left of the second line is the charge
current, which can be adjusted (0.1-10.0A). The right side of
the second line shows the number of cells in the battery, along
with the nominal voltage (3.7-22.2V, 1-6S). To change the
value of a specific parameter, press the “Start/Enter” button
to make it blink; when blinking, press the INC or DEC buttons
to change the parameter to the desired value. Press the
Start/Enter button once to store the new setting.
This screen shows the real-time status of the charge process.
Press the Batt Type/Stop button once to stop the charge
process.
Charging Lithium batteries in the storage mode
The Prodigy 620 DUO features a storage mode that is ideal for preparing lithium
batteries for long-term storage. Storage mode will charge or discharge the battery to a
specific voltage per cell (LiPo: 3.85V LiFe: 3.3V Li-Ion: 3.75V) that is roughly 50% that of
a fully charged pack.
INC
DEC INC
DEC
Batt Type
Stop
-+-+
Charged
capacity
Number
of cells Charging
Time Charging
Current
Battery
Voltage
The value on the left of the second line shows the discharge
current, which can be adjusted (Note: it should not exceed 1C,
or the capacity of the battery). The value on the right of the
second line shows the number of cells in the battery, along with
the nominal voltage (3.7-22.2V, 1-6S); this number should
match that of the battery to avoid deep discharging. Press and
hold the Start/Enter button for more than 3 seconds to start
the discharging process.
This screen shows the real-time status of the discharge
process. Press the Batt Type/Stop button once to stop the
discharge process.
DISCHARGING LITHIUM BATTERIES
INC
DEC INC
DEC
Start
Enter
Batt Type
Stop
'> 3 seconds’
Start
Enter '> 3 seconds’
-+-+
Charged
capacity
Number
of cells Charging
Time Charging
Current
Battery
Voltage
Table of contents
Other Protek RC Batteries Charger manuals


Popular Batteries Charger manuals by other brands


Genuine Shurco
Genuine Shurco Battery Box & Trickle Charger installation instructions

IES
IES Keywatt 24 Wallbox user manual

Schumacher Electric
Schumacher Electric SE-4225 owner's manual

Sollatek
Sollatek PowerBack PB5000 user manual

ABB
ABB HT570675 Operation manual

Wetekom
Wetekom 81 64 68 instruction manual


