Prowise iPro Wall Lift User manual


www.prowise.com4Prowise iPro Mobile Lift
Assembly of the touchscreen on the Mobile lift
The installation and the assembly of the touchscreen on the Prowise lift should be executed by certied
personnel of Prowise or a Prowise certied partner. Please be aware if damage is caused to the lift or
touchscreen due to incorrect assembly by third parties, the warranty will be void.
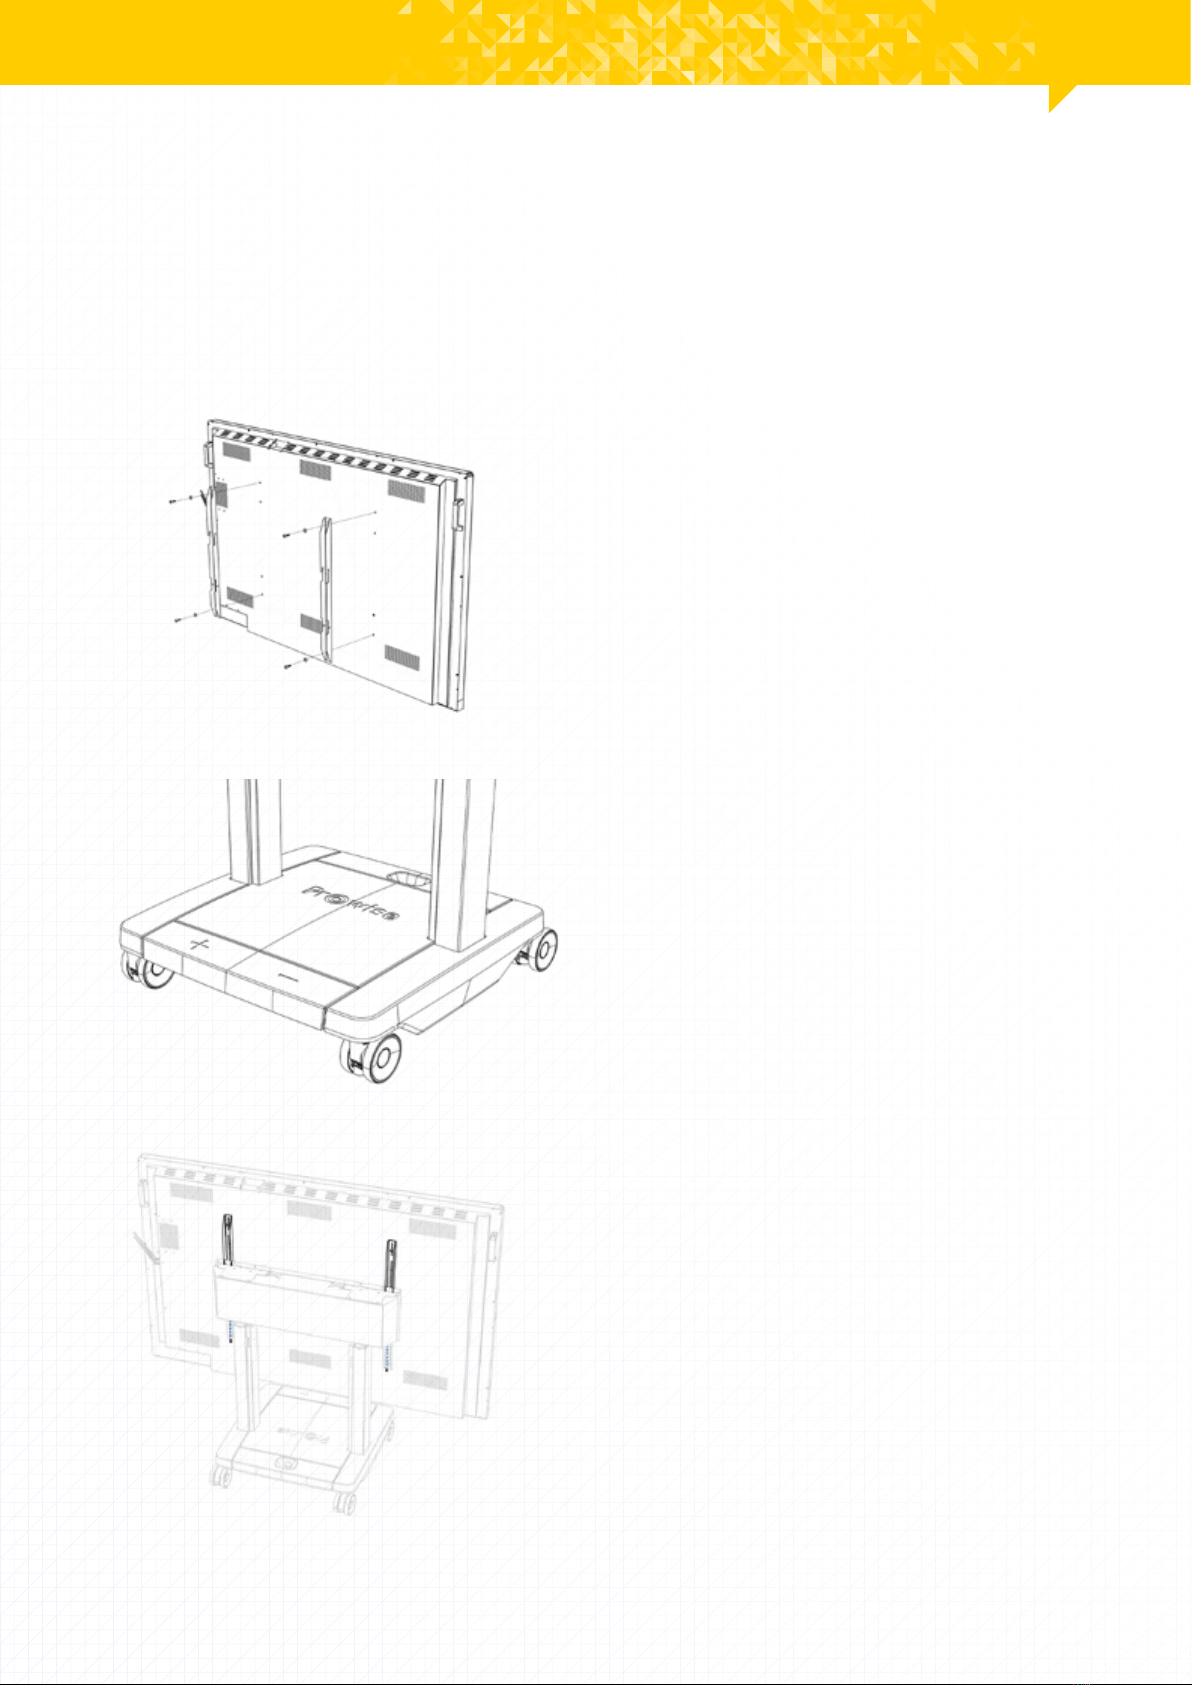
Assemble the touchscreen on the Mobile lift by following the steps below:
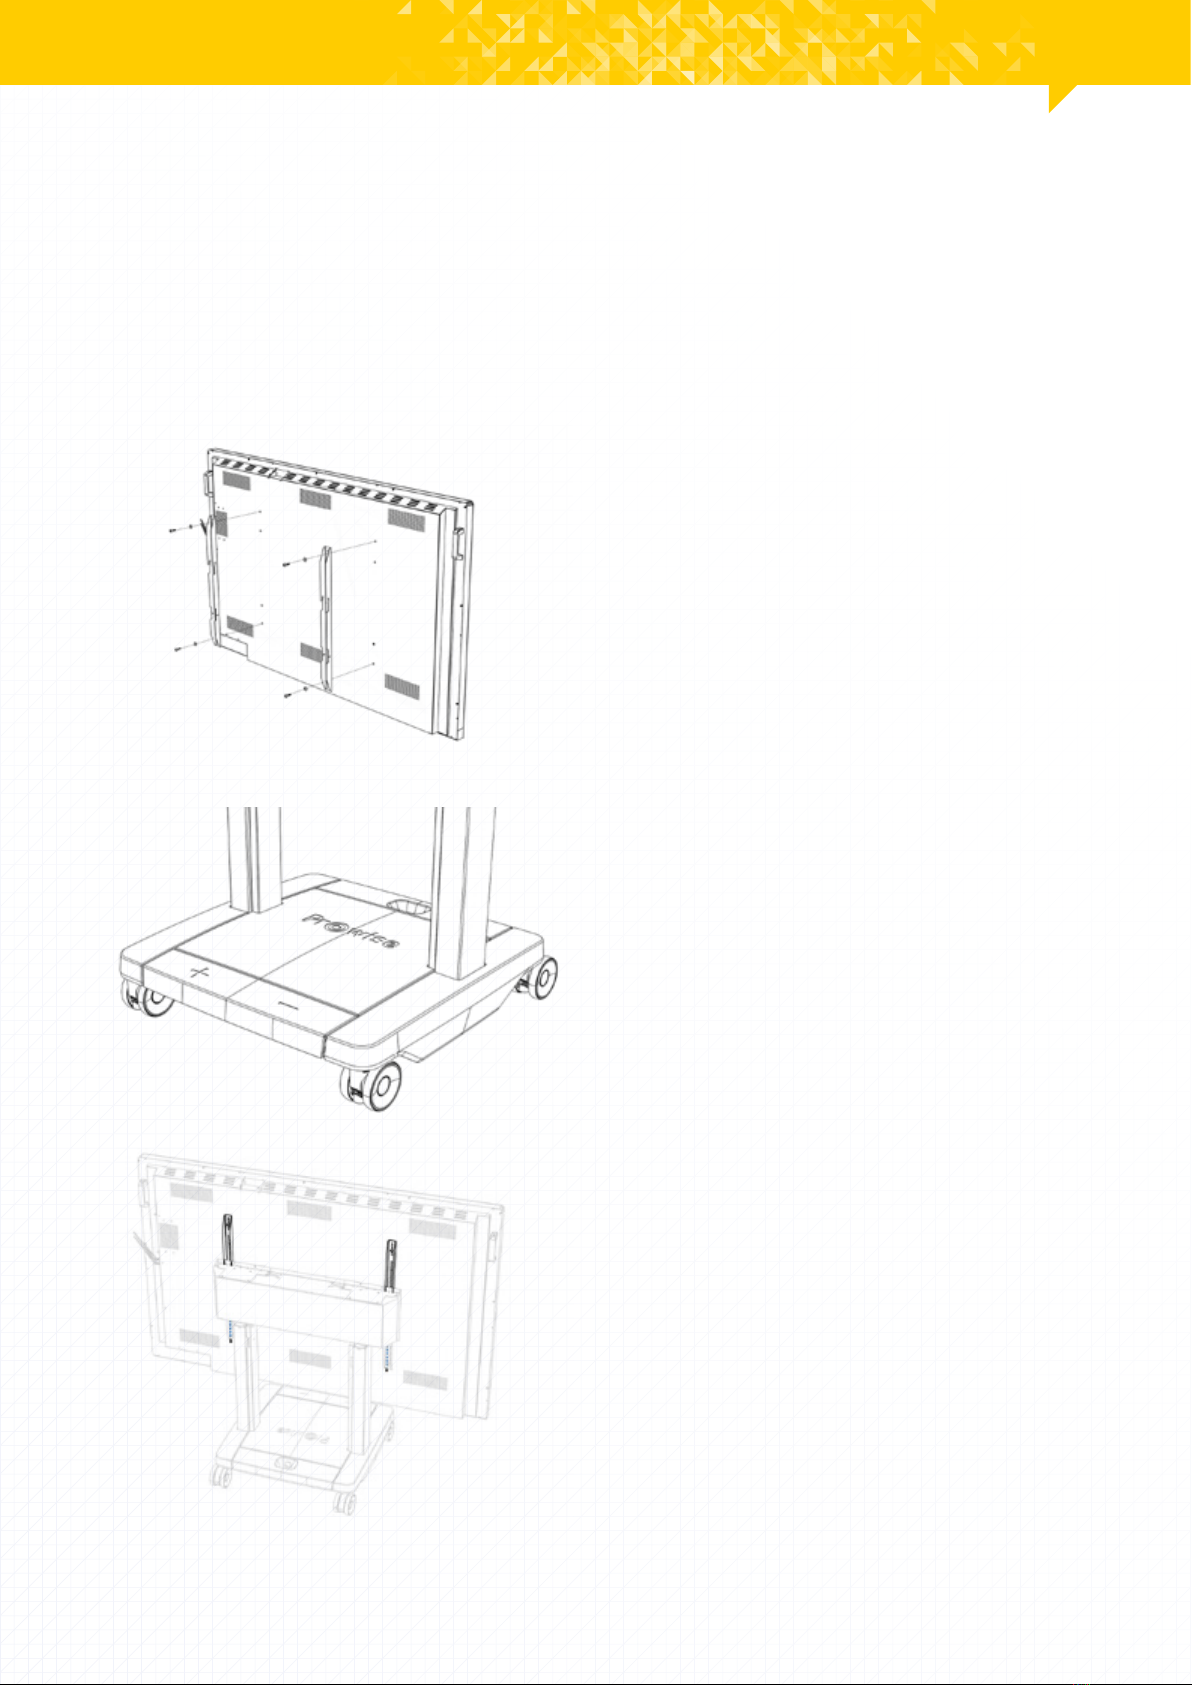
1. Install the VESA brackets on the
touchscreen using M8x20 screws
(supplied).
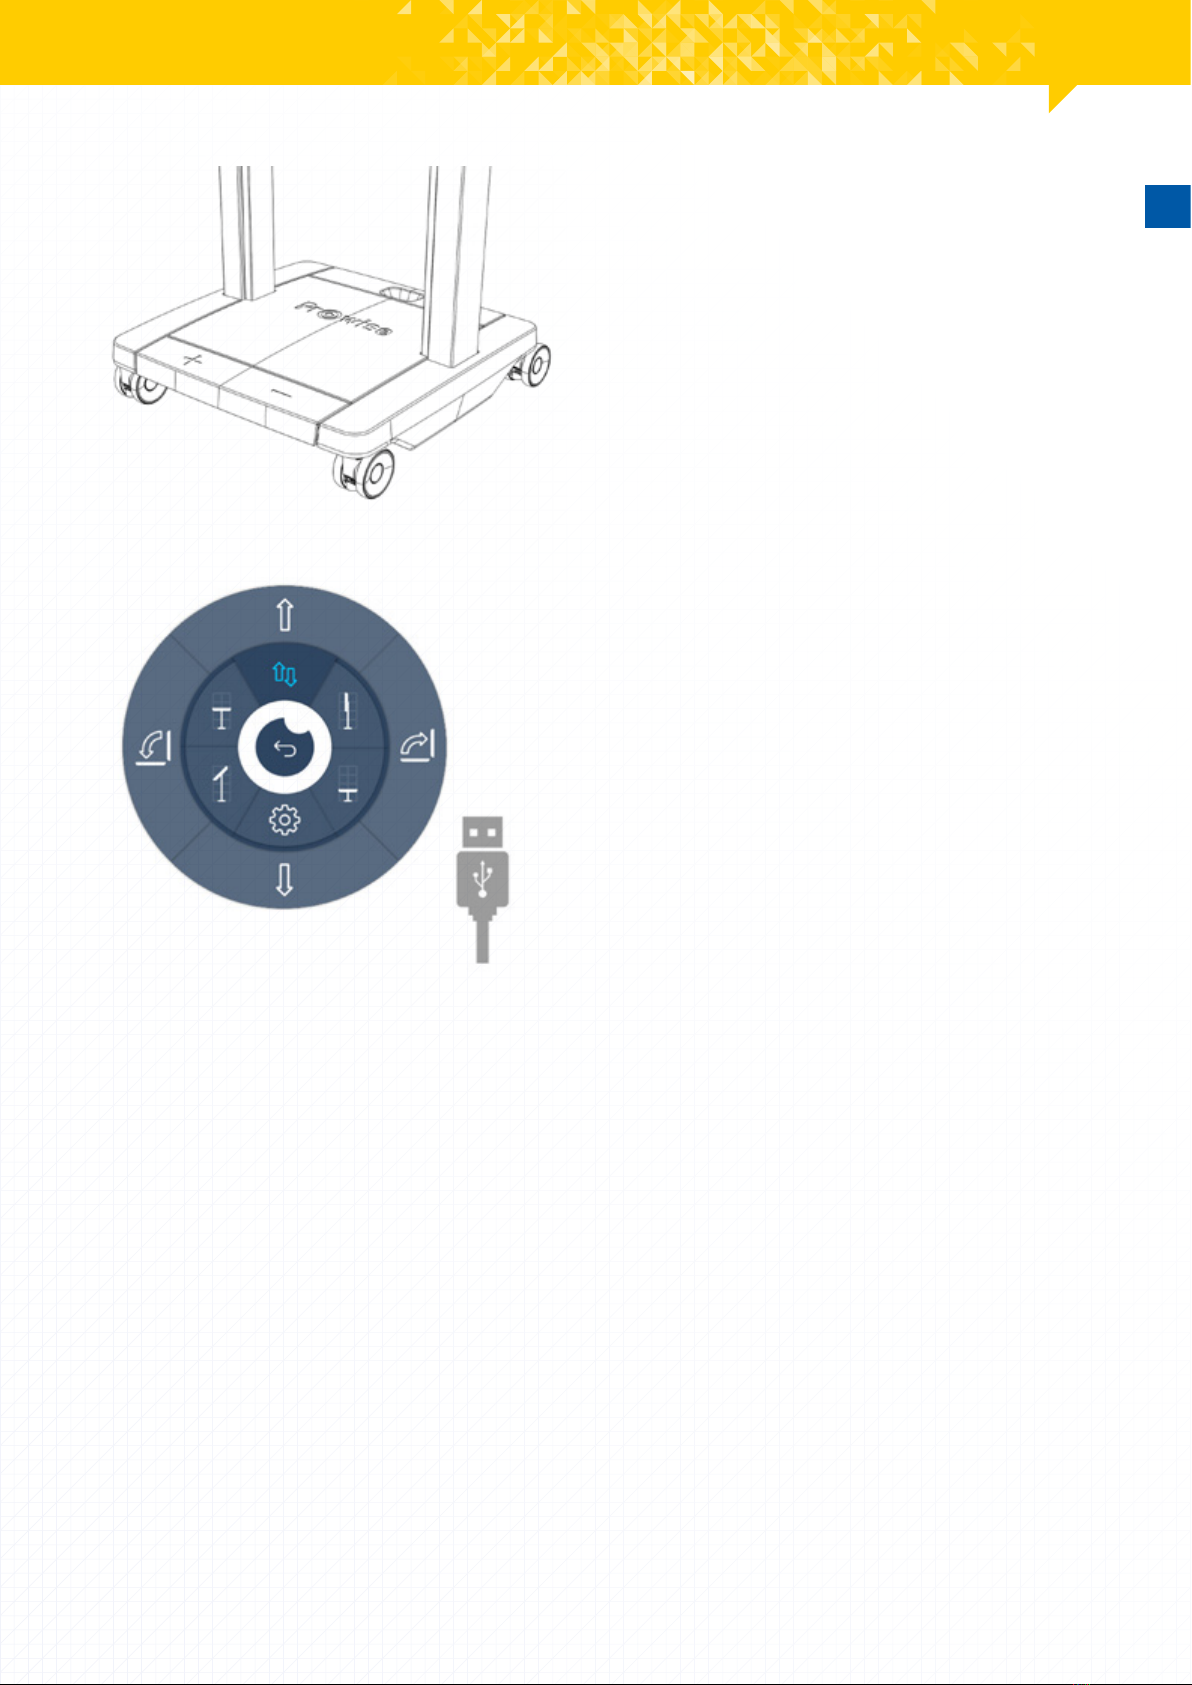
2. Adjust the height of the lift using the
foot controller, this will automatically
restrain the wheels.
3. Use the VESA brackets to install the
touchscreen on the VESA box (no. 2).
Make sure the touchscreen is correctly
positioned.
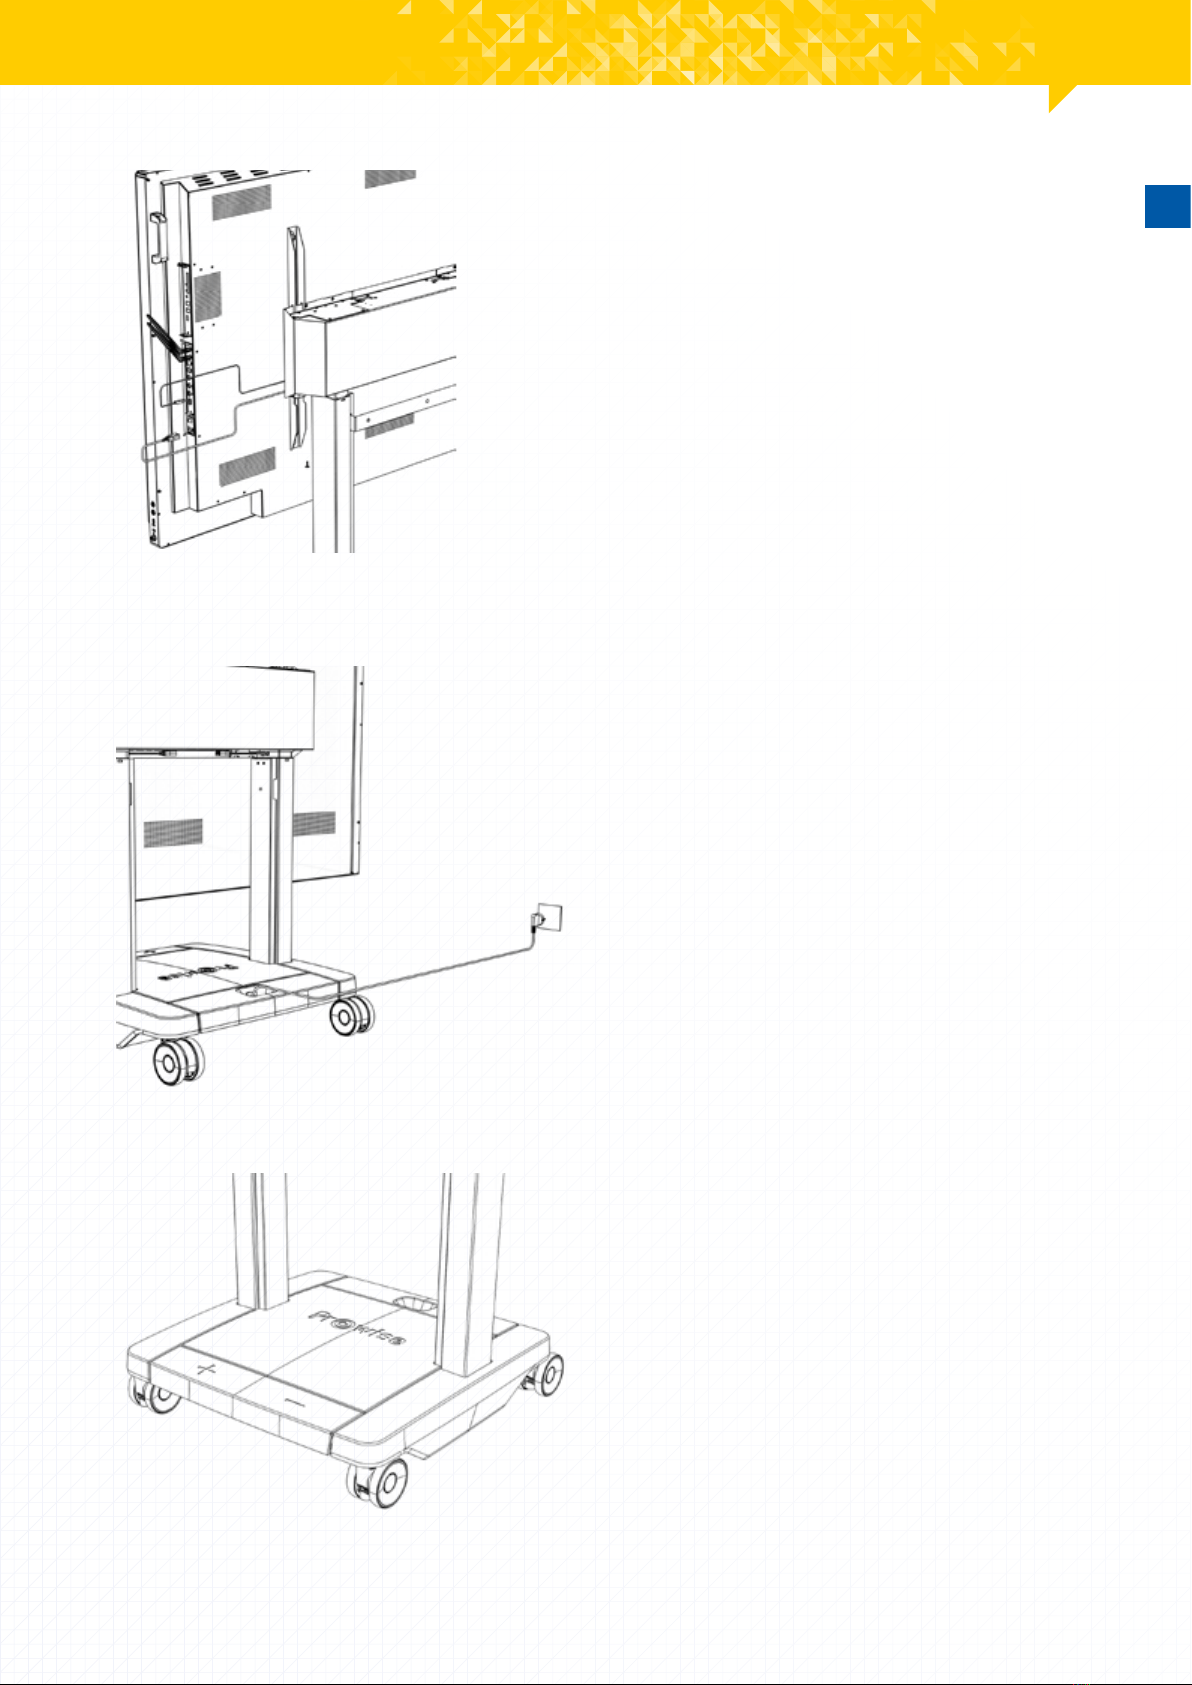
Secure the touchscreen using the supplied
M5x10 screws. Make sure the touchscreen
is securely fastened to the lift.

NL
DE
EN
Prowise iPro Mobile Lift www.prowise.com5
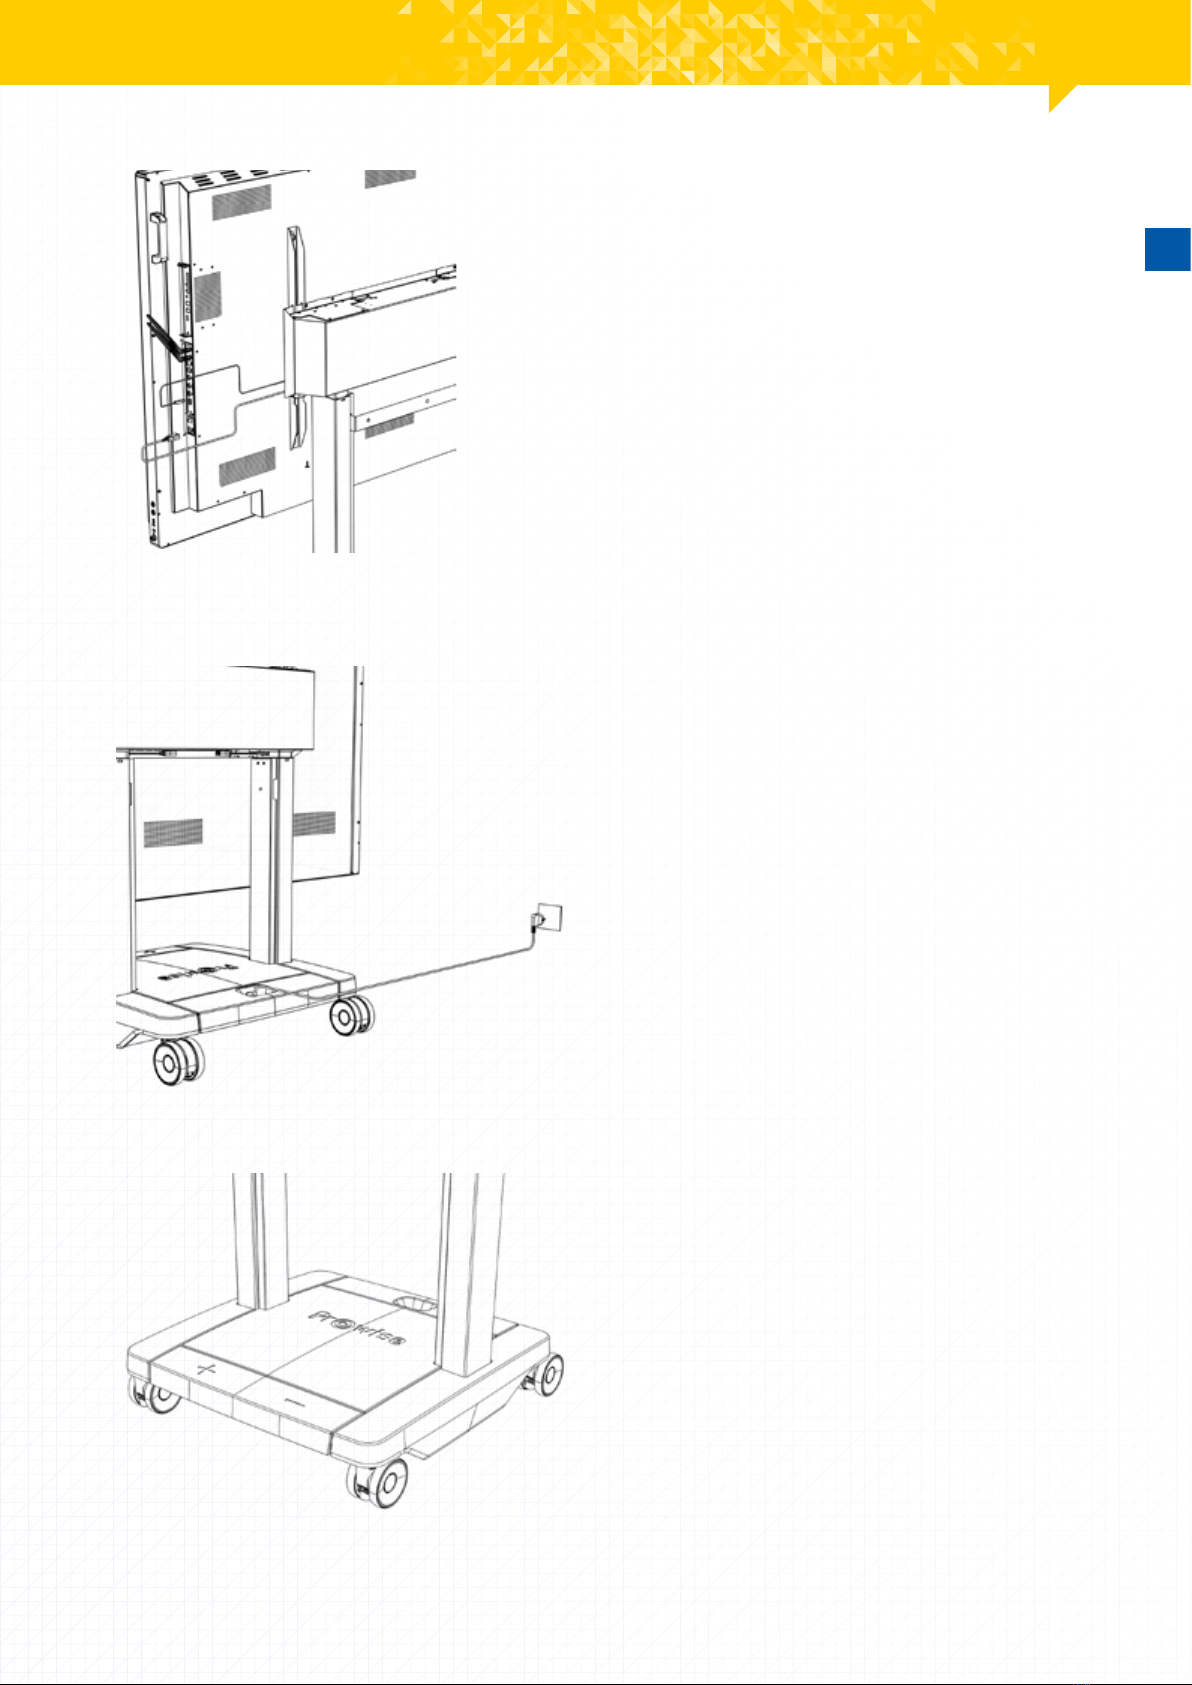
6. Connect the power cable of the lift
to the AC input of the touchscreen and
connect the usb cable from the screen to
the lift.
5. Connect the power cable of the lift
to the AC input of the touchscreen and
connect the usb cable from the screen to
the lift.
7. Align the lift by following the
initialisation procedure.
www.prowise.com6Prowise iPro Mobile Lift
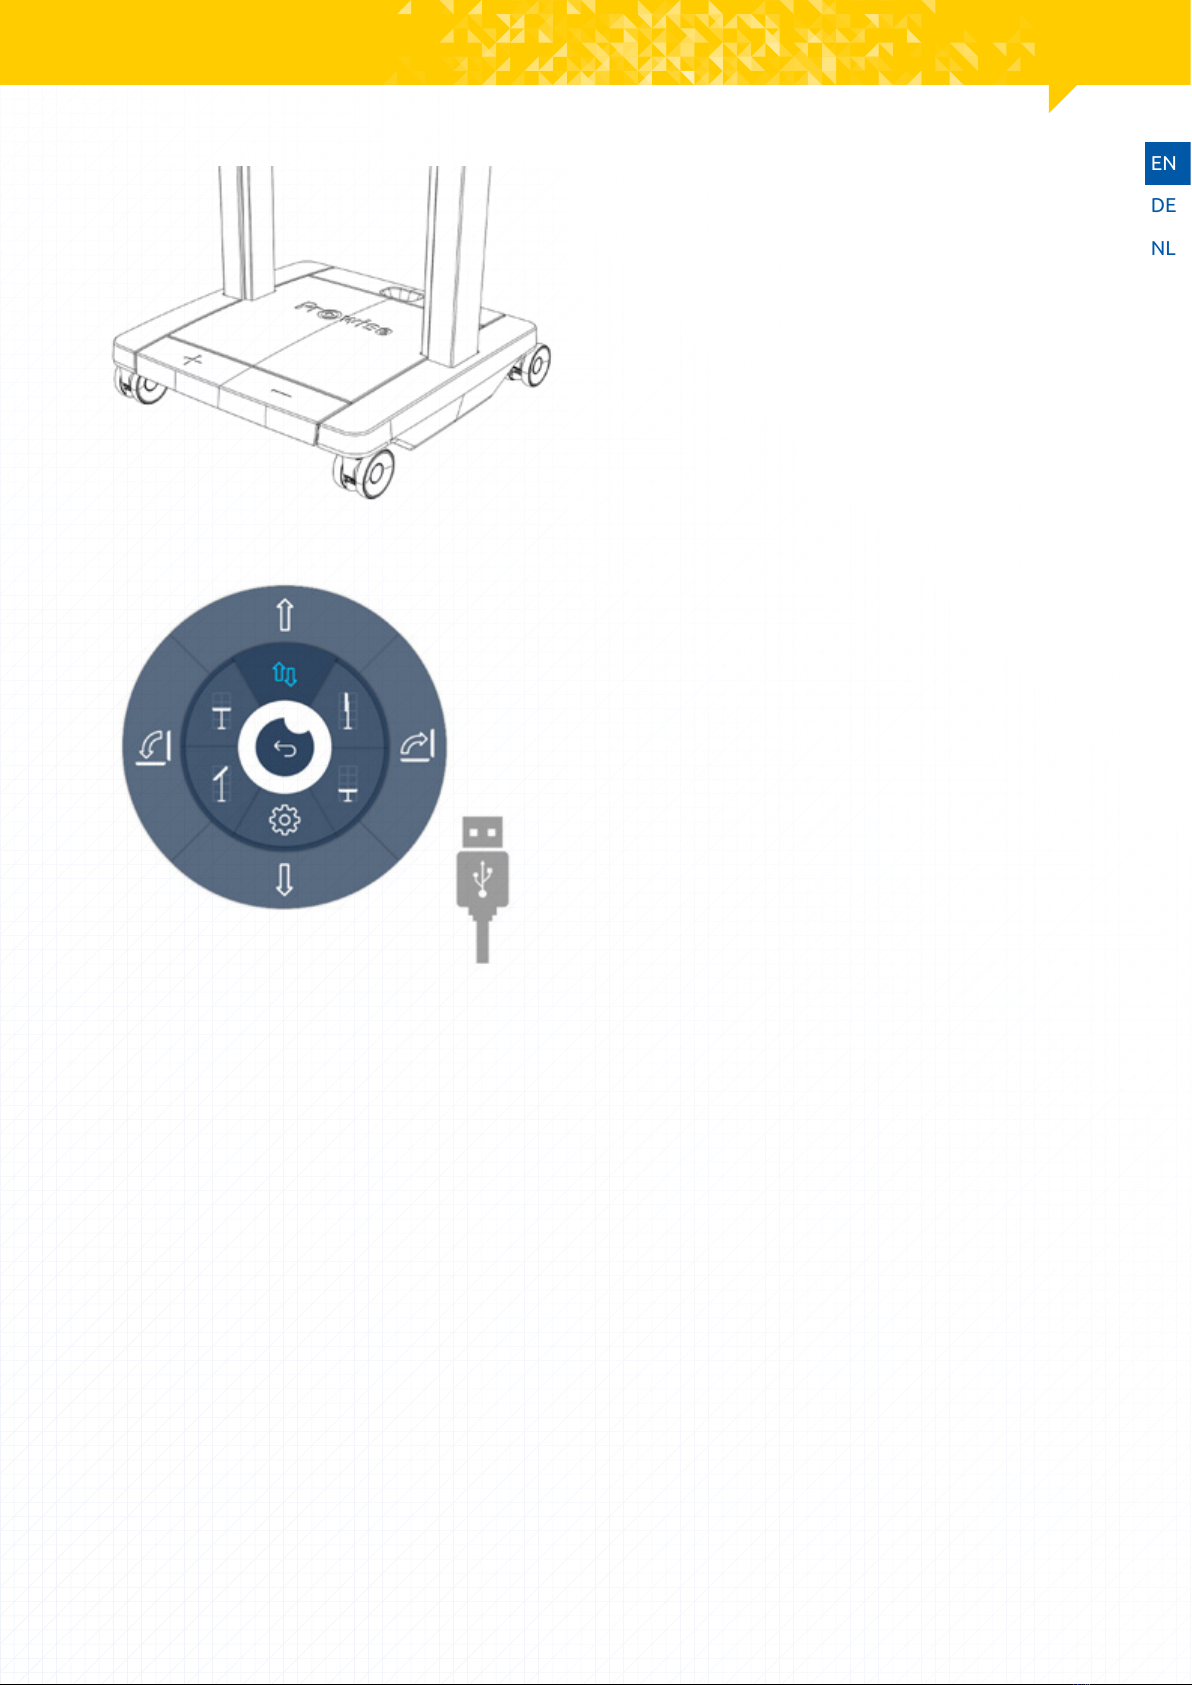
Initialisation procedure (aligning the lift columns)
Use
1. The lift is initialised by pressing the down button (-) on the foot controller.
2. Hold down the (-) button until the columns have reached the lowest position.
3. Press the down button (-) again and hold it until the columns automatically move approximately 3mm up and
down.
4. Release the down button (-) when the lift has completely stopped moving.
5. If you release the down button (-) before the initialisation process has nished, you will interrupt the
initialisation process. Repeating the previous steps is then required.
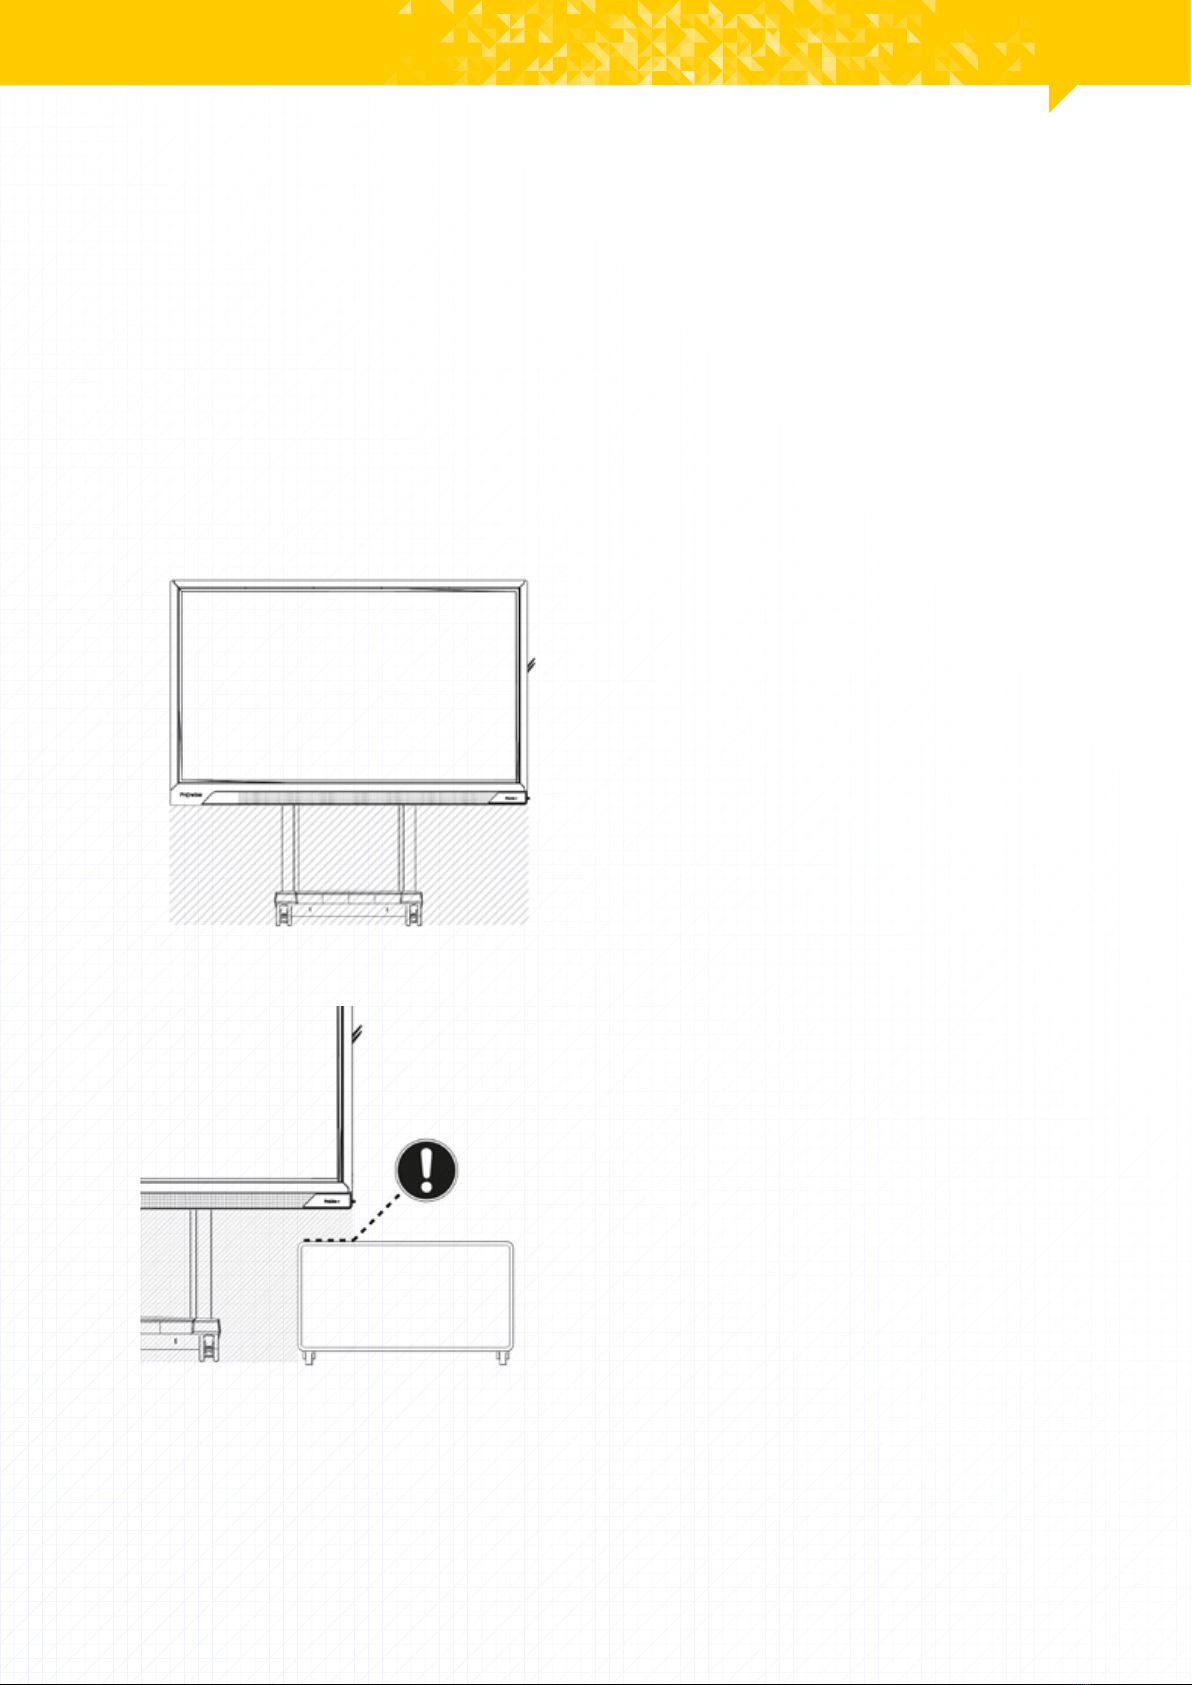
1. The range of operation of the lift must
be free from obstacles. Make sure there
are no objects or persons under the lift
when adjusting it in height and make sure
no body parts get stuck between the
touchscreen and another object.
2. The mobile lift is equipped with anti-
collision sensors, which will stop the
lift from moving as soon as it meets
resistance. This prevents damage to the
lift and the touchscreen installed on it.
NL
DE
EN
Prowise iPro Mobile Lift www.prowise.com7
3. Adjust the screen to the correct height
by pressing the + or - button on the foot
controller.
4. Connect the lift to the installed Prowise
touchscreen using the USB cable to
operate the lift directly from Prowise
Central. Please note, this functionality is
only supported by Prowise touchscreens
equipped with Prowise Central.
Follow the instructions below when moving the lift:
• In order to move the lift, start by placing it in the lowest position.
• Ensure the power cable is not dragging across the oor or is in the walkway of the mobile lift. This will avoid
the risk of tripping and will minimise the risk of damaging the cable.
• Ensure the walkway is free of objects and no persons are standing in the walkway when moving the lift.
• Two people are required to move the lift.
• Only move the mobile lift over a at and stable surface.
• Make sure that you do not run into anything while moving the lift, as this can cause damage to the screen
and the environment.
• After moving, the lift must be initialised, preventing damage and extending the lifetime of the lift.
Moving the lift


www.prowise.com10Prowise iPro Mobile Lift
Installation des Touchscreens auf dem Lift
Lassen Sie die Installation des Lifts und die Montage des Touchscreens auf dem Prowise Lift ausschließlich
von Prowise, oder einem durch Prowise zertizierten Partner ausführen. Prowise kann nicht für Schäden oder
Verletzungen, als Folge durch Montage durch Dritte, strafbar gemacht werden. Die Garantie verfällt, wenn der
Lift oder Touchscreen durch Dritte installiert, oder montiert wird.
Montieren Sie den Touchscreen folgendermaßen auf dem Lift:
1. Montieren Sie die VESA Bügel mit den
vier mitgelieferten M8x20 Schrauben an
dem Touchscreen.
2. Heben Sie den Lift mithilfe des
Fußschalters an ein wenig an, damit die
Rollen des Lifts blockieren.
3. Positionieren Sie den Touchscreen mit
den VESA Bügeln auf der VESA Box (nr
2) des Lifts. Stellen Sie sicher, dass der
Touchscreen richtig auf der VESA Box
positioniert ist.
Befestigen Sie den Touchscreen mit den
zwei mitgelieferten M5x10 Schrauben.
Stellen Sie sicher, dass der Touchscreen
richtig auf dem Lift befestigt ist.
www.prowise.com11Prowise iPro Mobile lift
NL
DE
EN
6. Schließen Sie den Lift mithilfe des
mitgelieferten Anschlusskabels an die
geerdete Steckdose an.
5. Schließen Sie das Anschlusskabel
des Lifts (nr. 4) am AC- Eingang des
Touchscreens an und verbinden Sie den
Touchscreen und den Lift mit dem USB
Kabel.
7. Justieren Sie die Liftsäulen mithilfe der
Prozedur zum “Initialisieren”.

www.prowise.com12Prowise iPro Mobile Lift
Initialisieren Lift (Justieren der Liftsäulen)
Liftnutzung
1. Das System wird initialisiert, indem der Fußschalter zum Absenken (-) des Lifts gedrückt wird.
2. Drücken Sie diesen Schalter, bis die Säulen die niedrigste Position erreicht haben.
3. Drücken Sie danach nochmals den Fußschalter zum Absenken (-) und drücken Sie diese Taste, bis die Säulen
sich automatisch c.a. 3mm heben und wieder absenken.
4. Lassen Sie den Fußschalter zum Absenken (-) erst dann los, wenn der Lift vollständig still steht.
5. Wenn der Fußschalter zum Absenken (-) losgelassen wird, bevor die Bewegung abgeschlossen ist, wird der
Vorgang abgebrochen und die Initialisierung muss erneut durchgeführt werden.
1. Die direkte Umgebung des Lifts muss
hindernisfrei sein. Es dürfen keine Objekte
unter dem Lift stehen. Sorgen Sie dafür,
dass keine Körperteile zwischen dem
Lift und dem Touchscreen oder anderen
Objekten, eingeklemmt werden können.
2. Der Lift ist von einem Anti-
Kollisionsschutz versehen. Er hält in
seiner Bewegung direkt an, wenn er
auf ein Objekt trit. Dadurch wird eine
Beschädigung des Lifts und des darauf
installierten Touchscreens vermieden.
www.prowise.com13Prowise iPro Mobile lift
NL
DE
EN
3. Stellen Sie den Touchscreen mithilfe der
Fußschalter zum Heben (+) und Absenken
(-) auf die richtige Höhe ein.
4. Verbinden Sie den Lift mithilfe
des USB Kabels mit dem darauf
installierten Prowise Touchscreen, um
die Liftbedienung in Prowise Central zu
integrieren. Achtung: Diese Funktion
ist nur für die Prowise Touchscreens
verfügbar, in welche Prowise Central
integriert ist.
Verschieben des Lifts
Beachten Sie beim Verschieben des Lifts die folgenden Hinweise:
• Bringen Sie den Lift in die niedrigste Position, um ihn zu verschieben.
• Sorgen Sie dafür, dass das Anschlusskabel nicht über den Boden schleift, oder im Laufweg des Lifts liegt,
indem Sie dieses aufrollen. So vermeiden Sie Stolpergefahr und Schäden am Anschlusskabel.
• Es dürfen sich keine Gegenstände oder Personen im Laufweg benden.
• Verschieben Sie den Lift immer zu zweit.
• Verschieben Sie den Lift ausschließlich auf einem achen, stabilen Untergrund.
• Achten Sie darauf, dass Sie mit dem Lift nicht anecken. So vermeiden Sie Beschädigungen des Lifts, des
Touchscreens und der Umgebung.
• Nach dem positionieren des Lifts muss dieser initialisiert werden. Dies verhindert Schaden am Lift und
verlängert dessen Lebensdauer.


www.prowise.com16Prowise iPro Mobile Lift
Installatie van touchscreen op lift
Laat de installatie van de lift en de montage van het touchscreen op de Prowise lift enkel door Prowise of een
gecerticeerde partner uitvoeren. Prowise kan niet aansprakelijk worden gesteld voor schade of letsel als gevolg
van montage door derden. De garantie komt te vervallen wanneer de lift of het touchscreen door derden wordt
geïnstalleerd of gemonteerd.
Monteer het touchscreen op de volgende manier op de lift:
1. Monteer de VESA beugels aan het
touchscreen met de vier meegeleverde
M8x20 schroeven.
2. Zet de lift een beetje omhoog met de
voetbediening zodat de wielen van de lift
geremd zijn.
3. Zet het touchscreen met de VESA
beugels op de VESA box (nr. 2) van de lift.
Zorg ervoor dat het touchscreen goed op
de VESA box is gepositioneerd.
Borg het touchscreen met de twee
meegeleverde M5x10 schroeven. Zorg
ervoor dat het touchscreen goed op de lift
bevestigd is.
www.prowise.com17Prowise iPro Mobile Lift
NL
DE
EN
6. Sluit de lift met het meegeleverde
aansluitkabel aan op een geaard
stopcontact.
5. Sluit de aansluitkabel van de lift (nr. 4)
aan op de AC-in van het touchscreen en
verbind het touchscreen en de lift met de
USB kabel.
7. Lijn de liftkolommen uit volgens de
procedure ‘initialiseren’.

www.prowise.com18Prowise iPro Mobile Lift
Initialiseren lift (uitlijnen van de liftkolommen)
Gebruik lift
1. Het systeem wordt geïnitialiseerd door op de omlaag-knop (-) van de voetbediening te drukken.
2. Blijf op deze knop drukken totdat de kolommen de laagste positie hebben bereikt.
3. Druk hierna nogmaals op de omlaag-knop (-) en blijf op deze knop drukken totdat de kolommen automatisch
ca. 3 mm uitlopen en daarna weer langzaam inlopen.
4. Laat de omlaag-knop (-) pas los als de beweging volledig gestopt is.
5. Als de omlaag-knop (-) losgelaten wordt voordat de beweging is voltooid, wordt de initialisatie onderbroken
en moet het proces opnieuw doorlopen worden.
1. Het werkingsbereik moet vrij zijn
van obstakels. Zorg ervoor dat er geen
objecten onder de lift staan en dat er
geen lichaamsdelen bekneld kunnen
raken tussen een ander voorwerp en de
lift of het touchscreen.
2. De lift is voorzien van anti-collision
sensoren, hierdoor stopt deze met
bewegen zodra de lift tegen een object
botst. Dit voorkomt schade aan de lift en
het daarop geïnstalleerde touchscreen.

www.prowise.com19Prowise iPro Mobile Lift
NL
DE
EN
3. Stel het touchscreen op de juiste
hoogte in door de omhoog- (+) of omlaag-
knop (-) van de voetbediening in te
drukken.
4. Verbind de lift door middel van de
USB kabel met het daarop geïnstalleerde
Prowise touchscreen voor een integratie
van de liftbediening in Prowise Central.
Let op, deze functie wordt enkel
ondersteund door Prowise touchscreens
waarbij Prowise Central is geïntegreerd.
Verplaatsen van de lift
Neem de volgende richtlijnen in acht bij het verplaatsen van de lift:
• Zet de lift in de laagste stand om deze te kunnen verplaatsen.
• Zorg ervoor dat de aansluitkabel niet over de grond sleept of in het looppad van de lift ligt door deze op te
rollen. Dat voorkomt struikelgevaar en schade aan de aansluitkabel.
• Let op dat zich geen voorwerpen of personen in het looppad van de lift bevinden.
• Verplaats de lift met twee personen.
• Verplaats de lift uitsluitend over een stabiele, vlakke ondergrond.
• Let op dat je nergens tegenaan botst terwijl je de lift verplaatst. Dat voorkomt schade aan de lift, het hierop
gemonteerde touchscreen en de omgeving.
• Na het verplaatsen moet de lift geïnitialiseerd worden. Dat voorkomt schade en verlengt de levensduur van
de lift.

Other manuals for iPro Wall Lift
2
Table of contents
Languages:
Other Prowise Lifting System manuals


