PSB imagine XA User manual

1
Imagine XA Dolby
Atmos®Speaker
Owner’s Manual

2

3
INTRODUCTION
Thank you for purchasing the PSB Speakers Imagine XA Dolby Atmos®Speaker. Our speakers are designed to make high-performance sound easy to bring
into your life. They have the wide frequency and dynamic range, natural tonal balance, and precise spatial imaging needed make both music and movies
powerfully lifelike and enjoyable. All of our models match closely in tonal balance to allow easy mixing in home theatre systems.
UNPACKING THE SPEAKERS
The packaging materials are designed to protect the speaker from damage during transport, however if visible or concealed damage has occurred in
handling, it should be reported at once to your authorized PSB dealer, or to the shipping company that delivered your speakers. We highly recommend
retaining all packaging, as it may be needed to transport the speakers in the future.
INSTALLING THE GRILLES
The included grilles are part of the acoustic design of the height speaker and required to be in
place to meet the Dolby specified response pattern. To attach the grille simply line up plastic grill
pins with their corresponding rubber grommet receptacles and lightly push down on the grille
frame. The grille must be installed at all times during use, however if you wish to remove the grille
for cleaning, grasp the frame of the grille cover and gently lift the grille away from the speaker. To
re-attach it, reverse the process and follow the instructions above.
WHAT IS DOLBY ATMOS®?
With Dolby Atmos, sound comes alive from all directions, including overhead. The format combines a channel-based audio bed with object-oriented sound
to place and move specific effects around the theater, creating a breathtakingly realistic and captivating sonic atmosphere.
Sound designers and artists are free to mix in a 3D space, steering effects through surround channels and adding a seamless overhead dimension
with discrete height channels. In commercial theaters, it supports up to 128 audio tracks and 64 unique speaker feeds. The home theater adaptation
automatically scales to your surround configuration.
Additionally, a new Dolby surround up-mixer used in today’s A/V receivers and processors allows for legacy channel-based content that has not been mixed
for Dolby Atmos to be expanded to fill the flexible speaker layouts of a Dolby Atmos system to add a new dimension to classic movies.
DESCRIPTION
The Imagine XA Dolby Atmos was specifically designed to be used as the “elevation” or “height”
speaker in a Dolby Atmos surround system.
Working with Dolby Laboratories, Paul Barton, the Founder and Chief Designer of PSB Speakers,
developed the Imagine XA with its unique vertically-firing driver array to deliver the excitement
of Dolby Atmos-encoded soundtracks with three-dimensional realism and pinpoint accuracy. The
Imagine XA’s frequency response and directivity pattern have been specifically engineered to meet
Dolby Atmos requirements.
The Imagine XA itself shares the same advanced driver technology with PSB’s prestigious Imagine
Series—including its 4” clay-filled injection moulded polypropylene woofer, 1” titanium dome
ferrofluid-cooled tweeter and advanced crossover design—and is measured at Canada’s National
Research Council (NRC) to the high performance standards of all PSB Speakers products.
The speaker is designed to fit perfectly on top of PSB Speakers’ Imagine XT2, XT and XB speakers, creating an integrated, “one-piece” look. Additionally,
the Imagine XA are well suited to being used on top of any other quality speaker brand, or wall mounted as “stand-alone” Dolby Atmos-enabled speakers
in a 5.1.2, 5.1.4 or 7.1.4 Dolbly Atmos system.

4
PLACEMENT IN A DOLBY ATMOS-ENABLED SYSTEM
The Imagine XA delivers the “overhead” dimension in a
Dolby Atmos-enabled surround sound system. The Dolby
Atmos-enabled speakers are used in addition to the
standard speakers in a 5.1 or larger home theatre system.
The Imagine XA speakers allow you to experience overhead
sounds when the speaker is placed at the same level as a
traditional speaker. These Dolby Atomos-enabled speakers
direct sound upward at a precise angle to reflect off the
ceiling to create an accurate reproduction of audio coming
from above you.
We will cover three basic configurations for Dolby Atmos systems.
1) 5.1.2 system, in which there are two Imagine XA speakers in addition to the existing five speakers

5
2) 5.1.4 system, in which there are four Imagine XA speakers in addition to the existing five speakers
3) 7.1.4 system, in which there are four Imagine XA speakers in addition to the existing seven speakers
6
In all three system configurations, one pair of Imagine XA speakers is located at
the front of the room, very nearby or on top of the front Left and Right speakers.
For optimal effect and to minimize the distracting effect of audio radiating
directly at the listening position, the Imagine XA should be no lower than the ear
height of a seated listener. Also, avoid placing the speaker higher than one-half
the height of your wall.
The Imagine is sized and styled to fit perfectly on top of PSB Speakers Imagine
XT2, XT and XB speaker as shown. Before placing the Imagine XA on top of a
Imagine X speaker apply the supplied single- or double-sided adhesive-backed
bumpers to the bottom of the Imagine XA. This will add stability to the speaker,
and protect the finish of both the Imagine XA and any speaker it sits atop of.
The Imagine XA can also be used with any high quality Left/Right speaker, from
PSB Speakers or any other quality speaker brand.
If the space or room/furniture layout restricts you from placing the front Imagine
XA speakers directly atop the front L/R speakers, then you can place or wall
mount the Imagine XA as follows:
Laterally: within 2-3 feet max of the associated L/R speaker
Vertically: at least as high, but no more than 18” higher than the associated L/R
speaker
WALL MOUNTING YOUR DOLBY ATMOS SPEAKER
The PSB Imagine XA is supplied with a custom wall-mounting bracket and template for ease
of installation.
Wall mounting the Imagine XA may require specialized tools and materials, as well as a
certain level of expertise. For example, if wires are to be hidden within the walls of your
home, we highly suggest consulting a local CEDIA certified installer in your area. To find a
CEDIA certified installer please visit www.cedia.net.
For successful on-wall mounting, the following tools will be required: tape measure, pencil,
level, screws, anchors, screwdrivers, power drill, and drill bits.
Prior to mounting, it is highly recommended to determine the best location for each Imagine
XA speaker in relation to your listening position. Please visit the Dolby website at www.dolby.
com/us/en/technologies/dolby-atmos.html for more information on on-wall positioning.
Ensure the selected locations for wall mounting do not conceal electrical wiring, and the
speaker clears surrounding physical structures, electrical fixtures and wiring.
Use the supplied wall-mounting template and mark the location of the pilot holes. Pre-drill
each hole for the mounting screws (not included) using the correct mounting hardware for
the specific wall surface.
If there is no stud behind the chosen location, use wall anchors (not included) to secure the bracket screws, following the wall anchor manufacturer’s
directions.
Important: It is recommended that you have at least two (2) mounting points attached into a stud for increased strength. Use the
appropriate hardware depending on the building material.
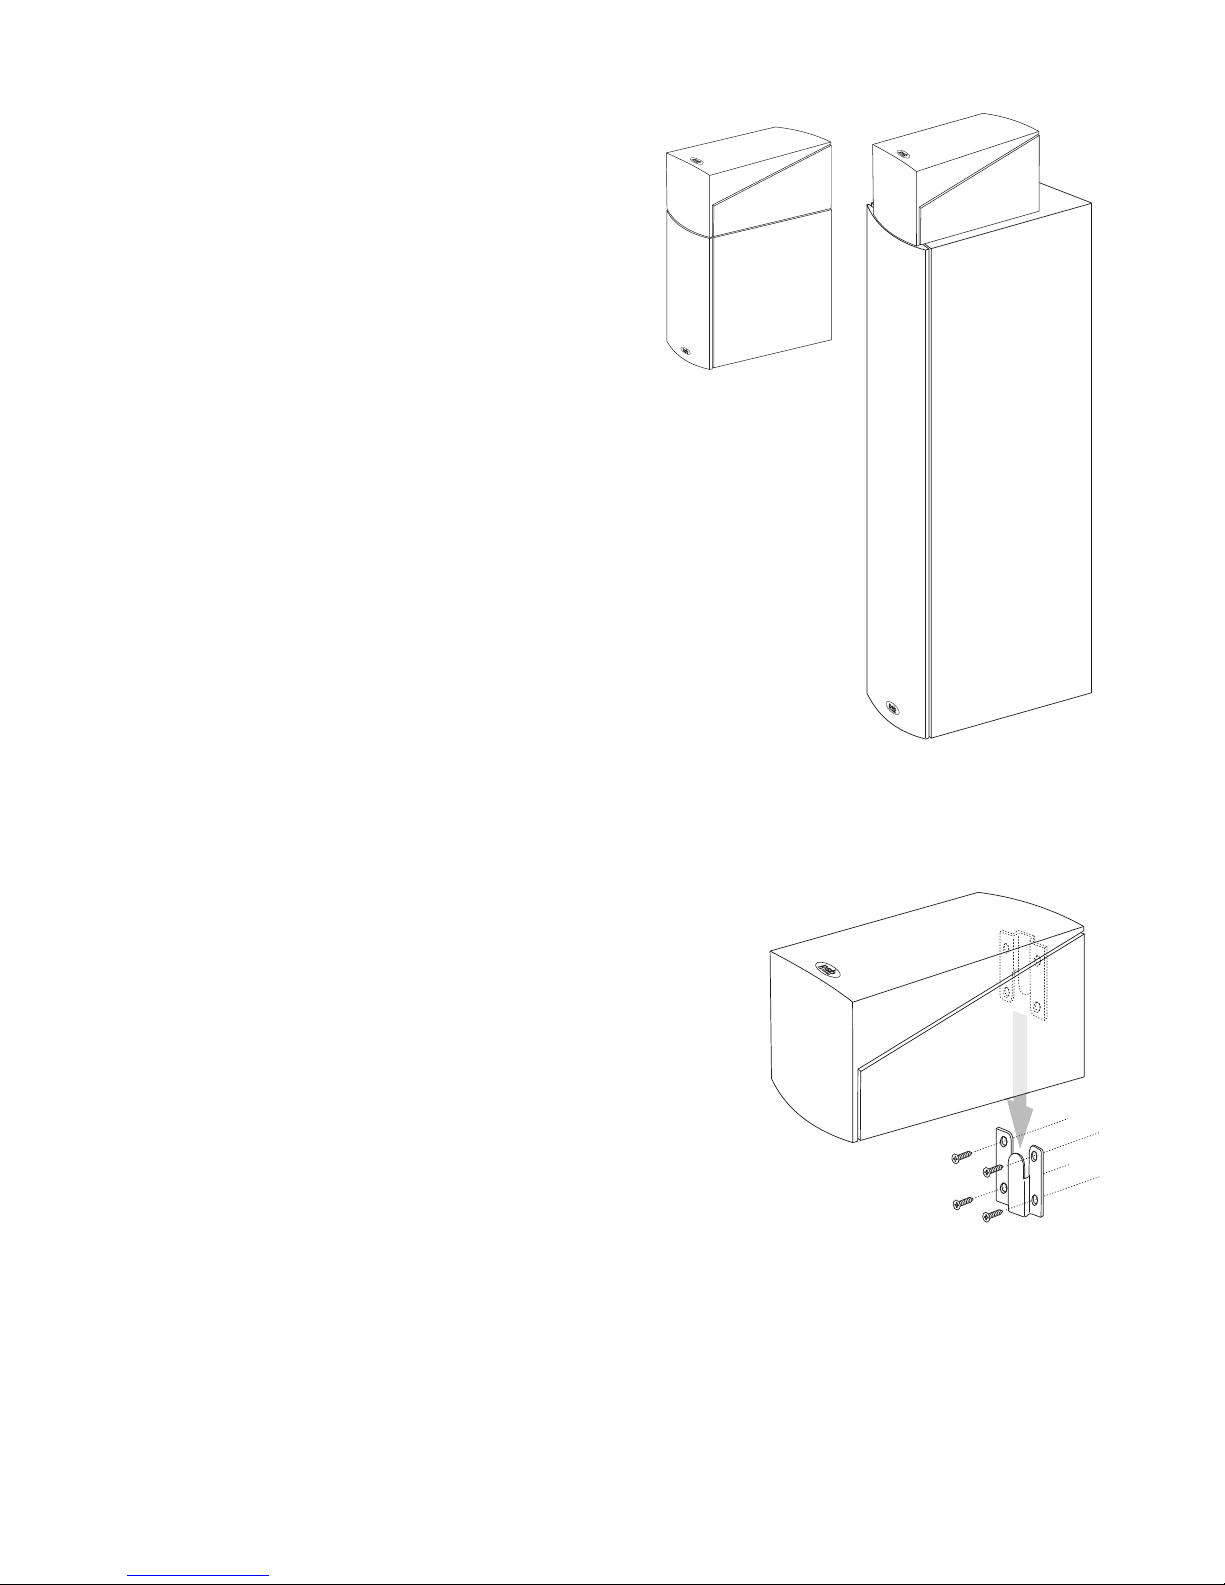
Position the Imagine XA inline with the wall-mounting bracket with bracket on the rear of the speaker and let the speaker slide straight down, allowing
the speaker to slide-and-lock into the slot for a secure mount.
PSB Speakers Imagine XA on an Imagine XB and an Imagine X2T.

7
For the side or back surround channels in a 5.1.4 Or 7.1.4 System:
Either place the Imagine XA directly on the associated surround speaker, or place it no more than 2-3 ft away laterally and within ±18” vertically.
If you need guidance for a more difficult setup, of if you want more information about Dolby Atmos please visit their website at www. dolby.com/us/en/
technologies/dolby-atmos.html
COMBINING OVERHEAD AND DOLBY ATMOS ENABLED SPEAKERS
In some instances, a home theatre system may already have overhead speakers that can be used to generated overhead audio. In this case, Dolby Atmos
enabled speakers may be used to complement existing overhead speakers to create a full, four-speaker height experience. If existing speakers are in the
front of the room, then Dolby Atmos enabled speakers may be used in the rear of the room and vice versa.
CONNECTING YOUR DOLBY ATMOS SPEAKER
We recommend that you connect your system using standard dual-conductor wire for the wiring distances specified; if you prefer, you can use thicker
(lower-gauge) wire.
Under 25 ft (7.5 m): 18-gauge or 1.0 mm dia
25-50 ft (7.5-15 m): 16-gauge or 1.3 mm dia
50-100 ft (15-30 m): 14-gauge or 1.6 mm dia
Over 100 ft <>30 m): 12-gauge or 2.0 mm dia
Please contact your audio/video dealer or installer for specific cable recommendations and further information regarding special circumstances.
Important: Always turn off your electronic equipment before connecting speaker. If you don’t, sever damage to equipment
and/or your ears may result.
Be sure to connect your Imagine XA speaker to your system in an identical manner for proper connection: Red or (+) amplifier/receiver terminal to Red (+)
speaker terminal, Black (-) amplifier/receiver terminal to Black (-) terminal.
A proper connection will ensure that each speaker driver cone on both channels move forward and backward together (in-phase), rather in opposition
(out-of-phase).
Important: All Dolby Atmos-enabled speakers must be in phase with the existing surround speakers in the system to create the
desired Dolbly Atmos effect.
Use the below wire-coding diagrams to ensure you are connecting the same wire of a given pair to a like-coded terminal on both ends of the connection.
Bare Wire Connection
Unscrew each speaker binding post until you expose a small hole through their centre.
Twist the bare speaker to create a single strand and insert it into the exposed holes and
retighten the binding post until it is firmly secured. Be careful not to over tighten and
damage the connectors.
Banana Plug Connection
Unscrew each speaker binding post and remove the red/black coloured binding post
plugs from the centre. Reinstall and tighten the binding posts until they are firmly secured
and insert the banana plug into the top of the binding post.
Observe Proper Connection Polarity
PROTECTING YOUR INVESTMENT
For long lasting enjoyment of your PSB product, you should respect their limits and avoid excessive volume levels for music or movie playback. Excessive
volume levels can damage all types of speakers.
If your speakers are pushed to excessive volume levels, they could be driven into “clipping”, which may result in severe and/or permanent damage. If
listening to your speakers at loud levels, listen carefully for any signs of harsh, distorted midrange and diminishing precision – if detected, turn the volume
down immediately. Never test peak listening levels of your speakers by turning the volume to the maximum level.

8
CARE AND CLEANING
For safe, sanitary use, it is essential to maintain and clean your speakers periodically. However, excessive cleaning may cause damage and jeopardize the
longevity of the product. When not in use, avoid storing in extreme hot or cold temperatures and humidity, and avoid exposure to liquids.
I. Packaging
We highly recommend retaining all packaging for this product any necessary transporting. To transport, carefully place the speaker into its original
packaging and close each panel.
II. Cabinet Care
PSB cabinets have varying materials and finishes, including wood veneers, vinyl, anodized aluminium and high gloss, and should be treated with the same
care you would with similar finishes such as on furniture. Dust lightly with a soft cloth, avoiding abrasive materials that will cause permanent damage to
the cabinet. If necessary, wipe carefully with a cloth slightly dampened with water-based cleaner to remove heavy soil.
II. Drivers and Port Care
During light cleaning, avoid touching speaker diaphragms as it could cause permanent damage to the tweeter and/or drivers. If deeper cleaning is
required, we suggest using a lint brush to clean the driver ports.
TROUBLESHOOTING
Audible Distortion
If a speaker begins to sound distorted or fatigued, check to see whether playing at a lower volume resolves the issue.
Low or No Volume Output
If there is low or no volume output, check the audio source is powered “on”, and the audio is set to a medium volume level and not muted.
If the audio source is indeed powered “on”, check and ensure the cable connections to the audio source and speakers are secure and in-phase. Also, try
connecting a different cable to see if this resolves the issue.
If there is no overhead sound output from the height speakers, check and ensure your receiver or pre-processor is set to the correct surround/audio mode
which can decode Dolby Atmos sound and send the signal to your speakers.
If you require service please visit your local authorised PSB service centre, or go to PSBspeakers.com to open a support ticket. If you have moved since your
purchase, the nearest authorised PSB dealer will be able to assist you.
If the problem is not resolved, please contact us directly and provide the model name, serial number, date of purchase, dealer name, and a full detailed
description of the issue.
Environmental Protection
At the end of its useful life, this product must not be disposed of with regular household waste but must be returned to a collection point for the recycling
of electrical and electronic equipment. The symbol on the product, owner’s manual and packaging, point this out.
The materials can be reused in accordance with their markings. Through re-use, recycling of raw materials, or other forms of recycling of old products, you
are making an important contribution to the protection of our environment.
Your local administrative office can advise you of the responsible waste disposal point.
We appreciate your purchase of our product, and thank you for taking the time to read this owner’s guide. We hope you enjoy the exceptional satisfaction
that PSB Speakers have to offer, and wish you many years of enjoyable listening.
Real Sound for Real People.
PSB Speakers
633 Granite Court
Pickering, Ontario L1W 3K1
CANADA
www.psbspeakers.com
888-772-0000 (905) 831-6555
Fax: 905-831-6936
Table of contents
Other PSB Speakers manuals

PSB
PSB GB1 User manual

PSB
PSB Alpha Alpha LR1 User manual

PSB
PSB THECUSTOMSOUND SERIES User manual

PSB
PSB Platinum Series User manual

PSB
PSB CHS80 User manual

PSB
PSB CHS212 User manual

PSB
PSB the CustomSound Series User manual

PSB
PSB SYNCHRONY Series User manual

PSB
PSB CWS8 Quick start guide

PSB
PSB CW600E User manual

PSB
PSB the CustomSound Series User manual

PSB
PSB Imagine On-Wall W1 User manual

PSB
PSB ALPHA AM5 User manual

PSB
PSB CWA-1 User manual

PSB
PSB CHS212 User manual

PSB
PSB Imagine T3 User manual

PSB
PSB Synchrony Series User manual

PSB
PSB CustomSound CW60R User manual

PSB
PSB CustomSound series C-LCR User manual

PSB
PSB CHS40 Quick start guide


