PSG Intelli$cale User manual
Intelli$cale
Electronic Cash Counter
Users Guide
Help Desk Support
If you need help with the operation of your Intelli$cale
Please call our help-line at:
1-866-476-8842
Mon-Fri
8AM-8PM EST
www.p-s-g.com
Profit Solutions Group
227 Bellevue Way NE #448
Bellevue, WA 98004
p. 425-644-7333
f. 425-641-1062

Introduction
Your new Intelliscale currency counter is a designed to help count coins, bills and checks very fast.
After you have assembled the Intelliscale following the instructions in the box, the next step is to
plug it in and become familiar with the way it works.
This document contains information on the following:
•Process changes to your Daily Cash Procedures that incorporate the Intelliscale Currency Counter.
•Tips to help you get started.
•Basic Counting Procedures for:
oDaily Shift Changes
oDaily Deposit
oAudits
The diagram below points out the most important features of your Intelliscale.
These features include the:
•HOD – the tray for bills and coins
•Display - provides instructions and count totals
•Up/Down Arrow Buttons – allows the user to go forward and backwards in a count
•Keypad – allows the user to go directly to a count type, clear a mistake, and enter a value
•Toll Free Help Line Number – call if you need help or service
•Power Indicator – indicates if the Intelliscale is plugged in to an ac outlet
•AC Adapter – provides power to the unit and charges its internal battery
•Till Insert Cups – cups that fit in the change section of your till. 1¢, 5¢, 10¢, 25¢ cups
HOD
Toll Free
Help Line
Numbe
r
Display
Keypad
Up
Down
Scroll
Buttons
Power
Indicator
AC
Adapter
Till Insert Cups
For Assistance
Cll
This Page Left Intentionally Blank
PSG Confidential -2- 10046-A PSG Confidential -11- 10046-A
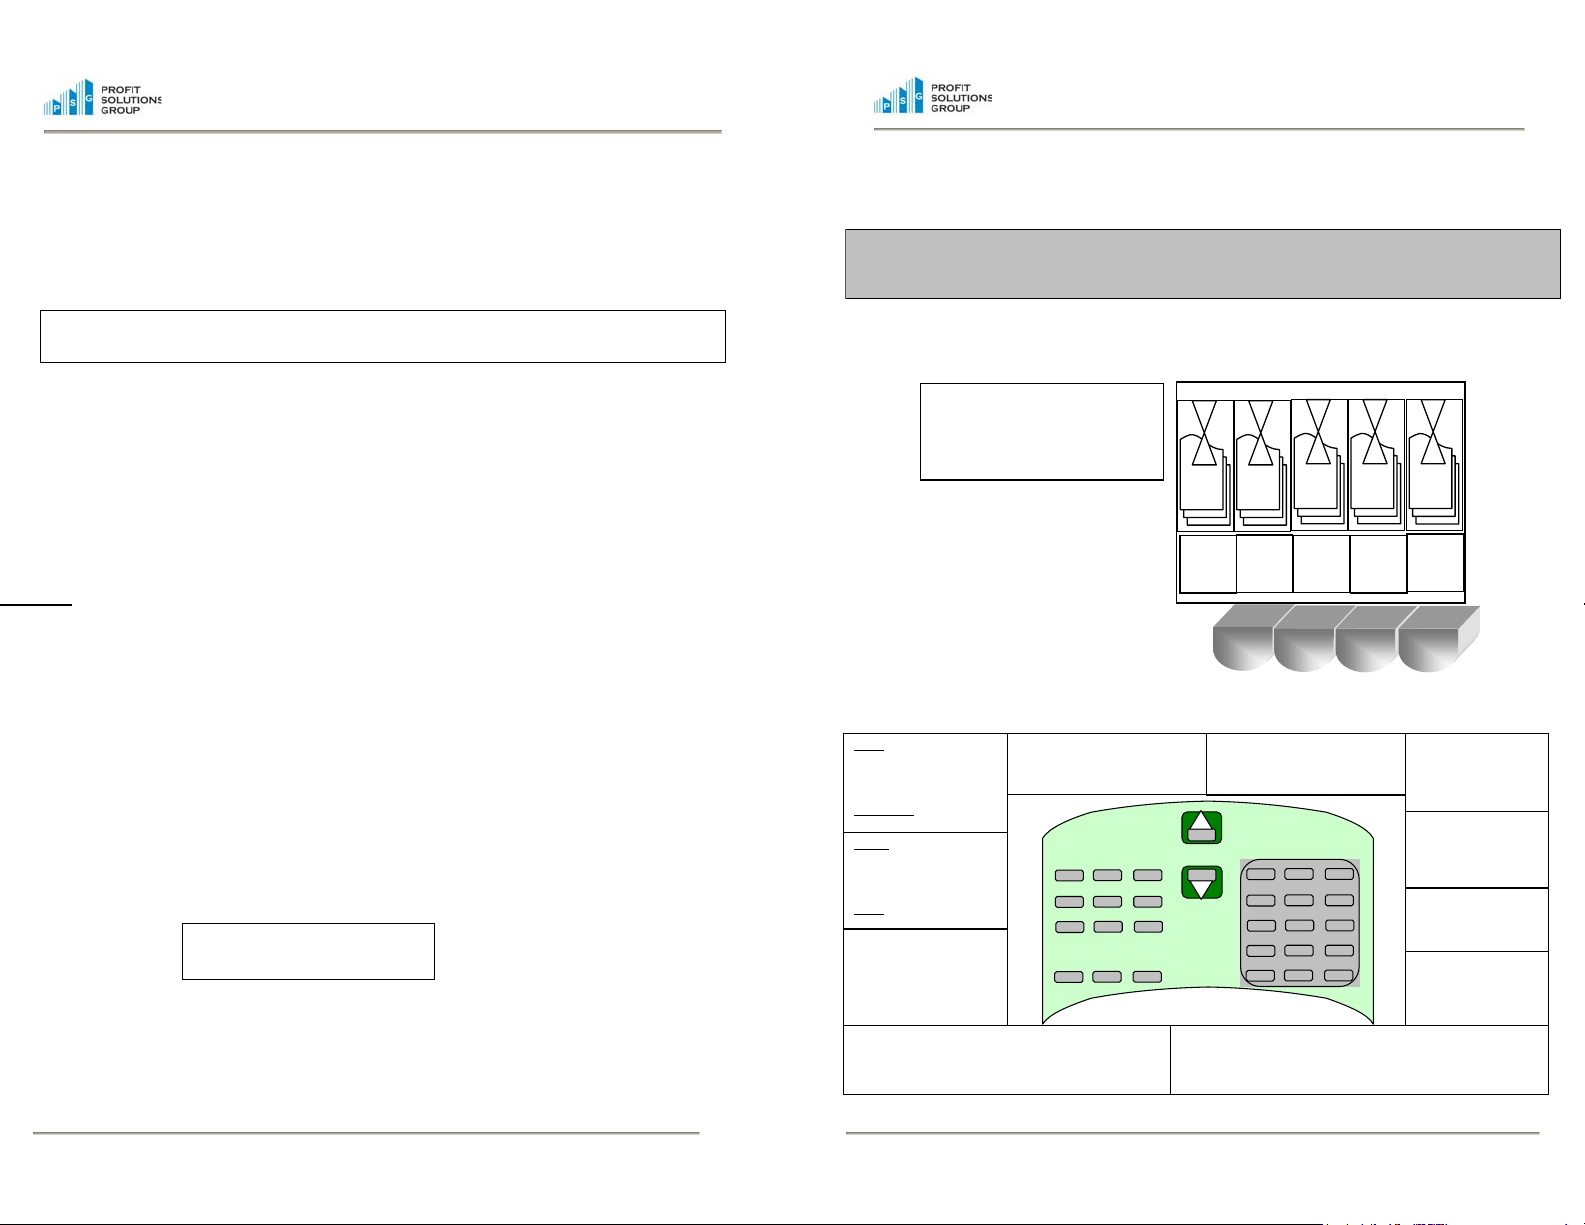
DAILY CASH HANDLING PROCEDURES WITH INTELLISCALE
Step 1 Preparing the Tills
Remove the coins from the till,
insert the Till Cups into the till,
and place the coins into the Till
Cups.
$1$5
$10$20
1¢5¢10¢25¢
Step 2 Getting Familiar With The Keypad
PSG Confidential -10- 10046-A PSG Confidential -3- 10046-A
•When the bills are removed from the HOD, the money will be added to the total and the machine will
automatically advance to the next denomination. Continue counting the bills you have for the deposit
on the proper denomination until all bills have been counted.
•When all cash has been counted, press and release the Green “End/Total” button located on the bottom
left of the Intelli$cale. The Printer will then give you a print out of all the monies counted AND all the
checks previously counted in each drawer count. They do not need to be re-entered. The print out will
provide you with an itemized deposit broken down into denominations and checks. Then press and
release the Green “End/Total” button again to clear out the machine and return to the Start menu ready
for the next count. This will clear out all the checks.
Note: If you would like a check list printed out BEFORE you perform the deposit, press and release the
“PRINT” button located on the bottom left of the Intelli$cale from the start menu. Use the numeric keypad to
select 1 which will give you a list of all checks entered.
D
aily Maintance – If you do not use the Deposit count, clear the check memory each day by doing the following:
•Press the “Print” button located on the bottom left side of the keypad. You will have the option to
1=Print Checks, or 2=Exit, press the “1” key on the keypad.
•The machine will print a list of all checks entered into the machine. Then press the #1” key on the
kepad again to clear all checks in memeory.
•Press and hold the RED “ON/OFF” button located on the bottom left of the Intelliscale. Hold the
button down until you see the “SWITCHING OFF NOW” messagfe on the display. Release the
button and the machine will go off.
U
seful Tips
C
up Calibration – Your Intelliscale has already been calibrated at the factory to use the cups that are included with
your machine. However, if at a later date you need to re-calibrate your machine, From the Start menu, or in any
count mode, press the MENU button. The next display will be the program menu. Follow the instructions below:
•Press and release the number “1” button on the keypad to select the “User Option”
•Your Intelliscale will need a pass code to enter User Options. Use the keypad on the right to enter the
pass code 1-2-4-1.
•The display will display “User Options, Printer set ON”, press and release the UP scroll button until
“Calibrate Cup” appears.
•Press and release the Green “Enter” button located on the bottom of the keypad on the bottom right of
the machine and follow the prompts. The cup must be empty.
•To exit the Program after calibrating your cup, press and release the RED “ESC” button twice until you
reach the Start Menu.
E
diting a Count – If you realize at the end of a count that you have made a mistake, you can always go back and
Edit that count. From the ending menu, press the #2 key on the keypad.
Use the up or down arrow keys to scroll to the denomination you want to edit. Press the CE (clear entry) key,
and only that amount is cleared from the Intelliscale. Next recount the coin, bill value that was in error. Press
the End/Total key and this will force a new printout with the edited total. If you need to modify a check value,
scroll to checks, and press the CE key. Next, use the up or down arrow keys to scroll to the check you want to
edit. Then key-in the new amount, and press the Enter key and then the ESC (Escape) key. Press the
End/Total key and this will force a new printout with the edited total.
1=REPRINT 2=EDIT
3=END COUNT
Note: Your daily cash procedures may have been slightly modified to incorporate the Intelliscale.
Please read and follow any new processes that may come from your corporate office.
BILLS - direct access to bill
denominations-each time
you press the button you
advance forward $1-$5-$10-
thru the denominations.
NON-CASH – access to
Checks,
Credit, Debit
CE - clears the entry currently on
screen (for just that denomination).
MENU - this moves you
from Count modes to
the Program modes.
ROLL/STRAP - allows for
counting rolls by
denomination (instead of
cup) and when in bills
mode, allows for straps or a
clip.
BANK - changes
between No Bank and
your pre-set $100 Bank.
ON/OFF – to turn the Intelliscale off, press and hold the
On/Off key for several seconds. This is a security feature to
keep the unit from being turned off accidentally.
ESC - this button allows for backing
out of any operation or entry.
COINS - direct access to
coin denominations-each
time you press the button
you advance forward 1¢-5¢-
10¢-thru the denominations.
CALC – Calculator Mode ENTER – enters the
value or selection.
END/TOTAL - Takes
you into final review
before ending a count.
UP/DOWN Arrow -moves up and down the menu options, bank options
and counting options in the count types.
For Assistance Call
Toll Fr ee 1-866-XXX-YYY
ESC CE Menu
Coins
Bills Non-Cash
BankCalc Roll/Strap
On/Off End/Total
Print Enter/+

1=Drawer 3=Audit
2=Deposit
1=User Options
2=Supervisor
Step 3 Getting Started
Turning your Intelliscale ON:
•Make sure there is nothing in the money holder (HOD), then press and release the RED “ON/OFF” button
located on the bottom left of your Intelliscale.
•Your Intelliscale display will light up and you will see a prompt “Enter Store Number”. You can do this using
the keypad located on the bottom right of the keypad. You may enter up to 6 numbers. After entering the
Store number, press the GREEN “Enter” button located on the right bottom of the keypad. By entering a
store number, your Intelliscale will print your Store number on the printouts of your cash counts. If you do
not want to use a store number, just press the GREEN “Enter” button and the Intelliscale will advance to the
next display.*
NOTE: *If your IntelliScale does not prompt you for the “Enter Store Number” from the Start menu prompt, press
the MENU button. The next display will be the program menu. Press and release the number “2” button on the
keypad to select the “Supervisor” mode. The machine will ask for a password.
•Press and release the 1, 2, 4, and 1, buttons to enter.
•From the Supervisor, Common Settings display, press and release the “UP” Scroll button 5 times (located in
the middle of the machine). You will be on the “Edit Store #”.
•Press and release the Green “Enter” button and enter your store number. Using the keypad located on the
right side of the keypad, enter your store number. You may enter up to 6 numbers. If you make a mistake,
you may correct it by pressing the RED “ESC” button located on the upper left side of the Intelliscale, then
re-enter the correct Store Number.
•After entering the Store number, press the GREEN “Enter” button located on the right bottom of the keypad.
To exit the Program after entering your store number, press the RED “ESC” button until you reach the Start
menu.
IntelliScale First Time Setup
Before using the IntelliScale to count, you will need to set the time and date.
Setting Time and Date – From the Start menu, or in any count mode, press the MENU button. The next
display will be the Program menu.
•Press and release the number “1” button on the keypad to select the “User Options”. Your Intelliscale
will need a pass code to enter User Options.
•Use the keypad on the right to enter the pass code 1-2-4-1
•The display will display “User Options, Printer set ON”, press and release the UP scroll button 3 times
(located in the middle of the machine). You will be on the “Date” display.
•Press and release the Green “Enter” button located on the bottom of the keypad on the bottom right
side of the machine and use the keypad to enter the current date. MM/DD/YY.
•Press and release the Green “Enter” button.
•Press and release the UP scroll button again 1 time.
•Press the Green “Enter” button, and use the keypad to enter the time using the military time format.
•
Press the Green “Enter” button.
S
tart Menu
P
ro
g
ram Menu
Ending a count
After you have counted all monies that you have to count, Press and release the Green “End/Total” button
located on the bottom left of the IntelliScale. When you end the count, the printer will give you a detailed
print out of everything counted and your screen will display three options for you to choose from:
1=Reprint – To reprint a copy of the printout (This option will not be available if you have turned off the
printer)
2=Edit – Allows you to re-enter the count to make any corrections needed.
3=End Count- This will end the count and bring you back to the Start Menu.
Using the Audit mode to perform Audits:
The Audit count works exactly as the Drawer Count. However, no bank is set and checks are not stored in
memory for the deposit count. This will allow you to obtain a total count of all monies in the drawer.
•Enter the Audit counting mode by press and releasing the #3 keypad.
•Follow the prompts on the display. (You can refer to the Drawer Count section above for help.)
•Because you have the Bank function set to $0.00, you will receive a running Total of all money being
counted.
•If you are using the machine as a portable unit, bring the machine back to the printer, reconnect the
machine, and then end the count for your printout. If you pressed End/Total prior to getting to the office,
press Reprint after connecting to the printer.
•The print out will identify this count as an Audit and provide you with the date and time of the Audit.
Using the Deposit Counting mode to verify the Deposit
•Using the keys on the right side of the Intelliscale, press and release key #2 to enter the Deposit count.
•Next, enter the Operator#, which is the employee number of who is compiling the deposit
•Press the Green “Enter” button to advance. Note: The screen will not advance without entering a
number. The IntelliScale will now be ready to verify all the money you are depositing
•The first display will be for the “MISC COIN”. This is where you manually enter the amount of loose coin
you have to deposit using the numeric keypad on the right side of the Intelli$cale. There is no decimal
point required. After entering the total value for the “MISC COIN”, press the Green “Enter” button
located on the bottom right side of the Intelli$cale to enter amount and advance to the next
denomination, which will be the $1.00 bill denomination.
•Place the $1 bills for deposit onto the HOD approximately 18-20 bills at a time. The machine will “beep”
once and display the number of pieces counted on the left and the cash total on the right on the top
line of the display. The bottom line of the display will give you a running total of the monies counted.
Note: The money will not be added to the total until it is removed from the Intelli$cale. Continue to add all
the bills on to the hod at one time in small batches. If you receive a “TO MANY BILLS REMOVE SOME”
message, just remove some bills off of the HOD until the machine gives you a count. Then replace the
remaining bills in small batches until all bills have been counted. You may receive this message for several
reasons. One is you have put to many bills on the machine at a time, or there may be a questionable
weight on the bills due to humidity or bill damage, the machine will then ask for a smaller amount of bills to
give an accurate count.
1=REPRINT 2=EDIT
3=END COUNT
Misc Cn = $0
Total $0.00
$1=$0 $0
TOTAL $0.00
PSG Confidential -4- 10046-A PSG Confidential -9- 10046-A

PSG Confidential -8- 10046-A PSG Confidential -5- 10046-A
•If you have no “Misc Coin”, press the “UP” scroll arrow or the Green “Enter” button to advance to the
“Verify Any Roll” screen.
Note: If the IntelliScale is on a denomination that you do not have, use either the “Up” Scroll button or the
Green “Enter” button to move to the next denomination.
•From the “Verify Any Roll” screen, you may place one roll at a time of any coin value on the IntelliScale.
The IntelliScale will verify the roll and add the amount to the running total. Continue placing rolls on the
HOD until finished. Then remove all the rolls. Or, you may also key in the value of all the rolls using
the key pad, and press the enter key, if you do not want to verify individual roll values.(example key in
$7.50 for rolls)
Note: If you should find a “Suspect Roll”, leave it on the IntelliScale, and use the down arrow key to scroll
to the correct denomination. The machine will give you a piece count of coins in that roll. Take the roll off
the machine. To count more rolls, and press the up arrow key to advance to Verify Any Roll. To move on
to counting bills, press until the $1 count is displayed.
•After counting all your rolls, you will need to manually advance to the next counting screen by pushing
and releasing either the “UP” Scroll button or the Green “Enter” button. The IntelliScale will not
automatically advance.
•Your IntelliScale will now be ready to count the Bills. Place small bundles of approx 18-20 bills on the
HOD at one time. The screen will change to display the denomination “times” the number of bills on the
right. And the total of the bills counted on the left of the screen. Continue placing all the $1’s on the
HOD, and then remove them all at once.
•The IntelliScale will automatically advance through all the bill denominations and give you a running
total of monies counted. Continue to place the loose bills on the hod in small bundles of approx 18-20
bills of the correct denomination until you reach the “Checks $”
•When you have gotten to the point where the “For Bank” display “double beeps” and switches to
“Deposit”, then the Start Bank of $100 has been reached and the rest of the money counted is for
Deposit.
•You will then remove the amount displayed on the from the cash drawer, place it in the Deposit Bag,
and continue to count the money left in the drawer. Do not return this money to the drawer after it is
counted. Add it to the money in the Deposit Bag. When you finish your count, you will have $100 in
the drawer and the deposit money in the bag.
•The IntelliScale will stay on the denomination when you reached the Start Bank ($100). Continue
counting that denomination and place the deposit money beside the drawer. When finished, the
Intelliscale will advance to the next denomination. If you do not have any of a denomination to count,
use the up Arrow key to advance to the next bill denomination.
•To enter your check into the Intelliscale, use the keys located on the bottom right of the Intelliscale
keypad.
•Enter the amount of the check not using decimal points. Example: To enter a check of $32.50. You
would press and release on the keys 3, 2, 5, 0. The machine will automatically enter the decimal.
Always press and release the Green “ENTER” button after entering the check amount
•The check screen will show you the total of the entered checks and the number of checks entered.
•If you need to edit a check while in the check mode, press and release the RED “CE” button and the
display will change to the edit check display. C-Edit.
•Use the Up and DOWN scroll buttons to scroll to the check you need to edit. Use the keypad to enter
the correct amount of the check. Press and release the Green “ENTER” button. The machine will make
the needed correction to the check total. Press the Red “ESC” button to exit the check edit mode.
•Other Non Cash entries may be enabled on your Intelliscale. They operate the same as the Check
feature, except their values are not held in memory for the Deposit count.
$1X13 $13
FOR BANK $32.36
Step 4 Counting on the Intelliscale
From the Start Menu display you will see:
These are the three count types available to you.
•1 = Drawer Count – This count is used to perform the Opening Till Verification, Office/Safe Counts
and Shift changes.
•2 = Deposit – This count is used to prepare the bank deposit.
•3 = Audits – This count type can be used for surprise and mandated audits. If your Intelliscale has a
has a battery option, it is portable and can be taken to the cash registers for an audit at any time during
the day with out being plugged in.
Using your Drawer Count mode for Opening Till Verifications and Office/Safe Counts
•From the Start menu use the keys on the right side of the Intelliscale, press and release key #1 to enter
the Drawer count.
•Next, enter the Register# and press the Green “Enter”, then the Cashier # and press the Green “Enter”.
Note: The screen will not advance without entering a number. Press and release the Green “Enter” button to
advance. Also, all machines may not have Register# and Cashier# enabled.
•The IntelliScale is ready to count your coins. It will prompt you to count your cash drawer starting with
pennies (1 cent) and continuing through each denomination.
Note: When the Bank Feature is turned “on”. The bottom line of the display will say “FOR BANK”. If the
display shows the word TOTAL you will need to turn the Bank ON. You will also need to verify the bank
amount the machine is set for at the time. For Till Verification the Bank will need to be set for $100.00. To
check your bank or to change the amount, press and release the “Bank” button on the left side of the
machine. The display will change to BANK = $100.00; BANK=$0.00, which is what the current bank is set
to. To change the amount, press and release the bank button until you get the desired amount, which is
SET TO $100.00 for Till Verification. Then press and release the green “Enter”button to change the
amount. The display will return to the screen where you began.
•Next, place the cup on top of the IntelliScale. You will hear a “beep” when the machine has completed
its count. The machine will display the total it has counted at the top. In this example we counted 65
cents and the total we have counted is 65 cents which will be applied to the till start bank, FOR BANK
$0.65. The running total is shown at the bottom of the display.
•The IntelliScale will automatically advance through the coin denomination and give you a running total
of monies counted. Continue to place the cup of coins of the correct denomination on the IntelliScale.
•When you have finished with 25 cents, the machine will advance to the “Misc Coin” display. If you have
some “Misc Coin” you may use the keypad on the right of the machine to enter the amount and then
press Green “Enter” button to advance. No decimal point is needed. (Misc Coin = 50c piece or a $1.00
coin)
•If you have no “Misc Coin”, press the “UP” scroll arrow or the Green “Enter” button to advance to the
“Verify Any Roll” screen.
1=Drawer 3=Audit
2=Deposit
1c=$0 CUP
FOR BANK $0.00
1c=$0.65 CUP
FOR BANK $0.65

PSG Confidential -6- 10046-A PSG Confidential -7- 10046-A
Note: If the Intelliscale is on a denomination that you do not have, use either the “Up” Scroll button or the
Green “Enter” button to move to the next denomination.
•From the “Verify Any Roll” screen, you may place one roll at a time of any coin value on the IntelliScale.
The IntelliScale will verify the roll and add the amount to the running total. Continue placing rolls on the
HOD until finished. Then remove all the rolls. Or, you may also key in the value of all the rolls using
the key pad, and press the enter key, if you do not want to verify individual roll values.(example key in
$7.50 for rolls)
Note: If you should find a “Suspect Roll”, leave it on the IntelliScale, and use the down arrow key to scroll to
the correct denomination. The machine will give you a piece count of coins in that roll. Take the roll off the
machine. To count more rolls, and press the up arrow key to advance to Verify Any Roll. To move on to
counting bills, press until the $1 count is displayed.
•After verifying all your rolls, you will need to manually advance to the next counting screen by pushing
either the “UP” Scroll button or the Green “Enter” button. The Intelliscale will not automatically
advance.
•Your IntelliScale is now ready to count the Bills. Place batches of approx 18-20 bills on the HOD at one
time. Do not remove those bills. The screen will change to display the denomination “times” the
number of bills on the right. And the total of the bills counted on the left of the screen. Continue placing
all the $1’s on the HOD in batches, when you are finished counting all the $1’s, then remove them all at
once.
•The IntelliScale will automatically advance through the all the bill denominations and give you a running
total of monies counted. Continue to place the loose bills on the hod in small bundles of approx 18-20
bills of the correct denomination until you reach the “Checks $”
Note: The money will not be added to the total until it is removed from the Intelli$cale. Continue to add all
the bills on to the hod at one time in small batches. If you receive a “TO MANY BILLS REMOVE SOME”
message, just remove some bills off of the HOD until the machine gives you a count. Then replace the
remaining bills in small batches until all bills have been counted. You may receive this message for several
reasons. One is you have put to many bills on the machine at a time, or there may be a questionable
weight on the bills due to humidity or bill damage, the machine will then ask for a smaller amount of bills to
give an accurate count. If this occurs, the machine is working correctly, it does this to keep from making a
wrong count.
When you have gotten to this point, all the cash will have been counted. Read the second line of the display
that says either “For Bank” or “Deposit”. If it is FOR BANK = $100.00, then your Drawer is correct.
If it is FOR BANK and equals anything less than $100.00, then your drawer is short.
If the display has changed to DEPOSIT =, the drawer is over by the amount shown.
$1X13 $13
FOR BANK $32.35
Ending a count
After you have counted all monies in your till, press the Green “End/Total” button located on the bottom left
of the IntelliScale. When you end the count, the printer (if you have one connected) will give you a detailed
print out of everything counted and your screen will display three options for you to choose from:
1=Reprint – To reprint a copy of the printout (This option will not be available if you have turned off the
printer option)
2=Edit – Allows you to re-enter the count to make any corrections needed.
3=End Count- This will end the count and bring you back to the Start Menu.
Office/Safe Count:
To do your Office/Safe Count, follow the directions for Till Verification format, but select the Audit count
mode from the main menu.
Using the Drawer Count mode to count Drawers at the end of the Cashier’s Shift:
The Drawer Count is performed when the cashiers end their shift. Enter the Drawer Count from the Start
menu.
•Using the keys on the right side of the Intelliscale, press and release key #1 to enter the Drawer count.
•Next, enter the Register# and Cashier # (up to four numbers.)
•Press and release the Green “Enter” button to advance. Note: The screen will not advance without
entering a number.
•The IntelliScale will now be ready to count your coins.
Note: The bottom line of the display will say “FOR BANK”. If the display shows the word TOTAL (and you
want to use the BANK feature) you will need to turn the Bank ON. You will also need to verify the bank
amount the machine is set for at the time. For Shift Changes/Deposit the Bank will need to be set for
$100.00. To check your bank or to change the amount, press the “Bank” button on the left side of the
machine. The display will change to BANK = $100.00 or BANK=$0.00, which is what the current bank is set
to. To change the amount, press the bank button until you get the desired amount, which is $100.00 for
Shift Changes/Deposit. Then press the Green “Enter” button to change the amount. The display will return
to the screen where you began.
•Next, place the cup on top of the IntelliScale. You will hear a “beep” when the machine has completed
its count. The machine will display the total it has counted at the top. In this example we counted 65
cents and the total we have counted is 65 cents which will be applied to the till start bank, FOR BANK
$0.65.
•The IntelliScale will automatically advance through the coin denomination and give you a running total
of monies counted. Continue to place the cup of coins of the correct denomination on the IntelliScale.
•When you have finished with 25 cents, the machine will advance to the “Misc Coin” display. If you have
some “Misc Coin” you may use the keypad on the right of the machine to enter the amount and then
press Green “Enter” button to advance. No decimal point is needed. (Misc Coin = 50c piece or a $1.00
coin)
1=REPRINT 2=EDIT
3=END COUNT
1c=$0 CUP
FOR BANK $0.00
1c=$0.65 CUP
FOR BANK $0.65

Help Desk 1-866-476-8842 Page 7 10046-A
Print Instructions
This is a double sided print document
Print Range 1,3,5
Flip over and put back in printer
Print Range 2,4,6
Document Layout
All pages are pasted into this document as Enhanced Metafile Pictures
The original text document is required:
“Intelliscale General Users Guide Text Paste”
To make changes, first change the text paste document and copy the page(s) to
be placed in this document. Next delete the page(s) from this document. Then
place the cursor where you want to paste the new page(s). Select Edit, Paste
Special, Picture (Enhanced Metafile). You may need to double click on the
new area, and select Layout, In Front of Text. Then you can move the area
around, as well as expand or shrink it.
Table of contents


