Pulse Shower Spas PolarSpa PPS-5000 User manual

PolarSpa
Model #PPS-5000
Owner's Manual

2
PolarSpa
Please Read The Following Instructions
COMPLETELY Before Beginning!
Our goal is to ensure your installation goes smoothly and safely. Please read these
instructions carefully and follow recommendations for plumbing and mounting. After
reading instructions, if you determine you do not have the necessary skills and/or tools,
we recommend that a licensed plumbing contractor complete the installation.
If you encounter any problems during installation
PLEASE VISIT CUSTOMER SUPPORT AT
WWW.PULSESHOWERSPAS.COM
Before returning your PolarSpa to the store
You Will Need The Following Tools
Soft pencil to mark placement
Adhesive or Mortar
Drain Assembly
Level
Safety Glasses
Measuring Tape
Hacksaw or PVC Pipe Cutter
Screwdriver
Rubber Mallet or Hammer

Parts Legend
1. Chiller
2. Control Panel
3. Carry Handles
4. Wheels
5. Cooling Fan (back)
6. Filter
7. Water Hoses
8. Power Cord
9. Drain Valve
10. Tub Cover
11. Cover Clips
12. Freestanding Tub
13. Wooden Cover (sold separately)
3

4
SAFETY WARNINGS
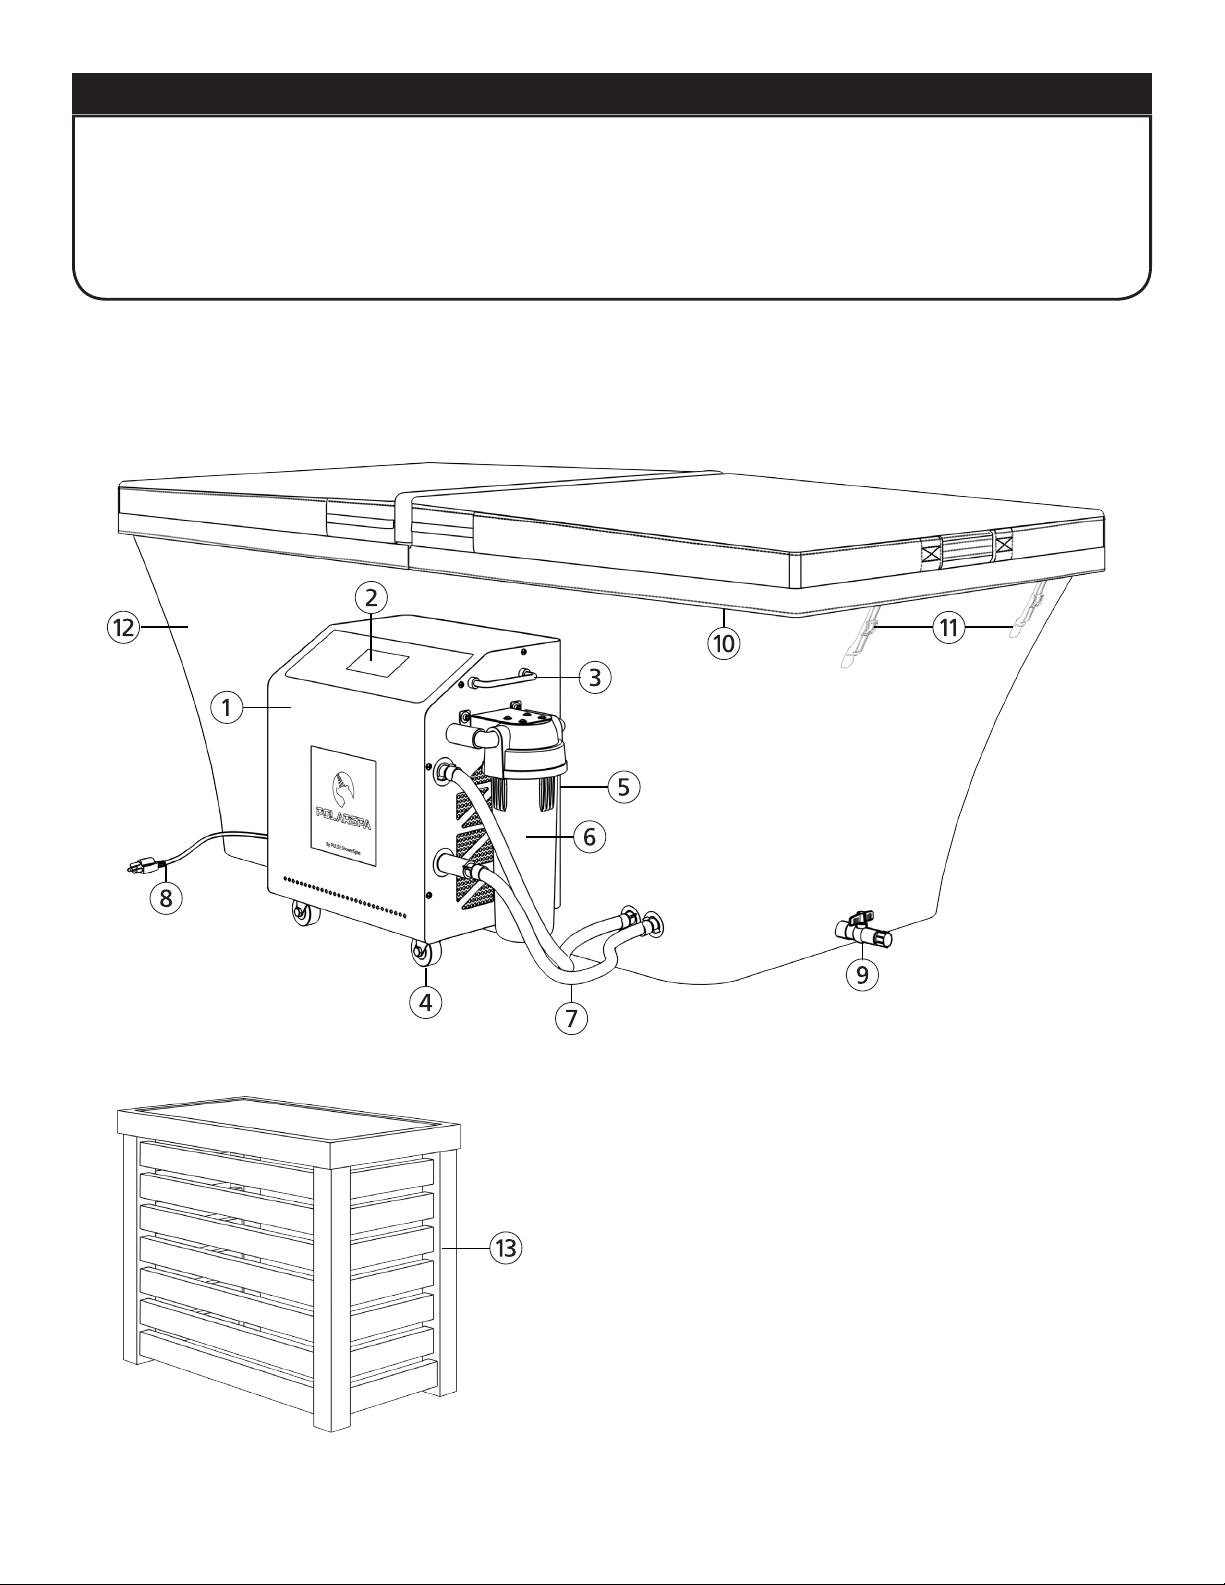
Congratulations on your purchase of an ice-bath machine, to ensure proper installation and operation, please read
this manual carefully, thanks!
• Electricity is very dangerous, in order to prevent accidents, please pay attention and make sure the local
electricity is suitable for the machine before using
• Please make sure the AC socket is properly grounded.
• Please don't forget to test the residual current circuit breaker (ROD/GFCI) once a week at least, must not use
the machine any more if it has any problems
Please never put this machine into the water, and it must not be immersed into the water, especially outside.
Stop use if accidentally immersed, that would be very dangerous. Also don't spray the machine with water.
It has a waterproof shade on the top if placing it outdoors.
• Although this machine has passed the safety test, we never recommend keeping the machine on while taking a
bath especially if unsure if the AC socket is properly grounded.
• Keepchildrenawayfromthemachinewhileinuse.Keepyourhair,ngers,andsoonawayfromthefaninuse.
• Keep the environment ventilated. The max allowable temperature of ambient is not more than 45 degrees.
Don't cover or block the air inlet or/and outlet in use, keep enough free space around the machine.
• Empty the water after every bath if the ambient temp less than 3 degrees celsius. The water will easily be iced
especially in the winter
• Do not use the machine if the power cord or plug are damaged.
• Please precool the bath water in advance before taking a bath.
• Onlyprofessionalmechanicswiththerightqualicationscanrepairthemachine.
• We are not responsible for anything that is caused by poor installation and abnormal use. Machine is subject to
change due to product improvements without notice.

5
Operation Instructions
CONTROL PANEL
1. ON/OFF button:
Press and hold it for 2 seconds to start or stop the cooling system.
2. MODE button:
ForenteringdierentmodeswithICEBATH/DEFAULT,AUTO,CONSTANT,normallyitisunnecessarytochangeit
by the user if just using for ice-bath. ICE BATH/DEFAULT Mode is just for ICE-Bath machines. it may not work well
or temperature can not be changed under CONSTANT or AUTO modes.
Single click to be able to cancel the error code, or press and hold SETTING button for 3 seconds to cancel the error
code FL & ICE (for new version).
Press and hold it for 5 seconds to exchange the temperature unite C and F (new version)
3. SETTING button:
Singleclickorpressandholditfor1secondtoenterthetempareturesetting.Singleclicktoconrmandreturn
after parameters setting. To enter advanced settings, normally It is unnecessary to change it by the user if just
using for ice-bath.
4. CLOCK:
Press and hold for 5-10 seconds to cancel and setup the APP connection. Press and hold for 5 seconds to enter
the clock setting when WIFI disconnected-Optional onivfold version only). Single click for exchanging the hour and
minutesettingduringtheclocksetting-Optionalonly.SingleclicktocanceltheickeredFILTERIcon(oldversion
only). Single click or presss and hold it for 5 seconds for setting the UV or Ozone working time after click the
SETTING button(U for UV only, for the ozone working time of each cycle)
5. UP button:
Click or press and hold this touch button to increase the setting values in setting mode.
6. DOWN button:
Click or press and hold this touch button for reducing the setting values in setting mode
*Press and hold the UP button and DOWN button together for 5 seconds to lock or unlock the control panel.
Press and hold it for 5 seconds to RESET the machine if the display or button function get messy
(new version only).

6
7. SYSTEM information:
For indicating the current working status of machine under AUTO, HEAT, COOL, OFF or EMER.
8. FAN or DEFROST information:
For indicating the current working status of cooling fan under ON or AUTO(old version). For indicating the current
working status of defrosting under heating the water in low ambient temp
9. MODEL information:
For indicating the mode of whole system under ICE BATH, AUTO or CONSTANT, just keen ICE BATH mode for ice
bath machine
10. TIME or WATER FLOW information:
For showing the time, it would be self-synchronized the Network Time Server during WIFI connected.
Please manually setup the clock again if the time is not right when WIFI disconnected. Or for indicating the water
ow(newversiononly).
11. WIFI information:
For indicating the connection status of WIFI. No WIFI icon: WIFI disconnection.
WIFIiconickering,readytoconnectwithAPPifitiscoveredinWIFI-24G(24Gonly,5.0Gisunavailable).
12. WATER TEMPERATURE information:
For indicating the current/real temperature of water from outlet of machine.
13. SETTING TARGET TEMPERATURE information:
For indicating the setting temperature you expected
14. CHILD LOCK information:
For indicating the control panel is locked or not.
15 WEATHER information-Optional.
For indicating the conditions of the local weather including humidity, UV index and so on
PLEASE NOTE WIFI AND APP ARE OPTIONAL ONLY
Operate the machine by control panel:
Pleasedon'tuseyourngertiptooperatethebuttons,mustuseyourngerpulponly.Thebuttonsmaynotwork
properlyifusingngertips.
Operation Instructions

7
Installation Instructions
HOW TO INSTALL MACHINE
IMPORTANT: Before tightening the connections, please make sure you are using the right type of o-ring and
tighten them appropriately. The system cannot start if installation has a problem with any air leakage, and normally
theerrorcodeE3/E1/FL/versionnumberwillshowuponthedisplay.Mustreinstalltheuvsterilizerforrstuseif
the machine with uv sterilizer, don't connect the hoses to any water sources and plug the machine to the AC socket
before that.
IMPORTANT:
Please tighten all connectors property.
Please use the gaskets with a round section if connectors of hose with wail.
Please use the gaskets with a rectangular section if the connectors of hose w/owall.
Any air leakage will cause the system not to start working if using wrong type o-ring or loose connections
PleasenoteIftheexternallterhavebeeninstalledbeforeshipment,theuserdoesn’tneedtoreinstallitforlistuse
Don't cover or block the air inlet or / and outlet when using the machine, and please keep more than 30cm of free
space around the air inlet and more than 80cm of free space in front of the fan.
Don'tuseextrasoftorsmallerhosetoextendthedistance.Thatwouldaectthecoolingeciencyorstopthe
system from working.
IMPORTANT: Non-professional personnel must not modify any parts of the machine without permission, otherwise
the machine will not work and it is dangerous.
*DRAIN: To empty your PolarSpa, connect any garden hose to the drain port. Place the other end of the hose next
to a drain and open the valve. We reccommend draining every week (minimum).

8
Operation Instructions
How to use the chiller
Please refer to the paragraph 1 and 2 to get to know all WARNINGS and the description of machine before use.
Please refer to paragraph 3 to install the machine with your bathtub or pool before use.
Especiallythersttime,afterturningonthemachineorwhenthemachinepumpisworking,theerrorcodeorver-
sion code will show up on the display, the vacuum time depends on how much air inside the water loop.
Please according to the following steps to set the temperature and pre-cool the water, the target water tempera-
ture can be set in 3-4 degrees.

9
Chiller Operation through APP

Accessories
Wood table SOLD SEPARATELY
For parts and accessories visit www.pulsepolarspa.com
All images shown are for illustration purposes.
Actual product may vary due to product enhancement

11
MANUFACTURER'S LIMITED WARRANTY
1. Defects Covered; Warranty Period: Pulse Shower Spas,
Inc. (“Pulse”) warrants to the original consumer purchaser
who purchases this shower spa (the “Product”) for use in
his or her own home, that the Product will be free from
defects in material and manufacturing workmanship for as
long as the original consumer purchaser owns that same
home. For all other purchasers (including, but not limited
to purchasers for industrial, commercial and business use),
the above warranty will apply for a period of 5 years from
the original date of purchase.
2. Remedy: If the Product does not conform to the above
warranty, Pulse, at its option, will repair or replace the
Product, free of charge, or refund your purchase price. For
warranty claims, please visit www.pulseshowerspas.com/
index.php/warranty. Pulse may require that you return the
Product to Pulse, shipping prepaid, in which case Pulse will
provide you with a return materials authorization number
(RMA). Pulse may also require that you provide evidence
of the date you purchased the Product. Pulse will ship a
new or repaired Product to you, at the expense of Pulse,
or refund your purchase price. Service labor performed
by you or others in connection with the removal or
replacement of the Product will not be reimbursed
by Pulse.
3. Exclusions: Pulse shall not be responsible for failure of
the Product, and the above warranties will not apply, if the
Product fails as a result of improper installation, improper
use,modicationsorrepairsbyanyoneotherthanPulse,
or accident or abuse (including damage during shipment).
4. Warranty on Repairs and Replacements: For consumer
purchasers who purchased the Product for home use,
repaired or replacement Products will continue to be
covered under this warranty for as long as he or she
owns that same home. For other purchasers, repaired or
replacement Products will be covered for the balance of
the original warranty period.
5. No Other Warranties; Limitation of Liability: OTHER
THAN THE LIFETIME LIMITED WARRANTY STATED
ABOVE, PULSE DISCLAIMS ALL OTHER WARRANTIES,
EXPRESS OR IMPLIED, INCLUDING BUT NOT LIMITED TO
WARRANTIES OF MERCHANTABILITY AND FITNESS FOR
A PARTICULAR PURPOSE, TO THE EXTENT PERMITTED
BY APPLICABLE LAW. THE REMEDIES STATED ABOVE
ARE YOUR SOLE REMEDIES IN CONNECTION WITH THIS
WARRANTY. IN NO EVENT WILL PULSE BE LIABLE TO
YOU FOR ANY DAMAGES, WHETHER DIRECT, INDIRECT,
INCIDENTAL, SPECIAL OR CONSEQUENTIAL, INCLUDING
BUT NOT LIMITED TO LOST PROFITS OR BUSINESS
INTERRUPTION, ARISING OUT OF OR RELATING TO THE
PRODUCT OR ITS USE, WHETHER UNDER A CONTRACT,
WARRANTY, TORT, OR ANY OTHER CAUSE OF ACTION,
EVEN IF PULSE HAS BEEN ADVISED OF THE POSSIBILITY
OF SUCH DAMAGES. NOTWITHSTANDING THE TERM
OF ANY LIMITED OR IMPLIED WARRANTY, OR IN THE
EVENT THAT ANY LIMITED WARRANTY FAILS OF ITS
ESSENTIALPURPOSE,INNOEVENTWILLPULSE’S
ENTIRE LIABILITY EXCEED THE PURCHASE PRICE OF
THE PRODUCT. SOME STATES AND PROVINCES DO NOT
ALLOW THE EXCLUSION OR LIMITATION OF INCIDENTAL
OR CONSEQUENTIAL DAMAGES SO THE ABOVE
LIMITATIONS OR EXCLUSIONS MAY NOT APPLY TO YOU.
THIS LIMITED WARRANTY GIVES YOU SPECIFIC LEGAL
RIGHTS, AND YOU MAY ALSO HAVE OTHER RIGHTS
WHICH VARY FROM STATE TO STATE AND PROVINCE
TO PROVINCE.

12
PULSE ShowerSpas, Inc. | 297 Anna Street | Watsonville, CA 95076 | 831.724.7300
www.PulsePolarSpa.com
PM-AA-01
NOTES
Table of contents
Popular Spa Accessories manuals by other brands

Balboa Instruments
Balboa Instruments Mach 3 GL Series Quick reference guide

Leisure Concepts
Leisure Concepts SMARTOP Vanish XL installation instructions

HoMedics
HoMedics ARMH-970-CA Instruction manual and warranty information

Lec+
Lec+ Tides La Mer user manual

Silvercrest
Silvercrest 367959 2101 operating instructions

Watkins Wellness
Watkins Wellness ProLift II installation manual