PULSE+ XE User manual

GETTING STARTED
GUIDE


Getting Started Guide V#122


STEP 1
UNBOXING
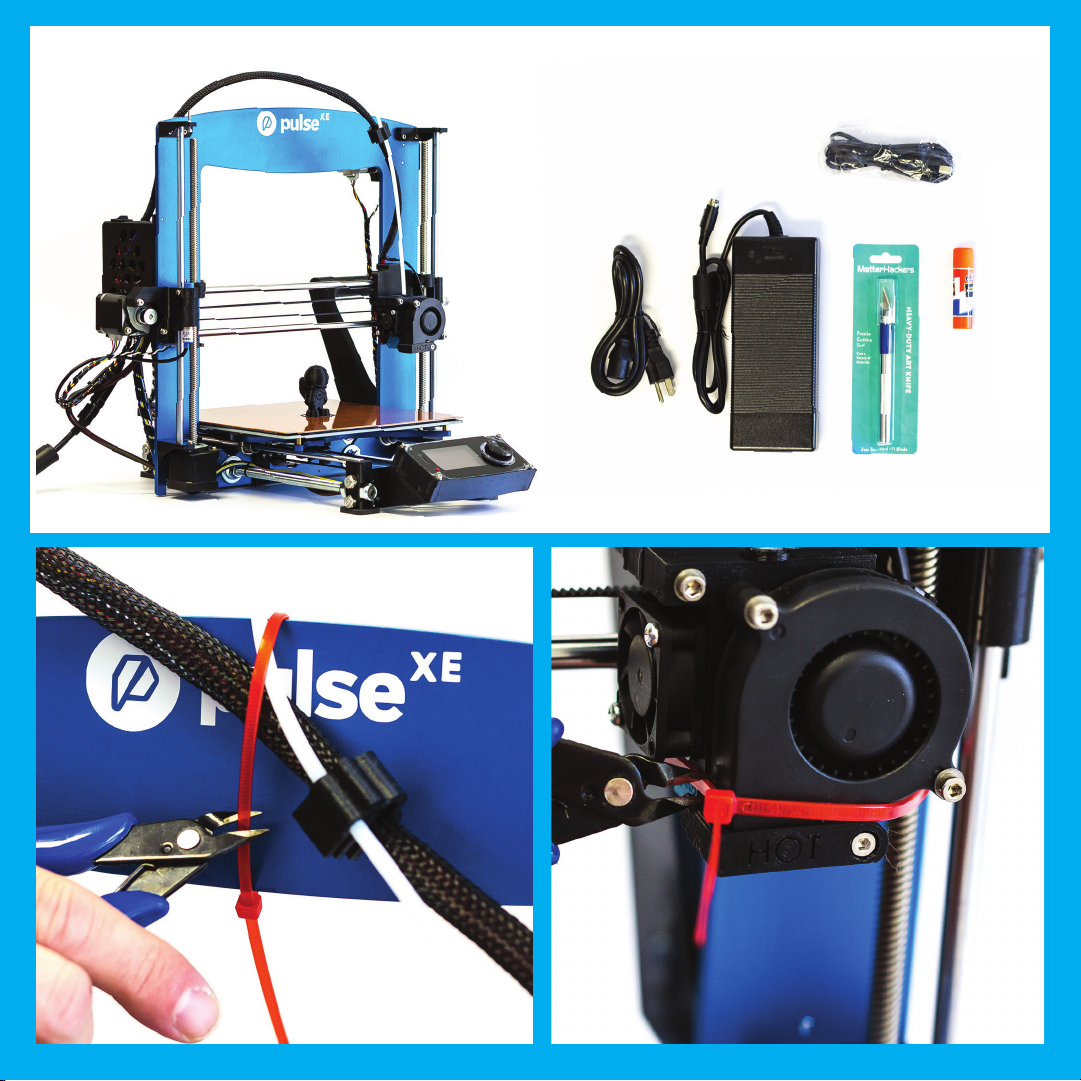
Remove printer and accessories from the packaging.
STEP 2
REMOVE RED ZIP TIES
Cut and remove RED zip ties.
DO NOT cut or remove any BLACK zip ties. They are used
for wire management, and are meant to remain in place.

STEP 3 (OPTIONAL UPGRADE - SKIP TO STEP 4)
VIKI2 LCD SCREEN INSTALLATION
Make sure the Pulse is powered off before proceeding.
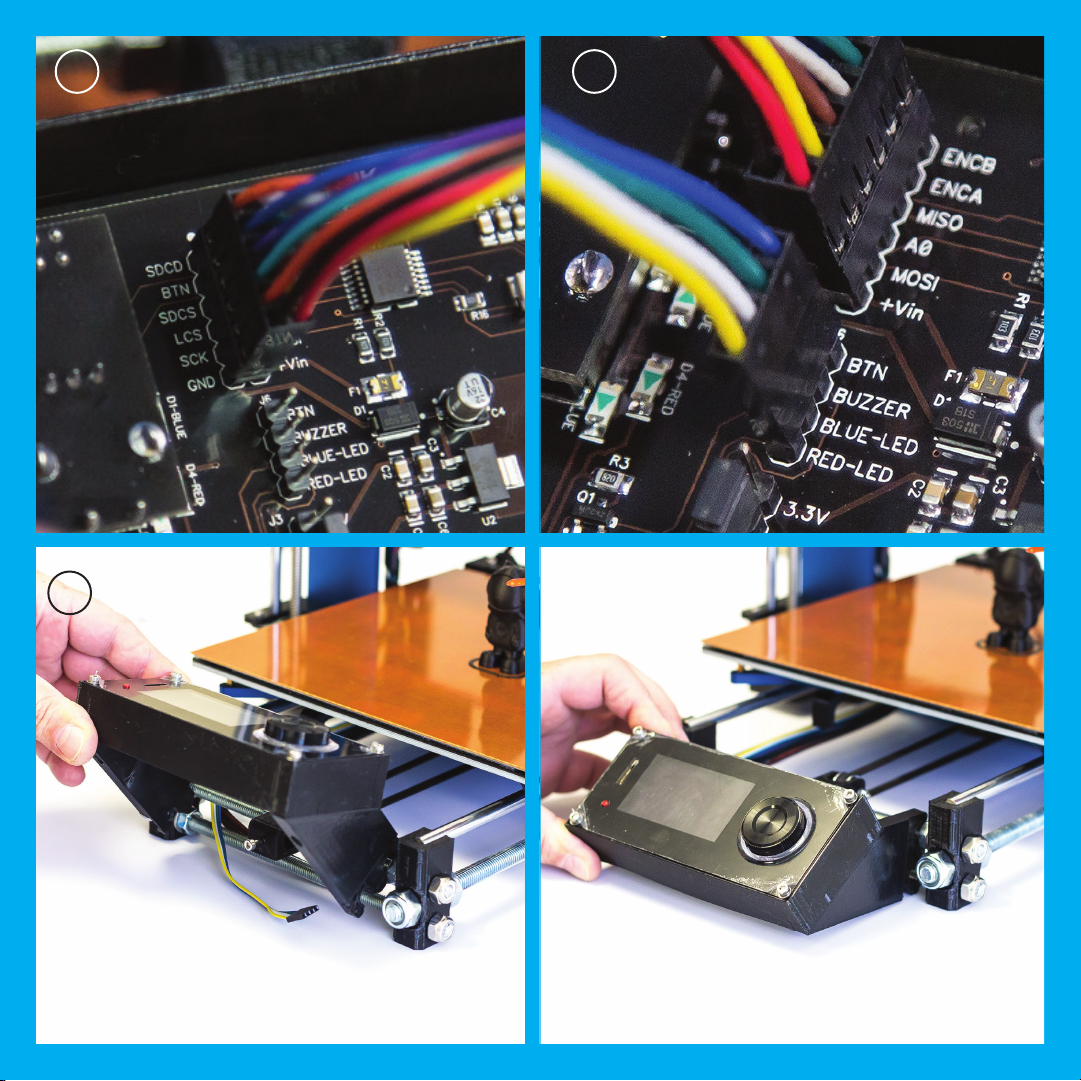
PLUG IN 12-PIN CONNECTOR
The black wire goes to the pin marked "GND". (A)
The red wire goes to the pin marked "+Vin". (A)
PLUG IN 4-PIN CONNECTOR
Blue wire goes to pin marked "BTN". (B)
SNAP VIKI INTO PLACE
Snap into place as shown. (C)
Turn the Pulse on and check that the screen powers on
and displays the printer status.

A
C
B

STEP 4
CONNECT POWER SUPPLY
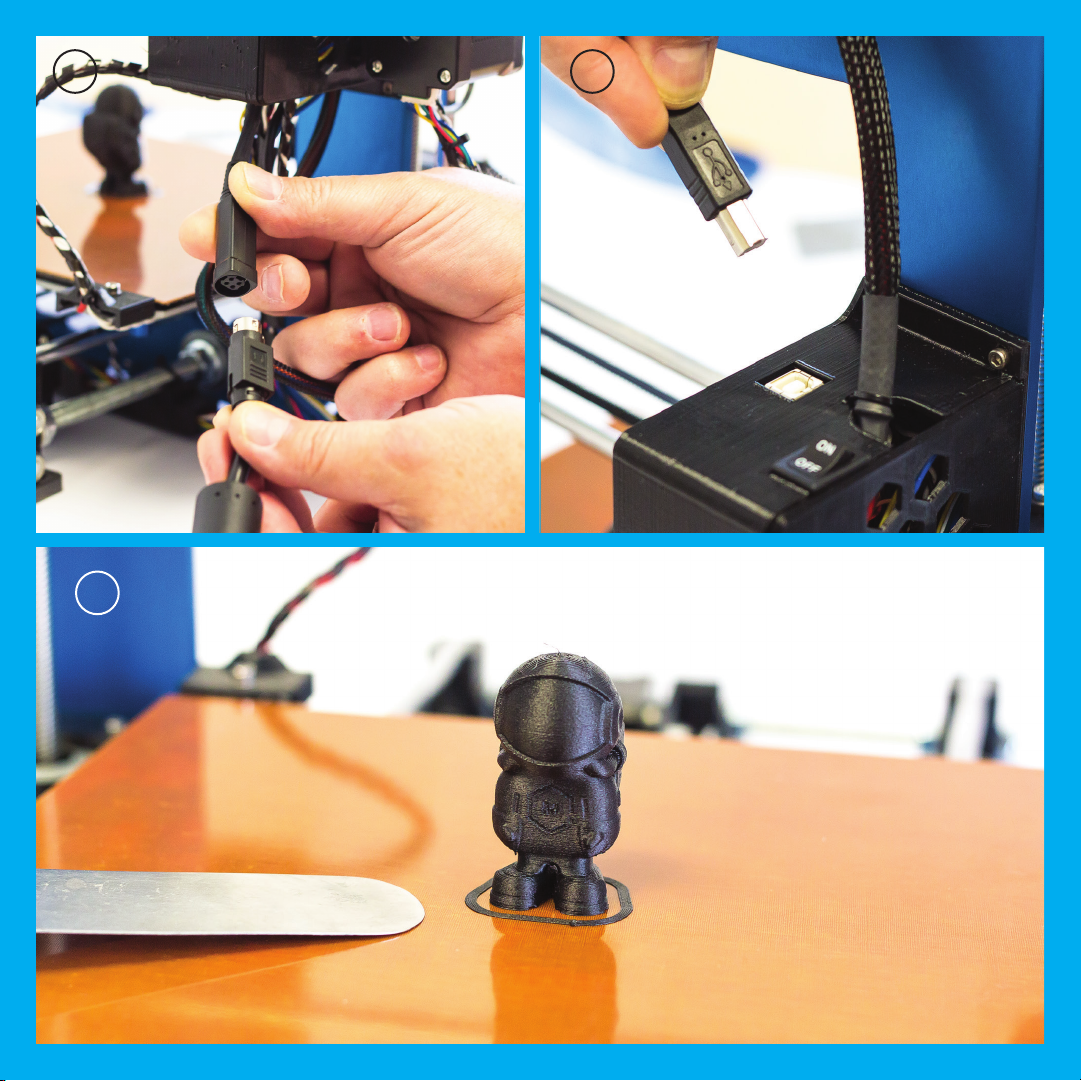
Connect the power supply to the Pulse. (A)
Turn the power switch on.
STEP 5
PLUG USB CABLE INTO PULSE
Locate the USB input on the back of your Pulse 3D printer and plug
USB cable in. (B)
Don't plug the USB cable into your computer yet. Doing so may cause
difficulties with the initial connection setup.
STEP 6
CLEAR THE BED
Every Pulse printer is tested before it is shipped out.
Remove the test print from the bed. (C)

A
C
B

STEP 7
INSTALL MATTERCONTROL
Download the latest version of MatterControl from matterhackers.com/pulse
STEP 8
SETUP WIZARD
Open MatterControl. You should see the Setup Wizard
window.
If you purchased your Pulse using a MatterHackers account, sign into
MatterControl using this account - your Pulse will already be loaded
into your MatterControl profile.
If not automatically prompted to add a printer, click the + button next
to the printer list.
Locate the model number on the sticker on the back of the blue
aluminum frame. Choose the model Pulse you have during setup.

MODEL
X-XXX
SERIAL
XXX-XXXXXXX-XXXXXXXXX

STEP 9
DETECT PRINTER
Once the correct model has been selected, the Setup Wizard Detect
Screen should be visible. (A)
Ensure that your Pulse is powered on and the USB cable is NOT
connected to your computer. Select "Continue".
If you have your USB cable connected during this step, MatterControl
will not be able to auto-detect the printer and you will need to go
through the process again.
STEP 10
CONNECT PRINTER
Connect the USB cable to computer and click "Connect". (B)
You should get confirmation of connection, and MatterControl will
prompt you to begin the initial calibration. Click "Next" to go
through the Probe Calibration wizard. (C)

A
B C

A B C

STEP 12
BED LEVELING
MatterControl will guide you through the process of Automatically
leveling the bed. (A)
Select the material you will be printing with first. We recommend
using the PRO Series Filament that came with your Pulse (you do not
need material loaded yet). (B)
You do not need to probe the bed before every print. MatterControl
stores the probing data and applies it to every print until you change it.
Because the bed expands with heat, we recommend probing the bed
any time you change the bed temperature by more than 10C.
The bed will begin heating. For best calibration results, wait until the
bed has reached the target temperature before proceeding. (C)
STEP 11
PROBE CALIBRATION
Follow the steps to calibrate your bed leveling probe - MatterControl
will guide you through the process.
This step sets the distance of the probe from the bed and is only
performed once.
You will need a piece of paper to complete this step. Place the paper
between the nozzle and the bed. Use the controls to move the nozzle
up and down until it gently grabs the paper.

STEP 15
START YOUR FIRST PRINT
Locate the ‘3D Phil’ design under the folders - Library - Calibration
Parts. Select the Design and drag it onto the bed (D)
For specific guides for succeeding with a bunch of different materials -
visit the Pulse User Guide at matterhackers.com/pulse
Select ‘Print’ then ‘Start Print.’ (E)
STEP 14
LOADING FILAMENT
At the top right of the screen you will see the Current Extruder
Temperature status - select that menue.(A)
Under ‘Filament’ select ‘Load’. (B)
Hang the spool of filament from the Spool Holder on the back right
side of the machine. Be sure to have the spool oriented so that the
filament flows into the extruder.
MatterControl will guide you through the loading process. Follow the
steps on the screen. (C)
For more information on Materials and Bed Surface compatibility
please visit the Guides section on www.matterhackers.com/pulse

A
D E
B C

TOO HIGH IDEAL TOO LOW

You should not need this - but if your part is not sticking to the build
plate or is too difficult to remover, you can adjust the distance from the
nozzle to the bed by accessing Baby Stepping in 'Movement Controls'
under the Controls Tab.
Once the print has started, simply click Z+ to move the nozzle higher
off the bed, or Z- to move it closer to the bed. (A)
Notice the ‘Offset’ next to the Home buttons. This indicates how much
you’ve moved each axis since the print started (X, Y, Z). (B)
Nozzle too far from the bed: The filament is just laying on top of the
bed & with no real compression. This leaves a very small contact point
with the bed and will likely result in the part not sticking to the bed. (c)
Ideal first layer for most materials. (D)
Nozzle too close to the bed: You will likely have extrusion issues
because there’s nowhere for your filament to go. Pressure will build up
in the nozzle and could cause filament grinding, heat creep, or other
extrusion related issues.(E)
STEP 16
TUNING YOUR FIRST LAYER

∙ Getting Started Guide
∙ How to succeed with a bunch of different materials
∙ Pulse User Manual
∙ Maintenance Instructions
Table of contents