PULSE+ Crossclimb User manual

Crossclimb
CV
215H
Owners Manual
EU / US

Introduction
Before using this product, it is essential to read ALL of this manual
and the documents it references prior to, choosing a location,
assembling or operating this piece of equipment. This manual
describes the equipment's setup, its installation and instructs how
to use it correctly and safely. It is of the utmost importance that
any User of the PULSE FITNESS Crossclimb (Seated Independent
Stepper) is fully trained in its operation! Please ensure that the
instructions given in General Safety Precautions section are
understood by ALL Users. Keep this manual for future reference.
WARNING: Health-related injuries may result from incorrect or excessive use of exercise
equipment. PULSE FITNESS STRONGLY recommends gaining professional medical advice
before using fitness equipment, particularly if the user has a family history of high blood
pressure or heart disease, is over the age of 45, smokes, has high cholesterol, is obese, or has
not exercised regularly in the past year.
Always warm up by exercising gently before progressing to a full programme of strenuous
exercise. Similarly, reduce the level of activity gradually towards the end of the exercise
programme.
Heart rate monitoring systems may be inaccurate.
Over exercise may result in serious injury or death. If you feel faint, light-headed, dizzy or
suffer from any kind of pain or exhaustion, STOP exercising immediately.
NOT suitable for Medical/Therapeutic purposes.
Ensure equipment is checked regularly for signs of damage and wear. Do not use equipment if
faulty or damaged, repair using only genuine PULSE FITNESS parts fitted by an authorised
person.
SERIOUS INJURY MAY OCCUR IF THESE PROCEDURES ARE NOT FOLLOWED.
FCC Warning - Possible Radio / Television Interference.
NOTE: This equipment has been tested and found to comply with the limits for a Class A digital
device, pursuant to part 15 of the FCC rules. These limits are designed to provide reasonable
protection against harmful interference when the equipment is operated in a commercial
environment. This equipment generates, uses and can radiate radio frequency energy, and if
not installed and used in accordance with the instruction manual, may cause harmful
interference to radio communications. Operation of this equipment in a residential area is likely
to cause harmful interference, in which case the user will be required to correct the interference
at his own expense.
Class SC (Studio): Professional and / or commercial use.
CAUTION: Any changes or modifications to this equipment could void the product warranty.
Any service, other than cleaning or user maintenance, must be performed by an authorised
service representative. There are no user serviceable parts
1

Important Safety Information
The successful and safe operation of PULSE FITNESS' Crossclimb (Seated Independent
Stepper) is dependent upon its proper handling, installation, operation and maintenance. The
following safety precautions are for safety and guidance. Please read them carefully before
proceeding to install and/or operate the Seated Independent Stepper. Specific notices are
included in the text where appropriate.
Read all instructions before using the PULSE FITNESS Crossclimb.
DANGER: To reduce the risk of electrical shock, always unplug PULSE FITNESS products
from the electrical outlet immediately after using and before cleaning or attempting any
maintenance activity. DO NOT remove any cover.
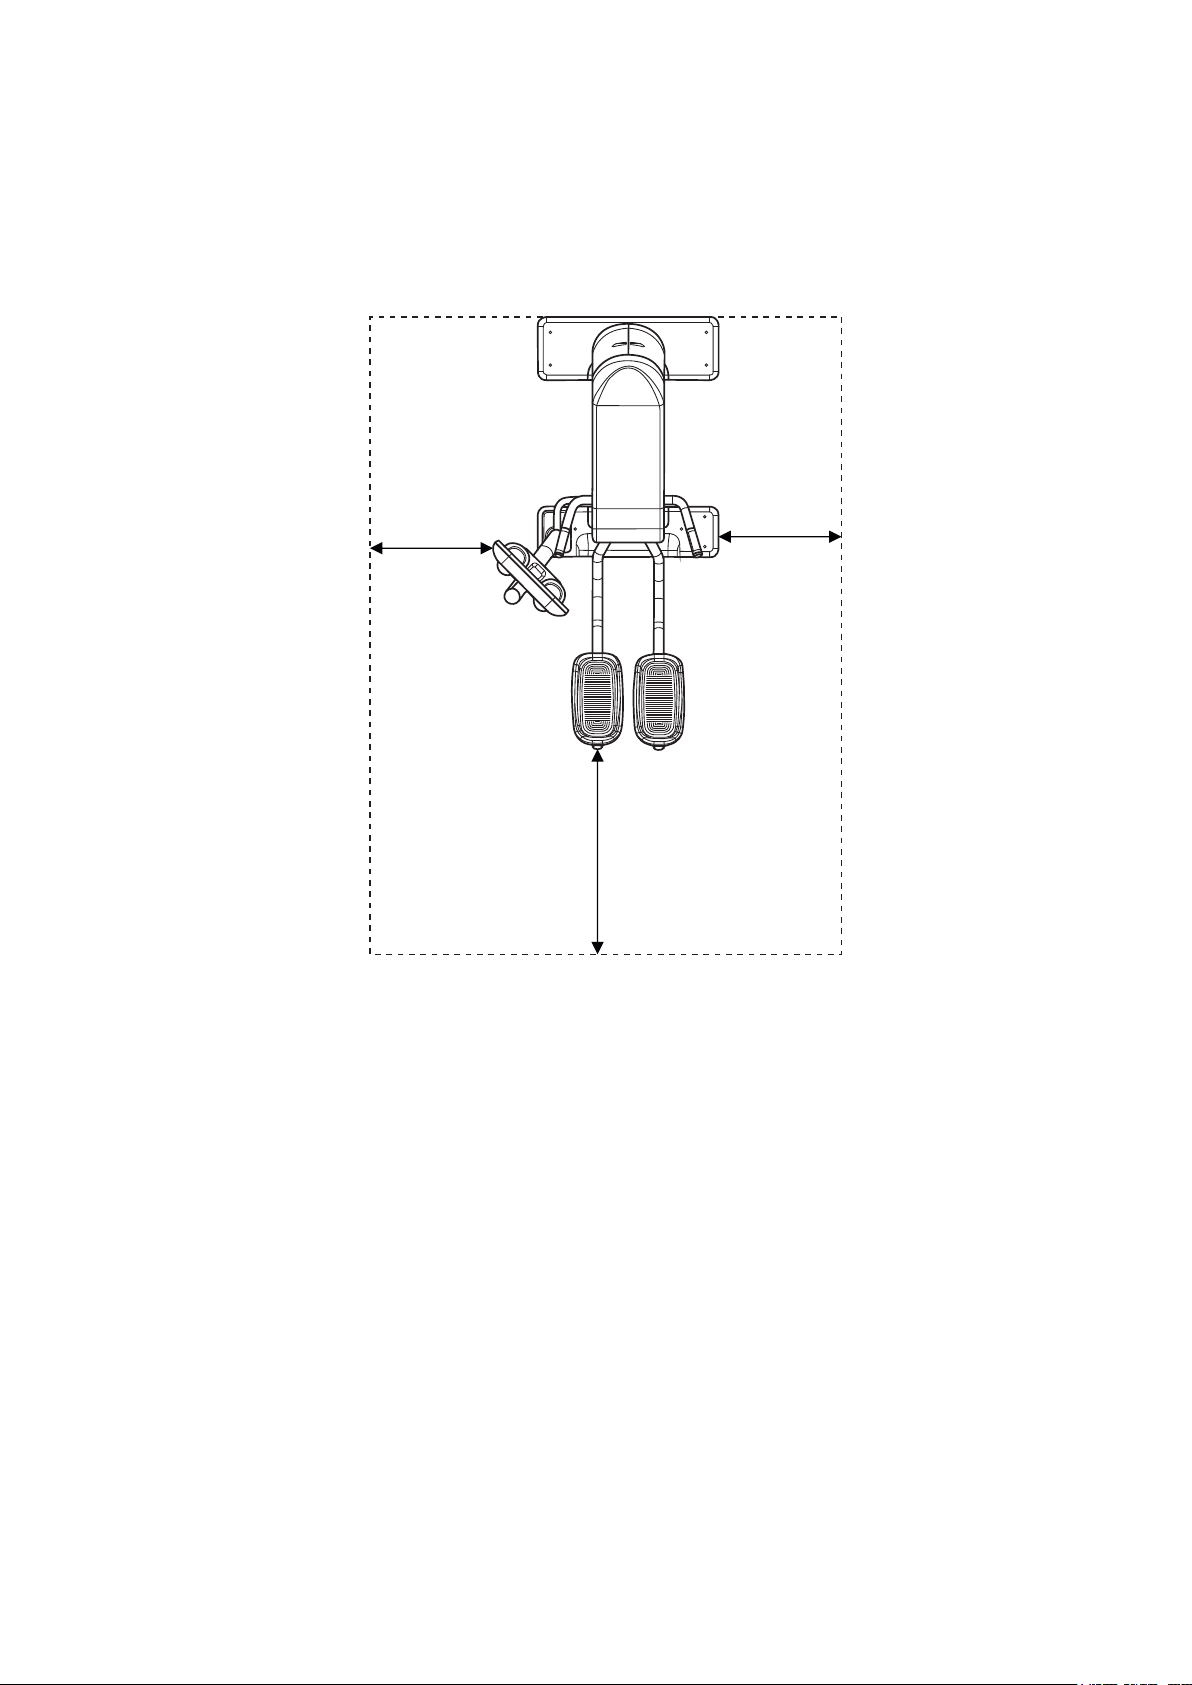
WARNING: Allow a distance of 0.6m (2ft.) between the widest part of the Independent Stepper
and other objects on either side. Provide at least 1m (3.28ft.) between the front of the PULSE
FITNESS Crossclimb (Seated Independent Stepper) to any other objects.
WARNING: To reduce the risk of burns, fire, electric shock, or injury, it is imperative to connect
each product to a properly grounded electrical outlet.
WARNING: Heart rate monitoring systems may be inaccurate. Over exercising may result in
serious injury or death. If you feel faint, stop exercising immediately.
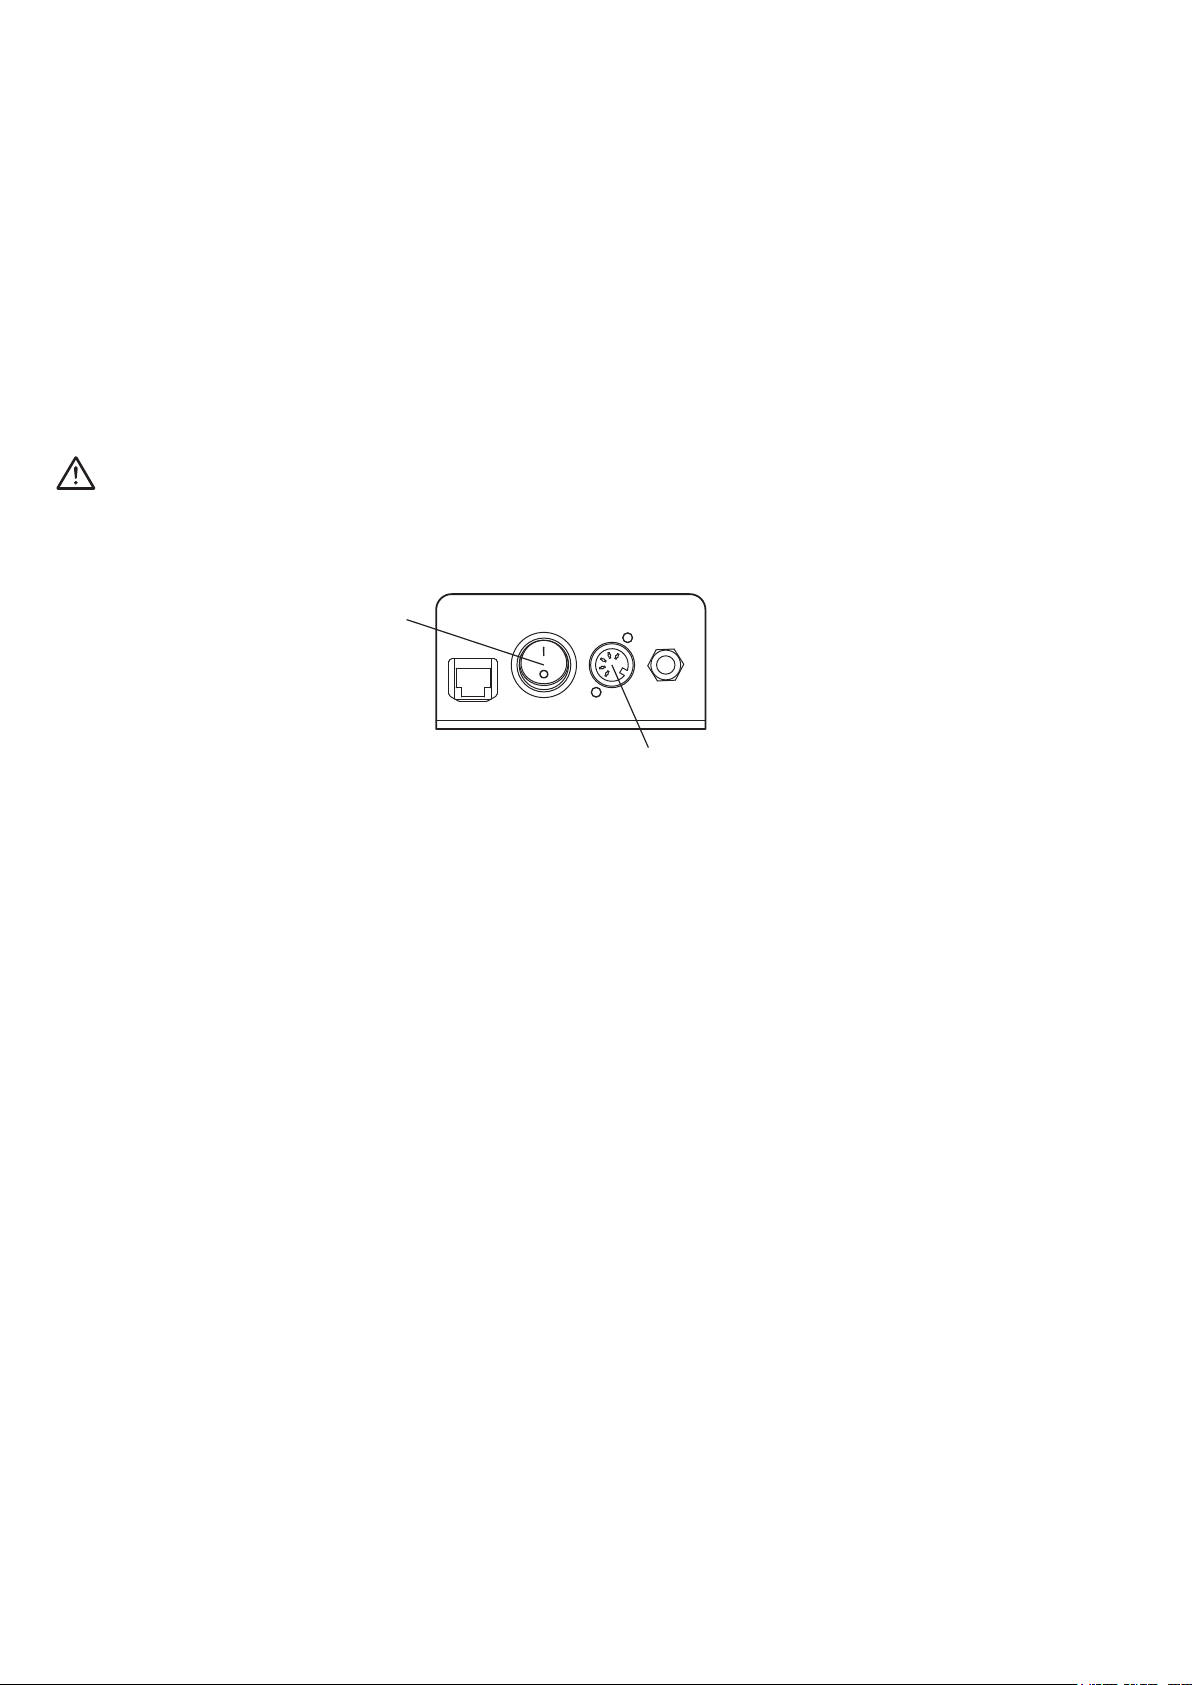
CAUTION: Read instruction manual before using. To disconnect, turn power OFF at the
ON/OFF switch, then remove plug from electrical outlet.
Do not stand or sit on plastic moulded covers.
Never operate a PULSE FITNESS product if it has a damaged power cord or electrical plug, or
if it has been dropped, damaged, or even partially immersed in water. Contact PULSE
FITNESS' Global Service Team.
Position the product so that the power cord plug is accessible to the User.
If the electrical supply cord is damaged, it must be replaced by the manufacturer, an authorised
Distributor/Dealer, or a similarly qualified person to avoid a hazard.
Use caution when mounting or dismounting the Crossclimb (Seated Independent Stepper).
Use the stationary handlebars whenever additional stability is required.
Never face backwards whilst using the Seated Independent Stepper.
Always follow the Console instructions for proper operation.
This appliance is not intended for use by persons (including children) with reduced physical,
sensory, or mental capabilities, or lack of experience or knowledge unless they have
supervision or been given instruction concerning the use of the appliance by a person
responsible for their safety.
Do not use this product outdoors, near swimming pools or in areas of high humidity.
Never operate a PULSE FITNESS product with the air openings blocked. Keep air openings
free of lint, hair, or any other obstructing material.
2

Never insert objects into any opening in these products. If an object should drop inside, turn off
the power, unplug the power cord from the outlet, and carefully retrieve it. If the item cannot be
reached, contact PULSE FITNESS' Global Service Team.
Never place liquids of any type directly on the unit, except in an accessory tray or holder.
Containers with lids are recommended.
Do not use these products in bare feet. Always wear shoes. Wear shoes with rubber or high-
traction soles. Do not use shoes with heels, leather soles, cleats or spikes. Make sure no
stones are embedded in the soles.
Keep all loose clothing, shoelaces, and towels away from moving parts.
Do not reach into, or underneath, the unit or tip it on its side during operation.
Do not allow other people to interfere in any way with the user or equipment during a workout.
Allow LCD consoles to “normalise” with respect to temperature for one hour before plugging the
unit in and using.
Use this product for its intended use as described in this manual. Do not use attachments that
have not been recommended by PULSE FITNESS, as such attachments may cause injury.
Read all warnings on each product prior to starting a workout.
If warnings are missing or damaged, please contact PULSE FITNESS immediately for
replacement warning labels.
Warning labels are shipped with every product and should be installed before product is used.
PULSE FITNESS is not responsible for missing or damaged warning labels.
This product may contain chemicals known to the State of California to cause cancer, birth
defects, or other reproductive harm. For more information refer to the European Commission
Regulation (EC) No. 1907/2006 (REACH) and the California Safe Drinking Water and Toxic
Enforcement Act of 1986 (Proposition 65).
SAVE THESE INSTRUCTIONS FOR FUTURE REFERENCE.
Read the entire manual before setting up the PULSE FITNESS Crossclimb (Seated
Independent Stepper). Place the Seated Independent Stepper where it will be used before
beginning the setup procedure.
Electrical Power Requirements
PULSE FITNESS Crossclimb (Seated Independent Stepper) requires an AC power supply
according to the electrical configurations listed in the chart below.
Supply Voltage Frequency Rated Current
115V 50/60Hz 0.4A
230V 50/60Hz 0.2A
Note: Do not modify the plug provided with this product. If the plug does not fit into an
available electrical outlet, have a proper outlet installed by a qualified electrician.
3

Where to place the PULSE FITNESS Crossclimb (Seated Independent Stepper)
Following all safety instructions move the PULSE FITNESS Crossclimb (Seated Independent
Stepper) to the location in which it will be used. Allow a clearance of 1.0m (3.28ft.) in the
direction the Seated Independent Stepper is accessed from. Allow at least 0.6m (2ft.) on the
side of the Seated Independent Stepper. Mount the PULSE FITNESS Seated Independent
Stepper by grasping the Handles and carefully stepping on the Pedals. To dismount the
Seated Independent Stepper, step off the Pedals while still holding handlebars.
How to Stabilise the PULSE FITNESS Crossclimb (Seated Independent Stepper)
Follow all safety instructions. Move the Seated Independent Stepper to the location in which it
will be used.
Install External Power Supply
The Consoles are powered by an external AC 12-Volt power supply. Plug in the power to the
external power connector on the side of the Seated Independent Stepper and then plug the
cord into an AC outlet. The Console should begin its boot-up cycle. The Consoles can show a
message indicating they are initialising (which may take upto approximately 2 minutes).
Note: If any of the Consoles do not light up, contact PULSE FITNESS' Global Service Team.
Use only the power supply provided by PULSE FITNESS in order to ensure against unsafe
operation.
0.6m /
2.0ft
0.6m /
2.0ft
1.0m /
3.28ft
4

Install Coaxial & Ethernet Cables (if necessary) - Series 2 & Series 3 Only
The following connection receptacles are located on one side of the 215H Seated Independent
Stepper:Coaxial Cable, and Ethernet Cable.
CAUTION: Connectors should easily fit into the receptacles. Forcing a connection may lead to
damage to the barrel connector and/or receptacle and may void product warranty.
Grounding Instructions
This PULSE FITNESS product must be properly grounded. If the unit malfunctions or breaks
down, proper grounding provides a path of least resistance for the electric current, which
reduces the risk of shock to anyone touching or using the equipment. Each unit is equipped
with an electrical cord, which includes an equipment grounding conductor and a grounding
plug. The plug must be inserted into an outlet that has been properly installed and grounded in
accordance with all local codes and ordinances.
DANGER – Improper connection of the equipment-grounding conductor can result in a risk of
electric shock. Check with a qualified electrician or serviceman if you are in doubt as to
whether the product is properly grounded. DO NOT modify the plug provided with the product.
If it will not fit an electrical outlet, have a proper outlet installed by a qualified electrician. Any
modification to the electrical plug will result in a voided warranty.
Note: This product is for use on a nominal 120-volt circuit and has a grounding plug that looks
like the plug illustrated in the figure. Make sure that the product is connected to an outlet having
the same configuration as the plug. No adapter should be used with this product.
120-Volt Grounded Plug
NB: Image for illustration only]
Grounding
Pin
Grounded
Outlet
5

Installation
Location
Select a suitable location for the PULSE FITNESS Crossclimb (Seated Independent Stepper)
before moving it. The site you choose should meet the following requirements:
ŸA flat, level and clean surface.
ŸClose to a suitable power socket.
ŸWell away from sources of water (or other liquids) or away from areas that is subject to
condensation.
ŸAway from direct sunlight (this can make it difficult to view the screen).
Note: The Seated Independent Stepper is not suitable for outdoor use.
If the chosen surface is carpet then the Seated Independent Stepper can be pushed to the
desired position on its front wheels (this is a two person procedure). However, if the surface is
more resistant, or the Seated Independent Stepper has to be lifted and lowered into place, then
four people will be required.
CAUTION
This equipment is heavy! We do not recommend attempting to lift it without assistance, at least
four people should lift the Seated Independent Stepper when necessary.
NEVER attempt to lift the Seated Independent Stepper by its Console or Handlebars.
Feet Adjustment
After placing the PULSE FITNESS Crossclimb (Seated Independent Stepper) in position, check
the unit’s stability by attempting to rock it. Any slight rocking indicates that the unit must be
levelled. Check the front stabilising feet to determine which foot does not rest fully on the floor.
If necessary, adjust the height of the feet to compensate. Turn the feet to the left or right to
increase or decrease the height as appropriate. When satisfied, securely fasten the locknut
against the feet strut.
WARNING - When installing or adjusting any piece of Pulse Fitness equipment, DO NOT leave
any adjustment devices projecting which could cause injury to any third party.
6
Locknut

Power
Input Socket
ON/OFF
Switch
On/Off Switch
The Seated Independent Stepper is power cable which has a delivered with a separate
moulded plug already fitted and plug-in external power supply adaptor. Plug the cable out of
the adaptor into the input socket at the front of the , then plug the Seated Independent Stepper
power cable into the adapter and into a suitable mains socket and then switch on the power.
Switch on the Seated Independent Stepper via the on/off (I / O) switch mounted at the front of
the machine. The Console should begin its boot-up cycle. The Series 3 Consoles will show a
message indicating it is initialising (which takes approximately 2 minutes). This indicates that
the Seated Independent Stepper is now ready for use.
NOTE: If the Seated Independent Stepper is not going to be used straight away, then switch off
and remove the 13A plug from the socket.
CAUTION - Ensure that the mains cable is routed in such a way that it does not create a
potential hazard to users of the or others persons in the vicinity.
7

Product Registration
Once the machine has been assembled, find the product SERIAL NUMBER located on the rating
plate.
* Refer to the SERIAL NUMBER and MODEL NAME when calling for service (Located on the front
page of this manual).
SERIAL NUMBER
8

Product Specification
9
PULSE FITNESS Crossclimb (Seated Independent Stepper) specifications:
Designed use: Heavy/Commercial.
Drive: Internal self tensioning poly V belt.
Resistance : 30-450W
Power: Generator brake.
‘Quick’ controls featuring handlebar resistance adjustments: Series 2 & 3 (10.1"/18.5").
40 Resistance levels: Series 1, 2 & 3 (10.1"/18.5").
Anti-slip pedals: Series 1, 2 & 3 (10.1"/18.5").
Independent pedals: Series 1, 2 & 3 (10.1"/18.5").
Pedal arm drive Kevlar® polychain: Series 1, 2 & 3 (10.1"/18.5").
Twin removable storage buckets/cup holders: Series 1, 2 & 3 (10.1"/18.5").
Integrated device storage tray: Series 1, 2 & 3 (10.1"/18.5").
Rear wheels for easy mobility: Series 1, 2 & 3 (10.1"/18.5").
Operating temperature: from +5C to +30C (+41F to +86F).
Telemetry: Equipped for heart rate telemetry reading using a chest strap. 5kHz non-coded
transmission Polar® Telemetry
Handpulse Sensors: DSP Handpulse Sensors (Digital Signal Processing)
LAN (Ethernet or WiFi): Series 3 (10.1"/18.5") ONLY
Integrated Television Tuner: Series 2 & 3 (10.1"/18.5") ONLY
Physical Dimensions (L x H x W)
Length (cm/"): Series 1, 2 & 3 (10.1"/18.5") = 183cm / 72-1/16" (201cm / 79-1/8" fully extended foot
pedals)
Height (cm/"): Series 1, 2 & 3 (10.1"/18.5") = 144cm / 56-11/16"
Width (cm/"): Series 1, 2 & 3 (10.1"/18.5") = 110cm / 43-5/16"
Weight (kg/lbs)
Machine NET Weight : 180Kgs
Maximum User Weight (kg/lbs):
160kg / 353lbs.

Product Specification
10
Console
Screen: Series 1 - 17.8cm / 7" Integrated High Contrast Colour Display. 16:9 Aspect Ratio.
512x300 Resolution.
Series 2 - 25.7cm / 10-1/8" Integrated High Contrast Colour Display. 16:9 Aspect Ratio.
512x300 Resolution
Series 3 Mini - 25.7cm / 10-1/8" Integrated High Contrast Capacitive Multi-Touch Colour
Display. 6:9 Aspect Ratio. 1366x768 Resolution.
Series 3 - 47cm / 18-1/2" Integrated High Contrast Capacitive Multi-Touch Colour
Display. 16:9 Aspect Ratio. 1366x768 Resolution.
Headphone Jack: Stereo 3.5mm, Series 2 & 3 (10.1"/18.5") ONLY
Integrated Television Tuner: Series 2 & 3 (10.1"/18.5") ONLY
EU - Analog – PAL. Digital - DVB-T (Freeview). IPTV: MPEG-2 Standard Definition;
MPEG -4 pt10 AVC/H.264 Standard Definition. Radio: Digital - DVB-T.
US - PAL/SECAM and NTSC require separate tuners. NTSC tuner supports NTSC-
Japan, NTSC-HRC, NTSC-M, NTSC-N. NTSC also supports PAL-M and PAL-N which
are unique PAL encodings for Argentina, Brazil, Paraguay and Uruguay. PAL/SECAM
tuner supports PAL, PAL-M, PAL-N, SECAM-B/G and SECAM-D/K.
Workout Programmes:
Series 1 - Quick Start, Goals (Time; Distance; Calories), Pacer (Time and speed; Time
and distance; Speed and distance), Profile: X-country (easy, moderate, advanced),
Aerobic (easy, moderate, advanced), Hill climb (easy, moderate, advanced), Intervals
(easy, moderate, advanced), Random (easy, moderate, advanced), Heart rate control
(variable heart rate training modes), Variable cool down with manual override.
Series 2 - Quick Start, Optional - E-Scape virtual workouts (road, lake. valley, beach),
Goals (Time; Distance; Calories), Pacer (Time and speed; Time and distance; Speed
and distance), Profile: X-country (easy, moderate, advanced), Aerobic (easy, moderate,
advanced), Hill climb (easy, moderate, advanced), Intervals (easy, moderate,
advanced), Random (easy, moderate, advanced), Heart rate control (variable heart rate
training modes), Variable cool down with manual override.
Series 3 (10.1"/18.5") - Quick Start, E-Scape virtual workouts (road, lake. valley, beach),
Goals (Time; Distance; Calories), Pacer (Time and speed; Time and distance; Speed
and distance), Profile: X-country (easy, moderate, advanced), Aerobic (easy, moderate,
advanced), Hill climb (easy, moderate, advanced), Intervals (easy, moderate,
advanced), Random (easy, moderate, advanced), Custom profile builder, Heart rate
control (variable heart rate training modes), Variable cool down with manual override.
Languages available:
Series 1 - English (UK).
Series 2 - Chinese, English (UK), French, German, Italian, Japanese, Russian, Spanish
& Welsh.
Series 3 (10.1"/18.5") - Chinese, English (UK), German, Japanese, Russian & Welsh.
Workout Displays:
Series 1 - Profile display with level indicator, Track display with level indicator (pacer
mode only), Time elapsed/remaining (depending on program), Distance
elapsed/remaining (depending on program), SPM, Calories used, Watts, Heart rate,
METs, User selectable/management programmable units (imperial/metric), User

Product Specification
11
selectable/management programmable language.
Series 2 - Profile display with level indicator, Track display with level indicator (pacer
mode only), Time elapsed/remaining (depending on program), Distance
elapsed/remaining (depending on program), SPM, Calories used, Watts, Heart rate,
METs, User selectable/management programmable units (imperial/metric), User
selectable/management programmable language.
Series 3 (10.1"/18.5") - Profile display with level indicator, Track display with level
indicator (pacer mode only), Time elapsed/remaining (depending on program), Distance
elapsed/remaining (depending on program), SPM, Calories used, Watts, Heart rate,
METs, Extendable workout goal, User selectable/management programmable units
(imperial/metric), User selectable/management programmable language.
USB: Series 1 - Service Port - For software updates & Smartphone device charging.
Series 2 - Service Port - For software updates & Smartphone device charging.
®®®
Optional - with supplied iPhone /iPod /iPad 30-pin connector.
Series 3 - Service Port - For software updates & Smartphone device(10.1"/18.5")
charging.
®®®
Optional - with supplied iPhone /iPod /iPad 30-pin or Lightning connector.
TM
Optional - with supplied Android Micro USB connector, just for charging.
Audio feedback: Series 2 & 3 - Optional.(10.1"/18.5")

What is the Crossclimb?
The PULSE FITNESS Crossclimb is a non weight-bearing, weight-loading exercise system. Regular
use produces increased aerobic capacity as well as stronger muscles and bones. This machine
prevents the users injury risk from high impact on joints as activities such as running.
The Crossclimb allows the user independent control of both speed level and resistance. The
exercise resistance can be controlled with the + and - buttons positioned on the ends of the
handgrips. A strength workout consists of lower exercise speeds and heavier resistance. A power
workout combines faster exercise speeds and heavy resistance. Fast exercise speeds and lighter
resistance improve leg speed. An endurance programme using slower speeds and lighter weights is
ideal for the long-duration workouts recommended by weight-control experts.
Intuitively designed, low-maintenance, reliability delivering an optimal workout.
Type of Training
Power
Speed
Strength
Endurance
Speed Level
Fast
Fast
Medium
Slowest
Resistance
High
Medium
High
Low
Duration
Short
Medium
Medium
Long
Primary Energy
Expelled
Anaerobic
Anaerobic &
Aerobic
Anaerobic &
Aerobic
Aerobic
12

Machine Overview
Upholstery
Pad
Console Stand
Hand Sensor
Console
Hidden
Transport
Wheels
Levelling
Foot
Pedal
Resistance
Adjuster
Pedal Arm
13

Installation Instructions
To install the machine, perform the following steps*:
1. Be careful unwrapping the machine and do not use a knife as it could damage the surface of the
machine.
2. When moving the machine, a sufficient number of personnel should be used to prevent the
equipment from collision, or to avoid injuries caused by personnel shortage.
3. Prior to installation of the equipment, make sure that all the parts are complete, with no missing
hardware.
4.When installing the equipment, there should be at least 2 or more persons working together to
ensure the accurate location of parts assembly.
5. When installing the equipment, the instructions must be followed to prevent components being
fitted incorrectly or omitted.
6. Appropriate tools should be used for installation to avoid damaging the equipment or causing
injury.
7. If the equipment needs to be moved this should be done after the installation process has been
completed. Failure to do so could result in injury.
8. Follow the installation sequence of the fastening locking nuts outlined in this manual. Locking nuts
should not be fully tightened until they are all loosely into position across the while machine and then
can be tightened up one by one.
9. After the completion of the installation, test the equipment. Check that the movement is smooth
and that there is no movement in the frame. If this is not the case it may be necessary to check the
equipment carefully, identify the problem and re-install.
*Please note: For installation a minium ceiling height of 2m and a doorway width of 1.2m is required.
14

Assembly Step 1
2
1
3
4
Steps
No.
Description
Specifications
Qty
1
1
Main Body
1
2
Rear Leg Assembly
1
3
Plain Washer
Φ24*Φ13*2.5
2
4
Cap Head Socket Screw
M12*65
2
Procedure: Connect the rear leg assembly. Loosely fix both bolts and washers, to line up the
assemblies, then tighten.
Note: This is a two person procedure.
Tools Required : 10mm Allen Key
15

Assembly Step 2
Steps
No.
Description
Specifications
Qty
2
1
Main Body
1
3
Plain Washer
Φ24*Φ13*2.5
2
4
Cap Head Socket Screw
M12*65
2
5
Front Leg Assembly
1
5
3
4
1
Procedure: Connect the front leg assembly. Loosely fix both bolts and washers, to line up the
assemblies, then tighten.
Note: This is a two person procedure.
Tools Required : 10mm Allen Key
16

Wiring Assembly Step 1
Procedure: Once the front leg is connected you will need to connect the Comms and Power cables
to the Splice PCB.
Steps
No.
Description
Specifications
Qty
1
A
Splice PCB
100-118-*
1
Comms
Power
Power
Comms
A
POWER
COMMS
17

Wiring Assembly Step 1 cont.
Procedure: Then you will need to unravel the Network, Coax and Handpulse Cables and thread
them through the console pipe.
Steps
No.
Description
Specifications
Qty
1
A
Splice PCB
100-118-*
1
Comms
Power
Power
Comms
A
COAX NETWORK HANDPULSE
18

Wiring Assembly Step 1 cont.
Procedure: Next you need to make sure that the Power and Comms cables are fitted from the splice
PCB and threaded through the console pipe.
Note: This must all be connected BEFORE any mouldings are fitted onto the front leg, or you won’t
be able to access the PCB without removing all mouldings..
Steps
No.
Description
Specifications
Qty
1
A
Splice PCB
100-118-*
1
Comms
Power
Power
Comms
A
COMMS
POWER
19
Table of contents
Other PULSE+ Fitness Equipment manuals
Popular Fitness Equipment manuals by other brands

Rugged Computing
Rugged Computing WARRIOR Y120 Assembly instructions & owner's manual

Adidas
Adidas POWER TOWER manual

Banfer
Banfer Vario manual

Next Level Racing
Next Level Racing CHALLENGER instruction manual

TKO
TKO G824FID Assembly instructions

Action Fitness
Action Fitness F000244 Assembly and instruction manual

Kaswit
Kaswit Pilates Power Gym Pro owner's manual

Hudora
Hudora 76749 INSTRUCTIONS ON ASSEMBLY AND USE

Body Flex Sports
Body Flex Sports PT817 owner's manual

Taurus
Taurus Dual Pro Bicep Curl & Tricep Assembly and operating instructions

Nautilus
Nautilus Glute Drive owner's manual

Batca
Batca Link owner's manual