PUR BOOSTER QUICK 7 Steps -400 GPD Manual

Content
I. Introduction
II. Packing list
III. Introduction to the main functions of the reverse
osmosis system
IV. Functionality
V. Water flow diagram
VI. Assembly Instructions
VII. Maintenance and Care
VIII. Technical parameters
I. Introduction
Dear buyer,
Thank you for purchasing the PUR Booster Reverse Osmosis System.
This reverse osmosis plant is one of the most efficient and practical water
treatment plants currently available on the market. To ensure proper
operation of the reverse osmosis system, please study this manual
thoroughly before initial startup.
II. Packing List
1. 1 x main unit incl. RO membrane
2. 1 x accessory bag: connection and mounting set, housing key, 2 x 1m
water hose (6mm + 9mm)
3. 1 x user manual
4. 1 x faucet incl. connection material
Attention:
The RO membrane is packed separately and must be inserted into the
membrane housing before first use.
III. Introduction to the main functions of the reverse
osmosis system
1. 1st stage: PP10 micron filter for filtration of coarser sediments such
as rust, sand, dust etc.
2. 2nd stage: GAC activated carbon filter for filtering chlorine, org.
substances, by-products by sterilization processes, taste and odor
impairments
3. 3rd stage: CTO carbon block 5 micron for filtration of finest particles,
chemical residues and oils, flavors etc.
4. 4th stage: UF 0.02 micron ultrafiltration fillter for filtration of very
fine residual particles and to protect the high performance
membrane
5. 5th stage: 400 GPD 0.0001 micron reverse osmosis membrane,
reducing bacteria e.g. 4,000 times and viruses 200 times. Effective

filtration of bacteria, viruses, heavy metals, pesticides, insecticides,
residues and other harmful substances
6. 6th stage: T33 activated carbon post filter, which improves the taste
of the water and keeps it fresh
7. 7th stage: mineralization postfilter, which reintroduces many
important minerals to the water, such as calcium, magnesium,
sodium, etc.
Optional configuration options:
The system can be equipped with a 12W UV system as a germ barrier for
additional protection against viruses, bacteria and all organic pollution.
IV. Functionality
The 0.0001 micron fineness of the RO membrane and the use of
state-of-the-art RO water treatment technologies eliminate many pollutants
such as: coarse to very fine contaminants, colloids, organic pollutants,
heavy metals, dissolved solids, bacteria and viruses, etc. while maintaining
the same molecular structure of water and dissolved oxygen. The achieved
reduction rate can be up to 96%.
ensure a stable environment for the RO membrane
automatically at a lower water pressure of 0.5 BAR or when the water
supply is blocked. ch: to prevent overheating of the pump, the unit is
switched off automatically when the pressure is fully reached.
Operating water pressure 4 BAR
V. Water flow diagram
VI. Assembly Instructions
We recommend having the installation carried out by a specialist. If you
install the reverse osmosis system yourself, please follow the steps below:
A Installation Preparations
1. Determine the mounting location (pay attention to the
environmental conditions)
2. Prepare the necessary tools: wrench –drilling machine - bits - 12

mm - hole saw (high speed steel or marble saw) - Phillips and
slotted screwdrivers - scissors - 16 mm and 14 mm wrenches –
needle-nosed pliers.
3. Make sure that you have all the necessary connection components
at hand.
4. Turn off the water and power supply before starting installation.
CAUTION: To open the hose quick connectors, push the small safety
ring inwards. Hold it down and pull out the hose.
For mounting, insert the hose back into the coupling as far as possible and
secure it by pulling the hose out slightly, thus activating the inner circlip.
B. Installation of reverse osmosis system
1. Close the inlet valve and unscrew the metal hose. Take the
supplied 3-way socket and connect one end to the water outlet
valve. Screw the other end of the unscrewed metal hose to the
3-way sleeve with the nut.
1. Take the supplied water inlet ball valve and wrap one end with
Teflon tape. Spray the valve with some silicone spray and screw it
into the provided thread of the 3-way water inlet sleeve. Take the
supplied 9 mm hose and cut it with scissors to the desired length.
Connect one end of the hose to the water inlet ball valve and screw
it tight with the nut. Connect the other end to the water inlet on the
1st filter of the device.

1. Drill a 6 mm hole in the basin drainpipe. Cut the supplied 6 mm
hose with scissors to the desired length and insert one end into the
drilled hole. Seal the hole with silicone gel. Attach the drain hose to
the drain pipe with a cable tie or hose clamp.
1. Drill a 12mm hole through the sink where you want to attach the faucet.
Take the supplied faucet, place the stainless steel neck on the faucet
body, lower the faucet into the provided hole, place a washer on it from
underneath and screw the faucet tightly with the nut. Take the supplied
6 mm hose and cut it with scissors to the desired length. Press the
supplied 6 mm plug into the end of the hose and fasten it with the nut
on the water inlet.
2. Open the faucet and fill the device with water. Check all connections for
leaks. Connect the device to the power supply to put it into operation.
At the beginning it is possible that the water is a bit dark and some
carbon dust can escape from the carbon block. This is absolutely
harmless and the water will be clear after a few minutes.
3. Close the faucet and check that the unit shuts off and the solenoid
valve stops the water inlet. Then open the faucet and check if the unit
turns on and the high pressure switch is reset.
4. Installation of reverse osmosis membrane
Unscrew the inlet water connection of the membrane cover. Remove the
hose and use the membrane spanner to loosen the membrane cover.
Unpack the membrane and press the end with the O-ring first into the
membrane shell. Tighten the membrane cover and secure it with the
membrane spanner. Insert the water inlet hose back into the water inlet
connection oft he membrane cover, secure it and place the membrane shell
in the provided holder of the reverse osmosis system.

ATTENTION:
- Please be sure to install the membrane in the correct direction.
- Make sure that one end of the diaphragm has O-rings.
- During installation, first insert the end of the membrane with the O-rings
into the membrane shell, a slight pressure is sufficient. If there is greater
resistance, do not use force as this could damage the membrane shell and
/ or its components (the warranty does not apply to such damage).
In the RO membrane is a protective liquid for the time of storage and
transport. Let the device run for about 30 minutes, after which the ultrapure
water can be safely used.
COMPUTER CONTROL
After connecting the unit to the power supply, the POWER indicator lights
up and an automatic flush is performed. The FLUSH indicator lights up. For
a manual rinse please press WASHING.
When the working pressure has been reached, the FULL indicator lights up
and the pump is switched off.
If the device is in operation for too long, the OVERHAUL indicator lights up
and the device shuts off.
Switch off the power, wait a moment and switch the device on again. Check
if a filter or membrane change is necessary.
Terms of use:
1. To prevent microbial contamination on the membrane components
during storage and transportation, the membrane was coated with
a light protective solution and the post-active carbon filter with
activated carbon powder. Therefore, dispose of the first liter and do
not use it as drinking water. Thereafter, the produced water can be
safely used.
2. When you start to operate the unit, the TDS value of the water may
be slightly elevated. After a short time, this value drops again and
stabilizes.
3. During operation, the water inlet ball valve and the faucet should be
open. If you currently do not need ultrapure water, close the tap, the
high pressure switch will automatically shut off the water supply.
4. These usage instructions only apply if the device is connected to
the power supply and / or the water inlet ball valve is opened and
the device is in operation.

VII. Maintenance and Care
1. During prolonged operation of the RO system, fine sediments and
bacteria may settle on the membrane surface and block the flow. It
is therefore advisable to carry out a regular rinse:
a. Manual flushing
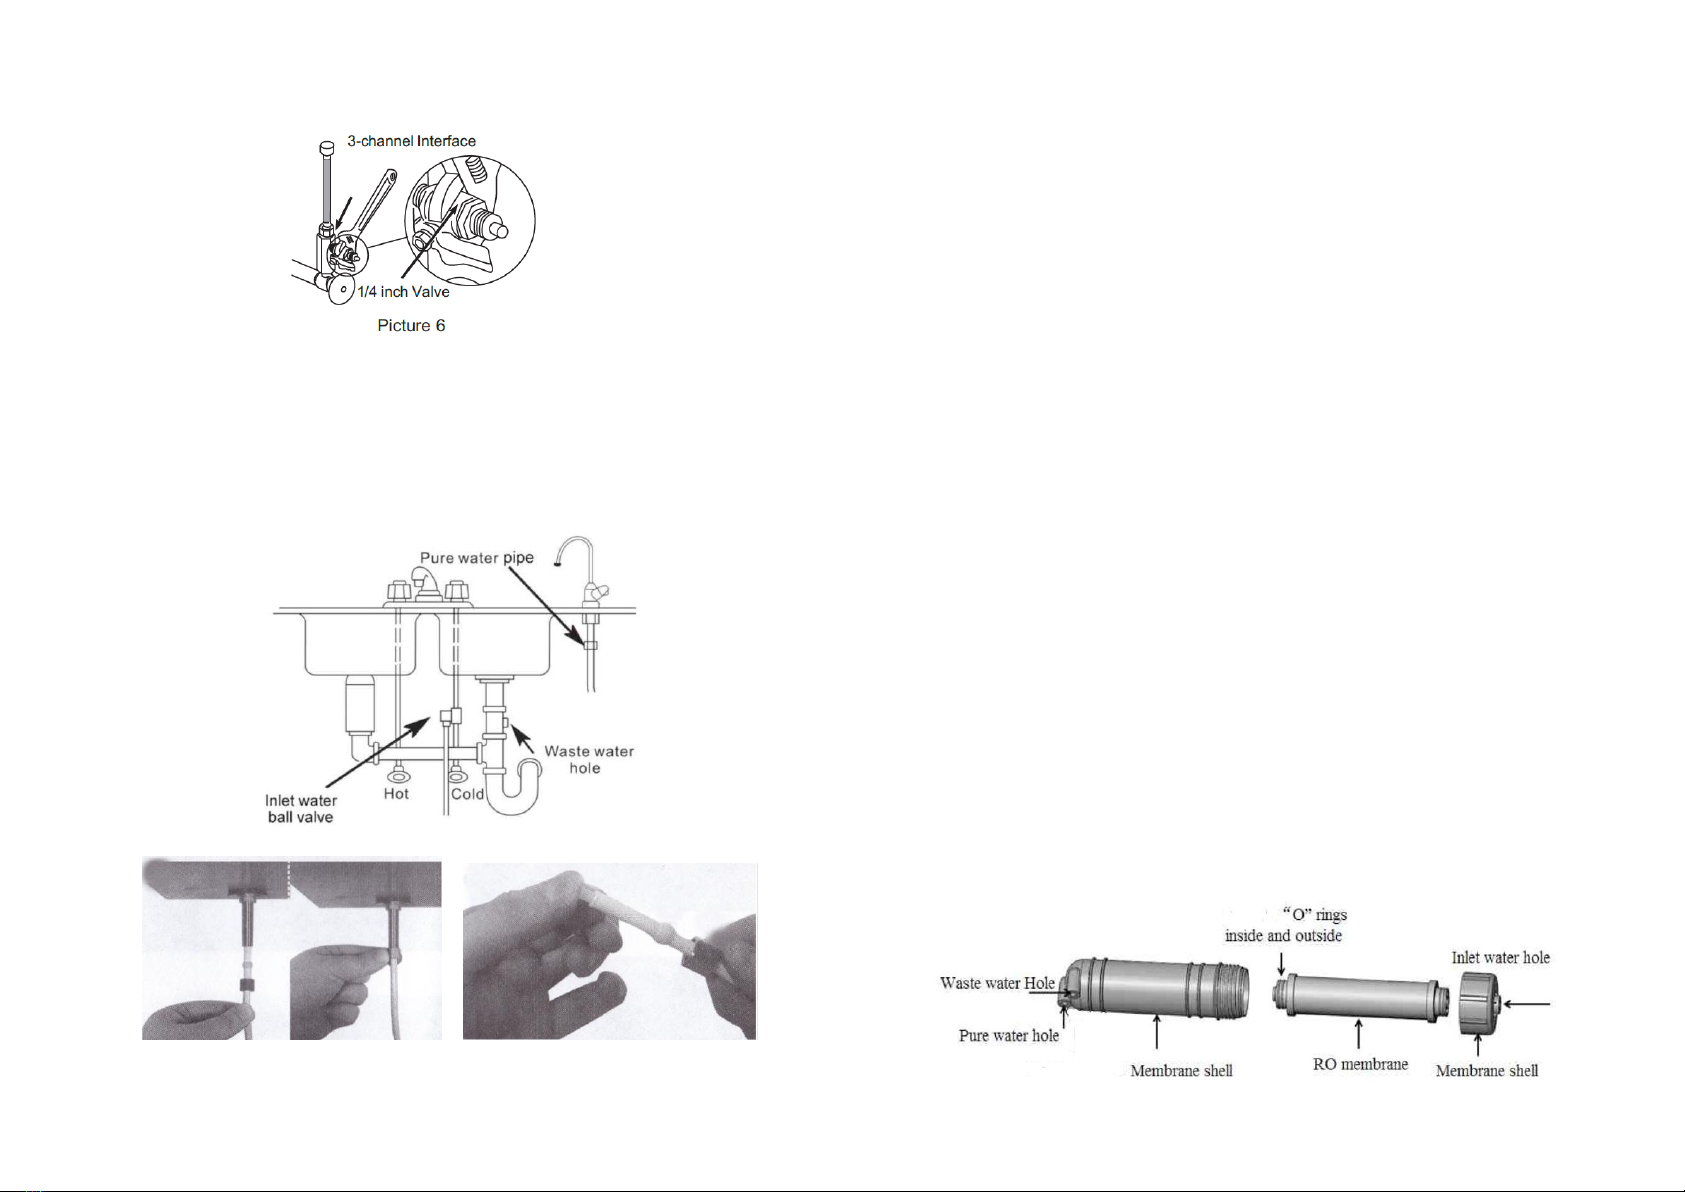
b. Rinsing procedure: Open the inlet water valve and allow the device
to rinse for approx. 5 - 10 minutes. Then close the inlet water valve
again.
2. To ensure an excellent quality of ultrapure water, the filters must be
replaced regularly. The lifetime of each filter varies depending on the
quality of the input water. A family of three has on average a daily
water consumption of about 10 liters of drinking water. The filters
should therefore be replaced as follows:
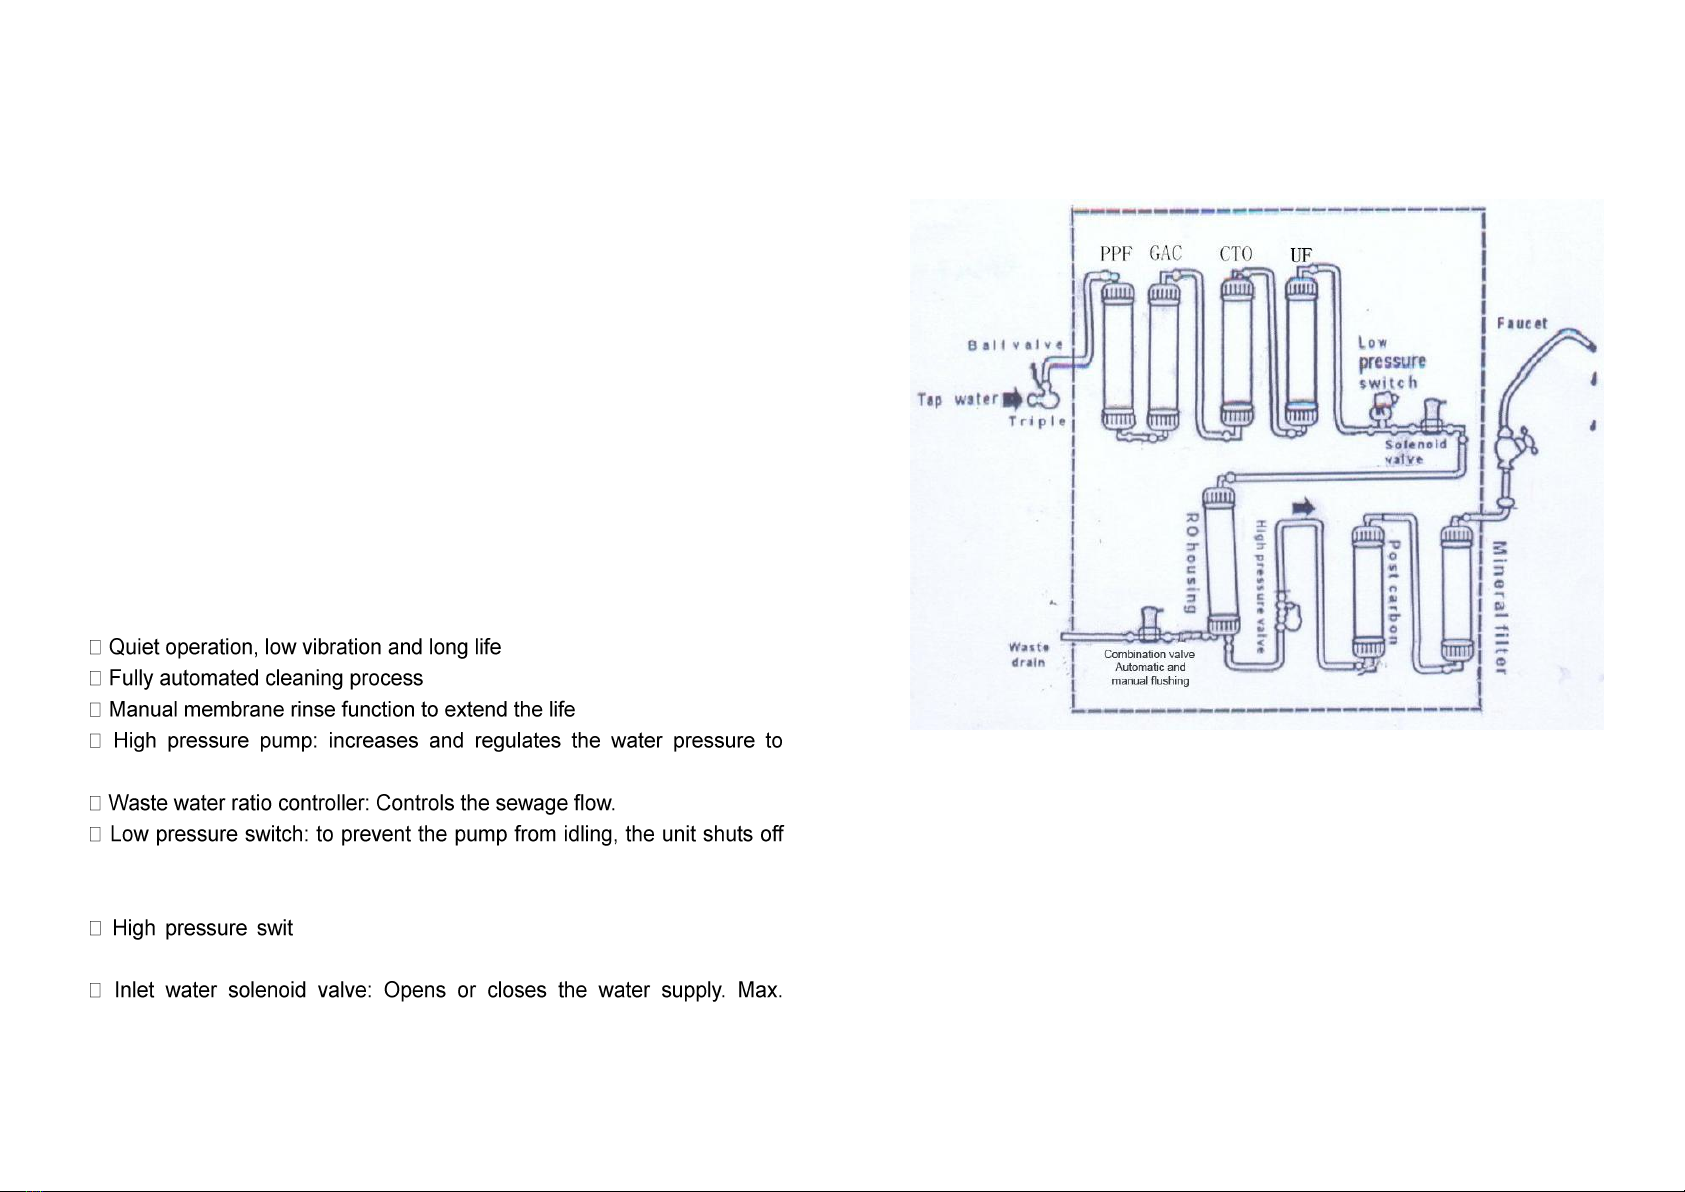
Stage 1 - PP filter 10 microns: about 3 - 6 months
Stage 2 - GAC granular activated carbon filter: approx. 3 - 6 months
Stage 3 - CTO activated carbon block 5 microns: about 3 - 6 months
Stage 4 - UF fine filter 0.02 micron: approx. 6 - 12 months
Stage 5 - RO membrane: approx. 12 - 24 months
Level 6 - T33 post activated carbon filter: approx. 6 - 12 months
Stage 7 - mineralization filter: approx. 6 - 12 months
A change of filters is necessary if the following situations occur:
1. The quality of the ultrapure water deteriorates and the taste
changes
2. The ultrapure water volume decreases noticeably. (ATTENTION: a
reduced volume of ultrapure water production also results from a
change in the temperature of the input water.)
Attention!
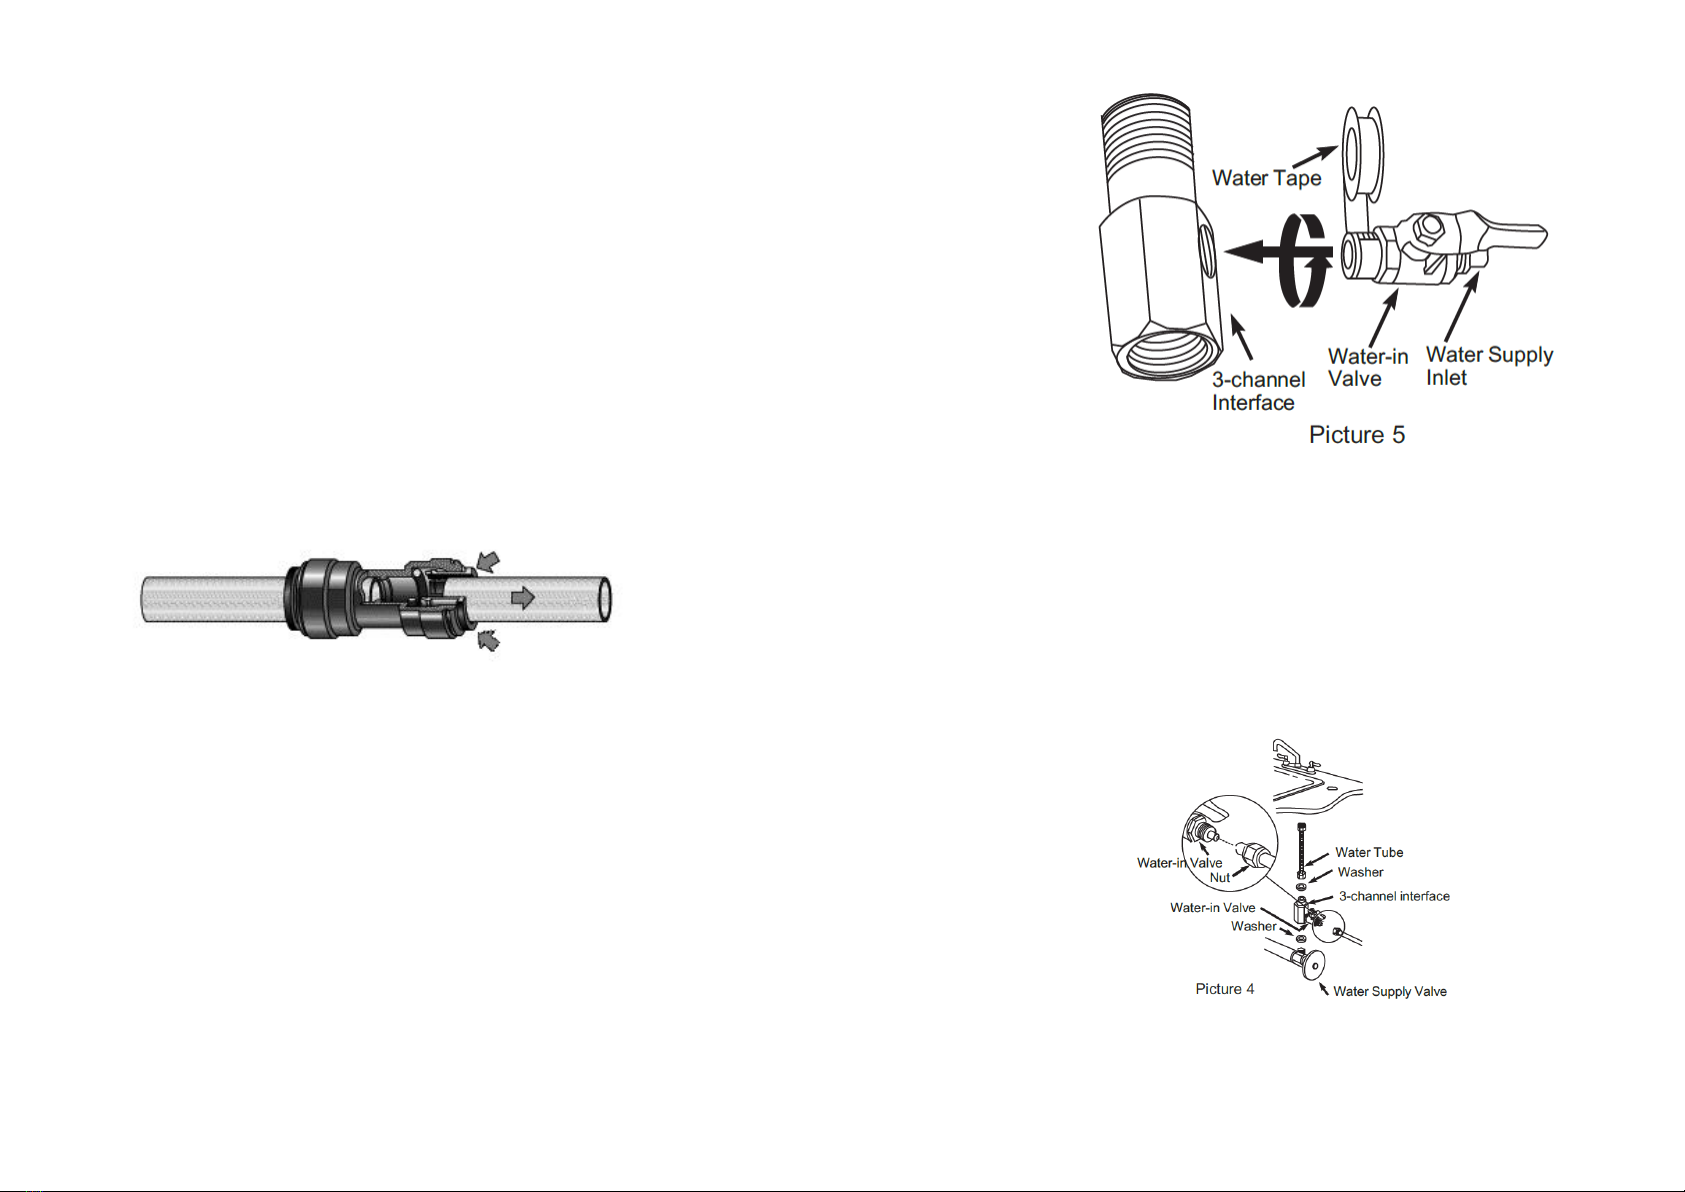
1. We recommend having the installation carried out by a specialist,
as a drill and other power tools are used during assembly. If you
install the reverse osmosis system yourself, please follow exactly
the listed individual steps. Please keep children away from the
device.
2. When drilling, make sure that there are no water and electrical
cables behind it. The device must be connected to a grounded
power outlet. The power adapter must be stored in a
well-ventilated and watertight location.
If any of the following occurs, disconnect the unit immediately from
the water supply (close the inlet water ball valve) or disconnect the
power cord and repair:
- if water comes out of the water pipes or other components
- if some of the elements are not working properly
- if some components carry electricity
- if you notice other anomalies or errors on the device

If you do not use the device for a while, disconnect the device from the
water supply or disconnect the power cable.
If the device and / or its components are damaged, please contact the
supplier or a specialist. We are not liable for any damage caused by
improper handling.
VIII. Technical parameters
Modell
PUR BOOSTER QUICK
7 Steps - 400 GPD
Nominal Voltage
AC 120V-230V
50/60Hz
Rated Output
80 W
Water Pressue
1 –4 BAR
Temperature inlet water
5 –40 °C
Connection
Max. TDS input value
1/2“
≤1000 PPM
Max. production volume
400 Gallons per day /
Approx. 1500 litres
Flushing Process
Automatic + manual
Protection type
Protection Class II
Note: Changes reserved for the improvement and further development of the product.
Information obligations to private households in accordance with § 18 ElektroG
(1) According to § 17 ElektroG, we are obliged under the conditions specified therein to withdraw
electrical and electronic waste equipment free of charge. We comply with this legal obligation via
the internet portal interseroh.de. Detailed information on the exact scope of our retention
obligations and the possibilities we have created for the return of old equipment can be obtained
via the following link:
>>> Return of old equipment <<<
(2) Disposal note: Please remove the filter cartridges from the reverse osmosis system and
dispose them of in the household waste before adding the rest of the system to electrical scrap!
(3) We would like to point out to all owners of electrical and electronic waste equipment that they
are legally obliged to supply these devices to a waste separate from the unsorted settlement waste.
In particular, the disposal of electrical and electronic waste equipment via the residual waste or the
yellow tonne is prohibited. The symbol of a crossed out waste bin on wheels, which is shown below
and applied to electro-and electronic devices, is additionally ensured to the obligation to separate
disposal.
(4) We would like to point out to all owners of electrical and electronic devices that they are
required by law to remove old batteries and old battery converters, unless they are enclosed by the
old devices to be disposed of.
(5) We would like to point out to all end-users of electrical and electronic devices that they are
responsible for deleting and removing personal data on the old devices to be disposed of.
If you still have questions or need further information, please call us by phone +49 (0)
4721-663050.

PUR BOOSTER QUICK
7 Steps - 400 GPD
REVERSE OSMOSIS SYSTEM
Table of contents
Other PUR Water Filtration System manuals
Popular Water Filtration System manuals by other brands

Finerfilters
Finerfilters RO400-E2 Installation and maintenance manual

Crystal Water
Crystal Water CW-A1001 Installation & user guide

TIGMON
TIGMON Lauben JUG 32GW user manual

Brita
Brita sodaTRIO Usage instructions

Apec Water
Apec Water ESSENCE ROES-PHUV75 Installation instructions & owner's manual

JRC
JRC NSVS1104 manual

BWT
BWT THERO 90PRO Installation and operating instructions

Ispring
Ispring RO1000 Series Installation instructions & user manual

Culligan
Culligan Aquasential Select Plus Iron-OX5 owner's guide

Kohler
Kohler LISON 21729T-PP020-01R installation guide

LBS
LBS GENERATION2FILTRATION G2F-POR101 Series manual

Living Water
Living Water Living water user manual