PUR PUVR15H User manual

© 2021 All rights reserved.
PUR is a registered trademark used under license from Helen of Troy Limited.
210113
Owner’s Manual
PUVR15H
Whole Home Ultraviolet Rack
Water Disinfection & Filtration System
EPA Establishment # 97287-CAN-1

1
Safety Precautions:
• Never attempt to operate your UV system unless it has first been properly grounded, to avoid creating an electric shock hazard.
• To prevent an electric shock, do not plug the UV system into any socket that has not been equipped with a Ground Fault Circuit
Interrupter (GFCI).
• Always unplug the power cord before attempting to install, clean or perform other routine maintenance on the unit.
• Always stop the inlet water flow before performing any maintenance on the unit.
• Do not attempt to service this unit unless you are an accredited service technician, as personal injury could result and/or
system operation could be detrimentally affected.
• Never operate this unit in an oxygen-rich environment, or within 6 feet (2 meters) of any oxygen source.
• If temperatures should fall below freezing (0°C / 32°F), drain all water from the unit, drain and disconnect all plumbing lines,
and cap the inlet and outlet ports.
• Do not attempt to install, operate, clean or perform routine maintenance on your UV system unless you have first read and
understood all of the warnings and safety instructions that are contained in this manual and on the labels that are affixed to
the system.
• Do not attempt to operate the UV system if it has been visibly damaged. Inspect it carefully to ensure it is free of
physical damage before using.
• Do not operate if the system is wet or if there are visible leaks.
• The UV system is electrically certified for indoor applications only and should not be exposed to outdoor elements.
• Always install and operate the unit in an environment where both the air and water temperatures will normally range between
36°F (2°C) and 104°F (40°C).
• The UV system has been tested and certified to NSF/ANSI Standard 55 and CSA B483.1 for the supplemental bactericidal
treatment of disinfected public drinking water or other drinking water that has been tested and deemed acceptable for human
consumption by the state or local health agency having jurisdiction. The system is only designed to reduce normally occurring
non-pathogenic nuisance microorganisms. Class B systems are not intended for treatment of contaminated water.
Safety Precautions ..................................................................1
Product Overview......................................................................2
Tools Required for Installation .................................................2
About Your System....................................................................3
Conditions for Operation ..........................................................3
Installation Instructions...........................................................4
*Accessibility, Orientation and Fittings ...............................4
*Optional Bypass Line and Drain Valve ...............................4
*Typical Installation ............................................................4
Operation Instructions..............................................................5
*Initial Start-up Procedure..................................................5
Service and Maintenance.........................................................5
Lamp Installation and Replacement ........................................6
Quartz Sleeve Installation and Replacement........................... 7
Replacement of Filter Cartridges .............................................8
Seasonal Use Maintenance Requirements ...............................9
In-House Water Distribution System Disinfection.....................9
Troubleshooting Guide............................................................10
Warranty.................................................................................11
Table of Contents:
WARNING: The installation of this Ultraviolet (UV) system must be in accordance with all provincial/state and/
or local laws and regulations regarding plumbing and electrical services. Installation by a certified plumber
is recommended. Always comply with the following warnings and safety instructions to prevent bodily harm,
injury or property damage.
DANGER: The lamp inside the unit emits UV light that can cause permanent damage to skin and eyes.
Never look at the lamp while the unit is operating.

2
The UV Water Treatment System has been engineered to rigid standards, and has been quality inspected at the factory prior to
packaging. Please review this manual in its entirety for a detailed system explanation, and ensure that the following components
accompany this system. To ensure system performance, all replacement components should be purchased directly from an autho-
rized dealer or online at www.ghpgroupinc.com. The use of components purchased from other sources will void the warranty, and
will potentially cause the system to function in a lesser capacity than intended.
Product Overview:
Item Description QTY
A System Assembly 1
B Sediment Filter 1
C Carbon Block Filter 1
D UV Lamp 1
E Quartz Sleeve 1
F Owner's Manual 1
Item Description QTY
G Anchor Bolts, 5/16" x 1.25" 2
H Retaining Nut 1
I VuCap®1
J Flow Restrictor 1
K 5/16" Flat Washer 2
L Quartz Sleeve Sealing O-Ring 1
Tools Required for Installation:
Safety
Goggles
Adjustable
Wrench
Pliers Phillips
Screwdriver
Utility Knife Measuring
Tape
Drill and 3/16"Bit
G.
F.
K.
J.
I.
H. L.
WARNING: Lamps must be replaced after 12 months of operation to ensure proper disinfection of your water.
Clean the Quartz Sleeve frequently for optimum performance.
A minimum 5 μ nominal pre-filter is recommended upstream (before) the UV system installation point. As UV system efficiencies
are dictated by penetration of the UV light through the water column, particulate matter within the water column could decrease
the disinfection capacity, and potentially create a harmful condition. A 5 micron prefilter and 5 micron carbon filter is supplied
with the system (Filtration systems sold separately).
B. D. E.
C.
A.

3
Specifications:
Flow Rate GPM US (LPM) Max* 15 (56)
Unit Dimensions (L x W x H) 68.6cm/27” x 21.6cm/8.5” x 79.4cm/31.25”
Power Input 115V / 60Hz
Operating Pressure Range 30 - 100 PSI
Feed Water Temperature Range 40 – 99 ˚F (4 – 37 ˚C)
Unit Volume 17L / 4.5G
Ambient Temperature Range 36 – 104 ˚F (2 – 40 ˚C)
Inlet Port Size 3/4" - 1" NPT
Outlet Port Size 3/4" - 1" combo NPT
Minimum distance for adjacent combustible materials 15 cm/6”
About Your System:
Conditions for Operation:
Water quality will impact the performance of your UV system, and the following levels should be utilized as a guideline for pre-
treatment requirements of the influent water supply prior to UV treatment:
If you are using untreated surface water or untreated groundwater as your source of supply, the suitability of the water supply for
potable applications must be confirmed by the provincial/state and/or local health agency that has jurisdiction.
If the test results indicate that: (1) any of the above contaminant levels are being exceeded, or (2) any prevailing drinking water
health standards are not being met, additional pre-treatment options must be installed that will eliminate all contaminants
posing health risks. Non-municipal water should be tested on an ongoing basis to ensure treatment efficiency.
Iron.................................................< 0.3 ppm (0.3 mg/L)
Turbidity.........................................< than 1 NTU
Tannins ..........................................< 0.1 ppm (0.1 mg/L)
Manganese.....................................< 0.05 ppm (0.05mg/L)
Hardness........................................< 120 ppm (7 grains per gallon)
UV Transmittance...........................> 75%

4
Installation Instructions:
Always mount the PUVR15H in a location that provides ample space for accessing the UV lamps. Service may require removing
the UV lamp and quartz sleeve. A minimum of 16" (41 cm) of clear space should be provided to allow for removal/installation of UV
lamp (See installation image below). As the UV system generates heat during use, please ensure that no combustible items come
into contact with, or are in proximity to the system.
It is recommended that you maintain at least 6” (15 cm) of clear wall space on all sides of the PUVR15H for cooling purposes. This
will prolong the operating life of the system.
CAUTION: Whenever soldering is required on any PUVR15H system component, always detach that component
from the system first.
To prevent possible contamination of water in the plumbing, which may pose a health hazard, do not use the bypass line and valve
if your source of supply is untreated surface or ground water. If your source of supply is treated municipal water, use of the bypass
line and valve will permit uninterrupted treated water service in the event of a system malfunction. The installation of a drain
valve, while not required, will allow the service technician to drain the system of water prior to conducting any service on the unit.
Accessibility, Orientation & Fittings:
Optional Bypass Line and Drain Valve:
Typical Installation:
Water Inlet
Optional
Bypass
Valves
16" Clearance
For Lamp Removal
Sediment
Filter
Carbon
Filter
Treated Water Exits
GFCI
Please note that the PUVR15H is not equipped
with a bypass valve system when purchased.
The addition of a bypass valve system is at the
discretion of the user. All plumbing components
must be purchased separately.
The Mounting Bracket
allows for a reversible
installation if preferred

5
NOTE: The PUVR15H system has been designed to be installed on the cold water line only.
NOTE: The UV System should remain turned on continuously to ensure protection of your water system. During
normal operation of the system, the green power LED will be illuminated and the countdown timer will show
days of lamp life remaining. When there is no flow in the system, the water in the UV chamber will be warmed
by the UV lamps. Running a cold water tap for about 30 seconds will eliminate all of the warm water.
The presence of small air bubbles in the water system may occasionally give tap water a milky appearance, but air bubbles will
not affect water quality or taste. Initially, filtered water may appear cloudy due to the release of air trapped within the filters and
throughout the system. Dependant upon your use of the system, this condition should disappear within a few days following system
installation.
Always perform the following start-up procedure when starting your PUVR15H system for the first time or after a dormant period:
1. Shut off the main water supply valve.
2. Mount the UV rack system to the wall. Please note that due to the weight of the UV rack, it is essential that the unit is mounted
directly to a concrete wall (screws and washers not provided) or directly into framing studs (screws and washers provided). Do
not mount the unit directly on dry wall.
3. Hook up inlet water connections and the outlet water connection. For ease of installation and service, it is recommended using
couplings on both the inlet and outlet lines.
4. The filters are wrapped and the wrapping around the filter(s) must be removed. Mount the filter(s) and housing(s) on the UV
rack system.
5. Plumb inlet water connections and the outlet water connection. For ease of installation and service, it is recommended using
union couplings on both the inlet and outlet lines.
6. Confirm that all of the plumbing connections are secured. Partially open the main supply valve while releasing air from the
system by opening a downstream faucet.
7. Plug in the UV disinfection system and confirm that the UV lamp is illuminated; it will glow purple through the VuCap®.
8. If no leaks are visible at low flow, then fully open the main supply valve. Check for leaks.
9. For chlorine disinfection of household water distribution system, follow procedures outlined on page 9.
10.Open a downstream tap and flush the system for 15 minutes prior to initial use.
11.Your UV rack system is now ready for use.
Operating Instructions:
Service and Maintenance:
Initial Start-Up Procedure:
The following instructions have been provided to assist with general maintenance of the system; UV lamp replacement and quartz
sleeve cleaning/replacement. All other system repairs must be completed by an accredited service technician.
Your PUVR15H uses a dual treatment process involving both filtration and UV disinfection to treat water. The water filters, quartz
sleeve and UV lamp require regularly scheduled replacement/service in order for the PUVR15H to provide maximum
performance.
Replacement UV lamps and quartz sleeves are available from an authorized retailer and GHP Group Inc. Use only PUR®lamps and
sleeves to ensure maximum system performance. Replacement lamp and quartz sleeve model # PUVLQS40H. Replacement ballast
model # BA-95H.

6
Lamp Installation and Replacement:
WARNING: The lamp heats up after continuous use and can burn your skin if touched. Disconnect power from
the wall outlet and allow lamp to cool for at least 5 minutes before removing. Do not operate the UV lamp
outside of the UV Chamber. The lamp in the unit emits powerful ultraviolet light that can cause permanent
damage to skin and eyes. Never look at the lamp when the unit is turned on. Handle the UV lamp by the ends
only. Do not touch the glass surface of the UV lamp with your fingers. If the surface of the lamp becomes dirty,
use a clean lint-free cloth and isopropyl alcohol to remove any dirt.
Your UV disinfection system is equipped with a visible/audible lamp failure indicator. In the event of UV lamp failure, the red LED
light will flash and a beeping sound will be audible from the Electronic Controller of the unit. The lamp life countdown timer will
stop decrementing when in alarm mode. Please note that if these conditions occur and you are on a non-municipal supplied water
source, you should immediately stop using the water for potable applications until the lamp is replaced and disinfection of all
distribution lines is completed.
The ultraviolet lamp has an approximate life of one year (9000 hours). The UV lamp will continue to operate past 9000 hours,
however, the UV output decreases rapidly beyond 9000 hours and the UV lamp may no longer provide adequate disinfection of your
water supply. The built in 365 day countdown timer displays the number of days remaining until lamp replacement is required.
When the countdown timer reaches 0 days, an intermittent audible alarm will be activated and the Controller display will indicate
alarm A3. In order to allow time to obtain a replacement UV lamp, the audible alarm can be silenced for 7 days by pressing and
holding button on Controller for 2-5 seconds. After 7 days, alarm will sound again if lamp has not been replaced. This can be done
a maximum of 4 times which allows up to 28 days to obtain a replacement UV lamp. After 4 times, the alarm can no longer be
silenced until a replacement lamp is installed and the lamp life alarm is reset to 365 days.
1. Depressurize UV chamber by turning off the inlet water supply
and open valve downstream of system. Then close the outlet
valve (Figure 1).
2. Unplug the Controller from the electrical outlet (Figure 2).
3. Allow at least 5 minutes for lamp to cool before removing
(Figure 3).
4. Remove the VuCap®from the UV chamber and carefully
disconnect the UV lamp from the lamp connector harness
(Figure 4).
5. Carefully remove the UV lamp from the quartz sleeve by gently
rotating the lamp free. Be sure to hold the lamp only by the
ceramic ends.
6. Carefully insert the new UV lamp into the quartz sleeve and
attach the lamp connector harness to the UV lamp.
7. Re-pressurize the system by slowly opening water inlet
valve (Figure 5).
8. Check the system for any leaks.
9. Plug Controller into the electrical outlet (Figure 6).
10. Ensure that the UV lamp is operating – the green power LED
light should be illuminated, the red lamp failure LED light
should be off and no audible alarm should be active.
11. The display will show the number of days until lamp replace-
ment is required. If a new lamp was installed, press and hold
the button on the Controller for 10 seconds to reset the lamp-life
countdown timer.
12. Allow UV lamp to warm up for a minimum of 2 minutes before
flushing water through the UV chamber.
2
1
2
2
2
x2
2
1
2
2
2
0
30
15
45
30 mins
Figure 1
Figure 3
Figure 2
Figure 4
Figure 5 Figure 6

7
Any mineral deposits or sediment build-up on the quartz sleeve will affect the system performance by decreasing the UV light
transmitted through the quartz sleeve into the water column.
The proper maintenance and replacement of the pre-filtration required for the UV system will reduce the accumulation of mineral
and sediment residue on the quartz sleeve. The quartz sleeve may be cleaned with a commercially available, non-abrasive, acidic
scale remover and a lint free cloth. Cleaning of the quartz sleeve should be done on a regular basis to ensure maximum system
performance. The amount of cleaning required will vary depending upon local water conditions and system pre-filtration.
All traces of the cleaning solution must be fully removed from the the quartz sleeve before it is reinstalled in the system.
Care should be taken to prevent any cleaning fluid from coming into contact with the inside surface of the quartz sleeve.
2
1
2
2
2
x2
2
1
2
2
2
0
30
15
45
30 mins
Quartz Sleeve Installation and Replacement:
1. Depressurize UV chamber by turning off the inlet water supply and open
valve downstream of system. Then close the outlet valve (Figure 7).
2. Unplug the Controller from the electrical outlet (Figure 8).
3. Allow at least 5 minutes for lamp to cool before removing (Figure 9).
4. Remove the VuCap®from the UV chamber and carefully
disconnect the UV lamp from the lamp connector harness.
5. Carefully remove the UV lamp from the quartz sleeve by gently
rotating the lamp free. Be sure to hold the lamp only by the
ceramic ends.
6. Drain water from the Stainless Steel UV Chamber.
7. Remove the retaining nut securing the quartz sleeve into the
UV chamber.
8. Remove the O-ring from the quartz sleeve.
9. Remove the quartz sleeve and clean as noted above (Figure 10).
10. Insert quartz sleeve into the UV chamber. Quartz sleeves should
be replaced every 3 years for optimal performance.
11. Insert UV lamp into the quartz sleeve and attach the connector.
12. Slowly refill the UV chamber by opening the water supply just
enough to fill the chamber with water (Figure 11).
13. Check the system for any leaks.
14. Apply power to the UV system (Figure 12).
15. Ensure that the UV lamp is operating by verifying the
Controller green LED indicator is on and display is operational.
Figure 7
Figure 9
Figure 11
Figure 8
Figure 10
Figure 12
Part Description Quantity Part Number
Sediment Filter 1 PUVRSED20
Carbon Block Filter 1 PUVRCRB20
UV Lamp & Quartz Sleeve 1 PUVLQS40H
Ballast 1 BA-95H
Replacement UV lamps and quartz sleeves are available from an
authorized dealer. Use only PUR®approved lamps and sleeves to
ensure system performance. Replacement lamps, quartz sleeves and
ballasts are sold under the following model numbers:
If additional replacement component items are required, please contact Customer Service at 1-877-447-4768.

8
Replacement of Filter Cartridges:
1. Turn off the water supply at both ends of the system.
2. Unplug the unit.
3. Depress the red pressure relief buttons on both filter housings. A small amount of water may come out of the release valve
when the pressure is released (this is normal).
4. Place a pail under the filter housing to catch any water during filter removal.
5. Using the filter housing wrench, loosen the filter housing.
6. When the filter housing is turning freely, hold onto it with both hands while backing the housing off the threads. The housing is
filled with water and a wet filter, which is heavy, so be cautious and ensure that you are adequately positioned to support the
weight.
7. Remove the old filter and dispose in the trash. Used filters are not considered hazardous waste.
8. Empty the housing of water, clean filter housing if stained, and insert the new filter cartridge. Make sure the o-ring on the filter
housing has not fallen off the housing when dumping the excess water or removing the old filter.
9. Attach the filter housing onto the system.
10. Tighten the filter housing back into position lightly with your hands. Use the wrench to ensure a good seal, although caution
should be taken to ensure the housing is not over tightened.
11. Slowly refill the system by opening the inlet water line just enough to fill the chamber with water.
12. Check the system for leaks.
13. If no leaks are evident, open the inlet water line completely and re-check for leaks.
14. Plug the system in and ensure that the UV lamp is operating.
15. Open the water supply line from the system.
16. Flush the system for a minimum of 5 minutes prior to use.
Filter cartridge life varies depending on usage and/or water conditions. Changes in taste, color, and flow of the water being filtered
indicate that the cartridge should be replaced. It is recommended that the filter cartridges be replaced every 6 months. Replace
sooner if water pressure at faucet begins to drop noticeably or cartridge fails to perform satisfactorily.
WARNING: Do not use with water that is microbiologically unsafe or with water of unknown quality without
adequate disinfection before or after the system.

9
Seasonal Use Maintenance Requirements:
If your system is only being used seasonally, it must be stored properly for the winter. Drain all water from the system and
disconnect it from the power source. Cap both the inlet port and the outlet port to prevent entry of insects and small animals.
Remove the filters from the system and discard in the trash.
Before placing the system back in service, it is recommended that the household plumbing procedures described below be followed
and that the entire plumbing network be fully disinfected and flushed prior to using the UV filtration system.
Always install new filters in the system. Do not re-install filters used during the previous season.
To clean any dust build up and/or dirt on the outside of the Quartz Sleeve, use a lint-free cloth with alcohol or non-abrasive scale
remover.
1. Familiarize yourself with the various shut-off valves on your system. It is important to understand which combinations of valve
positions allow you to isolate the UV filtration system.
2. Shut the main water supply off and drain the hot water tank and any other storage tanks that may be downstream of the filter
housing.
3. Close the valves necessary to isolate and remove the Carbon Block filter cartridge (Carbon Block filter is 2nd of the 2 UV
pre-filters) from the housing with the wrench provided.
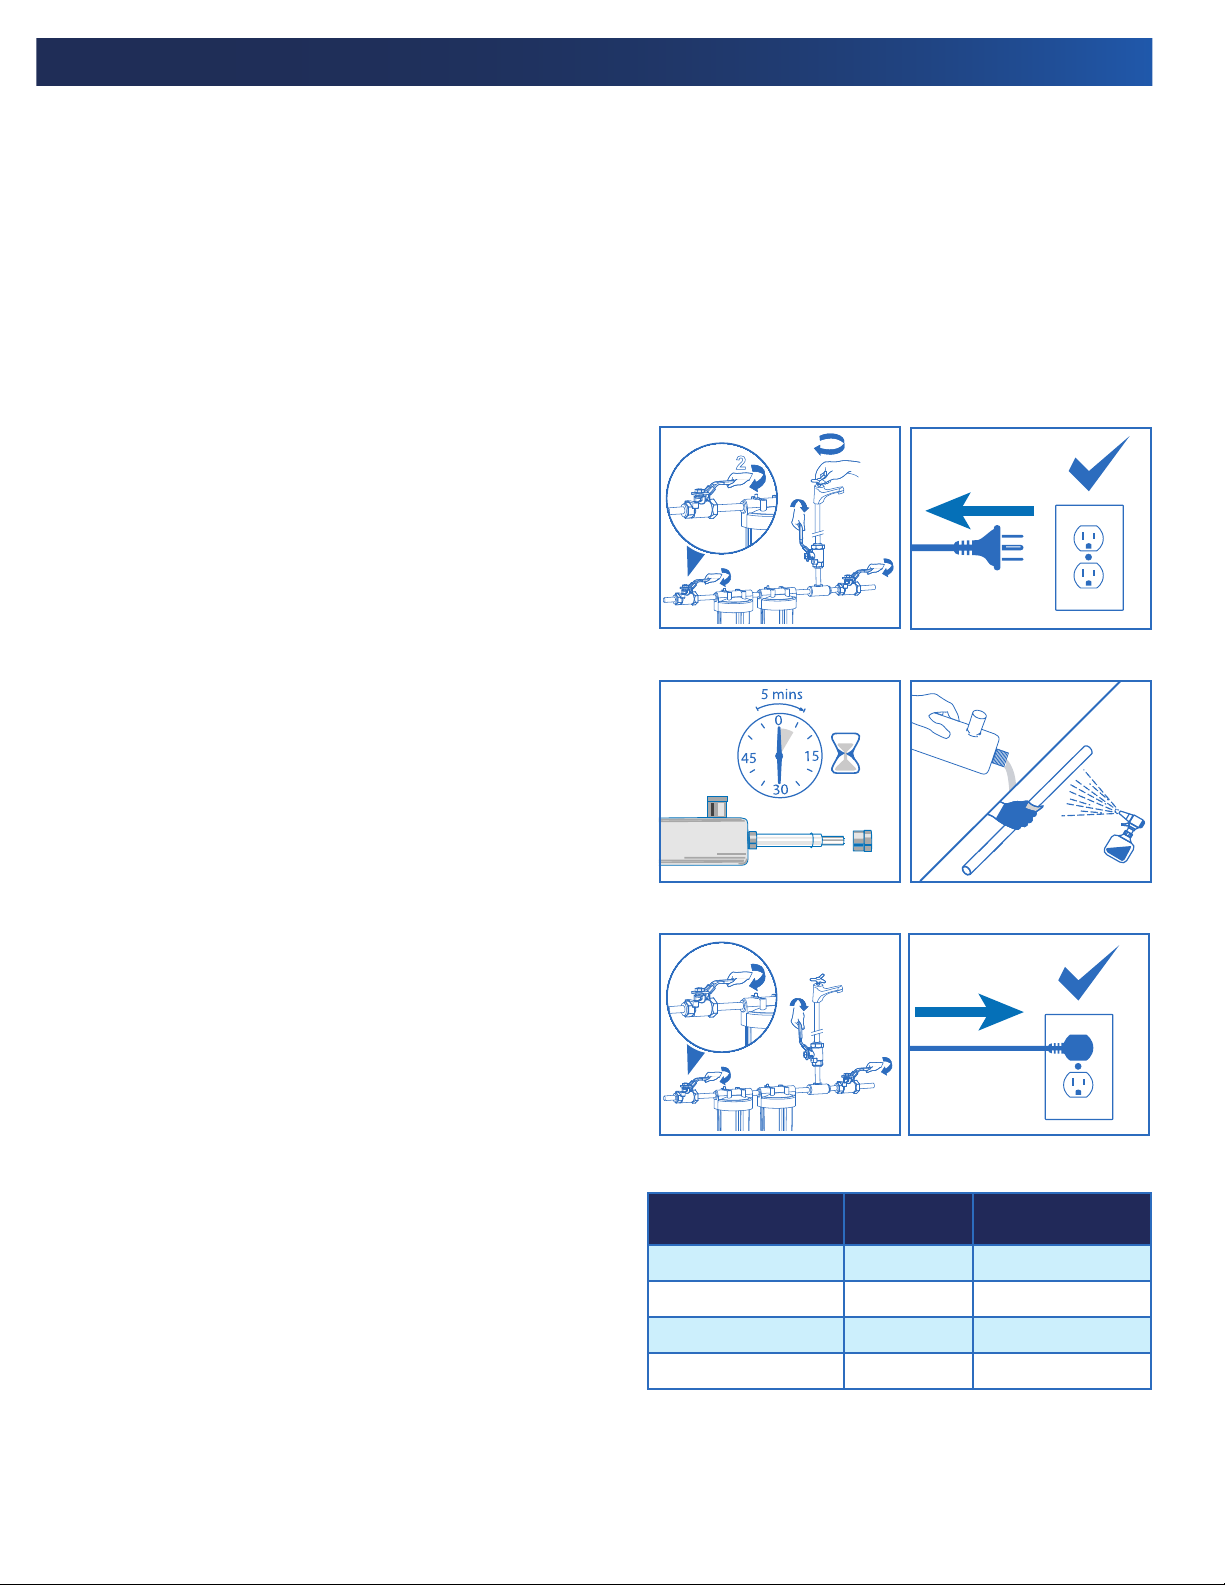
4. Remove the filter housings using the wrench provided with the system. Pour 1-2 cups of household bleach into the carbon filter
housing and reattach to the filter cap. Remember to leave the carbon filter out during chlorination.
5. Re-install the filter housing without the filter. Make sure that the housings are seated properly against the filter heads. Re-
open water lines slowly, checking to ensure there are no leaks.
6. Go to the furthest tap in the house and run the cold water until you notice the odor of bleach. Repeat this step at all other taps,
including washing machine, shower heads and toilets.
7. Allow the solution to remain in all the water lines for 30 minutes.
8. Remove the filter housings with the wrench provided with the system. Re-insert the Carbon Block filter into the
housing. Make sure that the housings are seated properly against the filter heads.
9. Slowly open up the main water lines and check the system for any leaks.
Caution: The addition of Chlorine (Bleach) to a hot water tank that has in the past been fed with untreated raw
water with high levels of contaminants (iron, manganese, hydrogen sulfide, organics, etc) will result in oxida-
tion of these contaminants and may require repeated flushing of the hot water tank. This contingency must be
dealt with independently under the start-up procedure.
Caution: It is critical to ensure that the water distribution system is fully flushed of all residual chlorine prior to
use. EXTREME CAUTION SHOULD BE EXERCISED, as the level of chlorine in the system is approximately 25-50
times greater than that observed in municipally treated water. This is required for the disinfection of the
household lines. It is extremely important that proper flushing procedures be followed for all taps prior to use.
In-House Water Distribution System Disinfection:
The following procedure is recommended for non-municipally supplied water installations. For systems installed on a municipal
water system, plumbing system disinfection is at the discretion of the user.
The entire household water system, between the UV filtration system and your taps and water outlets, MUST be sterilized before
system start up in order to destroy any residual contamination. The same treatment can also be completed at any time in the
future that untreated water is allowed into your distribution system (e.g. through an inadvertent by-pass, plumbing additions or
repairs, etc.) or in the case of seasonal dwellings at the beginning of each operating season.
Unscented household bleach (5% sodium hypochlorite) is an acceptable decontaminant when used at the rate of 1 liter, (0.3 gal-
lons) of bleach per 1000 liters, (264 gallons) of household plumbing volume. This includes the volume of water contained in all
lines, hot water tanks, etc. located 'downstream' of the filter housings. This ratio provides a dosage of 50 mg / L or 50 ppm, which
is sufficient for disinfection. To disinfect the distribution system, carry out the following steps. Ensure that the UV System remains
turned on during the entire process:

10
Troubleshooting Guide:
Problem Possible Cause Solution
Pressure Drop
(More than 40 psi loss at 8GPM) Prefilter(s) clogged Replace filter cartridge.
Warm water output Water sitting in UV reaction chamber and
heating up due to infrequent use Run tap for a short period of time.
Unit leaking water
Misaligned or cross-threaded
connections on inlet/outlet ports
Reinstall to ensure a solid connection with ports. Inlet/outlet threads on
UV chamber are NPT type and require thread sealant.
Excessive water pressure Install pressure regulator ahead of system.
Water hammer* causing pressure spikes Install a water hammer arrestor in system.
Improperly sealed Quartz Sleeve o-ring Re-align, apply o-ring grease and re-tighten retaining nut.
No power to UV lamp when
system is plugged in GFCI wall socket is tripped
Reset, following manufacturer’s instructions provided with the outlet.
Check socket with other appliances.
Ensure UV chamber is grounded.
Ensure all electrical ports/connections are dry.
System has power but UV lamp
is not coming on (visible /
audible alarm activated)
Lamp not installed correctly Ensure lamp is installed correctly with electrical fitting (must be snug).
Lamp failure Replace UV lamp.
Water is milky
Small air bubbles are trapped in water Leave tap on for short time.
Air purging from new filters/system Find source of air bubbles and correct (flush more).
System is vibrating
Not mounted securely Secure fasteners.
Water hammer* causing vibrations Install a water hammer arrestor in system.
Excessive heat generated
Not being allowed sufficient space for
cooling Clear space for cooling (min. 6-12” / 15-30 cm clearance around unit).
Operated in an excessive ambient
temperature Unplug unit until temperature is within ambient operating conditions.
Water temperature is too high Ensure treatment is on cold water side only (prior to heating of water).
Outlet water has bad taste
Filters not installed Ensure filters are in position.
Filter(s) / Housing(s) not seated properly Ensure filters are correctly seated in the housing, and the housings are
seating properly.
Testing/source identification/additional
pre-treatment may be required
Testing should be conducted to determine cause of bad taste. Additional
pre-treatment may be required.
Should service be required or you have any questions regarding how to use your PUR product,
Manufactured and warranted by GHP Group Inc.
USA: 6440 W. Howard St. Niles, IL 60714-3302
Canada: 271 Massey Rd. Guelph, Ontario, N1K 1B2
*Water hammer: Sudden closure of a control valve or stopping of a pump produces excessive pressure surges in a pipeline. These pressure surges can
cause significant damage to equipment and/or appliances directly attached to the water line. Water hammer is usually noted due to the characteristic
banging sounds when valves on the line are suddenly closed. Water hammer conditions must be immediately remedied, and damage to systems as a result
of this condition are not covered under warranty.

11
Warranty:
Limited Warranty:
This limited warranty is extended to the original retail purchaser of this filtration system and warrants against any defect in material and workmanship for
a period of one (1) year from the date of retail sale. GHP Group, Inc., at its option, will either provide replacement parts or replace the unit, when properly
returned to the retailer where purchased within one (1) year of retail purchase. (Shipping costs, labor costs, etc. are the responsibility of the purchaser.)
Duties of the Owner:
This filtration system must be installed and operated in accordance with the written instructions furnished with this system. This warranty shall not excuse
the owner from properly maintaining this unit in accordance with the instructions. A bill of sale, canceled check or payment record must be kept to verify
purchase date and establish warranty period. Original carton should be kept in case of warranty return of the unit.
What is Not Covered?
1. Damage caused by misuse, installation or use contrary to the owner’s manual and safety guidelines.
2. Use of this product where water is microbiologically unsafe or of unknown quality.
3. Damage caused by a lack of normal maintenance and cleaning.
4. Use of non-OEM parts or accessories.
5. Damage caused in transit. Freight charges on warranty parts or products to and from the factory shall be the responsibility of the owner.
THIS LIMITED WARRANTY IS GIVEN TO THE PURCHASER IN LIEU OF ALL OTHER WARRANTIES, EXPRESSED OR IMPLIED, INCLUDING BUT NOT LIMITED TO THE
WARRANTIES OF MERCHANTABILITY OF FITNESS FOR A PARTICULAR PURPOSE. THE REMEDY PROVIDED IN THIS WARRANTY IS EXCLUSIVE AND IS GRANTED IN
LIEU OF ALL OTHER REMEDIES. IN NO EVENT WILL GHP GROUP. INC. BE LIABLE FOR INCIDENTAL OR CONSEQUENTIAL DAMAGES.
Some states/provinces do not allow limitations on how long an implied warranty lasts, so the above limitation may not apply to you. Some states/provinces
do not allow the exclusion or limitation of incidental or consequential damages so the above limitation or exclusion may not apply to you.
Claims Handled as Follows:
1. Contact your retailer and explain the problem.
2. If the retailer is unable to resolve the problem, contact our Customer Service Dept. detailing the system model, the problem, and proof of date of purchase.
3. A representative will contact you. DO NOT RETURN THE UNIT TO GHP GROUP, INC. unless instructed by our Representative, or with written authorization.
This warranty gives you specific legal rights and you may also have other rights that vary from state/province to state/province.
Product Registration:
To register your product, please visit: ghpgroupinc.com/product-registration.html and complete within (14) days of purchase.
Warning: This Product can expose you to chemicals including Diisononyl phthalate (DINP)
which is known to the State of California to cause cancer and Mercury Compounds which is
known to the State of California to cause reproductive harm.
For more information go to www.p65Warnings.ca.gov
In the event of a broken UV lamp, there may be possible exposure to mercury.
There are no known health hazards from mercury within an intact UV lamp.
After handling the electrical power cord, please wash your hands.

© 2021 Tous droits réservés.
PUR est une marque déposée dont l’utilisation est autorisée en vertu d'une licence accordée par Helen of Troy Limited.
Manuel du
propriétaire
PUVR15H
Système de désinfection et de filtration de l’eau
aux rayons ultraviolets pour la maison entière

13
Précautions de sécurité..........................................................13
Aperçu du produit...................................................................14
Outils requis pour l’installation..............................................14
À propos de votre système......................................................15
Conditions de fonctionnement ...............................................15
Instructions d’installation......................................................16
*Accessibilité, orientation et raccords...............................16
*Ligne de dérivation et vanne de vidange optionnelles .....16
*Installation typique..........................................................16
Instructions de fonctionnement .............................................17
*Procédure de démarrage initiale......................................17
Service et entretien ................................................................17
Installation et remplacement de la lampe .............................18
Installation et remplacement de la gaine de quartz.............. 19
Remplacement des cartouches de filtre .................................20
Exigences d’entretien en cas d'une utilisation saisonnière....21
Désinfection du système de distribution de l’eau domestique21
Guide de dépannage ..............................................................22
Garantie.................................................................................23
Table des matières :
Précautions de sécurité :
AVERTISSEMENT : L’installation de ce système aux rayons ultraviolets (UV) doit se conformer à toutes les lois
et tous les règlements de plomberie et de services électriques étatiques, provinciaux ou régionaux en vigueur.
L’installation par un plombier agréé est recommandée. Respectez toujours les avertissements et les
instructions de sécurité suivants pour éviter toutes blessures ou tout dommage matériel.
DANGER : La lampe à l’intérieur de l’appareil émet des rayons UV pouvant causer des blessures irréparables à
la peau et aux yeux. Ne regardez jamais la lampe pendant que l’appareil est en marche.
• N’utilisez jamais votre système UV à moins qu’il n’ait d’abord été correctement mis à la terre afin d’éviter tout risque de choc
électrique.
• Pour éviter tout choc électrique, ne branchez pas le système UV dans une prise qui n’est pas équipée d’un disjoncteur
différentiel de fuite à la terre (DDFT/GFCI).
• Débranchez toujours le cordon d’alimentation avant d’installer, de nettoyer ou d’effectuer d’autres travaux d’entretien de
l’appareil.
• Fermez toujours votre arrivée d’eau avant d’effectuer tout entretien de l’appareil.
• N’essayez pas de réparer cet appareil à moins d’être un technicien de service agréé, sinon vous pourriez vous blesser ou
gravement endommager l’appareil.
• N’utilisez jamais cet appareil dans un environnement riche en oxygène ou à moins de 6 pieds (2 mètres) de toute source
d’oxygène.
• Si les températures tombent en dessous du point de congélation (0° C/32° F), videz toute l’eau de l’appareil, égouttez-le et
débranchez toute la plomberie et bouchez les ouvertures d’entrée et de sortie.
• N’essayez pas d’installer votre système UV, de l’utiliser, de le nettoyer ou d’effectuer un entretien sans avoir lu et bien compris
tous les avertissements et les instructions de sécurité contenus dans ce manuel et sur les étiquettes apposées sur le système.
• N’essayez pas de démarrer le système UV s’il a été visiblement endommagé. Prenez le temps de l’inspecter attentivement pour
vous assurer qu’il n‘y ait pas de dommages physiques avant de l’utiliser.
• Ne démarrez pas l’appareil si le système est humide ou s’il y a des fuites visibles.
• Le système UV est conçu pour une utilisation à l’intérieur uniquement et ne doit pas être exposé à l’extérieur.
• Installez et utilisez toujours l’appareil dans un environnement où la température de l’air et de l’eau se situe entre 36 °F (2 °C)
et 104 °F (40 °C)..
Le système UV a été testé et certifié selon les normes NSF/ANSI 55 et CSA B483.1 pour le traitement bactéricide supplémentaire
de l’eau potable publique désinfectée ou d’autres eaux potables qui ont été testées et jugées acceptables pour la consommation
humaine par l’État ou l’organisme local de santé en vigueur. Le système est uniquement conçu pour réduire les micro-organismes
nuisibles non pathogènes qui sont naturellement présents. Les systèmes de classe B ne sont pas destinés au traitement de l’eau
contaminée.

14
ART. Description QTÉ
A Assemblage du système 1
B Filtre à sédiments 1
C Filtre de bloc de charbon 1
D Lampe UV 1
E Manchon de quartz 1
F Le manuel du propriétaire 1
ART. Description QTÉ
G Boulons d'ancrage, 5/16 "x 1,25" 2
H Écrou de retenue 1
I VuCap®1
J Restricteur de débit 1
K Rondelle plate 5/16 " 2
L Joint torique d'étanchéité de manchon en quartz 1
G.
F.
K.
J.
I.
H. L.
B. D. E.
C.
A.
Le système de traitement de l’eau UV a été conçu pour respecter des normes strictes et a subi un contrôle de la qualité à l’usine
avant d’être emballé. Veuillez consulter ce manuel dans son intégralité pour obtenir une explication détaillée du fonctionnement
de l’appareil et vous assurer que les composants suivants sont inclus. Pour que le système fonctionne de manière optimale, il
faut acheter tous les composants de rechange directement auprès d’un concessionnaire autorisé ou en ligne à www.ghpgroupinc.
com. L’utilisation de composants achetés auprès d’autres vendeurs entraînera une annulation de la garantie et pourrait réduire les
capacités de l’appareil.
Aperçu du produit :
Outils requis pour l’installation :
Lunettes de
protection
Clé
réglable
Pinces Tournevis
Phillips
Couteau
utilitaire
Ruban à
mesurer
Perceuse et
forets
AVERTISSEMENT : Les lampes doivent être remplacées après 12 mois de vie afin d’assurer une désinfection
adéquate de votre eau. Nettoyez fréquemment la gaine de quartz pour obtenir une performance optimale.
Un préfiltre nominal d’au moins 5 μ est recommandé en amont (avant) du point d’installation du système UV. Comme l’efficacité
du système UV dépend de la pénétration de la lumière UV dans le courant d’eau, les particules présentes dans l’eau peuvent
diminuer la capacité de désinfection, et potentiellement contaminer l’eau. Un préfiltre de 5 microns et un filtre à carbone de 5
microns sont donc fournis avec le système (systèmes de filtration vendus séparément).

15
Caractéristiques :
Débit GPM US (LPM) Max* 15 (56)
Dimensions de l’unité (Longueur x largeur x Hauteur) 68,6cm/27po x 21,6cm/8,5po x 79,4cm/31,25po
Alimentation électrique 115V / 60Hz
Plage des pressions utilisées 30 - 100 PSI
Plage des températures de l’eau 40 – 99 ˚F (4 – 37 ˚C)
Volume de l’unité de 17L / 4,5G
Plage des températures ambiantes 36 – 104 ˚F (2 – 40 ˚C)
Taille de l’orifice d’entrée 3/4po - 1po NPT
Taille de l’orifice de sortie 3/4po - 1po combo NPT
Distance minimale entre toute matière combustible adjacente 15 cm/6po
À propos de votre système :
Conditions de fonctionnement :
La qualité de l’eau aura une incidence sur la performance de votre système UV. Les niveaux suivants devraient être utilisés comme
ligne directrice pour les exigences en matière de prétraitement de l’eau entrante avant le traitement UV :
Si vous utilisez des eaux de surface non traitées ou des eaux souterraines non traitées comme source d'eau alors l’approvisionnement
en eau pour la consommation doit être validé par l’organisme de santé provincial, national ou local en vigueur.
Si les résultats des tests indiquent que : (1) l’un des niveaux de contaminants ci-dessus est excessif ou (2) les normes de santé en
vigueur en ce qui concerne l’eau potable ne sont pas respectées, des dispositifs supplémentaires de prétraitement de l’eau doivent
être mis en place pour éliminer tous les contaminants présentant des risques pour la santé. L’eau non municipale devrait être
testée régulièrement afin d’assurer l’efficacité du traitement.
Fer .................................................< 0,3 ppm (0,3 mg/L)
Turbidité ........................................< que 1 NTU
Tanins ............................................< 0,1 ppm (0,1 mg/L)
Manganèse ....................................< 0,05 ppm (0,05 mg/L)
Dureté ...........................................< 120 ppm (7 grains par gallon)
Transmission UV ............................> 75 %

16
Instructions d’installation
Installez toujours le PUVR15H dans un endroit qui offre suffisamment d’espace pour accéder aux lampes UV. L’entretien peut
nécessiter d’enlever la lampe UV et la gaine de quartz. Un dégagement minimum de 16 po (41 cm) doit être prévu pour permettre
l’enlèvement ou l’installation de la lampe UV (voir l’image d’installation ci-dessous). Comme le système UV génère de la chaleur
pendant l’utilisation, assurez-vous bien qu’aucun élément combustible n’entre en contact avec le système ou ne se situe à prox-
imité de ce dernier.
Il est recommandé de laisser un espace libre d’au moins 6 po (15 cm) tout autour du PUVR15H pour aider le refroidissement de
l’appareil. Cela prolongera aussi la durée de vie de l’appareil.
ATTENTION : Chaque fois qu’une soudure est nécessaire sur un composant du système PUVR15H, veuillez
toujours retirer au préalable le composant en question.
Pour éviter une contamination possible de l’eau dans la tuyauterie, ce qui peut présenter un danger pour la santé, n’utilisez pas la
conduite ou la vanne de dérivation si votre source d’eau est de l’eau non traitée de surface ou souterraine. Si votre source d’eau est
de l’eau municipale traitée, l’utilisation de la conduite et de la vanne de dérivation maintiendra un flux non-interrompu d’eau trai-
tée en cas de dysfonctionnement du système. L’installation d’une vanne de vidange, bien qu’elle ne soit pas nécessaire, permettra
au technicien de service de vider le système d’eau avant d’effectuer un service sur l’appareil.
Accessibilité, orientation et raccords :
Conduite de dérivation et vanne de vidange facultatives :
Installation typique :
Entrée d’eau
Vannes de
dérivation
optionnelles
Un dégagement de 16 po
pour enlever la lampe
Filtre à
sédiments
Filtre à
carbone
Sorties d’eau
traitée
GFCI
Veuillez noter que le PUVR15H n’est pas équipé
d’une vanne de dérivation lors de l’achat. L’ajout
de la vanne de dérivation est à la discrétion
de l’utilisateur. Toutes les pièces de plomberie
doivent être achetées séparément.
Le support de fixation
permet une installation
réversible si vous le
souhaitez

17
REMARQUE : Le système PUVR15H a été conçu pour être installé uniquement sur la conduite d’eau froide.
REMARQUE : Le système UV doit être allumé en permanence pour assurer la protection de votre système d’eau.
Lorsque le système fonctionne tout à fait normalement, le voyant DEL vert s’allumera, et un compte à rebours
montrera le nombre de jours restants avant que la lampe ne cesse de fonctionner. Lorsque l'eau ne circule pas
dans le système, l’eau de la chambre UV sera réchauffée par les lampes UV. Ouvrez votre robinet d’eau froide
et laissez couler l’eau froide pendant 30 secondes pour vider toute l’eau chaude.
La présence de petites bulles d’air dans le système d’eau peut parfois donner à l’eau un aspect blanchâtre, mais les bulles d’air
n’affecteront pas la qualité ni le goût de l’eau. Dans un premier temps, l’eau filtrée peut sembler trouble en raison de la libération
d’air emprisonné dans les filtres et dans tout le système. Ceci devrait cependant disparaître dans les jours suivant l’installation du
système en fonction de votre utilisation.
Effectuez toujours la procédure de démarrage suivante lorsque vous démarrez votre système PUVR15H pour la première fois ou
après une période d’inactivité :
1. Fermez la vanne d’alimentation principale.
2. Installez le système UV au mur. Veuillez noter qu’en raison du poids de la grille UV, il est essentiel que l’appareil soit installé
directement sur un mur de béton (vis et rondelles non fournies) ou directement dans les poteaux muraux (vis et rondelles
fournies). N’installez pas l’appareil directement sur une cloison sèche.
3. Raccordez les conduits d’entrée et de sortie d’eau. Pour faciliter l’installation et l’entretien, il est recommandé d’utiliser des
raccords sur les lignes d’entrée et de sortie.
4. Les filtres sont emballés et l’emballage autour du(s) filtre(s) doit être enlevé. Installez le(s) filtre(s) et le(s) boîtier(s) sur le
système UV.
5. Sondez les branchements d’entrée et de sortie d’eau. Pour faciliter l’installation et l’entretien, il est recommandé d’utiliser des
raccords universels sur les tuyaux d’entrée et de sortie.
6. Assurez-vous que toute la tuyauterie est sécurisée. Ouvrez la vanne d’alimentation principale un peu et libérez l’air du système
en ouvrant un robinet en aval.
7. Branchez le système de désinfection UV et assurez-vous que la lampe UV soit bien allumée en vérifiant que son voyant violet
est bien allumé à travers le VuCap®.
8. Si aucune fuite n’est visible à faible débit, ouvrez complètement la vanne d’alimentation principale. Ensuite, vérifiez s’il y a des
fuites à nouveau.
9. Pour la désinfection au chlore du système de distribution de l’eau domestique, suivez les procédures décrites à la page 21.
10.Ouvrez un robinet en aval et rincez le système pendant 15 minutes avant de l’utiliser pour la première fois.
11.Votre système UV est maintenant prêt à être utilisé.
Instructions de fonctionnement :
Service et entretien :
Procédure de démarrage initiale :
Les instructions suivantes ont été fournies pour aider à l’entretien général du système, du remplacement de la lampe UV et du net-
toyage ou remplacement des gaines de quartz. Toutes les autres réparations du système doivent être effectuées par un technicien
agréé.Votre PUVR15H dispose d’un système double à filtration et à désinfection UV pour traiter l’eau. Les filtres à eau, la gaine de
quartz et la lampe UV doivent être remplacés ou entretenus de façon régulière pour que le PUVR15H fonctionne de manière
optimale.
Les lampes UV et les gaines de quartz de rechange sont disponibles auprès d’un détaillant agréé et du Groupe GHP Inc. N’utilisez
que les lampes et les gaines PUR®pour assurer une performance optimale du système. No. de modèle PUVLQS40H de la lampe et
de la gaine de quartz de rechange. Ballast de remplacement modèle # BA-95H.

18
Installation et remplacement de la lampe :
AVERTISSEMENT : La lampe chauffe après une utilisation continue et peut vous brûler si vous la touchez.
Débranchez l’appareil et laissez la lampe refroidir pendant au moins 5 minutes avant de la retirer. N’allumez
pas la lampe UV à l’extérieur de la chambre UV. La lampe de l’appareil émet une puissante lumière à rayons
ultraviolets qui peut causer des dommages permanents à la peau et aux yeux. Ne regardez jamais la lampe
directement lorsque l’appareil est allumé. Manipulez la lampe UV seulement en touchant les extrémités. Ne
touchez pas la surface en verre de la lampe UV avec vos doigts. Si la surface de la lampe devient sale, utili-
sez un chiffon propre sans peluche et de l’alcool isopropylique pour enlever toute saleté.
Votre système de désinfection UV est doté d’un indicateur de défaillance de la lampe qui est visible et audible. En cas de défail-
lance de la lampe UV, le voyant DEL rouge clignotera et vous entendrez un bip sonore qui proviendra du contrôleur électronique de
l’appareil. Le compte à rebours indiquant la durée de vie de la lampe cessera de diminuer lorsqu’il est en mode alarme. Veuillez
noter que si ces conditions se produisent et que vous utilisez une source d’eau non municipale, vous devrez immédiatement ar-
rêter d’utiliser cette eau comme source d'eau potable jusqu’à ce que la lampe soit remplacée et que la désinfection de toutes les
conduites de distribution soit terminée.La lampe à rayons ultraviolets a une durée de vie approximative d’un an (9 000 heures). La
lampe UV continuera à fonctionner au-delà de 9 000 heures, mais la production UV diminue rapidement au-delà de 9 000 heures
et la lampe UV peut ne plus fournir une désinfection adéquate de votre approvisionnement en eau. Le compte à rebours de 365
jours affiche le nombre de jours restants jusqu’à ce que le remplacement de la lampe soit nécessaire.Lorsque le compte à rebours
affiche 0 jours restants, une alarme sonore intermittente sera activée et l’alarme « A3 » sera affichée sur l’écran. Afin de vous
laisser le temps de vous procurer une lampe UV de remplacement, vous pouvez mettre l’alarme sonore en mode silencieux pendant
7 jours en appuyant et en maintenant le bouton sur l'écran pendant 2 à 5 secondes. Après 7 jours, l’alarme retentira à nouveau
si la lampe n’a pas été remplacée. Vous pourrez la mettre en mode silencieux 4 fois maximum. Cela vous donne jusqu’à 28 jours
pour vous procurer une lampe UV de remplacement. Après 4 fois, l’alarme ne peut plus être mise en mode silencieux. Elle retentira
jusqu’à ce qu’une lampe de remplacement soit installée et jusqu’à ce que le compte à rebours indiquant la durée de vie de la
lampe soit remis à 365 jours.
1. Dépressurisez la chambre UV en fermant l’alimentation en eau
et la vanne ouverte en aval du système. Fermez ensuite la vanne
de sortie (figure 1).
2. Débranchez le contrôleur de la prise électrique (figure 2).
3. Laissez refroidir au moins 5 minutes avant de retirer la lampe
(figure 3).
4. Retirez le VuCap® de la chambre UV et déconnectez la lampe
UV du harnais du connecteur de la lampe avec soin (figure 4).
5. Retirez soigneusement la lampe UV de la gaine de quartz en fai-
sant tourner doucement la lampe jusqu’à ce qu’elle soit libérée.
Assurez-vous de tenir la lampe seulement par les extrémités en
céramique.
6. Insérez doucement la nouvelle lampe UV dans la gaine de quartz
et attachez le harnais de connecteur de lampe à la lampe UV.
7. Pressurisez de nouveau le système en ouvrant lentement la
vanne d’entrée d’eau (figure 5).
8. Vérifiez le système pour toute fuite.
9. Branchez le contrôleur dans la prise électrique (figure 6).
10. Assurez-vous que la lampe UV fonctionne – le témoin vert DEL
doit être allumé, le témoin rouge DEL indiquant une défaillance
de la lampe doit être éteint et aucune alarme sonore ne doit être
entendue.
11. Le nombre de jours restants sera affiché jusqu’à ce que le rem-
placement de la lampe soit nécessaire. Si une nouvelle lampe a
été installée, appuyez et maintenez le bouton sur le contrôleur
pendant 10 secondes pour réinitialiser le compte à rebours
indiquant la durée de vie de la lampe.
12. Laissez la lampe UV chauffer pendant au moins 2 minutes
avant de faire circuler l’eau dans la chambre UV.
2
1
2
2
2
x2
2
1
2
2
2
0
30
15
45
30 mins
Figure 1
Figure 3
Figure 2
Figure 4
Figure 5 Figure 6

19
Tout dépôt minéral ou accumulation de sédiments dans la gaine de quartz aura un effet sur la performance du système en diminu-
ant la lumière UV transmise par la gaine de quartz dans la colonne d’eau.
Le bon entretien et remplacement de la préfiltration requise pour le système UV permettront de réduire l’accumulation de rési-
dus minéraux et de sédiments dans la gaine de quartz. La gaine de quartz peut être nettoyée à l’aide d’un solvant non corrosif
disponible en magasin et d’un chiffon sans peluche. Le nettoyage de la gaine de quartz doit être effectué régulièrement afin
d’assurer une bonne performance du système. La fréquence de nettoyage requis varie en fonction de la qualité de l’eau de votre
région et de la préfiltration du système.
Toute trace de produit de nettoyage doit être complètement enlevée de la gaine de quartz avant que la gaine ne soit réinstallée
dans le système. Les produits d’entretien ne devraient pas entrer en contact avec la surface intérieure de la gaine de quartz.
2
1
2
2
2
x2
2
1
2
2
2
0
30
15
45
30 mins
Installation et remplacement de la gaine de quartz :
1. Dépressurisez la chambre UV en fermant l’entrée d’eau et la vanne
ouverte en aval du système. Fermez ensuite la vanne de sortie (figure 7).
2. Débranchez le contrôleur de la prise électrique (figure 8).
3. Laissez refroidir au moins 5 minutes avant de retirer la lampe (figure 9).
4. Retirez le VuCap®de la chambre UV et déconnectez la lampe UV du
harnais du connecteur de la lampe avec soin.
5. Retirez soigneusement la lampe UV de la gaine de quartz en faisant
tourner doucement la lampe jusqu’à ce qu’elle soit libérée. Assurez-vous
de tenir la lampe seulement par les extrémités en céramique.
6. Videz l’eau de la chambre UV en acier inoxydable.
7. Retirez l’écrou de retenue sécurisant la gaine de quartz dans la chambre
UV.
8. Retirez le joint torique de la gaine de quartz.
9. Retirez la gaine de quartz et nettoyez comme indiqué ci-dessus (figure
10).
10. Insérez la gaine de quartz dans la chambre UV. Les gaines de quartz
doivent être remplacées tous les 3 ans pour une performance optimale.
11. Insérez la lampe UV dans la gaine de quartz et branchez le raccord.
12. Remplissez lentement la chambre à UV en ouvrant peu à peu
l’alimentation en eau juste assez pour remplir d’eau la chambre à UV
(figure 11).
13. Vérifiez s’il y a des fuites dans le système.
14. Branchez le système UV (figure 12).
15. Assurez-vous que la lampe UV fonctionne en vérifiant que le voyant vert
DEL est allumé et que l’écran fonctionne.
Figure 7
Figure 9
Figure 11
Figure 8
Figure 10
Figure 12
Description de la pièce Quantité Numéro de pièce
Filtre à sédiments 1 PUVRSED20
Filtre de bloc de charbon 1 PUVRCRB20
Lampe UV et manchon de quartz 1 PUVLQS40H
Ballast 1 BA-95H
Les lampes UV et les gaines de quartz de rechange sont disponibles
auprès d’un concessionnaire agréé. Utilisez uniquement les lampes et
les gaines approuvées PUR®pour assurer une performance opti-
male du système. Les lampes, des gaines de quartz et de ballast de
rechange sont vendues sous les numéros de modèles suivants :
Si d’autres éléments de remplacement sont requis, veuillez contacter le service clientèle au 1-877-447-4768.
Table of contents
Languages:
Other PUR Water Filtration System manuals
Popular Water Filtration System manuals by other brands

Brita
Brita intenza Repair instruction

Applied Membranes
Applied Membranes L Series Operation, maintenance & instruction manual

Watts
Watts 70608 Series installation manual

Schaffner
Schaffner FN5420 User and installation manual

Veolia
Veolia ELGA MEDICA-D 7 MKII US Operator's manual

Eureka Forbes
Eureka Forbes AquaSure Aayush user manual