PURE SIROCCO 150 User manual

SIROCCO 150
Owner’s manual
EN
DE
FR
IT
ES
DK
Bedienungsanleitung
Manuel de l’utilisateur
Manuale dell’utente
Brugsvejledning
Manual de instrucciones

Safety instructions
Keep the radio away from heat sources, such as naked flames or candles.
Ensure that the unit has adequate ventilation (at least 10cm space all round).
Do not use the radio near water.
Avoid liquids dripping or splashing onto the radio.
Do not place any objects containing liquids on the unit, such as vases.
When plugged in, Sirocco 150 remains connected to mains power, even in standby with the display backlight off.
To disconnect completely, unplug from the mains socket.
Ensure that the mains plug is readily accessible in case isolation from the mains is required.
Ensure batteries are not exposed to excessive heat such as direct sunlight, fire etc. and dispose of responsibly.
Do not remove screws from or open the radio casing.
Damage to hearing can occur with consistent exposure to high volume when using headphones.
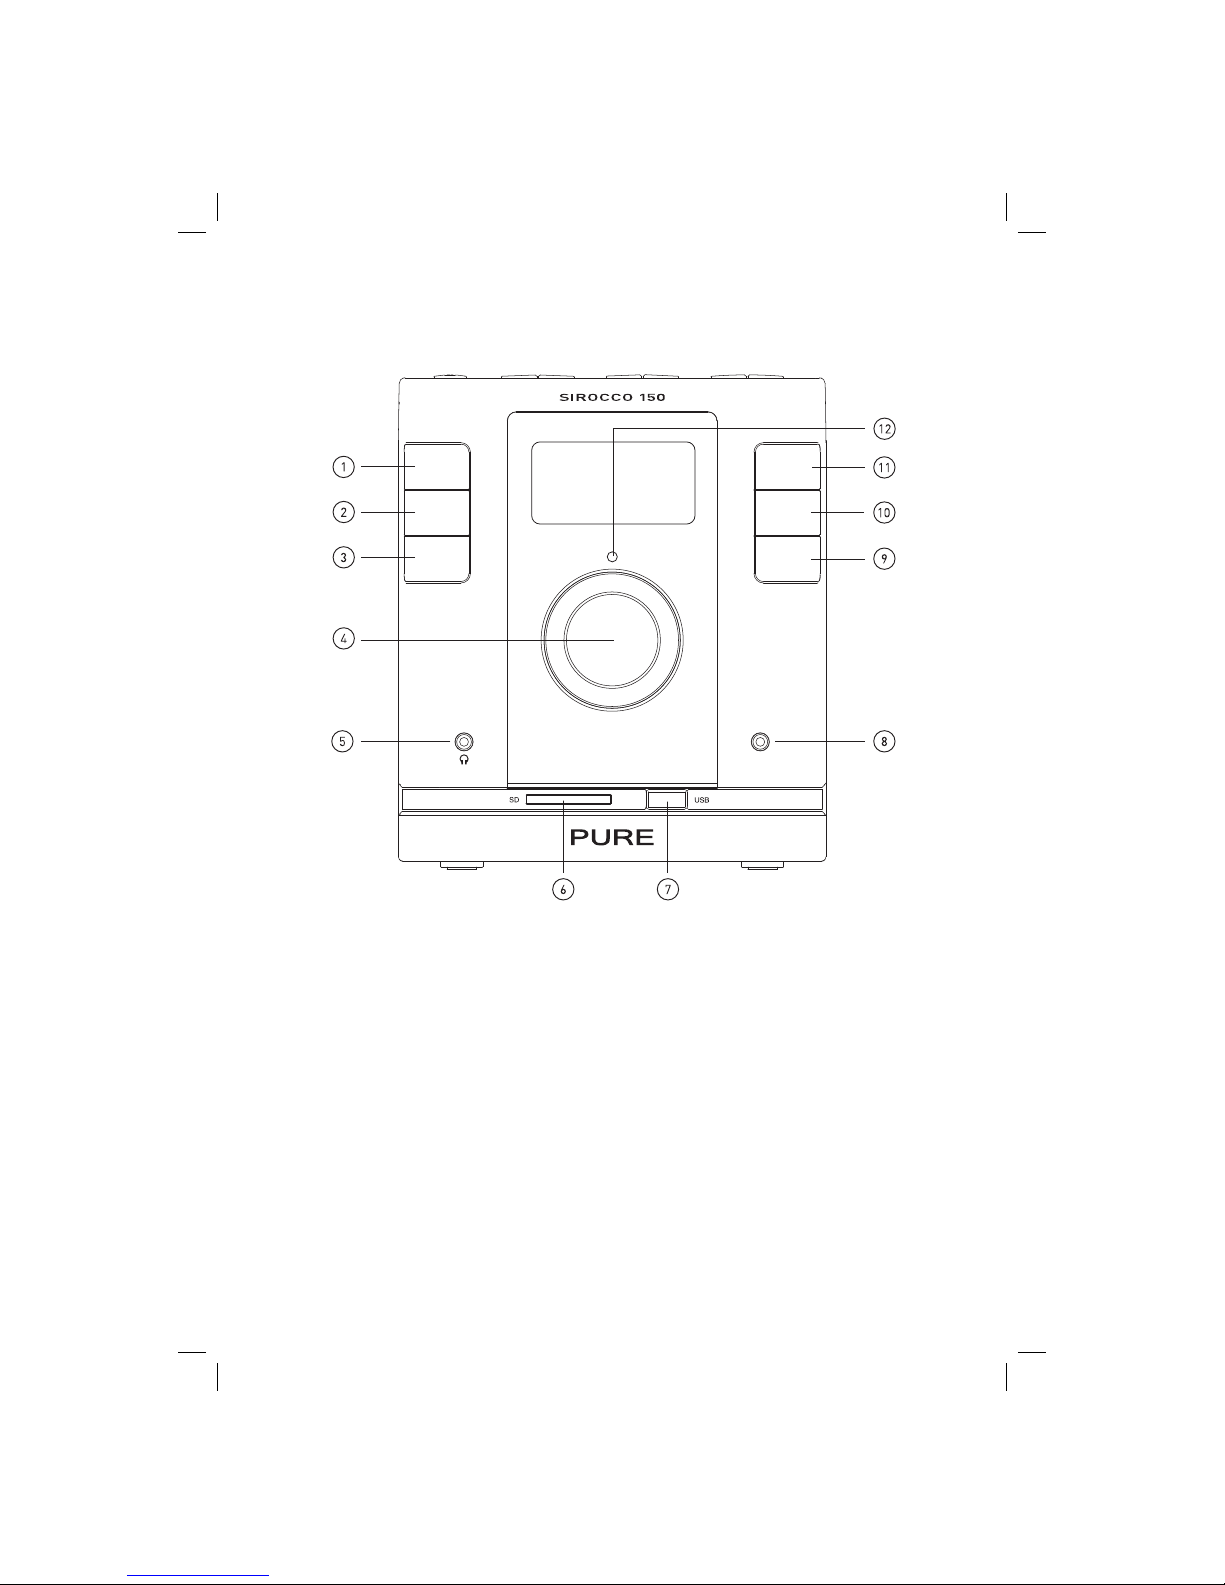
The marking label is located on the base of the unit
Sicherheitsanweisungen
Halten Sie das Radio fern von Hitzequellen wie etwa offenen Flammen oder Kerzen.
Vergewissern Sie sich, dass das Gerät ausreichend Freiraum für einen angemessenen Luftaustausch hat (mindestens 10 cm auf allen Seiten).
Nutzen Sie das Radio nicht in der Nähe von Gewässern.
Vermeiden Sie den Kontakt des Radios mit tropfenden oder spritzenden Flüssigkeiten.
Stellen Sie keine Gegenstände mit Flüssigkeiten (wie zum Beispiel Blumenvasen) auf dem Gerät ab.
Wenn das Netzkabel des Sirocco 150 eingesteckt ist, besteht eine aktive Verbindung zum Stromnetz. Dies gilt auch für den Stand-by-Modus mit
ausgeschalteter Display-Beleuchtung. Um das Gerät vollständig vom Netz zu lösen, muss es von der Netzsteckdose getrennt werden.
Vergewissern Sie sich, dass der Netzstecker leicht zugänglich ist, damit die Verbindung zum Netz jederzeit unterbrochen werden kann.
Vergewissern Sie sich, dass die Batterien keiner übermäßigen Hitze durch Sonnenlicht, Feuer usw. ausgesetzt werden und entsorgen Sie sie in
verantwortungsvoller Weise.
Lösen Sie keine Schrauben vom Gehäuse des Radios.
Bei der Verwendung von Kopfhörern kann das Hören von Musik in hoher Lautstärke dauerhafte Hörschäden verursachen.
Das Kennzeichnungsetikett ist auf der Unterseite des Geräts angebracht.
Instructions de sécurité
Maintenir l'appareil éloigné des sources de chaleur, telles qu'une flamme nue ou une bougie.
S'assurer que l'appareil est correctement ventilé en laissant au moins 10 cm de vide tout autour.
Ne pas utiliser l'appareil à proximité d'un point d'eau.
Éviter que des liquides ne gouttent sur l'appareil ou ne l'éclaboussent.
Ne pas déposer d'objets contenant du liquide (comme un vase) sur l'appareil.
Lorsqu'il est branché, le Sirocco 150 reste alimenté au secteur, même en mode veille et avec son écran éteint. Pour assurer une déconnexion
complète, débrancher l'appareil de la prise de courant.
Veiller à ce que la prise de courant soit facilement accessible, pour le cas où l'on aurait besoin d'isoler la chaîne du réseau électrique.
Veiller à ne pas exposer les piles à une source de chaleur excessive (rayons du soleil, cheminée, etc.) et, en fin de vie, à les éliminer de manière
écologiquement responsable.
Ne pas retirer les vis du boîtier de l'appareil et ne pas ouvrir le boîtier de l'appareil.
Toute exposition prolongée à des niveaux élevés de volume, avec des écouteurs, peut entraîner une atteinte définitive de l'ouïe.
La mention de mise en garde figure sur la base de l'appareil.
Istruzioni di sicurezza
Tenere la radio lontana da fonti di calore come fiamme vive o candele.
Assicurarsi che l'unità riceva una ventilazione adeguata (almeno 10cm di spazio libero).
Evitare il contatto con l'acqua.
Evitare lo sgocciolamento di liquidi sulla radio.
Non collocare oggetti contenenti liquidi (es. vasi) sull'unità.
Una volta inserito nella presa, Sirocco 150 resta connesso alla rete elettrica anche quando si trova in standby e con la luce del display spenta. Per
disconnettere completamente l'unità, staccare la spina dalla rete elettrica.
Assicurarsi che la spina di alimentazione principale sia facilmente accessibile in caso si renda necessaria la disconnessione dalla rete di
alimentazione principale.
Assicurarsi che le batterie non siano esposte a temperature eccessive, ad esempio in caso di esposizione alla luce solare diretta, vicinanza ad un
fuoco, ecc. Per lo smaltimento, adottare procedure responsabili.
Do not remove screws from or open the radio casing.
L'esposizione prolungata a suoni ad alto volume connessa all'uso delle cuffie può provocare danni all'udito.
L'etichetta con il marchio è situata alla base dell'unità principale.
Sikkerhedsanvisninger
Beskyt radioen mod varmekilde som for eksempel åbne flammer eller lys.
Sørg for, at enheden ventileres tilstrækkeligt (mindst 10 cm plads hele vejen rundt).
Undlad at bruge radioen i nærheden af vand.
Undgå, at der drypper væske ned på radioen.
Undlad at anbringe genstande med væsker som for eksempel vaser på enheden.
Når du slutter Sirocco 150 til strømforsyningen, forsynes den med strøm i standbytilstand, også selvom baggrundsbelysningen i displayet er slukket.
Hvis du vil afbryde strømmen helt, skal du tage stikket ud af stikkontakten.
Kontroller, at netstikket er let tilgængeligt, såfremt der kræves afbrydelse fra el-nettet.
Kontroller, at batterierne ikke udsættes for overophedning, f.eks. ved sollys, ild m.v., og bortskaf dem korrekt.
Du må ikke fjerne skruer fra eller åbne radiokabinettet.
Der kan ske skade på hørelsen ved vedvarende udsættelse for høj lydstyrke, når der bruges hovedtelefoner.
Mærkaten sidder under hovedenheden
Instrucciones de seguridad
Mantenga la radio alejada de fuentes de calor como llamas o velas.
Asegúrese de que la unidad esté adecuadamente ventilada (10 cm como mínimo en todo su perímetro).
No utilice la radio cerca del agua.
Evite derramar o salpicar líquidos sobre la radio.
No ponga ningún contenedor de líquido encima de la radio como vasos o jarras.
Cuando está enchufada, la Sirocco 150 está conectada a la red eléctrica, incluso en modo de espera con la luz trasera de la pantalla apagada. Para
desconectar completamente, desconéctela de la toma de la red eléctrica.
Asegúrese de se pueda obtener fácil acceso a la clavija eléctrica en caso de que se tenga que aislar la unidad de la red eléctrica.
Procure no exponer las pilas a fuentes de calor excesivo como la luz solar directa, el fuego, etc. y deséchelas de forma responsable.
No retire los tornillos ni abra el alojamiento de la radio.
Si se utilizan auriculares, los oídos pueden sufrir daños debido a una exposición prolongada a un volumen de audición alto.
La etiqueta de la marca está situada en la base de la unidad principal.

1
EN
Contents
Overview of the controls and connectors ................................2
Getting started ........................................................................4
Using DAB & FM radio..............................................................5
Changing stations (basic Navigation dial use) .................................................................5
Setting and selecting presets ................................................................................5
Changing the information shown on screen...........................................................5
Using a CD, SD card or USB memory drive ..............................6
Playing and selecting tracks..................................................................................6
Playlists .................................................................................................................7
Changing the information shown on screen...........................................................7
Using the iPod/iPhone dock.....................................................8
Selecting tracks .....................................................................................................8
iPod specific remote control functions ..................................................................8
Using the video out socket.......................................................9
Connecting to your display.....................................................................................9
Controlling video playback ....................................................................................9
Setting the time and date.......................................................10
Setting the timer....................................................................10
Using the sleep timer ........................................................................................... 11
Options .................................................................................. 11
DAB-only options ................................................................................................. 11
FM-only options ................................................................................................... 11
Audio options........................................................................................................ 11
Energy saving........................................................................12
Hints and Tips........................................................................12
Technical Specifications ........................................................13

2
Source
Info
Presets
Menu
Sleep
Timer
Aux in
1. Switch between sources (DAB, FM, iPod, CD, SD Card, USB or Aux in).
2. Press to change the information shown on-screen.
3. Press to set and select preset radio stations or set up a CD, SD Card or USB playlist.
4. Navigation dial - Rotate to adjust volume. Press to view station list in DAB, Frequency in FM and tracklist
in CD, SD Card and USB sources. Rotate to navigate menus and press to confirm selections.
5. 3.5mm stereo output for headphones.
6. SD Card slot for SD playback.
7. USB slot for USB playback.
8. 3.5mm stereo input for auxiliary devices such as CD player, etc.
9. Press to toggle timer on/off. Hold to enter timer setup.
10. Press to see current sleep timer setting, continue to cycle through options (Off, 90/60/45/30/15 mins).
Hold to cancel sleep timer.
11. Press to adjust settings and preferences. Hold for 3 seconds to reset unit.
12. Standby indicator.
Overview of the controls and connectors
Front Panel

3
EN
T
i
mer
Slee
p
Clock
I
nfo
Stereo EQ Bass
Select
Source-
Source+
Pr
ese
t
s
M
en
u
+
-
- Folder +
- Search +
Standby
FM/DAB
Band
III Ant.
SPEAKERS
IMPEDANCE
4 Ω
L
R
iDock
1. Standby. Press to switch unit between standby
and on.
2. Search +/- Press to skip track in CD, SD Card,
USB and iPod source and to tune in FM and
DAB source. Hold to rewind or fast forward
through tracks.
3. Stop, play and pause CD, SD Card, USB, iPod.
4. Previous/next folder (album) in CD, SD Card,
USB source.
1. Mute. Press to mute speakers.
2. Repeat. Press to cycle through repeat modes.
3. Volume +/- Press to adjust volume level.
4. Source +/- Press to select source.
5. Shuffle. Press to activate shuffle (random) play
for CD, SD Card, USB, iPod.
6. Stereo. Press to switch between stereo/mono
sound (FM only).
EQ. Press to cycle through Equaliser settings:
Flat, Pop, Classic, Rock, Jazz.
Bass. Press to activate Bass boost.
7. Navigation/Select. Navigate menus. Press
Select to confirm choices.
/Skip folder/album in CD/USB/SD source
only. Navigate menus on iPod.
8. Clock. Press to show current time.
1. 9-Pin socket for iPod/iPhone Dock.
2. Connector for DAB/FM aerial.
3. Spring-loaded speaker sockets for speaker
cables.
Top Panel
Remote Control Only
Rear Panel

4
SEARCH STOP PLAY/PAUSE
+
-
+
-
OPEN/CLOSE
FOLDER
STANDBY/ON
OPEN/CLOSE
Search
+
-
+
-
Folder
Standby
DAB
ANT.
SPEAKERS
IMPEDANCE4Ω
L
R
iDock
SPEAKERS
IMPEDANCE 4Ω
L
R
FM/DAB
Band
III Ant.
iDock
SPEAKERS
IMPEDANCE 4Ω
L
R
?DA4B8A>22> $
2. Insert the remote batteries.
3. Connect the speakers.
Getting started
1. Remove the adhesive tape securing the CD door. Press down on the front-right indent on
the CD door to open it and remove the CD mechanism transit card from inside the CD
compartment.
4. Plug in and extend the aerial vertically and plug in to your power supply.
5. Press the Standby button, if necessary, to switch the unit on. An autotune finds
the DAB stations available in your area and selects one.
6. Push and turn the Navigation dial to see all the available stations. Push again to change
to another station.
7. Push the Source button and repeat to switch between FM, iPod, CD, SD Card, USB, Aux
In or DAB listening.

5
EN
Using DAB & FM radio
Changing stations (basic Navigation dial use)
DAB
FM
OR
Press to step -/+ 0.05 MHz. Hold and release to scan to next station.
Setting and selecting presets
Store up to 30 radio stations (shared between DAB and FM) as presets for easy access.
To set a preset
To select a preset
Changing the information shown on screen
Press the Info button, and repeat, to change the information shown on screen.
DAB
1. Scrolling text broadcast by DAB stations.
2. DAB multiplex that the current station broadcasts from, followed by station frequency.
3. DAB signal quality; 85 to 100 Good, 70 to 84 OK, 0 to 69 poor
4. Time and date
FM RDS
1. Scrolling text.
2. PTY information
3. Time and date
112APSX^
^f_[PhX]V)HTPW
112APSX^
APSX^
Info
STEREO
BT[TRcUaT`dT]Rh
(%%5<
STEREO
<4A2DAH
ccTaP]S5aTbWT
Search
+
-
Presets
112APSX^
^f_[PhX]V)HTPW
?aTbTc
4\_ch_aTbTc
?[P]TcA^RZ
ÀaT[XbcT]X]Vc^
Presets
APSX^
?aTbTc
Presets

6
Playing and selecting tracks
Using a CD, SD card or USB memory drive
Sirocco 150 can play ordinary audio CDs, CD-R and CD-RW discs. It can also playback MP3 or
WMA files from a CD, SD card or USB memory drive.
To load a CD, press down on the the bottom-right indent to open the
door and push the CD gently onto the centre spindle.
To insert an SD memory card, push the card label side up into the slot
on the front panel with the gold pins towards the rear of the unit. Pull
the card to remove it.
It is not recommended that you remove an SD memory card when the
card is being used.
To insert a USB memory drive into your Sirocco 150 push the USB plug
into the USB socket on the front panel. Pull to remove it.
It is not recommended that you remove a USB memory drive when the
drive is in use.
Skip tracks. Hold to fast forward or rewind
Search
+
-
Folder
+
-
OPEN/CLOSE
STANDBY/ON
SEARCH STOP PLAY/PAUSE
+
-
+
-
FOLDER
CaPRZJ L
B4;42C^a?;0H
Push the naviagtion
dial, then rotate to
select a track. Push
again to begin playing.
Alternatively, press the
play/pause button to
start playing from the
first track.
Skip folder/album

7
EN
Playlists
You can setup a playlist to play up to 60 MP3/WMA or 60 CD tracks in a particular order.
A playlist remains available only for as long as the current CD/SD card/USB drive is inserted.
You can only set a playlist when the current track is stopped.
To set a playlist
1. Press the Presets button. Turn the Select dial and push to select tracks to add to the
playlist from the current CD, SD card or USB memory drive.
2. When you have finished selecting tracks, press the Presets button to store the playlist
To start playing the playlist push the dial or press the Play/Pause button.
To clear a playlist
Press the Stop button twice to clear the current Playlist.
Changing the information shown on screen
Press the Info button, and repeat, to cycle through information shown on screen.
MP3 & WMA
While playing, top line shows Track number (e.g. T 06) and time into track.
1. Play status
2. Filename/Directory
3. ID3 tags: Artist/Abum/Title
4. Directory/Track number.
While stopped – shows total number of directories and tracks.
Audio CD
While playing shows:
1. Track, time into track..
2. Track time remaining.
3. Total CD time played.
4. Total CD time remaining while stopped - shows number of tracks and total play time.
Presets
PROG
?A>6
CaPRZJ L
PROG
?A>6!
CaPRZJ#L
Presets
PROG
?a^VaP\R^\_[TcT
B4;42C^a?;0H
Stop
OR
Info
x2

8
Using the iPod/iPhone dock
Attach the Dock cable to the 9-pin socket on the rear of your Sirocco. Insert the correct dock
adapter (see page 9) for your iPod/iPhone model into your Sirocco’s dock, then insert your iPod/
iPhone into the dock.
Select ‘iPod’ as your source. Sirocco 150 will recognise the device and start playing the last track
listened to.
iPhone Only : When you recieve a phone call while listening to music with your Sirocco 150 the
volume will fade out, allowing you to hear the ringtone and answer the call
1. 2.
Selecting tracks
Search
+
-
P r e s s t o s k i p t r a c k s . H o l d t o s e a r c h t h r o u g h c u r r e n t t r a c k .
P l a y / P a u s e c u r r e n t t r a c k
iPod specific remote control functions
Time
r
I
n
f
o
S
t
e
r
eo
EQ
Bass
Select
Menu
Menu - Functions as menu button on iPod
Up/Down - Navigate menus
Select - Select menu options
Repeat - Cycles repeat modes: off, single track, playlist
Shuffle - toggle shuffle (random) mode on and off

9
EN
Using the video out socket*
The iPod dock is able to output video from you iPod or iPhone to a suitable television or monitor,
using the PURE 3.5mm to Phono video out cable (available separately from your PURE dealer).
Please note that this is only the video signal; all audio will play through your Sirocco 150 speakers.
Connecting to your display
Video Out
Video Audio R Audio L
Rear view of dock, with iPhone inserted.
Typical composite input layout.
Before connecting your iPod dock to your display, please ensure that the ‘TV-Out’ settings on your
iPod or iPhone are correct (see the user guide for your iPod model for specific instructions).
*Video output is only available on iPod and iPhone models with video playback.
You can use the remote control during video playback as you would during audio playback, or if
you wish, you can navigate using the controls on your iPod itself.
Controlling video playback
Dock adapter compatibility
Insert the 3.5mm jack (black) of your 3.5mm to Phono video out cable into the video out socket on
the rear of the dock.
Connect the RCA jack (yellow) into the video socket of your display. This is usually coloured yellow,
and is usually located next to Left and Right audio sockets (red and white) as part of a composite
input. Tune your display to the correct input, for example, ‘Composite’ or ‘AV’.
If your iPod model is not listed here, You may have received the correct adapter in the box with it.
If not, we recommend purchasing the correct one from Apple.
Adapter Model Capacity
9 iPod Classic 80 / 120 GB
10 iPod Classic 160 GB
15 iPhone 3G 8 / 16 / 32 GB
16 iPod Touch 2nd gen 8 / 16 / 32 GB
17 iPod Nano 4th gen 8 / 16 GB

10
A set timer is indicated by the ‘TIMER’ symbol on the screen.
To toggle the timer on and off, press the Timer button once.
Setting the time and date
Your Sirocco 150 automatically adjusts the time using a DAB signal. However, If you have a poor
signal or simply wish to set the clock yourself, you can do so from the menu.
Please note: When a DAB time signal is received, Sirocco 150 will default to this automatically.
To set the time
1. Press Menu, then select ‘Clock’
2. You will now see the Set time screen. Using the navigation dial, select 12 or 24-hour clock
3. Set the hours
4. Set the minutes
BTccX\T
!#W^da)
BTccX\T
!#7^da)
BTccX\T
!#7^da $)
Setting the timer
The timer function allows you to set your Sirocco 150 to switch on to your preferred source, and
then switch off again at specifed times.
To set the timer
1. Press and hold Timer to enter the
Set timer
screen. You can also accees Timer from the main menu.
2. Using the navigation dial, set the times you wish your Sirocco 150 to switch on, then off
3. Select how frequently you want the timer to go off (Once Only or Daily)
4. Select the source you would like your Sirocco 150 to play when it switches on - DAB, FM, CD, iPod, USB,
SD Card or Tone.
5. Finally, set your preferred volume level for the timer.
2[^RZ
1. 2. 4.
3.
After setting the time, you will be asked to set the date. Use the navigation dial as before.
>UU
BTccX\Ta
Timer
)
BTccX\T^]
3PX[h
BTcSPhb
301
BTc\^ST
%
BTce^[d\T
112APSX^
^f_[PhX]V)HTPW
TIMER
2. 3. 4. 5.

11
EN
You can quickly set your Sirocco 150 to automatically switch off after a set length of time.
Press the Sleep button repeatedly to cycle through 90, 60, 45, 30 or 15 minutes until switch-
off. To show the remaining time press Sleep once. Press and hold to cancel the timer.
Options
Press the Menu button to access the following options. You can also access the Clock, Timer and
Energy saving settings
DAB-only options
Autotune
Scans all DAB frequencies for stations and adds any new ones to the station list. To stop an
Autotune press Select.
DRC value
DRC (Dynamic Range Control) can make the quieter sounds in a DAB broadcast easier to hear
at low volume or in a noisy environment. DRC is not broadcast by all stations, please check
your preferred station’s broadcast information.
DRC off Any DRC level broadcast will be ignored.
DRC half DRC level is set to half that sent with the broadcast.
DRC full (default) Applies the DRC level as sent with the broadcast.
Manual tune
Shows DAB signal level which can help you find the best position for your radio.
Station Order
Alphanumeric Lists all stations in alphanumeric order.
Active station Lists active stations first on the station list.
Multiplex Lists stations in groups according to their multiplex.
FM-only options
FM stereo mode
Switch between Stereo and Mono sound.
May improve sound quality in poor FM signal areas
Audio options
EQ settings (remote control only)
Apply one of five equalisation presets (FLAT, POP, CLASSIC, ROCK or JAZZ) to the audio.
Sleep
SLEEP
B[TT_^]
AT\PX] $\X]b
Menu
Using the sleep timer

12
Energy saving
Sirocco 150 is part of the PURE EcoPlus product family and has an energy-saving standby
mode.
In energy-saving standby mode, the screen and clock will be switched off and any iPod or
iPhone in the dock will not be charged. The standby indicator light will be lit to show that the
unit is in standby, and power consumption will be greatly reduced.
In standby mode, the screen is illuminated and the time is shown. Any iPod or iPhone that is
docked will be charged
To switch energy saving on or off, press Menu then rotate the tune dial and select ‘Energy
Saving’, then ‘On’ or ‘Off’.
EcoPlus
4]TaVhBPeX]V
>UU
>]
Menu
Please note: When entering energy saving standby, there is a short delay while Sirocco 150 shuts
down. ‘Powering off’ will be shown on screen during this time.
Hints and Tips
(?) Inactive or unavailable DAB stations
Inactive or unavailable stations are those which appear on the station list but are not currently
available. Inactive stations have a ‘?’ before their name on the station list. If you select a station
which has this symbol, your radio tries to tune in or returns to the previous station.
Screen shows ‘No stations available’
Check that your aerial is fully extended. Use Autotune to search for stations. Try adjusting your
aerial or radio position.
Clock hasn’t adjusted for summer/winter daylight saving
Switch the unit on to DAB to acquire the time from the DAB signal – there may be a delay in
broadcasters updating the time signal.
Resetting your radio
Resetting your radio removes all presets, stored stations and favourite station settings and resets
all options to defaults. To reset:
1. Press and hold the Menu button for three seconds
2. Press the navigation dial to confirm the reset.

13
EN
Technical Specifications
Tuner Stereo digital radio with full Band III and FM reception. ETS 300 401
compliant and capable of decoding all DAB and DAB+transmission
modes 1-4 up to and including 384 kbps. Supports FM RDS.
Frequency range DAB – Band III (174-240 MHz), FM – 87.5-108 MHz.
CD player CD-R and CD-RW playback compatible. MP3 & WMA playback,
Multiple playback modes (repeat, random, etc.).
Support for 60 WMA/MP3 or CD track playlist.
Speakers 4 Ohms (nominal) impedance. 10W RMS power handling. Two-way
design. Treated paper mid-bass driver. Custom tuned crossover.
Input connectors 3.5mm Aux-in socket for auxiliary devices. USB host port for memory
drives up to 32GB. SD memory card slot (supports cards up to 2GB).
Output connectors 3.5 mm stereo socket for headphones. 9-pin socket for iPod/iPhone
dock. 3.5mm video out socket on rear of dock.
Remote control Infrared remote control.
Aerial Removable wire dipole DAB/FM aerial.
Mains power supply 240V Euro/UK power socket adapter.
Approvals CE marked. Compliant with the EMC and Low Voltage Directives
(2004/108/EC and 2006/95 EC).
Dimensions (mm) Unit – 145 wide x 164 high x 203 deep.
Speakers – 142 wide x 213 high x 160 deep.
Trademarks
Sirocco 150, PURE, the PURE logo, Imagination Technologies, and the Imagination Technologies logo are trademarks or registered trademarks of Imagination
Technologies Limited. “Made for iPod” means that an electronic accessory has been designed to connect specifically to iPod and has been certified by the
developer to meet Apple performance standards. “Works with iPhone” means that an electronic accessory has been designed to connect specifically to iPhone
and has been certified by the developer to meet Apple performance standards. Apple is not responsible for the operation of this device or its compliance with
safety and regulatory standards. iPod is a trademark of Apple Computer, Inc., registered in the U.S. and other countries. iPhone is a trademark of Apple Inc. All
other product names are trademarks of their respective companies. Version 1 July 2009.
Warranty information
Imagination Technologies Ltd. warrants to the end user that this product will be free from defects in materials and workmanship in the course of normal use for
a period of two years from the date of purchase. This guarantee covers breakdowns due to manufacturing or design faults; it does not apply in cases such as
accidental damage, however caused, wear and tear, negligence, adjustment, modification or repair not authorized by us. Please visit www.pure.com/register to
register your product with us. Should you have a problem with your unit please contact your supplier or contact PURE Support at the address shown on the rear
of this manual.
Disclaimer
Imagination Technologies Limited makes no representation or warranties with respect to the content of this document and specifically disclaims any implied
warranties of merchantability or fitness for any particular purpose. Further, Imagination Technologies Limited reserves the right to revise this publication and
to make changes in it from time to time without obligation of Imagination Technologies Limited to notify any person or organization of such revisions or changes.
Copyright
Copyright 2009 by Imagination Technologies Limited. All rights reserved. No part of this publication may be copied or distributed, transmitted, transcribed,
stored in a retrieval system, or translated into any human or computer language, in any form or by any means, electronic, mechanical, magnetic, manual or
otherwise, or disclosed to third parties without the express written permission of Imagination Technologies Limited.

14
Disposal of Waste Electrical & Electronic Equipment
This symbol on the product or on its packaging indicates that this product should not be treated as household waste. Instead it should be handed
over to a suitable collection point for the recycling of electrical and electronic equipment. By ensuring this product is disposed of correctly, you will
help prevent potential negative consequences for the environment and human health, which could otherwise be caused by inappropriate waste
handling of this product. The recycling of materials will help to conserve natural resources. For more detailed information about recycling of this
product, please contact your local council office, your household waste disposal service or the shop where you purchased the product.

1
DE
Inhalt
Beschreibung der Bedienelemente .........................................2
Erste Schritte ..........................................................................4
Verwendung des DAB- und UKW-Radios .................................5
Senderwechsel (grundlegende Funktionen des Navigationsrads).........................................5
Speichern und Abrufen von Vorwahlen..................................................................5
Angezeigte Bildschirminformationen ändern........................................................5
Verwendung von CDs, SD-Karten und USB-Speichersticks.....6
Auswahl und Wiedergabe von Titeln......................................................................6
Wiedergabelisten...................................................................................................7
Angezeigte Bildschirminformationen ändern........................................................7
Verwendung des iPod-/iPhone-Docks.....................................8
Titelauswahl ..........................................................................................................8
Spezielle Fernbedienungsfunktionen für den iPod................................................8
Verwendung der Videoausgangsbuchse..................................9
Anschluss an Ihr Display........................................................................................9
Steuerung der Videowiedergabe ...........................................................................9
Einstellung von Uhrzeit und Datum .......................................10
Einstellung des Timers..........................................................10
Verwendung des Sleep-Timers............................................................................ 11
Optionen ................................................................................ 11
Spezielle DAB-Optionen....................................................................................... 11
Spezielle UKW-Optionen...................................................................................... 11
Audiooptionen ...................................................................................................... 11
Energiesparmodus ................................................................12
Tipps und Tricks ....................................................................12
Technische Daten...................................................................13

2
Source
Info
Presets
Menu
Sleep
Timer
Aux in
1. Umschalter für Signalquelle (DAB, UKW, iPod, CD, SD-Karte, USB oder AUX-Eingang).
2. Drücken Sie diese Taste, um zu bestimmen, welche Informationen auf dem Display angezeigt werden sollen.
3. Drücken Sie diese Taste, um die Sender-Voreinstellungen zu verändern bzw. voreingestellte Sender
aufzurufen oder um eine Wiedergabeliste für CDs, SD-Karten oder USB-Speichermedien einzurichten.
4. Navigationsrad - Zur Lautstärkeregelung drehen. Drücken Sie das Rad, um eine Senderliste bei DAB-,
eine Frequenzliste bei UKW- oder eine Titelliste bei CD-, SD-Karten- und USB-Signalquellen angezeigt
zu bekommen. Drehen Sie das Rad zur Navigation durch die Menüs und drücken Sie es zur Bestätigung
Ihrer Auswahl.
5. 3,5-mm-Stereoausgang für Kopfhörer.
6. SD-Karten-Einschub für SD-Wiedergabe.
7. USB-Anschluss für USB-Wiedergabe.
8. 3,5-mm-Stereoeingang für Zusatzgeräte wie etwa CD-Player.
9. Drücken Sie diese Taste, um den Timer ein- oder auszuschalten. Halten Sie die Taste gedrückt, um die
Timer-Einstellungen aufzurufen.
10. Drücken Sie diese Taste, um die aktuellen Sleep-Timer-Einstellungen anzuzeigen. Drücken Sie sie
mehrmals, um die verschiedenen Optionen aufzurufen (Aus, 90/60/45/30/15 Minuten).
11. Drücken Sie diese Taste, um die Einstellungen und Optionen aufzurufen. Halten sie die Taste 3 Sekunden
lang gedrückt, um das Gerät auf die Standard-Einstellungen zurückzusetzen.
12. Stand-by-Anzeige.
Beschreibung der Bedienelemente
Vorderseite

3
DE
T
i
mer
Slee
p
Clock
I
nfo
Stereo EQ Bass
Select
Source-
Source+
Pr
ese
t
s
M
en
u
+
-
- Folder +
- Search +
Standby
FM/DAB
Band
III Ant.
SPEAKERS
IMPEDANCE
4 Ω
L
R
iDock
1. Standby. Drücken Sie diese Taste, um zwischen
Stand-by- und Normalbetrieb umzuschalten.
2. Search +/- (Suchen). Drücken Sie diese Taste,
um einen Titel von einer CD-, SD-Karten-, USB-
oder iPod-Signalquelle zu überspringen oder
um einen UKW- oder DAB-Sender aufzurufen.
Halten sie die Taste gedrückt, wenn Sie sich
vorwärts oder rückwärts durch die Titelliste
bewegen möchten.
3. Stopp, Wiedergabe und Pause für CD, SD-
Karte, USB und iPod.
4. Folder (Ordner). Nächster oder vorheriger Ordner
(Album) bei CDs, SD-Karten und USB-Quellen.
1. Stumm. Drücken Sie diese Taste, um die
Lautsprecher auszuschalten.
2. Wiederholen. Drücken Sie diese Taste, um sich
durch die Wiederholungsmodi zu bewegen: Aus,
aktueller Titel, alle Titel bei CDs, SD-Karten,
USB- und iPod-Quellen.
3. Lautstärke +/- Drücken Sie diese Tasten zur
Lautstärkeregelung.
4. Source +/- (Signalquelle) Drücken Sie diese
Tasten zur Auswahl der Signalquelle.
5. Zufällige Wiedergabe. Drücken Sie diese Taste,
um die Shuffle-Funktion (zufällige Wiedergabe)
für CDs, SD-Karten, USB- und iPod-Quellen zu
aktivieren.
6. Stereo. Drücken Sie diese Taste, um zwischen
Stereo- und Monowiedergabe umzuschalten
(nur für UKW).
EQ. Drücken Sie diese Taste, um sich durch die
Equalizer-Einstellungen zu bewegen: Flat, Pop,
Classic, Rock, Jazz.
Bass. Drücken Sie diese Taste, um die
Bassverstärkung zuzuschalten.
7. Navigation/Auswahl. Navigation durch die
Menüs. Drücken Sie die Auswahltaste Select,
um Ihre Auswahl zu bestätigen.
/Ordner/Alben überspringen; nur für CD-/
USB-/SD-Karten-Signalquellen. Navigation
durch die Menüs beim iPod.
8. Clock (Uhr). Drücken Sie diese Taste, um die
aktuelle Uhrzeit angezeigt zu bekommen.
1. 9-Pin-Buchse für iPod-/iPhone-Dock.
2. Anschluss für DAB-/UKW-Antenne.
3. Lautsprecherbuchsen mit Schraubklemmen
zum Anschluss von Lautsprecherkabeln.
Oberseite
Nur Fernbedienung
Rückseite

4
SEARCH STOP PLAY/PAUSE
+
-
+
-
OPEN/CLOSE
FOLDER
STANDBY/ON
OPEN/CLOSE
Search
+
-
+
-
Folder
Standby
DAB
ANT.
SPEAKERS
IMPEDANCE4Ω
L
R
iDock
SPEAKERS
IMPEDANCE 4Ω
L
R
FM/DAB
Band
III Ant.
iDock
SPEAKERS
IMPEDANCE 4Ω
L
R
?DA4B8A>22> $
2. Legen sie die Batterien ein.
3. Schließen sie die Lautsprecher an.
Erste Schritte
1. Entfernen Sie das Klebeband vom CD-Einschub. Drücken Sie auf die Einkerbung
vorne rechts an der CD-Schublade, um diese zu öffnen, und entfernen Sie die
Transportsicherungskarte aus dem CD-Fach.
4. Schließen Sie die Antenne an, ziehen Sie sie aus und schließen Sie
das Gerät an das Stromnetz an.
5. Drücken Sie gegebenenfalls die Stand-by-Taste, um das Gerät einzuschalten. Über den
automatischen Sendersuchlauf werden die verfügbaren DAB-Sender gesucht und einer
davon ausgewählt.
6. Drücken Sie das Navigationsrad und drehen Sie es, um alle verfügbaren Sender
angezeigt zu bekommen. Drücken Sie es erneut, um den Sender zu wechseln.
7. Drücken Sie mehrmals die Taste Source (Signalquelle), um zwischen den verschiedenen
Signalquellen UKW, iPod, CD, SD-Karte, USB, AUX-Eingang und DAB umzuschalten.
Table of contents
Languages:
Other PURE Stereo System manuals

PURE
PURE Legato CD-40 User manual

PURE
PURE Contour 200i Air User manual

PURE
PURE SIROCCO 550 User manual

PURE
PURE Contour User manual

PURE
PURE SENSIA 200D CONNECT User manual

PURE
PURE DMX-60 User manual

PURE
PURE DTM-300 User manual

PURE
PURE Evoke User manual

PURE
PURE SIROCCO 550 User manual

PURE
PURE Evoke C-F6 User manual