PureFlow AirDog DF-100-5G User manual

DF-100-5G
WITH IN-TANK RETROFIT PUMP
DF-165-5G
DF-220-5G
1998.5-2004 CUMMINS
INSTALLATION INSTRUCTIONS
PLEASE READ AND CHECK CONTENTS
BEFORE INSTALLATION
PUREFLOW AIRDOG
705 W MAUSOLEUM RD.
SHELBYVILLE, IN 46176
877-421-3187
PUREFLOWAIRDOG.COM
#14
PATENT PROTECTED:
https://pureflowairdog.com/p-35853-patents.html

1
TABLE OF CONTENTS
TITLE PAGE
INTRODUCTION 2
SAFETY GUIDELINES 3
PRE-INSTALLATION CHECKS 4
PARTS LIST 5
QUICK CONNECT FITTING OVERVIEW 7
QUICK CONNECT FITTING ILLUSTRATION 8
PUMP FITTING INSTALLATION DF-100 & DF-165 9
PUMP CRADLE BRACKET INSTALLATION 11
PUMP TO FRAME INSTALLATION 12
FUEL LINE ASSEMBLY OVERVIEW 15
ENGINE LINE INSTALLATION 1998.5-2002 VP-44 16
RETURN LINE INSTALLATION 19
WIRING INSTALLATION 29
INITIAL STARTING PROCEDURE 32
FILTER SERVICE 33
GEROTOR PUMP SERVICE 34
WARRANTY
35
ADJUSTING FUEL PRESSURE
36
PUMP FITTING INSTALLATION DF-220 10
INLET LINE DF-100 & DF-165 ONLY 20
INLET LINE DF-220 ONLY 27
ENGINE LINE INSTALLATION 2003-2004 CP3 18

2
INTRODUCTION
Thank you for choosing AirDog® for your truck fueling needs!
AirDog® recommends that a certified diesel shop technician install this product.
Please note, if the end user performs the installation, it is recommended they have
basic knowledge on how electric fuel systems operate and function. Failure to properly
set up this fuel system may result in a voided warranty. If properly set up per these
instructions, the pump head carries a lifetime warranty to the original purchaser.
THIS WARRANTY IS NON-TRANSFERRABLE!
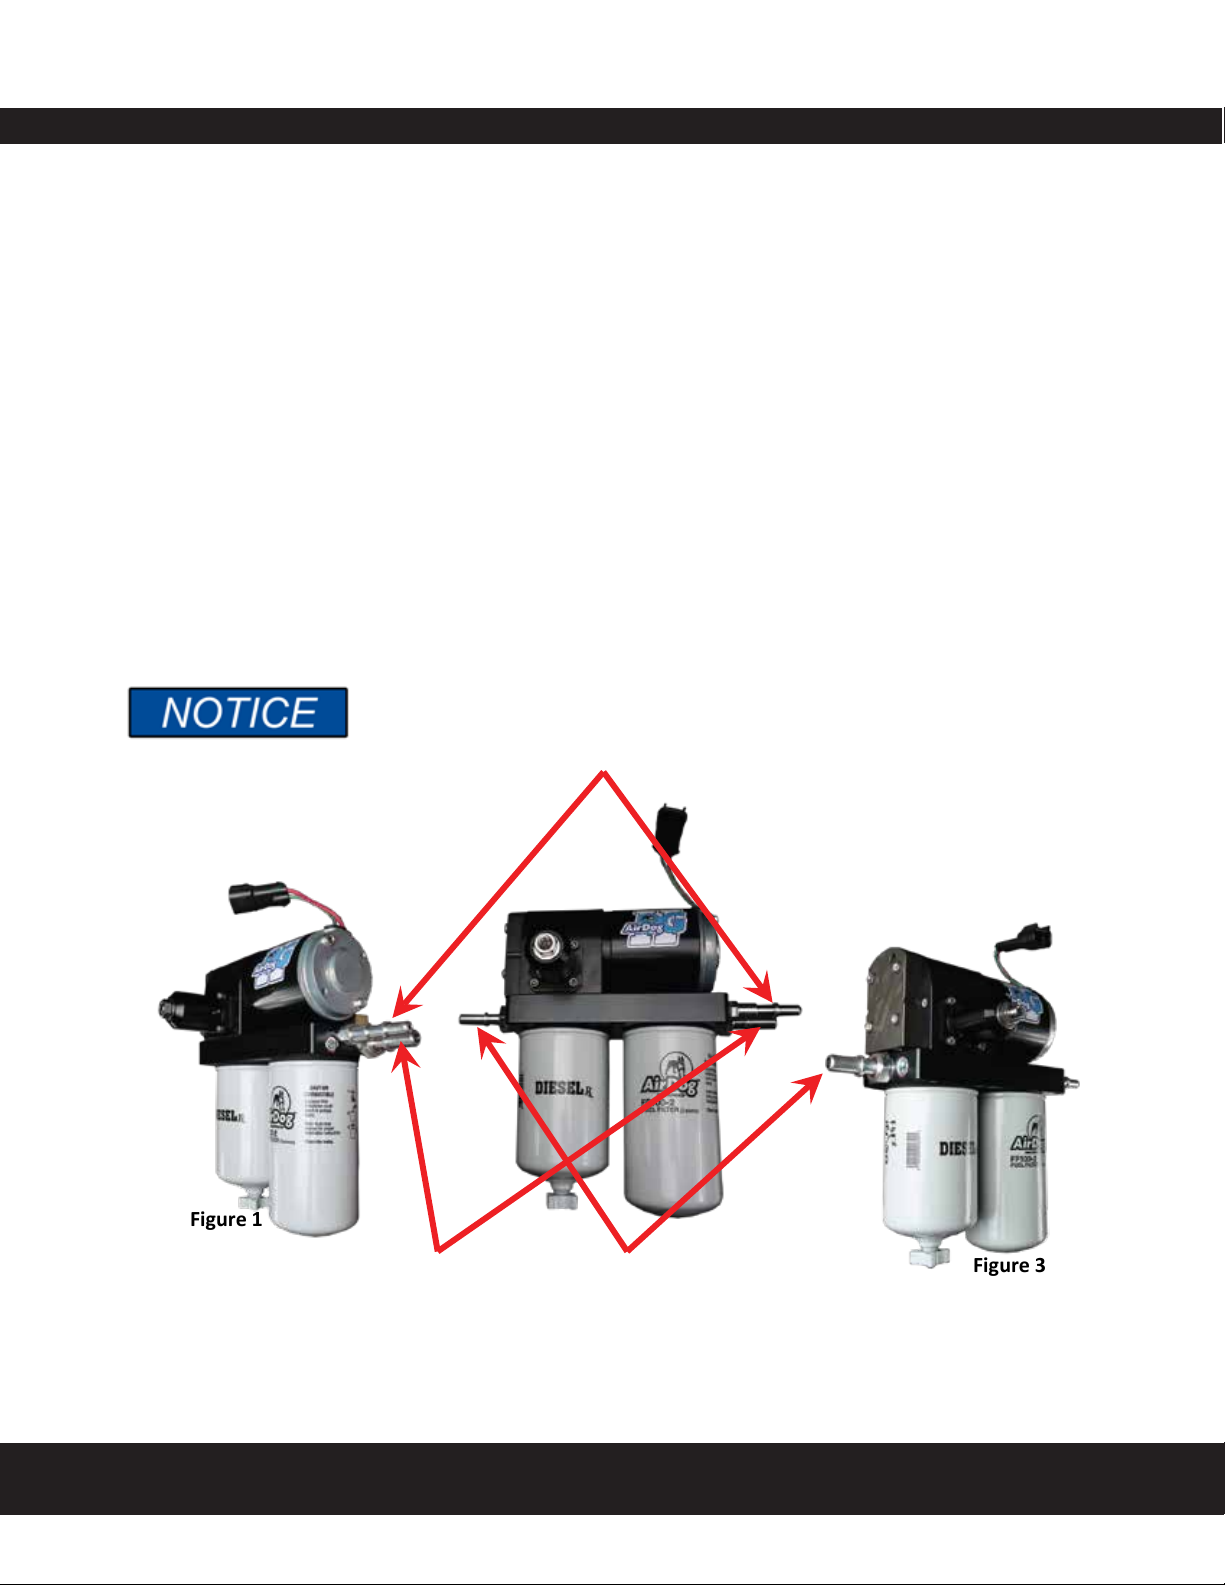
The AirDog® II-5G uses an adjustable diaphragm fuel pressure regulator to
regulate the fuel pressure to the injection system. The pressure for this application is
preset from the factory at 15-17psi. If a different pressure is desired, go to page 35 for
instructions on how to adjust the pressure. WARNING: RUNNING THE PUMP ABOVE
75PSI FOR THE DF-100 AND DF-165 AND ABOVE 55PSI FOR THE DF-220 WILL
DECREASE THE LIFE OF THE PUMP SIGNIFICANTLY AND MAY VOID THE
WARRANTY. MORE FUEL PRESSURE DOES NOT MEAN MORE FUEL FLOW AND
TOO HIGH OF PREESURE MAY DAMAGE YOUR INJECTION SYSTEM! MORE
FUEL PRESSURE DOES NOT MEAN MORE FUEL FLOW!
OVERVIEW ON HOW THE SYSTEM OPERATES
The AirDog® draws fuel from the tank from a high flow suction tube installed in
the tank. The fuel is then pulled through a water separator before being pressurized
through the Gerotor pump. The pressurized fuel is sent through the 2 micron fuel filter
before being sent to the engine. The pump maintains pressure through a diaphragm
fuel pressure regulator that recirculates fuel back through the water separator. The
separated air from the diesel fuel is returned through a filler neck return tee.

3
SAFETY GUIDELINES
LEARN TO RECOGNIZE SAFETY INFORMATION
This is the safety alert symbol. When you see this symbol in this
manual, BE ALERT TO THE POTENTIAL FOR PERSONAL
INJURY!
Follow recommended precautions and safe operating practices.
UNDERSTANDING SIGNAL WORDS
A signal word-DANGER, WARNING, or CAUTION is used with
the safety alert symbol.
DANGER indicates a hazardous situation which, if not avoided,
WILL result in death or serious injury.
WARNING indicates a hazardous situation which if not avoided,
COULD result in death or serious injury.
CAUTION indicates a hazardous situation which if not avoided,
COULD result in minor or moderate injury
NOTICE indicates a preferred installation procedure.
SAFETY INSTRUCTIONS

4
PRE-INSTALLATION CHECKS
The installation of your AirDog® can be made relatively easy by following the steps outlined in this
manual, and:
1. Inventory the package components completely. Notify PUREFLOW AIRDOG® immediately of
any missing or damaged parts! 317-421-3180
2. Read the installation manual completely. Understand how the system operates and understand
the installation recommendations before beginning the installation.
3. The installation recommendations contained herein are suggested installation guidelines only.
Individual installations may vary.
4. If any installation procedure is uncertain, contact PUREFLOW® AIRDOG for technical
assistance.
5. When installing the AirDog® fuel lines be sure to keep the ORIGINAL ENGINE RETURN LINE
connected as it is from the factory!
SAFETY GUIDELINES!
Please be sure to chock the vehicle’s tires to prevent rolling
Please use proper supports when working beneath an elevated vehicle
Most diesel pickups have two (2) 12 volt batteries. Disconnect the battery
cables to both batteries befire proceeding with the AirDog® installation
Vehicle main framerails should not be drilled into or welded upon.
Wear safety glasses or shield when using tools such as drills
and grinders or when using a punch or chisel
Prolonged exposure to loud noise can cause impairment or loss of
hearing. Wear suitable hearing protective devices such as ear muffs
or ear plugs to protech against loud noises.
Use common sense when routing fuel lines and electrical wiring. Keep them
away from hot exhaust components and/or moving parts. Properly secure
lines to prevent chaffing.

5
PARTS LIST
QTY DESCRIPTION PART NUMBER IMAGE
1 AirDog® II-5G DF-100, DF-165, OR
DF-220
1 AirDog® Cradle Bracket 001-3C-0004
1 Frame Bracket Set 010-3C-0001
010-3C-0002
1 Mounting Bracket Hardware 901-61-0102-PM
1 Spacer Block 010-3C-0003-A-P
1 Wiring Harness 5E-2-011-HD
1 1.5” Filler Neck Tee with Clamps 001-4A-1-0150
1 3/8” 90deg Hose Quick Connect Fitting FQC3890
112mm X ½” male SAE J2044 Fitting WAP102
13/8” Male SAE J2044 Quick Connect x 7/16 ORB 06J2044716UNF
1High Flow Suction Tube WAP109
1 Zip Tie Bundle 5H-2-1-B
1 Customer Service Replacement O-ring Kit 901-05-0500
1
1
HVC-467-16
4C-2-1-10
Vacuum Cap
Vacuum Cap Hose Clamp
1P-5-DSSealing Washer (installs on WAP102 fitting)
11/2” 90deg Hose Quick Connect Fitting FQC1290
1
COMMON PARTS

6
23/4-16 ORB Male to -10 JIC Male Fitting 4A-1-02-10-08-S
2-10 JIC Female to 5/8” Barb 4A-1-09-10-10-B
PARTS LIST CONTINUED
QTY DESCRIPTION PART NUMBER IMAGE
DF-100-5G AND DF-165-5G ONLY
120ft of 1/2” Fuel Line HS20
41/2” Straight Hose Quick Connect Fitting FQC12S
31/2” Male SAE J2044 Quick Connect x 3/4 ORB 08J2044-3/4UNF
QTY DESCRIPTION PART NUMBER IMAGE
DF-220-5G ONLY
114ft of 1/2” Fuel Line HS14
21/2” Straight Hose Quick Connect Fitting FQC12S
11/2” Male SAE J2044 Quick Connect x 3/4 ORB 08J2044-3/4UNF
1 7ft of 5/8” Fuel Line HS5807

7
OVERVIEW OF QUICK CONNECT FITTINGS
WHY WE USE QUICK CONNECT FITTINGS
Almost every modern vehicle on the road uses what are called quick connect fittings for their
fuel system. These are standardized using J2044 SAE specifications. We use these fittings to make
the installation of our fuel systems as simple and as least invasive as possible. This allows for a
simple/clean installation of our products.
HOW THE CONNECTIONS WORK
To connect the assemblies, simply insert the male end form into the mating female connector.
Push firmly until you hear it “click” into place. To disconnect the fittings, press down and hold the
tabs on the female connector while you firmly pull the assembly apart.

8
ILLUSTRATION OF QUICK CONNECT COMPONENTS
IMAGE NOT TO SCALE
VIEW OF PUMP IS LOOKING DOWN
THE PORTS ARE LABELED ON THE PUMP

9
INSTALLING THE PUMP FITTINGS DF-100 & DF-165
1a-1. Dip the threaded end of the 08J2044-3/4UNF fitting into clean motor oil and
hand-thread into the “ENGINE” and “INLET” ports of the AirDog®II-5G filter base
as illustrated in figures 1, 2, and 3. Using a 3/4” deep socket, torque the fittings to
180in-lb or 15ft-lb.
1a-2. Dip the threaded end of the 06J2044716UNF fitting into clean motor oil and
hand-thread into the “RETURN” port of the the AirDog®II-5G filter base as illus
trated in figures 1 and 2. Using a 9/16” deep socket, torque the fitting to 84in-lb or
7ft-lb.
DO NOT overtighten the fittings or damage may occur!
TOOLS NEEDED:
- Torque Wrench
- 7/8” Deep Socket
- 9/16” Deep Socket
PARTS NEEDED:
- (2) 08J2044-3/4UNF Fittings
- (1) 06J2044716UNF Fitting
Figure 1
Figure 2
Figure 3
RETURN
ENGINE
INLET

RETURN
ENGINE
INLET
10
1b-1. Dip the threaded end of the 08J2044-3/4UNF fitting into clean motor oil and
hand-thread into the “ENGINE” port of the AirDog®II-5G filter base as illustrated
in figures 4, and 5. Using a 3/4” deep socket, torque the fitting to 180in-lb or
15ft-lb.
1b-2. dip the threaded end of the 4A-1-02-10-08-S fitting into clean motor oil and
hand-thread into the “INLET” port of the AirDog®II-5G filter base as illustrated in
figures 5 and 6. Using a 15/16” wrench, snug the fitting untill the O-ring is no
longer visible. A torque spec is not given as a socket will not fit between the
gerotor cap and the fitting.
1b-3. Dip the threaded end of the 06J2044716UNF fitting into clean motor oil and
hand-thread into the “RETURN” port of the the AirDog®II-5G filter base as illus
trated in figures 4 and 5. Using a 9/16” deep socket, torque the fitting to 84in-lb or
7ft-lb.
DO NOT overtighten the fittings or damage may occur!
TOOLS NEEDED:
- Torque Wrench
- 7/8” Deep Socket
- 9/16” Deep Socket
-15/16” Wrench
PARTS NEEDED:
- (1) 08J2044-3/4UNF Fitting
- (1) 06J2044716UNF Fitting
- (1) 4A-1-02-10-08-S Fitting
INSTALLING THE PUMP FITTINGS DF-220
Figure 4
Figure 5
Figure 6

INSTALLING THE PUMP ON THE BRACKET
TOOLS NEEDED:
- 3/16 Allen
- 7/16 Socket or Wrench
PARTS NEEDED:
- (4) 1/4-20 x 1.25 Socket Head Cap Screws
- (4) 1/4” Lock Washers
- (4) 1/4-20 Nuts
- (1) 001-3C-0004 Cradle Bracket
2-1. First, take a look under the truck and pick a location where the pump and
brackets will fit. Once the location is known, orient the pump in the cradle bracket
with the suction line “FUEL IN” pointed towards the fuel tank.
We do recommend mounting the system on the inside of the
frame if possible.
2-2. Using the above listed hardware, mount the AirDog to the cradle bracket in the
desired orientation using a 7/16 socket and 3/16 Allen wrench.
Figure 7
Figure 8
11

12
INSTALLING THE PUMP ON THE FRAME
TOOLS NEEDED:
- 3/16 Allen
- 1/2 Socket or Wrench
- 9/16 Socket or Wrench x2
PARTS NEEDED:
- (4) 5/16-18 x 3.0” Flat Socket Head Cap Screws
- (4) 5/16” Lock Washers
- (4) 5/16-18 Nuts
- (3) 3/8-16 x 3.5” Hex Head Cap Screw
- (3) 3/8 Lock Washers
- (3) 3/8-16 Nuts
- (1) 010-3C-0001 Front Frame Sandwich Plate (Multiple Holes)
- (1) 010-3C-0002 Back Frame Sandwich Plate
- (1) 010-3C-0003-A-P Spacer Block
3-1. Mock up the Front Frame Sandwich Plate (Multiple Holes) (010-3C-0001) on the
frame and hold the pump assembly up to it. Choose a set of holes that tucks the
pump up as far as possible without touching the bottom of the cab and use those
holes to mount the pump in the next step.
Figure 9

3-2. Assemble the AirDog® mounting bracket (001-3C-0004) to the frame bracket
(010-3C-0001) using the spacer (010-3C-0003-A-P) as shown in figure 10 using
the four 5/16 bolts, lock washers, and nuts included in the mounting bracket
hardware kit (figure 10). Using a 3/16” Allen and a 1/2“ wrench, properly torque
all fasteners!
3-3. Clamp the frame between the AirDog® bracket assembly and the backing plate
using the 3/8” x 3 ½” bolts, lock washers, and nuts included in the kit. Use two
9/16” wrenches to tighten.
13
INSTALLING THE PUMP ON THE FRAME CONTINUED
Figure 10
Figure 11
Figure 10
VEHICLE
REAR
VEHICLE
FRONT

14
INSTALLING THE PUMP ON THE FRAME CONTINUED
3-4. For mounting on the outside of the frame, the regulator will be pointed towards
the frame to get the suction side of the pump pointed towards the fuel tank.
Clamp the frame between the AirDog® bracket assembly and the backing plate
using the 3/8” x 3 ½” bolts, lock washers, and nuts included in the kit. Use two
9/16” wrenches to tighten.
3-5. For the 98.5-02 trucks, the cab support may need to be clearanced/modified to
clear the fuel pressure regulaotor.
Figure 12
Figure 13

15
FUEL LINE ASSEMBLY OVERVIEW
This kit includes a length of fuel line and separate fuel line fittings to allow for a
much cleaner looking installation. Assemble the fuel lines as you install them.
Do not pre-assemble the fuel lines, or the lengths will not be
correct.
4-1. Take the fuel line end and lubricate the barbed end with clean motor oil (Figure
14) and press it into the fuel line until all three barbs are covered (Figures
15 and 16. The fuel line end should look like Figure 16.
4-2. Now plug that fuel line with that fitting into the connection on the either the
AirDog® or the truck where the manual calls it out.
4-3. Run the fuel line along the frame away from any hot or moving parts such as
exhaust or the driveshaft (Figure 17). Cut the hose to length and insert the other
fuel line end that the manual calls out into the fuel line as outlined in step 4-1.
Hose clamps are not needed for these push-lock connectors. They
may casue damage to the hose and cause fuel leaks.
Figure 14 Figure 15 Figure 16
Figure 17

16
When installing the AirDog® fuel system, it is recommended to
bypass the factory filter canister for optimum engine performance.
5a-1. Remove the 12mm banjo bolt and original factory fuel supply line at the fuel inlet
port of the VP-44 pump (Figure 18) using a 17mm wrench.
5a-2. Install the 12mm x ½” male SAE J2044 (WAP 102) fitting with the seal washer
(1P-5-DS) supplied into the inlet port of the injector pump (Figure 19) once the
original fitting is removed. Do not over tighten the fitting. It may crack or break.
Either remove or bend the original supply line out of the way.
TOOLS NEEDED:
- 17mm Wrench or Socket
- 13/16” Wrench or Extra Deep Socket
- Clean Motor Oil or ATF
- Hose Cutters or a way to cut Fuel Line
PARTS NEEDED:
- (1) WAP102 Injection Pump Fitting
- (1) 1P-5-DS Sealing Washer
- (1) FQC1290 1/2” 90deg Quick Connect Fitting
- (1) HS20 or Fuel Line
ENGINE LINE INSTALLATION 1998.5-2002 VP-44
Figure 19
WAP102
1P-5-DS
Figure 18

5a-3. Assemble one end of the hose (Reference section 4) using Fuel line end
FQC1290 and plug it into the WAP102 fitting installed in the previous step. A
“click” will be heard once the fitting is properly connected.
5a-4. Run the fuel line along the frame as mentioned in step 4-3 to the “Engine” port in
the AirDog®. Cut the fuel line to length and insert fuel line end FQC12S per step
4-1. Once the connector is installed, connect it to the male J2044 fitting in the
“Engine” port in the AirDog®. A “click” will be heard once properly connected.
17
ENGINE LINE INSTALLATION 1998.5-2002 VP-44 CONTINUED
HS20 DF-100 & DF-165
HS14 DF-220
FQC12S
Figure 21
FQC1290
Figure 20 HS20 DF-100 & DF-165
HS14 DF-220

18
When installing the AirDog® fuel system, it is recommended to
bypass the factory filter canister for optimum engine performance.
5a-1. Remove the 12mm banjo bolt and original factory fuel supply line at the fuel inlet
port of the VP-44 pump (Figure 18) using a 17mm wrench.
5a-2. Install the 12mm x ½” male SAE J2044 (WAP 102) fitting with the seal washer
(1P-5-DS) supplied into the inlet port of the injector pump (Figure 19) once the
original fitting is removed. Do not over tighten the fitting. It may crack or break.
Either remove or bend the original supply line out of the way.
When installing the AirDog® fuel system, it is recommended to
bypass the factory filter canister for optimum engine performance.
5b-1. Remove the 12mm banjo bolt and original factory fuel supply line at the fuel inlet
port of the CP3 pump (Figure 19) using a 17mm wrench.
5b-2. Install the 12mm x ½” male SAE J2044 (WAP 102) fitting with the seal washer
(1P-5-DS) supplied into the inlet port of the injector pump (Figure 16) once the
original fitting is removed. Do not over tighten the fitting. It may crack or break.
Either remove or bend the original supply line out of the way.
5b-3. Refer to steps 5a-3 and 5a-4 to install the fuel supply line for the CP3.
ENGINE LINE INSTALLATION CP3 2003-2004
TOOLS NEEDED:
- 17mm Wrench or Socket
- 13/16” Wrench or Extra Deep Socket
- Clean Motor Oil or ATF
- Hose Cutters or a way to cut Fuel Line
PARTS NEEDED:
- (1) WAP102 Injection Pump Fitting
- (1) 1P-5-DS Sealing Washer
- (1) FQC1290 1/2” 90deg Quick Connect Fitting
- (1) HS20 or Fuel Line
WAP102
1P-5-DS
Figure 23
Figure 22

19
6-1. Cut the filler tube as illustrated in figure 21. Loose assemble clamps on each end
of filler tube before the return tee (001-4A-1-0150) is pushed in. Install the filler
return tee with the arrows pointing towards the fuel tank (figure 22). Failure to do
so will cause fuel to spray up the filler tube and not down it. The finished product
should look like figure 23.
6-2. Assemble one end of the hose (Reference section 4) using Fuel line end
FQC3890 and plug it into the “Return” J2044 fitting installed in the AirDog®
(Figure 24). A “click” will be heard once the fitting is properly connected.
6-3. Run the fuel line along the frame as mentioned in step 4-3 to the filler neck tee.
Cut the fuel line to length and insert fuel line end FQC12S per step 4-1. Once the
connector is installed, connect it to the male J2044 fitting in the filler neck tee
(001-4A-1-0175). A “click” will be heard once properly connected.
TOOLS NEEDED:
- Clean Motor Oil or ATF
- Hose Cutters or a way to cut Fuel Line and the Filler Neck
PARTS NEEDED:
- (1) 001-4A-1-0150 1.5” Filler Neck Return Tee with Clamps
- (1) FQC3890 3/8“ 90deg Quick Connect Fitting
- (1) FQC12S 1/2” Straight Quick Connect Fitting
- (1) HS20 or HS14 Fuel Line
Towards
Tank
Figure 21 Figure 22 Figure 23
FQC3890
Figure 24
FQC12S Figure 25
RETURN LINE INSTALLATION
This manual suits for next models
2
Table of contents
Popular Automobile Accessories manuals by other brands

Rola
Rola PMX080 instructions

DRAGONFIRE
DRAGONFIRE 01-1109 quick start guide

Vais Technology
Vais Technology GSR Generation 2 Series owner's manual

Sirius Satellite Radio
Sirius Satellite Radio XM Sky Dock XVSAP1V1 quick guide

Malide
Malide MLD-B02 user manual

Metra Electronics
Metra Electronics 99-7013 installation instructions