manuals.online logo
Brands
  1. Home
  2. •
  3. Brands
  4. •
  5. PureLink
  6. •
  7. Transmitter
  8. •
  9. PureLink Luxi Presenter LU-TPR-150CR User manual

PureLink Luxi Presenter LU-TPR-150CR User manual

© PureLink GmbH
Innovation German Enterprises.Know-How. Quality. Design.
PureLink GmbH | Von-Liebig-Straße 10 | 48432 Rheine | Germany | Tel.: 0049 (0)5971-800 299-0 | E-mail: info@purelink.de | Internet: www.purelink.de
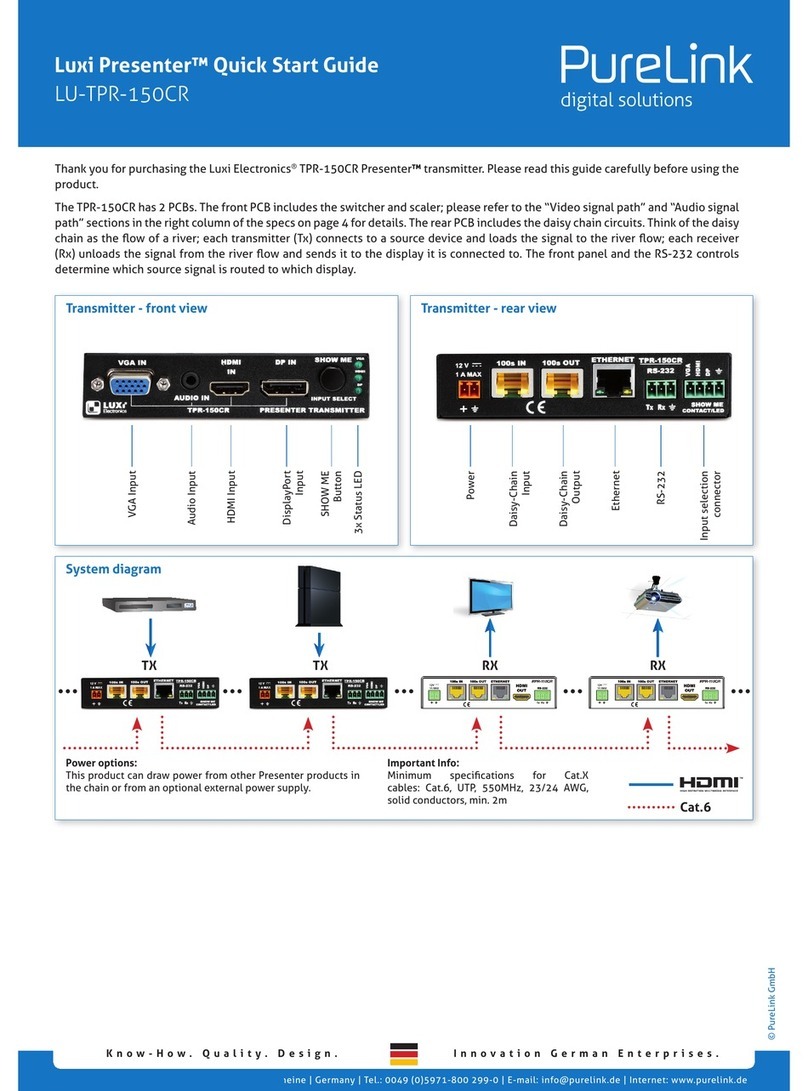
Transmitter - front view Transmitter - rear view
Thank you for purchasing the Luxi Electronics®TPR-150CR Presenter™transmitter. Please read this guide carefully before using the
product.
The TPR-150CR has 2 PCBs. The front PCB includes the switcher and scaler; please refer to the “Video signal path” and “Audio signal
path” sections in the right column of the specs on page 4 for details. The rear PCB includes the daisy chain circuits. Think of the daisy
chain as the ow of a river; each transmitter (Tx) connects to a source device and loads the signal to the river ow; each receiver
(Rx) unloads the signal from the river ow and sends it to the display it is connected to. The front panel and the RS-232 controls
determine which source signal is routed to which display.
TX TX RX RX
TITEL 01
System diagram
Audio Input
Daisy-Chain
Input
VGA Input
Power
HDMI Input
Daisy-Chain
Output
3x Status LED
Input selection
connector
DisplayPort
Input
Ethernet
SHOW ME
Button
RS-232
Luxi Presenter™ Quick Start Guide
LU-TPR-150CR
Power options:
This product can draw power from other Presenter products in
the chain or from an optional external power supply.
Important Info:
Minimum specications for Cat.X
cables: Cat.6, UTP, 550MHz, 23/24 AWG,
solid conductors, min. 2m Cat.6
© PureLink GmbH
Innovation German Enterprises.Know-How. Quality. Design.
PureLink GmbH | Von-Liebig-Straße 10 | 48432 Rheine | Germany | Tel.: 0049 (0)5971-800 299-0 | E-mail: info@purelink.de | Internet: www.purelink.de
The captive screw plugs for power, RS-232 and contact controls are
supplied with the unit. Separate the wires about 2,5cm long; strip o
precisely 5mm of the wires insulation from the end.
This product draws power from an external 12V power supply sold se-
parately (Luxi LU-PS-XXX). Do NOT plug the power supply con nector
into any other sockets; this could cause permanent damage to the
product and the warranty will be void.
Identify the positive and negative leads of the power supply before
assembly. When using a 3rd party PSU this must be checked before
assembly. CAUTION - always conrm your PSU connection with
a multimeter before inserting it into the product - a miswired
connection will cause damage to the product and void the waranty!!
Captive screw plug termination
Power options
Mounting options
Captive screw plug termination
The under desk mount is sold separately (LU-UDM-100); the product
also ts many other mounting hardware from Extron, Middle Atlantic,
etc. Only use the type 4-40, 3/16” (5mm) long screws supplied with
the mounting hardware to screw onto the pro duct. Wrong type of screw
could strip the threads; too long screw could touch and short the inter-
nal circuitry , cause permanent damages to the product and void the
warranty.
Luxi Presenter™ Quick Start Guide
LU-TPR-150CR
RS-232 controls
Only the Show Me / input selections can be controlled via the front
panel or external buttons; all other functions can only be controlled
by RS-232. See the RS-232 Setup Guide on our website for further in-
structions. For a detailed list of possible RS-232 commands visit the
downloads on the desired products page.
Pressing the “Show Me” button on the front panel will select the cur-
rent box or toggle through the 3 video inputs. 3 sets of external con-
tact closure push buttons and LEDs can select inputs discretely with
the LED indication; please see wiring diagram. Both front panel and
external LEDs work like this: only one LED associated with the active
input is lit at any given time. When the current box is not selec ted in
the daisy chain, the LED blinks slowly. When the current box is selec-
ted, LED lights up permanently. A RS-232 host connected to the rear
panel can control all functions.
When activated by a RS-232 command, the switcher will select the
last connected input with an active signal as the current input. Auto
swit ching is turned o after any front panel, external button push
or a RS-232 input command. In the default setting, auto switching is
turned o. Note: Due to the nature of the wide varieties of the Dis-
playPort product designs, some DisplayPort source devices may not
trigger the auto switch. Use the manual switch when this happens.
Auto input switching
Please contact your seller directly for local support. See PureLink
Germanys website for RS-232 commands, RS-232 Setup Guide, speci-
cations and manual.
Support
Control options

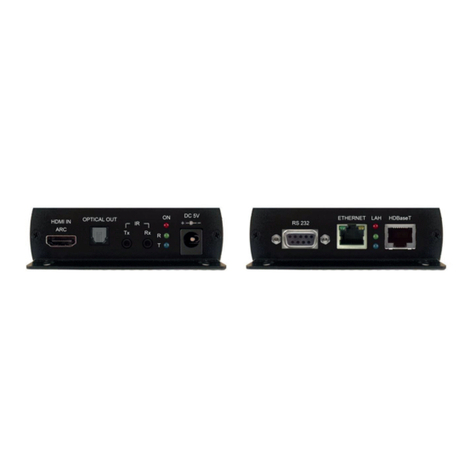
Other PureLink Transmitter manuals

PureLink Luxi Presenter LU-TPR-150CR User manual

PureLink

PureLink Luxi Presenter LU-TPR-150CR User manual

PureLink VIP200H-RX User manual

PureLink

PureLink VIP200H-RX User manual

PureLink HTR Tx User manual

PureLink

PureLink HTR Tx User manual

Popular Transmitter manuals by other brands

M-system KVS instruction manual

M-system

M-system KVS instruction manual

SGM LEKTRA RPL81 manual

SGM LEKTRA

SGM LEKTRA RPL81 manual

Greystone Energy Systems CMD5B1 010 Series installation instructions

Greystone Energy Systems

Greystone Energy Systems CMD5B1 010 Series installation instructions

Marmitek Stream S2 Pro quick start guide

Marmitek

Marmitek Stream S2 Pro quick start guide

Invonics EchoStream EN1233S installation instructions

Invonics

Invonics EchoStream EN1233S installation instructions

Hall Research Technologies Mini-Cat Series user manual

Hall Research Technologies

Hall Research Technologies Mini-Cat Series user manual

Azbil ATT085 user manual

Azbil

Azbil ATT085 user manual

LAUREL LTSE owner's manual

LAUREL

LAUREL LTSE owner's manual

CYP PUV-1510TX Operation manual

CYP

CYP PUV-1510TX Operation manual

Festo SDAT-MHS-SV Series operating instructions

Festo

Festo SDAT-MHS-SV Series operating instructions

Katronic Technologies KATflow 150 Quick start guides

Katronic Technologies

Katronic Technologies KATflow 150 Quick start guides

RKI Instruments 65-2645RK-05-04 Operator's manual

RKI Instruments

RKI Instruments 65-2645RK-05-04 Operator's manual

PR electronics PRetop 5334 manual

PR electronics

PR electronics PRetop 5334 manual

Amana DT01* installation instructions

Amana

Amana DT01* installation instructions

Ashcroft ZX11 Series Installation and maintenance instructions

Ashcroft

Ashcroft ZX11 Series Installation and maintenance instructions

Nailor ELECTRA-FLO G5 Operation and maintenance manual

Nailor

Nailor ELECTRA-FLO G5 Operation and maintenance manual

Monacor JTS PT-920BG/5 instruction manual

Monacor

Monacor JTS PT-920BG/5 instruction manual

Intelix AvoCat AVO-SVA2-WP-F Series installation manual

Intelix

Intelix AvoCat AVO-SVA2-WP-F Series installation manual

manuals.online logo
manuals.online logoBrands
  • About & Mission
  • Contact us
  • Privacy Policy
  • Terms and Conditions

Copyright 2025 Manuals.Online. All Rights Reserved.