PURPLE PANDA USB-C Lavalier Mic Kit User manual

USER GUIDE & SUPPORT
USB-C Lavalier Mic Kit


TABLE OF CONTENTS 4
PARTS GUIDE
MIC PLACEMENT
FUZZY WINDSCREEN
SMARTPHONES WITH 3.5MM EARPHONE PORT
ANDROID - MIC RECORDING SETUP
ANDROID - CALL SETUP
ANDROID - MIC NOT RECOGNIZED
IPHONE - MIC RECORDING SETUP
IPHONE - CALL SETUP
TABLET - MIC RECORDING SETUP
TABLET - CALL SETUP
IPAD - MIC RECORDING SETUP
IPAD - CALL SETUP
TROUBLESHOOTING
CONTACT US / NEED MORE HELP?
SPECIFICATIONS
1
2
3
4
5
6
7 -8
9
10
11
12
13
14
15-17
18
19

12
5
PARTS GUIDE
1
3
Microphone with TRRS Connector
9.8ft (3m) Extension Cord with TRRS Connector
Mic & Earphone Connector (for calls)
USB-C Adapter
Fuzzy Windscreen for Windy Environments
1.
2.
3.
4.
5.
4

MIC PLACEMENT 2
The microphone should be positioned directly underneath the
speaker's mouth (as close as possible), without being subject to
clothing rustle. When attaching the microphone, please ensure
the microphone is pointed towards the speaker's mouth.

FUZZY WINDSCREEN
3
The fuzzy windscreen is ideally used for windy environments to
prevent wind noise from distorting the audio quality of the
microphone. For increased wind protection, add the fuzzy
windscreen when recording outdoors by sliding it over the
microphone and ensuring the fur is fluffed up in all directions for
best results. Please remove the foam windscreen on the
microphone first before attaching the fuzzy windscreen.

12
INSERT RECORD
"CLICK"
CONNECT THE
MICROPHONE PLUG
FIRMLY INTO THE
EARPHONE PORT OF
YOUR SMARTPHONE
3UNPLUG 4PLAY
PRESS THE "PLAY"
ICON TO LISTEN TO
YOUR RECORDING
AFTER UNPLUGGING
THE MICROPHONE
ATTACH THE MIC TO
YOUR SHIRT AND
START RECORDING
USING THE PHONE'S
RECORDING APP
TO LISTEN TO YOUR
RECORDING YOU
MUST UNPLUG
THEMICROPHONE
FIRST
RECORDING ON SMARTPHONES WITH 3.5MM
EARPHONE PORT
FOR DEVICES WITHOUT A 3.5MM EARPHONE PORT, READ
FURTHER INSTRUCTIONS
4

MIC
CONNECT THE MIC PLUG FIRMLY
UNTIL YOU HEAR A “CLICK”
ANDROID SMARTPHONES WITHOUT AN EARPHONE PORT
REQUIRE THE USB-C ADAPTER (INCLUDED)
MIC
CONNECT ALL PLUGS FIRMLY
UNTIL YOU HEAR A “CLICK”
ANDROID - MIC RECORDING SETUP
USB-C Adapter
FOR ANDROID SMARTPHONES WITH A 3.5MM EARPHONE PORT:
CONNECT THE MIC PLUG FIRMLY INTO THE EARPHONE PORT OF
YOUR SMARTPHONE
IMPORTANT: TO LISTEN TO YOUR RECORDING YOU MUST UNPLUG
THEMIC OR USE THE "MIC & EARPHONE CONNECTOR" - SEE NEXT PAGE
5

6
ANDROID - CALL SETUP
Mic
Mic & Earphone
Connector
Plug earphones to listen
to playback or during call
CONNECT ALL PLUGS FIRMLY
UNTIL YOU HEAR A “CLICK”
CONNECT ALL PLUGS FIRMLY
UNTIL YOU HEAR A “CLICK”
Mic & Earphone
Connector
Plug earphones to listen
to playback or during call
Mic
ANDROID SMARTPHONES WITHOUT AN EARPHONE PORT REQUIRE
THE USB-C ADAPTER (INCLUDED)
USB-C Adapter
USE THE FOLLOWING CONNECTION
FOR ANDROID SMARTPHONES
WITH A 3.5MM EARPHONE PORT

ANDROID - MIC NOT RECOGNIZED
7
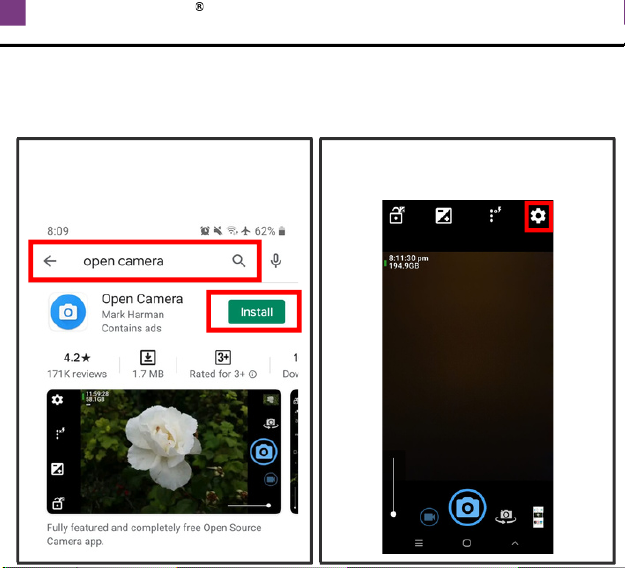
SOME ANDROID PHONES REQUIRE AN EXTERNAL APP FOR THE
MIC TO WORK. DOWNLOADING THE OPEN CAMERA APP WOULD
BE AN EASY FIX, PLEASE TAKE THE FOLLOWING STEPS:
1. Launch the Play Store and
search for "Open Camera" then
press on "Install"
2. Launch the Open Camera app
then press on the settings icon

ANDROID - MIC NOT RECOGNIZED
3. Select Video Settings... Audio Source External Mic
Then create your video recording using the Open Camera app
8

IPHONE - MIC RECORDING SETUP
NOT INCLUDED: LIGHTNING TO 3.5 MM
HEADPHONE JACK ADAPTER REQUIRED
Newer iPhone models require "Lightning to 3.5mm Headphone Jack
Adapter" - Sold Separately by Apple. It is recommended that it's
bought directly from Apple in order to guarantee quality.
iPhone SE (2016) and older models
CONNECT THE MIC PLUG FIRMLY UNTIL YOU HEAR A “CLICK”
9
IMPORTANT: TO LISTEN TO YOUR RECORDING YOU MUST UNPLUG
THEMIC OR USE THE "MIC & EARPHONE CONNECTOR" - SEE NEXT PAGE

IPHONE - CALL SETUP 10
Newer iPhone models require "Lightning to 3.5mm Headphone Jack
Adapter" - Sold Separately by Apple. It is recommended that it's
bought directly from Apple in order to guarantee quality.
iPhone SE (2016) and older models
Mic
Mic & Earphone
Connector
Plug earphones to listen
to playback or during call
Not Included
CONNECT ALL PLUGS FIRMLY
UNTIL YOU HEAR A “CLICK” Mic
Mic & Earphone
Connector
Plug earphones to listen
to playback or during call
CONNECT ALL PLUGS FIRMLY
UNTIL YOU HEAR A “CLICK”

FOR MODELS WITH A 3.5MM EARPHONE PORT
CONNECT THE MIC PLUG DIRECTLY INTO THE TABLET
Mic
CONNECT ALL PLUGS FIRMLY
UNTIL YOU HEAR A “CLICK”
Mic
CONNECT THE MIC PLUG FIRMLY UNTIL YOU HEAR A “CLICK”
11
IMPORTANT: TO LISTEN TO YOUR RECORDING YOU MUST UNPLUG
THEMIC OR USE THE "MIC & EARPHONE CONNECTOR" - SEE NEXT PAGE
TABLET - MIC RECORDING SETUP
USB-C Adapter
TABLETS WITHOUT AN EARPHONE PORT REQUIRE THE USB-C
ADAPTER (INCLUDED)

CONNECT ALL PLUGS FIRMLY
UNTIL YOU HEAR A “CLICK”
12
TABLET - CALL SETUP
Mic
Mic & Earphone
Connector
Plug earphones to listen
to playback or during call
CONNECT ALL PLUGS FIRMLY
UNTIL YOU HEAR A “CLICK”
Plug earphones to listen
to playback or during call
Mic
Mic & Earphone
Connector
USB-C Adapter
USE THE FOLLOWING
CONNECTION FOR TABLETS
WITH A 3.5MM EARPHONE PORT

NEWER MODELS (12.9‐INCH IPAD PRO, 11‐INCH IPAD PRO, ETC.)
REQUIRE THE USB-C ADAPTER (INCLUDED)
CONNECT ALL PLUGS FIRMLY UNTIL
YOU HEAR A “CLICK”
FOR MODELS WITH A 3.5MM EARPHONE PORT
(IPAD AIR, IPAD MINI, AND CLASSIC IPAD),
CONNECT THE MIC PLUG DIRECTLY INTO IPAD
MIC
MIC
CONNECT THE MIC PLUG FIRMLY
UNTIL YOU HEAR A “CLICK”
IPAD - MIC RECORDING SETUP
IMPORTANT: TO LISTEN TO YOUR RECORDING YOU MUST UNPLUG
THEMIC OR USE THE "MIC & EARPHONE CONNECTOR" - SEE NEXT PAGE
13
USB-C Adapter

Mic
Mic & Earphone
Connector
Plug earphones to listen
to playback or during call
CONNECT ALL PLUGS FIRMLY
UNTIL YOU HEAR A “CLICK”
CONNECT ALL PLUGS FIRMLY
UNTIL YOU HEAR A “CLICK”
IPAD - CALL SETUP 14
Mic
Mic & Earphone
Connector
Plug earphones to listen
to playback or during call
USB-C Adapter

TROUBLESHOOTING
When connecting adapters to each other, connect them firmly
until you hear a “CLICK”. Many issues happen due to the
adapters not being connected properly. Make sure you are
using the correct combination of adapters for your device by
referring to the instructions in this guide.
15
Record an audio recording (preferably with a smartphone)
while scratching the foam windscreen on the mic. Unplug the
mic and listen to the recording, if the mic is working, the
scratching sound should be loud which means the mic is active.
HOW TO TEST IF YOUR MIC IS WORKING:
IMPORTANT:

TROUBLESHOOTING
1. When connecting adapters to each other, connect
them firmly until you hear a “CLICK”. Many issues
happen due to the adapters not being connected
properly. Make sure you are using the correct
combination of adapters for your device by referring to
the instructions in this guide.
BUZZING NOISES IN RECORDING?
2. Ensure that Bluetooth and NFC (near field
communication) are turned off on the device, and you
are not next to a WiFi Router.
3. Check if the microphone cable or extension cables
are crossing other cables that are causing electrical
interference. This is especially possible close to power
cables.
16

TROUBLESHOOTING
4. Check if the microphone cable or extension cables
are close to or wrapped around other electrical devices
(including the one you are recording with).
BUZZING NOISES IN RECORDING?
5. Try the microphone with a smartphone to ensure
there is not a problem with the microphone itself. If you
are trying to use any of the adapters, ensure that they
are plugged in firmly (until you hear a click - see image
on page 15) and that the correct combination of
adapters is being used.
17
Table of contents
Other PURPLE PANDA Microphone manuals