PURSUIT PRO-9649b User manual

128-8191
1 of 10
Model PRO-9649b
InstallationManual
SELECTABLEFEATURES
Note: The method of manual override can either be selected to operate from the valet switch or operate as custom
code. Be certain to place a check mark indicating the method used in the box located on the last page of
the owner's manual.
Note: When both Passive Arming and Voltage Sensing are selected, you must hardwire the driver’s door pin
switch in order to begin the passive arming sequence.
RF Programmable Features :
Feature Selection 1 Chirp 2 Chirps 3 Chirps 4 Chirps Default
1st Door L/UL 1 Sec. 3.5 Sec. 1 Sec L, Dbl. U/L 1 Sec.
2nd Accy Lock Auto Lock On Auto LockOff Auto LockOff
3rdAccy. UL Auto UL Dr. Auto UL All AutoUL Off AutoUL Off
4th Headlights On Arm On Disarm On Both Off Both
5th Passive Locks Passive Active Active
6th Passive/Active Arm Passive Arm ActiveArm ActiveArm
7th Voltage Sense Voltage Sense Hardwire Hardwire
8th Siren/Horn Siren/Horn Siren Only Horn Only Siren/Horn
9th Horn Chirp 10mS 16mS 30mS 16mS
10th Override Method Custom Code Valet Valet
11th Two Step Unlock On Off Off
12th Chirp Delete From Tx On Off Off
To program these selectable features;
Action System Response
Turn ignition on No response
Press and release the valet switch 3 times 1 Chirp - LED 1 flash
Within 3 seconds, turn ignition Off Short chirp, then long chirp
First Then On 1 chirp = 1 second door locks
Press transmitter Lock button to change 2 chirps = 3.5 second door locks
Press transmitter Lock button to change 3 chirps = 1 sec. lock, dbl 1 sec. unlock
or
Second Press and release the valet switch 2 chirps = auto locks off
Press transmitter Lock button to change 1 chirp = auto locks on
or
Third Press and release the valet switch 3 chirps = auto unlock off
Press transmitter Lock button to change 1 chirp = auto unlock drivers door only
Press transmitter Lock button to change 2 chirps = auto unlock all doors
or

128-8191
2 of 10
Page 2
Fourth Press and release the valet switch 3 chirps = headlight output when arming and disarming
Press transmitter Lock button to change 4 chirps = headlight output off
Press transmitter Lock button to change 1 chirp = headlight output when arming
Press transmitter Lock button to change 2 chirps = headlight output when disarming
or
Fifth Press and release the valet switch 2 chirps = active locks
Press transmitter Lock button to change 1 chirp = passive locks
or
Sixth Press and release the valet switch 2 chirps = active arming
Press transmitter Lock button to change 1 chirp = passive arming
or
Seventh Press and release the valet switch 2 chirps = hardwire
Press transmitter Lock button to change 1 chirp = voltage sense
or
Eighth Press and release the valet switch 1 chirp = siren and horn output
Press transmitter Lock button to change 2 chirps = siren output only
Press transmitter lock button to change 3 chirps = horn output only
or
Ninth Press and release the valet switch 2 chirps = horn chirp output 16mS
Press transmitter Lock button to change 3 chirps = horn chirp output 30mS
Press transmitter Lock button to change 1 chirp = horn chirp output 10 mS
or
Tenth Press and release the valet switch 2 chirps = valet switch override operation
Press transmitter Lock button to change 1 chirp = custom code override operation
or
Eleventh Press and release the valet switch 2 chirps = 2 step unlock off
Press transmitter Lock button to change 1 chirp = 2 step unlock on
or
Twelfth Press and release the valet switch 2 chirps = chirp delete from transmitter inactive
Press transmitter Lock button to change 1 chirp = chirp delete from transmitter active
Press and release the valet switch Exit program mode
or
Turn ignition key off Exit program mode
Note: Once you enter the feature programming mode, do not allow more than 15 seconds to pass between steps,
or the programming will be terminated.
INSTALLATIONOF MAJOR COMPONENTS
Note: This system allows the transmitter to be programmed for single button lock/unlock or separate
button lock/unlock. The receiver is set up as follows:
Channel#1 = Lock/Unlock/Unlock 2 &Panic
Channel#2 = If Programmed, Unlock/Unlock 2 & Panic
Channel#3 = Channel3&AlternateChannel3
Channel#4 = Channel4 Output
Channel#5 = Channel5Output (If so Equipped)
Duringthe program routine, if a transmitterbuttonisprogrammed into receiver channel 2, thentheunitwill
alwayshaveseparatelock/unlock from thattransmitter.

128-8191
3 of 10
Page 3
Ifduring theprogramsequence receiverchannel1 isprogrammed,and receivedchannel2 isskippedover,
asindicatedin the transmitted program guide, then the unit will operate as a single buttonlock/unlockunit
fromthattransmitter.
It is possible to have one transmitter programmed for single button lock/unlock, and one transmitter
programmedforseparate button lock/unlock if the customer sodesires.
Ifyou inadvertently incorrectly programthetransmitter,pleasereadthe information on re-prioritizingfound
inthetransmitterprogrammingguide.
Control Module:
Select a mounting location inside the passenger compartment (up behind the dash), and secure it using
the two screws provided. The control module can also be secured in place using cable ties.
Do not mountthecontrol module in theenginecompartment, as it isnotwaterproof.Youshould also avoid
mountingthe unit directly ontofactoryinstalledelectronic components. These componentsmaycauseRF
interference,whichcanresultinpoor transmitter range or intermittent operation.
Siren:
Select a mounting location in the engine compartment that is well protected from access below the
vehicle.Avoid areasnear highheatcomponentsormovingparts withintheenginecompartment.Toprevent
waterretention,theflaredendofthesirenmustbepointeddownwardwhenmounted.
Mount the siren to the selected location using the screws and bracket provided.
Hood or Trunk Pin Switch:
A pin switch is included for use in protecting the hood or trunk (or hatchback) of the vehicle. The switch
must always be mounted to a grounded, metal surface of the vehicle. It is important to select a location
where water cannot flow or collect, and to avoid all drip gutters on hood and trunk fender walls. Choose
locations that are protected by rubber gaskets when the hood or trunk lid is closed.
The pin switch can be mounted using the bracket provided, or direct mounted by drilling a ¼ “ diameter
mountinghole.Keepinmindthat when properly mounted, the plunger of the pin switch should depress at
least ¼ “ when the hood or trunk lid is closed.
Pushbutton LED Combination Switch:
Selecta mounting location known andaccessibletothe operator of the vehicle. A dashboard plug or front
dashboardpanel is desirable becausethepushbuttonLED assembly needs theLEDtobe visible from the
outsideof the vehicle. It will be used forvaletmodes,programming features, programming transmitters,
andforoverridingthesystem when the transmitter is not functioning. Inspect behind the chosen location
to insure that adequate clearance is allowed for the body of the switch, and also that the drill will not
penetrate any existing factory wiring or fluid lines. Drill a 5/16" or 8mm hole in the desired location and
mount the switch by passing the connectors, one at a time, through the panel from the front side and
pressing on the bezel until the switch is fully seated.
Shock Sensor:
Select a solid mounting surface for the shock sensor on the firewall inside the passenger compartment,
andmountthesensorusingthe two screws provided. The shock sensor can also be secured to any fixed
brace behind the dash using tie straps.
Whichever mounting method is selected, make certain that the sensitivity adjustment is accessible for
use later in the installation.
WIRING THE SYSTEM
Large 10 Pin Edge Connector:
Red/White (5Amp) & Red (15Amp) Fused Wires: +12 VDC Constant Battery Source
This wire controls the sensitivity of the voltage sensing circuit, which detects the turning on of an interior
light when a door is opened. It will also detect the switching on of parking or headlamps, and in many

128-8191
4 of 10
Page 4
caseswilltriggerthealarmwhenathermostaticallycontrolledelectronicradiatorcoolingfanswitcheson.
When installing this system into vehicles with electronic “after fans“, it is recommended you disable the
voltagesensecircuit.
Involtage sensing applications, thecloserto the battery that thered wire is connected, theless sensitive
thevoltage sense circuitry will be. Moving this connection pointtothefusepanelwill increase the sensitiv-
ity, and connecting to the courtesy lamp fuse in the vehicle will provide maximum sensitivity of the voltage
sense circuit. Be certain to set selectable feature # 7 to 1 chirp, Voltage Sense On.
When hardwiring the control module to pin switches at all entry points, the voltage sense circuit must be
disabled.
White w/ Black Trace Wire: Positive Output to Siren
Route this wire through a rubber grommet in the firewall, and to the siren location.
Connectthewhite/black wire to the positive wire of the siren. Secure the black ground wire of the siren to
chassisground.
2 Dark Green w/ White Trace Wires: Entry Illumination
Thedarkgreenw/white trace wires provide the entry lighting, and flash the vehicle’s dome light whilethe
alarm is sounding. These are NO (normally open) and COM (common) contacts of an on board, 10 Amp
maximumrelay.
Connect one of the dark green w/ white trace wires to the wire in the vehicle that turns on the interior
courtesy light. Connect the other dark green w/ white trace wire to either chassis ground if the vehicle
switchesgroundtothe courtesy lights, or a fused + 12 volt constantbattery sourceif the vehicleswitches
12 volts to the courtesy lights.
Note: When wiring this feature in vehicles with factory equipped delay lighting circuits, it is
best to connect to the output of the timer which feeds the dome light, rather than at the
door switch. This will ensure that the dome light pulses when the alarm is triggered.
Black Wire: Chassis Ground
Connectthiswire to a solid, metal part of the vehicle’s chassis. Do not confuse this wirewiththethinblack
antennawirethat exitsthecontrolmoduleindependently.
2 Dark Blue Wires: DelayedPulsedOutput / Channel 3 (Optional Device)
Typically UsedFor RemoteElectricTrunk ReleaseOperation, whenactivated, thisoutput providesa800ms
closureofthe on board relay.
Thedark bluewiresare controlledviaan independentRFchannelfrom thekeychaintransmitter.These are
the N.O. and COMMON contacts of an on board, 10 Amp relay, so they can be connected to positive or
negativeswitchedcircuits.
Connectone of the darkbluewiresto the output oftheoptionaldevice you wish tocontrol,andconnect the
other dark blue wire to either chassis ground, or to a fused + 12 VDC battery source, depending on the
inputrequiredtoactivatethedeviceyouarecontrolling.
WARNING ! Never attempt to pull more than 10 Amperes of current through this relay. The circuit
will be damaged. Always check the requirements of accessories prior to connecting
them to the circuit.
Orange Wire: 300 mAGround Output WhenArmed - N. C. Starter Disable
This wire is provided to control the starter cut relay. Connect the orange wire to terminal 86 of the relay.
Connect relay terminal 85 to an ignition wire in the vehicle that is live when the key is in the on and crank
positions, and off when the key is in the off position.
(Thisiswhere the yellow wire from the alarm shouldbe connected).
Cut the low current starter solenoid wire in the vehicle, and connect one side of the cut wire to relay
terminal 87A. Connect the other side of the cut wire to relay terminal 30.

128-8191
5 of 10
Page 5
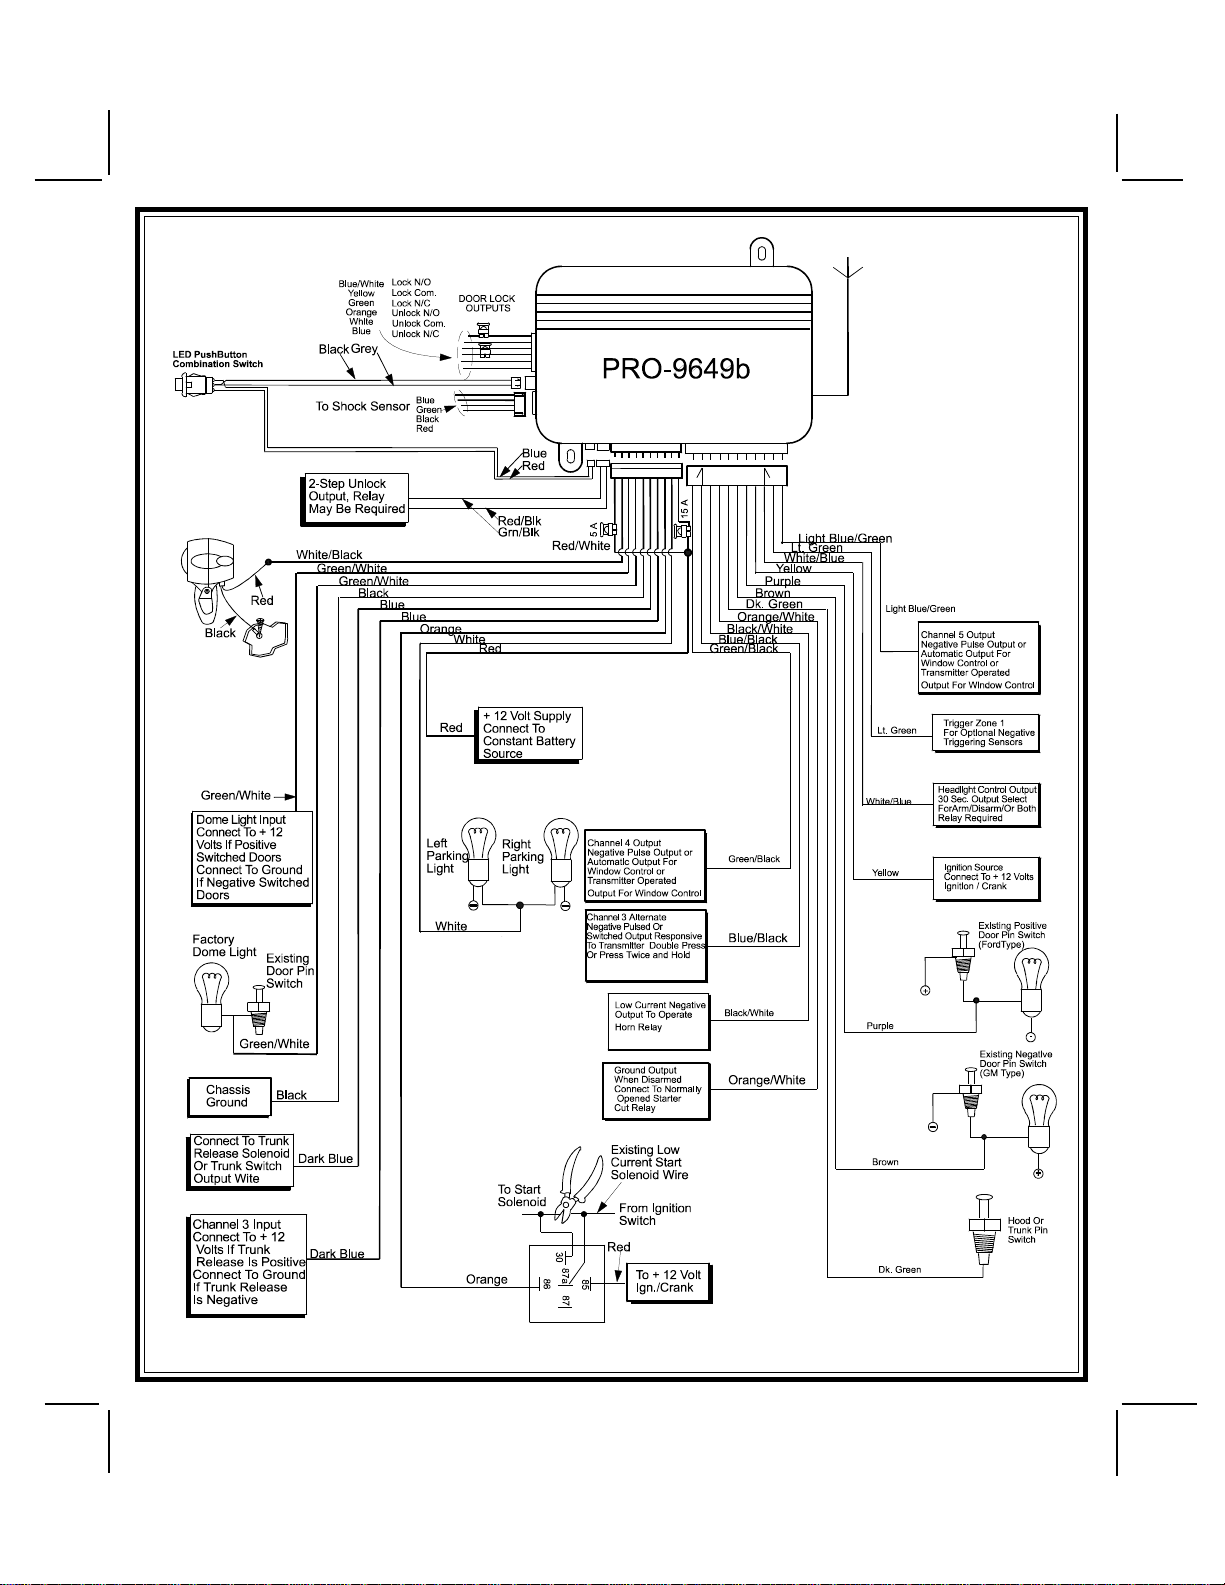
Note: This is a normally closed starter cut arrangement, and when power is removed from the
security system, the starter disable feature will not operate, allowing the vehicle to start.
Audiovox does not recommend using the Orange wire to interrupt anything but the
starting circuit of the vehicle.
White Wire: +12 VDC Pulsed Parking Light Output (15 Amp Max.)
Thiswireis provided to flash the vehicle’s parking lights. Connectthewhitewiretothepositive side of one
ofthevehicle’sparking lights.
Mini 11 Pin Edge Connector :
Dark Green w/ Black Trace Wire: Latching Output / Channel 4
This wire latches to ground via an independent RF channel from the keychain transmitter. This is a
transistorized, low current (300 mA) output, and should only be used to drive an external relay coil.
This wire provides an immediate ground signal, and stays at ground for as long as the button(s) on the
keychaintransmitterremainpressed.
WARNING ! Connecting this wire to the high current switched output of trunk release circuits will
damage the control module.
Connect this output to terminal 86 of the AS 9256 relay (or an equivalent 30 Amp automotive relay), and
wire the remaining relay contacts to perform the selected function of channel 4.
Dark Blue w/Black Trace Wire:Alternate Channel 3 Output (Dbl. Push Required)
This wire is controlled from the transmitter button programmed to the receiver's channel 3. By double
pressing this the transmitter button, this output will become active for 1 second. This is a transistorized,
low current (300 mA) output, designed to provide an output only when the transmitter is intentionally
operated, such as is the case with remote start add on modules. If you require more than 300mA drive
from this output, you must drive an external relay coil, and arrange the relays contacts to preform the
specifiedfunction.
Note: Pressingthetransmitter button, then immediately pressing and holding it willcause this outputto
be active as long as the transmitter button is depressed.
Black w/ White Trace Wire: 300 mA Horn Output
The black w/ white trace wire is provided to beep the vehicle’s horn. This is a transistorized low current
output, and should only be connected to the low current ground output from the vehicle’s horn switch.
Ifthevehicleusesa+12VDChornswitch,thenconnecttheblackw/ white trace wire to terminal 86 of the
AS 9256 relay (or an equivalent 30 Amp automotive relay) and connect relay terminal 85 to a fused +12
VDC battery source. Connect relay terminal 87 to the vehicle’s horn switch output, and connect relay
terminal 30 to a fused +12 VDC battery source.
Orange w/ White Trace Wire: 300 mA GROUND OUTPUT WHEN DISARMED - N. O. STARTER
DISABLE (Optional Relay Required).
Thiswireisprovided to control the startercut relay.Connecttheorange w/white wire to terminal 86 of the
relay. Connect relay terminal 85 to an ignition wire in the vehicle that is live when the key is in the on and
crank positions, and off when the key is in the off position. (This is where the yellow wire from the alarm
shouldbeconnected).
Cut the low current starter solenoid wire in the vehicle, and connect one side of the cut wire to relay
terminal 87. Connect the other side of the cut wire to relay terminal 30.
Note: This is a normally opened starter cut arrangement, and when power is removed from the
security system, the starter disable feature will remain operational, and the vehicle will
not start. Audiovox does not recommend using the Orange w/ White trace wire to
interrupt anything but the starting circuit of the vehicle.
Dark Green Wire: (- ) INSTANTTRIGGER ZONE
Thisis aninstantonground triggerwire.It must beconnectedto the previouslyinstalledhood and trunkpin
switches.

128-8191
6 of 10
Page 6
Brown Wire: -DOORTRIGGER
If the vehicle’s courtesy light switches have a ( - ) ground output when the door is opened (GM and most
Imports), you must connect this wire to the negative output from one of the door switches.
WARNING: Do not use the brown wire if the vehicle has +12 volt output type door switches.
(SeePurpleWire).
Noteforvehicleswithinteriordelaylightingseeprogrammingundertitle"CompletingTheInstallation".
Purple Wire: + DOOR TRIGGER
Ifthe vehicle’s doorcourtesylight switches havea+12 volt outputwhenthe door isopened(mostFords and
some Imports), you must connect this wire to the positive output from one of the door switches.
WARNING: Do not usethe purplewireifthe vehicle has ground output type doorswitches.
(SeeBrownWire).
Noteforvehicleswithinteriordelaylightingseeprogrammingundertitle"CompletingTheInstallation".
Yellow Wire: +12VDCIGNITIONSOURCE
Connect this wire to a source that is live when the key is in the on and crank positions. Be sure that this
source is off when the key is in the off position.
White w/ Blue Trace Wire: Low Current (-) Ground Headlight Output
The White w/ Blue Trace wire is provided to operate the optional headlamp illumination feature of the
system. This is a low current (300mA) output and must be connected to an external relay to control the
high current switching circuit of the vehicle's headlamps. To use this option, connect the White /w Blue
Trace wire to terminal # 86 of a P&B VF45F11 relay or equivalent. Connect Terminals #85 and # 30 to a
fused+12 Voltssourcewithacurrentcapabilityequaltoor in excess of thefactoryheadlampfuse. Connect
terminal # 87 of the relay to the switched +12 volt wire feeding the vehicle's headlamp circuit.
Note: Forgroundswitched headlamp circuits, connect the White /w BlueTrace wireto terminal# 86ofa
P&B VF45F11 relay or equivalent. Connect Terminal #85 to a fused + 12 Volts source. Connect
terminal # 30 to a clean chassis ground. Connect terminal # 87 to the ground switched headlamp
controlwireinthevehicle.
Light Green Wire: (-) Instant Trigger Zone 1
This is a instant on ground trigger input intended for the connection of optional triggering devices. The
ground trigger output wire of motion detectors, microwave detectors, or glass break detectors, can be
connectedto this Light Greentrigger input wire.
Light Blue/Green Wire: DELAYED 300 mAPULSED OUTPUT / CHANNEL5
The light blue/green wire pulses to ground via an independent RF channel from the keychain transmitter.
This is a transistorized, low current output, and should only be used to drive an external relay coil.
WARNING: Connecting the light blue/green to the high current switched output of trunk release circuits,
some remote start trigger inputs, will damage the control module.
Connectthelightblue/green to terminal 86 of the AS-9256 relay (or equivalent 30 A automotive relay), and
wire the remaining relay contacts to perform the selected function of channel 3.
2 Pin Blue Connector: Valet Switch
Routethegreyand black wires in the 2 pin connector from thevalet switchto the controlmodule, and plug
it into the mating blue connector on the side of the module.
2 Pin White Connector: Dash Mounted LED
Routethe redandbluewires in the2pin white connectorfromthe LED tothecontrol module, andplugit into
the mating white connector on the side of the module.
4 Pin White Connector: Shock Sensor
Routethered, black, green and blue wires in the 4pinwhiteconnectorfromtheshock sensor to the control
module,andplug one end into the shock sensor, and the other end into themating whiteconnector onthe
sideof the module.

128-8191
7 of 10
Page 7
Normal Door Lock Operation
6 Pin Door Lock Output Connector:
Theorange,bluew/whitetracer,yellow, white, green, and bluewires in the 6 conductor connector are the
contacts of the on board door lock relays. The function of each of these wires is listed below;
Lock Relay Unlock Relay
Blue w/ White Trace = N.O. Relay Contact Orange= N.O.Relay Contact
Dark Green = N.C. Relay Contact Dark Blue = N.C. Relay Contact
Yellow = Common Relay Contact White = Common Relay Contact
3 Wire Ground Switched Door Lock Circuits:
In this application, the dark green and dark blue door lock wires are not used.
The white and yellow wires must be connected to a chassis ground source.
Theblue w/whitestripe wire istheground pulse“lock“output,and shouldbeconnected tothenegativelock
wireinthevehicle.
Theorangewireisthegroundpulse“unlock“output,andshould be connected to the negative unlock wire
inthevehicle.
3 Wire Ground Switched 2 Step Door Locks
In this application, the Dark Green is not used, the Yellow wire connects to chassis ground, and the
Blue w/White wire connects to the negative switched low current door lock wire, or the lock wire
at the door switch.
Next, locate the drivers door unlock motor wire and cut it at a convenient location to allow wiring of the
WhiteandDark Blue wires, White will connect to the vehicle sideofthecutwireandDark Blue will connect
to the "Unlock Drivers Door Motor" side of the cut wire. Most vehicles door lock/unlock motor legs rest at
ground and switch +12 volts to the door lock/unlock motor legs for operation. If this is the case in the
vehicleyouare working on, connect Orange to a +12voltsource. Intherareinstancethat the vehicle door
lock/unlock motor legs rest at +12 volts and switches ground to the door lock/unlock motors, connect
Orangetochassisground.
ConnecttheGreen/Black wire of the two pin 2nd step unlockconnectortothelowcurrent ground switched
door unlock wire. The Red/Black wire is not used for this application.
3 Wire Positive Switched Door Lock Circuits:
In this application, the dark green and dark blue wires are not used.
The orange and blue w/ white stripe wires must be connected to a +12 volt battery source.
Theyellowwireisthe positive pulse “lock“ output, and should be connected to the positive lockwire in the
vehicle.
Thewhitewireisthepositivepulse“unlock“output,andshouldbeconnectedtothepositiveunlockwirein
thevehicle.
3 Wire Positive Switched 2 Step Door Locks
In this application, the Dark Green is not used, the Blue/White connects to +12 volt source, and the
Yellow wire connects to the positive switched low current door lock wire, or the lock wire at the
door switch.
Next, locate the drivers door unlock motor wire and cut it at a convenient location to allow wiring of the
Whiteand Dark Blue wires. Dark Bluewillconnectto the vehicle side ofthecutwireand White will connect
to the "Unlock Drivers Door Motor" side of the cut wire. Most vehicles door lock/unlock motor legs rest at
ground, and switch +12 volts to the door lock/unlock motor legs for operation. If this is the case in the
vehicleyouare working on, connect Orange to a +12voltsource. Intherareinstancethat the vehicle door
lock/unlock motor legs rest at +12 volts and switches ground to the door lock/unlock motors, connect
Orangetochassisground.
Anoptional relay will be required forthisapplication. ConnecttheGreen/Blackwire of the two pin 2ndstep

128-8191
8 of 10
Page 8
unlock connector to terminal 85 of a VF45F11 P&B relay or equivalent automotive 12 volt relay. Connect
Red/Black to terminal 86. Connect terminal 87 to a fused +12 volt source, and connect terminal 30 to the
low current +12 volt switched wire from the door unlock switch.
5 Wire Alternating Door Lock Circuits:
In this application, it is necessary to cut the existing door lock by - pass wires. These wires run from the
master door lock switch to the slave door lock switch, and then on to the door lock motors.
Cut the existing lock wire, and connect the yellow wire to the slave switch or motor side of the cut wire.
Connect the green wire to the master switch side of the cut wire.
Cut the existing unlock wire, and connect the white wire to the slave switch or motor side of the cut wire.
Connect the blue wire to the master switch side of the cut wire.
The orange and blue w/ white stripe wires must be connected to a fused +12 VDC battery source.
Referto the doorlockwiring supplement forproperconnectionof these wiresintothe various lockingcircuits
availablein current vehicles.
6 Pin Door Lock Output Connector:
When wiring for 2 step unlock operation, you must connect the outputs of the on board unlock relay to the
driver’s door lock motor. Wire these outputs as follows;
Orange = N.O. Relay Contact to +12 VDC Battery
Dark Blue = N.C. Relay Contact to Motor leg switch side
White = Common Relay Contact to Motor leg motor side
Wirethe transistorized negative “all doorsunlock“ output directly to thenegative unlock wire from thedoor
lock switch in vehicles with 3 wire ground switched circuits.
In vehicles with 3 wire positive or 5 wire alternating switched circuits, you must add a 30 Amp automotive
relaytoprovidethe“alldoorsunlock“feature.
Red w/ Black & Green w/ Black 2 Pin Red Connector: 2 Step Unlock Connector
Thegreen w/blacktracerwireprovides a300mA groundpulseoutput fortheall doorsunlocksignal, andcan
beconnectedtothenegativedoorunlock wire in 3 wire negative switched vehicles.
The red w/ black trace wire provides a low current (300 mA) +12 VDC source for those applications that
require a relay for the all doors unlock feature. This wire should be connected to the relay coil only. A
separate +12 VDC source must be used for the high current relay contacts.
Resistive Circuits, As Well As 4 Wire Polarity Reversal and 5 Wire Alternating 12 Volt
Door Lock Control Circuits
Theseapplications require theuseofadditional components whichmayincluderelays, fixed resistors,orfor
convenience,the AS9159DoorLock Interface. RefertotheAUDIOVOX DoorLockWiringSupplement and
orthe Audiovox fax backservice for information on yourparticular vehicle for properly connectingto these
types of circuits.
COMPLETINGTHE INSTALLATION
NOTE:This unit has the ability to learn the dome light delay time, up to 60 seconds. If thevehicle has delay
interior lights, and you wish to avoid three chirp, defect zone, indication normally associated with this type
of interior light, we suggest you learn the interior light delay.
To learn the light delay, start with all doors closed:
(1) Use the transmitter to Lock / Unlock / Lock / Unlock / Lock / Unlock / Lock, the system.
The LED turns on solid to confirm the system entered the learn mode.
(2) Immediately open and close the door of the vehicle to initiate the dome delay.

128-8191
9 of 10
Page 9
Theunitwill monitor the door trigger input Positive, (Purple), and Negative, (Brown) whenactive.
When the dome light turns off, the unit will add 2 seconds then exit the learn mode.
(3) The LED will begin flashing the Armed indication indicating the unit has exited the learn mode and is
armed
Antenna Wire: Be sure to extend the thin black antenna wire to it’s full length, and cable tie into place
whereitcannotbedamaged.Avoidwrapping this wire around major, high current wire looms.
Adjusting the Shock Sensor: Ifused, the sensitivity of the pre-detect circuit is automatically set 30% less
sensitive than the full trigger circuit.
Usingasmallscrewdriver,gentlyturntheadjustmentscrewfullycounterclockwise.(DONOTover turn this
screw. Maximum rotation for this adjustment is 270°). Close the hood and trunk lids, and arm the alarm.
Wait6secondsfortheaccessoriestrigger zone to stabilize, then firmly strike the rear bumper with the side
ofaclosed fist considering the amount of forcerequired tobreak awindow.
CAUTION: Never perform this test on the vehicle’s glass, as you may break the window.
Turn the adjustment screw clockwise ( increasing sensitivity ) about ¼ turn and re-test. Repeat this
procedure untilthe alarm sounds. Ultimately, one firmstriketotherearbumperwillcausethealarm to emit
pre-detectwarning tones.
WARNING ! Setting the sensitivity too high can cause false alarms due to noise vibrations from passing
trucks and heavy equipment. To decrease sensitivity, turn the adjustment screw coun-
terclockwise.
Wire Dressing: Always wrap the alarm wires in convoluted tubing, or with a spiral wrap of electrical tape.
Secure these looms along the routing using cable ties. This will ensure that the alarm wires are not
damagedbyfalling onto hot or sharp moving surfaces in the vehicle.
Operation: Take a few moments to check off the appropriate option boxes in the owner’s manual, and to
fully explain the operation of the system to your customer.
Place the Valet Switch Tag and or the Remote Start Control Switch Tag on their respective switches and
point these out to the customer.

128-8191
10 of 10

128-8191
11 of 10
THISPAGELEFTBLANKINTENTIONALLY

128-8191
12 of 10
© 2007 Audiovox Electronic Corporation, 150 Marcus Blvd., Hauppauge, N.Y. 11788
128-8191
Table of contents
Other PURSUIT Car Alarm manuals

PURSUIT
PURSUIT PR5BZ User manual

PURSUIT
PURSUIT PRO9776E Manual

PURSUIT
PURSUIT PRO 9244 User manual

PURSUIT
PURSUIT PRO-9642 User manual

PURSUIT
PURSUIT PR1BZLR User manual

PURSUIT
PURSUIT PRO-9776C User manual

PURSUIT
PURSUIT PRO-9344FT User manual

PURSUIT
PURSUIT PRO9233E User manual

PURSUIT
PURSUIT PRO-9800 User manual

PURSUIT
PURSUIT PR1BTWZ User manual