Q-See QCW4MP1PT-AU User manual

User Manual
WELCOME!
Congratulations on your latest pur-
chase and welcome to the Q-See
family. This guide will help get your
camera up and running.

1Download the App
Download the Q-see Plus app (the app)
from the App Store on your mobile
device. Once installed, ensure that your
mobile device is connected to your
2.4GHz Wi-Fi network you wish to use for
your camera. Launch the app on your
mobile device.
For iPad Users: Please search in App Store
for“Q-See Plus”. Select “iPhone Only” from
the drop down menu to nd the app.
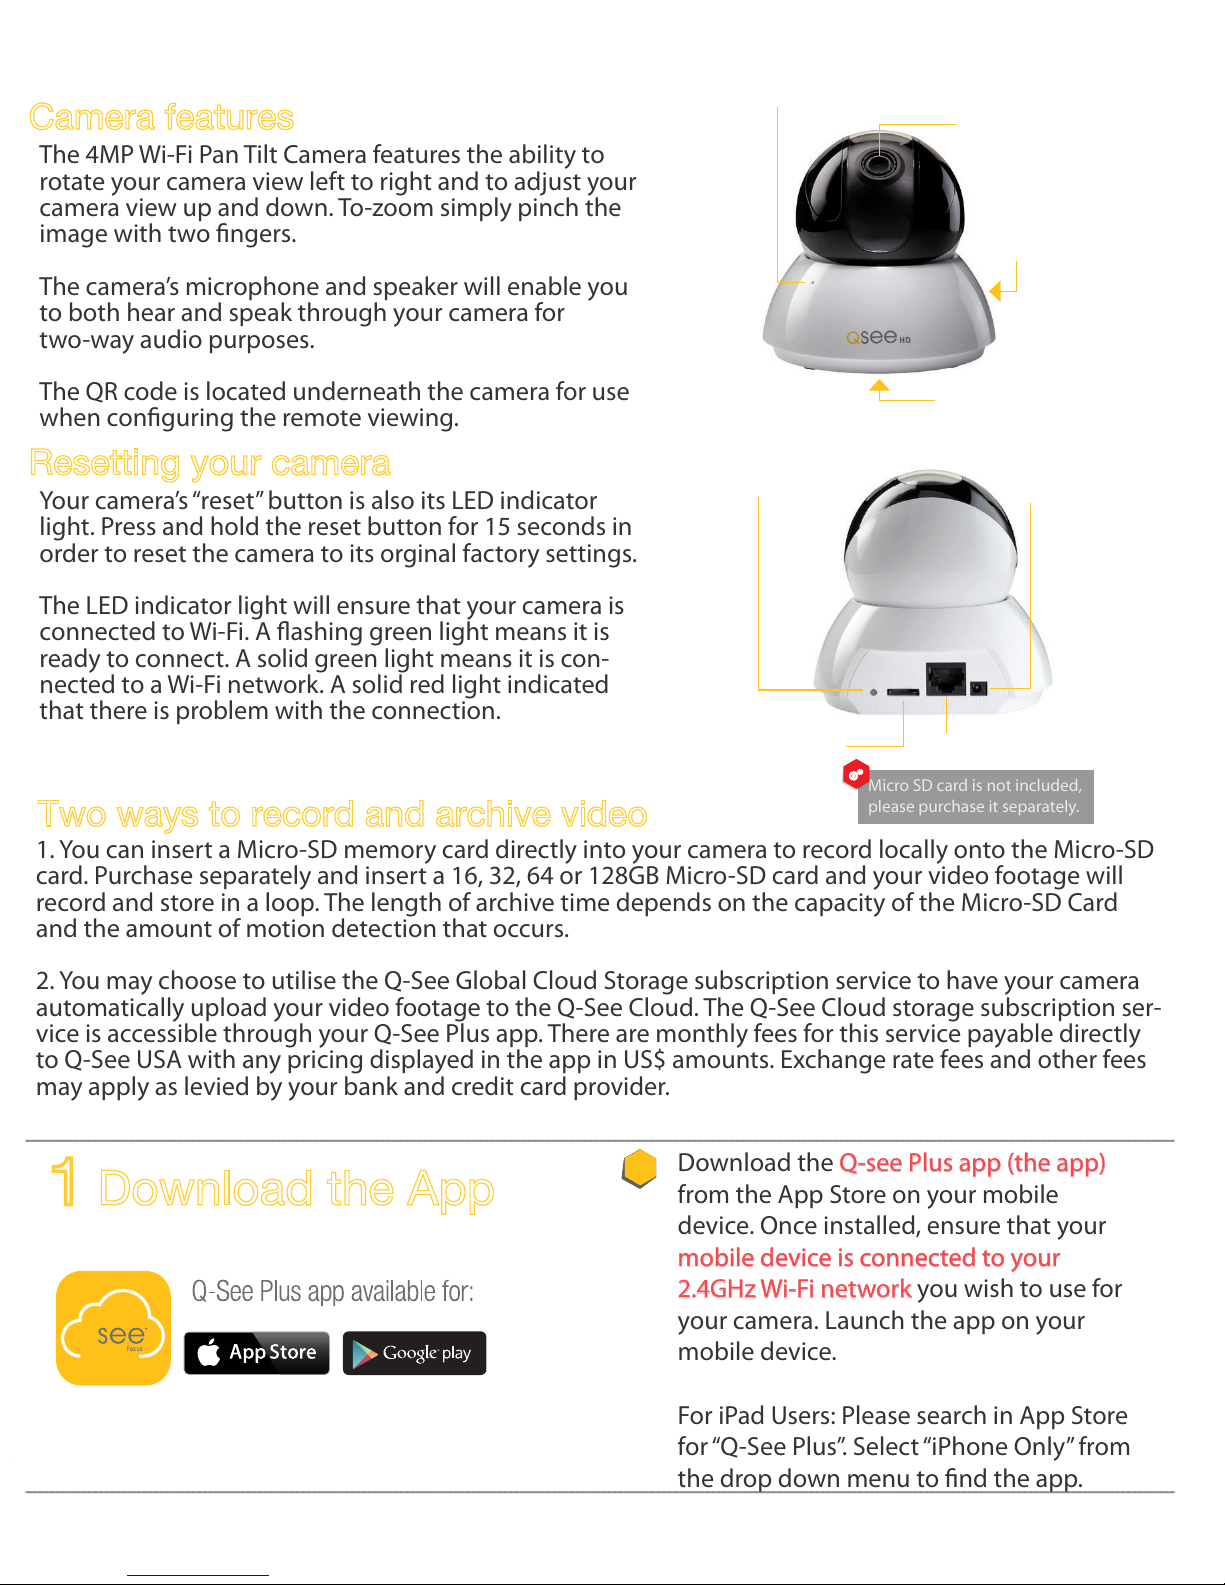
SPEAKER
CAMERA
LENS
MICROPHONE
QR CODE
NETWORK PORT
MICRO SD
CARD SLOT
POWER
PORT
RESET
BUTTON & LED
INDICATOR
Micro SD card is not included,
please purchase it separately.
Camera features
The 4MP Wi-Fi Pan Tilt Camera features the ability to
rotate your camera view left to right and to adjust your
camera view up and down. To-zoom simply pinch the
image with two ngers.
The camera’s microphone and speaker will enable you
to both hear and speak through your camera for
two-way audio purposes.
The QR code is located underneath the camera for use
when conguring the remote viewing.
Resetting your camera
Your camera’s “reset” button is also its LED indicator
light. Press and hold the reset button for 15 seconds in
order to reset the camera to its orginal factory settings.
The LED indicator light will ensure that your camera is
connected to Wi-Fi. A ashing green light means it is
ready to connect. A solid green light means it is con-
nected to a Wi-Fi network. A solid red light indicated
that there is problem with the connection.
Two ways to record and archive video
1. You can insert a Micro-SD memory card directly into your camera to record locally onto the Micro-SD
card. Purchase separately and insert a 16, 32, 64 or 128GB Micro-SD card and your video footage will
record and store in a loop. The length of archive time depends on the capacity of the Micro-SD Card
and the amount of motion detection that occurs.
2. You may choose to utilise the Q-See Global Cloud Storage subscription service to have your camera
automatically upload your video footage to the Q-See Cloud. The Q-See Cloud storage subscription ser-
vice is accessible through your Q-See Plus app. There are monthly fees for this service payable directly
to Q-See USA with any pricing displayed in the app in US$ amounts. Exchange rate fees and other fees
may apply as levied by your bank and credit card provider.
1

2Sign up and Q-See Plus Account
Tap on
Sign up
and create an account for
the new camera.
Change
country/region
to
Australia and click
Next
Enter an email address and password to use
for your account. Tick“I have read and
agreed Q-see Plus Privacy Policy” once read.
Tap
Verication code
You should receive an email with a verica-
tion code within minutes. Be sure you will
have quick access to the email address used.
Email example:
Enter the
verication code
then press
ok
.
You can log in immediately after success-
fully registering your Q-see account.
2

Plug the camera into a power source and wait
until the indicator light begins to ash. After
15-30 seconds the light should slowly ash
green which indicates it is ready to congure.
If the light displays solid red, hold the reset
button for 15 seconds
3Add QCW4MP1PT-AU to Q-See Plus App
Wireless Mode
After login using your Q-see account, press
+ symbol
to proceed to
scan the QR code
located at bottom of Wi PTZ camera
*please grant the Q-see plus app permis-
sion to use your mobile phone’s camera*
3
At this stage you must connect the app to your camera. There are two ways to do
this; either via wi (wireless mode) or with a directly connected ethernet cable
(wired mode). Chose step 3 below if you wish to use wireless mode or skip step 3
and go to step 4 if you wish to use wired mode.

Tap
Wi-Fi Cameras
under the Add Device
Page, choose
Yes, go to Wi-Fi settings
to
allow the mobile phone to connect to the
camera via local Wi-Fi.
ensure that your mobile device is
connected to the Wi-Fi network you
wish to use for your camera. Launch
the app on your mobile device.
Before pressing next
, make sure your
router works under 2.4GHz frequency,
and place your smartphone and camera
within 30cm of each other.
4

Type in your Wi-Fi password then
press Next.
Please be patient, this process may
take up to 3 minutes depending on
the network speed. If the congura-
tion fails, please enture your phone
and Wi-Fi camera are in range of
the Wi-Fi signal and each other.
While Q-See Plus congures your
camera, your mobile device may
begin to make a chime noise, this
is normal and you can lower the
volume slightly if you wish.
Enter the Password for your camera.
The default password is admin
Press next
5

Enter the
verication code
then press
ok
.
You can log in immediately after success-
fully registering your Q-see account.
After adding device successfully to your
Wi-Fi network, setup you
Time Zone
, tap
Start Preview
to start viewing and con-
trolling the Wi-Fi PTZ Camera.
If you completed Step 3 successfully,
skip Step 4.
6

4Add QCW4MP1PT-AU to Q-See Plus App
Wired/Troubleshooting Mode
If you are having issues connecting
your QCW Wi-Fi camera to the desired
Wi-Fi network, this tutorial will show
you how to establish the connection
with the help of a standard Ethernet
cable.
Only complete Step 4 if you did not
complete Step 3 successfully.
press
+ symbol
to proceed to
scan the QR
code
located at bottom of Wi PTZ
camera
*please grant the Q-see plus app permis-
sion to use your mobile phone’s camera*
Select the X in the top right corner to go
to the device adding page, if you had a
failure in Step 3 completion.
7

Use an
ethernet cable
to connect your
wi ptz camera to a free
LAN port
on
your router.
Press Next.
Tap
Wi-Fi Cameras
under the Add
Device Page, choose
No, I want wired
connection
to allow the mobile phone
to connect to the camera using an
ethernet cable.
8

Type
admin
(PTZ camera default pass-
word) to establish connection.
After adding device successfully to your
local network, setup you
Time Zone
Go to Setting by pressing the icon in the
top right corner
9

Select Wi-Fi Cong
Select Wi-Fi Cong
Select the Wi-Fi Network you wish to
connet your camera to, and type in your
Wi-Fi’s password
QCW Cameras are only compatible with
2.4Ghz Wi-Fi network.
Once you successfully add your Wi-Fi net-
work information to the camera, you may
now disconnect the ethernet cable from
your camera.
Select the Back Arrow to return to the live
display
10

Turn on/o Mic
Switch live preview resolution
Switch between one
screen and four
screen view
Pause
View history record/playback
*See next page Tap to talk
Snap image to mobile phone
Record to mobile phone
Call-out PTZ control console
While PTZ control button is o
Pinch in/out the screen to digital zoom in/out
Back to vertical
view
Call-out PTZ control console
Turn on/o Mic
Tap to talk
Record to mobile phone
playback
Switch between
one screen and
four screen view
Pause
Switch live preview resolution
Snap image to mobile phone
Switch to Horizontal View
While PTZ control button is o
Pinch in/out the screen to digital zoom in/out
5Q-See Plus App Camera Preview/Control Interface
11

Choose to view footage recorded
on Micro-SD card
Turn of speaker
Pause
Full-screen view
Drag or slide to view recorded
footage
(Orange=Motion Detection)
If you select “View History
Record” from home screen
Choose to view footage
recorded on Q-See Global
Cloud storage (when enabled
through subscription)
Choose the date
Press to save footage to your mobile’s local storage
Press to go to Back Up
Choose/Press one available footage
12

6Google Home Setup (Optional)
In the Google Home app on your mobile
device, Select Menu
Select Home Control
In order to stream your feed to a TV or
Monitor, a Chrome Cast is required and
must be linked to your Google account.
Select +ADD button in the bottom right
corner
13
This step is optional for
Google Home houses only. It
is not essential for operation

Search or scroll down to nd Q-See Plus
under the list, Press to add
Enter the Username and Password of your
Q-see Plus Account to link to Google Home
Select Sign In
Q-See Plus will require your authorization
to access your account
Select Authorize
14

Q-See Plus will add the device from your
account into Google Home
Select your Camera to assign a room
Ao room must be assigned to your camera.
The name of the room will be use to
identify your camera.
Select Done, now you can tell google to
show your camera on a chrome cast
Example:
OK Google, Show me Bedroom Camera on
Living Room TV
Depends on your internet speed, the video
feed shown via chromecast can have up to
10 seconds delay.
15

7Amazon Alexa Setup (Optional)
Competible with Echo Spot & Echo Show
In the Alexa App on your mobile device,
select the Menu button in the top left
corner
Select Skills
Search for Q-See
Select Q-See Plus
Select Enable
16
This step is optional for Amazon
Alexa (Echo Spot & Echo Show) only.
It is not essential for operation

7Amazon Alexa Setup (Optional)
Competible with Echo Spot & Echo Show Enter the Username and Password of your
Q-See plus account, then select Sign in
Amazon requires authorization to access
your Q-See Plus Account
Select Authorize
A conrmation page will appear when the
account is successfully linked
Close the window by pressing the X in the
top left corner
17

Q-See
A prompt to discover devices will appear,
Select Discover Devices
Alexa will begin to discover devices
associated with your Q-See Plus account
You must edit the name of your device
before it can be used with Alexa
Select the Device you will to edit
Choosing a simple name will make access-
ing your camera easier.
Press Edit Name and enter the desired
name of you camera.
Now you can tell Alexa to show your
camera on Alexa Spot or Alexa Show
Example:
Alexa, show me Q-see camera
18

8Troubleshooting
Q: I have forgotten my Q-See Plus account password.
A: Tap the Forgot Password button on your Q-See Plus mobile app and submit
your Q-See account username. We will retrieve your password and send it to your
registered email address.
Q: How can I view my camera using dierent mobile device (Android/iPhone/i-
Pad)?
A: As far as the user have Q-See plus app installed on their mobile device, they
can login using your registered Q-See plus account to access and control the
camera.
Q: I have forgotten the username and password of the camera.
A: The default username/password of the camera is admin/123456. If you have
changed the username and password to something dierent, you will need to
reset the camera back to its default factory settings.
Q: I have failed to connect via Wi-Fi in Step 3, what may be the problem?
A: Ensure you a re using a 2.4GHz wireless network (not 5GHz). Hint: To check all
the wireless networks in your vicinity and there modes, try the app “Wi Analyzer”
by Farproc.
Q: I have signed into the Q-See Plus app but I can’t get my camera to display.
A: Assuming you setup the Wi-Fi camera correctly with your Q-See plus account
at beginning. And, assuming your camera is plugged into power, it could be ex-
periencing network connectivity issues. Check the following:
If you changed your router or Wi-Fi password, then you need to reset the camera
and recongure it with your Q-See plus account using your new Wi-Fi password.
19
Table of contents
Other Q-See IP Camera manuals

Q-See
Q-See QTN8019B User manual

Q-See
Q-See QSTC211 User manual

Q-See
Q-See QC-SERIES User manual

Q-See
Q-See QT SERIES User manual

Q-See
Q-See QCN7001B User manual

Q-See
Q-See QSTC201 User manual

Q-See
Q-See QC-SERIES User manual

Q-See
Q-See QCN8025Z User manual

Q-See
Q-See EasyView QN6401X User manual

Q-See
Q-See QSTC201 User manual