QFX R-41 User manual

User Manual for PBX-312SM Portable Speaker
R-41
TM

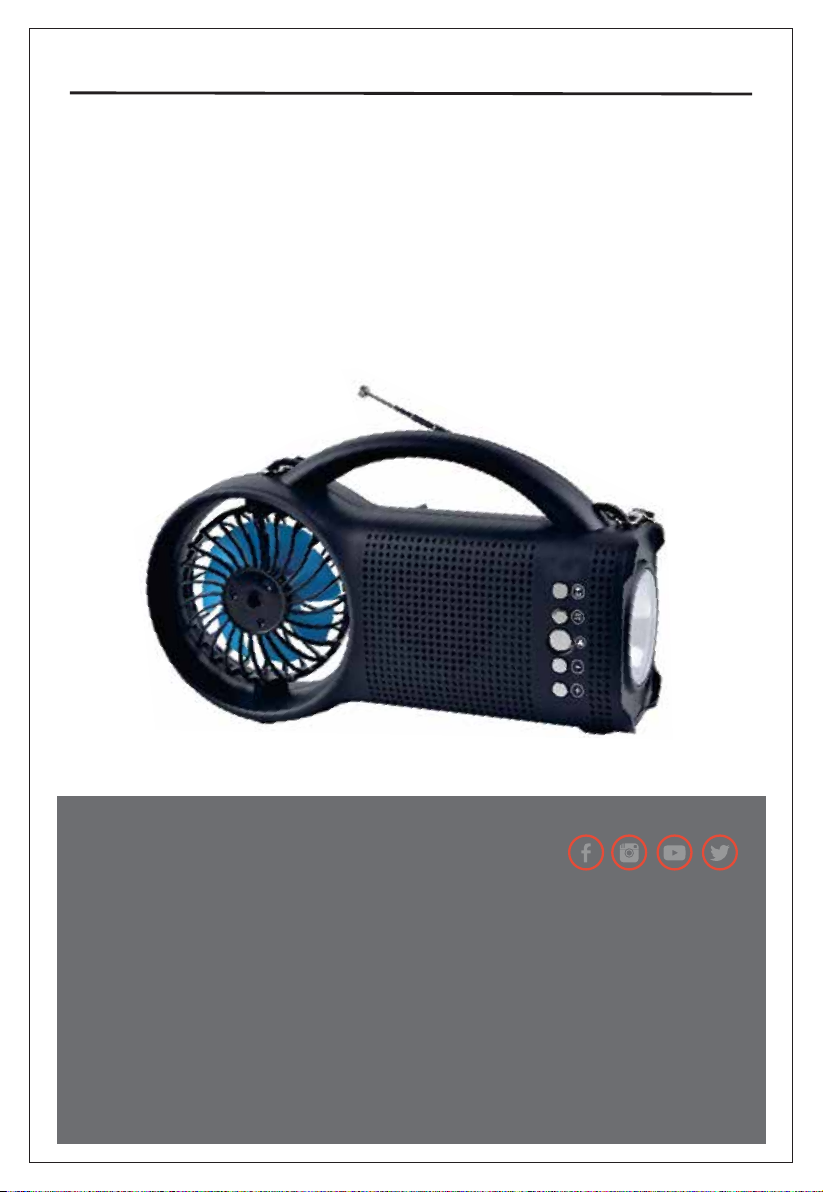
1.TELESCOPIC ANTENNA: Adjust to
optimize reception.
2.MODE/LED: Select the from
FM/BT/AUX/USB/TF. Press and hold to turn
ON/OFF LED Light.
3. PLAY/PAUSE/PHONE: Play/ Pause audio,
FM auto scan, answer and end calls.
4. -BUTTON: Select the previous audio
(.mp3) track from the USB or TF Card.
5. +BUTTON: Select the next audio (.mp3)
track from the USB or TF Card.
6.BATTERY COMPARTMENT: Rechargeable
batteries.
7. FAN: Swivel Fan
8. FAN BUTTON: Fan ON/OFF
9.POWER LED LIGHT: Switch to turn on the
LED light only.
10. DC 5V IN JACK: Connect to recharge the
unit.
11. AUX JACK: Connect a 3.5mm external
audio feed for audio playback.
12.CHARGE INDICATOR LIGHT: Indicates
when the unit is charging.
13.POWER INDICATOR LIGHT: Indicates
when the unit is ON.
14.TF CARD SLOT: Insert to playback mp3
formatted music.
15.USB: Insert to playback mp3 formatted
music.
16.HANDLE: Secure handle.
17. STRAP: Carrying strap.
18. SPEAKER: 2”
19.SOLAR PANEL: Recharge using solar
power.
20. FLASH LIGHT: LED type.
1. ANTENA TELESCÓPICA: ajuste para
optimizar la recepción.
2.MODE / LED: seleccione entre FM / BT /
AUX / USB / TF. Mantenga presionado para
ENCENDER / APAGAR la luz LED.
3. REPRODUCCIÓN / PAUSA / TELÉFONO:
Reproduce / Pausa el audio, escaneo
automático de FM, responde y naliza
llamadas.
4. - BOTÓN: Selecciona la pista de audio
anterior (.mp3) de la tarjeta USB o TF.
5. BOTÓN +: Seleccione la siguiente pista
de audio (.mp3) de la tarjeta USB o TF.
6. COMPARTIMENTO DE LA BATERÍA:
Baterías recargables.
7. VENTILADOR: Ventilador giratorio
8. BOTÓN DE VENTILADOR: Ventilador
ENCENDIDO / APAGADO
9. LUZ LED DE ALIMENTACIÓN: Cambie
para encender solo la luz LED.
10. TOMA DE ENTRADA DC 5V: Conecte
para recargar la unidad.
11. TOMA AUX: Conecte una alimentación
de audio externa de 3,5 mm para la
reproducción de audio.
12. LUZ INDICADORA DE CARGA: Indica
cuando la unidad se está cargando.
13. LUZ INDICADORA DE ENERGÍA: Indica
cuando la unidad está ENCENDIDA.
14.RANURA PARA TARJETA TF: Insértela
para reproducir música en formato mp3.
15.USB: Insertar para reproducir música en
formato mp3.
16. MANIJA: Asa segura.
17. CORREA: Correa de transporte.
18. ALTAVOZ: 2 ”
19. PANEL SOLAR: Recargue mediante
energía solar.
20. LUZ DE DESTELLO: tipo LED.
ANTENNE TÉLESCOPIQUE: Ajustez pour
optimiser la réception.
2.MODE / LED: sélectionnez FM / BT / AUX /
USB / TF. Appuyez et maintenez pour
allumer / éteindre la lumière LED.
3. LECTURE / PAUSE / TÉLÉPHONE: lecture /
pause audio, balayage automatique FM,
réponse et n des appels.
4. - BOUTON: Sélectionnez la piste audio
précédente (.mp3) de la carte USB ou TF.
5. TOUCHE +: Sélectionnez la piste audio
suivante (.mp3) à partir de la carte USB ou
TF.
6. COMPARTIMENT DE BATTERIE: batteries
rechargeables.
7. VENTILATEUR: ventilateur pivotant
8. BOUTON VENTILATEUR: Ventilateur
MARCHE / ARRÊT
9. LUMIÈRE LED D'ALIMENTATION:
interrupteur pour allumer la lumière LED
uniquement.
10. JACK DC 5V IN: connectez pour
recharger l'unité.
11. JACK AUX: connectez une alimentation
audio externe de 3,5 mm pour la lecture
audio.
12. VOYANT DE CHARGE: Indique quand
l'unité est en cours de charge.
13. VOYANT INDICATEUR D'ALIMENTATION:
Indique quand l'unité est allumée.
14. FENTE DE CARTE TF: Insérer pour lire de
la musique au format mp3.
15.USB: insérer pour lire de la musique au
format mp3.
16. POIGNÉE: poignée sécurisée.
17. SANGLE: Sangle de transport.
18. HAUT-PARLEUR: 2 "
19. PANNEAU SOLAIRE: Rechargez en
utilisant l'énergie solaire.
20. FLASH LIGHT: type LED.
Questions? Comments? Contact Us Anytime
Preguntas? Comentarios? Contáctenos en cualquier momento
Des questions? Commentaires? Contactez-nous à tout moment
1-800-864-CLUB (2582)
Mon-Fri 9AM - 5PM (PST)
CONTROL PANEL
WHERE THE PARTY BEGINSTM
8
2
16
1
18
17 17
20
12
9
13
11
10
15
14
19

General Functions:
1.Install the battery (18650) into the battery compartment (6). Double check the +/- symbols when installing the battery. Ensure that the
polarities are correct.
2. Use the ON/OFF/LED (9) switch to activate the unit or ashlight.
3. Press the Fan button (8) to turn ON/OFF the fan and to change fan speed.
4. When listening to a program (Radio Station) pull out the telescoping antenna (1) to optimize the reception.
5. To save battery power, turn the unit OFF when not in use and disconnect the USB power cord. If the unit will not be used for a long time,
disconnect the power cable and remove the batteries.
6.Use the “-” and “+” to adjust the volume, select the next audio track, or FM station (4/5).
7. Press the Play/Pause/Phone Button (3) to play or pause USB/TF Card playback. In FM mode, press and hold for 3 seconds to begin auto scan.
For Phone link, use this button to answer and end calls.
8. To use the Phone Link, please pair the mobile device and unit via bluetooth rst. Use the Play/Pause/Phone to answer and end calls. The unit
will promt with a“Beep”sound when staring or ending a call.
General Functions:
1.Instale la batería (18650) en el compartimento de la batería (6). Verique dos veces los símbolos +/- al instalar la batería. Asegúrese de que las
polaridades sean las correctas.
2. Utilice el interruptor de ENCENDIDO / APAGADO / LED (9) para activar la unidad o la linterna.
3. Presione el botón Ventilador (8) para ENCENDER / APAGAR el ventilador y cambiar la velocidad del mismo.
4. Cuando escuche un programa (estación de radio) saque la antena telescópica (1) para optimizar la recepción.
5. Para ahorrar energía de la batería, apague la unidad cuando no esté en uso y desconecte el cable de alimentación USB. Si la unidad no se
utilizará durante mucho tiempo, desconecte el cable de alimentación y retire las baterías.
6.Utilice“-” y“+” para ajustar el volumen, seleccione la siguiente pista de audio o estación FM (4/5).
7. Presione el botón Reproducir / Pausa / Teléfono (3) para reproducir o pausar la reproducción de la tarjeta USB / TF. En el modo FM, mantenga
presionado durante 3 segundos para comenzar la búsqueda automática.
8. Para utilizar Phone Link, primero empareje el dispositivo móvil y la unidad mediante bluetooth. Utilice Reproducir / Pausa / Teléfono para
responder y nalizar llamadas. La unidad emitirá un sonido de "Bip" al mirar jamente o al nalizar una llamada.
General Functions:
1.Installez la batterie (18650) dans le compartiment de la batterie (6). Vériez les symboles +/- lors de l'installation de la batterie. Assurez-vous
que les polarités sont correctes.
2. Utilisez l'interrupteur ON / OFF / LED (9) pour activer l'unité ou la lampe de poche.
3. Appuyez sur le bouton Fan (8) pour allumer / éteindre le ventilateur et pour changer la vitesse du ventilateur.
4. Lors de l'écoute d'un programme (Radio Station), retirez l'antenne télescopique (1) pour optimiser la réception.
5. Pour économiser la batterie, éteignez l'appareil lorsqu'il n'est pas utilisé et débranchez le cordon d'alimentation USB. Si l'appareil n'est pas
utilisé pendant une longue période, débranchez le câble d'alimentation et retirez les piles.
6.Utilisez les touches «-» et «+» pour régler le volume, sélectionnez la piste audio suivante ou la station FM (4/5).
7. Appuyez sur le bouton Lecture / Pause / Téléphone (3) pour lire ou mettre en pause la lecture de la carte USB / TF. En mode FM, maintenez la
touche enfoncée pendant 3 secondes pour lancer le balayage automatique.
8. Pour utiliser Phone Link, veuillez d'abord coupler l'appareil mobile et l'unité via Bluetooth. Utilisez Play / Pause / Phone pour répondre et
terminer les appels. L'appareil émettra un bip sonore lors du démarrage ou de la n d'un appel.
USB (TF) PLAYBACK
1. Insert a USB ash drive or a TF card with MP3 format music for playback. The unit will play automatically when inserting the USB or TF Card.
Press PLAY/PAUSE button to pause the audio track. Press “-” to select the previous audio track and“+” for the NEXT audio track.
REPRODUCCIÓN USB (TF)
1. Inserte una unidad ash USB o una tarjeta TF con música en formato MP3 para reproducir. La unidad se reproducirá automáticamente al
insertar la tarjeta USB o TF. Presione el botón REPRODUCIR / PAUSA para pausar la pista de audio. Presione "-" para seleccionar la pista de audio
anterior y "+" para la pista de audio SIGUIENTE.
LECTURE USB (TF)
1. Insérez une clé USB ou une carte TF avec de la musique au format MP3 pour la lecture. L'appareil jouera automatiquement lors de l'insertion
de la carte USB ou TF. Appuyez sur le bouton PLAY / PAUSE pour mettre la piste audio en pause. Appuyez sur «-» pour sélectionner la piste
audio précédente et sur «+» pour la piste audio SUIVANTE.
NOTE:
1.This unit includes a rechargeable battery.
2.In order to prolong the battery life, it is recommended that the unit is charge 6-8 hrs before the rst use.
NOTA:
1.Esta unidad incluye una batería recargable.
2. Para prolongar la vida útil de la batería, se recomienda que la unidad se cargue de 6 a 8 horas antes del primer uso.
REMARQUE:
1.Cet appareil comprend une batterie rechargeable.-
An de prolonger la durée de vie de la batterie, il est recommandé de charger l'appareil 6 à 8 heures avant la première utilisation..
GENERAL FUNCTIONS

BLUETOOTH PLAY INSTRUCTION:
1. Bluetooth mode: use the MODE button to enable Bluetooth on the R-41. Open the Bluetooth settings on your mobile device and search for
R-41. Select the option to pair both devices. Now you can sit back and enjoy the music from your favorite app.You will not need to reconnect
Bluetooth when changing modes.
INSTRUCCIONES DE BLUETOOTH PLAY:
1. Modo Bluetooth: use el botón MODE para habilitar Bluetooth en el R-41. Abra la conguración de Bluetooth en su dispositivo móvil y
busque R-41. Seleccione la opción para emparejar ambos dispositivos. Ahora puedes sentarte y disfrutar de la música de tu aplicación favorita.
No necesitará volver a conectar Bluetooth cuando cambie de modo.
INSTRUCTION DE LECTURE BLUETOOTH:
1. Mode Bluetooth: utilisez le bouton MODE pour activer Bluetooth sur le R-41. Ouvrez les paramètres Bluetooth sur votre appareil mobile et
recherchez R-41. Sélectionnez l'option pour coupler les deux appareils. Vous pouvez maintenant vous asseoir et proter de la musique de
votre application préférée. Vous n'aurez pas besoin de reconnecter Bluetooth lors du changement de mode.
THANK YOU.
Enjoy your speaker and make many memories with it because
QFX is Where the Party Begins!
We would love to hear about your R-41 Journey!
Tag us @QFXUSA to share your stories.
FOLLOW US @QFXUSA
GENERAL FUNCTIONS


Table of contents
Other QFX Radio manuals