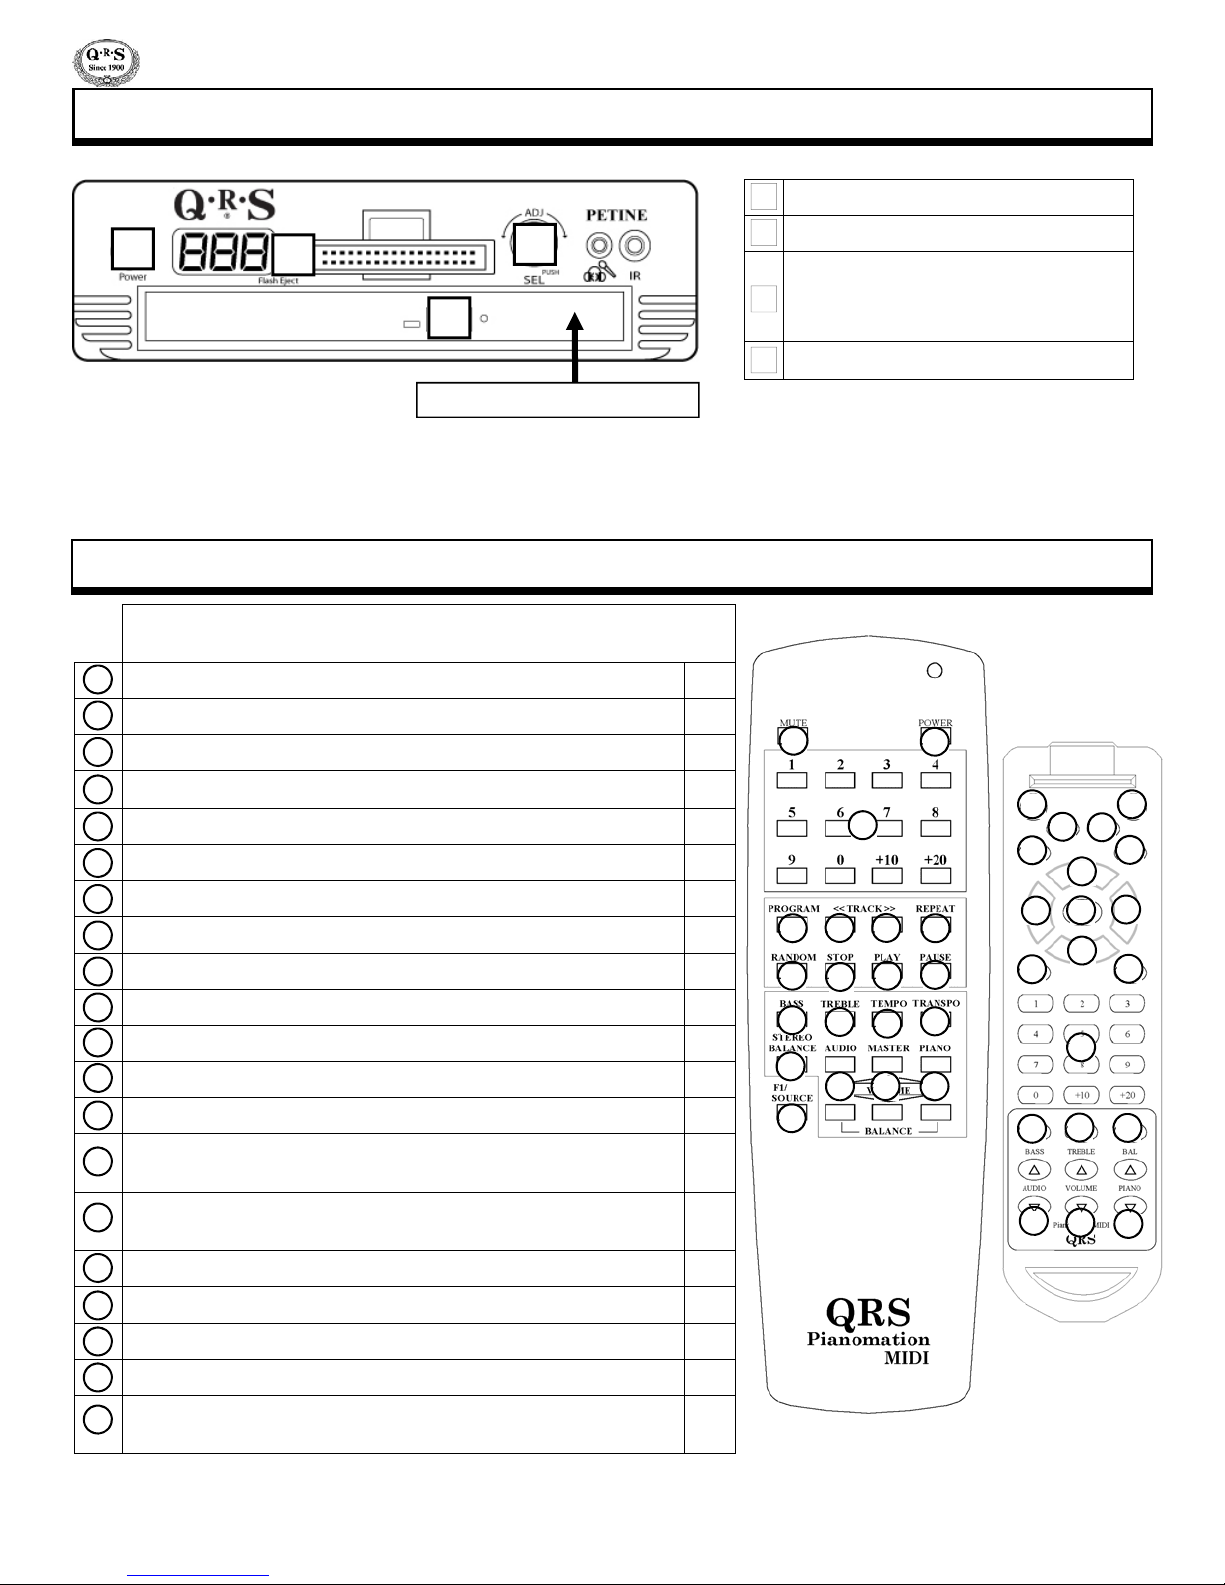
QRS Music Technologies Petine User manual

Petine
• Internal Source - Preloaded Music
• CD Drive
• CompactFlash Card Reader
• MP3 Music File Playback - Auto Detects Audio or Pianomation
• Complete Control From the Front Panel’s Rotary Dial
• Recording Capabilities - Optional Record System Required
• NetPiano Playback Capability - Subscription Service Required
• Internal Soundcard - Optional
Owner’s Manual
Manual #990021
Application Version 69
QRS Music Technologies, Inc.
MPE files are no longer supported.
Petine will still recognize MP3 files and now automatically detect any left
channel QRS AMI signal and direct it to Pianomation to trigger the keys.

Warnings
FCC INFORMATION
1. IMPORTANT NOTICE: DO NOT MODIFY THIS UNIT!
This product, when installed as indicated in the Installation Manual, meets FCC requirements. Modifications not expressly
approved by QRS Music Technologies, Inc. may void your authority, granted by the FCC, to use this product.
2. IMPORTANT: When connecting this product to accessories and/or another product use only high quality shielded cables.
Cables supplied with this product MUST be used. Follow all installation instructions. Failure to follow instructions could
void your FCC authorization to use this product in the United States of America.
3. NOTE: This product has been tested and found to comply with the requirements listed in the FCC Regulations, Part 15 for
Class “B” digital devices. Compliance with these requirements provides a reasonable level of assurance that your use of this
product in a residential environment will not result in harmful interference with other electronic devices. This equipment
generates/uses radio frequencies and, if not installed and used according to the instructions found in the Installation Manual,
may cause interference harmful to the operation of other electronic devices. Compliance with FCC regulations does not
guarantee that interference will not occur in all installations. If this product is found to be the source of interference, which
can be determined by turning the unit “OFF” and “ON”, please try to eliminate the problem by using one of the following
measures:
• Relocate either this product or the device that is being affected by the interference.
• Utilize power outlets that are on different circuits (circuit breaker or fuse) or install AC line filters.
If these corrective measures do not produce satisfactory results, please contact the local authorized distributor, or contact
QRS Music Technologies, Inc. 2011 Seward Ave. Naples, FL 34109.
INSTRUCTIONS PERTAINING TO A RISK OF FIRE, ELECTRIC SHOCK, OR INJURY
TO PERSONS
The lightning flash with arrowhead symbol, within an equilateral triangle, is intended to alert the user to the presence of un-
insulated “dangerous voltage” within the product’s enclosure that may be of sufficient magnitude to constitute a risk of
electric shock to persons.
The exclamation point within an equilateral triangle is intended to alert the user to the presence of important operating and
maintenance (servicing) instructions in the literature accompanying the product.
GROUNDING INSTRUCTIONS: This product must be grounded. If it should malfunction or breakdown, grounding
provides a path of least resistance for electric current to reduce the risk of electric shock. This product is equipped with a
cord having an equipment-grounding conductor and a grounding plug. The plug must be plugged into an appropriate outlet
that is properly installed and grounded in accordance with all local codes and ordinances.
DANGER - Improper connection of the equipment-grounding conductor can result in a risk of electric shock. Check
with a qualified electrician or serviceman if you are in doubt as to whether the product is properly grounded. Do not
modify the plug provided with the product. If it will not fit the outlet, have a proper outlet installed by a qualified electrician.
QRS MUSIC TECHNOLOGIES, INC.

Table Of Contents
Petine’s Front Panel Buttons 4
Remote Control Buttons
Powering ON Petine for the First Time 5
Changing Sources [CD-Internal-CompactFlash-Auxiliary-MIDI-Record]
Play the Internal Source’s Pre-installed Music
6
Internal Source Song List
PLAY Modes
Play from the CompactFlash Source - QRS Music Sampler 7
Play a QRS CD Using the Remote Control 8
How to Properly Adjust the Piano, Audio and Master Volume Levels
Play a QRS SyncAlong Series CD 9
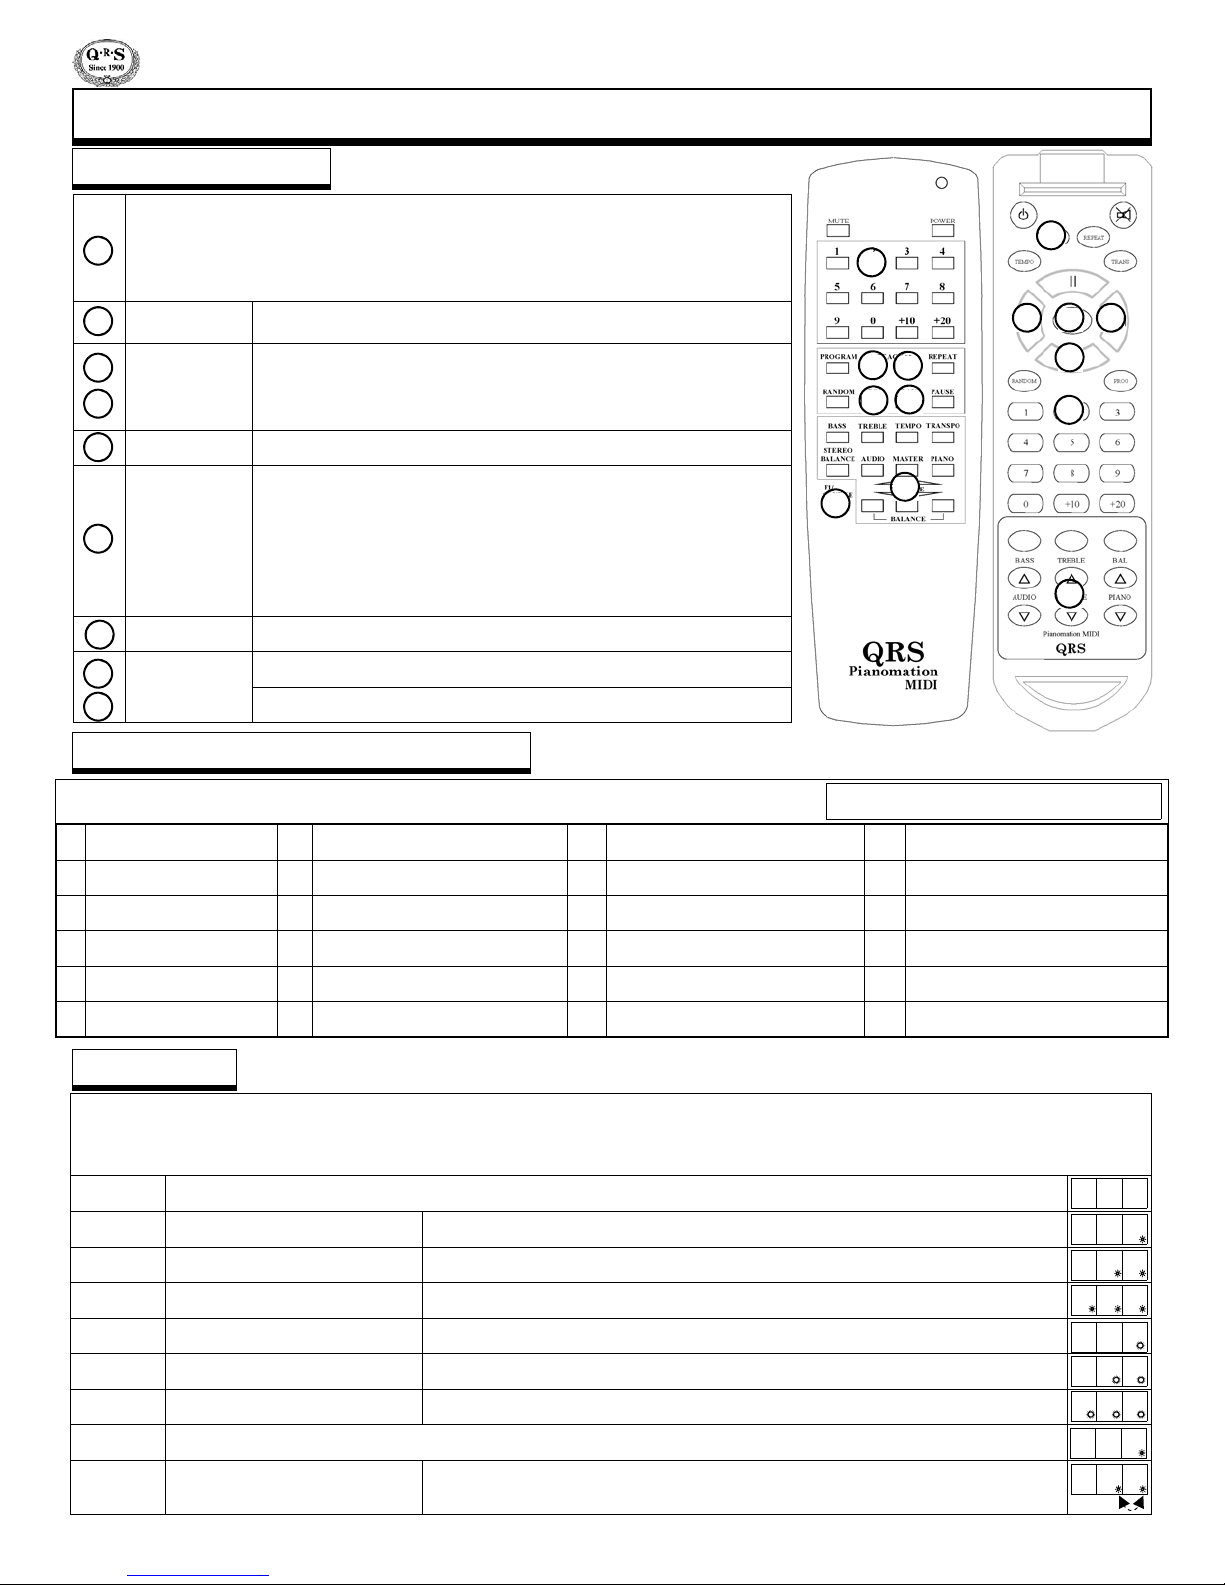
POWER Remote Control Features
10
SOURCE [ Maximum Number of Songs & Programs]
STOP
PLAY
PAUSE
MUTE
MASTER Volume
PIANO Volume
AUDIO Volume
BASS Volume
TREBLE Volume
11
TRANSPOSE
PROGRAM - Root Files vs. Program Files
REPEAT
RANDOM
TEMPO
12
<<TRACK and TRACK>>
Number Buttons - Selecting specific songs.
Playing Songs from the Root Directory
Playing Songs from a Program Directory
STEREO BALANCE
Play MIDI/MP3 Files from CDROM OR CompactFlash [Root vs. Program] 13
Record Using The Remote Control. Requires Optional PNOscan
14
Play a Recorded Song Using the Remote Control
How Individual Recordings are Named when Saved to CompactFlash Card
Play General MIDI Sound Using the Piano Keyboard. Optional Soundcard 15
Front Panel Features 16
Back Panel Features 17
Setup Menu Functions - Navigation Basics 18
Setup Menu Functions - Table 19
Play a QRS CD Using the Petine Controller 20
Record Using The Petine Controller. Requires Optional PNOscan 21
Set Up Petine To Play from a MIDI File Player Or Computer 22
Play Petine from a MIDI File Player Or Computer
Play (Non-SyncAlong) QRS CDs From Your Own CD player 23
Connect Petine to Your Own CD Player-Direct or Wireless Connect
Audio Configuration Options - Standard
Using a Microphone - Karaoke (Sing Along) 24
Practice In Silence - Silent Piano (Requires Optional Devices)
Send Acoustic Piano to Home Stereo - Optional Barcus Berry
Send “Optional” Soundcard Piano to Home Stereo - Mixed Output 25
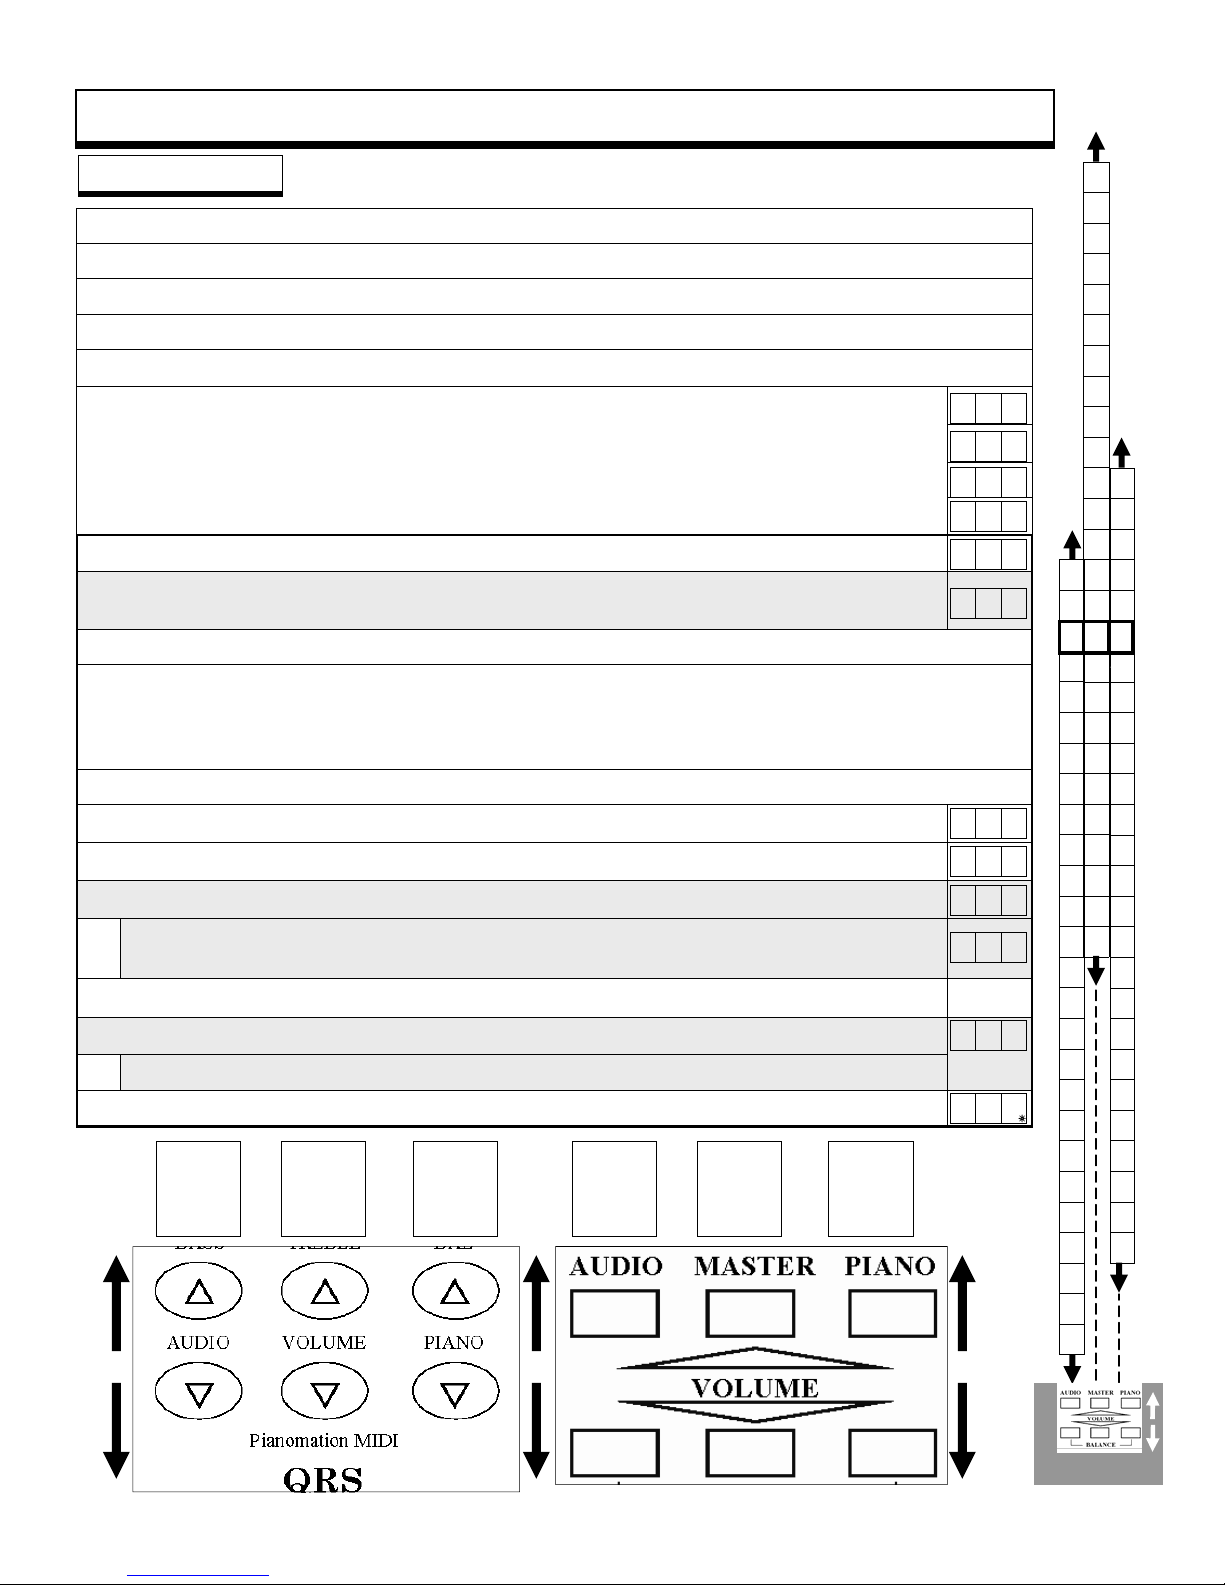
Setup Menu Functions -Advanced - Controlling Petine from Front Panel
Selecting a Source [CD-Internal-CompactFlash-Auxiliary-MIDI-Record] 26
File Types Recognized by Petine’s Sources
Audio Volume Level
27
Piano Volume Level
Tempo [Setting the Music’s Speed - MIDI Files ONLY!]
Transpose [Setting the Music’s “Key” - MIDI Files ONLY!]
Microphone Volume Level
28
Bass Volume Level
Stereo Balance [Two Speaker Installation]
Treble Volume Level
Metronome Volume - Record “Click-Track”
29Delay [Pianomation vs. Synthesizer]
How to Use Petine as a Stand-Alone MIDI Controller
Pianomation Configuration
30
All Pianos / Piano Channel 1 / All Instruments / All MIDI
How to set the Minimum Key Force / Alignment / Test 11
Audio Configuration
31
Standard
Karaoke (Sing Along)
Silent Piano
Barcus Berry Pickup (Piano Microphone)
Mixed Output
CompactFlash Utilities
32
Update: Demo / System / Application / Key List / Format
Copy Record Memory
How Recordings are Named when Saved as a Group
Erase Record Memory
CD Drive Utilities
33
Update: Demo / System / Application / Key List
Append/Overwrite SyncAlong files CDROM to CompactFlash
F-Curves - Activate / Change 34-35
MIDI Input Select 36
Metronome: Time Signature (Record Click-Track)
Mixed Output Level - Soundcard Piano 37
Soundcard Output
Main Audio Output
Exit Setup Menu
Power ON Sequence [Serial and Application Version Numbers] 39
Auto-Update Utility - Application Versions V0.38 or Later 40
Updating Petine’s Application Image 41
Update SyncAlong Music Index [Demo Image File] 42
Update SyncAlong CompactFlash Music From CDROM 43
Restoring Factory Default Settings 44
Restoring Petine’s Application Image 45
Connecting for Standard Playback or Optional Record 46
Parts / Mounting Bracket / Options / Updating Pianomation 47
Troubleshooting 48
CompactFlash Card Music Sampler - Song List 49-54
General MIDI Sounds List 55
Pianomation Two Year Limited Warranty 56-57
Pianomation Accessories 58
Notes 59
38

Petine V69_1
PAGE 4 QRS MUSIC TECHNOLOGIES, INC.
Remote Control Buttons
3
8 10
4
11 9
12
6
14
19
20
15
16
17
18
13
1
2
5
7
2
7
5
1
3
4
6
8
9
10
11
12 13 19
20
14
15
16
17
18
Petine’s Front Panel Buttons
Push Here to Close Door!
1 2 3
4
POWER the system ON and OFF. 10
MUTE the piano and audio. 10
NUMBER buttons select specific song tracks. 12
PROGRAM Up “PVP" exits from within a program. 11
Tap REPEAT during playback to select a repeat play mode. 11
Return to a PREVIOUS TRACK or PROGRAM. 12
Advance to the NEXT TRACK or PROGRAM. 12
Tap RANDOM to select a random play mode. 11
PAUSE play. 10
STOP play. 10
Begin PLAY. 10
Press BASS and then the master/volume buttons. 10
Press TREBLE and then the master/volume buttons. 11
Press TRANSPOSE and then the master volume up and down
buttons to change the key of the music, except when playing a CD. 11
Press TEMPO and then the master volume up and down buttons
to change the tempo of the music, except when playing a CD. 12
PIANO VOLUME 10
MASTER VOLUME (piano and audio). 10
AUDIO VOLUME 10
Press the STEREO BALANCE and then the <<track>> buttons. 12
In stop mode, tap the SOURCE button and then the number
button assigned to the desired source. 10
See these pages in section “Remote Control Features” for more information
1
20
19
2
10
11
9
17
16
18
12
13
14
15
4
5
8
6
7
3
Power
CompactFlash Card Eject
ADJ/SEL Dial
Rotate to Adjust
Press to Select, PLAY, PAUSE or STOP
CD Eject
1
2
3
4
See page 16
“Front Panel Features” for the complete list.

For Technical Support Call 1-800-247-6557 Petine V69_1
QRS MUSIC TECHNOLOGIES, INC. PAGE 5
Powering ON Petine for the First Time
Using the remote control, press STOP to halt play. The source cannot be changed if the unit is in play mode. Available Sources
You can choose any one of these three options to select a source. 1 cd = CD Drive
2iN = Internal Music
3cF = CompactFlash
4Av = Auxiliary Input
5Ni = MIDI
6rc = Record
1 Repeatedly tap the SOURCE button to cycle through the source list.
Stop tapping when the desired source displays.
2 Tap the SOURCE button, then immediately the number button associated with the desired source.
3 Tap the SOURCE button and then immediately tap the <<TRACK>> buttons, repeatedly, until the
desired source displays
Changing Sources [CD-Internal-CompactFlash-Auxiliary-MIDI-Record]
Point the remote control at Petine’s IR sensor and press the POWER button.
Please wait for about 20 seconds for Petine and Pianomation to power on.
See page 39, “Power On Sequence” for the Petine serial number and other system information.
Petine may power on to any one the following sources:
If you’re not certain which source is currently selected, tap the SOURCE button to display the Source #.
Source # Display Source Name Description Page
Internal Press PLAY on the remote to play through the 24 Internal pre-installed songs. 6
CD Press PLAY on the remote to play tracks 1 through “XX”
“C” indicates the CD Source and “XX” indicates the total number of songs. 8
CD
“saL” indicates the CD Source with a QRS SyncAlong Series CD inserted.
Petine is waiting for you to enter the SyncAlong access code.
“Play a QRS SyncAlong Series CD”.
9
or
CD
or
CompactFlash
Three numbers “XXX” or a “P01” indicate recognizable music files on either the
CD Source or the CompactFlash Source. “Play from the CompactFlash Source”
“Play MIDI & MP3 Files from CDROM or CompactFlash”
7
13
Auxiliary
“AMI” with a flashing dot indicates that the Auxiliary Source is active.
Petine is waiting to receive a signal into its rear panel’s “Line In” jack.
“Play Non-SyncAlong QRS CDs From Your Own CD player”.
STOP on the remote must be pressed before changing to another source.
23
MIDI
Either of these two displays would indicate the MIDI Source is active.
Use to trigger General MIDI Sounds or play Petine from an external MIDI device.
To play from this source requires an optional MIDI Adapter Cable and jumper.
STOP on the remote must be pressed before changing to another source.
15
22
Record Requires the optional PNOscan Record system, MIDI Adapter Cable and jumper. 14
X X X
0 2 4
P 0 1
C X X
A M I
S A L
r P 1
- - -
- 0 1
2 i n
1 c d
1 c d
1 c d
3 c F
4 A v
5 n i
6 r c
Power
Button

Petine V69_1
PAGE 6 QRS MUSIC TECHNOLOGIES, INC.
If Petine has powered on and the display reads “024” you are ready to play solo
piano music from the internal source.
Just press the PLAY button.
Otherwise...
Press Stop Press the STOP button to halt play.
Select the
Internal
Source
Tap the Source button and then the number 2button to select
the Internal Source, “2in”.
Wait for “024” to display.
Play Song Press the PLAY and the first song begins to play.
Adjust
Volume
Use these six buttons to adjust the volume levels.
Piano adjusts the piano only.
Audio adjusts the speaker volume.
Master adjusts the Piano and Audio together.
See page 8, “How to Properly Adjust the Piano, Audio and Master
Volume Levels”.
Stop play Press the STOP button to stop the song.
Next Song
Previous Song
Pressing the TRACK >> will advance to the Next song.
Pressing the << TRACK will go to the Previous song.
1
2
3A
3B
1
4
2
5A
5B
5A
1
4
3B
3A
2
5B
Play the Internal Source’s Pre-installed Music
5A
1
4
3B
3A
2
5A
PLAY Modes
Internal Source “in”
If your Petine doesn’t seem to be playing the way you think it should check below to verify the mode.
For example, if the “Random” button on the remote is press by mistake, the Petine will play one song and then stop.
See pages 10 & 11, for detailed information on these buttons.
STOP No dots in the display.
PLAY One slowly flashing dot. Normal PLAY mode.
Repeat 1 Two slowly flashing dots. Repeats the selected song
Repeat 2 Three slowly flashing dots. Repeats all songs in the selected CD or Program on CDROM or CF
Random 1 One rapidly flashing dot. Plays only one song, at random, and then stops!
Random 2 Two rapidly flashing dots. Plays songs randomly within the selected CD or Program on CDROM or CF.
Random 3 Three rapidly flashing dots. Plays songs randomly within the selected source.
MUTE
PAUSE Two alternately flashing dots.
One slowly flashing dot with headphone volume level displayed. Play continues but, piano doesn’t sound.
Pause halts play, the music continues from that point when play resumes.
0 0 1
0 6 3
0 1 8
0 0 1
0 0 1
0 0 1
0 0 1
0 0 1
0 0 1
Solo Piano MIDI Files
1 Georgia On My Mind 7 Burt Bacharach Medley 13 Perfidia 19 Music Of The Night
2 Candle In The Wind 8 Ain’t Misbehavin’ 14 Crazy 20 Amazing Grace
3 Feelings 9 Nice Work If You Can Get It 15 Night And Day 21 On The Beautiful Blue Danube
4 Greensleeves 10 Sweet And Low Down 16 Someone To Watch Over Me 22 Ave Maria
5 Danny Boy 11 Angel Eyes 17 Something 23 Meditation and Intermezzo
6 Mack The Knife 12 Yes! We Have No Bananas 18 Stars Fell On Alabama 24 Liebesleid
Internal Music Memory: Size = 1.44MB
Internal Source Song List

For Technical Support Call 1-800-247-6557 Petine V69_1
QRS MUSIC TECHNOLOGIES, INC. PAGE 7
Program (P) List P #
Children's Music P01
Country & Western P02
Classical P03
Christmas & Holiday P04
Dinner Music P05
International P06
Jazz P07
Musicals P08
New Age P09
Nostalgic P10
Popular P11
Ragtime, Stride & Boogie P12
Sacred P13
Concert Series P14
Play From the CompactFlash Source - QRS Music Sampler
See pages 49-54, “CompactFlash Card Music
Sampler - Song List” for the complete list.
CompactFlash cards known to work in the
Petine controller. 2Gb Max
Sandisk CF Sandisk Ultra II
Samsung Extreme Memory Kingston
IBM Microdrive Kodak
1
2 5
4B
7
3B
3A 6
4A
1
4A
5
6
3B
3A
2
4B
7
With the POWER OFF, insert the CompactFlash card into the reader.
Power ON Press the Power button to turn on the system.
Press Stop Press the STOP button to remove any flashing dots in display.
Select the CF
Source
Tap the Source button and then the number 3button to
select the CompactFlash Source. “3cf” displays.
You can also repeatedly tap the Source button to
cycle through all of the sources.
Stop tapping when “3cF” displays.
Wait for “P01” to display - Program one of ?
Select a
Program (P#)
Tap the <<TRACK>> buttons to display the desired Program
(P#) from the list above.
Play Song Press PLAY to enter the Program directory.
Press PLAY again to play the first song of the Program.
Next Song Pressing the TRACK >> will advance to the Next song.
Previous Song Pressing the << TRACK will go to the Previous song.
Adjust
Volume
Use these six buttons to adjust the volume levels.
Piano adjusts the piano only.
Audio adjusts the speaker volume.
Master adjusts the Piano and Audio together.
See page 8, “How to Properly Adjust the Piano, Audio and Master
Volume Levels”.
Stop play Press the STOP button to stop the song.
Exit Program
Press the Program button to return to the Program (P) list.
Return to “Select a Program (P#)” step above to select
another program from the list below.
1
2
4A
5
6
2
7
3A
3B
4B
4A
4B
CompactFlash Source “cF”
Maximum Number of Songs & Programs
Songs on the Root of a CompactFlash Card 000 - 509
Programs (Pxx) On a CompactFlash Card P01 - P99
Songs within a Program on a CompactFlash Card 000 - 999
For more information on how files are displayed when read from a CompactFlash card...
See page 12, “Playing songs from the Root Directory” and “Playing songs from a Program Directory” under “Number Buttons - Selecting
specific songs” which is located in the “Remote Control Features” section of this manual.

Petine V69_1
PAGE 8 QRS MUSIC TECHNOLOGIES, INC.
Play a QRS CD UsingThe Remote Control
1
4
3B
3A
2
6A6B
5A5B 5C
1
6B
4
3B
3A
2
6B
5A5C5B
Select a QRS Concert or SyncAlong Series CD.
Follow steps 1 through 3B above.
The piano volume range is from “P-9” to “P 9”.
Tap the Piano Volume buttons until “P 0” displays. This sets the piano volume in the center of it’s range.
The Audio volume range is from “A-9” to “A 9”.
Tap the Audio Volume buttons until “A 0” displays. This sets the audio volume in the center of it’s range.
Press the PLAY button to play a song.
While listening to the acoustic piano, tap the Master Volume buttons to set the piano volume at a comfortable
listening level.
Note:
It is normal for the piano to stop playing when the Piano Volume is set to “P 0” AND the Master Volume is
turned down to “000”. The piano is playing at it’s softest level when the Piano Volume is set to “P 0” AND the
Master Volume is turned down to “001”. Pianomation can only play as softly as the individual instrument will allow
and is also affected by the room’s acoustics. If you feel that the piano is playing too loudly, try asking someone to
play the piano as softly as possible and compare that volume to Pianomation.
Advanced: If you feel that the piano is still playing too loudly, See page. 30. “How to set the Minimum Key Force / Alignment / Test 11”.
Listen, and tap the Audio volume buttons to match the music from the speaker with the acoustic piano. You may
want to adjust the volume controls on the speaker itself.
You can now use the Master Volume to adjust the overall volume, the audio and piano will follow together.
Advanced: You can affect how the audio and piano volume levels “follow” the master volume by adjusting the “Function
Curves”. See pages 34 & 35. “F-Curves - Activate / Change“ section in the advanced section of this manual for details.
1 2 3A 3B
5A
5B
4
5C
5B
5C
CD Source “cd”
How to Properly Adjust the Piano, Audio and Master Volume Levels
Power ON Press the Power button to turn on the system.
Press Stop Press the STOP button to stop any flashing dots.
Press the CD Eject button to open the CD tray.
Snap the CD onto the spindle and close the tray.
Select the CD
Source
Tap the Source button and then the number 1button
to select the CD Source. “1cd” displays.
You can also repeatedly tap the Source button
to cycle through all of the sources.
Stop tapping when “1cd” displays.
Wait for Petine to scan the CD.
A “C” and the total number of songs will display.
Play Song Press the PLAY and the first song begins to play.
Adjust
Volume
Use these six buttons to adjust the volume levels.
Piano [5A] adjusts only the piano volume.
Audio [5B] adjusts only the speaker volume.
Master [5C] adjusts the Piano and Audio together.
See page 8, “How to Properly Adjust the Piano, Audio and
Master Volume Levels”.
Stop play Press the STOP button to stop the song.
Next Song
Previous Song
Pressing the TRACK >> advances to the Next song.
Pressing the << TRACK will go to the Previous song.
1
2
4
2
3A
3B
5A
5B
5C
6A
6B

For Technical Support Call 1-800-247-6557 Petine V69_1
QRS MUSIC TECHNOLOGIES, INC. PAGE 9
S A L S A L
Play a QRS SyncAlong Series CD
Y
T
s
P
o
L
J
I
H
0
F
E
d
c
b
a
9
8
7
6
5
4
3
2
1
0
Y
T
s
P
o
L
J
I
H
0
F
E
d
c
b
a
9
8
7
6
5
4
3
2
1
0
Y
T
s
P
o
L
J
I
H
0
F
E
d
c
b
a
9
8
7
6
5
4
3
2
1
0
QRS Remote
CD Source “cd”
Power ON Petine.
Press STOP to halt play.
Press the CD Eject button to open the door and snap the QRS SyncAlong series CD onto the spindle.
Using the remote control, tap the SOURCE button and then the number 1button. “1cd” momentarily displays.
If the access code for this CD has already been entered and saved , wait for “SAL” to display three times.
Press PLAY when “C” and the total number of tracks displays. You should hear the Piano with Audio.
If the access code has not been entered “SAL” will stay displayed, waiting for you to enter the code.
If “SAL” does not display, update the SyncAlong Music Index [Demo Image], see page 42.
Begin again at the top of this page after completing the update process..
Find the hand written access code located on the yellow QRS PICK TICKET that came with your order.
Use the six volume buttons at the bottom of the remote control to display the three character access code.
The two Audio buttons change the left display character.
The two Master/Volume buttons change the center display character.
The two Piano buttons change the right display character.
Press PLAY to save the access code to memory.
SAL displays to acknowledge the CD is recognized by the Demo Image index as SyncAlong.
SAL displays a second time to acknowledge the access code has been found in memory.
If “SAL” does not display a second time then verify the access code.
Open and close the door to rescan the CD.
If “SAL” displays and holds then enter the correct code.
SAL displays a third time to acknowledge the piano files have been located on the CompactFlash card.
If “SAL does not display a third time confirm the flash card is properly inserted. If it is then...
“Update SyncAlong CompactFlash Music From CDROM”. See page 43.
Press PLAY again to play the CD.
With Petine turned OFF, Insert the SyncAlong CompactFlash card into the CompactFlash card reader.
S A L
S A L
C 1 8
C 1 8
S A L
S A L
S A L
S A L
C 1 8
S A L
C 1 8
C 0 1

Petine V69_1
PAGE 10 QRS MUSIC TECHNOLOGIES, INC.
20
SOURCE
Press STOP to halt play. The source cannot be changed if the unit is in play mode.
1 Repeatedly tap the SOURCE button to cycle through the source list.
Stop tapping when the desired source displays.
2 Tap the SOURCE button, then immediately the number button associated with the desired source.
3 Tap the SOURCE button and then immediately tap the <<TRACK>> buttons, repeatedly, until the
desired source displays
1 cd = CD Drive
2iN = Internal Music
3cF = CompactFlash
4Av = Auxiliary Input
5Ni = MIDI
6rc = Record
1
Press the POWER button to turn the Petine controller and Pianomation ON and OFF.
POWER
b 1
12
BASS VOLUME
Press the BASS button to display the current Bass audio volume setting.
Within two seconds after pressing the BASS button, press the MASTER VOLUME buttons to adjust the Bass volume
setting. Range = -12 to +12
A 4
AUDIO VOLUME
Press the AUDIO VOLUME UP or DOWN button to display the current audio volume level setting.
Within two seconds after pressing the AUDIO VOLUME UP or DOWN button , press again or press and hold to adjust
the volume of the Audio only! Range = -9 to +9.
18
16
P - 1
PIANO VOLUME
Press the PIANO VOLUME UP or DOWN button to display the current piano volume level setting.
Within two seconds after pressing the PIANO VOLUME UP or DOWN button , press again or press and hold to adjust
the volume of the Piano only! Range = -9 to +9
0 6 7
MASTER VOLUME
Press the MASTER VOLUME UP or DOWN button to display the current master volume level setting.
Within two seconds after pressing the MASTER VOLUME UP or DOWN button , press again or press and hold to
adjust the volume of both the Piano and the Audio together. Range = 000 to 127
17
0 6 3
MUTE
Headphone Volume Level
Press the MUTE button to toggle the piano and audio ON & OFF.
The headphone volume is displayed and can be adjusted using the Data Dial on Petine or the Master Volume buttons on
the remote. The optional Soundcard is required to hear the piano melody.
2
0 1 8 No Dot!
STOP
Press STOP to halt play.
10
Alternately Flashing
0 1 8
PAUSE
Press PAUSE to suspend play.
9
Slowly Flashing
0 1 8
PLAY
Press PLAY to begin or resume play.
11
Maximum Number of Songs & Programs
CDROM Root 000 - 999
CFLASH Root 000 - 509
Programs On CFLASH or CDROM P01 - P99
CDROM & CFLASH Program Pxx 000 - 999
Internal Music Demo Disc 1.44MB
Remote Control Features... Refer to page 4 for button locations. #

For Technical Support Call 1-800-247-6557 Petine V69_1
QRS MUSIC TECHNOLOGIES, INC. PAGE 11
...Remote Control Features...
14
K 0 5
TRANSPOSE
Within two seconds after pressing the TRANSPOSE button, press the MASTER VOLUME buttons to adjust the playback “key”.
Range = Up 12 to Down 12in half-step increments from middle “C”.
Press the TRANSPOSE button to display the current playback “key”.
The key of the music on a CD or music from an MP3 file cannot be changed!
8
Flashing
0 0 3
Four Flashes
Per Second
0 0 3
0 0 3
Rapidly
Flashing
0 0 3
RANDOM
Press RANDOM repeatedly to cycle
through the PLAY mode and the three
RANDOM option modes.
Normal PLAY mode.
Though the random modes may be changed while play is stopped, the
random mode is only confirmed, by the flashing dots, during playback.
RANDOM Song (one).
Plays ONLY one random song within the selected program.
RANDOM Program. Plays songs randomly within the selected program.
RANDOM Source. Plays songs randomly within the selected source.
There are three RANDOM modes: One Song, Program, and Source
The RANDOM mode can be changed during STOP or PLAY.
Flashing
One Flash
Per Second
0 0 3
0 0 3
0 0 3
5
REPEAT
There are two repeat modes: Repeat Song and Repeat Program. REPEAT mode is accessed during song playback.
Select a song an press PLAY
PLAY
REPEAT Song. Repeats selected song.
REPEAT Program. Repeats all songs within selected Program or Root
Press PLAY and then REPEAT repeatedly
to cycle through PLAY and the two
REPEAT options.
4
P 0 1
P X X
0 0 1
0 5 6
P u P
P 0 1
PROGRAM - Root Files vs. Program Files
When Pxx is displayed, where xx is a number between 00 and 99, it’s an indication that there are Programs
(subdirectories) on the selected media. Unlike files on the root of the media, where the total number of songs on the
media are displayed after the initial scan, media with programs display the first program after the initial scan.
Press the <<TRACK or TRACK>> buttons to go to the available PROGRAMS.
Press the PLAY button to “drill down” into an available PROGRAM.
The first song number will be displayed. Press PLAY again to play this song or...
Press the <<TRACK, TRACK>> or the Number buttons to go to a song within the PROGRAM.
Press and Hold the <<TRACK button until “PuP” (Program Up) is displayed.
Pressing PLAY will then return to display the list of available PROGRAMS.
After gaining access to the songs within a program (subdirectory), pressing the PROGRAM button exits from the program.
13
t 0
TREBLE VOLUME
Press the TREBLE button to display the current Treble audio volume setting.
Within two seconds after pressing the TREBLE button, press the MASTER VOLUME buttons to adjust the Treble
volume setting. Range = -12 to +12
Refer to page 4 for button locations. #

Petine V69_1
PAGE 12 QRS MUSIC TECHNOLOGIES, INC.
19
v 0 5
_ 0 0
v 0 9
STEREO BALANCE
Press the STEREO BALANCE button to display the current Left/Right audio balance setting.
Range = Left 20 to Right 20
Display setting shown indicates equal balance between left and right speaker.
The <<TRACK button increases the volume of the Left speaker as it decreases the volume of the Right speaker.
The TRACK>> button increases the volume of the Right speaker as it decreases the volume of the Left speaker.
Within two seconds after pressing the STEREO BALANCE button, press the one of the <<TRACK>> buttons to balance the
volume of the Left and Right speakers. A two speaker system is required.
15
K 0 5
TEMPO
Press the TEMPO button to display the current tempo.
The tempo of the music on a CD or music from an MP3 file cannot be changed! Only Standard MIDI files.
Within two seconds after pressing the TEMPO button, press the MASTER VOLUME buttons to adjust the speed of the
playback. Range = -50 (Displays “nI”) to +100 (Displays “nA”)
Press the Number buttons to select a specific song by track number:
Press the +10 or +20 button to enter a 1- or 2- (10 or 20) to the display.
Then, press a single digit number from 0-9 to complete the song number selection.
Press and HOLD the +10 or +20 button to increment the display by 10 or 20. The display will advance until the button
is released or until the maximum number of songs available on the selected media has been reached.
Maximum: CFLASH=50- and CDROM=99-).
Then, press a single digit number from 0-9 to complete the song number selection.
Maximum: CFLASH=509 and CDROM=999.
Playing songs from a Program Directory
The first Program is displayed after the initial media scan.
The following examples assume that there are a total of 4 Programs on the media.
The 0, +10 and +20 buttons are not functional when Pxx is displayed.
Pressing one of these buttons at this time does not change the display.
Pressing a Number (N) button drills down to the first song of Program (N).
Example: Pressing 2 displays song 1 of Program 2.
Then, press PLAY to play song 1 or the Number (N) button to play song (N).
See the section directly above to enter numbers greater than 9.
If the Number (N) is greater than the total number of Programs on the media the last Program will be displayed.
Example: Pressing 9 displays P04 because it is the last Program on the media.
Playing songs from the Root Directory
Root Directory: Files on a CDROM or CompactFlash that are not within a Program directory
5
2 -
2 3
6 2 -
6 2 5
P 0 1
P x x
0 0 1
P 0 4
3
Number Buttons - Selecting specific songs.
6 7
P 0 1
0 0 1
v 0 5
v 0 9
Previous <<TRACK & Next TRACK >>
Press the <<TRACK>> buttons to go to the Previous or Next Program.
Press the <<TRACK>> buttons to go to the Previous or Next Song.
The <<TRACK button balances the volume to the Left speaker.
The TRACK>> button balances the volume to the Right speaker.
Within two seconds after pressing the STEREO BALANCE button, press the <<TRACK>> buttons to balance the volume of the
Left and Right speakers. A two speaker system is required.
...Remote Control Features Refer to page 4 for button locations. #

For Technical Support Call 1-800-247-6557 Petine V69_1
QRS MUSIC TECHNOLOGIES, INC. PAGE 13
Play MIDI & MP3 Files from CDROM or CompactFlash
CD “cd” or CompactFlash “cF” Source
Petine can read MIDI & MP3 files that are burned to a CD-R disc or copied to a CompactFlash memory card.
MIDI
Must be written for “Piano” [Patch numbers 1-6] to trigger the piano keys. See the “General MIDI Sounds List” on page 55.
The optional soundcard must be installed to hear any other instruments [Patches 7-128] and drums. See page 55.
Google search “MIDI Piano” on your computer to find MIDI files on the internet that will play the piano keys.
MP3
If the MP3 file was generated from QRS data Petine will automatically detect the Analog MIDI information on the left
channel to play the piano keys. Otherwise the piano keys will not play.
See “File Types Recognized by Petine’s Sources” Page 26.
Root Files vs. Program Files
Programs are subdirectories on a CDROM disc or CompactFlash card where song files can be categorized and saved for playback.
Petine will recognize and playback the file types, listed above, on either the Root or within a Program on a CDROM or
CompactFlash, but not from both areas on the same media. This means... if there are playable song files on both the Root and
within a Program Petine will only recognize and display the song files on the Root of the media.
Save music files to either the Root or in Programs on a particular CDROM or CompactFlash card.
Root Files will display three numbers “xxx”, ranging from 000-999 on a CDROM and 000-509 on a CompactFlash.
Programs will display as “Pxx”, where “xx” is a number from 01 to 99.
Refer to the following pages for more information.
“Maximum Number of Songs & Programs”, page 10.
“Playing Songs from the Root Directory”, page 12
“Playing Songs from a Program Directory”, page 12
To play these files see the following:
“Play from the CompactFlash Source…” Page 7
“Play a QRS CD Using the Remote Control” Page 8
P 0 1
6 2 5

Petine V69_1
PAGE 14 QRS MUSIC TECHNOLOGIES, INC.
Record Using the Remote Control - Requires Optional PNOscan
• Recordings are stored in 9 internal memory locations with a total record time of over 400 minutes.
• Saved recordings can be recorded over or erased.
• Individual recordings can be saved directly to a CompactFlash card.
• To save the 9 recordings as a group so that new songs can be recorded. See the “CompactFlash Utilities” section of this manual.
5
1
4
2
3
1
Press the STOP button to halt play.
Tap the SOURCE button and then the Number 6button to display “6rc”.
The first record source’s playback location “rP1” displays.
If you go to a different source before saving a recording and then return to the record
source “
rEC
” will display to remind you to save your last recording.
Repeatedly tap the TRACK>> button to display record “rEC”.
Press PLAY to enter the record session. Three dots will begin to flash at 60 beats per
minute. Rotating the ADJ Dial will change the metronome rate..
Play the piano or send MIDI data to start. Recording begins when MIDI data is
received by Petine via the MIDI Input cable.
Alternately flashing dots appear in the left and center display segments to
acknowledge that MIDI data is being received.
Press STOP when finished. The recording is temporarily stored in location “rPn”.
You now have several options to choose from:
Listen to the new recording, before saving, by pressing PLAY.
Or, review the 9 record locations by repeatedly tapping the <<TRACK>>
buttons to select “rPx” and press PLAY.
or
Record Over an existing recording or Save to an empty location by
repeatedly tapping the <<TRACK>> button to select one of the 9 record
locations “rcx” and then pressing the PLAY button to replace what’s
currently stored in “rPx”.
or Save the recording to a CompactFlash card by repeatedly tapping the
<<TRACK>> button to select “rcF” then pressing PLAY.
or Re-record by repeatedly tapping the <<TRACK>> button to select “rEC”
and then pressing PLAY to repeat the process.
or Erase an existing recording by going through the record procedure but, do not send MIDI data
to Petine. Then “save” this empty song to the desired record location.
0 0 1
6 R c
r P 1
r E C
r P n
r P x r P x
r c x r S A
r c f r S A
r E C 0 6 0
0 6 0
2
1
3
4
5
2
1
3
4 5 4
The very first time that an individual recording is saved directly to the CompactFlash card Petine creates a folder named “RECSES99”
and saves the individual recording as “RECSN001. All subsequent recordings saved to “rcF”, on the same CompactFlash card, are
placed in the same folder and named “RECSN002...RECSN###” up to RECSN999.
Note: If there are ANY music files on the “root” of the CFLASH card Petine will not recognize the files in the “RECSES99” folder. The nine
record locations can also be saved, as a group, using the “Copy Record Memory” option of the “CompactFlash Utility”.
These naming conventions are useful only when the CompactFlash card is viewed on a computer. Petine will display these groups as
“Pxx” where “xx” is a number corresponding to the location of the groups on the CompactFlash card. For more information see
“Playing Songs from a Program Directory” under “Number Buttons” which is located in the “Remote Control Features” section on page 12.
How Individual Recordings are Named when Saved to a CompactFlash Card
Record Source “rc”
Play a Recorded Song Using the Remote Control
Recording the piano requires the optional PNOscan, MIDI Adapter Cable & Jumper .
See page 46. “Connecting for Standard Playback or Optional Record” section of this manual for instructions.
To play back a song from one of the nine record locations follow steps 1 thru 3 above to access the Record Source.
At step 4, stop tapping the <<TRACK>> buttons at the desired record location, rP1 through rP9.
Press PLAY.

For Technical Support Call 1-800-247-6557 Petine V69_1
QRS MUSIC TECHNOLOGIES, INC. PAGE 15
Play a General MIDI Sound Using the Piano Keyboard
Requires Optional PNOscan & Soundcard
Press STOP to halt play. Press the remote control’s SOURCE button and then the number 5button. “5ni” displays.
If the display reads “- - -” then you need to change the MIDI Input Select option.
See page 36. “MIDI Input Select”, follow the instructions and set the option to “rc”.
Rotate the ADJ Dial to adjust the volume.
Press STOP on the remote control. Rotate the ADJ Dial on the Petine controller or push the <<TRACK>> buttons on
the remote control to select another instrument from the General MIDI Sound List.
See page 55. “General MIDI Sounds - List” for the numbers associated the soundcard instruments.
The display should read “001” with a flashing dot at right to indicate “play” mode.
“001” represents Patch 1, the Acoustic Grand Piano in the General MIDI Sound List.
The General MIDI Acoustic Grand Piano will sound through the speaker when triggered by MIDI data. See page 55.
Play the piano keys to hear the selected General MIDI soundcard instrument through the speakers.
- - -
0 0 1
0 2 0
S n i
0 0 8
MIDI Source “ni”

Petine V69_1
PAGE 16 QRS MUSIC TECHNOLOGIES, INC.
1 Power Button Turns the system ON and OFF.
2 Display Screen
Three segment LED display.
3 CompactFlash Eject
Button
Press to eject a CompactFlash card.
4 CompactFlash Card
Reader
The CompactFlash card reader replaces the traditional floppy disc drive.
It’s best to insert the CompactFlash card before powering ON.
5 CD ROM Drive
Plays the following formats: QRS CD; MIDI files on CDROM [CD-R Only].
6 CD Busy LED This LED illuminates whenever the CD is being accessed.
7 CD Eject Button Press to eject a CD.
8 Emergency CD Eject
Hole
Use to open the CD door when power is removed from the Petine CD
controller. Straighten the open end of a small paper clip and gently insert it
into the hole to open.
9 SELect/ADJust Dial
Used to access all of the functions of Petine.
Press & Hold to shut down if Petine stops responding.
10 Headphone Jack
Headphone output.
3.5mm (1/8”) Stereo Jack
11 Infra-Red (IR) Sensor
Point the remote toward the IR sensor to control Petine.
Front Panel Features
4 5 7
6 8 9
1
2
3
10
11

For Technical Support Call 1-800-247-6557 Petine V69_1
QRS MUSIC TECHNOLOGIES, INC. PAGE 17
Back Panel Features
1
2
3 4 5 7
6
9
8
1 Power Input
Input from the AC to 5 Volt DC Power Adapter.
2 Microphone Input /
Line Out 2
Inputs for: Microphone or Barcus Berry Pickup or Piano Microphone.
Output for: Mixed Output.
3.5mm (1/8”) Stereo Jack
3 Analog MIDI Output
Transmit the MIDI Piano signal wirelessly.
RCA Jack
Sends the analog MIDI signal out of the AMI Output jack only when playing from
the CD source.
4 Auxiliary Input
“Line In”
Stereo input for connection to an external computer or CD/DVD changer.
3.5mm (1/8”) Stereo Jack
5 Line Output
Stereo output to powered speakers).
3.5mm (1/8”) Stereo Jack
6 S-Video Output
Currently Not Used
7 Output to the Pianomation
Processor
Connector for the Standard Pianomation Processor Cable or for the Record-
MIDI IN /MIDI OUT cable.
DB15 Socket
8 Universal Serial Bus A Currently Not Used
9 Universal Serial Bus B Currently Not Used

Petine V69_1
PAGE 18 QRS MUSIC TECHNOLOGIES, INC.
Setup Menu Functions - Navigation Basics
Play must be STOPPED before the Setup Menu can be entered.
If any dots are flashing in the display, press the Remote’s STOP button or the Front Panel’s ADJ Dial.
When no dots are present, Double-Click the Dial to access the Setup Menu.
Double-Click = Tap the Dial twice within one-half second.
When you have entered the Setup Menu you will see the current “Source”. See below.
While in the Setup Menu, pressing the ADJ Dial changes the dot from solid to flashing to solid…
Rotating the Dial while the dot is SOLID moves the dot from left to right (table column).
Rotating the Dial while the dot is FLASHING moves you through the functions or values (table row).
To Exit the Setup Menu: Double-Click the ADJ Dial at any time.
All of Petine’s functions can be controlled from the Setup Menu which is accessed using the front panel’s ADJ Dial.
Some functions that can also be changed using the Remote Control - shown in bold type in the Function table below.
This page will show you the basics of navigating through the Setup Menu so that you can get to any function.
The pages that follow will give specific instructions on each of the functions.
The table on the opposite page shows
the complete list of Setup Menu options.
S
c d
Si n
Sc F
SA v
Sn i
Sr c
Setup Menu Function Display
0 2
Source S
i n
4 1] Stop Play
S
i n
2] Double-Click the ADJ dial.
3] Rotate dial to put dot at far right.
S
i n 4] Press the dial once.
5] Rotate dial to display “cd“.
Example: Select the CD Source.
C
1 4 6] Double-Click to Select and Exit.
Setup Menu Function Display
Source S
Audio Volume A 0
Piano Volume P 0
Tempo -
0 0
Transpose v
0 0
Microphone
\ 0
Stereo Balance _
0 0
Bass Volume b
0 0
Treble Volume t
0 0
Metronome Volume Uo 0
Delay d
P n
Configure Pianomation n
N 1
Test 2 2
E =
Alignment / Test 11 "
e =
Audio Configuration c
S t
CompactFlash Utilities F
d E
CD ROM Utilities C
d e
F-Curves / o F
Midi Input Select J r c
Time Signature n
4 4
Mixed Out Level Piano P 8 0
Soundcard Output Sn A
Main Audio Output o
n o
Exit E n d
c d
Flashing Dot
Solid Dot
Rotating the Dial moves a Solid Dot: Left / Right.
Pressing the Dial alternately changes the Dot: - Solid or Flashing.
Rotating Dial moves a Flashing Dot: Up / Down.
Dots can be placed in any of the highlighted squares in this table.
Double-Click at anytime to Exit.
With Play Stopped: Double-Click the ADJ dial to Enter the Setup Menu.
Dial
Rotate to ADJust Push to SELect

PAGE 19
Setup Menu Functions -Table
Function Display Options & Ranges Pages Default Remote
Source S
cd Compact Disc Drive 5,9,10,13,26
in Yes
in Internal 5,6,10,26
cF CompactFlash 5,7,10,13,26
Av Auxiliary
Settings below are not seen when in the Setup Menu.
5,10,23,26
AnI Analog MIDI (Default)
StE Stereo
ni MIDI 001 General MIDI Sound number when MIDI Input
Select is set to Record Strip “rc”. 5,10,15,22,26
--- Plays from MIDI IN cable when MIDI Input Select is set to File Player “FP”.
rc Record & Save [rc1-rc9; rEC; rcF] Playback [rP1-rP9; rPn] 5,10,14,26
Audio Volume A 0 Audio Offset Volume Range: -9 to 9 8,10,27 0 Yes
Piano Volume P 0 Piano Offset Volume Range: -9 to 9 8,10,27 0 Yes
Tempo - 00 Playback Speed Range: “nI” for Min=50 nA” for Max=100 12,27 -00 Yes
Transpose v 00 Playback Key Range: 00 = No change to Up or Down 12 Halfsteps 11,27 v00 Yes
Microphone \ 0 Microphone Volume Range: 0 to 9 28 0 No
Stereo Balance _ 00 Left / Right Audio Balance Range: L20 to R20 12,28 _00 Yes
Bass Volume b 00 Bass Volume Offset Range: -12 to 12 10,28 00 Yes
Treble Volume t00 Treble Volume Offset Range: -12 to 12 11,28 00 Yes
Metronome Volume Uo0 Click Track Volume Level Range: 0 to 9 29 0 No
Delay d
Pn Pianomation = 500ms Delay 29 Pn No
Sy Synthesis = No Delay
Configure
Pianomation n
m1 All Pianos
30 m1 No
m2 Piano Channel 1
m3 All Instruments
m4 All MIDI
Test 2 2 E= Not Yet Available
Test 11 " e= Sets the Minimum Force of the Keys and the Pedal Solenoid 30 No
Configure Audio c
St Standard
31 St No
SA Karaoke (Sing Along)
SL Silent Piano
bb Barcus Berry Pickup
2o Mixed Output
CompactFlash
Utilities F
d
E
Demo Update
32 d No
S System Update
A Application Update
L Key List Update
F Format
c Copy Record
E Erase Record Memory
CD ROM Utilities C
d
E
Demo Update
33 d No
S System Update
A Application Update
L L=Key List Update
c Copy - SyncAlong (Will not overwrite existing CompactFlash card SAL files)
C Copy - SyncAlong (Overwrites existing CompactFlash card SAL files)
F-Curves /
oF Off
34 & 35 of Yes
AU Automatic
nA Manual
Midi Input Select J rc Record Strip 15, 22,36 rc No
Fp F-Player
Time Signature n
44
Metronome Click-track 36 44 No
Mixed Out Level P 80 Soundcard Piano Volume on Line Output 2 Range: 00 to 80 37 80 No
Soundcard Output SnA Maximum 37 na No
St Dynamic
Main Audio Output o
no Mono 38 no No
St Stereo
Exit E Exit Setup Menu (“double-click” the ADJ Dial) 38 No
nd

Petine V69_1
PAGE 20 QRS MUSIC TECHNOLOGIES, INC.
Play a QRS CD Using the Petine Controller
Power ON Press the Power button to turn on the system.
Insert CD Press the CD Eject button to open the CD tray.
Snap the CD onto the spindle and close the tray.
Display
S
i n
0 2 4
S
i n
S
i n
S
c d
Si n
Sc F
SA v
Sn i
Sr c
C 1 2
Press STOP to halt play.
Double-Click the ADJ dial. [ Double-Click = twice within one-half second]
Rotate dial to move dot to the far right.
Press the dial, the dot begins flashing.
Rotate the dial to display “cd”.
Double-Click the dial to Select and Exit.
Play Song Press the ADJ Dial and the first song begins to play.
Adjust Volume Rotate the ADJ Dial to change the Master Volume level.
Stop play Press the ADJ Dial to stop the song.
Next song
Previous Song
While playback is stopped, rotate the ADJ Dial clockwise to advance to the Next song or
counter-clockwise to go back to the Previous song.
Power CD Eject
ADJ Dial
Rotate to Adjust
Press to Select
Infrared Eye (IR)
Remote Control
Three Segment
Display
Push Here to
Close Door!
CD Source “cd”
Other manuals for Petine
1
This manual suits for next models
1
Table of contents
Other QRS Music Technologies Media Player manuals