quadient LAN User manual

Installation Guide
LAN

2
LAN Installation Overview
The IS series mailing systems have the ability to connect to both the
Postage Funding Server Credifon and the Online Services Server via a
LAN connection using a standard RJ45 Ethernet patch cable.
When the machine connects to the Postage Funding Server or the
Online Services Server it opens a secure communication over your
Internet access based on SSL protocol via HTTPS on TCP port 443.
Depending on the network installed there are certain things that must
be known prior to installing the system. It is likely that you will want to
ask your IT department to get involved here.
IP addressing:
1. Do you want to let DHCP allocate an IP address to your Franking
Machine?
Does the network have a DHCP server that will provide an IP address,
default gateway, and DNS, which will allow access to the Internet?
2. Or do you want to manually assign an IP address from your organiza-
tion to the Franking Machine?
You will need to know the settings for IP address, Subnet Mask, Default
Gateway, and DNS server.
Getting Internet access:
The Franking Machine needs to get access via the Internet to:
uk-meterservices.neopost.com using TCP port 443.
1. Will the Franking Machine be able to get direct access to this from
your LAN once it has an IP address? If yes go to page 4.
2. Or, will someone from your IT/Security teams need to make firewall
changes to permit this? If yes go to page 5.
3. Or, will some Proxy settings need to be applied to the Franking Ma-
chine to allow Internet Access? If yes go to pages 6 and 7.

3
Terms used:
DHCP: (Dynamic Host Configuration Protocol). For Automatic IP addresses
assignment.
DHCP server provides the machine with an IP address. Generally requires no
user intervention to obtain IP address. The DHCP server automatically assigns
an IP address to the mailing system. It provides also the Default Gateway IP
address, and DNS server IP address.
DNS: (Domain Name System). The DNS server allows (resolves) Domain Name
to IP addresses.
Proxy: If a Proxy is used to access the Internet, you can set-up the machine
to use it when the machine tries to access the Neopost Servers through your
Internet connection.
Firewall: A network security system that allows businesses to closely control
access between networks and network attached devices, such as your Fran-
king Machine and Quadient.
Default settings: In its factory-default state, DHCP is enabled, DNS is in auto-
matic mode and Proxy support is disabled. By default the port used to com-
municate over the Internet is port 443. If the proxy support is activated, the
port used to communicate with the proxy is port 8080.
IP adress: This address consists of 4 series of 3 digits less than 255.
If you only have 1 or 2 digits per series, start it with one or more 0s.
Example: 169.254.001.012
4
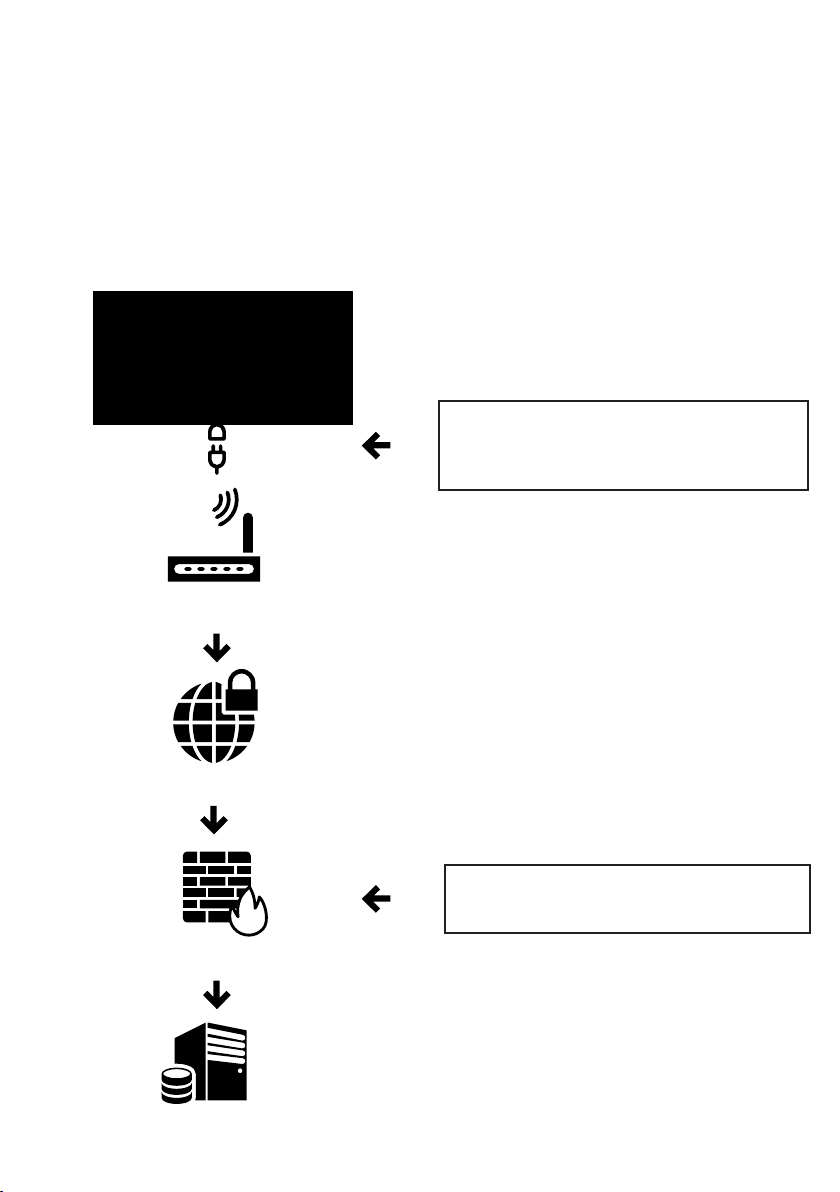
Sample Installation Scenarios
Simple Internet access via a standard ADSL Internet connection:
In this scenario, you simply plug the Franking Machine into your ADSL router
or LAN connected to the ADSL router using a standard Ethernet (CAT5, RJ45)
cable. The Router then assigns all IP address settings for you using DHCP. In most
cases, the franking machine will then be able to connect directly to Quadient
using you ADSL line.
Your franking machine
Your ADSL router
Internet
Quadient Firewall
Quadient Recrediting
Systems
uk-meterservices.neopost.com
TCP port 443.
Plug one end of your CAT5 cable
into your franking machine, and
the other end in your ADSL router
5
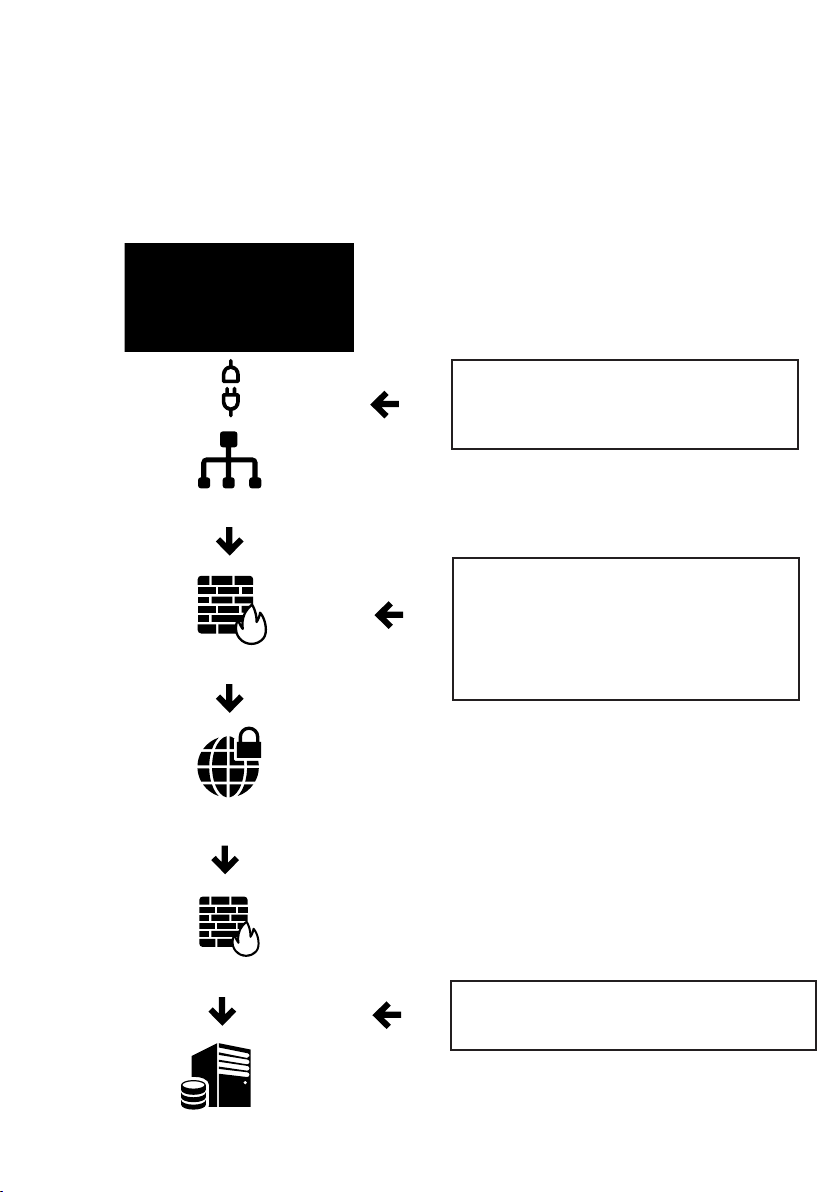
Corporate Internet access via a Firewall:
Here your Franking Machine is connected to your internal corporate network
using a standard Ethernet (CAT5, RJ45) cable, with either DHCP allocating the
IP address or your IT/Security departments giving you details for manual confi-
guration. Additionally, a security device called firewall controls access to the
Internet, and may block the Franking Machine. To enable the Franking Machine
to reach Quadient, you may need to involve your IT/Security teams, and ask
them to allow the Franking Machine to reach:
Your franking machine
Internet
Quadient Recrediting
Systems
uk-meterservices.neopost.com
TCP port 443.
Plug one end of your CAT5 cable
into your franking machine, and
the other end into your network.
Quadient Firewall
Your internal network
Allocated IP address of your
franking machine must be
allowed to reach
uk-meterservices.neopost.com
TCP port 443.
Quadient Firewall

6
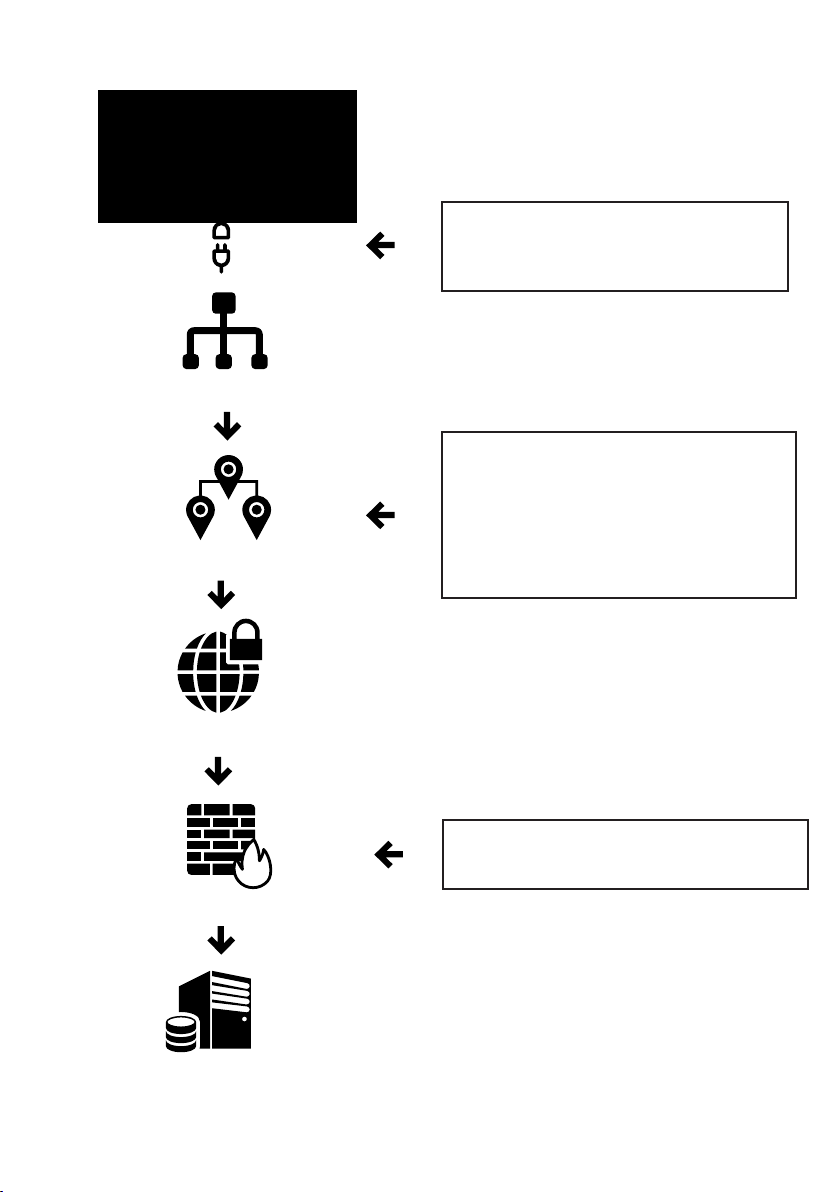
Corporate Internet access via a Proxy Server:
Here your Franking Machine is connected to your internal corporate network
using a standard Ethernet (CAT5, RJ45) cable, with either DHCP allocating
the IP address or your IT/Security departments giving you details for manual
configuration. Additionally, a security device called a Proxy Server is used to
permit access to Quadient.
It is likely you will need to ask your IT/Security teams to create settings for the
Franking Machine in the Proxy Server Configuration. They will need to know
the following information:
The Franking Machine needs to reach: uk-meterservices.neopost.com using
TCP port 443 (which is also known as SSL or HTTPS).
It will talk to your Proxy Server via TCP port 8080 by default, and is capable of
sending username and password.
They may respond by providing you with a Username and Password, as well
as an IP address or DNS name for the Proxy Server. These details will allow the
Franking Machine to get access to Quadient.
7
Your franking machine
Internet
Quadient Firewall
Quadient Recrediting
Systems
Plug one end of your CAT5 cable
into your franking machine, and
the other end into your network.
uk-meterservices.neopost.com
TCP port 443.
Your proxy server
Your internal network
Your franking machine communi-
cates with your Proxy server via
TCP port 8080 by default. Your
proxy server will pass it on to
uk-meterservices.neopost.com
TCP port 443.

8
The Franking Machine will need the following fields completed during setup.
(It may be advisable to have a member of your IT/Security teams present
during installation to assist here).
Proxy URL: This is the name or IP address of your Proxy Server. This will need
to be provided by your IT department.
Proxy Port: This is the port number allocated on the network that communi-
cates with your Proxy Server. By default this is set to 8080. This will need to be
provided by your IT department.
Proxy Login: This is a user account created on your Proxy Server that allows
Internet access. This will need to be provided by your IT department.
Proxy Password: This is the password that would be associated to your Proxy
Login. This will need to be provided by your IT department.
9
Manually configuring LAN communication settings
In some unique instances, the LAN settings may have to be programmed into
the IS series mailing machine in order to establish a valid connection via LAN.
To manually configure LAN settings on an IS series mailing machine for a new
install, the actions below are required. If not, the system will continue to auto-
matically start the installation wizard and forbid the configuration of the LAN
settings.
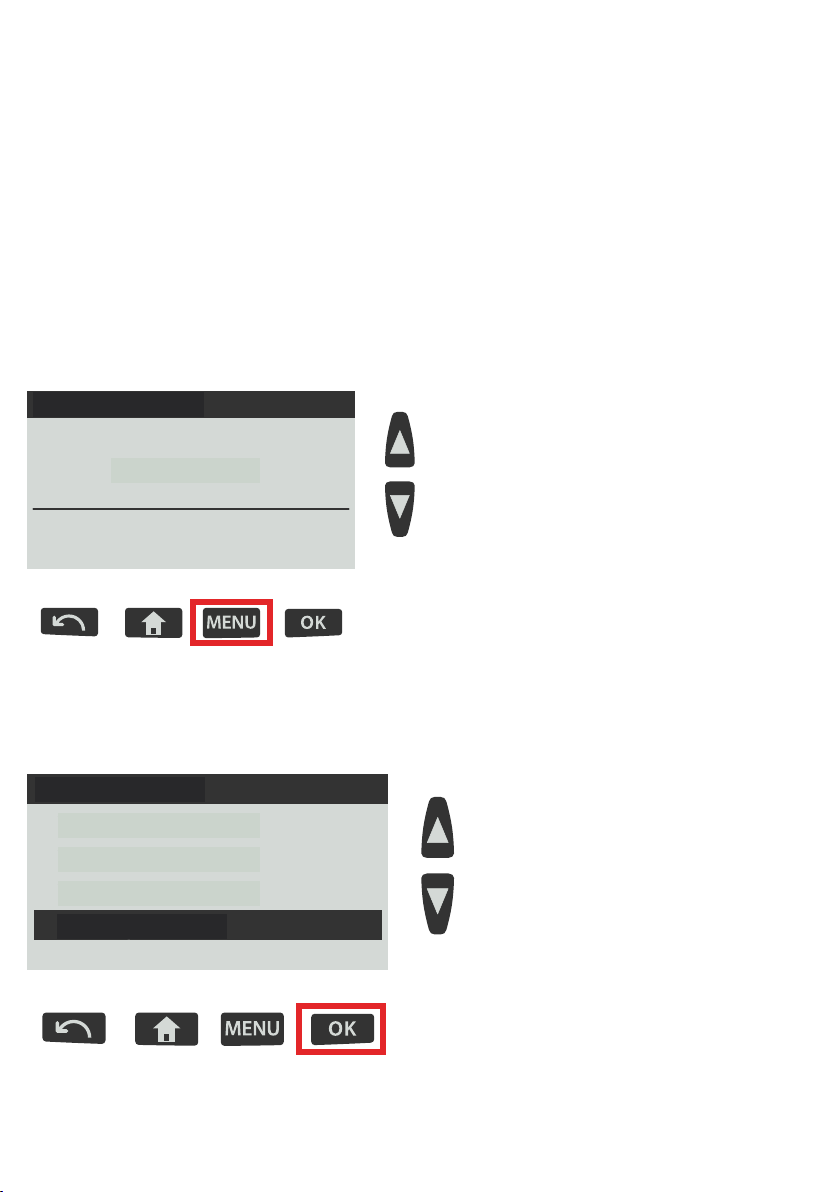
Remove the power from the system; remove the PSD (meter); plug the system
back in and wait until the system boots up.
1. When the system powers on with no PSD (meter), you will be requi-
red to clear a “boot with no PSD” message. Press “OK” to display the screen
below. Press the “Menu” button.
No stamp
No printing
Note: if there is no cartridge in the system, other messages may have to be
cleared by pressing OK.
2. Scroll down and select “13 Supervisor”.
10. Application
11. Preferences
12. Cartridge
13. Supervisor
Main Menu
10
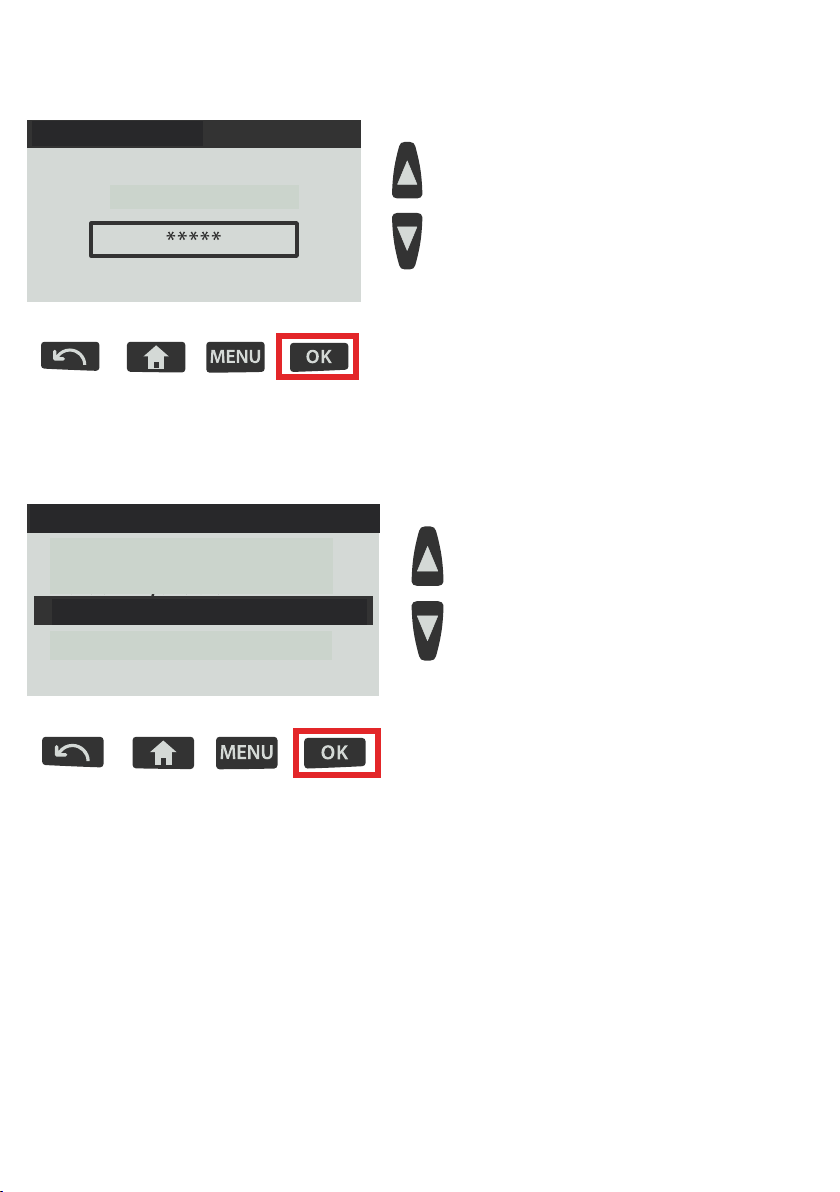
3. Enter the supervisor pin code “00000” and Press OK.
Note: This pin code only applies when the PSD (meter) is not present.
4. Scroll down to the option number 9 “Communication settings” and
Press OK.
Main menu
9. Communication settings
8. Options and Updates
7. Maintenance
10. Online Services
Note: Please ask a member of your IT administration sta to be present before
adjusting these settings.
Enter PIN code:
Login
This manual suits for next models
9
Table of contents
Other quadient Packaging Equipment manuals


