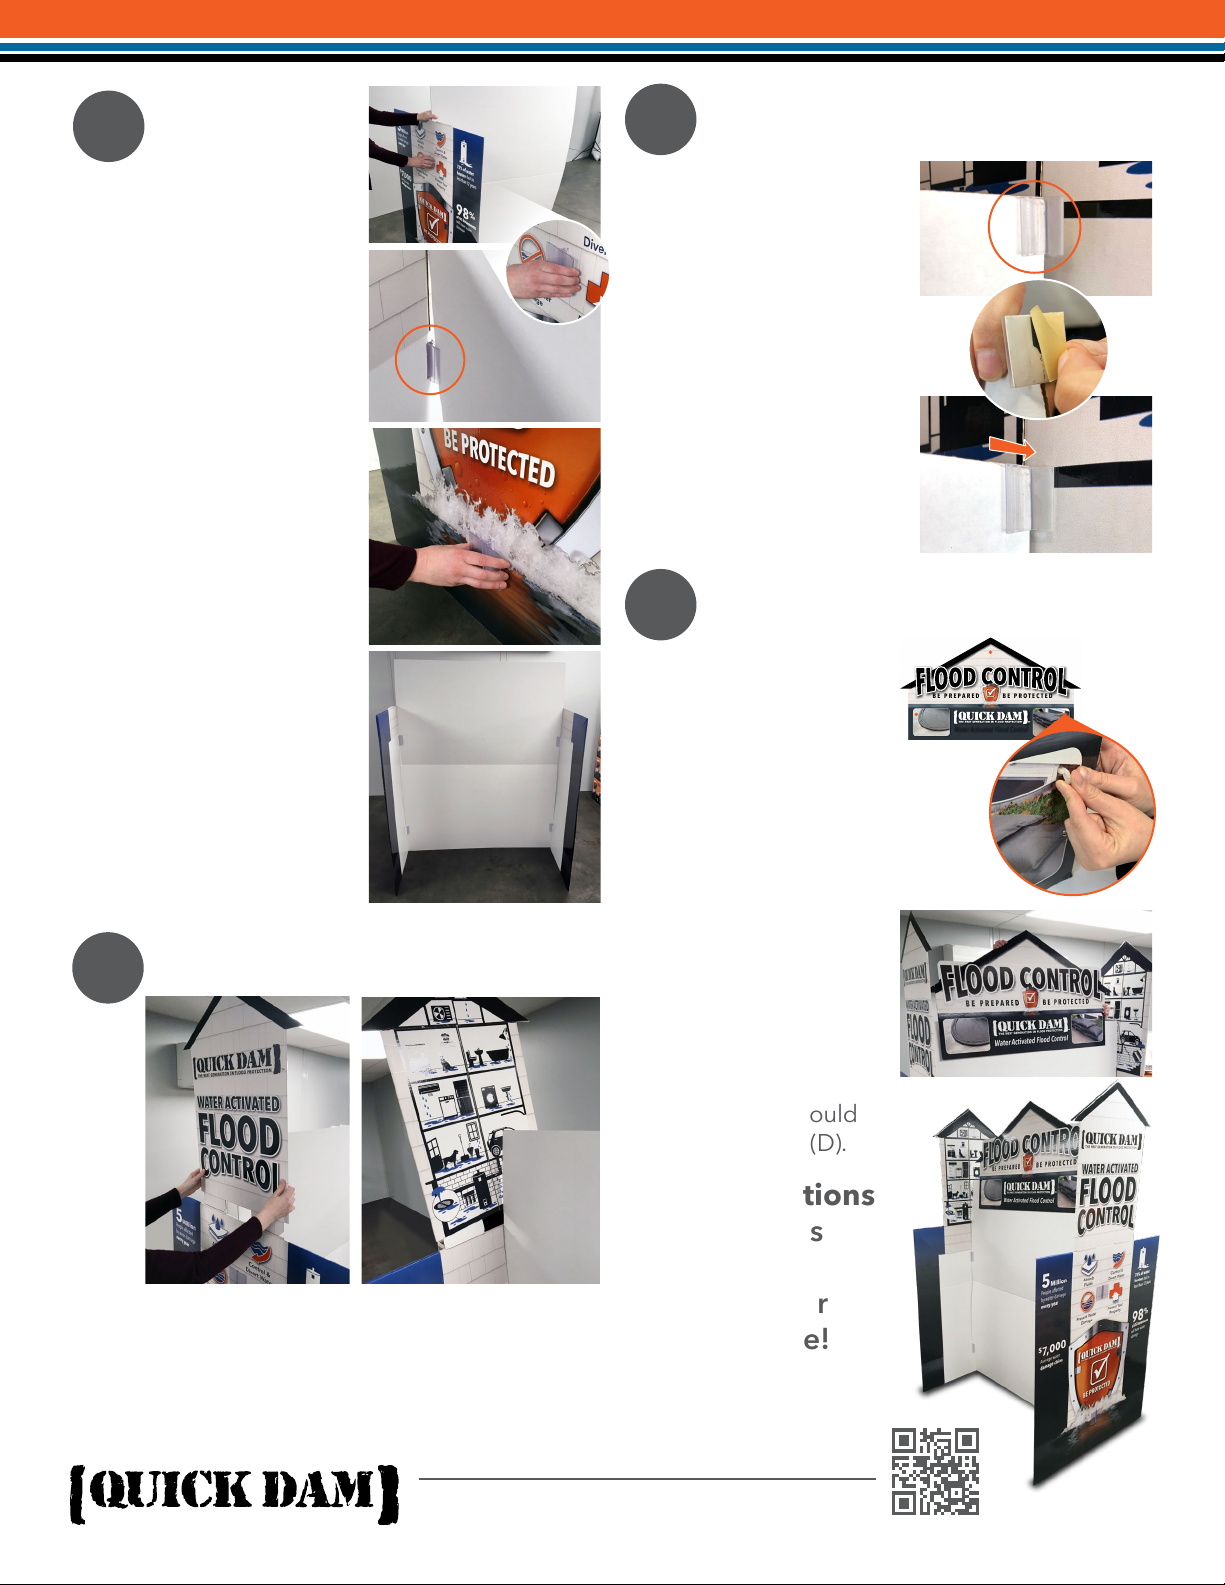
manuals.online logo
Brands
  1. Home
  2. •
  3. Brands
  4. •
  5. QUICK DAM
  6. •
  7. Protection Device
  8. •
  9. QUICK DAM Flood Control Center User manual

QUICK DAM Flood Control Center User manual

Other QUICK DAM Protection Device manuals

QUICK DAM Flood Gate Instruction Manual

QUICK DAM

QUICK DAM Flood Gate Instruction Manual

QUICK DAM FLOODGATE QDFG45 Instruction Manual

QUICK DAM

QUICK DAM FLOODGATE QDFG45 Instruction Manual

Popular Protection Device manuals by other brands

Merlin Gerin Sepam series 20 Quick start quide

Merlin Gerin

Merlin Gerin Sepam series 20 Quick start quide

OUTSTEEL VENITIAN installation instructions

OUTSTEEL

OUTSTEEL VENITIAN installation instructions

Kemo Electronic M148-24 instructions

Kemo Electronic

Kemo Electronic M148-24 instructions

Endress+Hauser HAW569 quick start guide

Endress+Hauser

Endress+Hauser HAW569 quick start guide

SK ClickClick user manual

SK

SK ClickClick user manual

Ultrasonic SonicPRO installation manual

Ultrasonic

Ultrasonic SonicPRO installation manual

nxt BIA-nXt-DPC 1-22 Installation and operation manual

nxt

nxt BIA-nXt-DPC 1-22 Installation and operation manual

TFortis SG-Switch operating manual

TFortis

TFortis SG-Switch operating manual

BERNINI DESIGN Be172 instruction manual

BERNINI DESIGN

BERNINI DESIGN Be172 instruction manual

Rayleigh Instruments RI-ENERGYSET-3P-ESS-50-100 manual

Rayleigh Instruments

Rayleigh Instruments RI-ENERGYSET-3P-ESS-50-100 manual

E.K.T. ke-DP01 quick start guide

E.K.T.

E.K.T. ke-DP01 quick start guide

Sola HD STV100K Series instruction manual

Sola HD

Sola HD STV100K Series instruction manual

socomec COUNTIS AMd operating instructions

socomec

socomec COUNTIS AMd operating instructions

Siemens SIPROTEC 7SD80 manual

Siemens

Siemens SIPROTEC 7SD80 manual

cias MICRO-RAY installation manual

cias

cias MICRO-RAY installation manual

Sungrow PVS-16MH user manual

Sungrow

Sungrow PVS-16MH user manual

Reer 32010 instruction manual

Reer

Reer 32010 instruction manual

STI STI-7560AC Mounting instructions

STI

STI STI-7560AC Mounting instructions

manuals.online logo
manuals.online logoBrands
  • About & Mission
  • Contact us
  • Privacy Policy
  • Terms and Conditions

Copyright 2025 Manuals.Online. All Rights Reserved.

1Review Contents
• Box should include:
(A) Center Headers
(1-sided) x2
(D) Back Wall
(White) x1
(E) Clear
Clips x4
(G) Clear Clips
w/ Adhesive
back x2
(F) Header Clips x6
(C) Side
Bottoms x2
(B) Side Headers
(2-sided) x2
BE PREPARED BE PROTECTED
Water Activated Flood Control
Control &
Divert Water
Prevent Water
Damage
Protect Your
Property
Absorb
Fluids
5Million
People affected
by water damage
every year
98%
$7,000
of US basements
will have water
damage
Average water
damage claim
75% of water
heaters fail in
less than 12 years
BE PROTECTED
Please note: It is recommended that you have
2 people for assembly
2Back Wall
• Hold Back Wall (D) so that
the fold is parallel with the
ground
THE NEXT GENERATION IN FLOOD PROTECTION TM
Protect Against:
Flood Control Center
ASSEMBLY INSTRUCTIONS
Visit us at www.quickdams.com or call 888-761-4405
4
4
5
Attach Side Headers
Attach Side Headers (cont.)
Attach Center Header
• You’ll need 2x (B) Side Headers
• Insert the feet of (B) into slits on the tops of
(C), with “Flood Control” facing outwards and
the house diagram facing inwards.
• You’ll need 2x (G) Clear
• Clips with adhesive
backing
• Secure clip to top of
back wall
• Remove adhesive
backing and stick to
Side Header back
• Repeat steps for
other side
• You’ll need 6x (G)
Header Clips
• Holding the 2 headers
back to back, insert
header clips through
the 3 holes, 1 on each
side, fastening the
headers together
• Lower double sided
center header (A) onto
(D) by pulling the
bottom portion slight-
ly apart and sliding
down. This should sit
7” down and should
be centered on (D).
•Congratulations
the display is
assembled
and ready for
merchandise!
3Assembling
Sides
• You’ll need:
2x (C) Side Bottoms
1x (D) Back Wall
4x (E) Clear Clips
• While holding (D),
place (C) perpendicular
to it, with both sitting
ush to the ground.
• Place Clip through
top hole on (C) and
secure to (D)
• Place Clip through
bottom hole and secure
to (D).
• Repeat these steps for
2nd Side Bottom.
• Once both sides are
attached, it should
stand freely on
its own.
Clip coming through
Side Bottom and
attaching to Back Wall
BE PREPARED BE PROTECTED
Water Activated Flood Control
www.quickdams.com | 888-761-4405
THE NEXT GENERATION IN FLOOD PROTECTION TM