quiko QK-CE220CT User manual

QK-CE220CT_V03
CENTRALE DI COMANDO pag. 3
MANUALE D’INSTALLAZIONE ED USO
CONTROL UNIT pag. 12
INSTALLATION AND OPERATION MANUAL
CENTRALE DE COMMANDE pag. 21
MANUEL D’ INSTALLATION ET D’ UTILISATION
IT
EN
FR

DICHIARAZIONE “CE” DI CONFORMITA’
“CE” DECLARATION OF CONFORMITY
Il costruttore: QUIKO
The manufacturer:
Indirizzo: Via Seccalegno, 19 Sossano (VI) Italy
Address:
DICHIARA CHE IL SEGUENTE APPARATO
DECLARES THAT THE FOLLOWING EQUIPMENT
Descrizione: Apparecchiatura elettronica per dissuasori di sosta
Description: Control unit for dissuasive pillars
Modello: QK-CE220CT
Model:
• Risulta conforme con quanto previsto dalle seguenti Direttive Comunitarie, comprese le ultime modi che e con la legisla-
zione nazionale di recepimento
Is in conformity with the provisions of the following Community Directives, including the latest modifications and
with the assimilating national legislation
2004/108/CEE 93/68/CEE
Compatibilità Elettromagnetica • Electromagnetic Compatibility
2006/95/CEE 93/68/CEE
Bassa tensione • Low voltage
• Rispetta le seguenti (parti/clausole di) norme tecniche armonizzate
Respects the following parts/clauses of harmonized technical standards
EN 61000-6-1 EN 61000-6-2 EN 61000-6-3 EN 61000-6-4 EN 55014-1 EN 55014-2
• E’ conforme alle seguenti (parti/clausole di) norme armonizzate
Is in conformity with the following parts/clauses of harmonized standards
EN 60335-1 EN 60335-2-103
La QUIKO garantisce detta conformità esclusivamente nel caso in cui l’apparecchiatura venga utilizzata come unità di co-
mando/gestione della motorizzazioni: QK-CT210500, QK-CT210500L, QK-CT210500LA, QK-CT210700, QK-CT210700L,
QK-CT210700LA, QK-CT115500 e QK-CT193700L nelle con gurazioni tipiche di installazione e con periferiche conformi alle
Direttive Europee.
QUIKO guarantees such a conformity only if the control unit is used as a control/management unit for automation system:
QK-CT210500, QK-CT210500L, QK-CT210500LA, QK-CT210700, QK-CT210700L, QK-CT210700LA, QK-CT115500 e
QK-CT193700L in typical configuration of installation and with peripherals which conform to the European Directives
Sossano 26/07/2011Il Rappresentante legale
The legal Representative

- 3 -
Indice Pag.
1. INTRODUZIONE 4
2. CARATTERISTICHE PRINCIPALI 4
3. CARATTERISTICHE TECNICHE 4
4. SICUREZZA DELL’INSTALLAZIONE 5
5. INGRESSI E USCITE 5
5.1 MORSETTIERA DI POTENZA CN6-CN1 5
5.2 MORSETTIERA USCITA IN BASSA TENSIONE CN2 5
5.3 MORSETTIERA INGRESSI CN3 6
5.4 MORSETTIERA RESISTENZA RISCALDANTE CN4 6
5.5 ANTIFURTO (Optional) oppure SENSORE STELO 6
ALZATO (Optional)
6. CONFIGURAZIONE DEI DIP-SWITCH 7
7. REGOLAZIONE DEI TRIMMER 7
8. RICEVENTE RADIO 7
9. FUNZIONAMENTO SIMULTANEO DI PIU’ DISSUASORI 7
10. ESEMPI DI CONTROLLO ACCESSI 8
10.1 ENTRATA O USCITA CONTROLLATA 8
10.2 ENTRATA O USCITA AUTOMATICA 9
10.3 ENTRATA ED USCITA CONTROLLATA 10
10.4 ENTRATA CONTROLLATA ED USCITA AUTOMATICA 11
AVVERTENZE
Si raccomanda di eseguire un’installazione che preveda tutti gli accessori necessari ad assicurare il
funzionamento secondo normativa vigente, impiegando sempre dispositivi originali QUIKO.
L’utilizzo e l’installazione di queste apparecchiature deve rispettare rigorosamente le indicazioni forni-
te dal costruttore che non può essere considerato responsabile per eventuali danni derivanti da uso
improprio o irragionevole.
La QUIKO declina ogni responsabilità per le possibili inesattezze contenute nel seguente pieghevole
e si riserva il diritto di apportare modifiche in qualsiasi momento senza preavviso alcuno.

- 4 -
CENTRALE DI COMANDO
QK-CE220CT
IT
La centrale di comando QK-CE200CT segna un evidente passo avanti nella gestione delle automazioni per arredi urbani e civili.
La scelta di diverse logiche di funzionamento ed una completa dotazione di ingressi, permettono di interfacciare la centrale a numerose
unità periferiche che, a seconda della complessità richiesta, servono a realizzare un evoluto e moderno sistema di controllo accessi nel
contesto della gestione del transito veicolare. Il microprocessore controlla costantemente le manovre di salita e discesa permettendo un
graduale rallentamento a fine manovra che rende più silenziosa e gradevole la corsa dello stelo.
CN16: Collegamento programmatore
S1: Dip switch
TR1,TR2 eTR3: Trimmer di regolazione
P1: Tasto di START
P2: Tasto di RESET
F1: Fusibile linea 6,3 A
- Alimentazione: 230Vac +/- 10% 50Hz (altre tensioni disponibili a richiesta)
- Uscita motore: 230Vac; 1000W max. (equivalenti a quattro motori)
- Uscita elettrofreno: 24Vdc di spunto e 12Vdc a regime
- Uscita semaforo: 230Vac 2 x 40W max.
- Uscita lampeggiante: 230Vac 80W max.
- Uscita luci led: 24Vac 24W max.
- Uscita 24Vac per accessori: 1A; 24W
- Temperatura di funzionamento: -15 / +60 °C
- Ingombro in contenitore: 200 x 275 x 130 mm
- Grado di protezione: IP54
1. INTRODUZIONE
3. CARATTERISTICHE TECNICHE
CN1: Morsettiera di potenza
CN2: Morsettiera comando in uscita bassa tensione
CN3: Morsettiera comando ingressi
CN4: Morsettiera resistenza riscaldante
CN5: Connettore trasformatore
CN6: Morsettiera di alimentazione 230V
F3: Fusibile E.F. 2 A
F4: Fusibile out 24 Vac 2A
F2: Fusibile logica 250 mA
CM: Connettore per condensatore
2. CARATTERISTICHE PRINCIPALI
- Logica a microprocessore.
- Led che visualizzano lo stato degli ingressi presenti in morsettiera.
- Morsettiere estraibili con passo di sicurezza per le connessioni di potenza.
- Gestione semaforica incorporata.
- Disponibilità di un contatto pulito temporizzato
- Protetta da sovratensioni e radiodisturbi tramite ltro di rete e varistori.
- Può comandare simultaneamente no a quattro dissuasori

- 5 -
11
12
EF
13
14
BT
+
1
2
230 V ~
F
N
3
4
5
M
AP
C
CH
9
10
SL
USCITA ELETTROFRENO morsetti 11 - 12 (EF)
Connessione per i due cavi bianchi di alimentazione dell’elettrofreno di stazionamento di cui è dotato il motore.
L’attivazione avviene solo a dissuasore completamente sollevato.
INGRESSO PER ALIMENTATORE ELETTROFRENO ANTI BLACK-OUT morsetti 13 - 14 (BT)
Consente l’alimentazione continuativa dell’elettrofreno anche in assenza di energia elettrica evitando l’abbassamento
spontaneo del dissuasore in caso di black-out. Non collegare direttamente a questo ingresso le batterie ma richiedere
l’accessorio originale QK-BPACKCT.
LUCI LED morsetti 15 - 16 (LED)
Uscita a 24Vac per alimentare le luci del dissuasore.
Le luci a led offrono una elevata luminosità con intermittenza differenziata in funzione della manovra e dello stato in cui si
trova il dissuasore. Quindi emetteranno: un lampeggio al secondo sia durante l’apertura che quando il dissuasore è abbas-
sato; due lampeggi al secondo sia durante la chiusura che a dissuasore sollevato.
LINEA 230V morsetti 1 - 2 (230V)
Ingresso linea 230V 50Hz con protezione interna a MOV e fusibile (5x20) da 6,3A.
Il cavo di terra deve essere collegato ai morsetti faston EARTH.
Utilizzare un cavo (tipo H05VV-F) 2 x 1,5 mm2+ T min.
MOTORE morsetti 3 - 4 - 5 (M)
Uscita motore 230V, collegare in quest’ordine i cavi alle uscite: NERO-3; BLU-4; MARRONE-5
Il cavo di terra deve essere collegato ai morsetti EARTH ed il condensatore, fornito nella busta accessori, deve essere
avvitato nella parte alta della scatola e connesso alla centrale tramite il cavetto fornito in dotazione.
SEMAFORO: LUCE VERDE a 230V 40W max. morsetti 6 - 7 (V)
Questa uscita comanda il faro a luce verde “avanti” del segnalatore semaforico.
SEMAFORO: LUCE ROSSA a 230V 40W max. morsetti 7 - 8 (R)
Questa uscita comanda il faro a luce rossa “stop” del segnalatore semaforico.
LAMPEGGIANTE: LUCE GIALLA a 230V 80W max. morsetti 9 - 10 (SL)
Questa uscita gestisce un segnalatore a luce gialla “attenzione” con intermittenza variabile a seconda della manovra e
dello stato del dissuasore
5. COLLEGAMENTI E FUNZIONALITA’ DI INGRESSI E USCITE
5.1 MORSETTIERA DI POTENZA CN6-CN1
5.2 MORSETTIERA DEI COMANDI DI USCITA IN BASSA TENSIONE CN2
V
8
COM
R
7
6
1) Realizzare tutti i collegamenti in morsettiera leggendo attentamente le indicazioni riportate in questo manuale ed osservando le norme
generali e di buona tecnica che regolano l’esecuzione degli impianti elettrici.
2) Predisporre a monte dell’installazione un interruttore magnetotermico omnipolare con distanza di apertura dei contatti di minimo 3 mm.
3) Installare, ove non sia previsto, un interruttore differenziale con soglia 30 mA ed un interruttore sezionatore lucchettabile
4) Veri care l’ef cacia dell’impianto di messa a terra e collegare a questa tutte le parti dell’automazione provviste di morsetto o cavo di terra.
5) Prevedere la presenza di almeno un dispositivo di segnalazione esterna, di tipo semaforico o lampeggiante, af ancato da un cartello
segnaletico di pericolo o di avviso.
6) Applicare tutti i dispositivi di sicurezza richiesti dalla tipologia dell’installazione considerando i rischi che essa può causare.
7) Separare nelle canalizzazioni le linee di potenza (sez. min. 1,5 mm2) da quelle di segnale in bassa tensione (sez. min. 0,5 mm2).
8) Ponticellare gli ingressi N.C. non utilizzati.
9) Disporre in serie eventuali contatti da collegare allo stesso ingresso N.C.
10) Disporre in parallelo gli ingressi da collegare al medesimo ingresso N.A.
4. SICUREZZA DELL’INSTALLAZIONE
Af nché si raggiunga il grado di sicurezza richiesto dalla normativa vigente, leggere attentamente le seguenti prescrizioni.
15
16
LED

- 6 -
CONTATTO AUSILIARIO PULITO morsetti 17 - 18 (AUX)
Consente di disporre di un contatto pulito N.A. con portata 250V 5Amax attivo ad intermittenza N.A.-N.C. regolabile da 0 a
10 secondi prima della salita del dissuasore durante tutte le manovre e 2 secondi prima della discesa. É particolarmente utile
per comandare segnalatori luminosi o avvisatori acustici.
USCITA PER ALIMENTAZIONE ACCESSORI morsetti 19 - 20 (24 Vac)
Uscita a 24Vac 1A max. per alimentare dispositivi di sicurezza o di comando, a completamento dell’impianto.
25
24
COM
FCA
19
20
APRI
COM
27
29
26
29
START
COM
5.4 MORSETTIERA PER RESISTENZA RISCALDANTE CN4
5.3 MORSETTIERA DI COMANDO INGRESSI CN3
5.5 ANTIFURTO (optional) oppure SENSORE STELO ALZATO (optional)
I dissuasori dotati dell’accessorio ANTIFURTO hanno un sensore reed collocato sotto la angia. Questo fornisce un contatto pulito N.C.
da collegare ad un antifurto esterno attivo in caso di manomissione del dissuasore.
I dissuasori dotati dell’accessorio SENSORE STELO ALZATO hanno un sensore reed che fornisce un contatto pulito N.C. a stelo com-
pletamente sollevato.
RESISTENZA RISCALDANTE morsetti 30 - 31 (CN4)
Fornisce l’alimentazione alla resistenza riscaldante da 230V 100W prevista nell’accessorio “QK-CTHEAT” (cavi di colore
rosso) ed è consigliata per l’utilizzo del dissuasore in paesi con clima particolarmente freddo.
INGRESSO FOTOCELLULE morsetti 21 - 22 (FTC)
Quando ne viene interrotto il raggio, consentono la riapertura durante la fase di chiusura.
INGRESSO DI STOP morsetti 23 - 22 (STOP)
Se viene attivato in apertura arresta la manovra lasciando il dissuasore sbloccato.
Uno start successivo attiva il dissuasore in apertura a meno che non sia già aperto; in questo caso effettua la chiusura.
Se è programmato il tempo di pausa, un comando di stop elimina la richiusura automatica.
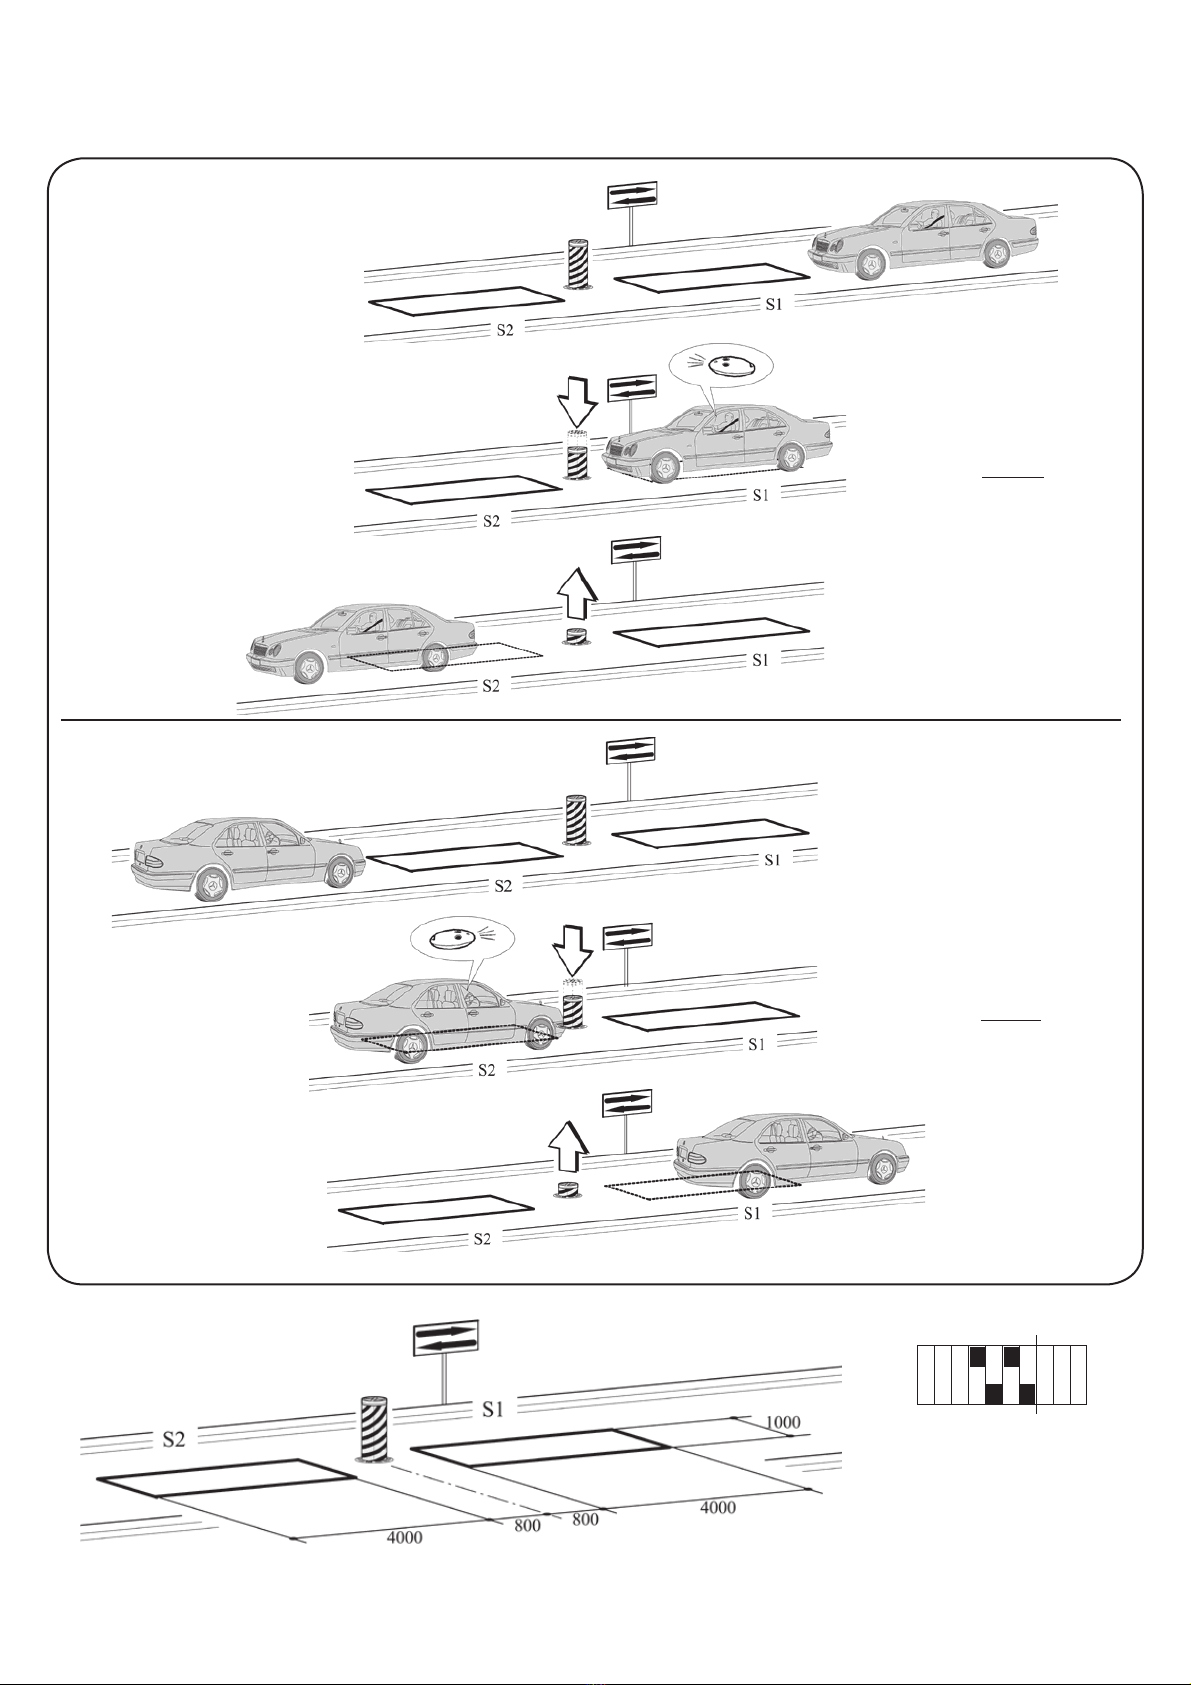
INGRESSO FINE CORSA DI APERTURA morsetti 24 - 25 (FCA)
Il dissuasore è dotato di un necorsa di apertura che, tramite un contatto reed (cavi verdi), garantisce la commutazione del
semaforo alla luce verde “avanti” solo quando il dissuasore è abbassato ed il motore è fermo.
INGRESSO DI START morsetti 26 - 29 (START)
A dissuasore sollevato comanda l’apertura, durante la quale altri impulsi di start non sono considerati.
A dissuasore abbassato lo start comanda la manovra di chiusura durante la quale, se sopraggiunge un ulteriore comando
di start, viene effettuata nuovamente la manovra di apertura.
Con gurare i dip switch 4-5-6 in modo da gestire i comandi di start a seconda delle esigenze dell’impianto.
INGRESSO DI APERTURA morsetti 27 - 29 (APRI)
Comanda l’apertura del dissuasore ed esegue anche una funzione di sicurezza in quanto, se attivato permanentemente,
non consente al dissuasore di poter effettuare la chiusura. Collegare a questo ingresso eventuali orologi programmatori
per aperture/chiusure periodiche, oppure rilevatori di masse metalliche.
E’ possibile gestire il comando d’apertura in due modi a seconda di come è impostato il dip switch n° 6.
INGRESSO DI CHIUSURA morsetti 28 - 29 (CHIUDI)
La chiusura del dissuasore può essere attivata ad impulso o al rilascio del comando a seconda di come è impostato il dip
switch n°7. Nel caso in cui si selezioni la chiusura del dissuasore al rilascio, se attivato permanentemente, questo ingresso
esegue anche una funzione di sicurezza sino a quando non viene liberato il comando.
28
21
FTC
CHIUDI
COM
29
LOGICA UOMO PRESENTE morsetti 21 - 28 - 29 (CN3)
La discesa del dissuasore è comandata in modalità semiautomatica mentre la salita funziona per comandi mantenuti.
Il completamento della manovra di salita può essere segnalata da una spia collegabile all’uscita elettrofreno.
All’attivazione della spia di segnalazione è possibile rilasciare il comando di salita.
La normativa vieta comandi via radio per la logica a uomo presente.
22
21
FTC
COM
22
23
STOP
COM
CHIUDI
COM
28
29
11
12
24V
3W max
30
31
F
N
17
AUX
18

- 7 -
6. CONFIGURAZIONE DEI DIP SWITCH
La centrale QK-CE220CT permette di azionare sino ad un massimo di quattro dissuasori collegati in parallelo ottenendo così il funzio-
namento simultaneo con un unico quadro di comando.
Utilizzare una scatola di derivazione, con grado di protezione adeguato, per effettuare le connessioni tra i dissuasori in modo da evitare
ingombranti giunte in prossimità del quadro di comando.
CAVI MOTORE:
Collegare in parallelo rispettando la polarità dei motori unendo tra loro i cavi neri, i cavi marroni, i cavi blu.
CAVI CONDENSATORI:
Collegare i condensatori (di cui è dotato ogni dissuasore) in parallelo tra i cavi nero e marrone dei cavi motore.
CAVI ELETTROFRENI:
Collegare in parallelo i cavi BIANCHI degli elettrofreni
CAVI LUCI:
Collegare in parallelo i cavi GIALLI delle luci led.
CAVI FINECORSA:
Collegare in serie i cavi VERDI del finecorsa di apertura
CAVI ANTIFURTO:
Collegare in serie i cavi ARANCIONE del contatto antifurto, se previsto
CAVI RESIST. RISCALD.:
Collegare in parallelo i cavi ROSSI della resistenza riscaldante, se previsto
Usare una radio ricevente QUIKO QK-R02
7. REGOLAZIONE DEI TRIMMER
Dip switch n°1-2-3: Selezione tipo di dissuasore.
Dip1 Dip2 Dip3 modello
OFF OFF OFF QK-CT210500 / QK-CT210500L / QK-CT210500LA
OFF OFF ON QK-CT210500FX/ QK-CT210500LFX/ QK-CT210500LAFX
OFF ON OFF QK-CT210700 / QK-CT210700L / QK-CT210700LA (PER MODELLI ACQUISTATI PRIMA DEL 01/07/11)
ON OFF ON QK-CT210700 / QK-CT210700L / QK-CT210700LA (PER MODELLI ACQUISTATI DOPO IL 01/07/11)
ON OFF OFF QK-CT115500/ QK-CT219500/ QK-CT219500L
ON OFF ON QK-CT193700L/ QK-CT219700/ QK-CT219700L
Dip switch n°4: Abilitazione richiusura automatica.
OFF: Esclusa.
ON: Inserita con tempo di pausa regolabile con l’apposito trimmer “T.PAUSA” da 2 a 120 sec.
Dip switch n°5: Abilitazione dei comandi di “START” e di “CHIUDI” durante il tempo di pausa.
OFF: Disabilitati.
ON: Abilitati.
Dip switch n°6: Comando di “START” valido solo se attivato prima l’apri.
OFF: Ingressi indipendenti.
ON: Ingressi legati o vincolati.
Dip switch n°7: Modalità del comando di chiusura.
OFF: Attivazione ad impulso.
ON: Attivazione a rilascio.
Dip switch n°8: Prelampeggio su lampeggiante, semaforo e uscita AUX
OFF: Escluso.
ON: Prima di ogni discesa attiva per 2 sec. il lampeggiante e l’ uscita AUX, e prima di ogni salita attiva da 0 a 10
sec.(regolabile col trimmer T.AUX) il lampeggiante, l’uscita AUX ed alterna il verde ed il rosso del semaforo.
Dip switch n°9: Led a dissuasore abbassato.
OFF: A luce fissa.
ON: Con 1 lampeggio al sec.
Dip switch n°10: Led a dissuasore alzato.
OFF: A luce fissa.
ON: Con 2 lampeggi al sec.
Per la configurazione a uomo presente si rimanda al paragrafo 5.3 alla sezione “LOGICA UOMO PRESENTE”
8. RICEVENTE RADIO
T. AUX: Regolazione del tempo da 0 a 10 sec. di prelampeggio del lampeggiante, del semaforo e di attivazione del contatto pulito
AUX tra i morsetti 17-18 prima della salita del dissuasore.
V. RAL: Imposta la velocità di rallentamento a fine manovra di chiusura.
La velocità di rallentamento a fine apertura ha un valore fisso preimpostato in Azienda.
T.PAUSA: Imposta il tempo di pausa da 2 a 120 sec.
9. COLLEGAMENTI PER IL FUNZIONAMENTO SIMULTANEO

- 8 -
10.1 ENTRATA O USCITA CONTROLLATA
DIMENSIONI
Questa soluzione è consigliata quando si desidera accedere ad un’area riservata in un solo senso di marcia attivando un
comando di riconoscimento (radiocomando, chiave di prossimità, chiavi magnetiche ecc. )
- Collegare il contatto N.A. del ricevitore spira S1 all’ingresso 27-29.
- Collegare il contatto N.A. del ricevitore spira S2 all’ingresso 28-29.
- Le quote dimensionali delle spire sono puramente indicative.
Si consiglia l’installazione del rilevatore di masse metalliche QUIKO QK-LDT2.
Settaggio dei
dip-switch
Il veicolo si avvicina
all’area riservata
Occupando la spira S1 si abilita
la discesa del dissuasore solo
dopo un comando di ricono-
scimento.
Nel caso in cui il dissuasore stia
risalendo, per abbassarlo nuova-
mente occorre sempre occupare
la spira S1 ed attivare il comando
di riconoscimento.
Liberando la spira S2 si attiva
la risalita del dissuasore.
10. ESEMPI DI CONTROLLO ACCESSI
Le spire S1 e S2 svolgono anche una funzione di sicurezza non permettendo la risalita del dissuasore sino a quando sono occupate
SENSO UNICO
SENSO UNICO
SENSO UNICO
SENSO UNICO
1 2 3 4 5 6 7 8 9 10

- 9 -
DIMENSIONI
10.2 ENTRATA O USCITA AUTOMATICA
Questa soluzione è consigliata quando si vuole consentire l’accesso ad un’area riservata, in entrata o in uscita senza l’utilizzo
di comandi di riconoscimento permettendo il transito veicolare esclusivamente in un solo senso di marcia
Settaggio dei
dip-switch
Il veicolo si avvicina all’area
riservata.
Occupando la spira S0 abilita il
dissuasore a ricevere il consenso
di discesa dalla spira S1.
Quando il veicolo sormonta le
spire S0 +S1
comanda automaticamente la
discesa del dissuasore.
Liberando la spira S2 si attiva la
risalita del dissuasore.
Le spire S1 e S2 svolgono anche una funzione di sicurezza non permettendo la risalita del dissuasore sino a quando sono occupate
- Collegare il contatto N.A. del ricevitore spira S0 all’ingresso 27-29.
- Collegare il contatto N.A. del ricevitore spira S1 all’ingresso 26-29
ed il contatto N.C. all’ingresso 21-29
- Collegare il contatto N.A. del ricevitore spira S2 all’ingresso 28-29.
- Le quote dimensionali delle spire sono puramente indicative.
Si consiglia l’installazione del rilevatore di masse metalliche QUIKO QK-LDT2.
SENSO UNICO
SENSO UNICO
SENSO UNICO
SENSO UNICO
1 2 3 4 5 6 7 8 9 10

- 10 -
10.3 ENTRATA E USCITA CONTROLLATA
Questa soluzione è consigliata quando si desidera accedere ad un’area riservata in entrambi i sensi di marcia attivando
un comando di riconoscimento (radiocomando, chiave di prossimità, chiavi magnetiche ecc.)
Il veicolo si avvicina all’area riservata.
Occupando la spira S1 si abilita la
discesa del dissuasore solo dopo
un comando di riconoscimento.
Nel caso in cui il dissuasore stia
risalendo, per abbassarlo nuova-
mente occorre sempre occupare
la spira S1 ed attivare il comando
di riconoscimento.
Liberando la spira S2 si attiva la
risalita automatica del dissuasore
dopo un tempo di pausa regola-
bile.
Il veicolo si avvicina all’area ri-
servata.
ENTRATA
USCITA
DIMENSIONI
Settaggio dei
dip-switch
- Collegare le spire S1 e S2 in serie ad un unico rilevatore il cui contatto N.A. va cablato all’ingresso 27-29.
- Le quote dimensionali delle spire sono puramente indicative.
Si consiglia l’installazione del rilevatore di masse metalliche QUIKO QK-LDT2.
Occupando la spira S2 si abilita la
discesa del dissuasore solo dopo
un comando di riconoscimento.
Nel caso in cui il dissuasore stia
risalendo, per abbassarlo nuova-
mente occorre sempre occupare
la spira S1 ed attivare il comando
di riconoscimento.
Le spire S1 e S2 svolgono anche una funzione di sicurezza non permettendo la risalita del dissuasore sino a quando sono occupate
Liberando la spira S1
si attiva la risalita auto-
matica del dissuasore
dopo un tempo di pau-
sa regolabile.
1 2 3 4 5 6 7 8 9 10

- 11 -
10.4 ENTRATA CONTROLLATA ED USCITA AUTOMATICA
Questa soluzione è consigliata quando si desidera accedere ad un’area riservata in entrambi i sensi di marcia. In entrata
il transito è consentito mediante un comando di riconoscimento, mentre l’uscita è automatica.
USCITA
Liberando la spira S0 si attiva la risa-
lita automatica del dissuasore dopo
un tempo di pausa regolabile.
Il veicolo si avvicina all’area riser-
vata.
Occupando la spira S0 abilita il
dissuasore a ricevere il consenso
di discesa dalla spira S1.
Quando il veicolo sormonta le spire
S0+S1 comanda automaticamente
la discesa del dissuasore.
Liberando la spira S2
si attiva la risalita auto-
matica del dissuasore
dopo un tempo di pausa
regolabile.
Settaggio dei
dip-switch
DIMENSIONI
Le spire S1 e S2 svolgono anche una funzione di sicurezza non permettendo la risalita del dissuasore sino a quando sono occupate
ENTRATA
Occupando la spira S2 si abilita la
discesa del dissuasore solo dopo un
comando di riconoscimento.
Nel caso in cui il dissuasore stia
risalendo, per abbassarlo nuova-
mente occorre sempre occupare
la spira S1 ed attivare il comando
di riconoscimento.
Il veicolo si avvicina
all’area riservata
- Collegare le spire S0 eS2 in serie ad un unico rilevatore il cui contatto N.A. va cablato all’ingresso 27-29.
- Collegare il contatto N.A. del rilevatore spira S1 all’ingresso 26-29 ed il contatto N.C. all’ingresso 21-29.
- Le quote dimensionali delle spire sono puramente indicative.
Si consiglia l’installazione del rilevatore di masse metalliche QUIKO QK-LDT2.
1 2 3 4 5 6 7 8 9 10

- 12 -
Index Pag.
1. INTRODUCTION 13
2. MAIN FEATURES 13
3. TECHNICAL SPECIFICATIONS 13
4. INSTALLATION SAFETY 14
5. INPUTS AND OUTPUTS 14
5.1 POWER TERMINAL BOARD CN6-CN1 14
5.2 LOW VOLTAGE OUTPUT COMMANDS TERMINAL BOARD CN2 14
5.3 INPUTS COMMAND TERMINAL BOARD CN3 15
5.4 TERMINAL BOARD FOR HEATING ELEMENT CN4 15
5.5 BURGLAR ALARM (Optional) or SHANK “UP” SENSOR (Optional) 15
6. DIP-SWITCH CONFIGURATION 16
7. ADJUSTING THE TRIMMERS 16
8. RADIO RECEIVER 16
9. HOW TO CONNECT DEVICES FOR SIMULTANEOUS OPERATION 16
10. EXEMPLES OF CONTROLLING ENTRANCES 17
10.1 CONTROLLED ENTRANCE OR EXIT 17
10.2 AUTOMATIC ENTRY OR EXIT 18
10.3 CONTROLLE 20
WARNINGS
You are recommended to fulfil an installation that includes all the accessories required to guarantee operation according
to current standards and always using original QUIKO devices.
These devices must be used and installed in strict compliance with the instructions supplied by the manufacturer, who
cannot be held liable for any damages deriving from improper or unreasonable use.
QUIKO declines all forms of liability with regard to any errors possibly written in this handbook and reserves the right to
add any modifications considered necessary at any time without notice.

- 13 -
- Microprocessor logic.
- LEDs that show the state of the inputs on the terminal board.
- Pull out terminal boards with safety pitch for power connections.
- Built-in traf c light control.
- Timed free contact available.
- Protected from over voltages and radio interference by means of a net lter and varistors.
- Suitable for controlling a maximum of 4 no-parking devices simultaneously.
2. MAIN FEATURES
CN1: Power terminal board
CN2:
Low output voltage command terminal board
CN3: Inputs command terminal board
CN4: Heating elements terminal board
CN5: Transformer connector
CN6: 230V power supply terminal board
EN
CONTROL UNIT
QK-CE220CT
1. INTRODUCTION
The control unit QK-CE220CT designed to control the QUIKO automatic bollards marks a step forward in the management
of automations for urban and civil furnishings. The choice of the various operating logics and the complete supply of inputs mean that
the control unit can be interfaced with many peripheral units which, based on the complexity requested, thus enabling the creation of a
state-of-the-art and modern access control system to manage vehicle traffic. The microprocessor constantly controls lifting and lowering
movements enables the gradual deceleration at the end of the movement, which makes the stem travel whisper-quiet and appealing.
3. TECHNICAL SPECIFICATIONS
- Power supply: 230Vac +/- 10% 50Hz (other voltages available on request)
- Motor outlet: 230Vac; 1000W max (equivalent to four motors)
- Electric brake output: 24Vdc inrush and 12Vdc at steady condition
- Traf c light output: 230Vac 2x40W max
- Flashing light output: 230Vac 80W max
- LED lights output: 24Vac 24W max
- 24Vac output for accessories:
1A, 24W
- Operating temperature: -15/+60 °C
- Box dimensions: 200 x 275 x 130 mm
- Protection level: IP54
CN16: Programmer connection
S1: Dip switch
TR1, TR2 and TR3: Adjustment trimmers
P1: START key
P2: RESET key
F1: 6.3 A line fuse
F3: 2 A E.F. fuse
F4: 2 A 24 Vac out fuse
F2: 250mA logic fuse
CM: Connector for capacitor

- 14 -
1) Terminal board wiring must be done reading all the instructions given in this manual carefully and observing the general and good
technique standards established for implementing electrical systems.
2) Install a multi-pole circuit breaker upstream from the installation with an opening distance between the contacts of at least 3 mm.
3) Install, wherever it is not provided for, an RCD with a 30 mA threshold. Install a lockable cut-off switch.
4) Check effectiveness of the earthing system and connect all parts of the automation tted with a terminal or earth wire to it.
5) There must be at least one external signalling device, like a traf c light or ashing light, together with a danger or warning sign board.
6) Use all the safety devices required by the type of installation, considering the risks it can cause.
7) Separate the power lines (with a minimum cross section of 1.5 mm2) from the low voltage signalling lines (with a minimum cross
section of 0.5 mm2) in ducts.
8) Short circuit the N.C. inputs not being used.
9) Arrange in series any contacts to be connected to the same N.C. input.
10) Arrange in parallel the inputs to be connected to the same N.O. input.
4. INSTALLATION SAFETY
To reach the degree of safety required by current standards, read the following prescriptions carefully.
ELECTRIC BRAKE OUTPUT terminals 11 - 12 (EF)
Connection for the two white power supply cables of the parking electric brake with which the motor is equipped.
It is only activated when the bollard is completely raised.
INPUT FOR THE ANTI BLACK OUT ELECTRIC BRAKE POWER SUPPLY terminals 13 - 14 (BT)
This powers the electric brake continuously also when there is power cut, thus avoiding the spontaneous lowering of the
no-parking device in the event of a black-out.
Do not connect to the input on the batteries but ask for the original QUIKO QK-BPACKCT.
LIGHT LEDS terminals 15 - 16 (LEDS)
24Vac output to power the lights that the no-parking device can be tted with (yellow coloured wires). The LED lights offer a
high level of brightness with differentiated intermittence according to the manoeuvre and the state the device is in.
They will ash once a second during opening and when the no-parking device is down and twice a second when it is closing
and when the no-parking device is up.
5. CONNECTION AND FUNCTION OF THE INPUTS AND OUTPUTS
5.1 POWER TERMINAL BOARD CN6-CN1
1
2
230 V ~
F
N
3
4
5
M
AP
C
CH
9
10
SL
V
8
COM
R
7
6
5.2 LOW VOLTAGE OUTPUT COMMANDS TERMINAL BOARD CN2
230V LINE terminals 1 - 2 (230V)
230V 50Hz line input with internal MOV and 6.3A fuse (5x20) protection.
The earth wires must be connected to the EARTH faston terminals.
Use a cable (type H05VV-F) 2 x 1,5 mm2+ T min.
MOTOR terminals 3 - 4 - 5 (M)
230V motor output, connect the wires to the outputs in the following order: Black-3; blue-4; brown-5
The earth cable is to be connected to the EARTH faston terminals. The condenser, supplied in the bag of accessories, is
to be screwed into the top of the box and connected to the control unit using the small cable supplied.
TRAFFIC LIGHT: GREEN LIGHT AT 230V 40W max. terminals 6 - 7 (V)
This output controls the traf c light* indicator’s green “forward” light.
TRAFFIC LIGHT: RED LIGHT AT 230V 40W max. terminals 7 - 8 (R)
This output controls the traf c light* indicator’s red “stop” light.
FLASHING LIGHT: YELLOW LIGHT AT 230V 80W max. terminals 9 - 10 (SL)
This output controls a yellow “warning” light, with variable intermittence depending on the manoeuvre and the state of the
bollard.
11
12
EF
13
14
BT
+
15
16
LED

- 15 -
FREE AUXILIARY CONTACT terminals 17 - 18 (AUX)
It is used to avail of a N.O. clean contact with capacity of 250V 5A max., activated intermittently as N.O.-N.C. adjustable from 0
to 10 seconds before the bollard raises, throughout all movements and 2 seconds before lowering. It proves particulary useful
to command luminous and acoustic indicators.
OUTPUT FOR POWERING ACCESSORIES terminals 19 - 20 (24 Vac)
24Vac 1A max. output to power safety or control devices once the system is completed.
Bollards equipped with the BURGLAR ALARM accessory have a reed sensor installed under the ange. This sensor supplies a clean
N.C. contact to be connected to an external burglar alarm system that triggers if the bollard is tampered with. Bollards equipped with the
SHANK “UP” SENSOR accessory have a reed sensor that supplies a clean N.C. contact when the shank is raised completely.
5.5 BURGLAR ALARM (optional) or SHANK “UP” SENSOR (optional)
HEATING ELEMENT terminals 30 - 31 (CN4)
It supplies power to the 230V 100W heating element, part of the accessory QK-CTHEAT (red coloured wires) and recom-
mended when the no-parking device is used in particularly cold places.
5.4 TERMINAL BOARD FOR HEATING ELEMENT CN4
PHOTOCELL INPUT terminals 21 - 22 (FTC)
When the beam is interrupted the device will open during the closing phase.
STOP INPUT terminals 23 - 22 (STOP)
If this is activated in opening it stops the manoeuvre, leaving the no-parking device released.
A following start command opens the no-parking device unless it is already open in which case it will be closed.
If the pause time has been programmed, a stop command eliminates automatic reclosing.
OPENING LIMIT SWITCH INPUT terminals 24 - 25 (FCA)
The device is equipped with an opening limit switch that, by means of a reed contact (green wires), guarantees switching of
the traf c light to the green “forward” light only when the no-parking device is down and the motor has stopped.
START INPUT terminals 26 - 29 (START)
With the no-parking device up, opening is commanded during which other start impulses are not considered.
With the no-parking device down, a start command commands the closing manoeuvre during which, if another start command
is given, the opening manoeuvre is effected again.
Con gure dip switches 4-5-6 so as to control the start commands according to system requirements.
OPENING INPUT terminals 27 - 29 (OPEN)
It commands opening of the device and also effects a safety function in that, if it is on permanently, it will not let the no-parking
device close. Connect either programmer clocks (if used) to this input for periodical opening/closing or metal detectors.
The opening command can be managed in two different ways depending on how dip switch 6 is set.
CLOSING INPUT terminals 28 - 29 (CLOSE)
The device can be closed either by pressing the button or by releasing the command, depending on how dip switch 7 is set.
If you choose to release the command in order to close the device and if this input is on permanently, it will also perform a
safety function until the command is freed.
5.3 INPUTS COMMAND TERMINAL BOARD CN3
DEAD MAN CONTROL terminals 21 - 28 - 29 (CN3)
The bollard lowering is semi-automatically controlled, whereas the switch should be pressed to raise it.
A warning light connected to the electric brake output signals that raising has ended.
The raising control switch can be released when the warning light comes on.
Regulations prohibit controls via radio with dead-man logic
25
24
COM
FCA
19
20
APRI
COM
27
29
26
29
START
COM
28
21
FTC
CHIUDI
COM
29
22
21
FTC
COM
22
23
STOP
COM
CHIUDI
COM
28
29
11
12
24V
3W max
30
31
F
N
17
AUX
18

- 16 -
6. DIP-SWITCH CONFIGURATION
The control unit QK-CE220CT is used to operate up to a maximum of four bollards connected in parallel to thus obtain simultaneous ope-
ration with just one control panel.
Use a junction box with adequate protection rating to complete the connections between the bollards in order to avoid cumbersome joints
near the control panel.
MOTOR CABLES: Connect them in parallel respecting the polarity of the motors and joining the black cables, the brown cables and the
blue cables together.
CONDENSER CABLES: Connect the condensers (with which each bollard is equipped) in parallel between the black cables and the brown
cables of the motor cables.
ELECTRIC BRAKE CABLES: Connect the WHITE cables of the electric brakes in parallel
LIGHT CABLES: Connect the YELLOW cables of the LED lamps in parallel.
END-OF-TRAVEL CABLES: Connect the GREEN cables of the opening end-of-travel devices in series.
BURGLAR CABLES: Connect the ORANGE cables of the burglar device contact in series, if envisaged
HEATING ELEMENT CABLES: Connect the RED cables of the heating element in parallel, if envisaged.
7. ADJUSTING THE TRIMMERS
Dip switch n°1-2-3: Select type of bollard.
Dip1 Dip2 Dip3 model
OFF OFF OFF QK-CT210500 / QK-CT210500L / QK-CT210500LA
OFF OFF ON QK-CT210500FX/ QK-CT210500LFX/ QK-CT210500LAFX
OFF ON OFF QK-CT210700/ QK-CT210700L / QK-CT210700LA (MODELS PURCHASED BEFORE 01/07/11)
QK-CT210700 / QK-CT210700L / QK-CT210700LA (MODELS PURCHASED AFTER 01/07/11)
QK-CT115500/ QK-CT219500/ QK-CT219500L
QK-CT193700L/ QK-CT219700/ QK-CT219700L
Dip switch no. 4: Automatic reclosing on.
OFF: Off.
ON: On with a pause time adjustable with the “T.PAUSA” trimmer, from 2 to 120 sec.
Dip switch no. 5: “START” and “CLOSE” commands enabled during the pause time.
OFF: Off.
ON: On.
Dip switch no. 6: “START” command valid only if open activated first.
OFF: Separate inputs.
ON: Dependent inputs.
Dip switch no. 7: Closing command procedure.
OFF: Impulse operation.
ON: Operates upon release.
Dip switch no. 8: Pre-flashing function on flashing light, traffic light and AUX output
OFF: Disabled.
ON: Before each lowering phase, it activates the flashing light and the AUX output for 2 seconds and before each
raising phase it activates the flashing light and the AUX output (adjustable with AUX trimmer) and alternates the
green and red lamps of the traffic light for 0 to 10 seconds.
Dip switch no. 9: Led with device in downright position.
OFF: Steady light.
ON: 1 flash a second.
Dip switch no. 10:Led with device in upright position.
OFF: Steady light.
ON: 2 flashes a second.
See para. 5.3, “DEAD MAN CONTROL” section for more details.
ON OFF ON
ON OFFOFF
OFF ONON
9. CONNECTIONS FOR SIMULTANEOUS OPERATION
Use a QK-R02 radio receiver
8. RADIO RECEIVER
T.AUX: It adjusts the duration, from 0 to 10 seconds, of the pre- ashing function of the ashing light, traf c light and activation of the
clean AUX contact between terminals 17-18 before the bollard rises.
V.RAL: it sets slowing down speed at the end of the closing manoeuvre.
Slowing down speed at the end of opening is factory set.
T. PAUSA: it sets pause time from 2 to 120 sec.

- 17 -
10.1 CONTROLLED ENTRANCE OR EXIT
DIMENSIONS
This solution is recommended when you want to enter a reserved area in just one direction activating a recognition com-
mand (radio control, proximity key, magnetic keys, etc.).
- Connect the N.O. contact of the S1 loop receiver to input 27-29.
- Connect the N.O. contact of the S2 loop receiver to input 28-29.
- The dimensional values of the loops are only approximate.
We suggest installing the QUIKO QK-LDT2 metal mass detector.
Setting the dip
switches
The vehicle approaches
the reserved area.
When the vehicle is on loop S1 the
device will move down only after a
recognition command.
If the device is moving back up
and you want to lower it again
the vehicle must be on loop S1
and then you must activate the
recognition command.
When the vehicle is no longer
on loop S2 the device will move
back up.
10. EXAMPLES OF CONTROLLING ENTRANCES
Loops S1 and S2 also have a safety function in that they will not let the device move all the time the vehicle is on top.
ONE DIRECTION
ONE DIRECTION
ONE DIRECTION
ONE DIRECTION
1 2 3 4 5 6 7 8 9 10

- 18 -
DIMENSIONS
10.2 AUTOMATIC ENTRY OR EXIT
This solution is recommended when you want to allow entry to a reserved area, entering or leaving without using the recogni-
tion commands, allowing transit of vehicles in just one direction.
Loops S1 and S2 also have a safety function in that they will not let the device move all the time the vehicle is on top.
Setting the dip
switches
ONE DIRECTION
ONE DIRECTION
ONE DIRECTION
When the vehicle is on loop S0
the device receives consent
from loop S1 to move down.
When the vehicle is on top
of loops S0+S1 the device
moves down automatically.
When the vehicle is no longer
on loop S2 the will move
back up.
ONE DIRECTION
- Connect the N.O. contact of the S0 loop receiver to input 27-29.
- Connect the N.O. contact of the S1 loop receiver to input 26-29
and the N.C. contact to input 21-29.
- Connect the N.O. contact of the S2 loop receiver to input 28-29.
- The dimensional values of the loops are only approximate.
We suggest installing the QUIKO QK-LDT2 metal mass detector.
1 2 3 4 5 6 7 8 9 10

- 19 -
10.3 CONTROLLED ENTRY AND EXIT
This solution is recommended when you want to enter a reserved area in both directions activating a recognition command
(radio control, proximity key, magnetic keys, etc.).
The vehicle approaches the re-
served area
.
ENTRY
EXIT
DIMENSIONS
Loops S1 and S2 also have a safety function in that they will not let the device move all the time the vehicle is on top.
Setting the dip
switches
- Connect loops S1 and S2 in series to just one detector whose N.O. contact is wired to input 27-29.
- The dimensional values of the loops are only approximate. We suggest installing the QUIKO QK-LDT2 metal mass detector.
When the vehicle is on loop S1 the
device will move down only after a
recognition command.
If the device is moving back up and
you want to lower it again the vehicle
must be on loop S1 and then you
must activate the recognition com-
mand.
When the vehicle is no longer on
loop S2 the device will move back
up automatically after an adjustable
pause time.
The vehicle approaches the reserved
area
.
When the vehicle is on loop S2 the
device will move down only after a
recognition command.
If the device is moving back up and
you want to lower it again the vehicle
must be on loop S1 and then you
must activate the recognition com-
mand.
When the vehicle is no
longer on loop S1 the
device will move back
up automatically after an
adjustable pause time.
1 2 3 4 5 6 7 8 9 10

- 20 -
10.4 CONTROLLED ENTRY AND AUTOMATIC EXIT
This solution is recommended when you want to enter a reserved area in both directions. To enter, transit is allowed by means
of a recognition command while exiting is automatic.
EXIT
The vehicle approaches the reserved
area.
When the vehicle is on loop S0 the
device receives consent from loop
S1 to move down.
When the vehicle is on top of loops
S0+S1 the device moves down au-
tomatically.
Loops S1 and S2 also have a safety function in that they will not let the device move all the time the vehicle is on top.
Setting the dip
switches
When the vehicle is no
longer on loop S2 the
device will move back
up automatically after
an adjustable pause
time.
When the vehicle is no longer on
loop S0 the device will move back
up automatically after an adjustable
pause time.
When the vehicle is on loop S2 the
device will move down only after a
recognition command.
If the device is moving back up and
you want to lower it again the ve-
hicle must be on loop S1 and then
you must activate the recognition
command.
ENTRY
The vehicle approaches
the reserved area
.
DIMENSIONS
- Connect loops S0 and S2 in series to just one detector whose N.O. contact is wired to input 27-29.
- Connect the N.O. contact of the S1 loop receiver to input 26-29 and the N.C. contact to input 21-29.
- The dimensional values of the loops are only approximate.
We suggest installing the QUIKO QK-LDT2 metal mass detector.
1 2 3 4 5 6 7 8 9 10
Other manuals for QK-CE220CT
1
Table of contents
Languages:
Other quiko Control Unit manuals
Popular Control Unit manuals by other brands

pumpa
pumpa PC-58 Translation of the original instruction manual

fafnir
fafnir VISY-Density Technical documentation

Spectech
Spectech VARI-DRIVE KBWM-120 Installation and operating instructions

Veeder-Root
Veeder-Root TLS-PC 32 installation guide

H3C
H3C PSR650C-12A user manual

Richter
Richter KN Series Installation and operating manual

Alemite
Alemite 7836-A Service guide

Huawei
Huawei MU709s-2 Hardware guide

Allen-Bradley
Allen-Bradley ControlLogix 1756-PLS installation instructions

Asco
Asco 262 Series Installation and maintenance instructions

EFI
EFI 300 Series Installation, operation & maintenance manual

Danfoss
Danfoss 176F3417 installation instructions