QUO Motiv User manual

User Manual

1.1 The Basics
1.1 Overview
Thank you for choosing the QUO MOTIV smart watch. After reading this
guide you will be able to fully master the use of your watch and
appreciate all its functions and ease of use.
Not only does the smartwatch provide you with basic call functions such
as call Register, but also with many practical functions and services, to
improve the time you spend working and playing.
The availability of some services and features described in this manual
depends on the network and your subscription. Therefore, some menu
items may not be available in your smartwatch. The shortcuts to menus
and features may also vary from watch to watch.
Our company reserves the right to revise this manual content without
prior notice.
1.2 Safety warnings and notices
Before using your mobile phone and smartwatch, read and understand
the following notices carefully to ensure you will use it safely and
properly.
1.3 General attention
• Only the battery and battery charger specied by our company should
be used in your smartwatch. Other products might result in battery
leakage, overheating, re or explosion.
• To avoid your smartwatch malfunctioning, or catching re, please do not
violently impact, jolt or throw your smartwatch.
• Please do not place the smartwatch in a microwave oven or high-pres
sure equipment. Otherwise it could lead to unexpected accidents such
as damage to the circuitry or re hazard.
• Please do not use your smartwatch near ammable or explosive gases,
otherwise it could cause malfunction of your phone or re hazard.
• Please do not subject your smartwatch to high temperatures, high
humidity or dusty places; otherwise this may lead to the malfunction of
your smartwatch.
• To avoid your smartwatch falling and malfunctioning or being damaged,
please do not place it on uneven or unstable surfaces.
1.4 Notices when using your smartwatch
• Please do not subject the LCD to impact or use the screen to strike
things, as this will damage the LCD board and cause leakage of the liquid
crystal. There is a risk of blindness if the liquid crystal substance gets into
the eyes. If this occurs rinse eyes immediately with clear water (under
no circumstances rub your eyes) and go immediately to a hospital for
treatment.
• Do not disassemble or modify your smartwatch, as it will lead to damage
to the smartwatch such as battery leakage or circuitry failure.
• Please do not use needles, pen tips, or other sharp objects on the key
pad as this may damage the smartwatch or cause it to malfunction.
• The battery has a limited service life. The remaining life gets shorter as
the times of charging increase. If the battery becomes feeble even after
the charging, this indicates the service life is over and you have to use a
new battery.
• When installing the battery, do not use force or pressure, as this will
cause the battery to leak, overheat, crack and catch re.
• If the battery overheats, changes color, or becomes distorted during use,
charging, or storage, please stop using and replace it with a new battery.
• Please do not continuously charge for more than 24 hours.
1.5 Charging your smartwatch
• Connect the connector of charger to the smartwatch. The battery level
indicator ashes on the screen. Even if the smartwatch has been turned
o, the charging image still appears, indicating that the battery is being
charged. If the smartwatch is overused when the current is insucient,

2. Getting Started
2.1 Equipment parts diagram
Items supplied and available accessories with the device may vary by
region or service provider.
• Accompanying articles designed specically for the device, which may
not be compatible with other devices.
• Design and specications are subject to change without notice.
• You can purchase additional accessories from your local dealer. Before
buying make sure they are compatible with the device.
• Other accessories may not be compatible with your device.
it may take longer time for the charging indicator to appear on the
screen after the charging begins.
• When the battery level indicator does not ash and indicates the battery
is full, this indicates the charging has been completed. If the smartwatch
is o during charging, the charging being completed image also appears
on the screen. The charging process often takes 3 to 4 hours. During the
charging, the battery, smartwatch and charger gets warm, this is a
normal phenomenon.
• Upon the completion of charging, disconnect the charger from AC
power socket, and from the smartwatch.
Notes:
• During charging, the smartwatch must be placed in well-ventilated
environment of +5°C ~ +40°C. Always use the charger supplied by your
smartwatch manufacturer. Using an unauthorized charger might cause
danger and invalidate the authorization and warranty clauses for your
smartwatch.
• Make sure the battery has been installed before charging. It is best not
to remove the battery while charging.
• Upon completion of charging, disconnect the charger from your
smartwatch and the power supply.
If you have not disconnected the charger from your smartwatch and the
power supply, the charger will continue to charge the battery after about
5 to 8 hours when the batter level decreases substantially. We advise you
not to do like this, as it lowers your phone performance and shortens your
smartwatch life.
Touch screen Power button
USB port
Camera
Strap
Microphone
Speaker
Buckle

2.2 Button explanations
Button Explanations
Power
Button
• Hold down this button to turn your smartwatch o and
on.
• Press this button in other applications to return to the
clock screen.
• Generally, press this button to lock the mobile phone.
• Shut down the smartwatch by pressing this button for
about 10 seconds or restart the smartwatch by
pressing this button for about 15 seconds.
2.3 Turning your smartwatch ON and OFF
To turn ON the phone, hold down the POWER button on the right; to turn
OFF the phone, hold down the POWER button and select power o.
2.4 Using the touch screen
Use only with your ngers.
Your smartwatch provides many options in the Main screen.
Meanwhile please follow the instructions:
Wearing the equipment
1. Loosen the buckle.
• Don’t hurt your nails when loosen the belt buckle.
• Don’t bend the strap excessively. It may damage the equipment.
2. Open the buckle and adjust wrist band to your size.
3. To wear the equipment, put it back on your wrist and press buckle until
a click is heard.

devices with Watch Manager.
The Watch Manager is installed on a mobile device, and then turn on
Bluetooth of both smartwatch and mobile device .Once you start Watch
Manager, the mobile device will scan smartwatch and then connect it.
After connecting to a mobile device, you can use part of the application
on a mobile device. (Note: Please contact your dealer to get Watch
Manager.)
2.7 Locking & Unlocking your smartwatch
When not in use, please lock the device to avoid unnecessary operations.
Press the power button on the screen to turn OFF the screen and make
the device go into lock-down mode. If the device is not used within a
specied period of time, it will be automatically locked. Press the power
button to unlock the device. You can also set smartwatch protection. If
you have selected this function, you must draw unlocking pattern each
time you turn on your smartwatch. You may also clear the unlocking
pattern. Use the locking function to prevent others to access your person-
al data installed in the device.
To set up design locking function, on the screen, click on SET/PRIVACY
LOCK, connection of four or more by drawing a pattern.
• Do not touch the screen with wet hands.
• Do not touch the screen with great forces.
• Do not touch the screen with metallic or conductive objects.
2.5 Basic functions
The home screen is the beginning of all applications. There are clock
shortcuts, applications, and others. Click on the screen to start the
application. The main screen has multiple panels. To view other panels,
swipe left or right.
Clock: Long press the clock screen until there is a shock, and then slide to
the left to the right to select your desired clock interface.
View Recent Tasks: Double-click on the clock screen to can see the
recent active tasks.
Return to the previous screen: Slide down from the top of the screen to
return to the previous screen interface.
Quick access to the camera: Slide down in the clock screen from the top
of the screen to enter the camera.
Quick access to dialing: Slide up in the clock screen from the bottom of
the screen to enter dialer.
2.6 Connecting to the mobile devices
Connect your smartwatch to another mobile device, so that you can use
the various functions on the mobile devices. To connect the smartwatch
to another mobile device, you can turn on Bluetooth to connect to mobile

• Click the Remote File Transfer Manager, display the device’s memory card
content, you can download the le to your connected mobile device, or
delete a le.
• Telecamera equipment needs to be used with a remote camera, open
search others, and then connect to the remote camera.
• Settings, it can be related to congure the device.
• Gesture Control: Select the program, draw a simple gesture, and then
draw the gesture in the smartwatch to make mobile devices into the
corresponding application.
• Sync: After selecting synchronization options in the mobile device,
smartwatch can sync some data and notications from the mobile de
vice , such as missed calls, unread messages, contacts, time and
language, but also allows the mobile devices to use application in smart
watch, such as a phone call.
• Help menu provides user guide of smartwatch and mobile devices,
which helps you quickly understand and use theme.
Quo Mobility Smart Watch Limited Warranty
QUO Mobility warrants to the original retail purchaser (and to their
dealers) that the products purchased from authorized dealers do not
contain default in material and workmanship for a period of 1 year from
purchase. Battery Warranty for period of 6 months from the original date
of consumer purchase. During this period, If this product proves defective
in either material or workmanship, QUO Mobility will, at its discretion,
either a) repair the defective unit or b) replace it with a rebuilt product at
no charge for parts or labor except as *stated below. The parts or product
that is replaced become the property of QUO Mobility.
Exclusions and Limitations
This Limited Warranty applies only to hardware products manufactured
by or for QUO Mobility and that can be identied by the“QUO Mobility”
trade name, or logo axed to them.
2.8 Notifications
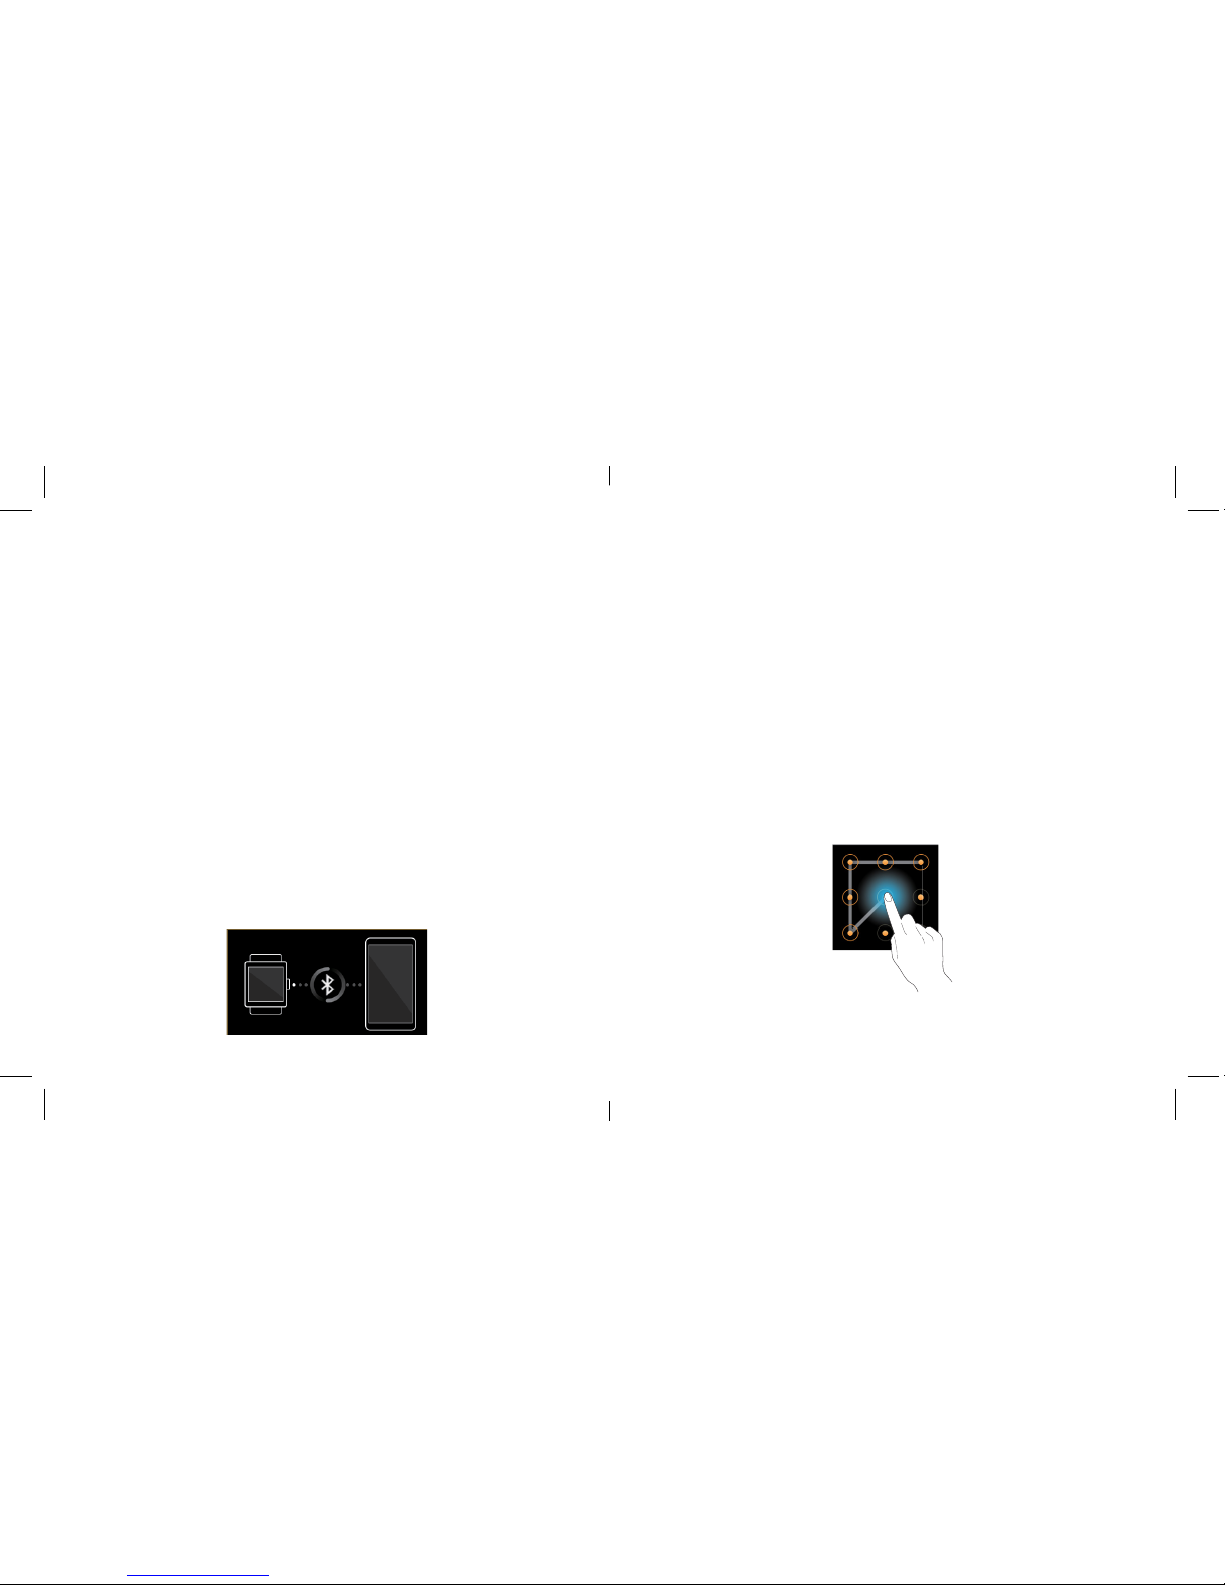
Once the smartwatch is connected to the mobile device and the mobile
device is targeted, you can receive notications, such as missed calls or
new messages.
Upon receipt of notication, click on the icon in the upper right corner of
the screen to view the details.
To view the notication history, slide to the application on the home
screen, and then click Apps/Notications to view the details.
2.9 Making a call
On the application screen, tap Dialer icon to enter the dial pad, enter the
number and then dial.
Choose a contact to see the details, and then click the number to dial.
Enter the call log interface, click on a contact record to see the details, and
then click the icon to dial back.
2.10 Watch manager
Using this application, you can connect to a mobile device, customize
your device settings and applications, and use applications of the
connected mobile devices.
Click Watch Manager on the application screen from a mobile device
connected to congure device settings.
• You can see the remaining battery and charge state at the back of the
name of the connected device.
• Click on the smartwatch connected, you can modify the Bluetooth name
of the smartwatch, but also to see some basic information about the
smartwatch.
• Click on the clock, change the clock type from all.
• Click on the Apps to see the program menu, enter an item to see related
settings.
• Click on the gallery to select transmission modes, manual, automatic
transmission, and immediately transmit while charging.

This warranty does not apply:
• Concerning software products. QUO Mobility limited warranty applies
only to a failure to execute programming instruction. QUO Mobility
does not guarantee the operation of any product will be uninterrupted
or error free.
• Repair, modication, or installation of options or parts by anyone other
than a QUO Mobility Authorized Service Center.
• More than an eventual water splash exhibition.
• Overheating around.
• Consumable parts, such as batteries, unless damage has occurred due
to a defect in materials or workmanship;
• To cosmetic damage, including but not limited to scratches, dents and
broken plastic on ports.
• To damage caused by operating the product outside the permitted or
intended uses described by QUO Mobility. Adjustment by non-autho-
rized source.
• Improper environment.
• Damage Incurred to the LCD screen or scratch. Excessive or inadequate
heating or air conditioning or electrical power failures, surges, or other
irregularities This One year limited warranty does not cover any of
the product’s rmware or hardware that you or any third party have
modied or altered; you bear the sole responsibility and liability for any
such modication or alteration, including if the serial number has been
removed.
If you have any question about your warranty coverage, need help, or you
exclusiones y limitaciones de la garantia
Esta garantía limitada se aplica únicamente a los productos fabricados por
y para QUO Mobility y que se puedan identicar por el nombre comercial
QUO Mobility a través de los logos colocados directamente en ellos.
Esta garantía no cubre:
· En cuanto a encuentros no deseados de software. La garantía de QUO Mo-
bility incluye únicamente a la incapacidad para ejecutar la programación.
QUO Mobility no garantiza que el funcionamiento de su producto será
ininterrumpido o libre de errores.
• Partes Consumibles como baterías, a menos que el daño se trata de
componentes en su fabricación.
• Danos cosméticos incluyendo y no limitándose a rayas, golpes o piezas y
puertos rotos.
• Danos causados por funcionamiento del producto fuera de los usos
recomendados o para los cuales esta supuesto a funcionar. Ajustes hechos
por Centros Autorizados de Servicios no autorizados por QUO Mobility.
• Reparaciones, Modicaciones, instalaciones o ajustes hechos por un
Centro de Servicio no Autorizado por QUO Mobility.
• Una exposición al agua mayor que lo considerado un rocío eventual.
• Temperaturas en Exceso en los componentes del equipo.
• Peso Excesivo sobre el equipo o sus componentes.
• Los daños causados por trabajo a sobretensiones eléctricas.
• Los productos no deben ser alterados de su diseño original.
• Ambiente Impropio
Si usted tiene alguna pregunta acerca de la cobertura de la garantía ,
necesita ayuda, o usted piensa que puede necesitar servicio, envíenos un
s/n
mobility
.com

2.8 Notificaciones
Una vez el QUO Motiv SmartWatch está conectado al dispositivo móvil,
podrá recibir noticaciones, tales como llamadas perdidas o nuevo
mensajes. Al recibir una noticación, haga clic en el icono de la esquina
superior derecha de la pantalla para ver los detalles.
Para ver el historial de noticaciónes, Regrese a la pantalla de inicio y
luego haga clic en aplicaciones → noticaciones para ver los detalles.
2.9 Realizar una llamada
Sobre la pantalla principal, vea el icono marcador para entrar en el tecla-
do, Introduzca el número y luego marque.
Elija un contacto para ver los detalles, y haga clic en el número de Marcar-
lo. Entrar al interfaz de llamadas, haga clic en el contacto registrado para
ver los detalles, y haga clic en el icono para marcar.
2.10 WatchManager
Usando esta aplicación, puede conectarse a un dispositivo móvil, person-
alizar la conguración del dispositivo y aplicaciones, y usar aplicaciones
de los dispositivos móviles conectados.
Haga Clic en la aplicación del WatchManager en el dispositivo móvil
conectado para congurar parámetros interesados.
• Le puede mostrar el tiempo restante de la batería y estado de carga del
dispositivo conectado.
• Haciendo clic en el QUO Motiv SmartWatch conectado, usted puede
modicar el nombre del QUO Motiv SmartWatch en la sección de Blue-
tooth, también puede ver alguna información básica sobre el QUO Motiv
SmartWatch.
• Haga clic en el reloj, para cambiar el estilo del reloj.
• Haga clic en el icono de aplicaciones para ver el menú de aplicaciones.
• Haga clic en la Galería para seleccionar el modo transmisión: manual o
automático.
• Haga clic en el icono de Transferencia Remota de Archivos, para ver el
contenido de la tarjeta de memoria, ahí podrá descargar un archivo en su
dispositivo móvil conectado, o eliminar un archivo.
• La aplicación de tele-cámara le permite usar el dispositivo como una
cámara remota, puede utilizar la cámara del Quo Motiv SmartWatch o la
cámara de un dispositivo remoto.
• Haga clic en el Icono de Ajustes, para realizar la conguración el dispos-
itivo.
• Control por Gestos: al seleccionar esta opción, le permitirá llegar a de-
terminadas aplicaciones en el QUO Motiv SmartWatch a través de simples
gestos dibujados y congurados previamente en el equipo.
• Sync: después de seleccionar la opción de sincronización en el dispositivo
móvil , el QUO Motiv SmartWatch puede sincronizar algunos datos y
noticaciones desde el dispositivo móvil , tales como llamadas perdidas,
mensajes sin leer, contactos, tiempo e idioma, pero también permite que
ciertas funciones los dispositivos móviles sean utilizadas desde el QUO
Motiv SmartWatch, tales como una llamada de teléfono.
• Menú de ayuda: Proporciona guía al usuario del QUO Motiv SmartWatch
y dispositivos móviles, para rápidamente entender las funciones del mismo.
Quo Mobility Reloj Inteligente Garantía Limitada
QUO Mobility garantiza al comprador original (y a sus distribuidores) que
los productos comprados a distribuidores autorizados no contienen por
defecto en el material y mano de obra durante un periodo de 1 año a
partir de la fecha de compra. El periodo de Garantía de la batería es de 6
meses a partir de la fecha original de compra. Durante este período, Si este
producto sufre algún defecto de materiales o mano de obra, QUO Mobility,
a su discreción, ya sea a) reparar la unidad defectuosa o b) reemplazarlo
por un producto sin cargo por las piezas o la mano de obra, excepto como
se indica a continuación.
Las piezas o producto que se reparen pasarán a ser propiedad de QUO
Mobility

• No toque la pantalla con las manos mojadas.
• No toque la pantalla haciéndole presión.
• No toque la pantalla con objetos metálicos o conductores eléctricos.
2.5 Funciones básicas
La pantalla principal se inician todas las aplicaciones. Existen atajos y ges-
tos para utilizar ciertas aplicaciones. La pantalla principal tiene múltiples
vistas. Para ver otras pantallas deslice hacia la izquierda o derecha.
Pantalla con vista como Reloj: Pulse por un tiempo discreto la pantalla
del reloj hasta que haya un cambio en la vista y luego deslice hacia los
lados para seleccionar la interfaz deseada del reloj.
Vista de tareas recientes: Haga doble click en la pantalla del reloj para
ver las las tareas recientes.
Volver a la pantalla anterior: Deslice hacia abajo la pantalla superior del
reloj para volver a la pantalla anterior.
Acceso rápido a la cámara: Deslice hacia abajo la pantalla del reloj para
entrar en la pantalla de cámara.
Acceso rápido a marcar: Deslice hacia arriba en la pantalla del reloj
desde la parte inferior de la pantalla, para entrar en el marcador.
2.6 Conexión a un dispositivo Móvil
Conecte su QUO Motiv SmartWatch a otro dispositivo móvil, y así podrá
utilizar las distintas funciones en los dispositivos móviles. Conecte el QUO
Motive SmartWatch a otro dispositivo móvil, a través de Bluetooth y
utilizando la aplicacion de“WatchManager”.
La aplicacion“WatchManager”se instalada en un dispositivo móvil y
luego se conecta con otros equipos atravez del Bluetooth. Una vez que
empiezas la aplicacion de WatchManager, el dispositivo móvil escaneará el
reloj inteligente y se conectara.
El WatchManager está instalado en un dispositivo móvil y luego se enciende
Bluetooth de los otros equipos. Una vez que empiezas el WatchManager, el
dispositivo móvil escaneará inteligente reloj y luego conectarlo. Después
de conectar a un dispositivo móvil, puede utilizar parte de la aplicación
en un móvil de dispositivo. () Nota: Parrendar póngase en contacto con su
distribuidor para obtener reloj Manager.)
2.7 Bloqueo y desbloqueo de tu QUO Motiv SmartWatch
Cuando no esté en uso su equipo, por favor apague el dispositivo para
evitar operaciones innecesarias. Pulse el botón de Encendido para apagar
la pantalla y hacer que el dispositivo entre en modo de aislamiento, si el
dispositivo no es usado dentro de un período determinado de tiempo,
será automáticamente bloqueado. Pulse el botón de encendido para
desbloquear el dispositivo. Usted también puede establecer un patrón de
protección a su QUO Motiv SmartWatch. Si ha seleccionado esta función,
usted debe dibujar el patrón de desbloqueo cada vez que enciende su
QUO Motiv SmartWatch, para desbloquearlo y luego realizar o contestar
llamadas. Usted puede borrar el patrón de desbloqueo (ver “Conguración
de seguridad”). En este caso, no se puede proteger el uso no autorizado de
tu QUO Motiv SmartWatch.

2.2 Explicaciones sobre algunos botones.
Botón Explicaciones
Encender/
Apagar
• Utiliza este botón para encender y apagar su QUO
SmartWatch.
• Hunde el botón mientras tenga otras aplicaciones
abiertas para regresar a la pantalla de reloj.
• Pulse esta tecla para bloquear el teléfono móvil.
• Puede apagar el QUO SmartWatch presionando el
botón del QUO SmartWatch por 10 segundos o reinície-
lo Presionando el botón por 15 segundos.
2.3 Encender y apagar su QUO SmartWatch
Para encender el teléfono, mantenga pulsada el botón Encender/Apagar
que se encuentra a la derecha. Para apagar el teléfono, mantenga pulsado
el botón Encender/Apagar y seleccione apagar
2.4 Utilizando la pantalla táctil
Utilice solo con los dedos. Tu QUO SmartWatch proporciona varias
opciones en la pantalla principal. Mientras tanto, por favor siga las
instrucciones:
Como colocarse el equipo:
1. Suelte la hebilla.
• No se haga daño en las uñas cuando aoje la hebilla del cinturón.
• No doble excesivamente la correa. Esto puede dañar el equipo.
2. Abra la hebilla y ajuste la banda de la muñeca a su tamaño.
3. Para usar el equipo, coloquelo de nuevo en su muñeca y presione la
hebilla hasta oir un clic.

2 Para comenzar
2.1 Diseño del dispositivo.
Los productos y accesorios disponibles con el dispositivo pueden variar
por región o servicio del distribuidor local.
• Algunos artículos y accesorios que acompañan este dispositivo solo son
compatibles con este modelo.
• Diseño y especicaciones están sujetas a cambio sin previo aviso.
• Usted puede comprar accesorios adicionales a su distribuidor local.
Antes de comprar asegúrese de que son compatibles con el dispositivo.
• Otros accesorios pueden no ser compatibles con su dispositivo.
1.5 Carga tu QUO SmartWatch
• Conecte el conector del cargador al QUO SmartWatch. El indicador
de nivel de batería titilará en la pantalla. Incluso si se ha desactivado el
QUO SmartWatch. La imagen de cargar aparecerá en la pantalla, lo que
indica que la batería se está cargando. Si el QUO SmartWatch es utilizado
cuando la corriente es insuciente, puede tomar más tiempo para que el
indicador de carga aparezca en la pantalla.
• Cuando el indicador de nivel de batería no titile, indica que la batería
está llena, y que la carga se ha completado. Si el QUO SmartWatch es
apagado durante la carga y la carga está completa la imagen también
aparecerá en la pantalla. El proceso de carga tarda de 3 a 4 horas. Durante
la carga, la batería, el QUO SmartWatch y el cargador se pondrán calien-
tes, este es un fenómeno normal.
• Cuando nalice la carga, desconecte el cargador de toma de corriente
AC y de la QUO SmartWatch.
• Durante la carga, se colocarán el QUO SmartWatch en ambiente bien
ventilado de +5°C ~ +40°C. Siempre use el cargador suministrado por el
fabricante del QUO SmartWatch. Utilizando un cargador no autorizado
podría causar peligro y anular las cláusulas de garantía y autorización para
su QUO SmartWatch.
• Asegúrese de que la batería ha sido instalada antes de cargar. Es mejor
no quitar la batería durante la carga.
• Cuando nalice la carga, desconecte el cargador de su QUO SmartWatch
y la fuente de alimentación.
Nota:
Si no ha desconectado el cargador de su smartwatch, el cargador continu-
ará cargando la batería hasta después de 5 a 8 horas cuando el rendimiento
de la batería disminuya y cortará la vida de su batería y la duración. Le
sugerimos no hacer esto.
Puerto USB
Pantalla táctil Encendido/ Apagado
Camára
Hebilla
Cinturón
Micrófono
Parlante

explosivos, de lo contrario podría ocasionar un mal funcionamiento de su
teléfono o peligro de incendio.
• Por favor no someta su QUO SmartWatch a altas temperaturas, alta
humedad o lugares polvorientos; de lo contrario esto puede provocar el mal
funcionamiento de tu QUO SmartWatch.
•Para evitar caídas, mal funcionamiento mal o daño a su QUO SmartWatch,
por favor, no lo coloque sobre supercies desniveladas o inestables.
1.4 Avisos cuando se utiliza el QUO SmartWatch
• Por favor no someta la pantalla LCD a golpes ni lo use para golpear cosas,
esto puede dañar el tablero LCD y causar fugas del cristal líquido. Hay un
riesgo de ceguera si la sustancia de cristal líquido se mete en los ojos. Si esto
sucede enjuague los ojos inmediatamente con agua limpia (bajo ninguna
circunstancia se frota los ojos) y dirigirse de inmediato a un hospital para
recibir tratamiento.
• No desmonte ni modique su QUO SmartWatch, esto conducirá a daños en
el dispositivo como fugas o falla de la batería.
• Por favor no utilice agujas, puntas de lápiz u otros objetos puntiagudos
en el teclado ya que podría dañar el QUO SmartWatch o causar un mal
funcionamiento.
• La batería tiene una vida útil limitada. El tiempo de vida restante se puede
acortar mientras mas se recarga. Si la batería no dura después de cargarse,
esto indica que terminó la vida de servicio y tienes que usar una batería
nueva.
• Al instalar la batería, no use fuerza o presión, pues esto ocasionará la fugas,
sobrecalentamiento, grieta y prenderse fuego.
• Si la batería se sobrecalienta, cambia de color o se distorsiona durante el
uso, carga o almacenamiento, por favor deje de usar y reemplacela con una
nueva batería.
• Por favor no cargar el dispositivo continuamente por más de 24 horas.
1 Los fundamentos
1.1 Resumen
Gracias por elegir el QUO MOTIV smartwatch. Después de leer esta guía
podrá dominar el uso de su reloj y apreciar todas sus funciones y facilidad
de uso.
El QUO SmartWatch no sólo te proporcionará con funciones básicas de
llamada y registro, sino también con muchas funciones prácticas y servicios,
para mejorar el tiempo que pasas trabajando y jugando.
La disponibilidad de algunos servicios y características que se describen
en este manual depende de la red y su suscripción. Por lo tanto, algunos
elementos del menú pueden no estar disponibles en tu QUO SmartWatch.
Los accesos directos a los menús y funciones pueden variar de reloj en reloj.
Nuestra empresa reserva el derecho de modicar el contenido de este
manual sin previo aviso.
1.2 Avisos y advertencias de seguridad
Antes de usar su teléfono móvil y QUO SmartWatch, lea y comprenda los
siguientes avisos cuidadosamente para asegurar que lo usará con seguridad
y correctamente.
1.3 Atención general
• Únicamente la batería y el cargador especicado por nuestra empresa
deben usarse en tu QUO SmartWatch. Otros productos pueden resultar en
fugas, sobrecalentamiento, incendio o explosión.
• Para evitar el mal funcionamiento del QUO SmartWatch, por favor no
golpee violentamente, sacuda o lance su QUO SmartWatch.
• Por favor, no coloque el QUO SmartWatch en un horno de microondas o
equipos de alta presión. De lo contrario podría conducir a accidentes ines-
perados tales como daño a los circuitos o riesgos de incendio.
• Por favor no use su QUO SmartWatch cerca de gases inamables o

Manual del Usuario
Q033MA01
Other manuals for Motiv
1
Table of contents
Other QUO Watch manuals
Popular Watch manuals by other brands

Denver
Denver SW-151MK2 user manual

National Geographic
National Geographic NG704 SERIES instruction manual

Festina
Festina IFM3510 instruction manual

Conrad Electronic
Conrad Electronic 86 07 46 operating instructions

Zeon
Zeon IN7209 Calibre 425 Operation manual

Garmin
Garmin Forerunner 235 Quick start manual