manuals.online logo
Brands
  1. Home
  2. •
  3. Brands
  4. •
  5. Ra Lights
  6. •
  7. Flashlight
  8. •
  9. Ra Lights Ra Clicky User manual

Ra Lights Ra Clicky User manual

Ra Clicky™ Flashlight User's Guide
Copyright 2008 by Ra Lights
All rights reserved
November 9, 2008
Introduction
Congratulations on your purchase of the Ra Clicky Flashlight. We believe you
will find your new Ra Clicky Flashlight the most versatile flashlight you have ever
owned. Simple single-handed operation provides quick access to the 4 brightness
settings allowing you to conveniently select the amount of light you need for any
task. You can customize your flashlight for additional utility. Your flashlight can
be used with both primary and rechargeable batteries. Your flashlight is built to
provide years of reliable service with daily use.
Basic Operation
Press and release the recessed rubber button on the tail of your flashlight to turn on
your flashlight. Your flashlight automatically turns on to the Primary brightness
setting, which provides plenty of light for most tasks.
Press and hold the button while your flashlight is on to activate the High
brightness setting. Release the button to return to the previous brightness setting.
Quickly press and release the button while your flashlight is on to turn off your
flashlight.
Advanced Operation
We use the term “click” to indicate a quick press and release of the button. Think
of it like a mouse click on your computer. The button must be released in less than
1/3 of a second to be recognized as a click. The term double-click means two clicks
in rapid succession and triple-click means three clicks in rapid succession.
We use the term “press-hold-release” to indicate that the button should be held
down for an extended period – longer than 1/3 of a second – to allow your
flashlight to tell the difference between a click and a press-hold-release. We use the
term “press and hold” to indicate you should continue to hold the button down
until you are told to release it. A click press-hold-release is a click followed by the
next press in quick succession. The same applies to a double-click press-hold-
release and a triple-click press-hold-release.
You tell your flashlight what to do through a sequence of clicks and/or a press-hold-
release. The commands are simple and easy to learn. It will take a few minutes of
practice to become proficient with them.
From Off: these commands are available when your flashlight is turned off:
•Click – turns on your flashlight to the Primary brightness setting.
•Click, press-hold-release – turns on your flashlight to the High brightness
setting.
From On: these commands are available when your flashlight is turned on:
•Click – turns off your flashlight.
•Double-click – toggles between the Primary and Secondary brightness settings
or returns you to the last Primary or Secondary brightness setting used.
•Triple-click – goes to the Low brightness setting.
•Click, press-hold-release – goes to the High brightness setting.
•Press and hold – goes to the High brightness setting for as long as you hold
down the button and then returns to the previous brightness setting when the
button is released.
Note: your flashlight will turn on burst output whenever you select the High
brightness setting. After 10 seconds of burst output, the output is automatically
reduced to the one-hour output level. You can return to burst output for another 10
seconds by releasing the button and then pressing and holding the button again.
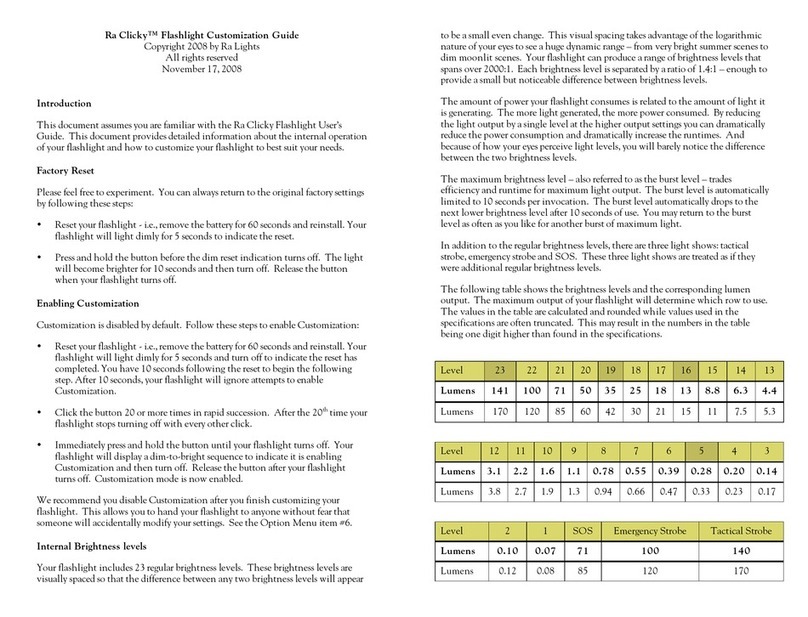
Please refer to the Ra Clicky Flashlight Customization Guide for detailed
instructions on customizing your flashlight.
Low Battery Indication
Your light will momentarily turn off and then back on to half of the previous
brightness level when the battery in your flashlight is unable to supply enough
power to run the current brightness level. This process is repeated when needed as
the battery is used up. After this process starts, your flashlight will double-blink
once a minute to remind you that the battery needs to be changed. Selecting a
brightness level below the current brightness level will extend the dying battery
and turn off the dying battery reminder.
Your flashlight will start blinking once a second when the battery is no longer
capable of powering any of the regular brightness levels.
Warning: continued use of a rechargeable battery after your flashlight begins
blinking once a second will result in sudden darkness because your flashlight will
eventually turn itself off to protect the battery.
Installing the Battery
Unscrew the battery compartment from the head and remove the old battery from
the battery compartment. Insert the new battery into the battery compartment with
the positive terminal out. Align the head and battery compartment, press them
together to overcome the spring pressure and screw the battery compartment and
head back together.
The light comes on dimly for two seconds following a battery change to indicate it
is functioning correctly. If you do not see this indication when changing batteries,
remove the battery for 60 seconds and try again.
Note: your flashlight protects rechargeable batteries from over-discharge under most
conditions. However, we still recommend you use batteries with built-in over-
discharge protection for an added level of safety.
Warning: only install fully charged rechargeable batteries. Using partially charged
batteries may result in the batteries not being properly recognized as rechargeables.
This can lead to the rechargeable batteries being over-discharged and damaged.
Caution: do not try unscrewing or removing the switch cap. Doing so may damage
your flashlight.
Cleaning and Maintenance
Periodically clean the open end of the battery compartment, the threads and O-
ring with a clean lint-free cloth lightly moistened with isopropyl alcohol. Apply a
coat of non-conductive silicon or petroleum grease to these surfaces.
Replace the battery compartment O-ring if it becomes worn or damaged. The
battery compartment O-ring is: 1.5mm x 20.5mm, 70 durometer Nitrile (Buna-N).
The recessed electrical contacts and interior threads can be cleaned using a lint-free
swab lightly moistened with isopropyl alcohol. Recessed contacts and threads
should be cleaned in a counter-clockwise direction to prevent snagging the swab.
Be sure to remove any particles or fibers that may be left behind. Apply a coat of
non-conductive silicon or petroleum grease to the interior threads.
The exterior can be cleaned with a mild soap and water. Rinse well and dry with a
lint-free cotton cloth.
Additional Warnings
Warning: your flashlight on the higher brightness levels is very bright. You should
avoid looking directly into the light as the light can be intense enough to injure
your eyes.
Warning: a sudden total failure is unlikely but is still possible. We recommend you
always carry a second light during critical situations (e.g., caving). We also
recommend you carry enough spare batteries to cover your lighting requirements
plus a reasonable safety margin. It is not necessary to start each trip with new
batteries in your flashlight as long as you have spare batteries along.
Warning: do not recharge a rechargeable battery if you think it has been over-
discharged or otherwise damaged. Dispose of the damaged battery immediately. An
over-discharged or otherwise damaged battery can vent or explode when the battery
is recharged or when the battery is subsequently used.
Warning: water – especially salt water – in the battery compartment will cause
electrolysis, giving off hydrogen and oxygen – an explosive gas mixture. Electrolysis
will also cause corrosion. If water gets inside of the battery compartment,
immediately open the battery compartment, rinse the battery compartment and
battery with fresh water and allow to completely dry.
Contact Us
Ra Lights (HDS Systems, Inc. dba Ra Lights)
P.O. Box 42767
Tucson, Arizona 85733
USA
520-325-3004
www.RaLights.com
info@RaLights.com
Warranty
Your Ra Clicky flashlight (Product) is warranted to be free from defects in materials
and workmanship for the life of Product to the original owner. This warranty does
not include cosmetic blemishes, damage, modifications and normal wear. We will
repair Product, replace Product with an equivalent Product or refund the original
purchase price for the defective Product – at our discretion. You are solely
responsible for determining the Product's suitability for your application and you
take sole responsibility for Product's use. In no case shall we be liable for more than
the original purchase price of Product.
Specifications
Input voltage: 1.8V to 4.5V
Light source: high efficiency white LED
Light output: burst: 140 lumens, high: 100 lumens, secondary: 35 lumens,
primary: 12 lumens, low: 0.3 lumens
Runtimes: 1 hour on high setting, 10 hours on primary setting
Regulation: constant power regulation
Battery: 1 – IEC-CR17345, Li-MnO23.2V non-rechargeable,
Li-CoO2Li-ion 4.2V (3.7V nominal) rechargeable
Lens: ultra-clear glass with anti-reflective coatings
Housing: aerospace aluminum, military type III hard anodize, stainless steel bezel
Pocket clip, deep carry bezel up, MOLLE compatible, retaining
Waterproof: 20 meters (66 feet) – static
Dimensions: 25.5mm (1 inch) diameter by 95mm (3.75 inches) long
Weight: 90g (3.2 ounces) including batteries
Specifications are subject to change without notice.

Other manuals for Ra Clicky

1

Other Ra Lights Flashlight manuals

Ra Lights Ra Every Day Carry User manual

Ra Lights

Ra Lights Ra Every Day Carry User manual

Ra Lights Ra Twisty Flashlight User manual

Ra Lights

Ra Lights Ra Twisty Flashlight User manual

Ra Lights Ra Clicky User manual

Ra Lights

Ra Lights Ra Clicky User manual

Popular Flashlight manuals by other brands

Mellert SLT TL 600 operating instructions

Mellert SLT

Mellert SLT TL 600 operating instructions

Burners FV-11-S instruction manual

Burners

Burners FV-11-S instruction manual

Harbor Freight Tools Dynamo LED Flashlight 65207 operating instructions

Harbor Freight Tools

Harbor Freight Tools Dynamo LED Flashlight 65207 operating instructions

Hypertherm Duramax Hyamp Series Service manual

Hypertherm

Hypertherm Duramax Hyamp Series Service manual

Tokin TokinArc YMENS-300R instruction manual

Tokin

Tokin TokinArc YMENS-300R instruction manual

Bayco Products NightStick XPP-5422GX instruction manual

Bayco Products

Bayco Products NightStick XPP-5422GX instruction manual

NightSearcher ZOOM 580 user manual

NightSearcher

NightSearcher ZOOM 580 user manual

Emos E-497-2 manual

Emos

Emos E-497-2 manual

PELI 2380 instruction manual

PELI

PELI 2380 instruction manual

Bolt VX-710N user manual

Bolt

Bolt VX-710N user manual

Metz MECABLITZ 44 AF-1 Operating	 instruction

Metz

Metz MECABLITZ 44 AF-1 Operating instruction

Sparky Group FL 12L Original instructions

Sparky Group

Sparky Group FL 12L Original instructions

Walter xl1000 Operation manual

Walter

Walter xl1000 Operation manual

Makita DML801X instruction manual

Makita

Makita DML801X instruction manual

Bergstrom H812 Instructions for use

Bergstrom

Bergstrom H812 Instructions for use

Foxfury Lighting Solutions HAMMERHEAD SERIES product manual

Foxfury Lighting Solutions

Foxfury Lighting Solutions HAMMERHEAD SERIES product manual

Black & Decker 9506 instruction manual

Black & Decker

Black & Decker 9506 instruction manual

Milwaukee M18 IL Original instructions

Milwaukee

Milwaukee M18 IL Original instructions

manuals.online logo
manuals.online logoBrands
  • About & Mission
  • Contact us
  • Privacy Policy
  • Terms and Conditions

Copyright 2025 Manuals.Online. All Rights Reserved.