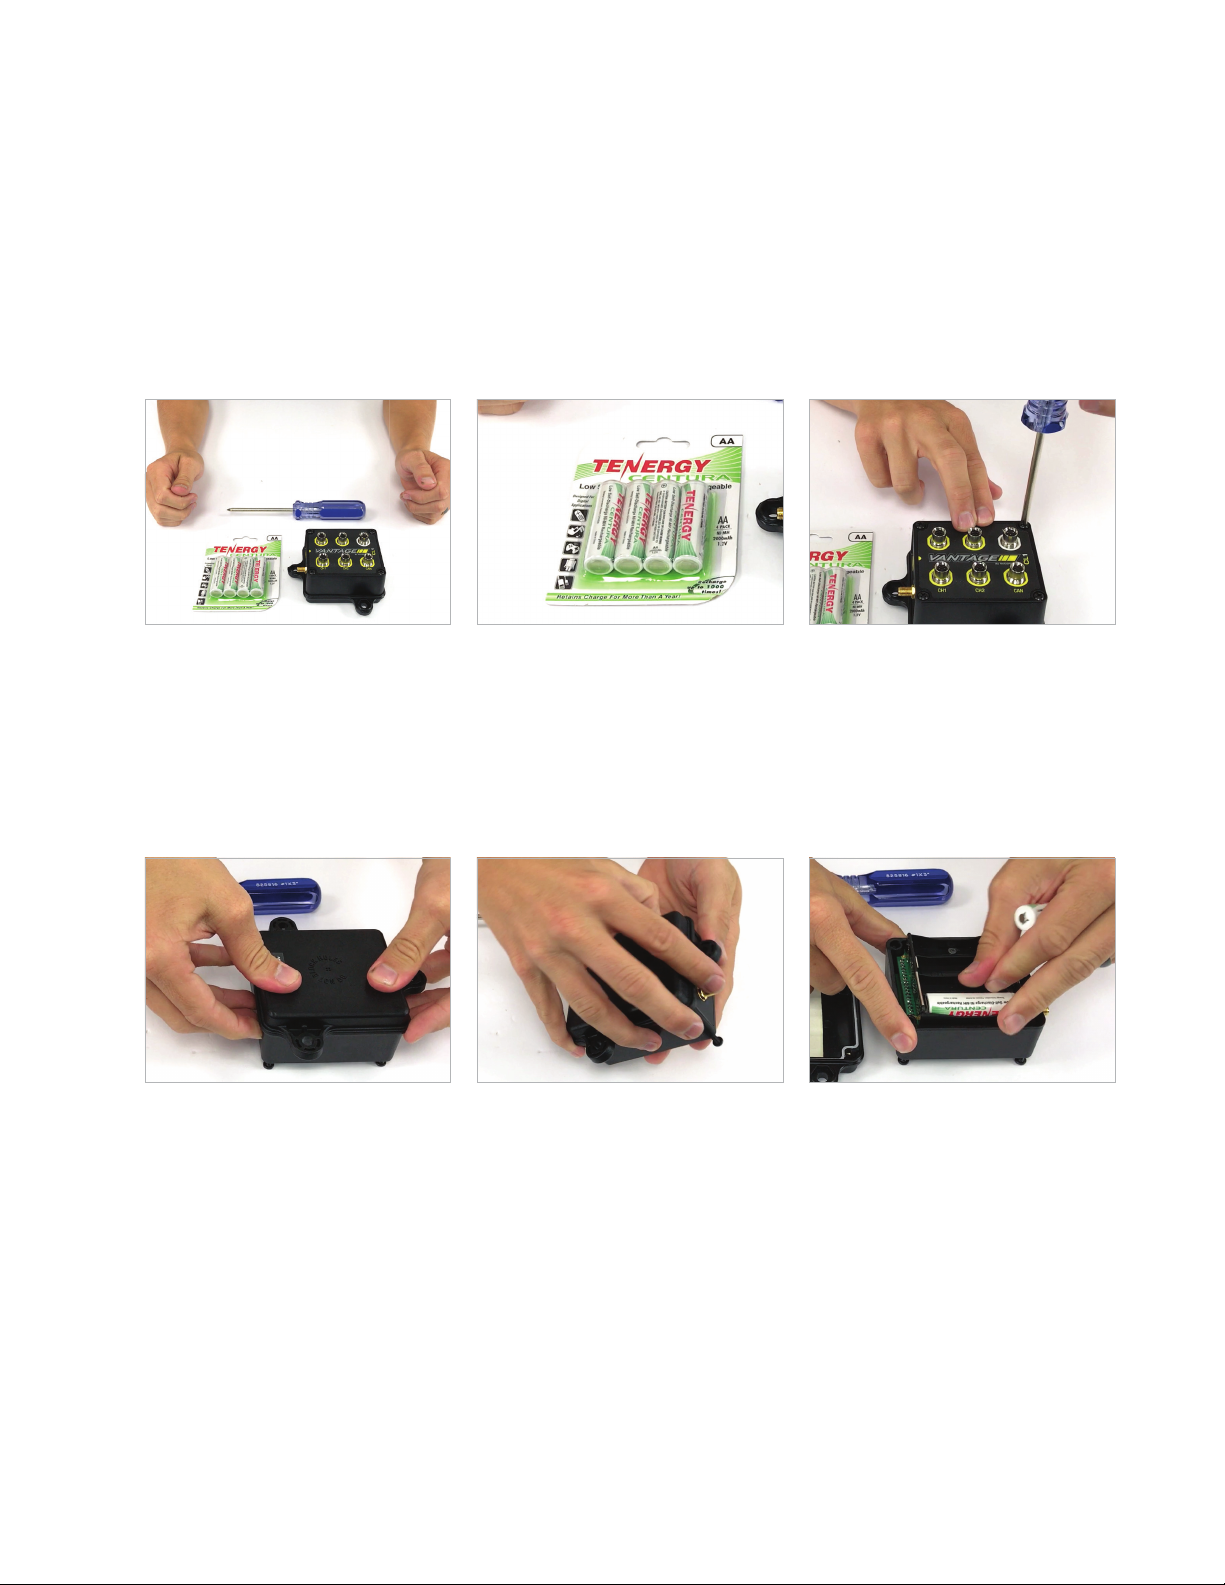
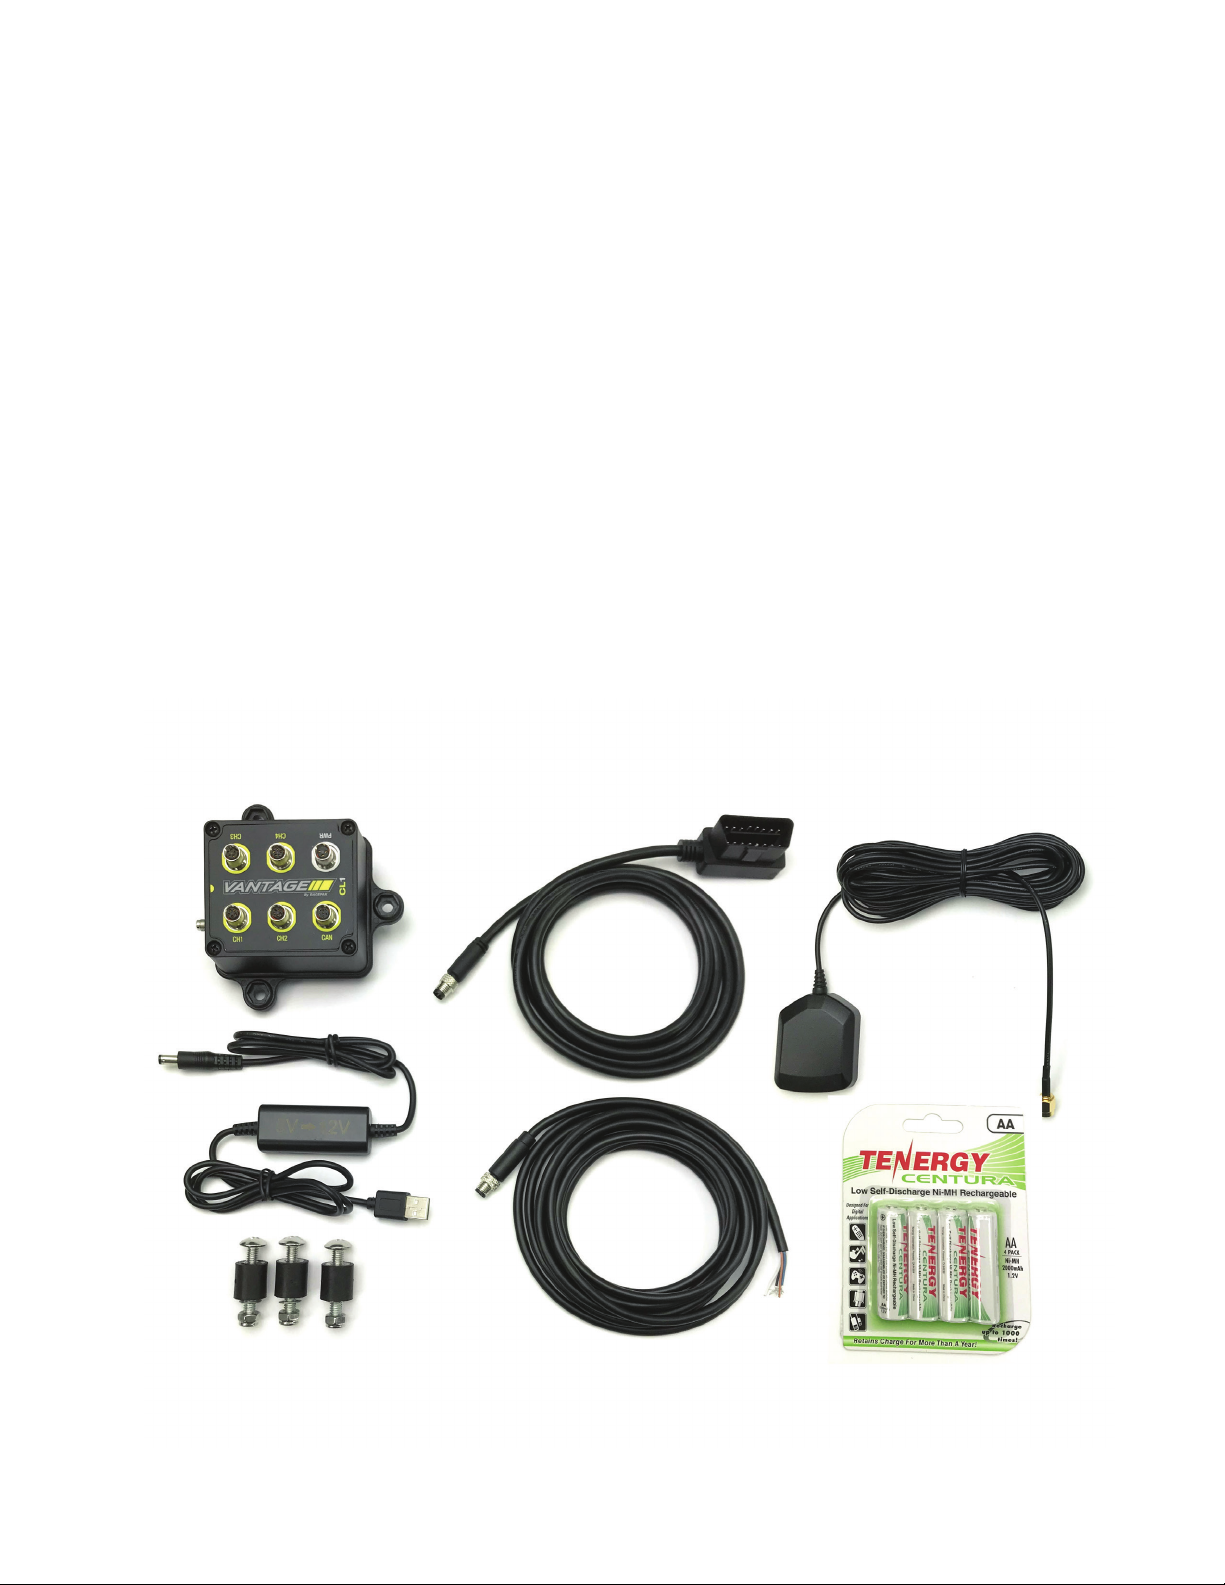
Racepak Vantage CL1 Quick start guide

VANTAGE CL1
Installation and use of the
CL1 Autocross Kit

VANTAGE CL1
Table of Contents
What’s in the box 3
Items needed for installation 4
CL1 registration 5
D3 app install 6
Battery installation 7
Charging the CL1 data box batteries 9
Paring of the mobile device 10
CL1 data box status LED patterns 14
Firmware auto-update 15
Mounting the CL1 data box 16
Mounting the mobile device 18
Connection of GPS antenna 19
First time track use of the CL1 data kit 20
Installation of Engine RPM cable 21
Set up prior to first outing 22
Setting up Engine RPM and External Sensors 24
Setting up OBD2 26
Vantage EFI Interface Module 27
Pit Dash information 29
Remote viewing of live data 30
Data analysis features 33
On track alerts 37
EFI Module Available Data Channels 38

3
VANTAGE CL1
What’s In the Box –
Racepak Vantage CL1 Autocross Kit
PN: 20100-2002
Vantage CL1 Data Box 20100-2002
Engine RPM Cable 28101-2001
USB Charging Cable 28118-2001
Charging Cable Adapter 28118-2002
GPS Antenna ANTG-ANN-05
4 Rechargeable AA Batteries 89118-2001
Rubber Isolation Mounting Feet 89112-2001
OBD2 Cable 28120-2001
The CL1 Autocross Kit combines the power of mobile technology with Racepak’s CL1 data box and external sensors, providing
professional level instrumentation and data analysis, all within Racepak’s exclusive D3 app.

4
VANTAGE CL1
CL1 Autocross Kit Mobile phone with protective case
(not included with standard kit)
#8 / 5mm bit for installation of Rubber
Isolation Mounting Feet
Optional vehicle phone mount -
(not included with kit)
Phillips screw driver Optional CL1 cup holder mount
(not included with kit)
Installation and Use of the CL1 Autocross
Kit Requires the Following Items:

5
VANTAGE CL1
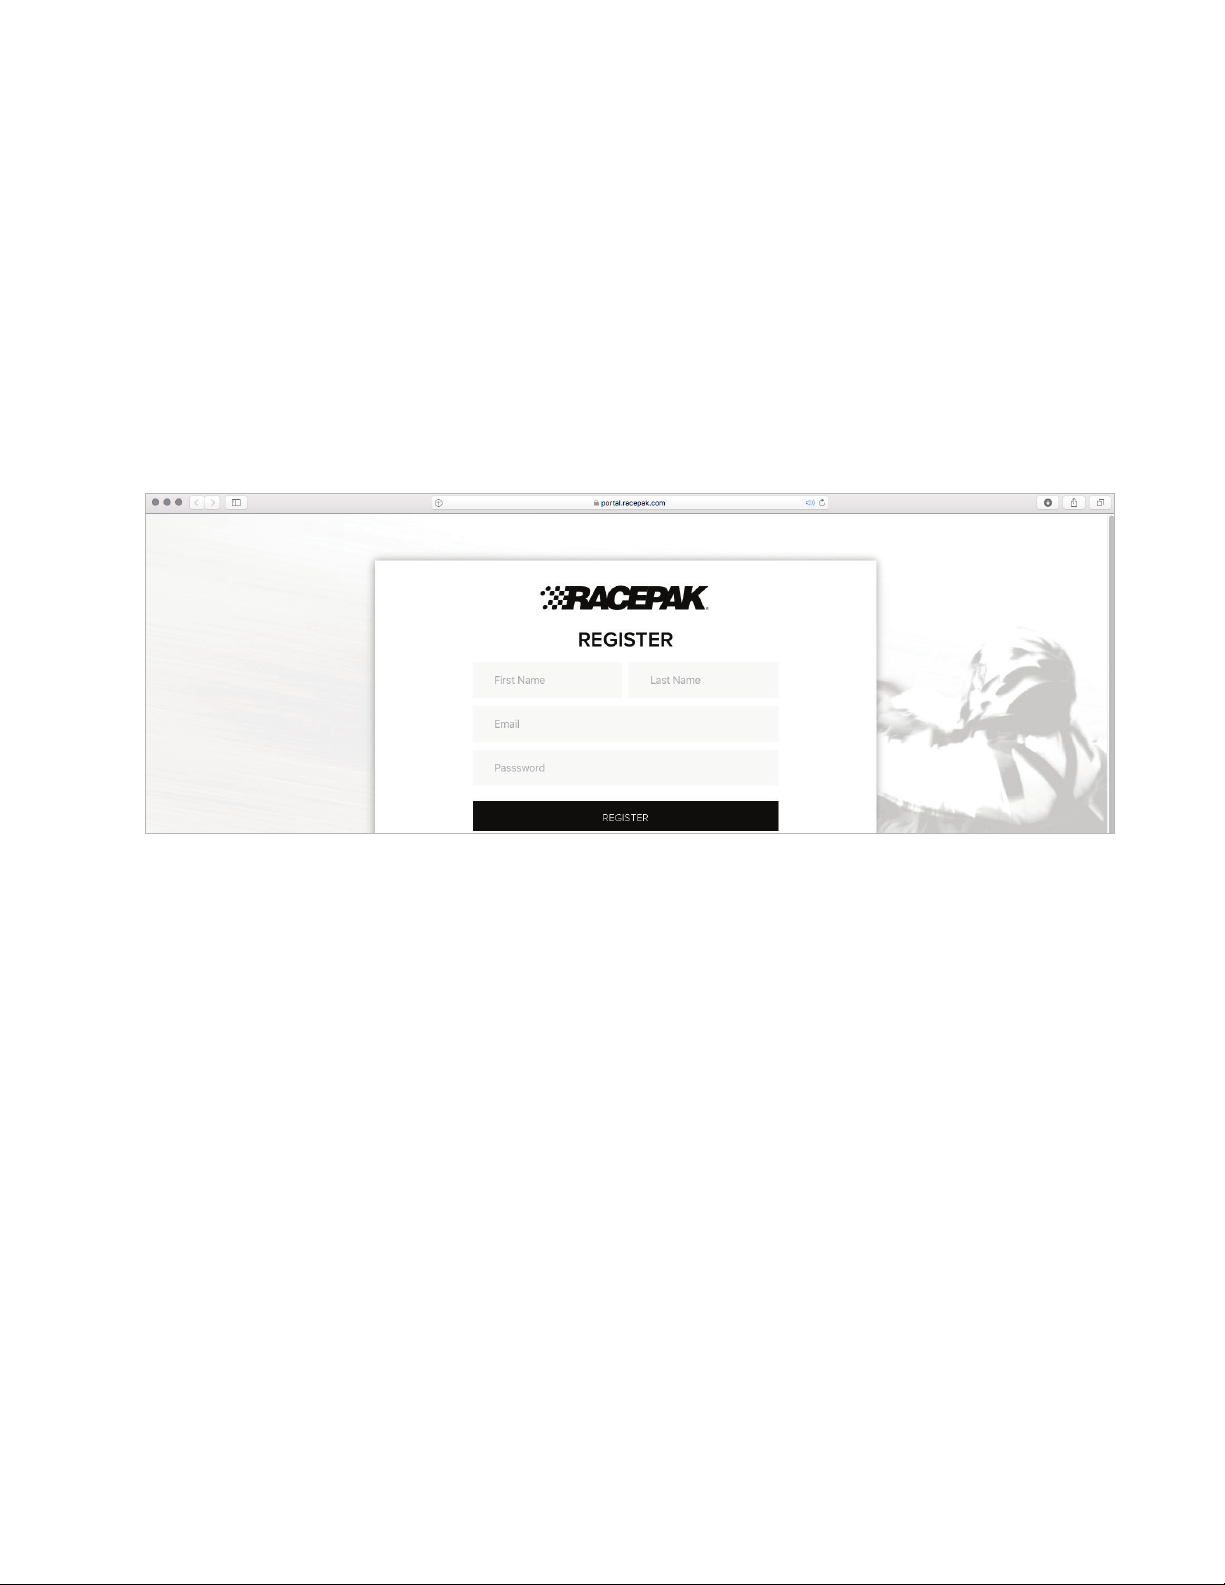
Log onto portal.racepak.com and register your CL1 Data Box by following the step by step prompts shown online.
Registration of the CL1 data box is provides a number of benefits, to the customer, and is necessary for use of the CL1
product. There are a number of aspects of device registration that should be reviewed, before the registration process.
Register Device
1. Team: The creation of a team provides a secure location
for all cloud based data, related to that particular team and
CL1 data box. This action also provides the ability to define
the desired Team from the vehicle mounted mobile device
running the CL1 app, for cloud data uploading purpose.
Teams are also presented to remote viewers, in order to
select the correct team for data review.
2. Device Serial Number: 12 digit/letter combination found
on the bottom of the CL1 data box.
3. Subscription: Available on a monthly or yearly basis,
providing the ability for users to remotely view data from
any location, utilizing an internet connected mobile device,
running the D3 app.
My Teams
1. Provides ability to add individuals, for remote data
viewing. A valid email address is required for each team
member.
2. The team “owner” has exclusive access to the team, and
as such is responsible for the addition or removal of team
members, in order to provide access to, or remove access
from, reviewing remote data.
Before you Begin,
Register your CL1 Data Box

6
VANTAGE CL1
2. Install the app per your individual mobile device
instructions.
1. Search the term Racepak D3 in the Google Play or Apple
store, then download onto the mobile device which will be
mounted on the vehicle.
Note: Access to cloud data requires a
monthly or yearly subscription fee.
Note: Cellular service is not required
to utilize the D3 app on a mobile
phone for on-board vehicle instru-
mentation and data analysis, but is
necessary in order to upload data
to the cloud.
Note: For suggested mobile phone,
tablets and protective cases, please
see www.racepak.com.
Racepak’s exclusive D3 app turns a cellular & Bluetooth enabled smartphone into an on-board instrumentation and data
analysis device, while simultaneously uploading data via cellular connection to your secure, personal cloud account. Data
is stored locally on the mobile phone for instant data analysis, while live or cloud recorded data can be remotely viewed via
the same D3 app installed on any web connected tablet or mobile phone.
Step 1. Download and Install
the Racepak D3 App

7
VANTAGE CL1
1. Locate the four rechargeable batter-
ies found in the CL1 Data Kit.
4. Turn the CL1 upside down.
2. Remove batteries from packaging.
5. Grip the mounting pads and gentle
wiggle, while pulling the base from
the housing.
3. Using a small Phillips screwdriver,
completely loosen each of the four
screws found on each top corner of
the CL1 data box.
6. Once removed, install each battery,
ensuring the battery + and – are
oriented as shown on the battery
pack case.
Step 2. Battery Installation
The CL1 arrives from the factory without the rechargeable batteries installed in the unit. Installation of the batteries is a
quick and simple process.

8
VANTAGE CL1
7. Replace the base. 8. Reinstall the four screws, taking
care to not overtighten.
9. Charge the batteries following the
Charging the CL1 Data Box Batteries
section of this manual.
Step 2. Battery Installation
Continued

9
VANTAGE CL1
1. Locate the USB charging cable
and adapter, if the adapter was not
attached to the CL1 data box during
installation.
3. Connect the mating single pin male
and female on the charging cable and
adapter.
2. Connect the short adapter cable to
the PWR port of the CL1 data box.
Step 3. Charging the CL1 Data Box Batteries
4. Power down the CL1 data box. 5. Plug the USB connector into any
commonly available USB charger.
NOTE: 110v wall adapter is not includ-
ed with this kit. Shown for illustrative
purposes only.
6. Power up the CLI data box then
observe the flashing red LED on the
end of the CL1 data box, which
indicates charging.
7. When charging is complete, LED
flashing will cease and unit will power
OFF.
8. IMPORTANT: Remember to power
CL1 back ON, before use.
NOTE: DO NOT leave the charger
connected to the CL1, when in use on
the track!

10
VANTAGE CL1
Keeping in mind that the D3 app not only transforms the mobile device into on track instrumentation for the driver, but also
functions as the data recorder and uploads data to your optional cloud account, it is necessary to pair the mobile device
with the CL1 before use.
Step 4. Pairing of the Mobile Device with
the CL1 Data Box - Android
2. Locate Settings in your mobile de-
vice, then Bluetooth. For Android,
Settings are typically found in Apps on
the home page.
4. Vantage should now appear as a
device connection option.
3. Turn Bluetooth ON.
5. Open the D3 app.
1. Briefly press the power button on
the CL1 data box. The LED will turn
BLUE.
6. TOUCH and HOLD the mobile
device on the CL1 data box.
Note: Do not pair from this window!

11
VANTAGE CL1
Step 4. Pairing of the Mobile Device with
the CL1 Data Box - Android
8. The top two icons (Pit Dash and
Manual Record) will now change from
GRAY to GREEN. This indicates the
mobile device and CL1 are now paired.
9. If unit fails to pair, power o CL1,
then press and hold the power button
until the LED turns PURPLE, and re-
peat starting at step 6.
7. The LED will change from solid
BLUE to blinking GREEN, indicated
phone and CL1 are paired.
Continued
Note: Disable mobile device screen
lock, after installation of D3 app.

12
VANTAGE CL1
Keeping in mind that the D3 app not only transforms the mobile device into on track instrumentation for the driver, but also
functions as the data recorder and uploads data to your optional cloud account, it is necessary to pair the mobile device
with the CL1 before use.
Step 4. Pairing of the Mobile Device with
the CL1 Data Box - iOS
2. Locate Settings in your mobile de-
vice, then Bluetooth. For iOS devices,
Settings are typically found on the
home screen.
4. Open the D3 app.
3. Turn Bluetooth ON.
5. TOUCH and HOLD the mobile
device on the CL1 data box.
1. Briefly press the power button on
the CL1 data box. The LED will turn
BLUE.
6. Wait for the Bluetooth Pairing Re-
quest message. Select Pair.
Continued
Note: Do not pair from this window!

13
VANTAGE CL1
Step 4. Pairing of the Mobile Device with
the CL1 Data Box - iOS
Continued
8. The top two icons (Pit Dash and
Manual Record) will now change from
GRAY to GREEN. This indicates the
mobile device and CL1 are now paired.
9. If unit fails to pair, power o CL1,
then press and hold the power button
until the LED turns PURPLE, and re-
peat starting at step 6.
7. The LED will change from solid
BLUE to blinking GREEN, indicated
phone and CL1 are paired.
Note: Disable mobile device screen
lock, after installation of D3 app.

14
VANTAGE CL1
A single LED, adjacent to the external GPS connector, provides the current status of the CL1, through a variety
of colors and flashing sequences.
Step 5. CL1 Data Box Status LED Patterns
Light Blue, Solid
Initializing
Purple, solid
Reset pairing
Blue, Solid
Ready to connect
Red, solid
Powering o
Green, flashing Blue
once every second
Connected, transmitting
Green, flashing on and o
every three seconds
Connected, waiting (standby)
Red, flashing on and o
every three seconds
Charging

15
VANTAGE CL1
The CL1 data box contains an automated firmware update feature, utilizing the vehicle mounted mobile device. No action is
required from the user. Instead, when powering up the mobile device and the CL1, if new firmware is available, the mobile
device connects to the server, retrieves the latest firmware and loads to the CL1. The user is alerted to this action by a
message on the mobile device display. Once updated, the display on the mobile device will return to the D3 home page
indicating the CL1 is ready for use.
Note: Do not power down the CL1 or the mobile
device during the update process.
Step 6. Firmware Auto-Update Feature
Updating Box Firmware

16
VANTAGE CL1
1. Avoid mounting near excessive heat
and noise sources.
2. Mounting location of the CL1 data
box is determined by the location of
the GPS antenna and OBD2 port (if
applicable) due to the length of each
cable.
3. Racepak suggests mounting the CL1
in a convenient location.
4. The CL1 Data Box can be mounted
in any direction, via the three rubber
isolation mounting feet.
Step 7. Mounting the CL1 Data Box
X
5. Ensure the Power / LED Status Indi-
cator and sensor ports are in view and
accessible.
6. Using a number #8 / 5mm drill and
the base of the CL1 data box as a
template, drill three mounting holes as
needed.

17
VANTAGE CL1
8. Remove the supplied locknut from
the rubber mount stud, drop into the
recessed hex mount tab on the bottom
of the CL1 housing.
9. Thread the rubber mount stud
through the bottom of the mount pad,
and tighten by hand. Repeat the pro-
cess for the remaining rubber feet.
10. Locate the three pan head screws
and washers, insert through the
mount panel, into the mounting feet
and tighten.
11. Vehicles utilizing stock style interi-
ors may utilize the optional Racepak
CL1 cup holder mount.
7. Locate the three rubber mount feet.
Step 7. Mounting the CL1 Data Box
Continued

18
VANTAGE CL1
1. For automotive applications, Race-
pak oers the Ram X Grip universal
holder and Ram Twist Lock Suction
mount.
NOTE: Mount the phone as close as
possible to the CL1. Remember, all
sensor data is transmitted via blue-
tooth, from the CL1 to the phone.
NOTE: The D3 app can not be viewed
in Portrait orientation. The phone must
be mounted with the home button on
the right, as viewed from the drivers
position.
3. Orient the phone horizontally, with
the home button on the right, as
viewed from the driver position.
2. Mount the phone within view and
reach of the driver, as the D3 app will
be used for pit and on track
instrumentation.
Step 8. Mounting of Mobile Device
Given the nearly unlimited combination of vehicles utilizing the CL1 data box, Racepak recommends the selection of a
rugged phone mount capable of securing the phone for any type of motorsports situation.

19
VANTAGE CL1
1. Mount the GPS antenna in a location with an unobstructed
view of the sky.
3. Connect the GPS antenna cable to the GPS connector on
the CL1 data box.
2. Locate the GPS antenna and route from mounting
location to the CL1 data box.
Step 9. Mounting and Connecting
the GPS Antenna

20
VANTAGE CL1
Step 10. First Time Track Use of the CL1
Autocross Kit
At this time, the CL1 data kit and mobile device is mounted on the vehicle, with the D3 app installed and paired with the
CL1 data box and the CL1 is registered (cloud account not required) to your online account. It is now time to turn our attention
to the use of the D3 app. Open the D3 app on the vehicle mounted mobile device. The icons are group by color, based on
their function.
Green:
On-track driver information
and CL1 connection status.
Blue:
Data analysis functions
and cellular connection
status.
Orange:
Setup functions.
Red:
Manual record function.
Circuit
(track mapping)
Settings
Manual Record
Pit Dash
Analysis
(track map and
graphing)
Sensors
Lap Time
Live Data and
cellular
connection status
Live Data and
cellular
connection status
Log In Team
Other manuals for Vantage CL1
3
Table of contents
Other Racepak Automobile Accessories manuals