Radio Shack 20W Soldering Starter Kit User manual

20W Soldering
Starter Kit
6400255 User’s Guide
We hope you enjoy your 20W Soldering Starter
Kit from RadioShack. Please read this user’s
guide before using your new soldering kit.

2
Package Contents
Soldering
Iron
Silicone Ring Soldering
Iron Holder
Stand
Cleaning
Sponges (2) Rosin Core
Solder
Soldering Tips (3)
Cone Chisel Fine-point
Desoldering
Vacuum
Pump
2.5mm
Desoldering
Braid
User’s
Guide

3
Features
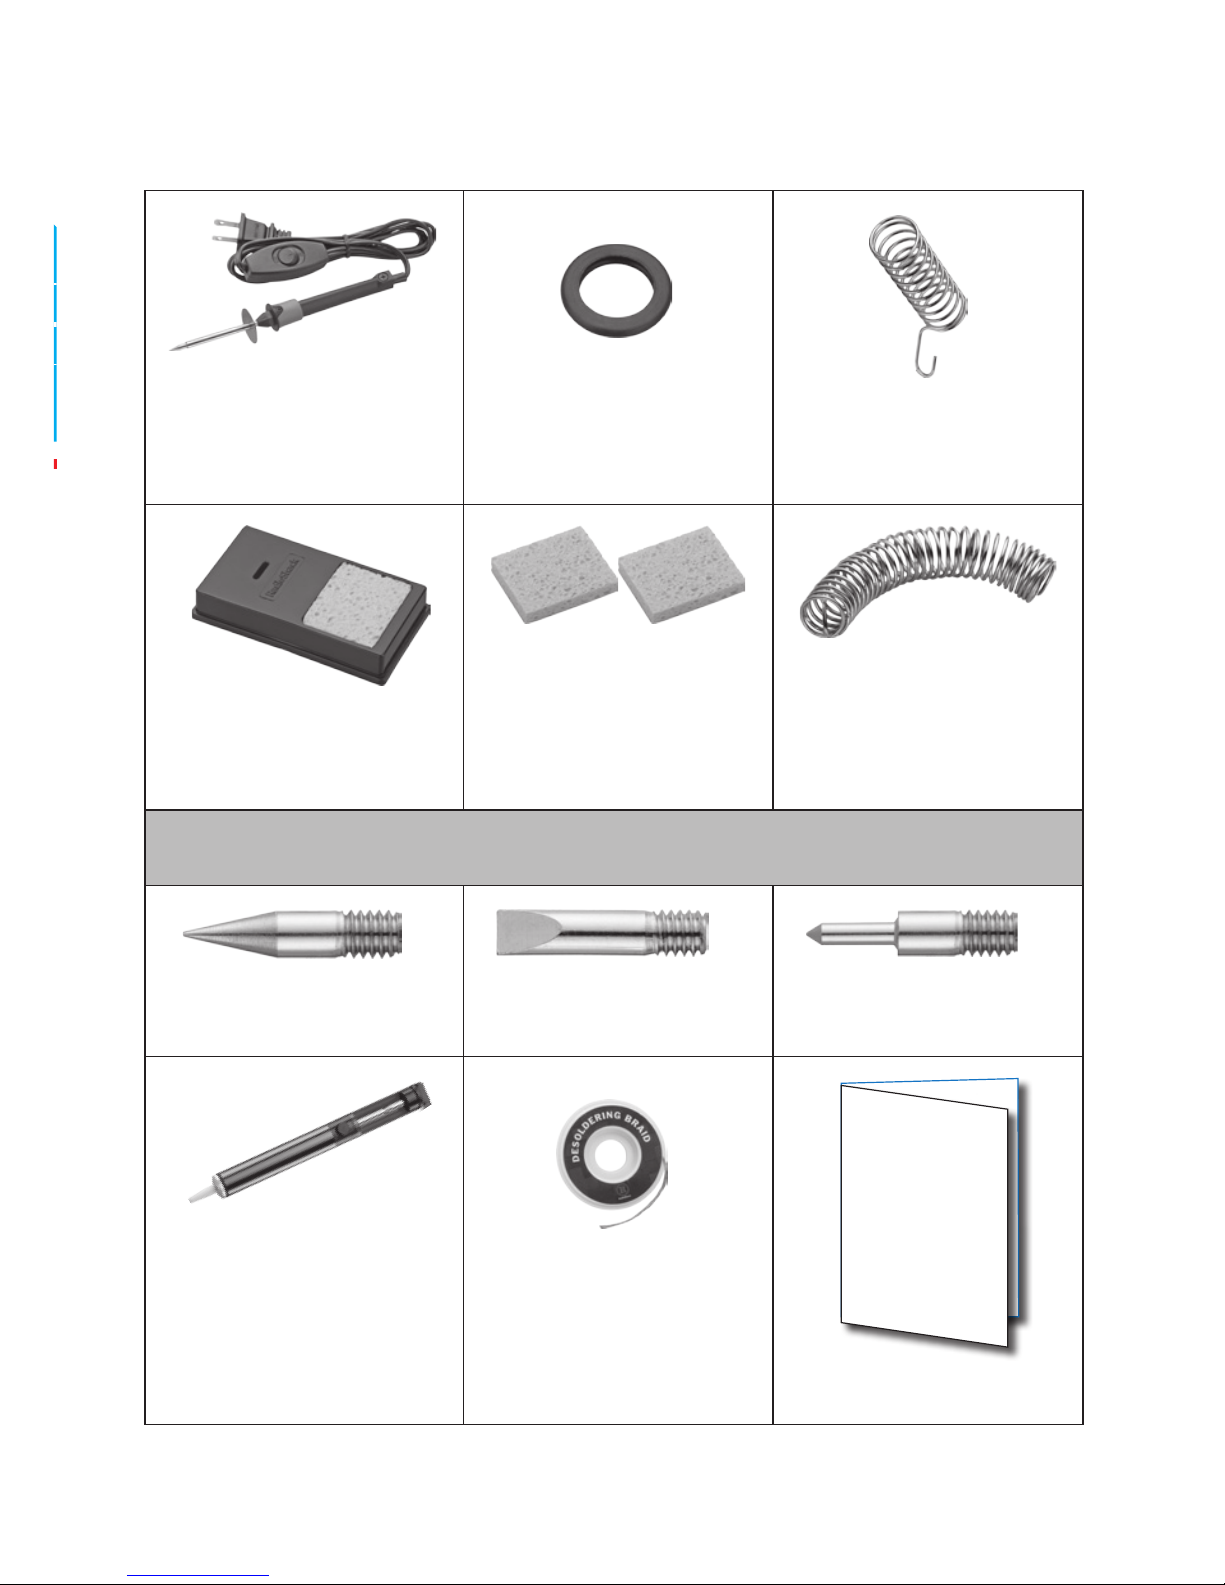
• Ergonomic,cool-griphandle
• Heat-dissipatingcoil
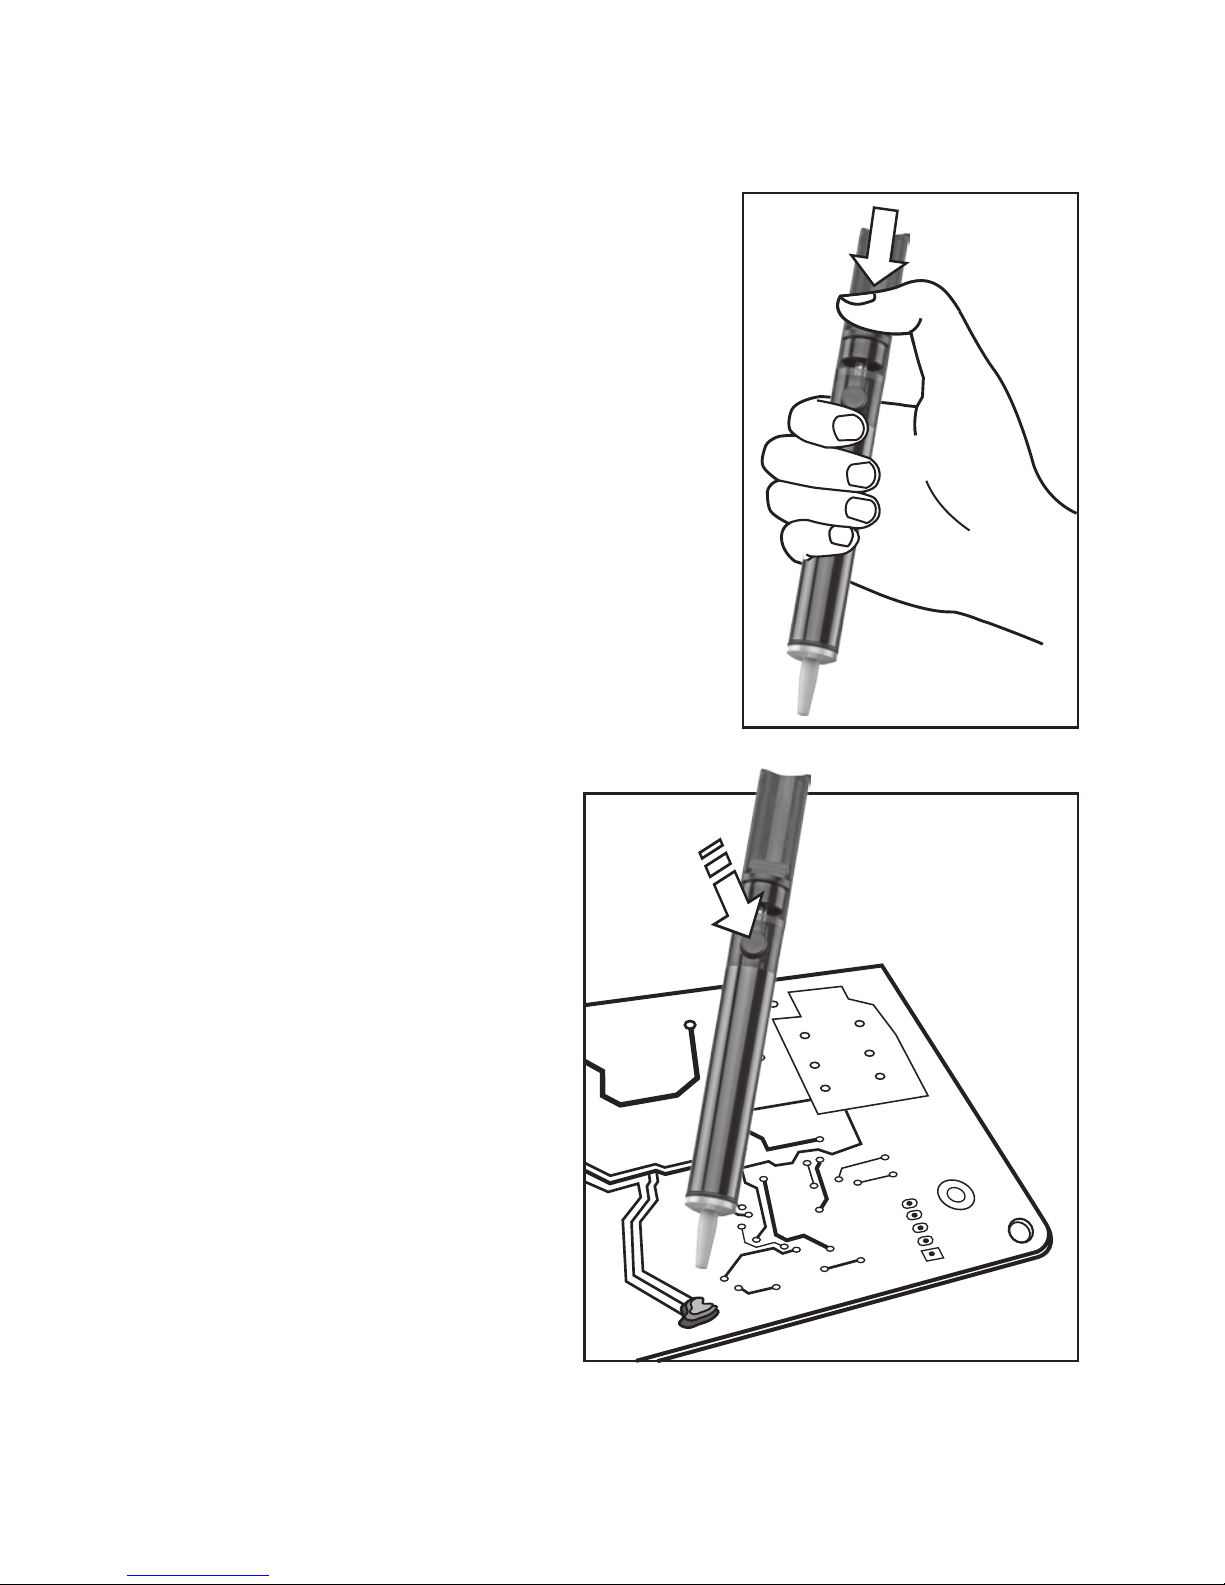
• Lightweightdesolderingvacuumpump
Important Safety Instructions
• Readinstructionsbeforeoperatingtheproduct.
• Keepoutofthereachofchildren.
• Workonlyinadryareathatisfreefrom
ammablematerials.
• Operatethesolderingironinproperlyventilated
roomsorroomswithafumeextractionsystem.
Inhalationofsolderingfumesandparticlesfrom
uxinthesolderisdetrimentaltohealth.
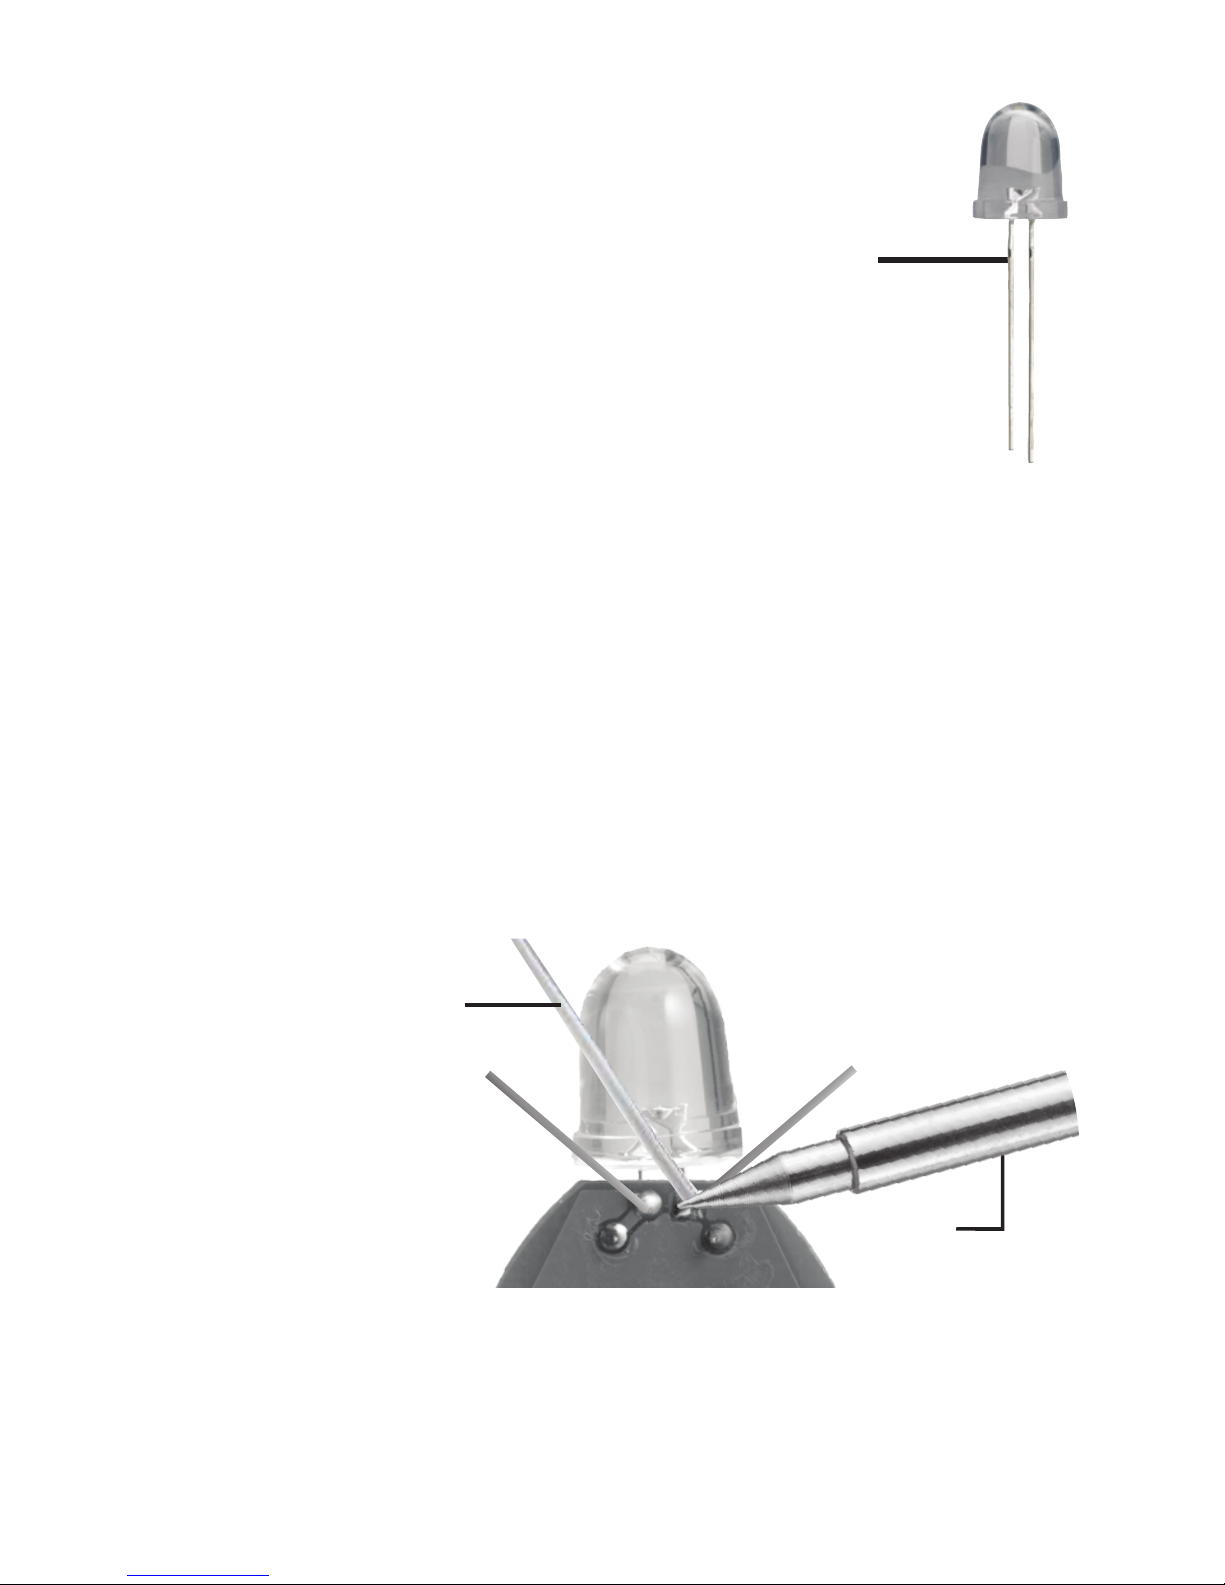
• Becareful!Hotsolderingironscancausesevere
burnsandigniteres.Donottouchthetipand
theheatsinkplateorletitcomeincontactwith
anyothermaterial.
• Donottouchthetipofahotsolderingironor
removesolderfromitssurfacewithyourhands.
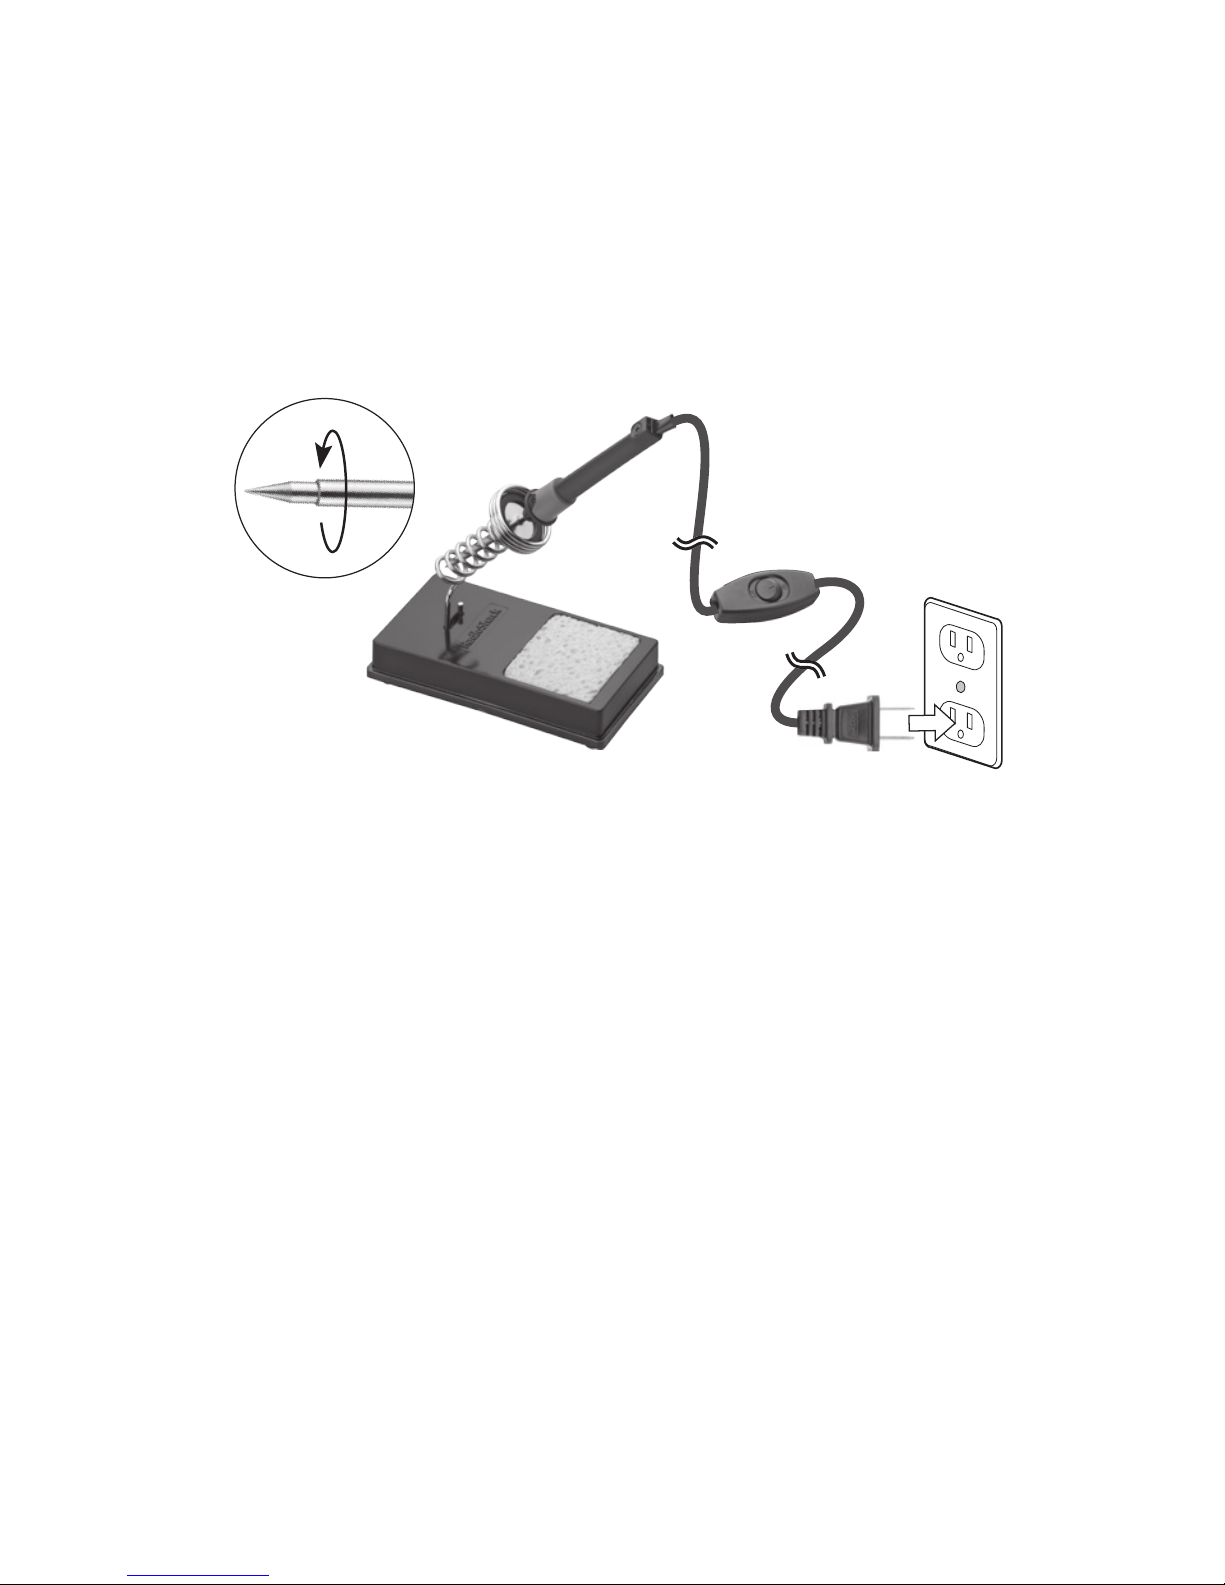
• Thissolderingironhasapolarizedplug(one
bladeiswiderthantheother).Toreducethe
riskofelectricshock,thisplugismadetotthe
polarizedoutletonlyoneway.Iftheplugcannot
befullyinsertedintotheoutlet,turntheplug

4
overandtryagain.Ifitstilldoesnott,contact
aqualiedelectrician.Donotmodifytheplugin
anyway.
• Ifthesuppliedcableisdamaged,itshouldbe
repairedbythemanufactureroritsagentor
asuitablequaliedpersoninordertoavoida
hazard.
• Neverholdthesolderingtiptothesoldering
pointtoolong.Thiscandestroythesoldering
point.
• Neveroperatethesolderingironwithoutthe
soldering tip. This can damage the heating
device.
• Whenyouarenotusingyoursolderingiron,set
thepowerswitchtoOFF.
• Storethesolderingironinadry,secureplace
wherechildrencannotreachit.
• Keepthesolderingironawayfromdustanddirt,
andcleanitwithadampclothoccasionallyto
keepitlookingnew.
• Thisproduct,whenusedforsolderingand
similarapplications,produceschemicalsknown
totheStateofCaliforniatocausecancerand
birthdefects(orotherreproductiveharm).

5
Setting Up Your Soldering Iron
1. Carefullythreadthedesiredtipintothe
ironandtightenwithpliers.
2. Install the silicone ring on the iron’s heat
sinkplate.
3. Insert the soldering iron holder into the
slot on the stand.
4. Place the iron in the holder and plug the
powercordintoanACoutlet.
5. Place the cleaning sponge into the stand
andaddwater.Whenyou’rereadytouse
theiron,addwatertothesponge.
Note: To avoid burns, always set the power
switch to OFF or unplug the iron and allow it
to cool before changing tips or touching the
silicone ring.

6
Replace the Soldering Tip
1. Unplugthepowercordandlet
thesolderingironcooldown.
2. Useplierstorotateandremove
the current tip.
3. Carefullythreadthedesiredtip
intotheironandtightenwith
pliers.
Tin the Soldering Iron Tip
“Tinning” means coating the soldering iron tip
withasmallamountofsolder.
1. Plugintheiron,switchonandwaitone
minute.Thenwipethetipquicklyonthe
dampspongetoremoveimpuritiesand
oxides.
2. Tinthesolderingtipbyaddingasmall
amountofsolder.
3. Whenthetip
becomesdiscolored
duringuse,wipeit
across the damp
cleaningsponge,
then tin it again.

7
Soldering
1. Insert the component
leads through the
correct pads on the PCB.
2. Press the soldering iron
tothepadwherethe
lead emerges. Heat the
padforonesecond.
3. Donotmovetheiron.Instead,movethe
soldertotouchthepointwherethepad
and lead meet. Do not touch the solder
to the iron.
4. Pullbackthesolderbeforeyouremove
the iron.
Leads
Iron
Solder

8
Flowenough
solder to hold the
component; solder
shouldnotextend
beyondthepadand
shouldextendonly
slightlyabovethepad.
5. Trimtheexcess
leadascloselyas
possibletothe
PCB.
Caution: Be careful
when soldering and
trimming leads.
Protective eyeware is recommended.
Turnothesolderingironifnotusedforover
5minutes.Toprotectyourtools,donotkeep
theironsetatahightemperatureforlong
periodsoftime.
Tintheironagainafterusetoprevent
oxidation.

9
Using Desoldering Braid
Abridgeforms
ifsolderows
overtheboard,
connectingtwo
pads that should
notbeconnected.
1. Place the
endofyour
desoldering
braiddirectly
on the solder.
2. Press the iron
ontopofthe
braid.When
the solder
melts,the
braidwill
soakupthe
excess.

10
Using the Desoldering Pump
1. Pushdownthe
desoldering tool
plunger until the
cleaningshaft
protrudesfromthetip.
2. Heatthebridgewith
soldering iron until
solder melts and
becomesliquid.
3. Holdthepumplightly
to the melted
solder and
press the
triggerbutton
tovacuum
solderfromthe
connection.

11
4. Ejectthesolderintoametal,glass,or
ceramicreceptaclebypushingplungerall
thewaydown.Donotreusethissolder.
Caution:
• Alwayskeepthetipendoftoolawayfrom
your face.
• Neverpointthetoolatanotherperson.
• Becarefulnottoletejectedsolderfallonto
PCBs or other wiring, as this may cause a
short circuit.
Note: To extend the life of the tip, avoid
pressing it into the work area.

12
Clean the Desoldering Pump
Afteruse,thoroughlycleantheplunger,
cleaningshaft,O-ring,andbarrelofthe
desolderingtool.Youcanremovethetip
andbarrelforeasycleaning.CoattheO-ring
and cleaning
shaftwith
petroleum
jellylubricant.
Do not use
solventsor
heat.
Specications
OutputPower.............................................................20W
Input Voltage ........................................ 120VAC,60Hz
MaximumTemp.Output ..................... 860°F(460°C)
PowerCord............................................SPT-1 18 gauge
LengthofthePowerCord ...........................5ft(1.5m) .
...............................................................withon/oswitch
Soldering Tips ............................Copper-platednickel
Guard Ring............................................................ Silicone
Specicationsaresubjecttochangeandimprovement
withoutnotice.Actualproductmayvaryfromthe
imagesfoundinthisdocument.
Barrel
Cleaning Shaft
and O-Ring
Plunger

13
Limited Warranty
RadioShackwarrantsthisproductagainst
defectsinmaterialsandworkmanshipunder
normalusebytheoriginalpurchaserfor
ninety (90) days afterthedateofpurchase
fromaRadioShack-ownedstoreoran
authorizedRadioShackfranchiseeordealer.
RADIOSHACKMAKESNOOTHEREXPRESS
WARRANTIES.
Thiswarrantydoesnotcover:(a)damage
orfailurecausedbyorattributableto
abuse,misuse,failuretofollowinstructions,
improperinstallationormaintenance,
alteration,accident,ActsofGod(suchas
oodsorlightning),orexcessvoltageor
current;(b)improperorincorrectlyperformed
repairsbypersonswhoarenotaRadioShack
AuthorizedServiceFacility;(c)consumables
suchasfusesorbatteries;(d)ordinary
wearandtearorcosmeticdamage;(e)
transportation,shippingorinsurancecosts;
(f)costsofproductremoval,installation,set-
upservice,adjustmentorreinstallation;and
(g)claimsbypersonsotherthantheoriginal
purchaser.

14
Shouldaproblemoccurthatiscovered
bythiswarranty,taketheproductand
theRadioShacksalesreceiptasproofof
purchasedatetoanyRadioShackstore
intheU.S.RadioShackwill,atitsoption,
unlessotherwiseprovidedbylaw:(a)repair
theproductwithoutchargeforpartsand
labor;(b)replacetheproductwiththesame
oracomparableproduct;or(c)refund
thepurchaseprice.Allreplacedpartsand
products,andproductsonwhicharefundis
made,becomethepropertyofRadioShack.
Neworreconditionedpartsandproducts
maybeusedintheperformanceofwarranty
service.Repairedorreplacedpartsand
productsarewarrantedfortheremainder
oftheoriginalwarrantyperiod.Youwillbe
chargedforrepairorreplacementofthe
productmadeaftertheexpirationofthe
warrantyperiod.
RADIOSHACKEXPRESSLYDISCLAIMSALL
WARRANTIESANDCONDITIONSNOT
STATEDINTHISLIMITEDWARRANTY.
ANYIMPLIEDWARRANTIESTHATMAYBE
IMPOSEDBYLAW,INCLUDINGTHEIMPLIED
WARRANTYOFMERCHANTABILITYAND,
IFAPPLICABLE,THEIMPLIEDWARRANTY
OFFITNESSFORAPARTICULARPURPOSE,

15
SHALLEXPIREONTHEEXPIRATIONOFTHE
STATEDWARRANTYPERIOD.
EXCEPTASDESCRIBEDABOVE,
RADIOSHACKSHALLHAVENOLIABILITY
ORRESPONSIBILITYTOTHEPURCHASER
OFTHEPRODUCTORANYOTHER
PERSONORENTITYWITHRESPECTTO
ANYLIABILITY,LOSSORDAMAGECAUSED
DIRECTLYORINDIRECTLYBYUSEOR
PERFORMANCEOFTHEPRODUCTOR
ARISINGOUTOFANYBREACHOFTHIS
WARRANTY,INCLUDING,BUTNOTLIMITED
TO,ANYDAMAGESRESULTINGFROM
INCONVENIENCEANDANYLOSSOFTIME,
DATA,PROPERTY,REVENUE,ORPROFIT
ANDANYINDIRECT,SPECIAL,INCIDENTAL,
ORCONSEQUENTIALDAMAGES,EVENIF
RADIOSHACKHASBEENADVISEDOFTHE
POSSIBILITYOFSUCHDAMAGES.
Somestatesdonotallowlimitationson
howlonganimpliedwarrantylastsorthe
exclusionorlimitationofincidentalor
consequentialdamages,sotheabove
limitationsorexclusionsmaynotapplytoyou.
Thiswarrantygivesyouspeciclegalrights,
andyoumayalsohaveotherrightswhich

16
Printed
inTaiwan
11A13
6400255
©2013RadioShackCorporation.
Allrightsreserved.RadioShackis
aregisteredtrademarkusedby
RadioShackCorporation.
varyfromstatetostate.Youmaycontact
RadioShackat:
RadioShackCustomerRelations
300RadioShackCircle,FortWorth,TX76102
04/08
www.RadioShack.com
Table of contents
Popular Power Tools manuals by other brands

Neilsen
Neilsen CT0878 Original instructions

Cooper Power Tools
Cooper Power Tools UTICA PL12-UT02 operating instructions

Hakko Electronics
Hakko Electronics FR-410 instruction manual

DeWalt
DeWalt DW620 manual

Parkside
Parkside KH 3179 Operation and safety notes

Milwaukee
Milwaukee M12 IR Original instructions