manuals.online logo
Brands
  1. Home
  2. •
  3. Brands
  4. •
  5. Radio Shack
  6. •
  7. Switch
  8. •
  9. Radio Shack 15-1977 User manual

Radio Shack 15-1977 User manual

©2002 RadioShack Corporation.
All Rights Reserved.
RadioShack and RadioShack.com are trademarks
used by RadioShack Corporation.
15-1977
OWNER’S MANUAL — Please read before using this equipment.
Your RadioShack A/V Selector with
Composite/S-Video Conversion is a time-
saving switch box for your home audio/video
system. The selector lets you connect four
audio/video devices directly to your TV and
VCR. Once connected, each device can be
accessed with the touch of a button or remote
control. This helps to avoid the need to plug
and unplug each device when changing
audio/video sources (for example, switching
from a DVD player to a camcorder or video
game system).
Two Audio/Video Outputs let you
connect up to four sources to two different
TVs or stereo VCRs.
Built-in Composite/S-Video Composite
Circuit — lets you convert composite video
(RCA) to S-Video, or S-Video to composite
video.
Built-in Auto-Learning Function lets you
operate the selector with most remote
controls.
Standard Color-Coded Phono Connectors
make connections simple.
Easy Push-Button Selection lets you
quickly set the input source for each TV or
VCR.
Permanent Memory of Learned Codes —
retains learned codes, even if the AC power
fails.
S-Video Jack transmits the best picture
for your video.
24'2#4#6+10
2.#%+0)"6*'"5'.'%614
You can place the selector on almost any flat
surface. For the best results, do not place it
on top of a TV or other electrical appliance.#
%100'%6+0)"&'8+%'5
Use stereo audio/video cables with phono
plugs (available at your local RadioShack
store and online at RadioShack.com) to
make all connections. For the best
performance, use high-quality audio/video
cables. Do not use audio cables for video.
The selector’s color-coded jacks make it easy
to connect devices to the selector. Yellow
jacks are for video, red jacks are for right
audio, and white jacks are for left audio.
1. Connect the sound outputs for each
device to a set of INPUT R/L (1-4) jacks
on the back of the selector.
2.
If a device does not have an S-Video
cable
, connect its video output to the
selector’s INPUT V (1-4) jack for that
device.
If the device has an S-Video cable
,
connect it to theINPUT S-VIDEO (1-4) jack
for that device.
Do not connect the device’svideo output
to both INPUT V (1-4) and INPUT S-VIDEO
(1-4) jacks.
3.
If your TV or monitor does not have an
S-Video cable
, connect its video input to
the selector’s OUTPUT V (1 or 2) jack.
If the TV or monitor has an S-Video
cable
, connect it to the OUTPUT S-VIDEO
(1 or 2) jack.
Do not connect the TV or monitor’s video
input to both OUTPUT V (1-2) and
OUTPUT S- VIDEO (1-2) jacks.
4. Connect the TV or monitor inputs to the
OUTPUT R/L (1-2) jacks.
5. Connect the supplied AC adapter’s
barrel plug to DC 9V, then connect the
adapter’s AC plug to a standard AC
outlet..
..
.
%106'065
Preparation ...................................................... 1
Placing The Selector .................................... 1
Connecting Devices ...................................... 1
Operation ......................................................... 3
Manually Operating the Selector .................. 3
Using the Learning Function ......................... 3
Using the Remote Control
to Operate the Selector ................................ 3
Troubleshooting ............................................... 3
Care ................................................................. 3
Service and Repair .......................................... 4
Specifications ................................................... 4
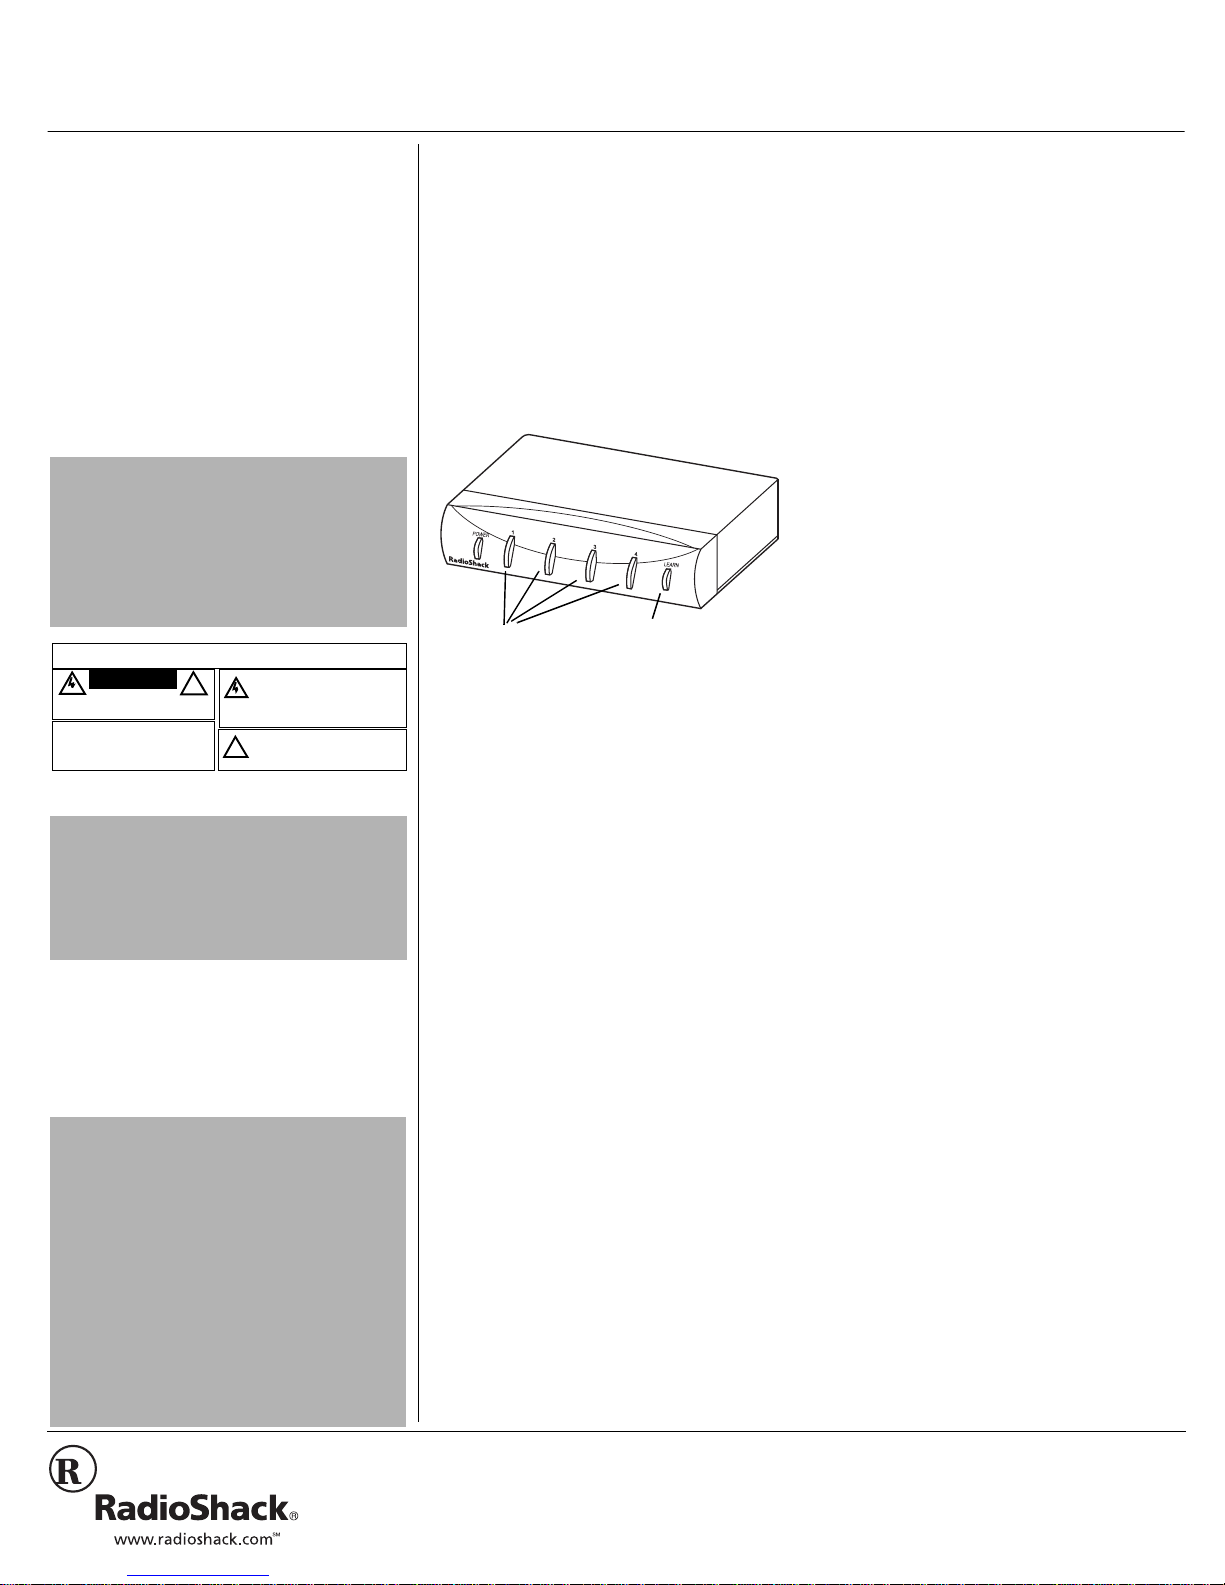
LEARN — See
“UsingtheLearning
Function” on
Page 3.
Input Select Buttons
1–4 — Makes source
selection easy.
#"+/2146#06"#
If an icon appears at the end of a paragraph, go
to the box on that page with the corresponding
icon for pertinent information.
Rý— Warning #— Important
.
..
.— Caution °
°°
°— Hint
±— Note
#"+/2146#06"#
If you place the selector on the top of your TV,
electromagnetic interference from the TV might
distort the sound from any devices connected to
the selector. If this happens, move the selector
away from the TV.
The lightning symbol is intended to alert
you to the presence of uninsulated danger-
ous voltage within this product’s enclo-
sure that might be of sufficient magnitude
to constitute a risk of electric shock. Do
not open the product’s case.
The exclamation symbol is intended to in-
form you that important operating and
maintenance instructions are included in
the literature accompanying this product.
!
.CAUTION.
!
CAUTION: TO REDUCE THE RISK OF
ELECTRIC SHOCK, DO NOT REMOVE
COVER OR BACK. NO USER-SERVICE-
ABLE PARTS INSIDE. REFER SERVIC-
ING TO QUALIFIED PERSONNEL.
RISK OF ELECTRIC SHOCK
DO NOT OPEN
WARNING:
To reduce the risk the of fire or shock hazard, do not expose this product to rain or moisture.
."%#76+10".
RYou must use a Class 2 power source that
supplies 9V DC and delivers 500 mA. Its center
tip must be set to negative and its plug must fit
the selector’s DC 9V jack. The supplied adapter
meets these specifications. Using an adapter
that does not meet these specifications could
damage the selector or the adapter.
• Always connect the AC adapter to the
selector before you connect it to AC power.
• When you finish, disconnect the adapter from
AC power before you disconnect it from the
selector.
#18"5GNGEVQT
YKVJ"%QORQUKVG"5/8KFGQ"%QPXGTUKQP
2
3
12'4#6+10
/#07#..;"12'4#6+0)"6*'"
5'.'%614
1. Turn on the device you want to view.
2. Press POWER on the selector.
3. To view material from the device
connected to the INPUT 1 jack, press 1.
For INPUT 2, press 2, for INPUT 3, press
3, and for INPUT 4, press 4.
4. Turn on the desired input device, and
operate the device as you usually do.°
°°
°
75+0)"6*'".'#40+0)"(70%6+10
The selector is designed to learn signals from
a universal remote, or up to four different
audio/video devices’ remote controls. It can
connect a range of devices, including a DVD,
laser disc, another VCR, camcorder, or video
game player. The selector uses the latest
integrated circuit recording technology, so
the learned information is protected if AC
power fails.
1. Press POWER. The POWER indicator
lights.
2. Hold down LEARN for about four
seconds then release. The LEARN
indicator flashes.±
3. Press the button (1, 2, 3, or 4) on the
selector’s front panel to learn the
corresponding device’s signal. The
indicator lights.
4. Point the device’s remote control at the
selector then press the control’s power
key to turn on the device.
If you are using a universal remote
,
press the remote’s key for the desired
device, the press the remote’s power
key.
The selector learns the device’s signal,
then the button indicator turns off.
5. Repeat steps 3 and 4 to learn additional
remote control signals.
6. Press LEARN again. The LEARN
indicator turns off.
75+0)"6*'"4'/16'"%10641."
61"12'4#6'"6*'"5'.'%614
1. Turn on the desired output devices (TV,
VCR, etc.).
2. Press POWER on the selector.
3. To view material from the device
connected to the INPUT 1 jack, point that
device’s remote control at the selector,
then press the power key on the remote
control to turn on the device.
If you are using a universal remote
,
press the remote’s key for the desired
device, the press the remote’s power
key.
4. Repeat step 3 to turn on other devices
connected to the INPUT 2, INPUT 3, or
INPUT 4.
5. Operate the devices as you usually do.
6417$.'5*116+0)
We do not expect you to have any problems
with your selector, but if you do, these
suggestions might help.
The selector does not work or works poorly.
• Be sure the AC adapter is properly and
securely connected.
•BesurePOWER is turned on. If the
power is turned on but the selector still
does not work, return it to the store for
repair.
While learning commands from a standard or
universal remote control, the selector does
not respond or its indicator lights.
• Be sure the learning process is correct.
• Try remote control’s other keys.
• Try another remote control.
• Try using a number key on the remote
control (for example, 0) instead of the
power key.
%#4'
Keep the selector dry; if it gets wet, wipe it
dry immediately. Use and store the selector
only in normal temperature environments.
Handle the selector carefully; do not drop it.
Keep the selector away from dust and dirt,
and wipe it with a damp cloth occasionally to
keep it looking new.
°
°°
°"*+06"°
°°
°"
Place a small white adhesive label (not supplied)
below the buttons on the front of the selector to
note which devices are connected to which set
of jacks (INPUT 1, INPUT 2, INPUT 3, INPUT 4).
±"016'5"±"
• If you do not complete each step within 10
seconds, the selector returns to the normal
function and you must start again at Step 1.
• Be sure the selector’s learning setup does
not affect the setup of other existing
equipment.
15-1977
03A02
Printed in China
RadioShack Corporation
Fort Worth, Texas 76102
5'48+%'"#0&"4'2#+4
If your selector is not performing as it should, take it to your local RadioShack store for
assistance. Modifying or tampering with the selector’s internal devices can cause a malfunction
and might invalidate its warranty.
52'%+(+%#6+105
Power Source...........................................................................................................................DC 9V, 500mA
Power Consumption...................................................................................................................................8W
Remote Control Average Range ..................................................................................................20 ft (6.1 m)
Dimension (HWD)..........................................................2 1/16 ×8 31/32 ×5 31/32 Inches (52 ×228 ×152 mm)
Weight .....................................................................................................................................35.1 oz (995 g)
Specifications are typical; individual units may vary. Specifications are subject to change and improvement
without notice.
Limited Ninety-Day Warranty
This product is warranted by RadioShack against
manufacturing defects in material and workmanship
under normal use for ninety (90) days from the date of
purchase from RadioShack company-owned stores
and authorized RadioShack franchisees and dealers.
EXCEPT AS PROVIDED HEREIN, RadioShack
MAKES NO EXPRESS WARRANTIES AND ANY IM-
PLIED WARRANTIES, INCLUDING THOSE OF
MERCHANTABILITY AND FITNESS FOR A PARTIC-
ULAR PURPOSE, ARE LIMITED IN DURATION TO
THE DURATION OF THE WRITTEN LIMITED WAR-
RANTIES CONTAINED HEREIN. EXCEPT AS PRO-
VIDED HEREIN, RadioShack SHALL HAVE NO
LIABILITY OR RESPONSIBILITY TO CUSTOMER
OR ANY OTHER PERSON OR ENTITY WITH RE-
SPECT TO ANY LIABILITY, LOSS OR DAMAGE
CAUSED DIRECTLY OR INDIRECTLY BY USE OR
PERFORMANCE OF THE PRODUCT OR ARISING
OUT OF ANY BREACH OF THIS WARRANTY, IN-
CLUDING, BUT NOT LIMITED TO, ANY DAMAGES
RESULTING FROM INCONVENIENCE, LOSS OF
TIME, DATA, PROPERTY, REVENUE, OR PROFIT
OR ANY INDIRECT, SPECIAL, INCIDENTAL, OR
CONSEQUENTIAL DAMAGES, EVEN IF RadioShack
HAS BEEN ADVISED OF THE POSSIBILITY OF
SUCH DAMAGES.
Some states do not allow limitations on how long an
implied warranty lasts or the exclusion or limitation of
incidental or consequential damages, so the above
limitations or exclusions may not apply to you.
In the event of a product defect during the warranty
period, take the product and the RadioShack sales re-
ceipt as proof of purchase date to any RadioShack
store. RadioShack will, at its option, unless otherwise
provided by law: (a) correct the defect by product re-
pair without charge for parts and labor; (b) replace the
product with one of the same or similar design; or (c)
refund the purchase price. All replaced parts and
products, and products on which a refund is made, be-
come the property of RadioShack. New or recondi-
tioned parts and products may be used in the
performance of warranty service. Repaired or re-
placed parts and products are warranted for the re-
mainder of the original warranty period. You will be
charged for repair or replacement of the product made
after the expiration of the warranty period.
This warranty does not cover: (a) damage or failure
caused by or attributable to acts of God, abuse, acci-
dent, misuse, improper or abnormal usage, failure to
follow instructions, improper installation or mainte-
nance, alteration, lightning or other incidence of ex-
cess voltage or current; (b) any repairs other than
those provided by a RadioShack Authorized Service
Facility; (c) consumables such as fuses or batteries;
(d) cosmetic damage; (e) transportation, shipping or
insurance costs; or (f) costs of product removal, instal-
lation, set-up service adjustment or reinstallation.
This warranty gives you specific legal rights, and you
may also have other rights which vary from state to
state.
RadioShack Customer Relations, 200 Taylor Street,
6th Floor, Fort Worth, TX 76102
12/99

Other Radio Shack Switch manuals

Radio Shack 61-3005 User manual

Radio Shack

Radio Shack 61-3005 User manual

Radio Shack 26-192 User manual

Radio Shack

Radio Shack 26-192 User manual

Radio Shack 26-199 User manual

Radio Shack

Radio Shack 26-199 User manual

Radio Shack 1500474 User manual

Radio Shack

Radio Shack 1500474 User manual

Radio Shack 49-537 User manual

Radio Shack

Radio Shack 49-537 User manual

Radio Shack 15-316 User manual

Radio Shack

Radio Shack 15-316 User manual

Radio Shack 16-985 User manual

Radio Shack

Radio Shack 16-985 User manual

Radio Shack 1500469 User manual

Radio Shack

Radio Shack 1500469 User manual

Radio Shack 26-137 User manual

Radio Shack

Radio Shack 26-137 User manual

Radio Shack AFX-500 User manual

Radio Shack

Radio Shack AFX-500 User manual

Radio Shack 15-312 User manual

Radio Shack

Radio Shack 15-312 User manual

Radio Shack AFX-300 User manual

Radio Shack

Radio Shack AFX-300 User manual

Radio Shack 26-139 User manual

Radio Shack

Radio Shack 26-139 User manual

Radio Shack 15-1586 - Digital Optical Selector User manual

Radio Shack

Radio Shack 15-1586 - Digital Optical Selector User manual

Radio Shack 15-1985 User manual

Radio Shack

Radio Shack 15-1985 User manual

Radio Shack 15-1988 User manual

Radio Shack

Radio Shack 15-1988 User manual

Radio Shack 26-191 User manual

Radio Shack

Radio Shack 26-191 User manual

Radio Shack 15-1976 User manual

Radio Shack

Radio Shack 15-1976 User manual

Radio Shack 61-3010 User manual

Radio Shack

Radio Shack 61-3010 User manual

Radio Shack Switch User manual

Radio Shack

Radio Shack Switch User manual

Radio Shack AFX-400 User manual

Radio Shack

Radio Shack AFX-400 User manual

Radio Shack Amplified Video Selector User manual

Radio Shack

Radio Shack Amplified Video Selector User manual

Radio Shack 10A02 User manual

Radio Shack

Radio Shack 10A02 User manual

Popular Switch manuals by other brands

Allen-Bradley 1783-IMS28NDC installation instructions

Allen-Bradley

Allen-Bradley 1783-IMS28NDC installation instructions

Vutlan VT825 quick start guide

Vutlan

Vutlan VT825 quick start guide

Inday AV4X-R user manual

Inday

Inday AV4X-R user manual

CTC Union SB262 Series product manual

CTC Union

CTC Union SB262 Series product manual

Livoo TEA294 user manual

Livoo

Livoo TEA294 user manual

Indu-Sol PROmesh B8 compact Quick start user guide

Indu-Sol

Indu-Sol PROmesh B8 compact Quick start user guide

ATEN CS1964 user manual

ATEN

ATEN CS1964 user manual

Veris Industries Hawkeye 959 installation guide

Veris Industries

Veris Industries Hawkeye 959 installation guide

Patton FiberPlex 1004E user manual

Patton

Patton FiberPlex 1004E user manual

Force 10 S50 quick reference

Force 10

Force 10 S50 quick reference

Leviton 5246 Installation instruction

Leviton

Leviton 5246 Installation instruction

TeleAdapt PowerHub USB-C TA-7540 Series installation guide

TeleAdapt

TeleAdapt PowerHub USB-C TA-7540 Series installation guide

Wieland SNA 4043KE Translation of the original instructions

Wieland

Wieland SNA 4043KE Translation of the original instructions

3Com 610 user guide

3Com

3Com 610 user guide

DELTA DORE Tyxia 2310 installation guide

DELTA DORE

DELTA DORE Tyxia 2310 installation guide

TRENDnet TFU-430 Specifications

TRENDnet

TRENDnet TFU-430 Specifications

Dell PowerConnect W-7200 Series reference guide

Dell

Dell PowerConnect W-7200 Series reference guide

HP ProCurve 8206zl Product End-of-Life Disassembly Instructions

HP

HP ProCurve 8206zl Product End-of-Life Disassembly Instructions

manuals.online logo
manuals.online logoBrands
  • About & Mission
  • Contact us
  • Privacy Policy
  • Terms and Conditions

Copyright 2025 Manuals.Online. All Rights Reserved.