RadioPRO RP5-GM31 User manual

RP5-GM31
Radio Replacement & Steering Wheel Control Interface
with OnStar Retention for General MotorsVehicles
Pacic Accessory Corporation® | Santa Ana, California 92705 | Ph. 866-931-8021 | [email protected]
©2012 Pacic Accessory Corporation
www.pac-audio.com
Rev. 012813
Pacific Accessory Corporation
Introduction & Features
Important Notes
Wiring Connection Chart
Illustration / Schematic
The RP5-GM31 interface allows the replacement of a factory radio in select General Motors vehicles with 29-bit LAN
radios. Using this interface will retain factory features such as OnStar, steering wheel controls (SWC), warning chimes,
Rear Seat Controls (RSC), factory XM Radio and the BOSE amplier when the original radio is removed. The RP5-
GM31 also provides data bus driven outputs such as retained accessory power (RAP), vehicle speed sensor (VSS),
illumination, reverse trigger and parking brake.
1. The radio select rotary switch on the side of the interface must be adjusted to the proper radio setting before plugging the
interface into the vehicle (see next page for setting chart).
2. The interface comes pre-programmed for all of the vehicles factory SWC functions and does not require programming unless
you wish to re-assign the SWC functions to different buttons. The SWC can always be restored to default settings by pressing
and releasing the program button on the side of the interface once and waiting 7 seconds for the LED to ash 3 times.
3. RSC buttons that are identical to the SWC will mimic the SWC one for one.
4. The LED will ash whenever a SWC button is pressed.
Red / White Parking Brake
Output (-)
Purple / White Vehicle Speed
Output
Blue Not Used
Blue / White Amp Turn On Input
Orange / White Illumination Output
(+)
Green Reverse Output (+)
Brown Loop Mute Loop - See
installation note 8.
Aftermarket Radio Connections
Yellow Battery +12v
Black Ground
Red Acc. Output
White Front L + input
White / Black Front L - input
Grey Front R + input
Grey / Black Front R - input
Green Rear L + input
Green / Black Rear L - input
Purple Rear R + input
Purple / Black Rear R - input
SWC Connector
Blu/Yel Kenwwod, Newer
JVC, OEM or
Blaupunkt
3.5mm Jack Alpine, JVC,
Clarion, Pioneer,
Sony, Fusion, Valor,
Boyo, Dual, Visteon
or Advent
SWC Connection
See above chart for
different radio type
connections
x3
Wiring SWC Connection
Page 1
XM R
XM L
Aftermarket
Radio
Connections
Vehicle
Connections

RP5-GM31
Radio Replacement & Steering Wheel Control Interface
with OnStar Retention for General Motors Vehicles
Pacic Accessory Corporation® | Santa Ana, California 92705 | Ph. 866-931-8021 | [email protected]
©2012 Pacic Accessory Corporation
www.pac-audio.com
Pacific Accessory Corporation
Rev. 012813
SET RADIO SELECT SWITCH
1
2
3
4
5
6
7
8
9
0
Installation Steps
1.The radio select rotary switch on the side of the interface must be adjusted to the proper radio
setting before plugging the interface into the vehicle.
2. Make all connections as described in the chart on page1.
3. Factory installed ampliers will determine the audio output connection. If the vehicle has a factory installed amplier use the factory amplier
audio location. If a factory installed amplier is not present use the non-amplied factory audio location.
4. If the vehicle is equipped with a Premium BOSE system, connect the subwoofer and center channel RCA inputs to the aftermarket radios.
If the aftermarket radio to be installed does not have a dedicated center channel or sub output do not use this cable. To ensure best sound
performance channel summing is not recommended. Use this cable according to the outputs that are available.
5. If the vehicle is equipped with a reverse camera and the aftermarket radio has a reverse camera input, connect the yellow RCA plug on the
brown connector to the aftermarket radios reverse camera input.
6. If the aftermarket radio is equipped with an auxiliary input and you wish to retain the factory XM tuner, plug the RCA connectors from the
interface into the radios auxiliary input.
7. Plug the CMX chime module in if necessary (If the vehicle chimes when the radio is removed the CMX is not necessary). PLEASE NOTE:
In order to get the best possible sound out of the CMX please mount it in a place free and clear of any obstructions, preferably as close as
possible to the bottom of the dash pointing down toward the oor of the vehicle.
8. The Mute loop (if not cut) will turn the accessory output off when an OnStar or Bluetooth call is made or received. If the aftermarket radio has
a mute input cut this loop and connect the outer brown wire to the mute input.
9. Connect the SWC wire according to the chart on page 1 (aftermarket radio MUST support a wired remote input).
10. If you wish to reassign functions to the SWC follow the programming instructions in the next section.
SET RADIO SELECT SWITCH
1
2
3
4
5
6
7
8
9
0
IMPORTANT! The interface comes pre-programmed for the functions listed in the chart below and does not require programming
unless you wish to re-assign the SWC functions to different buttons. The SWC can always be restored to default settings by
pressing the program button on the side of the interface once and waiting for the timeout.
If you wish to re-assign the SWC functions, the interface must be programmed in the specic order shown in the chart on the next
page. If you come across a function in the chart that your steering wheel does not have, or you do not want to program, press and
release the program button on the side of the interface to skip that function. The LED will ash off and on conrming that you have
successfully skipped that function and are ready to proceed to the next one.
Alpine JVC Kenwood Clarion
V
alo
r
OEM Sony/Pionee
r
Fusion Blaupunkt
V
olume + Volume + Volume + Volume + Volume + Volume + Volume + Volume + Volume + Volume +
V
olume - Volume - Volume - Volume - Volume - Volume - Volume - Volume - Volume - Volume -
Source Source Source Source Source Source Source Source Source Source
Track + Track + Track + Track + Search + Track + Next Track + Track + Track +
Track - Track - Track - Track - Search - Track - Previous Track - Track - Track -
V
oice Mute Mute Mute Mute Mute Mute Mute Mute Mute
Play/Pause Preset + Preset/Disc - Disc/FM+ Band OK Play/O
K
Preset +
A
udio Disc +
Optional Steering Wheel Control Programming
Default SWC Button Assignments
Page 2
Alpine
Advent,
BOYO, Dual,
Visteon, Sony
Blaupunkt Clarion Fusion JVC Kenwood OEM Pioneer Valor
1 7 8 49 2 3 6 7 5
Alpine
Advent,
BOYO, Dual,
Visteon, Sony
Blaupunkt Clarion Fusion JVC Kenwood OEM Pioneer Valor
1 7 8 49 2 3 6 7 5

RP5-GM31
Radio Replacement & Steering Wheel Control Interface
with OnStar Retention for General MotorsVehicles
Pacic Accessory Corporation® | Santa Ana, California 92705 | Ph. 866-931-8021 | [email protected]
©2012 Pacic Accessory Corporation
www.pac-audio.com
Rev. 012813
Pacific Accessory Corporation
Optional Steering Wheel Control Programming (cont.)
8/17/2012 - 2:33 PM swi-rc radio and button chart.xls
Radio Alpine JVC Kenwood Clarion Valor OEM
Advent, Boyo, Dual,
Visteon, Sony Pioneer Blaupunkt Fusion
1 Volume + Volume + Volume + Volume + Volume + Volume + Volume + Volume + Volume + Volume +
2 Volume - Volume - Volume - Volume - Volume - Volume - Volume - Volume - Volume - Volume -
3 Mute Mute Mute Mute Mute Mute Mute Mute Mute Mute
4 Preset + Source Source Source Source Source Preset + Preset + Source Source
5 Preset - Track + Play Search + Track + Next Preset - Preset - Track + Track +
6 Source Track - Track + Search - Track - Previous Source Source Track - Track -
7 Track + Band/Disc + Track - Band Up Cursor Play/Ok Track + Track + Disc + Audio
8 Track - Preset/Disc - Disc/FM + Send/End Down Cursor Band Track - Track - Disc - Power
9 Power Select Disc/AM - Send Ok Up Cursor Band Band Ok
10 Enter/Play Attenuation Answer End Down Cursor Phone Menu
11 Band/Program Phone Receive BT Answer Answer Call
12 Receive Phone Reject BT Hangup End Call
13 End Voice Dial Voice Activation
14 Power
Optional Programming Order
Step B.
Press and
release the
programming
button.
Step C.
Once you
release the
programming
button. The
LED will turn
on.
SWC Connection
See above chart for
different radio type
connections
x3
SWC Connection
See above chart for
different radio type
connections
x3
Step A.
Turn the vehicle ignition to
the ON position.
OFF
ACC
IGN
STRT
SWC Connection
See above chart for
different radio type
connections
x3
Step E.
Release the button.
The LED will turn on
back on.
Step D.
Within 7 seconds,
press and release the
button that is to be
learned on the steering
wheel.
The LED will
turn off during
this process.
SWC Connection
See above chart for
different radio type
connections
x3
VOL
VOL
Step F.
If you need to program more buttons,
repeat steps D & E for each additional
audio function on the steering wheel.
Program
remaining buttons
SWC Connection
See above chart for
different radio type
connections
x3
Once programming is
completed, wait 7 seconds.
The LED will ash three
times indicating the end of
programming.
Step G.
After all buttons are
programmed
Page 3

RP5-GM31
Radio Replacement & Steering Wheel Control Interface
with OnStar Retention for General Motors Vehicles
Pacic Accessory Corporation® | Santa Ana, California 92705 | Ph. 866-931-8021 | [email protected]
©2012 Pacic Accessory Corporation
www.pac-audio.com
Pacific Accessory Corporation
Rev. 012813
Testing & Verication
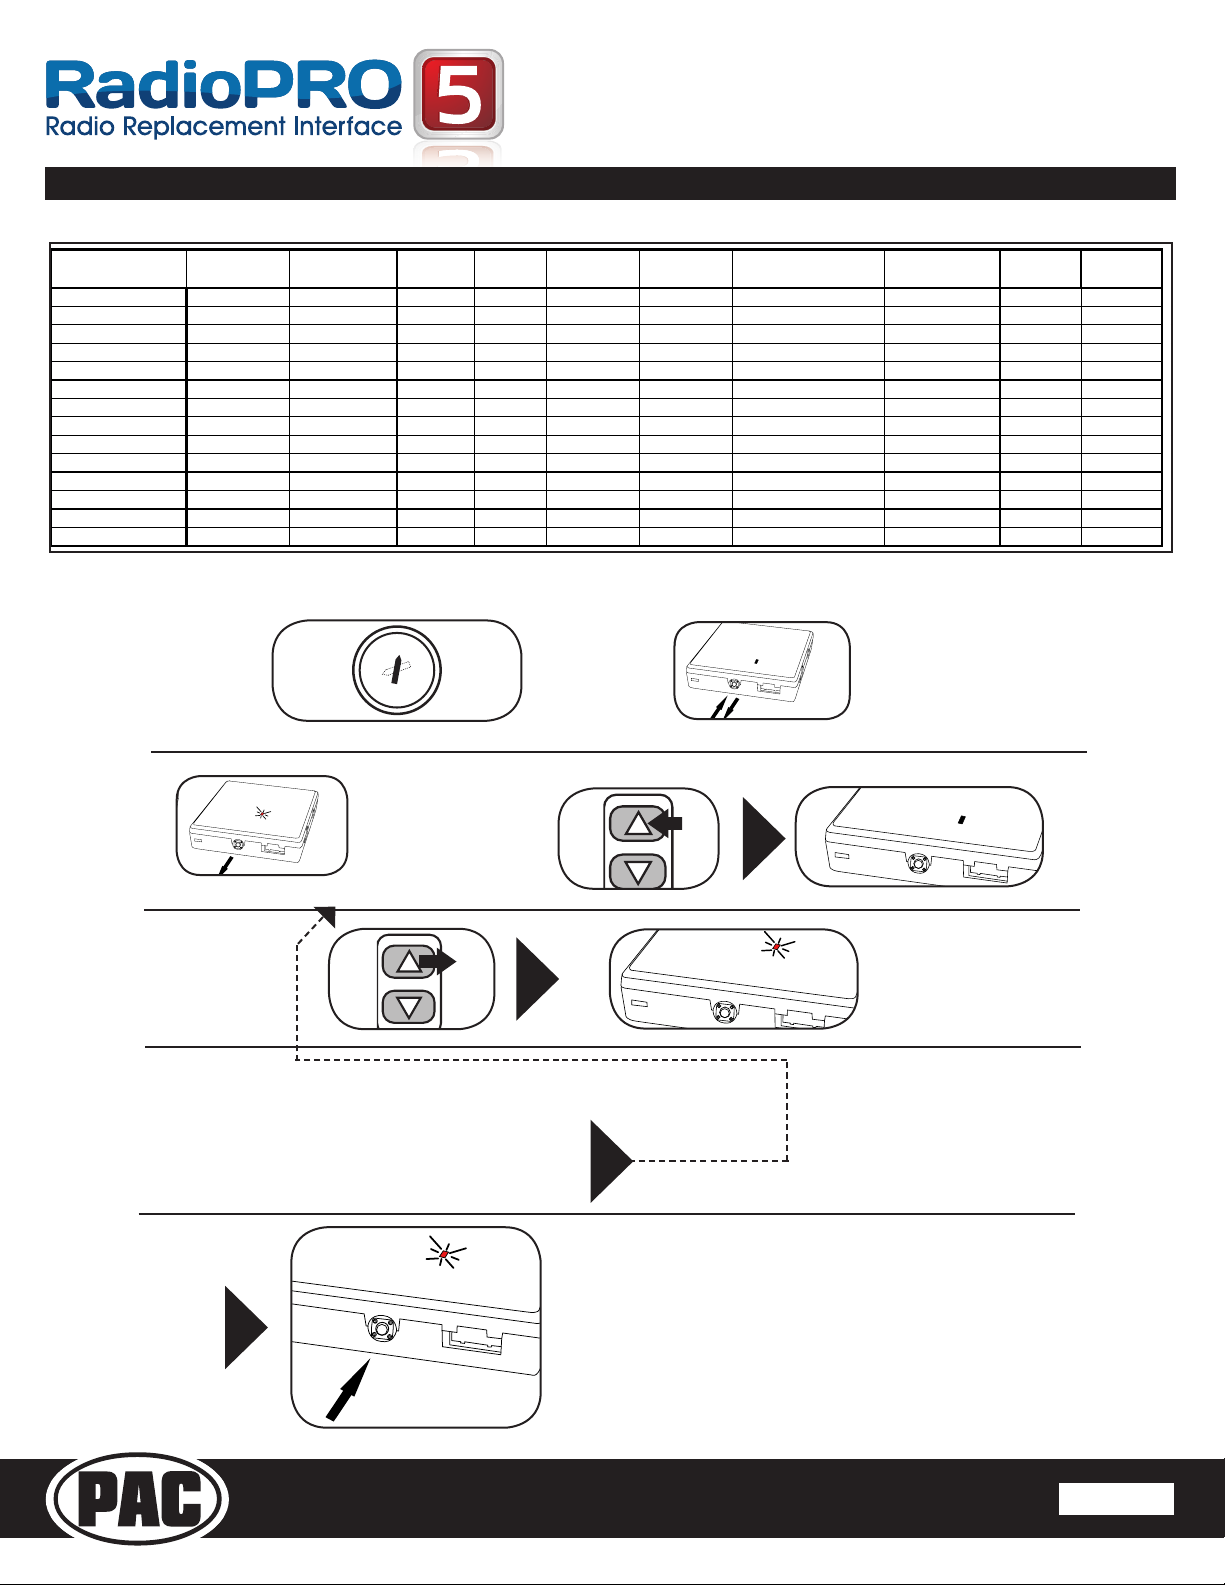
1. Turn the ignition on. The LED on the interface will turn on & the +12v accessory wire will turn on.
2. Turn on the radio & check balance & fade. Note: Premium Factory amplied Systems will not fade as neither the
aftermarket radio or the RP interface have the ability to control the amplier’s fader.
3. Verify that the factory subwoofer (if present) is playing
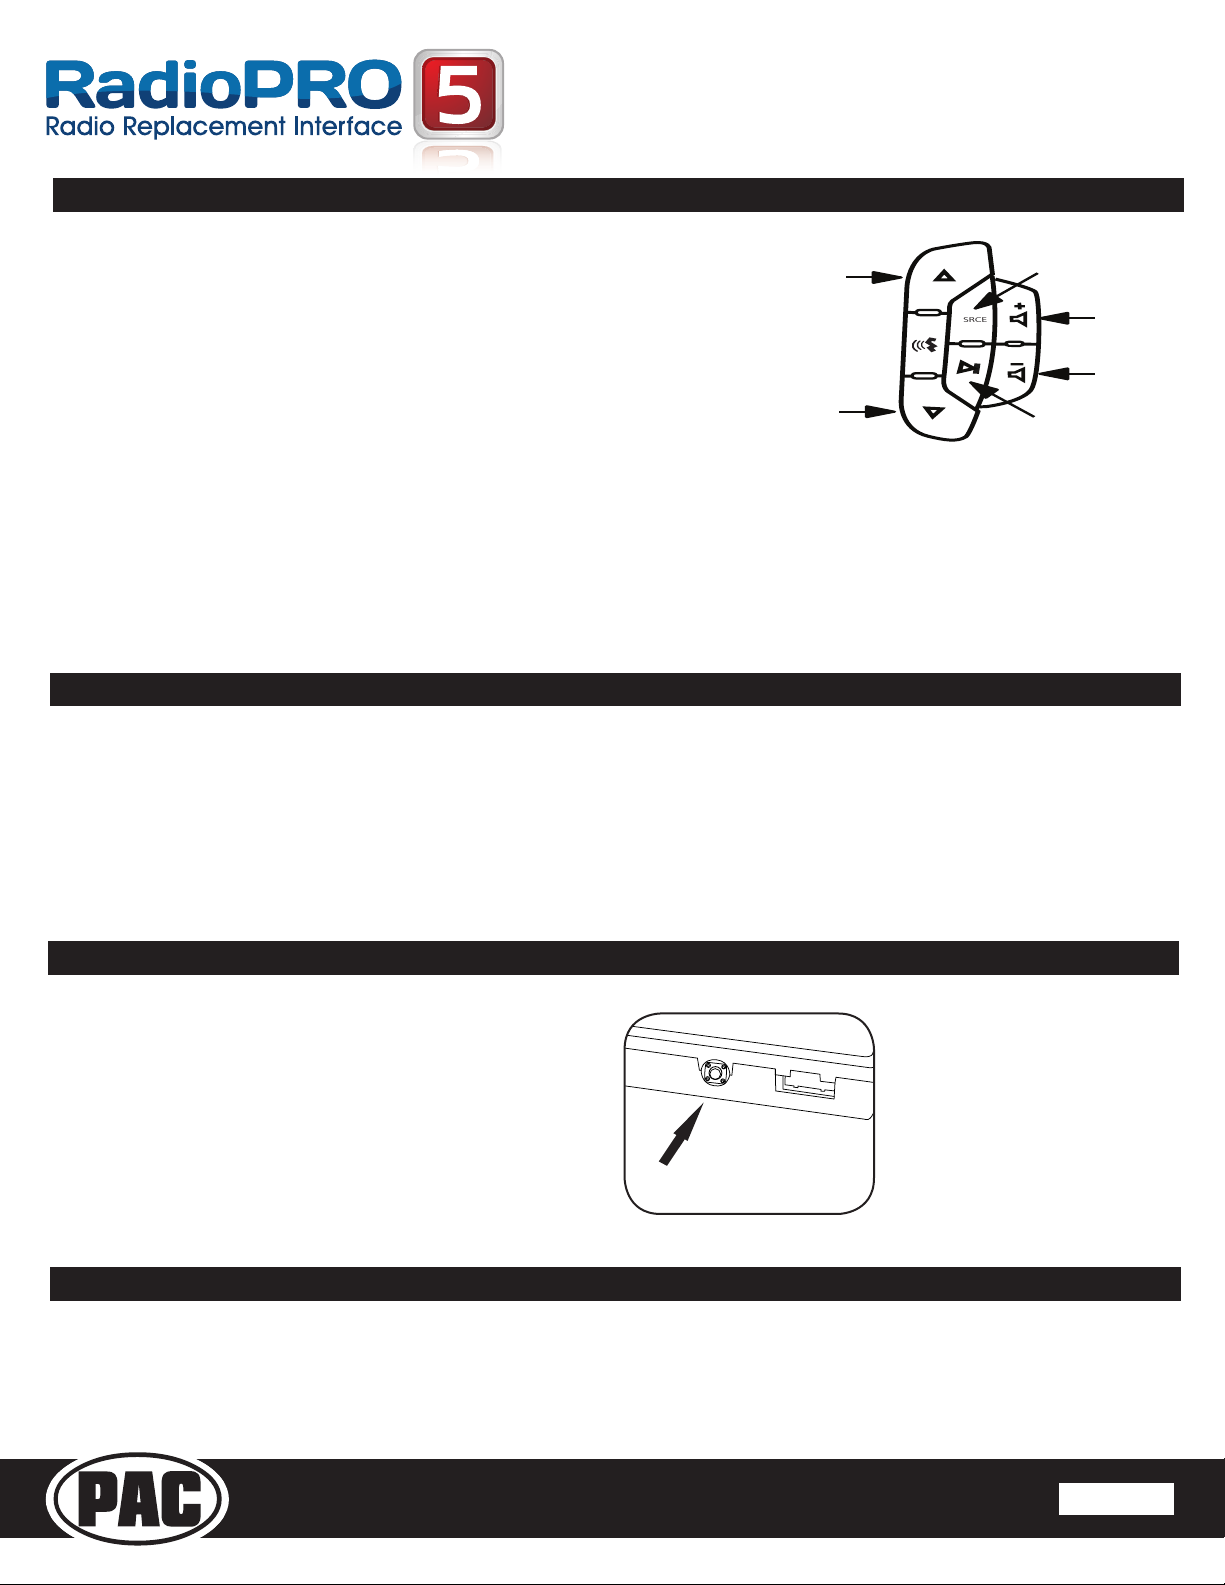
4. Verify that all SWC are functioning properly for both the aftermarket radio and OnStar. To adjust OnStar volume, press the
OnStar button on the mirror then use the volume buttons on the SWC to adjust the level. The volume will raise a total of 8
times before returning to the original level.
5. Verify that the factory XM tuner is functioning properly.
6. Pressing the OnStar® button on the rearview mirror will turn off the rear speakers and allow the OnStar® audio to be heard in
the two front speakers. The OnStar® active LED will also turn on. When OnStar® disconnects, the radio will un-mute or turn
back on and the OnStar® LED will turn off. Pressing the Mute/OnStar® button on the steering wheel for 1.5 seconds will also
activate Onstar®.
7. Turn off vehicle & remove key. RAP will be active & keep the radio on for 10 minutes or until the drivers door is opened.
8. The LED & radio will turn off when RAP turns off or the drivers door is opened.
Page 4
Using the Radios Dual Zone Source Using the Factory XM Radio Tuner
• Press the power button to turn the RSE Controls on. When
Radio is displayed on the RSE Controls, the aftermarket
radios rear speaker output will be heard through the
headphone jacks. Putting the aftermarket radio into dual
zone mode should change the output level of the rear
speakers to a xed level. This allows precise user
adjustment from the level knobs on the RSE Controls (refer
to aftermarket radio owners manual for model specic dual
zone operation).
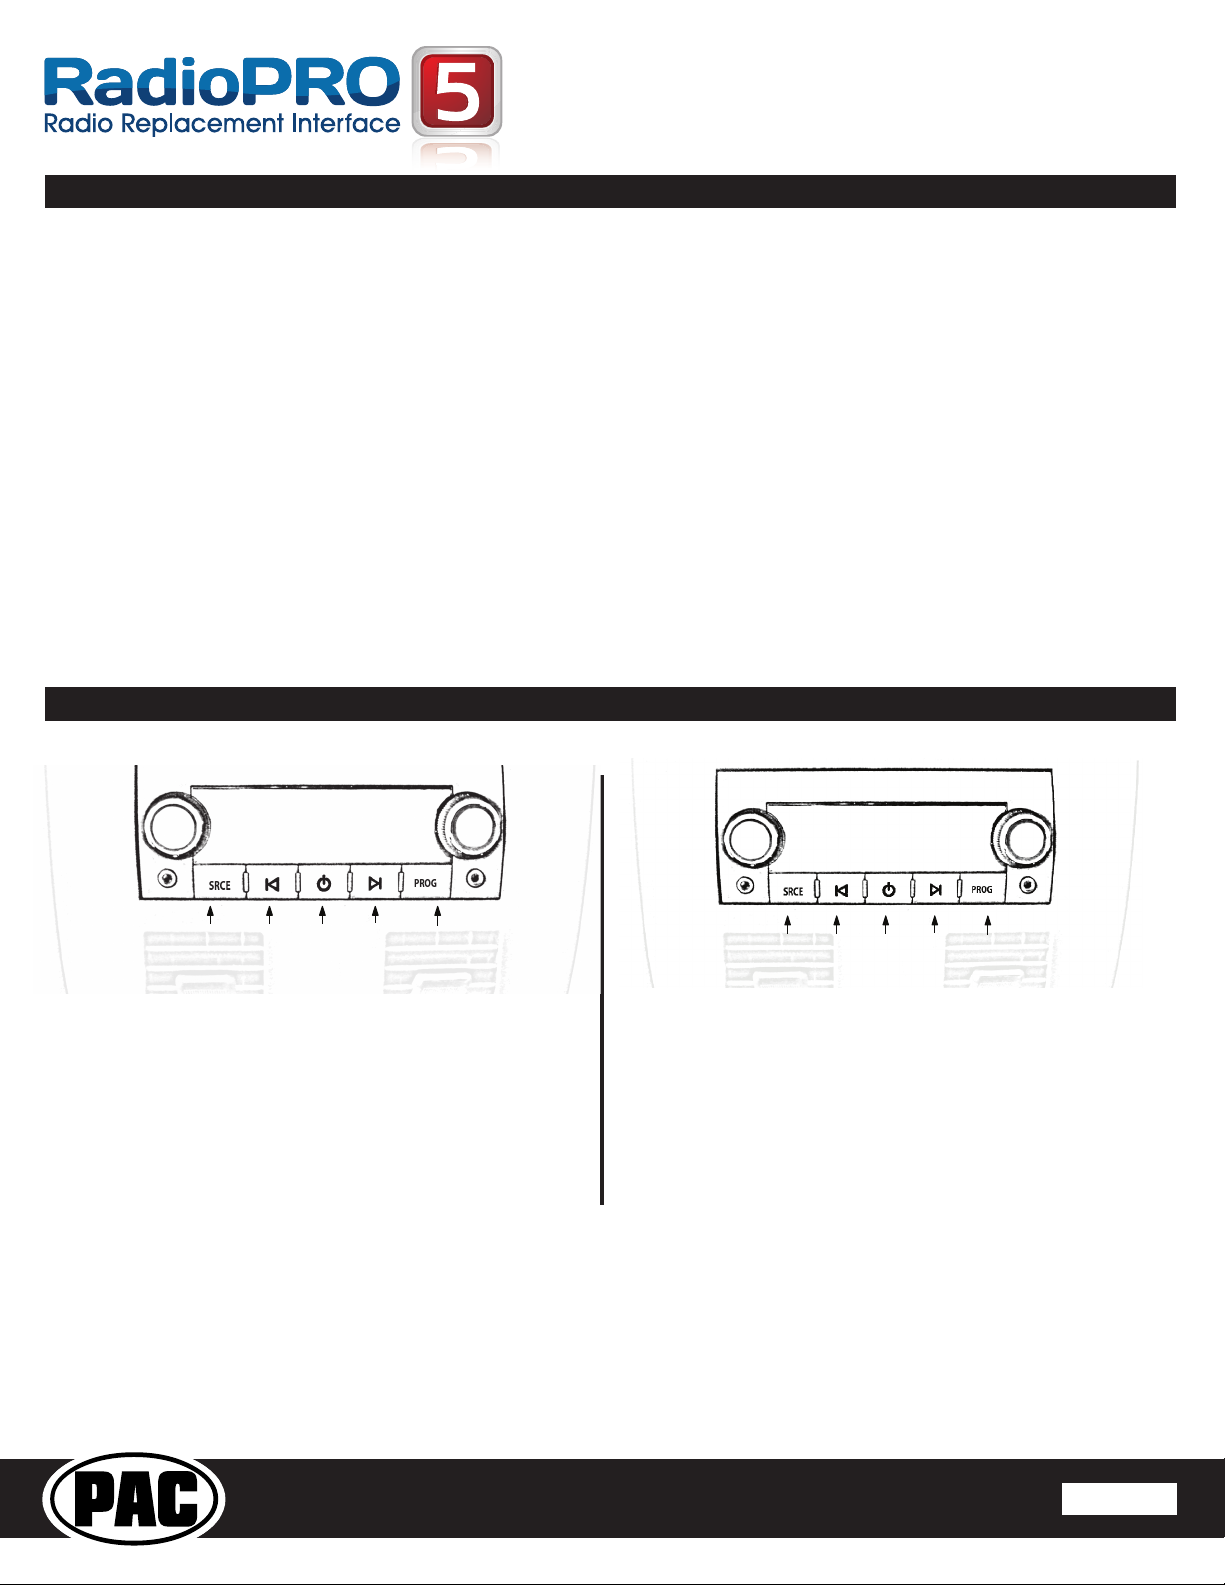
• The seek arrows and PROG button will control the radio
as programmed by the SWC interface. These buttons are
mapped to the SWC buttons as stated above.
• Pressing the SRCE button will toggle between the Factory
XM tuner and the Radio as the RSE source. Pressing the
power button will turn the RSE Controls off as well as turning
the key off. The seek arrows and PROG button will continue
to operate as stated (with the exception of SRCE which has
no function) when the Rear Seat Controls are turned off.
• Press the power button to turn the RSE Controls on. If Radio
is displayed press the SRCE button to select factory XM
tuner mode. When XM followed by the channel number is
displayed factory XM tuner audio will be heard through the
headphone jacks.
• The Seek arrows will control the factory XM radio tuner and
select the desired station.
• The PROG button will scroll through Presets 1-6
• Pressing the SRCE button will toggle between the Factory
XM tuner and Radio as the RSE source. Pressing the power
button or turning the key off will turn off the RSE Controls.
• The factory XM tuner must remain serviced to take
advantage of this feature. Visit www.xmradio.com for a
complete up-to-date channel listing and service options.
• In order for the RSE controls to properly work the XM tuner,
the front XM controls must be set to off.
XM 16
XM 16
Turns the
Rear Seat
Controls On
or Off
Change between
Factory XM tuner
and Dual Zone
Radio Source
Scrolls through
Presets 1-6
Seek to the
Next
Factory XM
Tuner Station
Seek to the
Previous
Factory XM
Tuner Station
XM
Turns the
Rear Seat
Controls On
or Off
Change between
Factory XM tuner
and Dual Zone
Radio Source
Controls the
Radio as
Programmed
by the SWC
interface (Mapped
to the Arrow
and Bar Button)
Controls the
Radio as
Programmed
by the SWC
interface (Mapped
to the Arrow
Down Button)
Controls the
Radio as
Programmed
by the SWC
interface (Mapped
to the Arrow
Up Button)
Radio
Using Rear Seat Audio Controls

RP5-GM31
Radio Replacement & Steering Wheel Control Interface
with OnStar Retention for General MotorsVehicles
Pacic Accessory Corporation® | Santa Ana, California 92705 | Ph. 866-931-8021 | [email protected]
©2012 Pacic Accessory Corporation
www.pac-audio.com
Rev. 012813
Pacific Accessory Corporation
Page 5
Rear Seat Entertainment (RSE); If equipped
Product Updates (Firmware)
1. Vehicles equipped with an overhead screen only:
In this application the GMRVD must be used in order to feed A/V into the factory screen from an aftermarket head unit (head
unit must support A/V out). With the GMRVD, A/V will be passed from the aftermarket head unit to the rear screen and audio
can be heard through the headphones. The GMRVD will also pass the Auxiliary inputs on the rear of the center console to the
aftermarket head unit.
2. Vehicles equipped with an overhead screen AND headrest monitors:
In this application the headrest monitors will function independantly from the overhead monitor. Neither video or audio
can be passed to or from the headrest monitors. The overhead monitor will function exactly as described in #1.
The RP5-GM31 can be updated with new rmware as it becomes available using the PAC-UP interface updater (sold seperatly).
Please visit www.pac-audio.com/rmware for available updates.
• To activate the XM controls press and hold the “Source” button until a chime
is heard. The Driver Information Center (DIC) in the instrument cluster will
display “XM Control On” or display XM text.
• Arrow up moves forward through the channels. The channel name and song
name will be displayed on the DIC.
• Arrow down moves backwards through the channels. The channel name will
be displayed on the DIC.
• To store a preset, rst choose the preset location by pressing the “Play”
button repeatedly. The DIC will display the XM preset locations. When the
desired preset location is displayed, tune to the desired station, then press
and hold the “Play” button until a chime is heard. “Preset Saved” will then be displayed on the DIC.
• To recall a preset simply press the “Play” button repeatedly until the desired preset is displayed.
• To de-activate the XM controls press and release the “Source” button. Do not hold the Source button to exit XM control.
PLEASE NOTE: You MUST be installing an aftermarket radio that is equipped with an auxiliary input
to be able to retain the factory XM audio. If the vehicle is equipped with steering wheel controls other
than the ones pictured here, you will not be able to control the factory XM tuner as the
required buttons are not present.
SRCE
Press & release to
recall a preset.
Press & hold to store
a preset.
Moves back
through the XM
channels
Moves forward
through the XM
channels
Press & hold to
enable XM controls.
Press & release to
disable XM controls
Factory XM Controls
Volume Up
Volume Down
Using the Factory XM Tuner With the SWC
OnStar Volume Adjustment for Vehicles w/o SWC
1. If SWC buttons are not present you must use the
programming button on the interface to control the OnStar
audio level during an OnStar connection.
2. When OnStar is active pressing the programming button
will raise the audio level 8 times before returning to the
original level.
SWC Connection
See above chart for
different radio type
connections
x3
Press the programming button
on the side of the interface while
OnStar is active to adjust the
OnStar volume
Table of contents
Other RadioPRO Car Video System manuals
Popular Car Video System manuals by other brands

Eonon
Eonon L0606 user manual

Directed Video
Directed Video OHC100 Owner's installation guide

Xtrons
Xtrons D717AL user manual

Boss Audio Systems
Boss Audio Systems BV10.4 owner's manual

Farenheit
Farenheit 8" wide Touch Screen 1-Din Oversized Fully Motorized TFT... operating manual

AVIN
AVIN AA-BE46 operating manual

Blaupunkt
Blaupunkt TEXAS CITY 800 Operating and installation instructions

Boss Audio Systems
Boss Audio Systems BV775B user manual

Vizualogic
Vizualogic Quantum Series owner's manual

JVC
JVC KW-AV60BT Specification sheet

Sanyo
Sanyo NV-E7500 - Navigation System With DVD Player Service manual

XZENT
XZENT ARGO X-F275 Mounting instruction