manuals.online logo
Brands
  1. Home
  2. •
  3. Brands
  4. •
  5. Radius
  6. •
  7. Outdoor Furnishing
  8. •
  9. Radius LETTERMAN 1 User manual

Radius LETTERMAN 1 User manual

DEUTSCH ENGLISH
1
3
4
5
2
congratulation to the purchase of your
LETTERMAN ail box.
1) open the large clap and ark the
attach ent points through the drillho-
le in the backside of the ail box.
2) to asse ble the lock, put it in the
provided hole in the flap. ake sure
that the latch faces up when closing.
the lock is fastened fro the inside
using the spoon-shaped ounting
tongue, sliding the tongue through.
OPTIONAL PORT HOLE FOR
LETTERMAN 1, 2 and XXL
4) if desired, the provided adhesive
fil - used for blinds - can be sticked
into the porthole. please notice that
the fil can only be fixed at te peratur
up on 10 °C. oisten the glass plate
with water, that is filled with a drop of
washing-up liquid. now put the adhe-
sive fil with the adhesive side on the
glass. please press out the bubbles at
the edge of the fil . it takes 24 hours
until the fil is fixed.
5) align the holes of the porthole with
the ones of the ail box. put a screw,
fro the outside, through one hole of
the porthole and put on a nut fro the
othersidet. at first, tighten only with
the hand. proceed in the sa e way with
the other screws and nuts. now tighten
the screws with a screw-driver and a
screw-wrench (wrench side 8 ).
herzlichen glückwunsch zu kauf ihres
LETTERMAN briefkastens.
1) öffnen sie die unterklappe und
arkieren sie die befestigungspunkte
durch die bohrungen in der briefkas-
tenrückwand.
2) zur ontage des schlosses stecken
sie es in das vorgesehene loch in der
klappe. prüfen sie, ob der riegel bei
schließen nach oben zeigt. das schloss
wird it der gabelför igen ontage-
zunge von innen durch aufschieben
befestigt.
3) befestigen sie den briefkasten an
der wand. verwenden sie dafür das
zu untergrund passende
ontage aterial setzten sie
gegebenenfalls die 4 itgelieferten
distanzscheiben ein.
3) attach the ailbox to the wall.
use the suitable ounting aterial
if necessary use the 4 supplied spacers.
OPTION BULLAUGE FÜR
LETTERMAN 1, 2 und XXL
4) die itgelieferte klebefolie kann auf
wunsch als sichtschutz in das bullau-
ge eingeklebt werden. beachten sie:
die folie nicht bei te peraturen unter
10 °C anbringen. befeuchten sie die
glasscheibe it wasser, die it eine
tropfen spül ittel versetzt sein uss.
jetzt die klebefolie it der klebeseite
zu glas hin auflegen. wenn sie die fo-
lie ausgerichtet haben drücken sie bitte
evtl. entstandene luftblasen zu rand
der folie hinaus. es dauert 24 stunden,
bis die folie angezogen ist.
5) richten sie den lochkreis des
bullauges über de des briefkastens
aus. stecken sie jetzt von außen eine
schraube durch ein vorgesehenes loch.
legen sie von innen eine utter auf die
schraube und ziehen sie diese it der
hand an. nachde sie bei den restli-
chen fünf schrauben ebenso verfahren
sind ziehen sie die schrauben it hilfe
eines schraubenziehers und eines
schraubenschlüssels (schlüsselweite 8
) fest.
ART.NR.: 505, 506, 550, 560, 561, 562
LETTERMAN 1, 2, 4, 5, XXL, XXL 2
1/2
danke, dass sie sich für ein produkt von radius
design entschieden haben. weitere produkte
finden sie unter:
www. adius-design.com
thank you for choosing a product fro radius
design. you can find further products at:
www. adius-design.com
DEUTSCH ENGLISH
OPTIONAL NEWSPAPER HOLDER
FOR LETTERMAN 2 and 5
6) the newspaper holder which is
included into the letter an is
fixed with three flat lenshead screws
under the ail box. NOTE: the indenta-
tion of the newspaper holder ust face
forward.
OPTIONAL NAME PLATE
7) the provided na e plate can be fixed
on the letterbox wherever you desire.
PLACE OF INSTALLATION
please ount your LETTERMAN in the
ost weather protected position as
possible. avoid to install the ail box
under drip edges. water retention in the
newspaper roll are possible.
PRODUCTCARE
8
7
6
OPTION ZEITUNGSROLLE FÜR
LETTERMAN 2 und 5
6) die i lieferu fang enthaltene zei-
tungsrolle (innenliegend i briefkasten
und it 2 kunststoffstiften fixiert) wird
kräftig herausgezogen und it drei
linsenflachkopfschrauben unter de
briefkasten ontiert. HINWEIS:
die einbuchtung der zeitungsrolle
sitzt bei der ontage vorne / oben.
OPTION NAMENSSCHILD
7) das itgelieferte na ensschild kann
ganz nach ihre wunsch a briefkas-
tens angebracht werden.
HINWEIS ZUM AUFSTELLUNGSORT
stellen sie ihren LETTERMAN ög-
lichst geschützt auf. ver eiden sie es
den briefkasten unter tropfkanten zu
ontieren. wasseransa lungen in
der zeitungsrolle sind öglich.
PFLEGEHINWEISE
bitte beachten sie folgende hinweise,
u flugrost und korrosionsbildung
a briefkasten zu verhindern:
ver eiden sie die aufstellung von
briefkästen in jodhaltigen at osphären,
wie beispielsweise in küstengebieten
oder auf inseln. auch in der nähe von
industrieanlagen und stark befahrenen
straßen kann es zu eisen-
staubablagerungenko en,
die den briefkasten konta inieren
können. es wird e pfohlen,
den briefkasten alle 4 wochen
gründlich zu reinigen, inde
sie entweder ein feuchtes tuch
(für farbige briefkästen) oder
edelstahlpflege ittel
(für edelstahlversionen) verwenden.
sollte sich dennoch ein al flugrost auf
der oberfläche des etalls bilden,
können Sie diesen einfach abwischen.
please observe the following instructions,
to prevent flash rust and corrosion
on the ailbox:
avoid the installation of
ailboxes in iodine-containing at ospheres,
such as in coastal areas or on islands.
also avoid placing ailboxes near
industrial plants and heavily trafficked
roads can also lead to iron
dust deposits,
can conta inate the ailbox.
it is reco ended that
thoroughly clean the ailbox every 4
thoroughly every 4 weeks by
either a da p cloth
(for colored ailboxes) or
stainless steel care product
(for stainless steel versions).
if, however, flash rust should for on the
the surface of the etal,
you can si ply wipe it off.
ART.NR.: 505, 506, 550, 560, 561, 562
LETTERMAN 1, 2, 4, 5, XXL, XXL 2
2/2

This manual suits for next models

11

Other Radius Outdoor Furnishing manuals

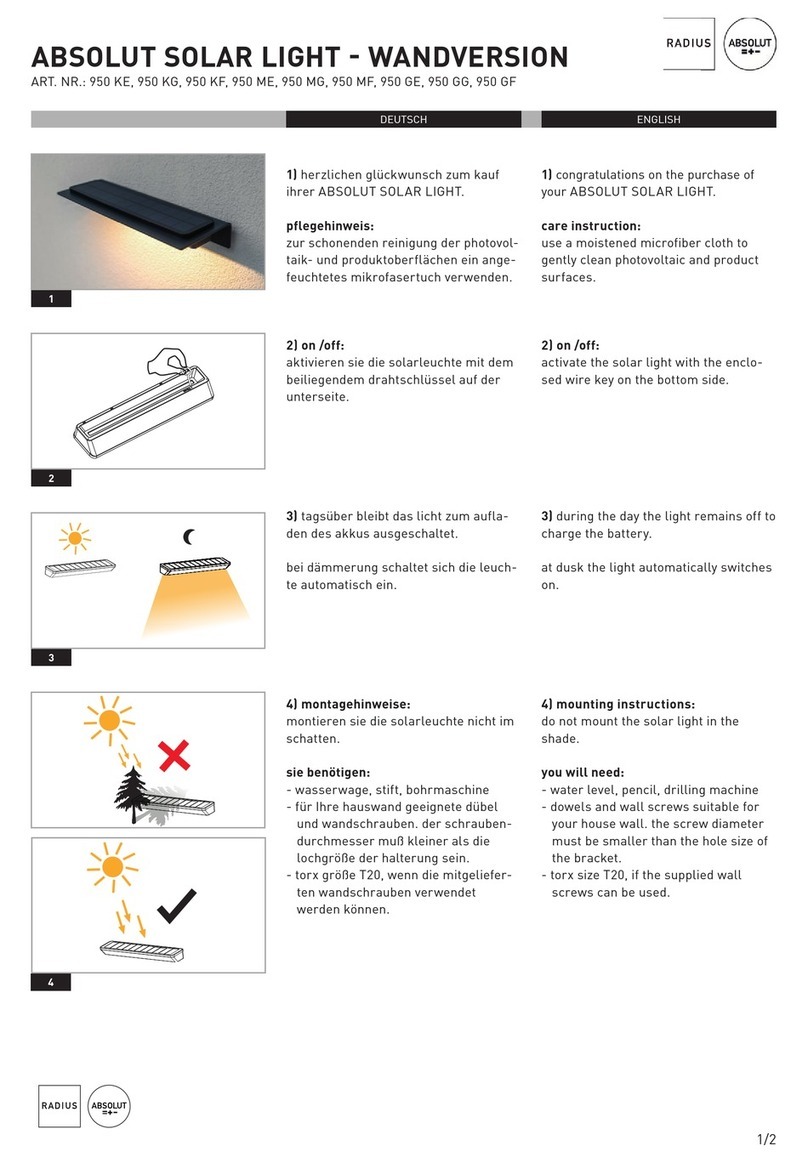
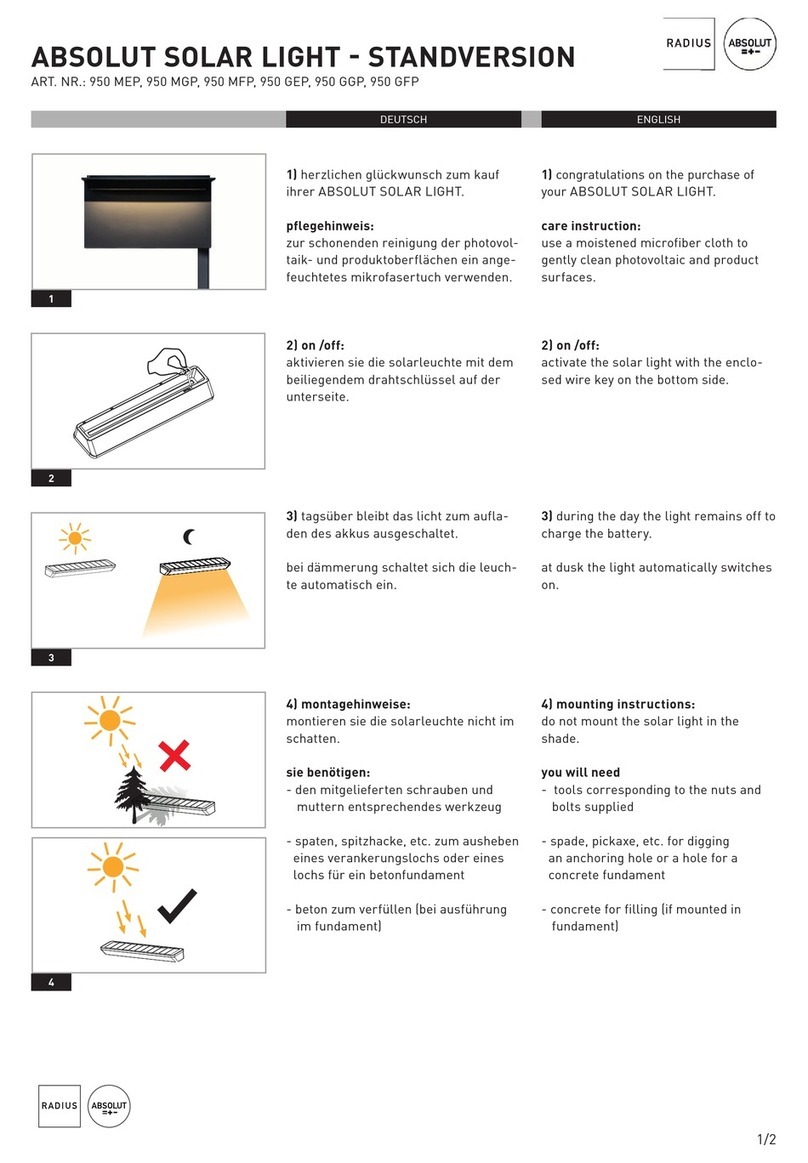
Radius ABSOLUT SOLAR LIGHT STANDVERSION 950 MEP User manual

Radius

Radius ABSOLUT SOLAR LIGHT STANDVERSION 950 MEP User manual

Radius ABSOLUT SOLAR LIGHT WANDVERSION 950 KE User manual

Radius

Radius ABSOLUT SOLAR LIGHT WANDVERSION 950 KE User manual

Popular Outdoor Furnishing manuals by other brands

nardi MUSA 610 Instructions for use

nardi

nardi MUSA 610 Instructions for use

New England Arbors Summerwood Craftsman Arbor VA68895 Assembly guide

New England Arbors

New England Arbors Summerwood Craftsman Arbor VA68895 Assembly guide

Hanover MANDN9PCOV manual

Hanover

Hanover MANDN9PCOV manual

Forest garden UPK01 quick start guide

Forest garden

Forest garden UPK01 quick start guide

PREMIER POLYSTEEL 971-103 manual

PREMIER POLYSTEEL

PREMIER POLYSTEEL 971-103 manual

Hanover Monaco MONDN5PCSP Assembly instructions

Hanover

Hanover Monaco MONDN5PCSP Assembly instructions

Gazebo penguin Solarium 41212 Assembly instructions

Gazebo penguin

Gazebo penguin Solarium 41212 Assembly instructions

sweeek. VENEZIA W001 manual

sweeek.

sweeek. VENEZIA W001 manual

Sunjoy D-GZ209PST-H Assembly instructions

Sunjoy

Sunjoy D-GZ209PST-H Assembly instructions

Sunjoy L-GZ120PST manual

Sunjoy

Sunjoy L-GZ120PST manual

Courtyard Creations KUS691F Assembly instruction

Courtyard Creations

Courtyard Creations KUS691F Assembly instruction

Garden Oasis D71 20558 Use and care guide

Garden Oasis

Garden Oasis D71 20558 Use and care guide

deVRIES Trendy Willington 40469 Assembly instructions

deVRIES

deVRIES Trendy Willington 40469 Assembly instructions

Joyside F04 Series instruction manual

Joyside

Joyside F04 Series instruction manual

DekoVries deVries PURE ADRIA XL Care & assembly instructions

DekoVries

DekoVries deVries PURE ADRIA XL Care & assembly instructions

John Lewis Anyday 820 35107 manual

John Lewis

John Lewis Anyday 820 35107 manual

YOTRIO BH19-092-199-01 Assembly instruction

YOTRIO

YOTRIO BH19-092-199-01 Assembly instruction

Suncast BMAC1000 Series Assembly instructions

Suncast

Suncast BMAC1000 Series Assembly instructions

manuals.online logo
manuals.online logoBrands
  • About & Mission
  • Contact us
  • Privacy Policy
  • Terms and Conditions

Copyright 2025 Manuals.Online. All Rights Reserved.