Radwin TV White Space User manual

INSTALLATIONGUIDE
RADWINTVWHITESPACE
Release1.0
FOR REGULATORY USES ONLY

TVWhiteSpaceInstallationGuide Release1.0 1‐1
TableofContents
Chapter1:Introduction
1.1ScopeofThisDocument...................................................................................................... 1‐1
1.2RADWINTVWhiteSpaceOverview .................................................................................... 1‐1
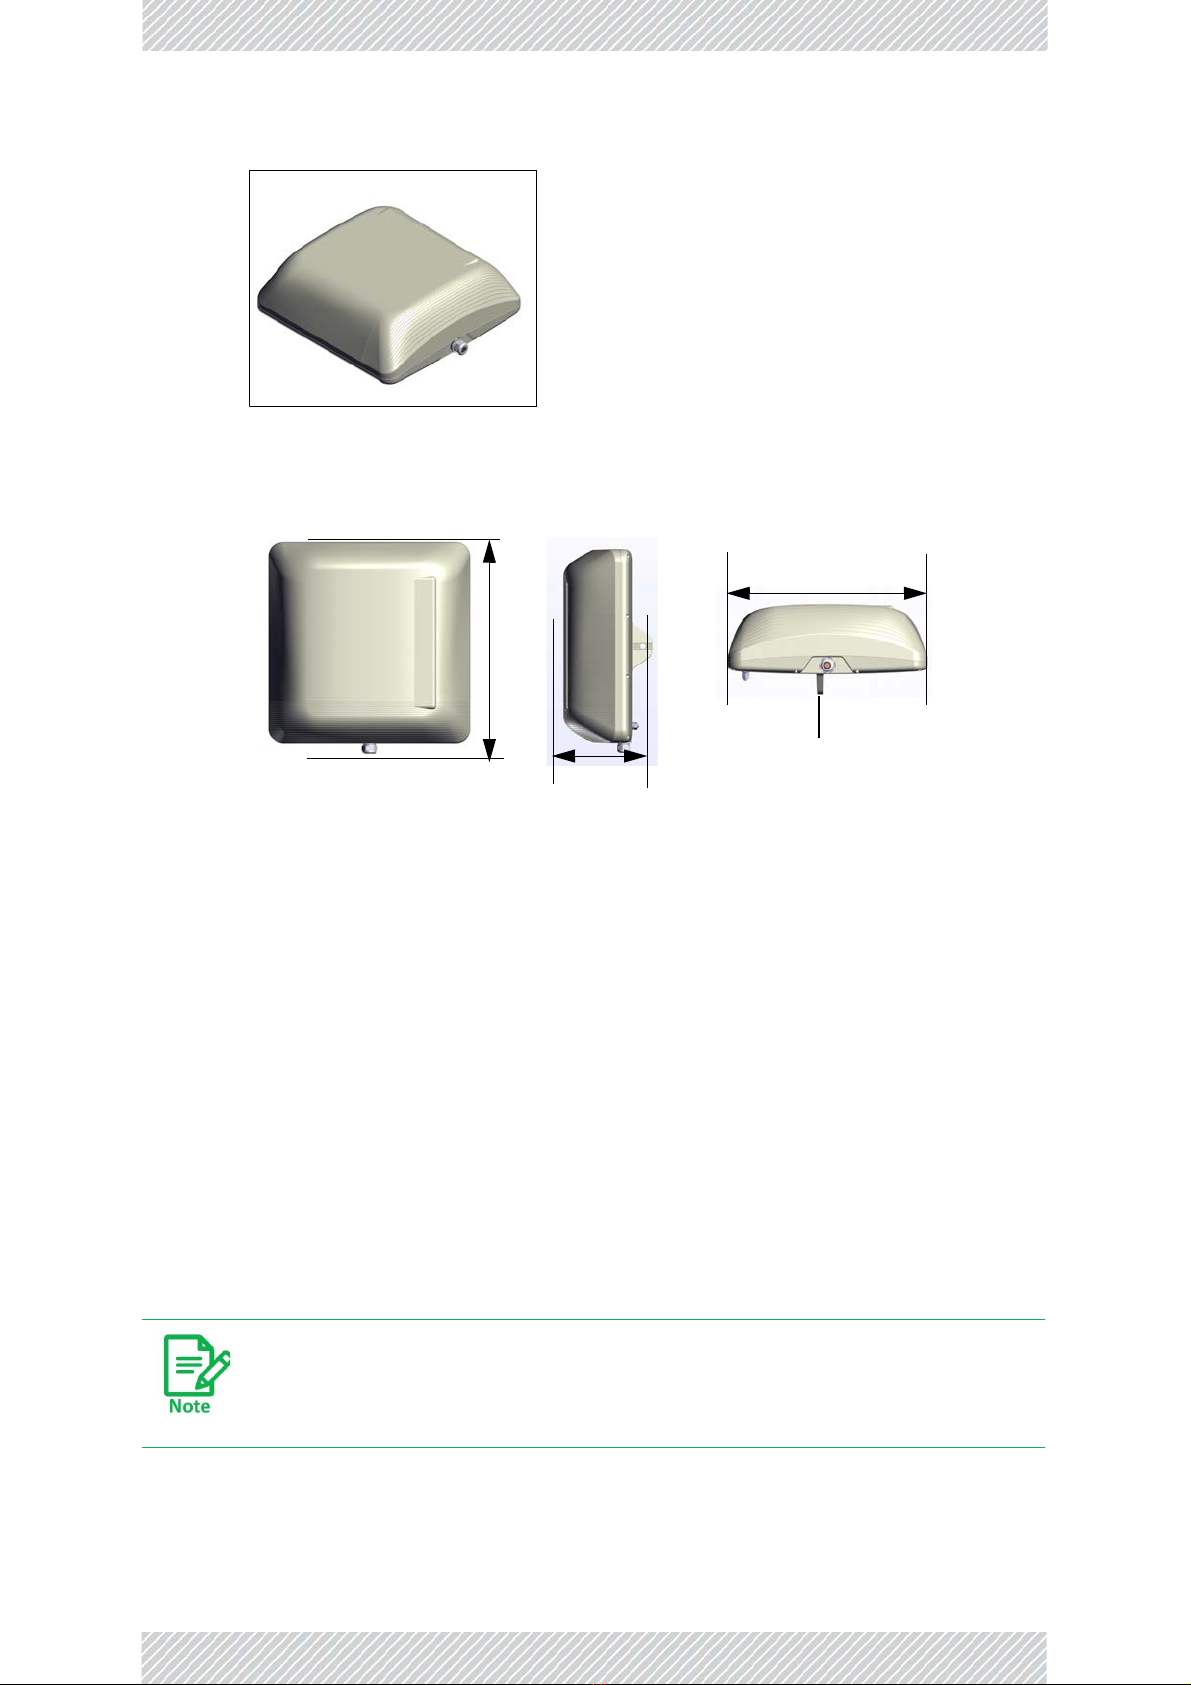
1.2.1RadioUnits .................................................................................................................. 1-1
1.2.2MethodofWork .......................................................................................................... 1-3
1.2.3ManagementTools ..................................................................................................... 1-4
1.3KeyfeaturesofTVWhiteSpace .......................................................................................... 1‐4
1.4What’sNewinRelease1.0.................................................................................................. 1‐5
1.5Notifications ........................................................................................................................ 1‐5
Chapter2:InstallationSteps
2.1PrepareLaptop.................................................................................................................... 2‐2
2.2ConnectLaptoptoRadioUnit ............................................................................................. 2‐2
2.2.1TVWhiteSpaceHBSUnits...........................................................................................2-3
2.2.2TVWhiteSpaceSUUnits............................................................................................. 2-3
2.3UpdateConnectivityParametersofRadioUnit................................................................. 2‐4
2.3.1HBSUnits..................................................................................................................... 2-4
2.3.2SUUnits....................................................................................................................... 2-5
2.4Checkitemstobeinstalled ................................................................................................. 2‐5
2.5PrepareTools ...................................................................................................................... 2‐6
2.6MounttheHBS .................................................................................................................... 2‐6
2.6.1MountingtheHBSwithitsantenna ............................................................................2-6
2.6.2MountingtheHBSadjacenttoitsantenna .................................................................2-7
2.7ConnectHBSantenna.......................................................................................................... 2‐7
2.8InstallSUMountingKit........................................................................................................ 2‐9
2.8.1StandardMountingKit................................................................................................ 2-9
2.8.2VerticalPole ..............................................................................................................2-10
2.8.3HorizontalPole ..........................................................................................................2-12
2.8.4Wall ...........................................................................................................................2-12
2.9MountingtheSU ............................................................................................................... 2‐13
2.10GroundRadioUnit........................................................................................................... 2‐13
2.10.1HBSUnits.................................................................................................................2-13
2.10.2SUUnits...................................................................................................................2-14
2.11MountingtheLightningProtectionUnits........................................................................ 2‐14
2.12Waterproofing................................................................................................................. 2‐17
2.13ConnectRadio(ExternalConnections)............................................................................ 2‐18
2.13.1HBSUnits.................................................................................................................2-18
2.13.2SUUnits...................................................................................................................2-19
2.14CheckConnectivitytoRadio............................................................................................ 2‐19
2.15Request(andreceive)permittedfrequencies................................................................. 2‐20
2.16ActivateHBS .................................................................................................................... 2‐20
2.17AlignSUUnit ................................................................................................................... 2‐21
Chapter3:SafetyPracticesandProvisions
3.1ScopeofthisChapter .......................................................................................................... 3‐1
3.1.1PreventingOverexposuretoRFEnergy .......................................................................3-1
3.1.2Grounding ................................................................................................................... 3-1
3.1.3ProtectionagainstLightning .......................................................................................3-1
3.1.4General........................................................................................................................ 3-2
3.1.5InternalESDProtectioncircuits ................................................................................... 3-2
3.1.6Ratings........................................................................................................................ 3-2
FOR REGULATORY USES ONLY

TVWhiteSpaceInstallationGuide Release1.0 1‐2
AppendixA:WiringSpecifications
A.1ScopeofthisAppendix........................................................................................................ A‐1
A.1Radiounit‐PoECable(HBSandSU)..................................................................................... A‐1
A.2UserPortConnectors.......................................................................................................... A‐2
A.3DCPowerTerminals............................................................................................................ A‐2
AppendixB:AboutAntennas
B.1ScopeofthisAppendix........................................................................................................ B‐1
B.1AntennaIssues .................................................................................................................... B‐1
B.2AboutSingleandDualAntennas......................................................................................... B‐1
B.3ConsiderationsforChangingAntennaParameters............................................................. B‐3
AppendixC:Terminology
AppendixD:CertifiedAntennas
D.1ForDeploymentinU.S. ....................................................................................................... D‐1
D.1ForDeploymentinEUMemberStates ...............................................................................D‐2
FOR REGULATORY USES ONLY

TVWhiteSpaceInstallationGuide Release1.0 1‐1
Chapter1:Introduction
1.1ScopeofThisDocument
ThisdocumentshowshowtoinstallRADWINTVWhiteSpaceradios.
ForadetaileddescriptionofhowtoconfigureRADWINTVWhiteSpaceradios,seethe
RADWINTVWhiteSpaceConfigurationGuide.
1.2RADWINTVWhiteSpaceOverview
RADWIN’sTVWhiteSpaceusestheUHFband(470‐698MHz)todelivercoverageforunserved
andunderservedruralcustomersusingaNon‐Line‐Of‐Sight(NLoS)solutionthatcan
penetratefoliageandchallengingterrains.Withasectorcapacityofupto300Mbpanda
subscriberunitcapacityofupto150Mbps(dependingonfrequencyavailability,rangeand
topography)inapoint‐to‐multipointlink,ruralcustomerscanbeconnectedtobroadband
services.
1.2.1RadioUnits
Therearetwotypesofoutdoorradiounits(ODUs):BaseStations,andSubscriberUnits
Table1‐1:RADWINTVWhiteSpaceBasicParameters
ModelName
Max
T‐put
(Mbps)
InputVoltage
&Current FormFactor Enclosure
Type
Oper.
Temp
RADWINTVWhiteSpace:
BaseStation 300 41.2‐57VDC,
1.6A
TVWhite
Space
HBS
IP67/Type4‐40Cto
+60C
RADWINTVWhiteSpace:
SubscriberUnit 150 42.5‐57VDC,
0.7A
TVWhite
Space
SU
IP67/Type4‐40Cto
+60C
•BaseStation‐Withanexternalantenna.
FOR REGULATORY USES ONLY

TVWhiteSpaceInstallationGuide Release1.0 1‐2
RadioUnits Introduction
Figure1‐1:BaseStation
radio
Figure1‐2:BaseStationwith
externalantenna
Figure1‐3:BaseStationradioexternaldimensions
•SubscriberUnit‐thisunithasanintegratedantenna.
255mm
75mm
248mm
Antenna
connections “PoE”
SFP
GPS
FOR REGULATORY USES ONLY

TVWhiteSpaceInstallationGuide Release1.0 1‐3
MethodofWork Introduction
1.2.2MethodofWork
TheradiounitscommunicatewiththeserviceproviderandusersthroughPoEdevices.The
communicationprotocolforboththeserviceproviderandtheusersisEthernet.
SeeFigure 1‐6,RADWINTVWhiteSpaceConnectionScheme:
•Foreachinstallation,permissionmustbegrantedfromlocalregulatoryauthoritiesfor
thespecificworkingfrequenciesforboththebasestationandthesubscriberunit.
•APoEdeviceisconnectedtopowerandthecommunicationsnetwork:
•UsingCAT‐5ecables,theradiounitsareconnectedtopowerandthecommunications
networkviaaPower‐over‐Ethernet(PoE)device.
•TheradiounitsandPoEdevicesarealsoconnectedtoground.
•Theradioscommunicatewitheachotherviatheairinterface.
Figure1‐4:SubscriberUnit
Figure1‐5:SubscriberUnitradioexternaldimensions
Forsimplicity,LightningProtectionUnits(LPU)arenotshowninFigure 1‐6,but
thesearerecommended.SeeMountingtheLightningProtectionUnitsonpage2‐
14fordirectionsonhowtoinstalltheLPUs.
325mm
114mm
325mm
Externalconnection
toPoE
FOR REGULATORY USES ONLY

TVWhiteSpaceInstallationGuide Release1.0 1‐4
ManagementTools Introduction
Figure1‐6:RADWINTVWhiteSpaceConnectionScheme
1.2.3ManagementTools
RADWINWebInterface
TheWebInterfaceenablesyoutocarryoutunitand/orsectormanagementfunctionsusinga
Webbrowser.
Itmaybeusedto‐
•Setorchangeradiounitparametersinthefield
•Establishasector
•Checklinkparametersandmakechanges
•ViewthelinkInventory
•InspecttheEventslogs
1.3KeyfeaturesofTVWhiteSpace
»Ethernetconnectivity
»Dualcarrierbasestationwithupto4channelspercarrier1
»EmbeddedGPS
»AdvancedOFDM&MIMO2x2fornon‐lineofsite(NLoS)performance
»Inter&intrasitesynctoreduceselfinterference
1. FCCregulations.Maxof3channelspercarrierforETSIregulations
FOR REGULATORY USES ONLY

TVWhiteSpaceInstallationGuide Release1.0 1‐5
What’sNewinRelease1.0 Introduction
»Regulationssupported‐FCC/ETSI(theproductshippedtoanygivenregulatoryenvi‐
ronmentcanonlysupportthoseregulations)
»Simpletodeploy
»WebInterfaceforsectormanagement
»FullyintegratedwithRADWIN’sfamilyofsolutions
»SeparateuplinkanddownlinkconfigurableMaximumInformationRate(MIR)
»IP‐67compliant
1.5Notifications
NotificationsconsistofNotes,Cautions,andWarnings:
1.4What’sNewinRelease1.0
»SeetheReleaseNotesfordetails
Caution:Riskofdamagetoequipmentorofservicedegradation
Warning:Riskofdangertopersonsoperatingneartheequipment
ThepurposeofaNoteisto:
•Drawyourattentiontosomethingthatmaynotbeobvious
•Emphasizeaspecialfeature
•Provideadditionalbackground
FOR REGULATORY USES ONLY

TVWhiteSpaceInstallationGuide Release1.0 2‐1
Chapter2:InstallationSteps
Toinstallandestablishabasicconnectionwitharadiounit,carryoutthestepsshownbelow.
Printoutthislist,andplaceacheckmarknexttoacompletedtask.
Table2‐1:InstallationCheck‐List
Step Action Page Done?
Beforedeployingatinstallationsite
1. PrepareLaptop page 2‐2
2. ConnectLaptoptoRadioUnit page 2‐2
3. UpdateConnectivityParametersofRadioUnit page 2‐4
4. Checkitemstobeinstalled page 2‐5
5. PrepareTools page 2‐6
Installation
6. MounttheHBS page 2‐6
7. ConnectHBSantenna page 2‐7
8. InstallSUMountingKit page 2‐9
9. MountingtheSU page 2‐13
10. GroundRadioUnit page 2‐13
11. MountingtheLightningProtectionUnits page 2‐14
12. Waterproofing page 2‐17
Commissioning
13. ConnectRadio(ExternalConnections) page 2‐18
14. CheckConnectivitytoRadio page 2‐19
15. Request(andreceive)permittedfrequencies page 2‐20
16. ActivateHBS page 2‐20
17. AlignSUUnit page 2‐21
FOR REGULATORY USES ONLY

TVWhiteSpaceInstallationGuide Release1.0 2‐2
PrepareLaptop InstallationSteps
2.1PrepareLaptop
ConfigureIPaddressandsubnetmaskoflaptopasfollows:
•ControlPanel‐>NetworkandInternet‐>NetworkandSharingCenter‐>Change
Adaptersettings‐>clickonNetworkInterfaceCardname
•Properties‐>SelectInternetProtocolVersion4(TCP/IPv4)‐>Properties‐>setIPaddress
to10.0.0.100andSubnetmaskto255.255.0
2.2ConnectLaptoptoRadioUnit
ConnectPoEtopower,connectthelaptop’sethernetporttotheIN(orLAN)portonthePoE,
thenconnecttheOUT(orPoE)socketonthePoEtotheappropriateportontheradiounit.
MakesureyouareusingtheappropriatePoEforyourspecificradiounit.
Figure2‐1:Connectinglaptoptoaradiounit
FOR REGULATORY USES ONLY

TVWhiteSpaceInstallationGuide Release1.0 2‐3
TVWhiteSpaceHBSUnits InstallationSteps
2.2.1TVWhiteSpaceHBSUnits
Connecttoportlabeled‐>“PoE”
Figure2‐2:PoEport:HBSradiounit
2.2.2TVWhiteSpaceSUUnits
Connecttoinputport
Figure2‐3:Inputport:SUradiounit
FOR REGULATORY USES ONLY

TVWhiteSpaceInstallationGuide Release1.0 2‐4
UpdateConnectivityParametersofRadioUnit InstallationSteps
2.3UpdateConnectivityParametersofRadio
Unit
2.3.1HBSUnits
1. Ifyouhavenotalreadydoneso,connecttheradiotoyourPC/networkandvoltageviaits
inputport.
2. EnteritsIPaddressinawebbrowser(defaultvalue:10.0.0.120).
3. Fromtheloginpage,enterusernameadminandpasswordnetwireless.
4. ClicktheConfigureicon
5. Fromthewindowthatappears,selectManagement‐>Network
6. EnterthenewIPaddress,SubnetMaskandDefaultGatewayinaccordancewith
yourradioplan,thenclickSave.
7. Youwillbewarnedthatthedevice(HBSradiounit)willbereset.Ifallthevalues
arecorrect,clickOK.
8. Fromacommandline,pingradiounitusingnewIPaddresstoverifychange.
Onceyouarefinishedwiththestepsabove,disconnecttheradiounitandprepareitfor
deploymentinthefield.
FOR REGULATORY USES ONLY

TVWhiteSpaceInstallationGuide Release1.0 2‐5
SUUnits InstallationSteps
2.3.2SUUnits
1. Ifyouhavenotalreadydoneso,connecttheradiotoyourPC/networkandvoltageviaits
inputport.
2. EnteritsIPaddressinawebbrowser(defaultvalue:10.0.0.120).
3. Fromtheloginpage,enterusernameadminandpasswordnetwireless.
4. ClicktheConfigureicon
5. SelectAirInterface‐>Radio
6. EntertheSectorID,andifapplicable,ChannelBandwidth,thenclickSave.
7. SelectManagement‐>Network
8. EnterthenewIPAddress,SubnetMask,andDefaultGateway,thenclickSave.
9. Youwillbewarnedthatthedevicewillbereset.Ifallthevaluesarecorrect,click
OK.
10.Fromacommandline,pingradiounitusingnewIPaddresstoverifychange.
Onceyouarefinishedwiththestepsabove,disconnecttheradiounitandprepareitfor
deploymentinthefield.
2.4Checkitemstobeinstalled
•Radiounit+mountingkit
•2LPUsforeachradio(recommended)
•PoE(ifoutdoor,requiresmountingkit)
•CAT‐5ecables
•Groundingcables(10AWG)forradiounit,LPUsandoutdoorPoE(ifused)
•Externalantenna+HBSmountingkit(ifinstallinganHBS)
•Standardmountingkit(ifinstallinganSU)
•RFcables
FOR REGULATORY USES ONLY

TVWhiteSpaceInstallationGuide Release1.0 2‐6
PrepareTools InstallationSteps
2.5PrepareTools
•Crimpingtool
•Spanner/wrench13mm(1/2”)
•Cableties
•Sealingmaterial
•Waterproofingtape(likeScotch23)
2.6MounttheHBS
TheHBScanbemountedtogetherwithitsantenna,orseparatelyonitsownmount.
2.6.1MountingtheHBSwithitsantenna
MounttheHBSontheantennausingthemountingplate:
Figure2‐4:MounttheHBSonitsmountingplate
PushdowntheHBSuntilyouhearaclick,thenfastenthelockingscrewasshown:
Figure2‐5:Fastenthelockingscrew
HBS
Mountingplate
FOR REGULATORY USES ONLY

TVWhiteSpaceInstallationGuide Release1.0 2‐7
MountingtheHBSadjacenttoitsantenna InstallationSteps
Mounttheantennaonapoleusingitsmountingassembly:
Figure2‐6:MountHBS/antennaonpole
2.6.2MountingtheHBSadjacenttoitsantenna
2.7ConnectHBSantenna
ConnectCAT‐5ecablesbetweentheHBSandantennaasshown:
FOR REGULATORY USES ONLY

TVWhiteSpaceInstallationGuide Release1.0 2‐8
ConnectHBSantenna InstallationSteps
Figure2‐7:Connectantennacables‐HBSmountedonantenna
Figure2‐8:Connectantennacables‐HBSmountedadjacenttoitsantenna
FOR REGULATORY USES ONLY

TVWhiteSpaceInstallationGuide Release1.0 2‐9
InstallSUMountingKit InstallationSteps
2.8InstallSUMountingKit
2.8.1StandardMountingKit
UsethestandardmountingkitforSUradiounits
Figure2‐9:StandardMountingKitContents
Themountingkitcanbeusedonaverticalorhorizontalpoleoronawall:
Tightenallboltswithatorqueof15Nm.
VerticalPolepage 2‐10
HorizontalPole page 2‐12
Wall page 2‐12
FOR REGULATORY USES ONLY

TVWhiteSpaceInstallationGuide Release1.0 2‐10
VerticalPole InstallationSteps
2.8.2VerticalPole
Themountingkitcanbeusedonathin,medium,orthickpole.
ThinPole
1. Diameter3/4to11/2:Positionthepoleclampasshowninthefollowingfigures.
Donottightentheboltsalltheway.
2. Placethis“unit”onthepolewhereyouwanttomountthedevice.Onceitisin
place,rotatethepoleclampasshown,thentightenbothbolts.
ThinPole Dia.3/4‐11/2 page 2‐10
MediumPole Dia.2‐3page 2‐11
ThickPole Dia.>3page 2‐11
Figure2‐10:ConnectPoleClamptoRadio
Holder
Figure2‐11:Partiallytightenbolts
Figure2‐12:RotateClampandtightenbolts Figure2‐13:Completelytightenbolts
FOR REGULATORY USES ONLY

TVWhiteSpaceInstallationGuide Release1.0 2‐11
VerticalPole InstallationSteps
MediumPole
1. Diameter2to3:Positionthepoleclampasshowninthefollowingfigures.Donottighten
theboltsalltheway.
2. Placethis“unit”onthepolewhereyouwanttomountthedevice.Onceitisin
place,rotatethepoleclampasshown,thentightenbothbolts.
ThickPole
1. Diameterlargerthan3:Usewormdriveclamps(notsupplied),threadedthroughtheholes
asshown:
Figure2‐18:Mountingkitonathickpole
Thepoleclampisnotneeded.
Figure2‐14:ConnectPoleClamptoRadio
Holder
Figure2‐15:Tightenbolts
Figure2‐16:RotateClamp Figure2‐17:Completelytightenbolts
FOR REGULATORY USES ONLY

TVWhiteSpaceInstallationGuide Release1.0 2‐12
HorizontalPole InstallationSteps
2.8.3HorizontalPole
Installingthemountingkitonahorizontalpoleisdoneinasimilarmannertothatona
verticalpole(thin,medium,orthicksizes):
Figure2‐19:MountingKitonahorizontalpole
2.8.4Wall
Usetwomountingscrews(notincluded)appropriateforthetypeofwalltoinstallthe
mountingkitonawall.Makesureyouusetheindicatedholes.
Thepoleclampisnotneeded.
Figure2‐20:Mountingkitonawall
FOR REGULATORY USES ONLY
Table of contents
Other Radwin Radio manuals
Popular Radio manuals by other brands

Streamit
Streamit Lukas II user manual

Cobra
Cobra 29 LX OEM B owner's manual

COBHAM
COBHAM SAILOR XTR Platform - SW ver. 3.03 Build 021 quick start guide

Thrane&Thrane
Thrane&Thrane Sailor 6216 User & installation manual

Scot-tel Gould
Scot-tel Gould Marr (South) SRM9030plus Quick user guide

Mitsubishi MOTORS
Mitsubishi MOTORS DY-5MU4R69-T Service manual