ratiotec Soldi Smart Pro USD User manual

We support retail
Instruction manual Soldi Smart Pro USD

2

Contents
Page
Instructions for use . . . . . . . . . . . . . . . . 4 – 9
Bedienungsanleitung . . . . . . . . . . . . 10 – 15
Istruzioni per l’uso . . . . . . . . . . . . . . . 16 – 21
Mot d’emploi . . . . . . . . . . . . . . . . . . . 22 – 27
Instrucciones de uso . . . . . . . . . . . . 28 – 33
Instruções de uso . . . . . . . . . . . . . . . 34 – 39
3

4
3
1
2
Instruction Manual Soldi Smart Pro USD
Dear customer,
Thank you for choosing the ratiotec banknote detector Soldi Smart Pro USD. This automatic de-
tector offers a fast and reliable counterfeit detection for up to four currencies (factory default US
Dollar, Canadian Dollar, Mexican Peso und Brazilian Real).
Start-up
Note: All sensors are covered with a security stripe. Before first use, remove the security stripe by
opening the cover. After closing the cover again please connect the Soldi Smart Pro USD to power
supply using the mains cable.
Please clean all sensors frequently to ensure a trouble-free operation.
Contents of Package
Banknote detector Soldi Smart Pro USD, Power adaptor, Guide rail, Instruction Manual
Control panel
1. Display indicating banknote ejection
2. Display with lighting frame: information output, optical detection result
(the lighting frame flashes red or green in case of a suspicious or origin banknote)
3. REP/ADD button: Selection of Report- and Addition function
4. ON/OFF button: To switch ON and OFF, set functions
5. CURR/Setup button: Selection of currency and starting the setup
1
2
3 4 5
1. Feeding sensors
2. IR sensors
3. MG sensor

Switch ON and OFF
To switch on, press ON/OFF until an acoustic signal arises. When the device is switched on, it will
carry out a self-test and 0 will appear on the display.
Insert banknote
Place banknote on feeder: the device starts up automatically and pulls in the banknote. The
banknotes must be inserted according to the indicated side, direction and positioned to the right
side. (see illustration). If the banknotes are not inserted in correct way, error messages will occur
also for genuine banknotes. For further information contact ratiotec or your sales representative.
Operation
USD CAD MXN BRL
- the top of the
banknote is
positioned to the
right side
- the portrait
remains visible
- the top of the
banknote is
positioned to the
right side
- the portrait
remains hidden
- the top of the
banknote is
positioned to the
right side
- the portrait
remains visible
- the top of the
banknote is
positioned to the
right side
- the portrait
remains visible
SPECIMEN
SPECIMEN
SPECIMEN
SPECIMEN
5

6
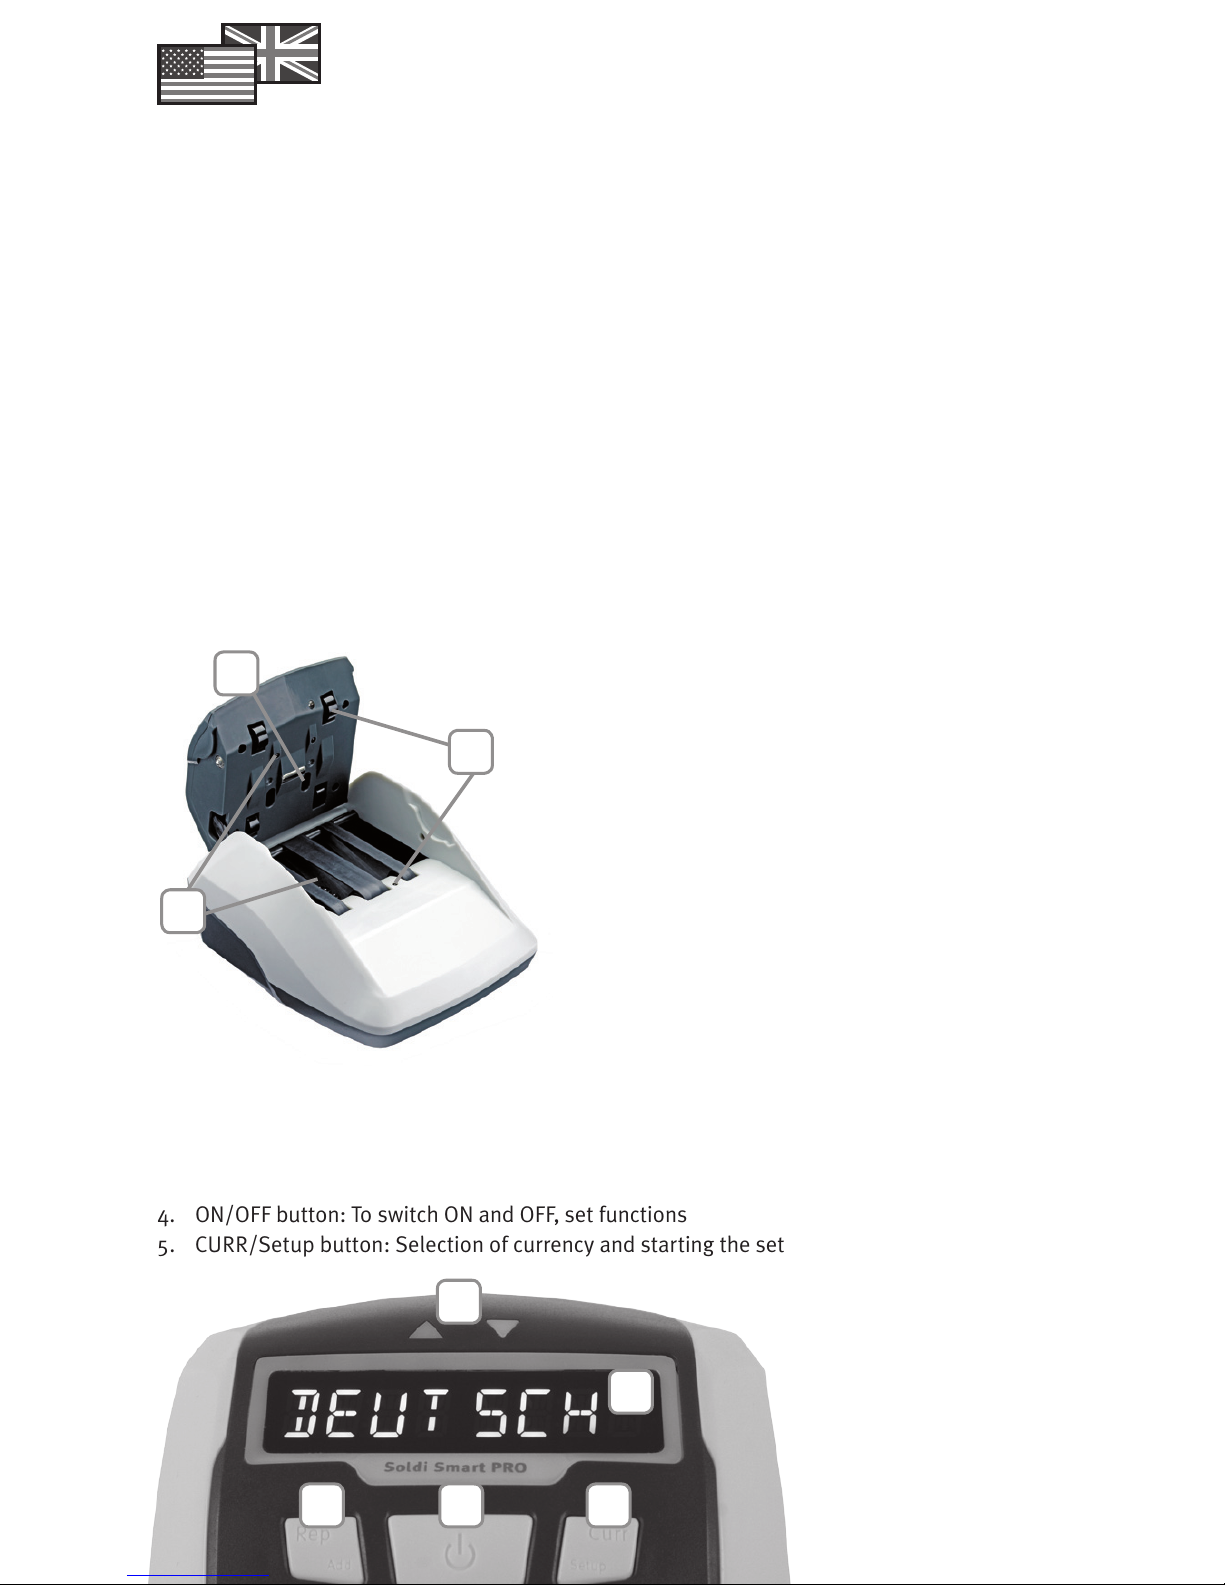
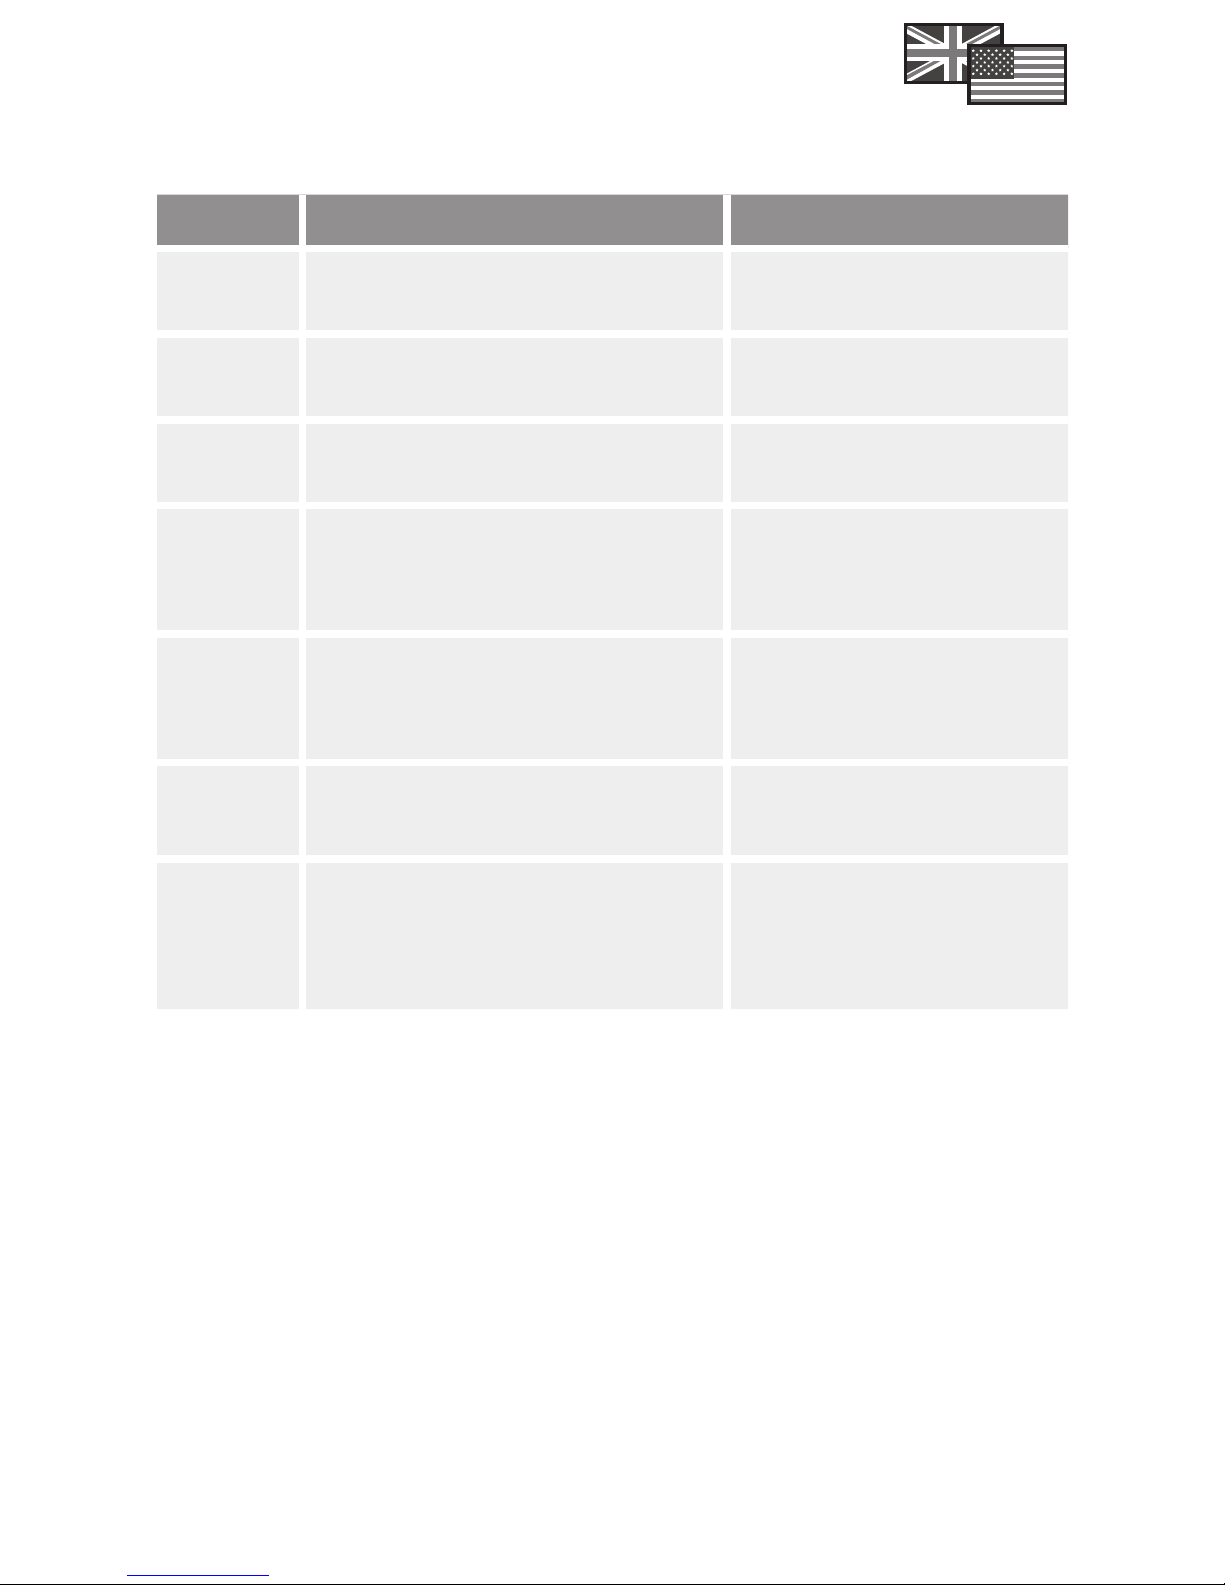
Keys and their functions
REP/ADD-switch (Report and addition function)
Press REP/ADD once to change to the report view. The frame lights up with blue light. The quan-
tity and value of all counted notes will appear with each pressing REP/ADD. Please note, only the
currently chosen currency appears. After the report the total value is displayed again.
Note: The report function is only available while the addition function is switched on.
Keep REP/ADD pressed for long to switch the addition function on or off. Is the function acti-
vated, the unit number and value number of the banknotes is automatically counted. The unit
number can be a value of up to 999 and the value number up to 9995. After this, the display is
automatically reset to zero.
CURR/Setup-Taste (Currency- and Setup function)
Press CURR/Setup once to select the currency. The chosen currency is displayed. The Soldi Smart
Pro can detect up to three currencies, for further information contact ratiotec or your sales re-
presentative.
Keep pressed CURR/Setup down for several seconds to select the SETUP menu. The message
SETUP will appear and the frame lights up with blue light. To select the desired function, press
REP/ADD or CURR/Setup and change this by pressing ON/OFF.
False or suspect note
An acoustic signal arises and the red warning symbol blinks in case of a false or suspect note.
Additionally, an error message appears in the display. In the event of a false or suspicious bank-
note, the ejection is always against selected direction.
Note: If TONE or LED is switched off in Setup, no acoustical or optical signal will appear.
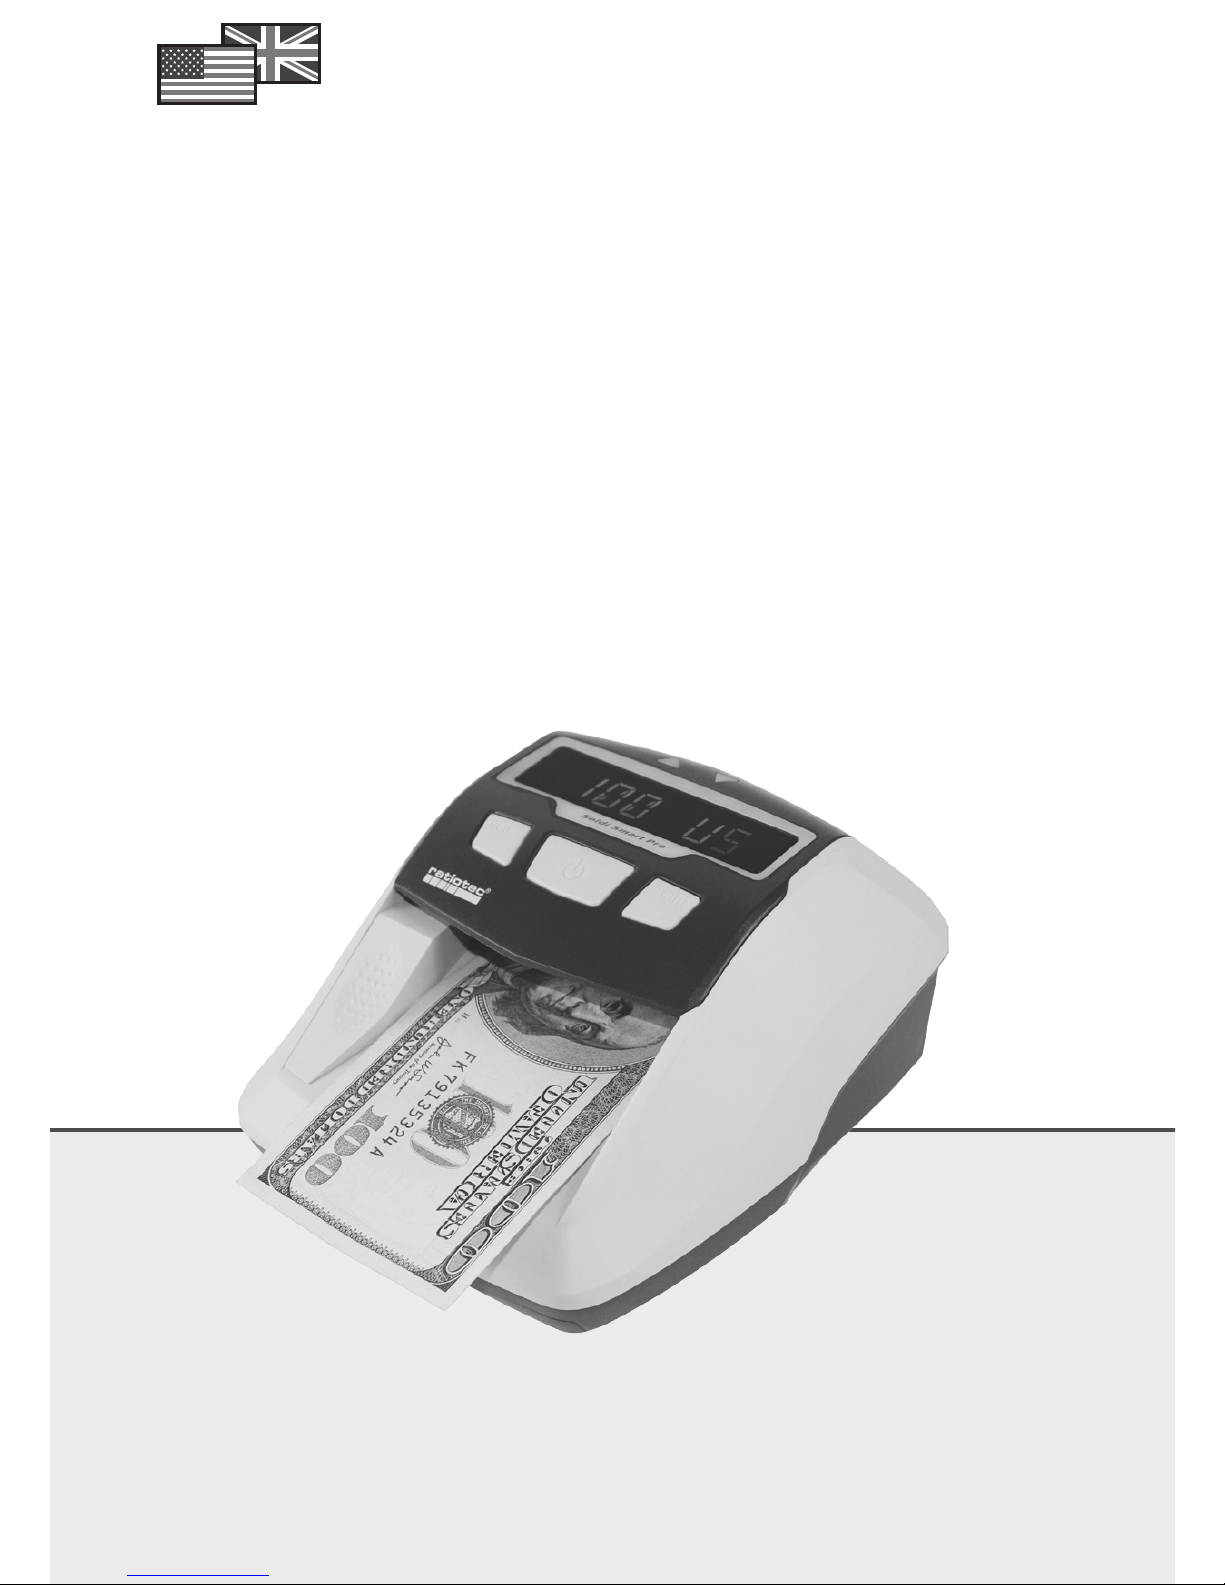
There is a guide rail as an accessory, to simplify the
inserting of dollar notes. It should ensure the correct
feeding of banknotes to the detector by reducing the
feeder’s area. It can be easily installed and uninstalled.

Function Setting Explanation
HOLD ON or OFF Banknote ejection with or without
holding on to it.
TONE ON or OFF Switch on or off acoustic signals.
LED ON or OFF Switch on or off the frame light func-
tion.
ECO OFF, 15, 30, 45, 60
The device turns off automatically after
a defined period of time without use.
(Ecomode)
BANKNOTE Arrows point to the front or the rear
Select the ejection of the detected
banknotes, false or suspect notes eject
against the selected direction.
LANGUAGE English, Deutsch, Francais, Italiano, Espanol The currently used language appears.
RESET Set to factory settings
Press ON/OFF for several seconds to
set all functions to factory settings.
(factory settings are highlighted as
bold above)
Special functions
Cleaning Message
In the event a cleaning is needed, the message CLEAN appears after switching on the device. The
frame lights up with red light. Turn not off the device for the cleaning process. Clean all sensors
by opening cover.
Low-power mode
If the device is unused, it automatically switches to Low-power Mode after 10 minutes. During this
mode only the arrows above the display are activated. After inserting a banknote to the feeder,
the Low-power mode is automatically switched off again.
Note: Use the ECO function to save even more energy.
Following functions can be activated or inactivated:
7

8
Usage with battery
An optional battery can be used to run the Soldi Smart Pro USD. Before its first use, charge the
battery for a period of 15 hours. If CHARGE is displayed, the battery is still charging. If battery
status is weak, the banknote detector displays LOW.
Identify installed software
To show the used software version, hold down ON/OFF until the display is activated. The software
version of all three currencies will appear on display, finally the device turns off automatically.
Software update
To switch to the update mode, switch off the device and connect it to the PC. Keep pressed all
three switches simultaneously until UPDATE appears in display. For further information as well as
downloading specific files, please visit www.ratio-tec.com.

Currency EUR / GBP / CHF (others optional)
Speed 0,3 sec. / banknote
Counterfeit detection IR, MG features, metal thread
Banknote insertion Euro: Any direction, Others: Indicated direction
Banknote ejection Optionally front or rear / hold or eject banknotes
Indication LED display
Language English, German, Italian, Spanish, French
Acoustic warning signal / Signal frame To switch on and off
Standby / energy saving mode Freely adjustable in steps of 15 minutes
Update function
PC interface / USB
Voltage 12 V DC
Options Rechargeable battery, adapter cable for cigarette lighter, Wall
bracket, Anti-theft plate
Measurements (l x w x h in mm / inches) 170 x 135 x 80 / 6.7 x 5.3 x 3.4
Weight in kg / lb 0,5 / 1.1
Technical Data
For accessories please contact ratiotec or your sales representative!
9

10
3
1
2
Bedienungsanleitung Soldi Smart Pro USD
Sehr geehrte Kundin, sehr geehrter Kunde,
vielen Dank, dass Sie sich für das Banknotenprüfgerät Soldi Smart Pro USD von ratiotec ent-
schieden haben. Das kompakte Prüfgerät gewährleistet eine schnelle und zuverlässige Echtheits-
prüfung von bis zu vier Währungen (werkseitig US Dollar, Kanadische Dollar, Mexikanische Peso
und Brasilianische Real).
Inbetriebnahme
Hinweis: Entfernen Sie den Sicherheitsstreifen, indem Sie die Oberseite des Gerätes nach hinten
klappen. Nachdem Sie die Oberseite geschlossen haben, schließen Sie das Banknotenprüfgerät
an die Stromversorgung an. Um die Funktionalität des Soldi Smart Pro USD zu gewährleisten,
reinigen Sie die Sensoren bitte in regelmäßigen Abständen.
Verpackungsinhalt
Banknotenprüfgerät Soldi Smart Pro USD, Netzteil, Bedienungsanleitung
Bedienfeld und Display
1. Symbolanzeige: Richtung des Banknotenauswurfs
2. Displayanzeige mit Lichtring: Informationsausgabe, optische Anzeige des Prüfergebnisses
(der Lichtring blinkt rot bzw. grün bei verdächtigen bzw. echten Banknoten)
3. REP/ADD-Taste: Auswahl der Report- und Additionsfunktion
4. ON/OFF-Taste: Ein- und Ausschalten des Gerätes, Vornehmen von Einstellungen
5. CURR/Setup-Taste: Auswahl der Währung und Wechsel in das Menü
1. Einzugssensoren
2. IR-Sensoren
3. Magnetsensor
1
2
3 4 5

Gerät ein- und ausschalten
Zum Einschalten betätigen Sie die ON/OFF-Taste des Soldi Smart Pro USD solange, bis ein aku-
stisches Signal ertönt. Das Gerät beginnt automatisch mit dem Selbsttest. Erscheint im Display
der Wert 0, können Sie mit der Prüfung beginnen.
Banknote einlegen
Legen Sie die zu prüfende Banknote in den Einzug. Das Gerät startet den Prüfvorgang automa-
tisch und zieht die Banknote ein. Bitte beachten Sie, dass die Banknoten rechtsbündig und mit
einer spezifischen Orientierung eingelegt werden müssen (siehe Abb.). Werden die Bankno-
ten nicht wie vorgesehen eingelegt, kann es auch bei echten Banknoten zu Fehlermeldungen
kommen. Nähere Informationen dazu erhalten Sie von Ihrem Fachhändler oder direkt bei Ihrem
ratiotec-Team.
Bedienung
USD CAD MXN BRL
- die Oberkante
des Scheins liegt
rechtsbündig an
- das Bild der
aufgedruckten
Person zeigt nach
unten
- die Oberkante
des Scheins liegt
rechtsbündig an
- das Bild der
aufgedruckten
Person zeigt nach
unten
- die Oberkante
des Scheins liegt
rechtsbündig an
- das Bild der
aufgedruckten
Person zeigt nach
oben
- die Oberkante
des Scheins liegt
rechtsbündig an
- das Bild der
aufgedruckten
Person zeigt nach
oben
SPECIMEN
SPECIMEN
SPECIMEN
SPECIMEN
11

12
Um das Einlegen von Dollar-Banknoten zu vereinfachen,
liegt dem Gerät eine Führungsschiene bei. Diese dient
dazu, die Auflagefläche zu verkleinern und Eingabefeh-
lern vorzubeugen. Sie lässt sich nach Bedarf leicht ein-
setzen und wieder entfernen.
Tasten und ihre Funktionen
REP/ADD-Taste (Report- und Additionsfunktion)
Drücken Sie die REP/ADD-Taste kurz um in die Reportansicht zu wechseln. Der Lichtring leuchtet
blau. Mit jedem weiteren Betätigen der REP/ADD-Taste werden die Anzahl und die Stückelung
der gezählten Banknoten angezeigt. Es erscheinen nur die Werte der aktuell verwendeten Wäh-
rung. Ist der Durchlauf beendet, erscheint im Display wieder das Gesamtergebnis.
Hinweis: Die Reportfunktion ist nur bei eingeschalteter Additionsfunktion verfügbar.
Drücken Sie die REP/ADD-Taste lange, um die Additionsfunktion an- bzw. auszuschalten. Bei
aktivierter Funktion wird die Gesamtsumme aller Zählergebnisse dauerhaft im Display angezeigt.
Wird der maximale Wert 9995 oder die maximale Anzahl 999 überschritten, beginnt die Zählung
wieder bei 0.
CURR/Setup-Taste (Währungs- und Setupfunktion)
Drücken Sie die CURR/Setup-Taste kurz, um zwischen den möglichen Währungen umzuschalten.
Die ausgewählte Währung wird im Display angezeigt. Der Soldi Smart Pro USD kann bis zu drei
verschiedene Währungen prüfen. Nähere Informationen dazu erhalten Sie von Ihrem Fachhänd-
ler oder direkt bei Ihrem ratiotec-Team.
Um individuelle Einstellungen über das Setup vorzunehmen, drücken Sie die CURR/Setup-Taste.
Der Lichtring leuchtet blau. Wählen Sie den gewünschten Menüpunkt mit der Taste REP/ADD
oder CURR/Setup aus. Um eine Änderung vorzunehmen, drücken Sie die ON/OFF-Taste.
Falsche oder verdächtige Banknoten
Bei einer falschen oder verdächtigen Banknote ertönt ein akustisches Signal und der Lichtring
blinkt rot. Im Display erscheint eine Fehlermeldung, die das verdächtige Merkmal des Scheins be-
nennt. Außerdem erfolgt die Ausgabe der Banknote entgegen der eingestellten Auswurfrichtung.
Hinweis: Sind TON oder LED im Menü ausgeschaltet, wird kein akustisches bzw. optisches Signal
wiedergegeben.

Funktion Einstellung Bedeutung
HALT AN oder AUS Banknotenausgabe mit oder ohne
Festhalten.
TON AN oder AUS Akustische Signale an- oder ausschal-
ten.
LED AN oder AUS Lichtringfunktion an- oder ausschalten.
ECO AUS, 15, 30, 45, 60
Das Gerät schaltet sich nach einem be-
stimmten Zeitraum ohne Nutzung aus.
(Ecomodus)
BANKNOTE Symbolanzeige weist nach vorn oder hinten
Ausgaberichtung der geprüften Bank-
noten auswählen, verdächtige Bank-
noten werden entgegen der gewählten
Richtung ausgegeben.
SPRACHE English, Deutsch, Francais, Italiano, Espanol Die aktuell verwendete Sprache wird
angezeigt.
RESET Werkseinstellungen übernehmen
Um alle Einstellungen auf Werksein-
stellungen zurückzusetzen, halten Sie
die ON/OFF-Taste solange gedrückt,
bis ein akustisches Signal ertönt. (die
Werkseinstellungen sind obenstehend
fett markiert)
Mit Hilfe des Setup können folgende Funktionen eingestellt werden:
Sonderfunktionen
Reinigungsanzeige
Ist eine Reinigung für die fehlerfreie Funktion des Soldi Smart Pro erforderlich, erscheint nach
dem Einschalten die Meldung REINIGEN im Display. Der Lichtring leuchtet rot. Schalten Sie das
Gerät vor der Reinigung nicht aus. Säubern Sie die Sensoren, indem Sie die Oberseite des Ge-
rätes nach hinten klappen.
Stromsparmodus
Das Gerät schaltet sich nach 10 Minuten automatisch in den Stromsparmodus. In diesem Zustand
leuchtet lediglich die Symbolanzeige oberhalb des Displays. Um den Stromsparmodus zu verlas-
sen, legen Sie eine Banknote in das Gerät ein.
Tipp: Nutzen Sie auch die ECO Funktion um zusätzlich Strom zu sparen.
13

14
Betrieb mit Akku
Optional kann der Soldi Smart Pro USD mit einem Akku betrieben werden. Der Akku sollte vor
dem ersten Einschalten für eine Zeit von ca. 15 Stunden voll aufgeladen werden. Während des
Ladevorgangs erscheint im Display LADEN, ist die Batterie fast leer, wird LOW angezeigt.
Ermitteln der installierten Gerätesoftware
Um die aktuelle Prüfsoftware des Soldi Smart Pro USD zu ermitteln, drücken Sie so lange ON/
OFF, bis sich das Display einschaltet. Es wird die Versionsnummer jeder installierten Währung
angezeigt, anschließend schaltet sich das Gerät aus.
Softwareupdate durchführen
Um in den Updatemodus zu gelangen, schließen Sie das ausgeschaltete Gerät an den PC an.
Drücken Sie anschließend so lange alle drei Funktionstasten gleichzeitig, bis im Display UPDATE
erscheint. Weitere Informationen und alle notwendigen Dateien sowie eine Schritt-für-Schritt-
Anleitung für die Durchführung des Updates finden Sie auf unserer Homepage unter www.ratio-
tec.com.

Technische Daten
Währung EUR, GBP, CHF (andere optional)
Geschwindigkeit 0,3 Sekunden / Banknote
Echtheitsprüfung IR- und MG-Merkmale, Sicherheitsfaden
Banknoteneinzug Euro: jede Richtung, Andere: richtungsbezogen
Banknotenauswurf Wahlweise vorn oder hinten / Banknoten halten
oder auswerfen
Anzeige LED Display
Sprache Deutsch, Englisch, Italienisch, Spanisch, Französisch
Signalton / Signalrahmen Ein- und ausschaltbar
Standby / Energiesparmodus Frei einstellbar in 15-Minuten-Schritten
Update-Funktion
PC-Anschluss / USB
Spannung 12 V DC
Optionen Akku, Kfz-Ladekabel, Wandhalterung, Diebstahlsicherung
Abmessungen (l x w x h in mm / inches) 170 x 135 x 80 / 6.7 x 5.3 x 3.4
Gewicht in kg / lb 0,5 / 1.1
Alle Zubehörartikel erhalten Sie bei Ihrem Fachhändler oder direkt bei
ratiotec!
15

16
3
1
2
Manuale d‘uso Soldi Smart Pro USD
Gentile cliente,
Grazie per aver scelto il nostro rilevatore di banconote false Soldi Smart Pro USD. Il Soldi Smart
Pro USD fa una veloce e affidabile verifica delle banconote fino a quattro valute (di fabbrica:
dollaro, dollaro canadese, peso messicano e real brasiliano).
Start-up
Nota: Tutti i sensori sono coperti con un nastro di sicurezza, prima dell’uso rimuovere il nastro
aprendo il coperchio superiore. Collegare l’alimentatore al Soldi Smart Pro USD premendo il tasto
On/Off per accenderlo (solo dopo aver rimosso nastro di sicurezza).
Pulire frequentemente tutti i sensori, per assicurarvi un uso senza problemi (non usare alcool).
Contenuto scatola
Rilevatore di banconote false Soldi Smart Pro USD, alimentatore, rotaia di guida, manuale d‘uso
Panello di controllo
1. Display indicazione uscita banconote
2. Display con cornice di illuminazione: Tutte le informazioni hanno un riscontro ottico che
informa l’operatore (Cornice lampeggia rosso in caso di banconota sospetta, verde se vera)
3. REP/ADD Tasto: Seleziona il tipo di informazione sul display –
attivare o disattivare auto somma
4. ON/OFF Tasto: Accensione/spegnimento
5. CURR/Setup Tasto: Per selezionare altre valute
1. Sensore ingresso banconote
2. Sensore IR
3. Sensore MG
1
2
3 4 5

Tasto ON e OFF
Per accendere premere tasto ON/OFF finché non si sente un segnale acustico. Una volta aceso, il
rilevatore esegue un‘auto-test, se funziona appare sul display 0.
Inserire la banconota
Inserire la banconota nella fessura di ingresso, il dispositivo parte in automatico e la trascina
dentro. Le banconote Euro possono essere introdotte in tutti e 4 i sensi, per altre valute può esser
richiesto di introdurle in un determinato modo. Per maggiori informazioni mettersi in contatto
con il rivenditore o direttamente con la ratiotec.
Istruzioni
USD CAD MXN BRL
- la parte superiore
della banconota è
allineata a destra
- l‘immagine della
persona stampata
rivolta verso l‘alto
- la parte superiore
della banconota è
allineata a destra
- l‘immagine della
persona stampata
rivolta verso il basso
- la parte superiore
della banconota è
allineata a destra
- l‘immagine della
persona stampata
rivolta verso l‘alto
- la parte superiore
della banconota è
allineata a destra
- l‘immagine della
persona stampata
rivolta verso l‘alto
SPECIMEN
SPECIMEN
SPECIMEN
SPECIMEN
17

18
Tasti e altre funzioni
REP/ADD- Tasto di funzione rapporto o auto somma
Premere il tasto REP/ADD una volta per visualizzare sul display il valore della banconota verifica-
ta: Il display si illumina di colore blu.
Nota: Questa funzione è disponibile se auto somma è attivata.
Tenere premuto più a lungo il tasto REP/ADD per attivare o disattivare la funzione di auto somma.
Se la funzione è attiva, il valore e numero di banconote sarà sommato. Il massimo di banconote
registrate è di 999, e il valore massimo è di 9995 Euro, al raggiungimento di queste cifre, il dis-
play si azzera automaticamente.
CURR/Setup- Tasto (Valuta - e funzione di configurazione)
Premere tasto CURR/Setup una volta per selezionare la valuta desiderata, la valuta selezionata ver-
rà visualizzata sul display. Il Soldi Smart Pro può verificare fino a tre valute, per ulteriori informazioni
mettersi in contatto con il rivenditore o direttamente con la ratiotec.
Tenere premuto il tasto CURR/Setup per alcuni secondi per selezionare SETUP menù. Sul display
appare SETUP e il bordo del display diventa blu. Per selezionare la funzione desiderata premere
il tasto REP/ADD o il tasto CURR/Setup, per confermare la selezione, premere il tasto ON/OFF.
Banconote false o sospette
Se la banconota risulta falsa o sospetta, l’operatore viene avvisato da un segnale acustico e la
cornice del display si illumina di rosso. Inoltre, appare un messaggio di errore sul display e la
banconota esce sempre dal lato opposto a quello di entrata.
Consiglio: Se alla prima passata una banconota appare sospetta, ripresentala girando la banco-
nota sotto sopra, se risulta buona potete incassarla, se risulta falsa non accettatela.
Nota: Se vengono spente le funzioni acustiche o ottiche, nessun segnale acustico o ottico verrà
visualizzato o udito.
Per semplificare l‘inserimento delle banconote del dolla-
ro, con l‘apparecchio è incluso un binario. Questo serve
per ridurre la superficie ed evitare errori di imput. Lo
potete facilmente inserire o rimuovere a seconda della
necessità.

Funzione Impostazione Spiegazione
STOP NO or SI Espulsione banconota con o senza
trattenere.
SUONO NO or SI Accendere o spegnere segnale
acustico.
LED NO or SI Accendere o spegnere illuminazione
colorata del bordo.
ECO NO, 15, 30, 45, 60
Il dispositivo si spegne automatica-
mente dopo un determinato periodo di
tempo prescelto. (Ecomode)
BANKNOTE Espulsione banconote davanti o dietro
Selezionare l'espulsione, davanti
o dietro, delle banconote rilevate
sospette.
LANGUAGE English, Deutsch, Francais, Italiano, Espanol Appare la valuta selezionata.
RESET Impostare le impostazioni di fabbrica
Premere tasto ON/OFF per qualche
secondo per resettare le impostazioni di
fabbrica. (le funzioni fabbrica sono
evidenziate come fat sopra)
Possono essere attivate le seguenti funzioni:
Funzioni speciali
Messaggio di pulizia
Nel caso sia necessaria una pulizia dei sensori di controllo, appare il messaggio PULIRE dopo
l‘accensione del dispositivo. La luce attorno il display si illumina con una luce rossa. A dispositivo
acceso aprire il coperchio superiore e pulire tutti i sensori.
Modalità basso consumo
Se il dispositivo non viene usato, automaticamente si attiva modalità basso consumo dopo 10
minuti. Quando è su questa funzione, sul display appaiono solo le frecce di direzione. Se si intro-
duce una banconota la modalità basso consumo verrà disattivata.
Nota: Usate la funzione ECO per un maggior risparmio energetico.
19

20
Funzionamento con batteria
Opzionale. Il Soldi Smart Pro USD può essere usato con una batteria ricaricabile.
La prima volta, la batteria deve essere ricaricata completamente per un tempo di circa 15 ore. Du-
rante il processo di ricarica, appare sul display “CARICARE”, se la batteria è quasi scarica, viene
visualizzato sul display “BASSO”. La ricarica della batteria si effettua solo a rilevatore acceso.
Identificazione del software installato
Per visualizzare il software installato, premere il tasto ON/OFF finché sul display non appare la
versione installata; mostrerà la versione per ognuna delle tre valute installate, dopo di che il
dispositivo si spegne automaticamente.
Aggiornamenti software
Per attivare la funzione aggiornamento, accendere il dispositivo collegato al PC. Tenere premuti
tutti e tre i tasti simultaneamente finché UPDATE appare sul display. Per ulteriori informazioni su
come aggiornare o specifiche del software, visitare il nostro sito www.ratio-tec.com.
Table of contents
Languages:
Other ratiotec Security Sensor manuals