ratiotec Soldi Smart Pro User manual

We support retail
Instruction manual Soldi Smart Pro
Bedienungsanleitung Soldi Smart Pro


Inhalt / contents Seite / page
Instruction manual .................................... 4 – 7
Bedienungsanleitung ................................8 – 11
Istruzioni per l‘uso ................................. 12 – 15
Mode d´emploi ................................... 16 – 19
Instrucciones de uso ............................... 20 – 23
Gebruiksaanwijzing ............................... 24 – 27
Manual de instruções .............................. 28 – 31
Kiirlugeja ........................................ 32 – 35
Λειτουργία ..................................... 36 – 38
Машина за броене на монети . . . . . . . . . . . . . . . . . . . . . 40 – 43
Navodilo za uporabo ............................... 44 – 47
Obsluha. . . . . . . . . . . . . . . . . . . . . . . . . . . . . . . . . . . . . . . . 48 – 51
Návod k použití ...................................52 – 55
Ekspluatācijas instrukcija . . . . . . . . . . . . . . . . . . . . . . . . . 56 – 59
Naudojimo instrukcija .............................60 – 63
Update Software ................................. 64 – 67

3
1
2
Instruction Manual Soldi Smart Pro
Dear customer,
Thank you for choosing the ratiotec banknote detector Soldi Smart Pro. This automatic detector
offers a fast and reliable counterfeit detection.
Start-up
Note: All sensors are covered with a security stripe. Before first use, remove the security stripe
by opening the cover. After closing the cover again please connect the Soldi Smart Pro to power
supply using the mains cable.
Please clean all sensors frequently to ensure a trouble-free operation.
Contents of Package
Banknote detector Soldi Smart Pro, Power adaptor, Instruction Manual
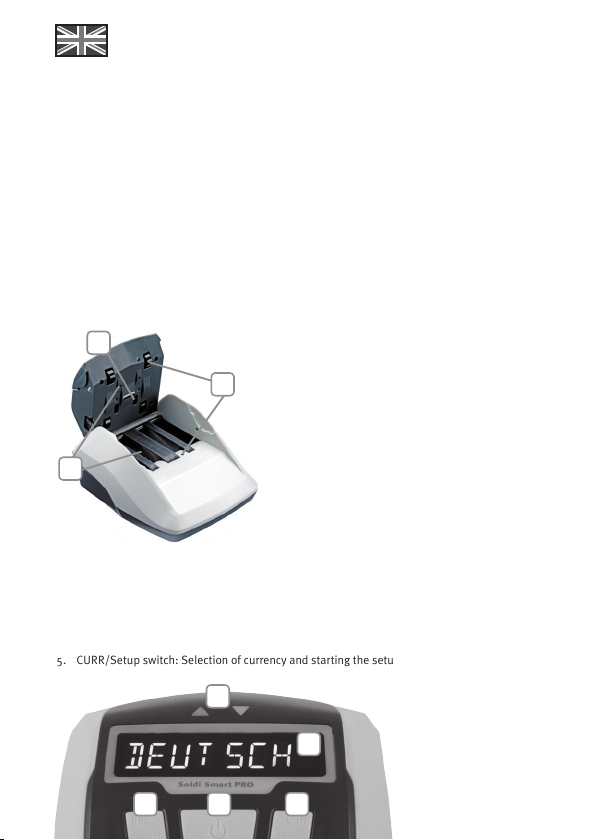
Control panel
1. Display indicating banknote ejection
2. Display with lighting frame: information output, optical detection result
(the lighting frame flashes red or green in case of a suspicious or origin banknote)
3. REP/ADD switch: Selection of Report- and Addition function
4. ON/OFF switch: To switch ON and OFF, set functions
5. CURR/Setup switch: Selection of currency and starting the setup
1
2
3 4 5
1. Feeding sensors
2. IR sensors
3. MG sensor
4 4
5 5

Switch ON and OFF
To switch on, press ON/OFF as long as an acoustic signal arises. When the device is switched on,
it will carry out a self-test and 0 will appear in the display.
Insert banknote
Place banknote on feeder: the device starts up automatically and pulls in the banknote. Euro-
banknotes can insert in any direction. Other currencies may have different directions. For further
information contact ratiotec or your sales representative.
False or suspect note
An acoustic signal arises and the red warning symbol blinks in case of a false or suspect note.
Additionally, an error message appears in the display. In the event of a false or suspicious bank-
note, the ejection is always against selected direction.
Note: If TONE or LED is switched off in Setup, no acoustical or optical signal will appear.
Operation
Keys and their functions
REP/ADD-switch (Report and addition function)
Press REP/ADD once to change to the report view. The frame lights up with blue light. The quan-
tity and value of all counted notes will appear with each pressing REP/ADD. Please note, only the
currently chosen currency appears. After the report the total value is displayed again.
Note: The report function is only available while the addition function is switched on.
Keep REP/ADD pressed for long to switch the addition function on or off. Is the function acti-
vated, the unit number and value number of the banknotes is automatically counted. The unit
number can be a value of up to 999 and the value number up to 9995. After this, the display is
automatically reset to zero.
CURR/Setup-Taste (Currency- and Setup function)
Press CURR/Setup once to select the currency. The chosen currency is displayed. The Soldi Smart
Pro can detect up to three currencies, for further information contact ratiotec or your sales re-
presentative.
Keep pressed CURR/Setup down for several seconds to select the SETUP menu. The message
SETUP will appear and the frame lights up with blue light. To select the desired function, press
REP/ADD or CURR/Setup and change this by pressing ON/OFF.
4 4
5 5

Function Setting Explanation
HOLD ON or OFF Banknote ejection with or without
holding on to it.
TONE ON or OFF Switch on or off acoustic signals.
LED ON or OFF Switch on or off the frame light func-
tion.
ECO OFF, 15, 30, 45, 60
The device turns off automatically after
a defined period of time without use.
(Ecomode)
BANKNOTE Arrows point to the front or the rear
Select the ejection of the detected
banknotes, false or suspect notes eject
against the selected direction.
LANGUAGE English, Deutsch, Francais, Italiano, Espanol The currently used language appears.
RESET Set to factory settings
Press ON/OFF for several seconds to
set all functions to factory settings.
(factory settings are highlighted as fat
above)
Following functions can be activated or inactivated:
Special functions
Cleaning Message
In the event a cleaning is needed, the message CLEAN appears after switching on the device. The
frame lights up with red light. Turn not off the device for the cleaning process. Clean all sensors
by opening cover.
Low-power mode
If the device is unused, it automatically switches to Low-power Mode after 10 minutes. During this
mode only the arrows above the display are activated. After inserting a banknote to the feeder,
the Low-power mode is automatically switched off again.
Note: Use the ECO function to save even more energy.
6 6
7 7

Technical Data
Currency EUR / GBP / CHF (others optional)
Speed 0,3 sec. / banknote
Counterfeit detection IR, MG features, metal thread
Banknote insertion Euro: Any direction, Others: Indicated direction
Banknote ejection Optionally front or rear / hold or eject banknotes
Indication LED display
Language English, German, Italian, Spanish, French
Acoustic warning signal / Signal frame To switch on and off
Standby / energy saving mode Freely adjustable in steps of 15 minutes
Update function
PC interface / USB
Voltage 12 V DC
Options Rechargeable battery, adapter cable for cigarette lighter, Wall
bracket, Anti-theft plate
Measurements (l x w x h in mm) 170 x 135 x 80
Weight in kg 0,5
Identify installed software
To show the used software version, hold down ON/OFF until the display is activated. The software
version of all three currencies will appear on display, finally the device turns off automatically.
Software update
To switch to the update mode, switch off the device and connect it to the PC. Keep pressed all
three switches simultaneously until UPDATE appears in display. For further information as well as
downloading specific files, please visit www.ratio-tec.com.
For accessories please contact ratiotec or your sales representative!
6 6
7 7

3
1
2
Bedienungsanleitung Soldi Smart Pro
Sehr geehrte Kundin, sehr geehrter Kunde,
vielen Dank, dass Sie sich für das Banknotenprüfgerät Soldi Smart Pro von ratiotec entschieden
haben. Das kompakte Prüfgerät gewährleistet eine schnelle und zuverlässige Echtheitsprüfung
von Banknoten.
Inbetriebnahme
Hinweis: Entfernen Sie den Sicherheitsstreifen, indem Sie die Oberseite des Gerätes nach hinten
klappen. Nachdem Sie die Oberseite geschlossen haben, schließen Sie das Banknotenprüfgerät
an die Stromversorgung an. Um die Funktionalität des Soldi Smart Pro zu gewährleisten, reinigen
Sie die Sensoren bitte in regelmäßigen Abständen.
Verpackungsinhalt
Banknotenprüfgerät Soldi Smart Pro, Netzteil, Bedienungsanleitung
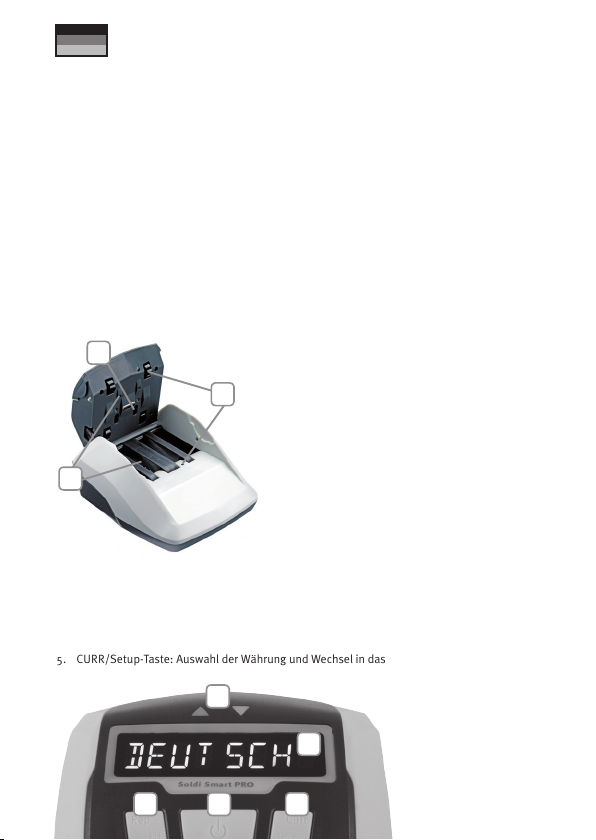
Bedienfeld und Display
1. Symbolanzeige: Richtung des Banknotenauswurfs
2. Displayanzeige mit Lichtring: Informationsausgabe, optische Anzeige des Prüfergebnisses
(der Lichtring blinkt rot bzw. grün bei verdächtigen bzw. echten Banknoten)
3. REP/ADD-Taste: Auswahl der Report- und Additionsfunktion
4. ON/OFF-Taste: Ein- und Ausschalten des Gerätes, Vornehmen von Einstellungen
5. CURR/Setup-Taste: Auswahl der Währung und Wechsel in das Menü
1. Einzugssensoren
2. IR-Sensoren
3. Magnetsensor
1
2
3 4 5
8 8
9 9

Gerät ein- und ausschalten
Zum Einschalten betätigen Sie die ON/OFF-Taste des Soldi Smart Pro solange, bis ein akustisches
Signal ertönt. Das Gerät beginnt automatisch mit dem Selbsttest. Erscheint im Display der Wert
0, können Sie mit der Prüfung beginnen.
Banknote einlegen
Legen Sie die zu prüfende Banknote in den Einzug. Das Gerät startet den Prüfvorgang automa-
tisch und zieht die Banknote ein. Euro-Banknoten können in beliebiger Orientierung eingelegt
werden. Dies gilt nicht für alle Währungen. Nähere Informationen dazu erhalten Sie von Ihrem
Fachhändler oder direkt bei Ihrem ratiotec-Team.
Falsche oder verdächtige Banknoten
Bei einer falschen oder verdächtigen Banknote ertönt ein akustisches Signal und der Lichtring
blinkt rot. Im Display erscheint eine Fehlermeldung und die Ausgabe der Banknote erfolgt entge-
gen der eingestellten Auswurfrichtung.
Hinweis: Sind TON oder LED im Menü ausgeschaltet, wird kein akustisches bzw. optisches Signal
wiedergegeben.
Bedienung
Tasten und ihre Funktionen
REP/ADD-Taste (Report- und Additionsfunktion)
Drücken Sie die REP/ADD-Taste kurz um in die Reportansicht zu wechseln. Der Lichtring leuchtet
blau. Mit jedem weiteren Betätigen der REP/ADD-Taste werden die Anzahl und die Stückelung
der gezählten Banknoten angezeigt. Es erscheinen nur die Werte der aktuell verwendeten Wäh-
rung. Ist der Durchlauf beendet, erscheint im Display wieder das Gesamtergebnis.
Hinweis: Die Reportfunktion ist nur bei eingeschalteter Additionsfunktion verfügbar.
Drücken Sie die REP/ADD-Taste lange, um die Additionsfunktion an- bzw. auszuschalten. Bei
aktivierter Funktion wird die Gesamtsumme aller Zählergebnisse dauerhaft im Display angezeigt.
Wird der maximale Wert 9995 oder die maximale Anzahl 999 überschritten, beginnt die Zählung
wieder bei 0.
CURR/Setup-Taste (Währungs- und Setupfunktion)
Drücken Sie die CURR/Setup-Taste kurz, um zwischen den möglichen Währungen umzuschalten.
Die ausgewählte Währung wird im Display angezeigt. Der Soldi Smart Pro kann bis zu drei ver-
schiedene Währungen prüfen. Nähere Informationen dazu erhalten Sie von Ihrem Fachhändler
oder direkt bei Ihrem ratiotec-Team.
Um individuelle Einstellungen über das Setup vorzunehmen, drücken Sie die CURR/Setup-Taste.
Der Lichtring leuchtet blau. Wählen Sie den gewünschten Menüpunkt mit der Taste REP/ADD
oder CURR/Setup aus. Um eine Änderung vorzunehmen, drücken Sie die ON/OFF-Taste.
8 8
9 9

Funktion Einstellung Bedeutung
HALT AN oder AUS Banknotenausgabe mit oder ohne
Festhalten.
TON AN oder AUS Akustische Signale an- oder ausschal-
ten.
LED AN oder AUS Lichtringfunktion an- oder ausschalten.
ECO AUS, 15, 30, 45, 60
Das Gerät schaltet sich nach einem be-
stimmten Zeitraum ohne Nutzung aus.
(Ecomodus)
BANKNOTE Symbolanzeige weist nach vorn oder hinten
Ausgaberichtung der geprüften Bank-
noten auswählen, verdächtige Bank-
noten werden entgegen der gewählten
Richtung ausgegeben.
SPRACHE English, Deutsch, Francais, Italiano, Espanol Die aktuell verwendete Sprache wird
angezeigt.
RESET Werkseinstellungen übernehmen
Um alle Einstellungen auf Werksein-
stellungen zurückzusetzen, halten Sie
die ON/OFF-Taste solange gedrückt,
bis ein akustisches Signal ertönt. (die
Werkseinstellungen sind obenstehend
fett markiert)
Mit Hilfe des Setup können folgende Funktionen eingestellt werden:
Sonderfunktionen
Reinigungsanzeige
Ist eine Reinigung für die fehlerfreie Funktion des Soldi Smart Pro erforderlich, erscheint nach
dem Einschalten die Meldung REINIGEN im Display. Der Lichtring leuchtet rot. Schalten Sie das
Gerät vor der Reinigung nicht aus. Säubern Sie die Sensoren, indem Sie die Oberseite des Ge-
rätes nach hinten klappen.
Stromsparmodus
Das Gerät schaltet sich nach 10 Minuten automatisch in den Stromsparmodus. In diesem Zustand
leuchtet lediglich die Symbolanzeige oberhalb des Displays. Um den Stromsparmodus zu verlas-
sen, legen Sie eine Banknote in das Gerät ein.
Tipp: Nutzen Sie auch die ECO Funktion um zusätzlich Strom zu sparen.
10 10
11 11

Ermitteln der installierten Gerätesoftware
Um die aktuelle Prüfsoftware des Soldi Smart Pro zu ermitteln, drücken Sie so lange ON/OFF, bis
sich das Display einschaltet. Es wird die Versionsnummer jeder installierten Währung angezeigt,
anschließend schaltet sich das Gerät aus.
Softwareupdate durchführen
Um in den Updatemodus zu gelangen, schließen Sie das ausgeschaltete Gerät an den PC an.
Drücken Sie anschließend so lange alle drei Funktionstasten gleichzeitig, bis im Display UPDATE
erscheint. Weitere Informationen und alle notwendigen Dateien sowie eine Schritt-für-Schritt-
Anleitung für die Durchführung des Updates finden Sie auf unserer Homepage unter www.ratio-
tec.com.
Technische Daten
Währung EUR, GBP, CHF (andere optional)
Geschwindigkeit 0,3 Sekunden / Banknote
Echtheitsprüfung IR- und MG-Merkmale, Sicherheitsfaden
Banknoteneinzug Euro: jede Richtung, Andere: richtungsbezogen
Banknotenauswurf Wahlweise vorn oder hinten / Banknoten halten
oder auswerfen
Anzeige LED Display
Sprache Deutsch, Englisch, Italienisch, Spanisch, Französisch
Signalton / Signalrahmen Ein- und ausschaltbar
Standby / Energiesparmodus Frei einstellbar in 15-Minuten-Schritten
Update-Funktion
PC-Anschluss / USB
Spannung 12 V DC
Optionen Akku, Kfz-Ladekabel, Wandhalterung, Diebstahlsicherung
Abmessungen (l x b x h in mm) 170 x 135 x 80
Gewicht in kg 0,5
Alle Zubehörartikel erhalten Sie bei Ihrem Fachhändler oder direkt bei ratiotec!
10 10
11 11

3
1
2
Manuale d‘uso Soldi Smart Pro
Gentile cliente,
Grazie per aver scelto il nostro rilevatore di banconote false Soldi Smart Pro. Il Soldi Smart Pro fa
una veloce e affidabile verifica delle banconote.
Start-up
Nota: Tutti i sensori sono coperti con un nastro di sicurezza, prima dell’uso rimuovere il nastro
aprendo il coperchio superiore. Collegare l’alimentatore al Soldi Smart Pro premendo il tasto On/
Off per accenderlo (solo dopo aver rimosso nastro di sicurezza).
Pulire frequentemente tutti i sensori, per assicurarvi un uso senza problemi.
Contenuto scatola
Rilevatore di banconote false Soldi Smart Pro, alimentatore, manuale d‘uso
Panello di controllo
1. Display indicazione uscita banconote
2. Display con cornice di illuminazione: Tutte le informazioni hanno un riscontro ottico che
informa l’operatore (Cornice lampeggia rosso in caso di banconota sospetta, verde se vera)
3. REP/ADD Tasto: Seleziona il tipo di informazione sul display –
attivare o disattivare auto somma
4. ON/OFF Tasto: Accensione/spegnimento
5. CURR/Setup Tasto: Per selezionare altre valute
1. Sensore ingresso banconote
2. Sensore IR
3. Sensore MG
1
2
3 4 5
12 12
13 13

Tasto ON e OFF
Per accendere premere tasto ON/OFF finché non si sente un segnale acustico. Una volta aceso, il
rilevatore esegue un‘auto-test, se funziona appare sul display 0.
Inserire la banconota
Inserire la banconota nella fessura di ingresso, il dispositivo parte in automatico e la trascina
dentro. Le banconote Euro possono essere introdotte in tutti e 4 i sensi, per altre valute può esser
richiesto di introdurle in un determinato modo. Per maggiori informazioni mettersi in contatto
con il rivenditore o direttamente con la ratiotec.
Banconote false o sospette
Se la banconota risulta falsa o sospetta, l’operatore viene avvisato da un segnale acustico e la
cornice del display si illumina di rosso. Inoltre, appare un messaggio di errore sul display e la
banconota esce sempre dal lato opposto a quello di entrata.
Consiglio: Se alla prima passata una banconota appare sospetta, ripresentala girando la banco-
nota sotto sopra, se risulta buona potete incassarla, se risulta falsa non accettatela.
Nota: Se vengono spente le funzioni acustiche o ottiche, nessun segnale acustico o ottico verrà
visualizzato o udito.
Istruzioni
Tasti e altre funzioni
REP/ADD- Tasto di funzione rapporto o auto somma
Premere il tasto REP/ADD una volta per visualizzare sul display il valore della banconota verificata:
Il display si illumina di di colore blu.
Nota: Questa funzione è disponibile se auto somma è attivata.
Tenere premuto più a lungo il tasto REP/ADD per attivare o disattivare la funzione di auto somma.
Se la funzione è attiva, il valore e numero di banconote sarà sommato. Il massimo di banconote
registrate è di 999, e il valore massimo è di 9995 Euro, al raggiungimento di queste cifre, il dis-
play si azzera automaticamente.
CURR/Setup- Tasto (Valuta - e funzione di configurazione)
Premere tasto CURR/Setup una volta per selezionare la valuta desiderata, la valuta selezionata
verrà visualizzata sul display. Il Soldi Smart Pro può verificare fino a tre valute, per ulteriori infor-
mazioni mettersi in contatto con il rivenditore o direttamente con la ratiotec.
Tenere premuto il tasto CURR/Setup per alcuni secondi per selezionare SETUP menù. Sul display
appare SETUP e il bordo del display diventa blu. Per selezionare la funzione desiderata premere
il tasto REP/ADD o il tasto CURR/Setup, per confermare la selezione, premere il tasto ON/OFF.
12 12
13 13

Funzione Impostazione Spiegazione
STOP NO or SI Espulsione banconota con o senza
trattenere.
SUONO NO or SI Accendere o spegnere segnale
acustico.
LED NO or SI Accendere o spegnere illuminazione
colorata del bordo.
ECO NO, 15, 30, 45, 60
Il dispositivo si spegne automatica-
mente dopo un determinato periodo di
tempo prescelto. (Ecomode)
BANKNOTE Espulsione banconote davanti o dietro
Selezionare l'espulsione, davanti
o dietro, delle banconote rilevate
sospette.
LANGUAGE English, Deutsch, Francais, Italiano, Espanol Appare la valuta selezionata.
RESET Impostare le impostazioni di fabbrica
Premere tasto ON/OFF per qualche
secondo per resettare le impostazioni di
fabbrica. (le funzioni fabbrica sono
evidenziate come fat sopra)
Possono essere attivate le seguenti funzioni:
Funzioni speciali
Messaggio di pulizia
Nel caso sia necessaria una pulizia dei sensori di controllo, appare il messaggio PULIRE dopo
l‘accensione del dispositivo. La luce attorno il display si illumina con una luce rossa. A dispositivo
acceso aprire il coperchio superiore e pulire tutti i sensori.
Modalità basso consumo
Se il dispositivo non viene usato, automaticamente si attiva modalità basso consumo dopo 10
minuti. Quando è su questa funzione, sul display appaiono solo le frecce di direzione. Se si intro-
duce una banconota la modalità basso consumo verrà disattivata.
Nota: Usate la funzione ECO per un maggior risparmio energetico.
14 14
15 15

Identificazione del software installato
Per visualizzare il software installato, premere il tasto ON/OFF finché sul display non appare la
versione installata; mostrerà la versione per ognuna delle tre valute installate, dopo di che il
dispositivo si spegne automaticamente.
Aggiornamenti software
Per attivare la funzione aggiornamento, accendere il dispositivo collegato al PC. Tenere premuti
tutti e tre i tasti simultaneamente finché UPDATE appare sul display. Per ulteriori informazioni su
come aggiornare o specifiche del software, visitare il nostro sito www.ratio-tec.com.
Dati tecnici
Valute EUR, GBP, CHF (Altre disponibili)
Velocità 0,3 sec / banconota
Rilevamenti effettuati IR, MG caratteristiche, filo metilico
Inserimento delle banconote Euro: tutti e 4 i sensi, Altre: seguire indicazioni
Espulsione banconote Opzionale davanti o dietro / trattieni o espelli le banconote
Indicazioni LED display
Lingue disponibili Italiano, Tedesco, Inglese , Spagnolo, Francese
Segnale acustico e audio Si può accendere e spegnere
Standby / risparmio energia regolabile in periodi di 15 minuti
Funzione update
PC Interfaccia / USB
Voltaggio 12 V DC
Opzioni Batterie dedicate ricaricabili / adattatore per auto 12v,
supporto muro, staffa di fissaggio banco
Dimensioni (l x p x a in mm) 170 x 135 x 80
Peso in kg 0,5
Contattate il vostro rivenditore o ratiotec direttamente per la disponibilità degli accessori o ul-
teriori informazioni!
14 14
15 15

3
1
2
Mode d’emploi Soldi Smart Pro
Cher client, chère cliente,
Merci d’avoir choisi le détecteur Soldi Smart Pro de ratiotec. Le détecteur vous offre une authen-
tification rapide et fiable des billets.
Mise en marche
Note : Avant le premier usage, enlevez la bande de protection en relevant la coque plastique.
Connectez le détecteur à l’alimentation après avoir fermé la coque plastique.
Nous vous recommandons de nettoyer régulièrement les capteurs pour éviter toute panne.
Contenu de l’emballage
Détecteur de billets Soldi Smart Pro, bloc d’alimentation, mode d’emploi
Champ d’utilisation et écran
1. Indication écran : Direction d’expulsion des billets
2. Indication écran avec une trame de signal, distribution d’informations, écran optique
du résultat (la trame de signal est rouge ou verre, dépendante si le billet est faux ou vrai)
3. Interrupteur REP/ADD : Choix de fonction d’addition ou de report
4. Touche ON/OFF : Allumer et éteindre l’appareil, faire des réglages
5. Touche CURR/SETUP : Choix de devise et changement dans le menu
1. Capteur supérieur d’introducteur
2. Capteur IR
3. Capteur MG
1
2
3 4 5
16 16
17 17

Allumer et éteindre
Pour allumer le détecteur, appuyez sur la touche ON/OFF jusqu’à la réception d’un signal sonore.
Quand sur l’écran apparaît la valeur 0, vous pouvez commencer par la détection.
Introduire le billet
Placez le billet dans la fente d’insertion. Le détecteur démarre automatiquement et procède à
l’introduction du billet. Si le billet à contrôler est en Euro, ni le sens d’introduction ni le côté
du billet faisant face n’est déterminant. Cela n’applique pas à toutes les devises. Plusieurs
d’informations vous recevez chez votre négociant ou chez ratiotec.
Billet faux ou suspect
Si le billet est faux ou suspect, un signal sonore et la trame de signal clignote rouge. Un message
d’erreur apparaît sur l’écran et le billet est automatiquement expulsé par devant de la direction
installée.
Note : Si le ton ou DEL est éteint dans le menu, il n’y a pas d’un signal optique ou acoustique.
Utilisation
Touches et leurs fonctions
Touche REP/ADD
Appuyez brièvement sur la touche REP/ADD pour changer à la vue de report. La trame de signal
est bleue. Avec chaque pression sur la touche REP/ADD il est montré le nombre et le coupure
des billets comptés. Il apparaît seulement les valeurs de devise actuelle. Si le passage est finit,
le résultat total apparaît sur l’écran.
Note : La fonction de report est exclusivement disponible si la fonction d’addition est activée.
Pour activer ou éteindre le mode Addition, appuyez sur la touche REP/ADD pour longtemps. Si ce
mode est activé, le résultat total est montré à demeure. Le nombre de billet peut atteindre 999,
leur chiffre valeur peut atteindre 9995. Par la suite l’écran affiche de nouveau automatiquement
la valeur 0.
Touche CURR/Setup (mode de devise et de setup)
Appuyez brièvement sur la touche CURR/Setup pour changer entre des devises différentes. La
devise choisie est montrée sur l’écran. L’appareil peut contrôler jusqu’à trois devises différentes.
Plus d’information vous recevez chez votre négociant ou chez ratiotec.
Pour installer des réglages individuels, appuyez sur la touche CURR/Setup. La trame de signal
est bleue. Choisissez la fonction REP/ADD ou CURR/Setup. Pour prendre le changement, appu-
yez sur la touche ON/OFF.
16 16
17 17

Fonction Réglage Sens
TENIR ON ou OFF Billets sont expulsés avec ou sans tenir.
SON ON ou OFF Allumer ou éteindre les signales acou-
stiques.
DEL ON ou OFF Allumer ou éteindre la trame de signal.
ECO Eteint, 15, 30, 45, 60 L’appareil s’éteint après un temps sans
usage.
BILLET Indication écran montre à l’avant ou à l’arrière
Choisir la direction d’expulsion de
billets, billets suspects sont expulsés
contre la direction choisi.
LANGUE English, Deutsch, Francais, Italiano, Español La langue usée est montrée.
RESET Remettre à zéro de tous les réglages effectués
Pour remettre à zéro de tous les réglages
d’usine, appuyez sur la touche ON/OFF
jusqu’à un signale acoustique sonore.
(les réglages d’usine sont marqués en
caractères gras)
À l’aide de setup vous pouvez installer des fonctions suivantes :
Fonctions particulières
Écran de nettoyage
Si le détecteur Soldi Smart Pro nécessite un nettoyage, il apparaît le message NETTOYER sur
l’écran. La trame de signal est rouge. Pendant l’appareil est allumé, nettoyez les capteurs en
relevant la coque plastique.
Mode Eco
Le détecteur Soldi Smart Pro passe automatiquement en mode Eco après 10 minutes. Le mode
Eco est signalé par l’éclat d’indication au dessus d’écran. Pour quittez le mode Eco, placez un
billet à authentifier dans la fente d’insertion.
Note : Utilisez le mode ECO pour faire des économies d’énergie.
18 18
19 19

Informer du logiciel d’appareil
Pour informer du logiciel actuel de Soldi Smart Pro, appuyez sur la touche ON/OFF jusqu’ à
l’écran allume. Le numéro du logiciel est montré. D’après l’appareil éteint.
Exécuter la fonction Mise à jour
Éteignez la Soldi Smart Pro et connectez l’appareil avec l’ordinateur. Puis appuyez sur
toutes les trois touches en même temps jusqu’au message UPDATE apparaît sur l’écran. Plus
d’informations, des fichiers nécessités et un mode d’emploi pour le passage de la fonction Mise
à jour il y a sur notre page d’accueil www.ratio-tec.com.
Informations techniques
Devise EUR, GBP, CHF (autres devises optionnelles)
Vitesse 0,3 seconds / billet
Test d’authenticité Contrôle infrarouge, contrôle zone magnétique, contrôle fil de
sécurité
Insertion des billets Euro: chaque direction, autres devises: dépendant de la direction
Expulsion des billets Au choix par devant ou par derrière / Tenir ou expulser le billet
Indication Écran à DEL
Langue Allemand, Anglais, Italien, Espagnol, Français
Signal acoustique / Anneau de lumière Allumable et éteignable
Mode Eco Réglable dans des intervalles de 15 minutes
Fonction Mise à jour
Interface PC / USB
Tension 12 V DC
Options Batterie rechargeable, câble de chargement pour voiture, support
fixation au mur, plaque anti-vol
Mesures (l x l x h en mm) 170 x 135 x 80
Poids en kg 0,5
Contactez-nous ou contactez votre représentant ratiotec pour plus d’informations!
18 18
19 19

3
1
2
Manual de instrucciones Soldi Smart Pro
Estimado cliente,
Gracias por haber elegido el detector de billetes falsos Soldi Smart Pro. Con el detector Soldi
Smart Pro podrá realizar, de forma rápida y segura, la detección de billetes falsos.
Encender el aparato
Nota: Los sensores se encuentran cubiertos con una cinta protectora. Levante la cubierta y quite
la cinta protectora antes del primer uso. Conecte el detector al enchufe luego de haber cerrado
la cubierta.
Le recomendamos limpiar los sensores frecuentemente para un funcionamiento sin errores.
Contenido
Detector de billetes falsos Soldi Smart Pro, bloque de alimentación, Instrucciones de uso
Cuadro de mandos y pantalla
1. Indicación símbolo: dirección salida billetes
2. Indicación pantalla con una trama de señal: Salida de información, indicación óptica
del resultado del control (la trama de luz se ilumina rojo o verde en caso de billetes
sospechosos o genuinos)
3. Tecla REP/ADD: Selección de la función Report o adición
4. Interruptor ON/OFF: Encender y apagar el aparato, ajustar funciones
5. Tecla CURR/Setup: Selección de la divisa y cambio en el menu
1. Sensor de entrada superior
2. Sensor IR
3. Sensor MG
1
2
3 4 5
20 20
21 21
Table of contents
Languages:
Other ratiotec Security Sensor manuals
Popular Security Sensor manuals by other brands

Research Electronics International
Research Electronics International ORION 2.4 user manual

elsner elektronik
elsner elektronik Intra-Sewi KNX L-Pr Installation and adjustment

DÖRR
DÖRR E-DIRECT GS-25 instruction manual

RKI
RKI 35-3010A-12 manual

PCB Piezotronics
PCB Piezotronics ICP 113A22 Installation and operating manual

Macurco
Macurco OX-6 User instructions