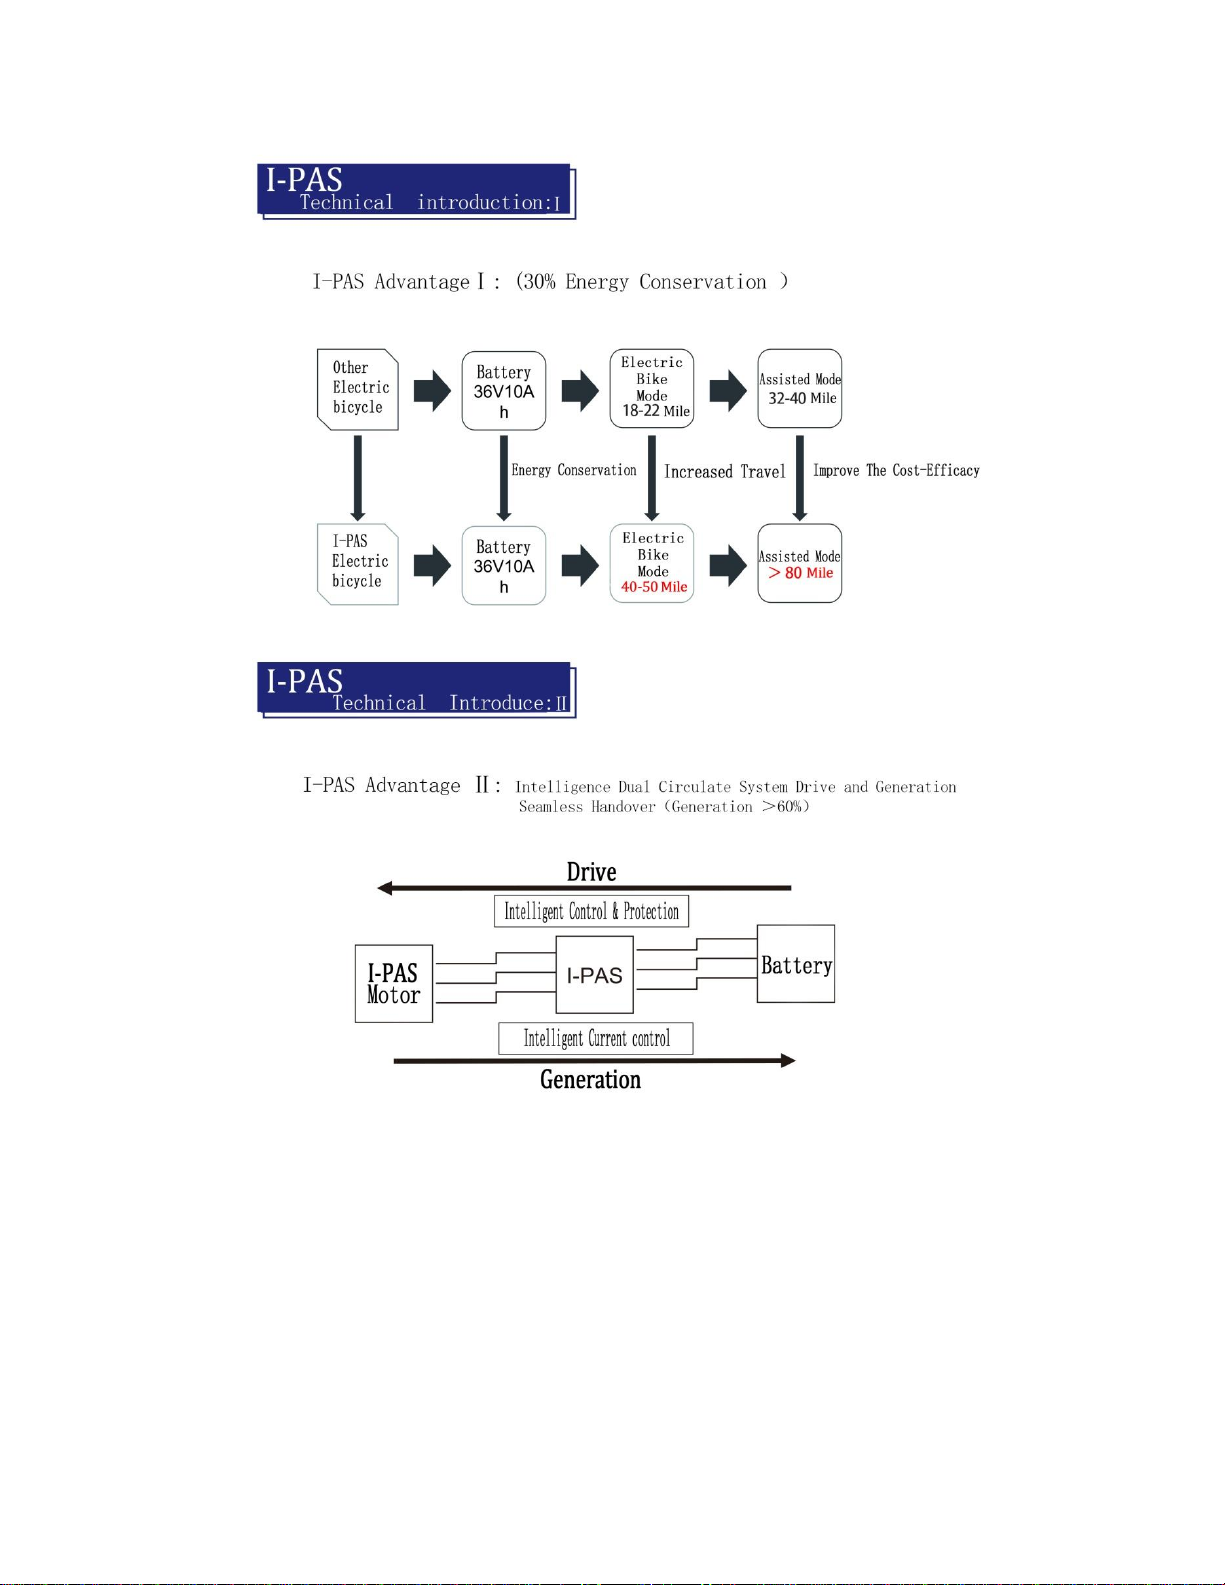
RATTAN CHANLLENGER PRO Version User manual

PRODUCT INSTRUCTION

About US
Rattan was founded on the belief that the company does not have to compromise to
create great products at great prices. We are a team specialized in the manufacture of
electric bicycles for more than 10 years, and the goal of Ratan is to develop the latest
technology and affordable electric bicycle for all our friends.
We hope to pass a positive attitude towards life for all through our products. There is
much to be gained from traveling and seeing the world. We must all embrace at least a
walkthrough. However, let's not forget the ultimate goal; in wise words for T.S. Elliott, "We
will not stop exploring, and the end of all our explorations will be to get where we started
and find out the place for the first time." Now, ride your bike and let's go for a trip! Because
you will not know how beautiful the world is before you go out. After that, you will find that
we do not sell you a wonderful bike but a wonderful scenery along the mild.

What is I·PAS?
Intelligent power assist system (I·PAS) is patented technology of Rattan.
Featured with energy conservation and rechargeable.


CONTENTS :
PART 1 Introduce of the Product (page 1-31)
PART 2 RIDING POSITION (page 32-35)
PART 3 Assembly instructions (page 36)
PART 4 Riding instructions (page 37-39)
PART 5 After selling and Warranty (page 40-43)

PART 1 Introduce of the Product
1. Specification
Brand
RATTAN
Fork
Suspension Fork
Model
CHANLLENGER
RIM
26inch
Frame
Aluminum 18inch
Transmission
Shimano 7speed
Motor
36V 350W
Tire
CST 26*2.10
Mode
PAS/Throttle
Weight
25KG
PRO Version
PLUS Version
Motor
Eco motor
Intelligent motor
Controller
Eco controller
Intelligent controller
Display
LCD
LCD color
Throttle range
50mile
50mile +
PAS range
80mile
80mile +
Self-charge
No
Yes
Password protect
No
Yes
Headlight Automatic
No
Yes
Mode option
No
Normal/Eco/Sport


2. Display instruction
MODEL: LCD-M5
Instructions for operating the manual control panel (PRO Version)
(1).LSD display Size and Material
LSD display, material is [ABS] Liquid crystal transparent window material is high
hardness acrylic.
Frontal view lateral view
31.8mm stent is available
22.2mm、25.4mm、28.6mm Transfer Ring Selection [throttle].

Frontal view lateral View
(2)Function of bike components
1- Function of LCD Display;
Speed display.
Power level display.
Power indicator.
Failure warning.
Total mileage.
Individual mileage.
Headlight display.
Single driving time display.
2.Control, setting up functions
Power switch control.
Headlight switch control.
6Km/h point control.
Wheel diameter setting.
Maximum speed setting.
Auto idle time setting.
Backlight brightness setting.
Voltage level setting.
3. Communication protocol:UART
All the contents of the display screen (full display in boot 1S)

Bike Components
3.1 Headlight . The instrument can be manually turned on.
3.2 Battery power display .
3.3 Multi-functional display area
Total mileage ODO.
Single mileage TRIP A.
Single mileage TRIP B.
Battery current voltage VOL.
Current operating current CUR.
Remaining mileage RM.
Instrument boot time TM.
3.4 Vehicle mode

Walk boost mode.
Cruise: constant speed Cruise mode.
PAS: Power file position: 0 ~ 9 ajustable.
3.5 Speed display area
Maximum speed MAX.
Average speed AVG
Unit MPH.
KM/H
[The meter will calculate the true speed based on the wheel diameter and signal data]
3.6 Vehicle Status Display Area
Vehicle Status Code Meaning.
Status
Code(Decimal)
State Meaning
Remarks
0
Normal
1
Reservation
2
Brakes
3
Power Sensor Fault(Riding Mark)
Not Realized Here
4
6KM/H cruise
5
Real-time cruising
6
Battery undervoltage
7
Motor failure
8
turn malfunctioning
9
Controller failure
10
Communication reception failure
11
Communication dispatch failure
12
BMS communication failure
13
Headlight failure

5.6 Protocol Vehicle Status Code Meaning:
Status Code(Decimal)
State Meaning
Remarks
33
Current anomaly
34
Turn the anomaly
35
Motor phase deficiency
36
Motor Hall anomaly
37
Brake anomaly.
30
Communication anomaly
3.7. Install
P01:Backlight brightness, the darkest level 1, the brightest level 3;
P02: mileage unit, 0: KM; 1: MILE;
P03: Voltage level: 24V, 36V, 48V, 60V, 64V default 36V;
P04: Dormancy time: 0, not dormancy; Other numbers are dormancy times, range: 1-60; Unit minutes;
P05:Help file bit: 0, 3 file mode: 1,5 gear mode:
P06: Wheel diameter: unit, inch;
Protocol 2 wheel diameter value: 5.0 ~ 50 Precision: 0.1 inch
5S protocol wheel diameter value: 0:16 inch, 1:18 inch, 2:20 inch, 3:22 inch, 4:24 inch, 5:26 inch,
6:700 C, 7:28 inch.
This parameter is related to the meter display speed and needs to be entered correctly;
P07: Speed gauge magnetic steel number: Range 1-100.
This parameter is related to the meter display speed and needs to be entered correctly.
If it is an ordinary hub motor, the number of magnetic steel is input directly.
If it is a high-speed motor, it is also necessary to calculate the deceleration ratio, and the input data = the
number of magnetic steel × deceleration ratio.
For example: number of motor magnets 20, deceleration ratio 4.3: input data is: 86 = 20 × 4.3.
P08: Speed limit: Agreement No. 2 range 0-100km / H, 100 means no speed limit.
5S protocol 0-41km / H;
The input data here represents the maximum operating speed of the vehicle: for example, input 25,
indicating that the maximum operating speed of the vehicle will not exceed 25km/h; The drive speed is
maintained at the set value,

Error: ± 1km/h; (The speed limit for power and turning is equal).
Note: The value here is based on kilometers.
When the unit setting is converted from kilometers to miles, the speed value of the display interface
automatically converts to the correct mile value, but the speed limit value data set at this menu under the
mile interface is not converted. Is inconsistent with the actual speed limit of the mile speed.
P09: zero start, non-zero start setting, 0: zero start; 1: Non-zero start.
P10: The drive mode is set to 0: Power Drive (how much power is output is determined by the power file
bit and the switch is invalid at this time).
1: Electric drive (by turning the handle drive, the power file bit is invalid at this time).
2: Power Driven and Electric Driven Coexistence.
P11: Help sensitivity setting range: 1-24.
P12: Help start intensity setting range: 1-5.
P13: Power Magnetic Steel Disk Type Setting 5, 8, 12 Magnetic Steel Types.
P14: Controller limit value set default 12A range: 1-20A.
P15: Controller under voltage.
P16: ODO zero setting length press key 5 seconds ODO zero
P17:0: No enabling cruising, 1: enabling cruising; Automatic cruise optional (valid for protocol 2 only)
P18: Display speed ratio adjustment range: 50 % ~ 150 %,
P19: 0 power bit, 0: 0 file, 1: does not include 0 file
P20:0:2 Protocol 1:5 S Protocol 2: Standby 3: Standby

(4)Key Introduction:
The specific combination of keys is as follows
Press the button to use the brief, Key operation is divided into short press, long press,
and combination key length press Short press is used for rapid/frequent operations, such
as the specific key combination position as follows;
1. When riding, if you want to modify the power/speed state that through short pressing to
or
2. Toggle display data for multi-function areas during cycling, short click
Single key length is mainly used to switch the mode / switch state.
Composite keys (long presses) are used to set parameters because the operation is complex,
which can reduce errors
(Short press does not make the composite key, because it is easy to trigger mistakenly, so it is too
difficult to do).
3. Specific operational explanations:
Modify the power ratio / power state, let’s say the current is power mode.
Short press Help + 1
Short press Help - 1

Toggle speed display
Long press, + Toggle speed display
Set / Disable 6Km/h Cruise, Switch Headlight, ODO Clear Zero
Static state of vehicles,long press will enter 6KM/h cruise mode.
Let go of cruise mode; long press Turn the lights on and off.
P16Menu Interface,long press five seconds,ODO clear zero.
Switching liquid crystal display [LCD]
If the current display is working,long press will turn off the screen, instead
turn on the screen
Toggle multi-function display area content
Short press to Can switch the value of the multifunction display area.

Set Parameters
Long press + will enter the parameter-setting interface. Parameters that can be set include,
Wheel diameter (in: inches), number of magnetic steel, liquid crystal brightness, low pressure points,
etc.(see settings: P01-P20).
Under Settings Interface,Can be short press or Set the value to perform a minimum-
precision unit value operation,you can also long press or Continuous Fast Modify
Parameters:
Short press Switch to Next Parameter;Exit settings and save parameters. If not operated, the
modified parameters will automatically exit and be saved after 8 seconds.
Note: Due to company product upgrades, product content will differ
from specifications, but will not affect your normal use.

Intelligent LCD display (PLUS Version)
Model: RT918
Specifications
Power Supply 24V/36V/48V
Rated working current: 10mA
The maximum working current: 30mA
leakage of current: <1uA
The supply controller working current ; 50mA
Operating temperature: -20℃~ 60℃
Storage temperature: -30℃~ 70℃
Appearance and Size
Display appearance and dimension (unit: mm)

A summary explaining the components of the bike
RT918 can provide many functions to fit the User’s needs. The indicating contents
are as below:
Battery and battery percentage indication.
Motor Power indication
Assistance-level indication
Pedaling frequency indication(optional)
USB connection indicator (optional)
The remaining range indication(optional)
Various Parameters Settings (e.g., wheel size, speed-limited, battery level bar,
Speed indication (incl. running speed, Max. speed and Ave. speed)
Odometer and trip distance
The push-assistance function
Trip time indication
Backlight On/Off
Error code indication
Assistance level, controller limited current, password enable, etc.)
Recover Default Settings.
General Operation
Switching the E-bike System On/Off
Briefly press the power button to switch on the E-bike system, and provides the power Supply for
the controller. To hold the power button for 2s, the E-bike system will be switched off. The E-bike
system no longer use the battery power.
When switching off the E-bike system the leakage current is less than 1 uA.
When parking the E-bike for more than 10 minutes, the E-bike system switches off.
Display Interface
After switching on the E-bike system, the display will show Speed and Trip Distance.
Pressing the “i” button will show more riding data as below:
Trip Distance (Km) →Total Distance (Km) →Max. Speed (Km/h) → Ave. Speed (Km/h)
→ Ride Time (Min.)

Switch the display inte rface
Switch the display interface
Switching Push-assistance Mode On/Off
To activate the push-assistance function, hold the button always after 2 s.
E-bike drive is activated at a uniform speed of 6 Km/h. While the screen displays.
The push-assistance function is switched off as soon as you release the button on the operating
unit .The E-bike system stop the power output immediately.
This manual suits for next models
1
Table of contents
Other RATTAN Bicycle manuals