RATTAN Challenger 2020 User manual

CONTENTS
Part 1 Main Parts Introduction (page 1)
Part 2 Assembly Instructions (page 2-3)
Part 3 The Correct Usage of Main Accessories
(page 4-5)
Part 4 Check Before Riding (page 6)
Part 5 Riding Guidance (page 7-8)
Part 6 Adjustment of Main Parts and
Components (page 9-19)
Part 7 Handling of Abnormal Ebike Conditions
and Common Problems (page 20-22)
Part 8 Use and Maintenance (page 23-25)
Part 9 After sales and Warranty (page 26-32)

1
Part 1 Main Parts Introduction
1. Handlebar
14. Peddle
2.Brake
15. Crank Set
3. Headlight
16. Crank
4. Suspension Front Fork
17. Chain
5.Rim
18. Saddle
6. Fender
19. Rear Rack
7.Valve
20. Seat Post Reflector
8. Brake Disc
21. Flywheel
9. Spoke
22. Caliper
10.Reflector
23. Motor
11. Frame
24. Protector
12. Seat Post Clamp
25.Motor Wire
13. Battery
26.Derailleur

2
Part 2 Assembly Instructions
Unboxing
Image of the bike when you take it out of the box
Assemble front fork

3
Lossen the hub quick release to make enough space for
the fork.
In case of the spring drops from the quick release, here are the
original position images of both sides of the hub quick release.

4
The two feet of the front fork must be aligned with the hub
quick release position before the fork can be installed.
Make sure the brake rotor is in the middle of brake pads so that
it won`t make noise during riding or braking. Tighten the quick
release till it fully close to the hub.

5
Install the handlebar
Loosen the screws on the handlebar, hold the handlebar
in the middle of the joint, tighten the screws.

6
Headlight Installation
Place the headlight at a right position, then tighten the
screw.
Pedals installation
“L”indicates the left side, “R”indicates the right
side. Make sure tighten the screws connect the pedals
and cranks.Twist to left when install the left side and
twist to right when install the right one.

7
Part 3 How to use the part correctly
Battery and Charger
Make sure the charger is pressed to the end of charging
connector when charging.
Fully charge the battery for each ride to extend the life
of battery
Charger light in red means charging, charger light in
green means fully charged.

8
Two ways for charging:
1. Charge the Ebike without removing the battery
2. Remove the battery, and charge it.
Turn off the display and keep the key at power off
position when charge the Ebike without removing the
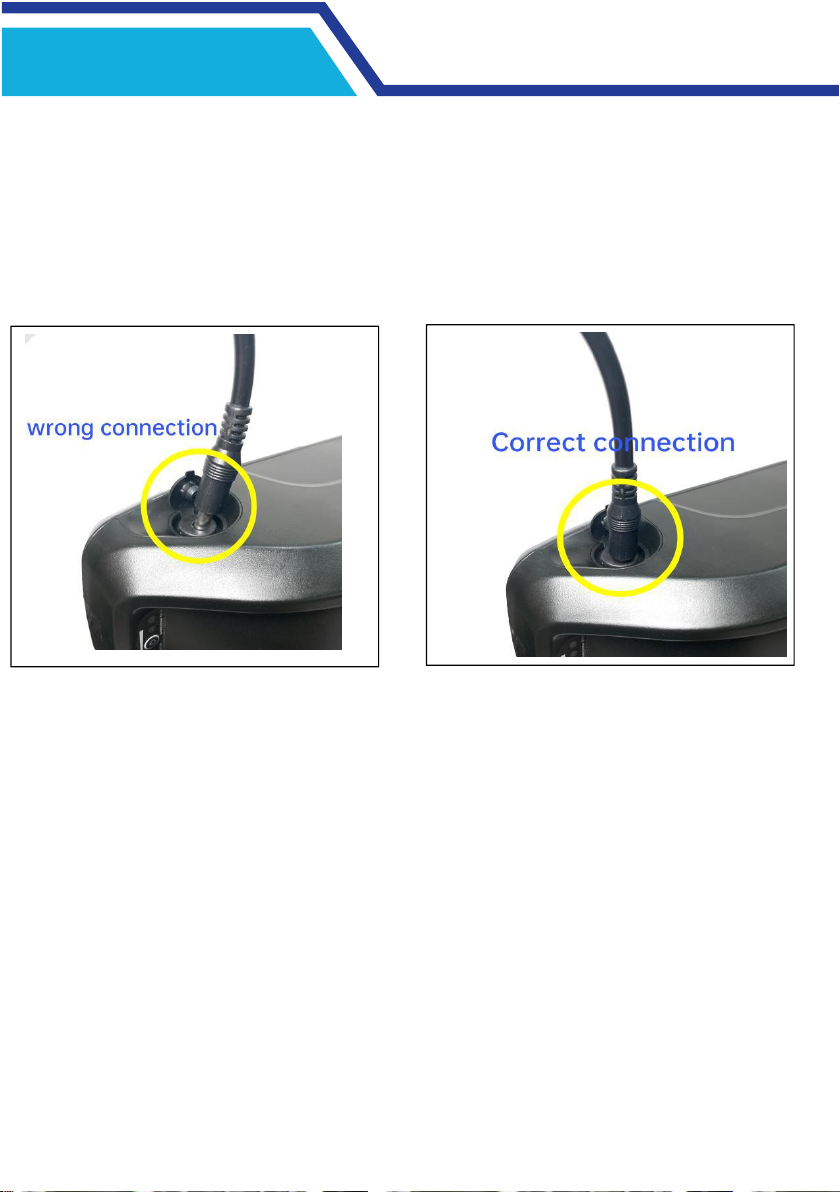
battery. Connect the plug of the charger into the
battery charging port , plug into the wall plug or
power strip.
Remove the battery to charge. Turn the key to the
unlock position to remove the battery. Do not place
the battery upside down, connect the plug of the
charger into the battery charging port and then plug
into the wall plug of power strip.
Electronic Control System
The electronic control system includes controller,
display, motor and battery.
Keep the electronic control system away from water.
Electric bike should not be washed with high-pressure
water guns.

9
Part 4 Check before riding
Make sure all components are tightened. Adjust the
height of the handlebar and the seat post. DO NOT raise
it above the safety line.
Make sure the brakes can cut off the power supply to the
motor, and whether it is sensitive and reliable.
Make sure the front and rear axle nuts are tightened.
Make sure the display, brake and light can work properly.
Make sure the chain is tight.
Make sure the pedals and all the connection parts are
firm and would not loose, and whether the crank is
flexible without jamming.
Make sure the front and rear tire pressure and tire wear
are suitable for your journey ahead.
Make sure the throttle works well without jamming, and
whether it feels tight or loose when pressing the throttle.
Make sure the battery has been locked.

10
Part 5 Riding Guidance
The electric bike has three riding modes:Pedal Mode,
Electric Mode, and Pedal Assist Mode:
Pedal Mode: This mode does not require any power. It
allows the E-bike to work as other regular bike. You
will be automatically switched to this mode when the
battery dies while riding.
Electric Mode: Turn on the display and press the
throttle slowly to get started. When release the
throttle slowly, the riding speed will gradually drop
until power off.
Pedal Assist Mode:Accelerate slowly and use the
pedal assist in the beginning of riding. When riding
against the wind or climbing the hill,avoid using the
pedal assist to protect the battery.
This ebike will power off when braking. It ensures safety
of riding.
Do not carry people on the rear seat. The weight limit of
the rear seat is 25kg.
Do not ride exceed the speed limit set by the local traffic
laws. Comply with the CLASS 3 maximum speed limit:
20MPH.

11
Always wear a helmet that meets the standards and make
sure having the necessary protection to ensure the safety
when riding the ebike,
Turn on the headlight when riding at night. Use the
headlight for a long time will consume part of the electric
energy and reduce the mileage.
Avoid pressing the throttle frequently and rapidly to start
the ebike when stationary to extend the service life of the
motor, battery and electrical components.
Turn off the display when parking or leaving the ebike to
prevent accidents caused by accidentally turning the
throttle and the ebike suddenly moving.
*Recommendation: Press the throttle slowly for safety.

12
Part 6 Adjustment of main parts and
components
Display Instruction (MODEL: LCD-YL80C)
Appearance Dimensions

13
Function Overview
YL80C display provides a variety of functions to meet
your riding needs, including:
Electricity display
Motor power indication
Boost gear adjustment and indication
Speed display (including real-time speed, maximum
speed and average speed)
Mileage display (including single mileage and total
mileage)
Assist in implementing control and display
Backlight control and display
Error Code Display
Functional Area Distribution
YL80C Functional Area Distribution Interface

14
Button Definition
There are five buttons on the corresponding operation unit
of YL80C instrument, of which the buttons are
replaced by the words "UP" and "DOWN" respectively in
the following instructions.
General Operations
Press the button for few seconds to turn on/off the
display and controller. In the start up state, the electric bike
can be turned off by pressing the button for a short time.
(If the electric bike has not been used for more than 10
minutes, the display will automatically shut down.)
Display Interface
The interface shows the real-time speed and total mileage
(km) by default. Press the "i" button briefly to display
information switching between real-time speed (km/h),
single mileage (km), total mileage (km), maximum speed
(km/h), average speed (km/h) and riding power.

15
Display Interface Switch
Electric Assistance Pushing Mode
Keep pressing the DOWN button, and the ebike
will enter the electric assistance pushing mode.
The ebike will run at a constant speed of 6
km/h. At the same time, the screen shows .
Release the DOWN button and the electric
bike will immediately power off.

16
Turn the Backlight On/Off
Press the headlight button briefly to turn on
the taillight and the controller will turn on
the headlight at the same time when the
environment light is dark or driving at
night. Press the headlight button again,the
display taillight turns light and the
controller off.
Assistance Level Selection
Press the UP/DOWN button for a few
seconds to switch the assistance IPAS
level, thus changing the output power of
the motor. The default output power range
of the display is level 0-3. Level 0 is no
power. Level 1 is the lowest power. and
level 3 is the highest power. The default
level for the display is level 1.
Battery Indicator
The indicator shows the battery power status. The outer
frame of the battery flashes at a frequency of 1HZ,
indicating the need to charge immediately when the battery
is under-voltage,
Battery under-voltage flicker

17
Motor Power Indication
The output power of the motor can be
known through the display.
Error Code Display
The display will automatically
show the error code When the electric
control system is not working.
See the table for the definition of the
detailed error code.
Once the fault occurs, don’t use the ebike for safety.
Error Code
Definition
21
Current Abnormality
22
Throttle Abnormality
23
Motor Abnormality
24
Motor Hall Signal Abnormality
25
Brake Abnormality
30
Communication Abnormality

18
General Settings
Press the key for a few seconds to start the display. In
the start up state, when the ebike is stationary, press the UP
+ DOWN button over 2 seconds. The display will access
the display setting.
Single Mileage Reset
TC stands for resetting the single mileage.
Y/N can be selected through the UP/DOWN
key. “Y” means reset. “N” means the
contrary. Press the "i" button to confirm.
Backlight Brightness
BL stands for backlight. Parameters 1, 2, 3
can be set to indicate backlight brightness.
BL-1 is the darkest, BL-3 is the brightest.
The default value of the display is BL-1.
Table of contents
Other RATTAN Bicycle manuals