Raymarine Raymic User manual

Raymicwiredhandsetinstallation
instructions
Warning:Productinstallationand
operation
•Thisproductmustbeinstalledandoperatedin
accordancewiththeinstructionsprovided.Failure
todosocouldresultinpersonalinjury,damageto
yourvesseland/orpoorproductperformance.
•Raymarinerecommendscertifiedinstallation
byaRaymarineapprovedinstaller.Acertified
installationualifiesforenhancedproduct
warrantybenefits.ContactyourRaymarinedealer
forfurtherdetails,andrefertotheseparate
warrantydocumentpackedwithyourproduct.
Productdisposal
DisposeofthisproductinaccordancewiththeWEEEDirective.
TheWasteElectricalandElectronicEuipment(WEEE)Directive
reuirestherecyclingofwasteelectricalandelectroniceuipment
whichcontainsmaterials,componentsandsubstancesthat
maybehazardousandpresentarisktohumanhealthandthe
environmentwhenWEEEisnothandledcorrectly.
Euipmentmarkedwiththecrossed-outwheeledbin
symbolindicatesthattheeuipmentshouldnotbedisposedof
inunsortedhouseholdwaste.
Localauthoritiesinmanyregionshaveestablishedcollection
schemesunderwhichresidentscandisposeofwasteelectrical
andelectroniceuipmentatarecyclingcenterorothercollection
point.
Formoreinformationaboutsuitablecollectionpointsforwaste
electricalandelectroniceuipmentinyourregion,refertothe
followingtable:
RegionWebsiteRegionWebsite
ATwww.ara-
plus.at
ITwww.erp-
recycling.org/it-it
BEwww.recu-
pel.be
LTwww.eei.lt
BGwww.green-
tech.bg
LUwww.ecotrel.lu,
https://aev.gou-
vernement.lu/fr.html
CYwww.elec-
trocyclo-
sis.com.cy
LVwww.lze.lv
CZwww.retela.czMThttp://www.green-
pak.com.mt
DEwww.earn-
service.com
NLwww.wecycle.nl
DKwww.elre-
tur.dk
PLwww.electro-
system.pl
EEwww.elektroo-
nikaromu.ee
PTwww.amb3e.pt
ESwww.raee-
asimelec.esROwww.ecotic.ro
FIwww.elker.fiSEwww.el-kretsen.se
RegionWebsiteRegionWebsite
FRwww.ecologic-
france.com,
www.eco-
systemes.fr
SIwww.zeos.si
GRwww.electro-
cycle.gr
SKwww.erp-
recycling.sk
IEwww.weeeire-
land.ie
UKwww.waste-
care.co.uk/com-
pliance-ser-
vices/weeecare
Raymicwiredhandset
TheRaymicwiredhandsetiscompatiblewiththeRay60,Ray70,
Ray90andRay91VHFDSCradios.
Ray60/Ray70
TheRaymicwiredhandsetcanbeconnecteddirectly,orviaan
adaptorcable,tothesecondstationconnectorlocatedontherear
oftheRay60andRay70tocreateasecondhandsetstation.
Ray90/Ray91
TheRaymicwiredhandsetcanbeconnectedtothehandset
stationconnectorsonaRay90andRay91,atotalof2Raymic
wiredhandsetscanbeconnected.
Partssupplied
1Throughpanel
cablemounting
dustcap.
6Handsethookplate.
2Throughpanel
cablemounting
platescrewsx3.
7Handsetholsterandhookplate
mountingscrewsx6.
3Throughpanel
cablemounting
nut.
8Throughpanelcablemounting
plategasket.
4Throughpanel
cablemounting
plate.
9Wiredhandsetholster.
5Raymicwired
handset.
10Documentation.
Unpackyourproductcarefullytopreventdamageorlossof
parts.Checktheboxcontentsagainstthelistabove.Retainthe
packaginganddocumentationforfuturereference.
Documentnumber:87354-1AA;8592;2018-04-20T14:59:05Date:03-2018

BasestationandRaymichandset
softwarecompatibility
TheRaymicHandset’ssoftwareversionmustbecompatiblewith
thesoftwareinstalledontheBasestation.
Ray90/Ray91softwarecompatibility
TobecompatiblewithyourRay90orRay91thehandsetmustbe
runningsoftwareversionVH1.26orgreater.
Ray60/Ray70softwarecompatibilitytable
BasetationsoftwareCompatibleHandsetsoftware
V1.40VH1.09
V1.39VH1.09
V1.35VH1.06
V1.31VH1.06
V1.24VH1.01/VH1.04
V1.22VH1.01/VH1.04
V1.13(Ray70introduction)VH1.01/VH1.04
V1.06(Ray60introduction)VH1.01/VH1.04
V1.04(Ray50only)N/A
Important:
Pleaseensurecompatiblesoftwareversionsareinstalledon
boththeBasestationandHandset.TheHandsetwillnot
operatecorrectlyifincompatiblesoftwareversionsareused.
Poweringthehandset
TopowertheHandsetonandofffollowthestepsbelow.
WiththeBasestationpoweredOn:
1.PressandholdthePowerbutton,locatedonthetopofthe
Handset,for2seconds.
TheHandsetwillpoweron.
2.TopowerofftheHandset,pressandholdthePowerbuttonfor
approximately3seconds,untilthescreenturnsoff.
Handsetcontrols
TheHandset’scontrolsareshownbelow.
1.Power—Presstopowerthehandseton.Pressandholdfor
3secondstopowerthehandsetoff.Momentarypressto
accesstheshortcutlist.
2.PTT(PushtoTalk)—Pressandholdtosendavoicemessage.
Releasetoreturntoreceivemode.
Note:Themaximumtransmittimeislimitedto5minutes
topreventun-intentionaltransmissionsfromoccupyingthe
VHFchannel.
3.Microphonelocation
4.ChannelUpandChannelDown—Changestothenextor
previousVHFchannel,alsousedtoselectoradjustsetting
optionsinthemenu.
5.LCDscreen
6.Back—Gotothepreviousmenu/screen.Pressandholdto
returntotheHomescreen.
7.OK/menubutton—Pressbuttontoaccessmenu/DSC
functionsandtoconfirmselections.
8.16/+—Whenpoweredonpresstoswitchbetweenpriority
channels.
9.HI/LO—PresstoswitchbetweenHigh(25W)andlow(1W)
transmitpower.
10.DITRE—Liftupthespringloadedcoverandpressthis
buttontomakeaDSCdistresscall.
11.VolumeUpandVolumeDown—Presstoadjustvolumeor
suelchupordown.
12.VOL/Q—Pressbuttontoswitchbetweenvolumeand
suelchcontrol.
13.Built-inspeaker
Ray60/Ray70
econdhandsetstation—Ray60/Ray70
TheRaymichandsetaccessorycanbeconnectedtothesecond
stationconnectorlocatedontherearoftheradio,thiswillcreatea
secondfullyfunctionalstation.
2Raymicwiredhandsetinstallationinstructions

1.Primarystation.
2.Raymichandsetextensioncable(A80290,A80291orA80292)
3.Raymichandsetsecondstation(A80289)
4.Panelmountfixingskit(R70438)
5.RaymichandsetadaptorcablewithRCAaudio(A80297)
6.Primarystationpassivespeaker
7.Secondstationpassivespeaker
Note:AstheFistmicdoesnotincludeadisplayitcannotbe
usedtocreateasecondfunctionalstation.
Alarmbehaviorforsecondstationpassivespeakers(appliesto
Ray60/70only)
TheA80297adaptorcablecanbeusedtoconnectanadditional
passivespeakertothesecondhandsetstation.Apassivespeaker
connectedtothesecondstationofaRay60orRay70Radiowill
onlyreceivevoiceaudio.AlarmswillNOTbeheardfromthe
passivespeakerwhenitisconnectedtothesecondstationofa
Ray60orRay70Radio.
Ray90-Ray91
Handsetstationconnection
AWiredhandsetcanbeconnectedtoeachHandsetstation
connection(HS1/HS2).Y ourradioissuppliedwiththeeuipment
tocreateafullhandsetstation(i.e.:Wiredhandset,Adaptorcable
andPassivespeaker).Additionalaccessoriescanbepurchased
tocreateasecondwiredhandsetstation.
1.Basestation
2.Passivespeaker(1xsuppliedandavailableasaccessory:
A80542)
3.Wiredhandset(1xsuppliedandavailableasaccessory:
A80289)
4.HandsetstationadaptorcablewithRCAAudio400mm(1.3ft)
(1xsuppliedandavailableasaccessory:A80297)
5.Wiredhandsetextensioncable(Availableoptional
accessories:A80290–5m,A80291–10mor15–A80292)
6.Panelmountfixingskit(1xsuppliedandavailableasaSpare:
R70438)
Connectinghandsetsandcables
Followthestepsbelowtoconnecthandsetsandextensioncables
together.
1.Iffitted,unscrewandremovethedustcapfromtherelevant
connector.
2.Ensurethecableconnectorsarecorrectlyorientated,before
insertion.
3.Ensureconnectorsarefullyinserted,beforelocking..
4.TightenlockingcollarsbyRotatingclockwise.
Handsetextensioncables
Handsetstationcablingcanbeextendedusingapproved
extensioncables.
ThemaximumlengthofcablefromtheHandsettotheBasestation
shouldnotexceed50m(164ft)
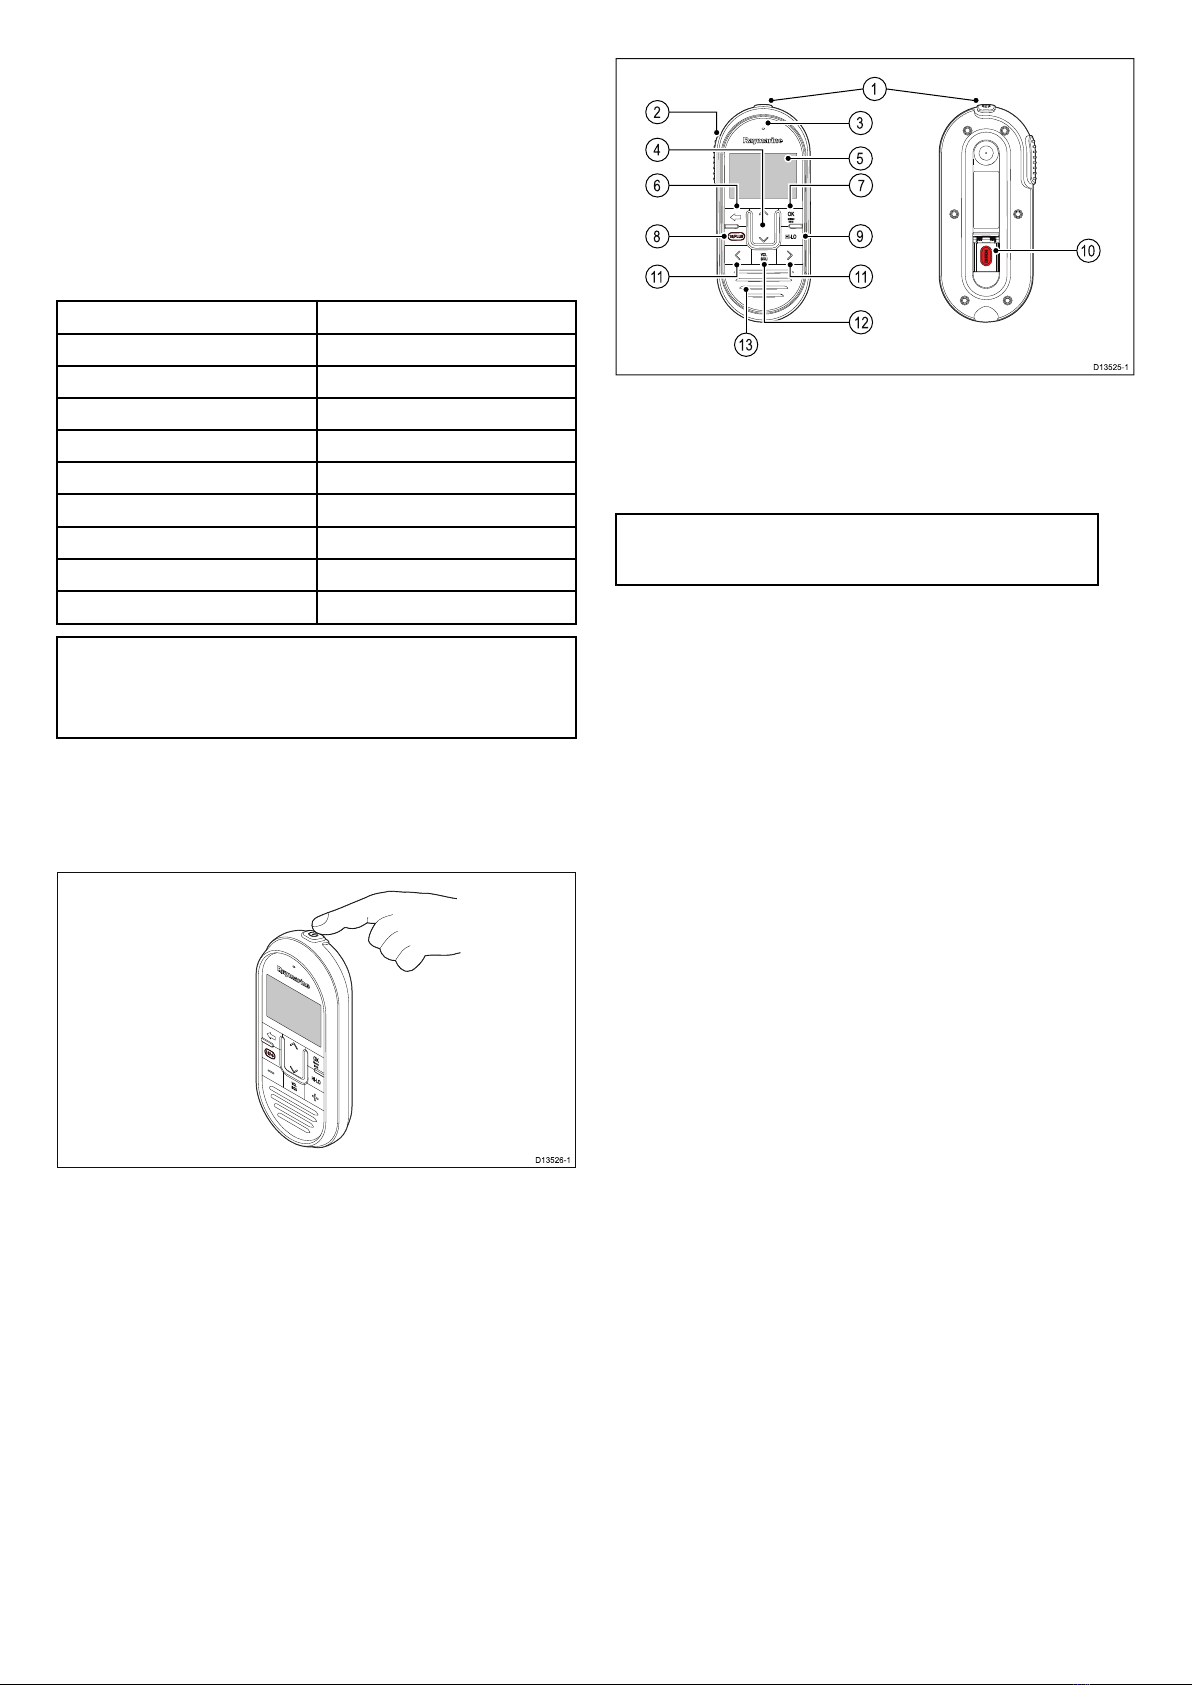
Handset(wired)mountingusingthe
holster
Beforemounting,ensurethatyourselectedlocationmeetsthe
locationreuirementsfoundinthisdocument.
1.Checktheselectedlocationforthemountingholster,aclear
flatareaisreuired,withsufficientspacearoundittoplace
andremovetheHandset.
2.Usingapencil,offeruptheholstertothedesiredlocationand
markthelocationofthescrewholesonthemountingsurface.
3.Drillthemountingholesusingasuitablesizedrillbit.
4.Holdtheholsterinplaceandsecureusingthescrewsprovided.
5.PlacetheHandsetintotheholsteruntilitclicksintoposition.
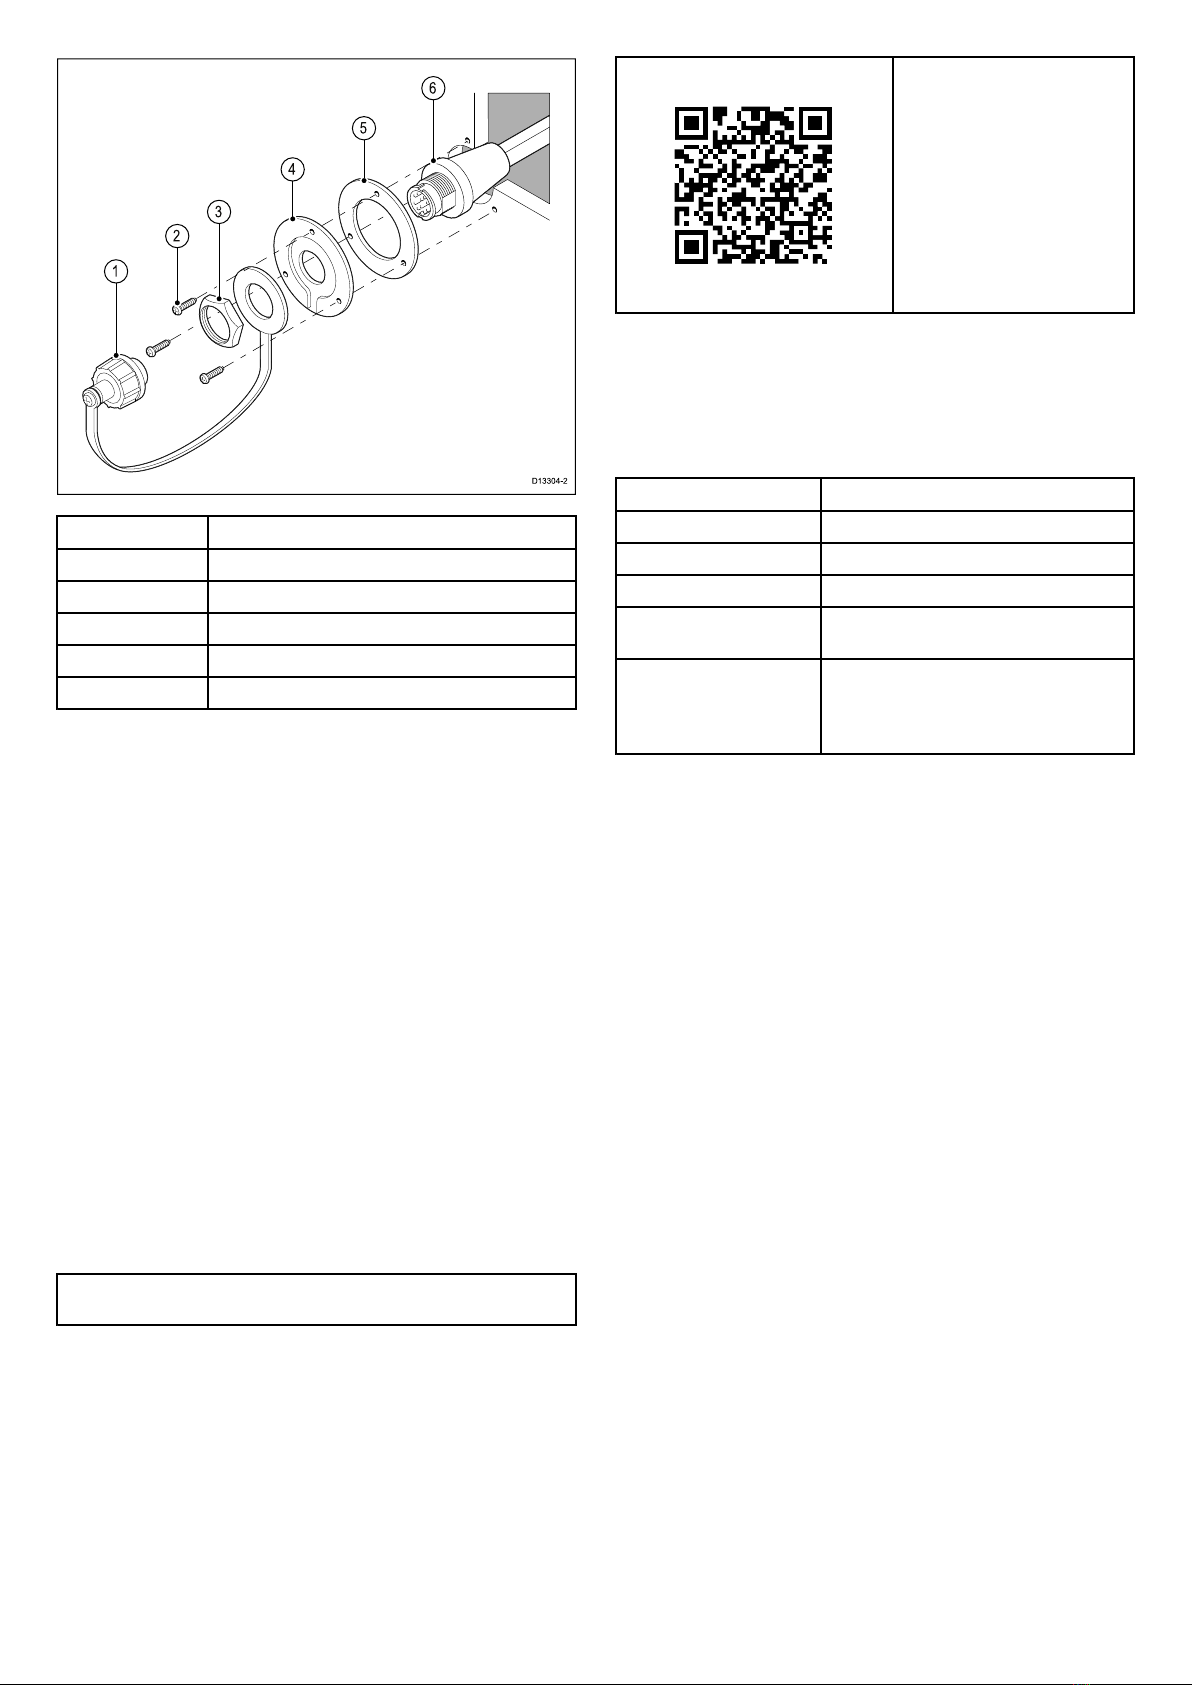
Pass-throughpanelkitmounting
Wheninstallinghandsets,thepass-throughpanelkitshouldbe
usedtosecurethecabletoanypanelsthecablehastopass
through.
Raymicwiredhandsetinstallationinstructions3

1Splash-proofdustcapwithlanyard
2Mountingplatefixingsx3
3Mountingplatenut
4Mountingplate
5Mountingplategasket
6Extensioncable
1.ChecktheselectedlocationfortheMountingplate,aclearflat
areaisreuired.
2.Usingapencil,offeruptheMountingplatetothedesired
locationandmarkthelocationofthescrewholesandthe
centerholeonthemountingpanel.
3.Drillthemountingholesusingasuitablesizedrillbit.
4.Drillthecenterholeusinga25mm(1in.)holecuttingsaw.
5.Pulltheconnectorendofthecablethroughtheholeinthe
mountingsurface.
6.PlacetheMountingplategasketovertheendoftheconnector.
7.Withtherecessedsidefacingawayfromthemountingpanel,
placetheMountingplateovertheendoftheconnector.
8.PlacethelanyardendoftheSplash-proofdustcapover
theconnector,ensuringthelanyardsitsintherecessinthe
Mountingplate.
9.PlacetheMountingplatenutovertheconnectorandtighten
clockwiseusinga13/16in.(21mm)socketwrench,being
carefulnottodamagetheplasticnutbyovertightening.
10.SecuretheMountingplatetothemountingsurfaceusingthe
suppliedscrews.
11.AttachtheHandset/Fistmicconnectortothecableconnector
androtatethelockingcollarclockwisetosecure.
12.Connecttheoppositeendofthecabletothereuired
connectoreitherontheBasestationortoanotherpass-through
panelmountingplateconnector.
Note:Drillbit,tapsizeandtighteningtorueisdependenton
thethicknessandtypeofmaterialtheunitistobemountedon.
Operationinstructions
Foroperationinstructionsforyourhandset,refertothe
documentationthataccompaniesyourRadio.
Allproductdocumentation
isavailabletodown-
loadfromtheRaymarine
website:www.rayma-
rine.com/manuals
•Ray60/Ray70Installation
andoperationinstructions
documentnumber:81356
•Ray90/Ray91Installation
andoperationinstructions
documentnumber:81377
Technicalspecification—Wiredhandset
(Raymic)
ThefollowingtechnicalspecificationsapplytotheWiredhandset.
Operatingtemperature-25ºC(-13ºF)to+55ºC(131ºF)
Storagetemperature-25ºC(-13ºF)to+70ºC(158ºF)
Relativehumidity95%
WaterproofingIPx6&IPx7
Maxspeakerpower
output
1W(16Ω)
VHFradiocompatibility•Ray60
•Ray70
•Ray90/Ray91
4Raymicwiredhandsetinstallationinstructions
Other Raymarine Handset manuals